
Perfect Air ZV2021 - Humidifier Concept - Free user manual and instructions
Find the device manual for free Perfect Air ZV2021 Concept in PDF.

| Product type | Air humidifier |
| Brand and model | Concept Perfect Air ZV2021 |
| Dimensions (L x W x H) | 23,5 x 20 x 34,8 cm |
| Power supply | 220-240 V ~ 50/60 Hz |
| Power | 30 W (cold steam) / 110 W (hot steam) |
| Water tank capacity | 4.31 L |
| Steam output | ≥ 350 ml/h (cold) / 50 ml/h (hot) |
| Noise level | ≤ 35 dB |
| Operating modes | Auto, Night, Health, Baby |
| Timer | 1 to 12 hours |
| Humidity adjustment | 30% to 75% in 5% increments |
| Special functions | Plasma, UV, hot steam, backlight |
| Water filter | Ceramic beads (softening and odor removal) |
| Connectivity | WiFi 2.4 GHz, Concept Home app |
| Remote control | Yes (CR2032 battery included) |
| Automatic shut-off | In case of water shortage |
| Maintenance | Daily cleaning, weekly descaling with vinegar |
| Safety | Do not immerse, use on a flat surface, keep out of reach of children |
| Warranty | 24 months |
Frequently Asked Questions - Perfect Air ZV2021 Concept
User questions about Perfect Air ZV2021 Concept
0 question about this device. Answer the ones you know or ask your own.
Ask a new question about this device
Download the instructions for your Humidifier in PDF format for free! Find your manual Perfect Air ZV2021 - Concept and take your electronic device back in hand. On this page are published all the documents necessary for the use of your device. Perfect Air ZV2021 by Concept.
USER MANUAL Perfect Air ZV2021 Concept
Thank you for purchasing a Concept product. We wish you much joy with your new appliance every day you use it. Please read the instruction manual carefully before initial use. To refer to this manual any time you need to, we recommend you to keep it in a safe place. And please pass it to any future owner of the appliance.
| Technical specifications | |
| Voltage 220–240 V, 50/60 Hz | |
| Input 30 W (cold steam), 110 W (hot steam) | |
| Water tank capacity 4.3 l | |
| Power ≥350 ml/h (cold steam), ±50 ml/h (hot steam) | |
| Sound level ≤35 dB | |
| Dimensions 23,5 x 20 x 34,8 cm | |
| Frequency range 2412–2472 MHz | |
| Transmitter power (max.) 17,30 dBm | |
IMPORTANT SAFETY PRECAUTIONS
- Do not use the appliance in any other way than as described in this manual.
- Remove all the covering and marketing materials from the appliance before the first use.
- Make sure the mains voltage corresponds to the values on the rating plate of the product.
- Place the appliance on a stable, flat surface away from other heat sources.
- Do not leave the appliance unattended when it is switched on or connected to the mains.
- When connecting and disconnecting the appliance from the mains, the on/off button must be turned off.
- When disconnecting the appliance from the wall outlet, never pull the power cord, grasp the plug end and disconnect it by removing it from the receptacle.
- Do not allow children or unauthorized people to handle the appliance, use it out of their reach.
-
Persons with reduced mobility, reduced sensory perception, mental disadvantage or persons not familiar with the operation must use the appliance only under the supervision of responsible person, who is familiar with the instructions.
-
Pay extra attention if the appliance is used near children.
-
Do not use the appliance as a toy.
-
Never put your fingers, pencils or other objects into the openings of the appliance.
-
Never use the appliance without cover grids.
-
Do not let small children and sick persons to be exposed to a direct air flow.
-
Do not cover the appliance.
-
Do not put anything on the appliance or place anything in front of it.
-
The appliance must only be used in the upright position.
-
Do not use the appliance near shower, bathtub, sink or pool.
-
Do not use the appliance in a damp or dusty environment.
-
Do not use the appliance in an environment where there are explosive gases and flammable substances (solvents, varnishes, adhesives, etc.).
-
Place the humidifier to an inner wall near the electrical outlet. To achieve the highest possible efficiency, the humidifier should be positioned at least 10cm from the wall.
-
Do not pour water into the humidifier if it is plugged into the wall socket, always disconnect it from the mains first.
-
Place the humidifier on a stable, flat surface, at least 60~cm above the floor level.
-
Do not point the steam outlet directly against the wall.
-
If the appliance is not in use, always disconnect it from the mains.
-
NEVER tilt, empty or move the appliance while operating.
-
Disconnect the appliance from the mains before manipulating with the appliance and the water tank.
-
Do not pour water into any other openings of the appliance, pour water into the water tank only.
-
Excessive room humidity may cause condensation of water on windows and furniture. If this happens, turn the humidifier off.
-
Before assembly and disassembly, disconnect the power cord from the wall outlet.
-
Before cleaning and after use of the appliance, switch the appliance off and disconnect it from the mains.
-
Keep the appliance clean, do not allow foreign objects to into the grid openings. It could cause serious injury, short circuit, damage to the appliance or cause fire.
-
Do not use coarse and chemically aggressive substances to clean the appliance.
-
Do not use the appliance with a damaged cord or plug and have it repaired immediately by an authorized service centre.
- Do not use the appliance if it is not working properly, has been dropped, damaged or immersed in liquid. Have it checked and repaired by an authorized service centre.
- Do not use the appliance outdoors.
- The appliance is only suitable for home use and is not intended for commercial use.
- Do not touch the appliance with wet hands.
- Do not immerse the power cord, plug or appliance in water or any other liquid.
- Do not repair the appliance yourself. Contact an authorized service centre.
- This appliance can be used by children aged from 8 years and above and persons with reduced physical, sensory or mental capabilities or lack of experience and knowledge if they have been given supervision or instruction concerning the use of the appliance in a safe way and understand the hazards involved. Cleaning and maintenance performed by the user must not be carried out by children unless they are at least 8 years old and under supervision. Children aged under 8 years of age must be kept away from the appliance and its power cord. Do not let children play with the appliance.
- Before using essential oils, check the harmful effects that the use of these products may have on your health.
- Always use quality essential oils that are clean, 100% natural and intended for diffusion. Use them with care and caution. Follow the instructions and precautions given on the packaging of the essential oil.
- Pregnant women, people with epilepsy and asthma, people suffering from allergies, patients with heart problems or serious illnesses should not use essential oils.
- Use essential oils for a maximum of 10 minutes. Do not use essential oils in the presence of a child under 3 years of age.
- Always fill the reservoir with water before adding the essential oil.
Damages from failure to follow the manufacturer's instructions are not covered by the warranty.
CONSUMER SAFETY INFORMATION
Note: The humidifier, as an electrical appliance, requires supervision during operation.
Note: If moisture is formed on the walls or windows, switch the humidifier off. Excessive humidity in the room may cause damage. Do not block the air inlet or outlet.
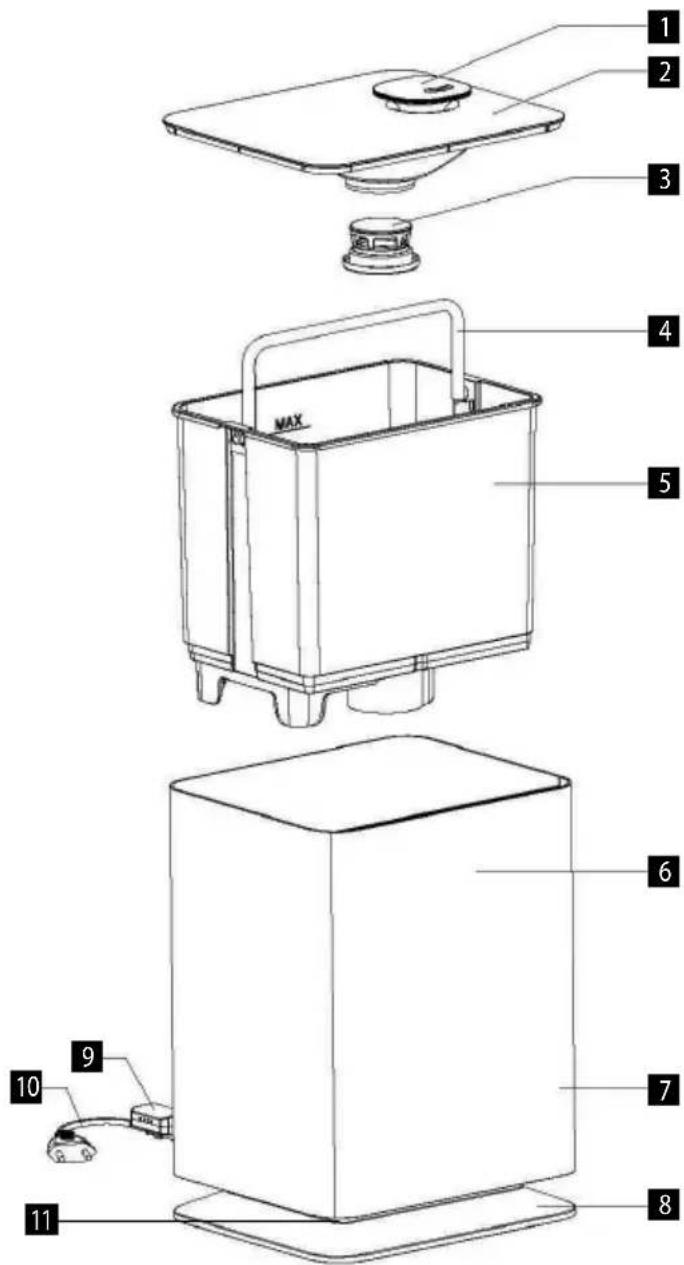
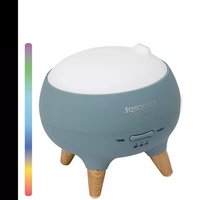
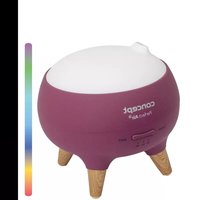
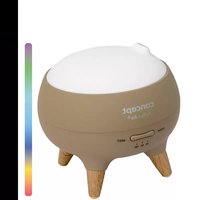
PRODUCT DESCRIPTION
1 Steam outlet
2 Water tank cap
3 Filter
4 Handle
5 Water tank
6 Control indicator
7 Base
8 Base stand
9 Sensor
10 Power cord
11 Backlight
DISPLAY AND CONTROL PANEL
A Steam intensity setting
B Percentage representation of humidity
C Room temperature indicator
D Timer
E Lack of water in the tank
F Plasma
G Hot steam setting indicator
H UV
I NIGHT mode
J AUTO mode
K HEALTH mode
L BABY mode
M Humidity level setting indicator
USE
BEFORE FIRST USE
- Make sure the appliance is switched off and disconnected from the mains.
- Place the humidifier on a flat surface at least 60~cm from the floor level and 10~cm from the wall. We do not recommend placing the humidifier on expensive furniture.
-
Refiling the water tank:
-
Remove the tank from the base upwards.
- Remove the cap from the water tank and pour fresh cold water into it.
-
DO NOT FILL THE WATER TANK WITH WARM OR HOT WATER, IT MAY CAUSE DAMAGE TO THE WATER TANK
-
After filling the tank, replace the cap and place the tank back on the base. Water flows automatically into the base of the appliance.
-
Connect the mains cable to the mains.
- Plug the humidifier into the socket according to the recommended input voltage. Then the red ON/OFF icon lights up.
- Touch the ON/OFF symbol to start the device. Then the display and control panel with indicators light up. The humidifier automatically starts to operate in AUTO mode. This symbol appears on the display with the current temperature and humidity.
- Press the MODE button to select from three modes: night, health and auto. Press repeatedly to switch between the modes.
NIGHT mode - When the night mode is activated, the symbol appears on the display and the brightness of the other indicators decreases. The following functions can also be used - heating, UV, plasma and timer. After 15 seconds, the indicators automatically turn off and ON/OFF remains flashing. Touch any indicator to activate the display.
AUTO mode - When the humidifier is switched on, the auto mode is automatically activated and the AUTO symbol appears on the display. The humidifier checks the optimal air humidity every minute. If the air humidity is lower than the optimal humidity, the humidifier starts to operate at the highest power; if the humidity in the room is sufficient, the humidifier operates at lower power. Warm mist, UV, plasma and timer functions are available in the auto mode.
NIGHT and AUTO modes:
The appliance is automatically set to optimally humidify the air depending on the room temperature.
For example: The temperature of the room, in which the appliance operates, is 24^ and the optimal humidity is 53% . The humidifier operates at maximum power until the optimal air humidity is reached. If the air humidity is lower than 53% , the humidifier will operate at maximum power. When the humidity reaches 53% , the humidifier automatically reduces the power to the minimum. The humidifier checks the air humidity every minute.
| Room temperature - see Humidi- fer (C°) | ≤19 | 20 | 21 | 22 | 23 | 24 | 25 | 26 | 27 | 28 | 29 | 30 | 31 | 32 | 33 | 34 | 35 | 36 | ≥37 | |||||||||||
| Air humidity (%) | 65 | 60 | 58 | 57 | 55 | 53 | 50 | 48 | 45 | 43 | 40 | 38 | 36 | 35 | 34 | 32 | 31 | 30 | 25 |
HEALTH mode - When the health mode is activated, the symbol appears on the display. The warm mist and UV functions are automatically activated. The humidifier starts to operate at maximum power, the air humidity is automatically set to 60% . If the air humidity is lower than 60% , the humidifier will operate at maximum power. When the humidity reaches 60% , the humidifier automatically reduces the power to the minimum. The humidifier checks the air humidity every minute.
BABY mode - Touch the indicator to activate the BABY mode. The warm mist, plasma and UV functions are automatically activated. The humidifier starts to operate at maximum power, the air humidity is automatically set to 55% . If the air humidity is lower than 55% , the humidifier will operate at maximum power. When the humidity reaches 55% , the humidifier automatically reduces the power to the minimum. The humidifier checks the air humidity every minute.
-
Press the button to select the desired humidification time. The time can be set between 1-12 hours at intervals of 1 hour, which is added by repeatedly pressing the button. If the timer function is active, the desired hour lights up on the display. To deactivate the timer, press and hold the button until "Co" appears on the display, then release the button and the timer will be deactivated.
-
Press the to switch on the heated humidification and the indicator appears on the display. The heated humidification starts in 10-15 minutes. To switch this function off, press the button again, the indicator on the display disappears and the humidification will cool down again.
-
Press the button to start the humidity level setting and the indicator appears on the display, select the desired humidity from 30 to 75% . The desired air humidity can be set at intervals of 5% . If the humidity exceeds 75% , "Co" appears on the display and after three seconds the humidifier automatically switches to the AUTO mode. After setting the desired humidity level, the display shows the current air humidity. Press the button again to view the set value. The humidifier automatically adjusts the amount of steam according to the current humidity.
-
If the humidity level is set to be 1 - 10% higher than the current humidity. The humidifier sets the humidification level to the first level.
- If the humidity level is set to be 10 - 15% higher than the current humidity. The humidifier sets the humidification level to the fourth level.
- If the humidity level is set to be 15% higher than the current humidity. The humidifier sets the humidification level to the seventh level.
If the humidity exceeds the set value, the appliance stops. It starts again when the air humidity drops below the set level. Long press the button to cancel the set values, the humidifier will automatically return to the AUTO mode.
- Press the button to activate the plasma function, the indicator appears on the display. Press the button again to deactivate the plasma function. Long press the button to switch on/off the appliance backlight.
The appliance produces positive and negative ions using high voltage. Negative ions in much larger quantities than positive ions. These ions are surrounded by molecules of water that ensure their long lifetime. The clusters of ions
then surround the viruses floating in the air, breaking the membrane of the virus, which dies instantly.
- Press the to switch on the UV function and the indicator in appears on the display. Press the button again to switch the UV function off.
- Swipe across the MAX-MIN button to manually adjust the steam release and the number of levels changes on the display. There are 1-7 levels of steam intensity. Swipe the symbol to the right to increase the intensity, swipe the symbol to the left to decrease the intensity. After 5 seconds of inactivity, the intensity is set and the current humidity appears on the display. For NIGHT, HEALTH, BABY and CONSTANT HUMIDITY modes, it is not possible to manually change the steam intensity.
- Automatic humidifier shut-off If there is not enough water in the water tank, the humidifier automatically switches off, the low water indicator appears on the display and the appliance beeps three times (this function is disabled if you have activated the NIGHT mode). Before refilling the water tank, make sure that the humidifier is switched off and disconnected from the mains. Refill the water tank with water and switch on the humidifier. The low water indicator disappears and the humidifier restarts.
- Regardless of the selected mode, the display and the control panel automatically dim after 15 seconds, press any button to reactivate them.
Note: Always use fresh, distilled or demineralized water to avoid any malfunction.
Adding essential oil
To add essential oil, press the aroma tray to remove it. Add 1-3 drops of essential oil to the pad inside. Press the aroma tray again to secure it to the appliance body.

Water filter
- Ceramic balls in the filter soften hard water.
- Ceramic balls in the filter eliminate water odour.
Ideal relative air humidity:
- Ideal RH for persons: 45-65%
- Ideal RH for therapeutic purposes: 40-55%
- Ideal RH for libraries, galleries, furniture, musical instruments, etc.: 45-60%
The humidifier uses an ultrasonic high-frequency oscillator to break water into small water droplets of a diameter of approximately 1 - 5 m . The ventilation system distributes this water into the dry air, where it evaporates and the desired humidity is reached.
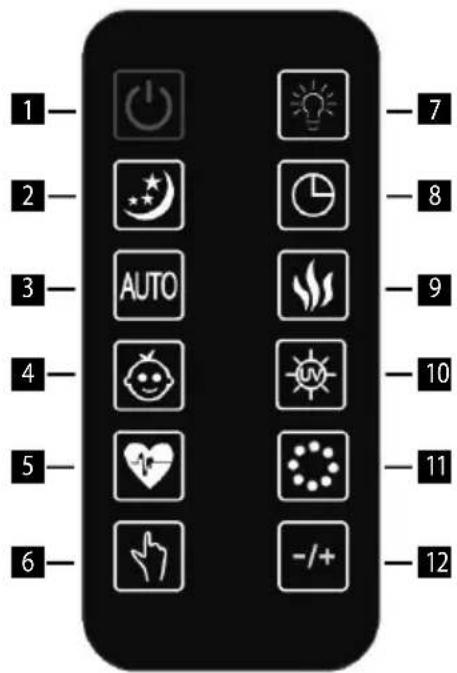
Remote control description
- ON/OFF
- NIGHT mode
- AUTO mode
- BABY mode
- HEALTHY mode
- Humidity level
- Humidifier backlight
- Timer
- Steam heating
- UV
- Plasma
- Steam intensity
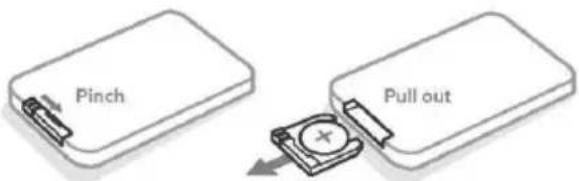
Before using the remote control for the first time, remove the plastic film from the battery.
Replacing the remote control battery
The battery is stored in the back lower part of the remote control. Press and pull out the cover with the battery. Replace the battery with a new one. Make sure that the battery is correctly inserted. Slide the cover with the battery back into the remote control.
CLEANING AND MAINTENANCE
Lack of moisture during winter can cause dry skin, nose irritation, frequent colds, sore throat, etc. Humidifiers produce relative humidity to protect our health. Use the following maintenance instructions in order to get the best out of the humidifier without damaging it. If you do not follow these guidelines, unwanted microorganisms can grow in water.
DAILY MAINTENANCE
- Switch the appliance off and disconnect it from the mains prior to cleaning.
- Open the water tank and the top of the humidifier.
- Rinse the water tank thoroughly and remove all deposits and dirt. Clean and wipe the water tank with a clean, soft cloth or paper towel.
- Fill the water tank with fresh cold tap water as described in the water refill instructions.
WEEKLY MAINTENANCE
- Repeat the three above mentioned daily maintenance steps.
- Pour about 200ml of vinegar into the reservoir and leave it for 15 minutes. Then remove the lime scale in the tank, especially in the ultrasonic disk, with a soft brush.
- Wipe lime scale and vinegar residues with a clean, soft cloth.
MAINTENANCEWARNINGS
- NEVER submerge the appliance main unit into water.
- Do not use any solvents or other aggressive substances to clean the humidifier.
- Clean the inside of the appliance with a soft cloth.
- Clean the ultrasonic disk only with a soft brush. Clean it at least once a week. You can add 2-5 drops of vinegar to the ultrasonic disk - leave it for about 5 minutes. Then clean with the brush provided.
- Use a brush with fine bristles.
- If water has remained in the water tank, replace it at least once a week.
CLEANING OF CERAMIC FILTER BALLS
Use 1 litre of clean distilled water to clean the ball filter. If the balls are still dirty, you need to repeat the cleaning more often. For greater cleaning efficiency, immerse the ceramic balls in a glass of vinegar and leave it for 5 minutes. Then rinse the balls thoroughly and let them dry in a dry place for 4-6 hours.
STORAGE
- Clean and dry the humidifier as described above.
- It is recommended to store the appliance in its original packaging.
- Do not expose it to high temperatures.
TROUBLESHOOTING
If your humidifier does not work properly, check the following possible causes.
| Problem Cause Remedy | ||
| The humidifier does not work. | The power cord is not connected. Plug the power cord into the socket. | |
| The indicator is on, but no mist is coming out of the appliance. | There is too much water in the water tank. | Pour some water from the water tank. |
| No mist | Water level in the water tank is too low. | Fill the water tank with water. |
| Water is leaking from the water tank. | Check that the water tank is in the correct position. | |
| The temperature of the device is too low. | Place the device at a room temperature for half an hour before use. | |
| Deposit on ultrasonic disk Clean | the ultrasonic disk. | |
| Weak mist output | Too much/too little water in the water tank | Pour out water from the water tank/add water to the water tank. |
| Deposit on ultrasonic disk Clean | the ultrasonic disk. | |
| Water is too cold Use water | with a room temperature. | |
| The water is not clean. | Clean the water tank and pour fresh, distilled or demineralized water into it. | |
| White dust is formed on the furniture. | Hard water can deposit a certain amount of white powder on the ultrasonic disk. The white powder is decomposed by ultrasonic vibrations and blows into the air along with the mist. White powder in the air settles on the furniture. | If the problem persists, use distilled water. Do not forget to clean the ultrasonic disk and the filter after a short use. |
| Water accumulates outside the humidifier or the surrounding area. | Saturation of moisture. | Switch off the humidifier or set it to a low mist level. |
| The device is not levelled and accumulates water. | Unplug it and place it on a flat surface. Aim the mist nozzle away from objects. Place it on a waterproof, flat surface at least 60 cm from the floor. | |
| The mist has an unusual odour. | The appliance is new. | Open the water tank and leave it in a dark and cool place for 12 hours. |
| Water in the water tank is dirty or it has been there for too long. | Clean the water tank and pour fresh, distilled or demineralized water into it. | |
| The device generates unusual noise | The noise in the water tank is caused by a low water content. | Fill the water tank. |
| The appliance is not placed on a flat surface. | Move the appliance to a stable, flat surface. | |
| The appliance has stopped producing steam. | The air humidity is sufficient. | |
| The timer symbol is lit on the display. | Refill the water tank. | |
| The set timer is over. Switch on the humidifier. | ||
| The display shows incorrect humidity level. | The room is too large. Move the humidifier to a smaller room. | |
| Steam has gotten into the sensor. | Switch off the humidifier and leave it in a dry place to dry properly before using it again. If the sensor is still not working, contact an authorized service centre. | |
| Control panel does not work. | Wet hands. | Keep your hand dry. Do not handle the appliance with wet hands. |
| Control panel malfunction Contact your dealer. | ||
| Steam is coming out outside of the steam outlet. | The water tank is incorrectly inserted. | Switch off the appliance and make sure that it is not plugged in. Open the lid and insert the water tank correctly. |
| The hot steam function does not work. | The humidifier is not heated up yet. | Wait a few minutes for the appliance to heat up to the correct temperature. |
| The steam is too fine. Increase the steam release level. | ||
| The room is too cold and the steam cools quickly. | Increase the steam release level and the room temperature. | |
| The remote control does not work. | The remote control batteries are dead. | Replace the batteries. |
| The remote control is out of range of the appliance. | Step closer to the appliance and repeat the action. | |
| The plastic film was not removed from the battery. | Remove the protective plastic film. | |
| The display shows an error code “E0”. | The water detector (PCB) and electronics (PCB) are disconnected. | Contact your dealer. |
| The water detector (PDB) is damaged. | Contact your dealer. | |
| The display shows an error code “E1”. | The factory setting of the water detector (PCB) failed. | Follow these steps to reset the device: 1. Switch off the appliance and unplug it from the mains. 2. Remove the water tank. 3. Dry the silver base stand. 4. Plug the appliance into the socket. 5. Press the POWER button twice, then press and hold the POWER button again for 2 seconds. “PL” and then “PA” appears on the display. 6. Unplug the appliance from the mains. The appliance has been reset. The entire process of resetting the appliance must be completed within one minute. If the appliance no longer works, contact your dealer. |
| The water detector (PDB) is damaged. | Contact your dealer. | |
| The display shows an error code “EF”. | There is too much water in the base. | Switch off the humidifier and unplug it. Remove the water tank and pour the water out of the base. Check the water tank for leaks. If there is no leak, return the water tank to the appliance. |
Before you can control the device through the application, it is necessary to connect it to your phone and give it access to your Wi-Fi network.
Recommended distance during setting is less than 4 meters.
Make sure that your appliance, router and your mobile phone are close together so that you can pair your phone with the device with no problems.
Download and installation of the app
- Scan the QR code below (Fig. 1) or find and download the "Concept Home" application on Google Play or App Store.
- If you already have Concept Home, open the app, sign in and follow the pairing instructions.
- If you are a new user, register (Fig. 3-7) and follow the instructions.

Fig. 1
Instructions for pairing the device
- At the beginning of the pairing, you need to be connected to your Wi-Fi-Fi network.
- Before connecting the app to the device, make sure that the Wi-Fi icon on the appliance, which you can press and hold to activate, is flashing.
- Next, press "Add device" (Fig. 8) in the app to add a new device and "Add manually" and "Auto scan" (Fig. 9) options will pop up.
- Select the "Auto scan" option and enable the Wi-Fi connection (Fig. 10).
- Select your Wi-Fi network to which the device needs to connect to and enter your password (Fig. 10).
- This will start the set-up process, which may take some time (Fig. 11).
- Your phone will try to connect to the device and it will connect it to your Wi-Fi network (Fig. 11).
- Select your device and click "Next" (Fig. 12).
- After successful set-up (Fig. 13), click "Done" to enter the device control interface (Fig. 14).
Pairing troubleshooting
- Check that your Wi-Fi network password is correct.
- The device only supports 2.4GHz Wi-Fi networks.
- The router is overloaded as many other devices are connected.
- Error while attempting to connect to the device, go back to Fig. 9 and try to manually connect to its Wi-Fi network.
Compatibility:
- Smart device operating system - Android 5.0 and higher
IOS 9.0 and higher
Wi-Fi network -2.4 GHz - WPA1 and WPA2 security (WPA2 recommended)
NOTICE: The appliance cannot be operated on IEEE 802.1X-protected Wi-Fi networks (usually corporate Wi-Fi networks).
WIRELESS CONNECTION AND COMPATIBILITY
- Jindrich Valenta - CONCEPT shall in no way be liable for any incidental, indirect or consequential damages, or for any loss of data or loss due to information leakage during communication via wireless technologies.
- Successful wireless communication cannot be 100% guaranteed on all Smart devices and Wi-Fi networks (routers). Due to the variety of devices on the market, there may be cases where the character or specification of a given Smart device or Wi-Fi network (router) makes connection impossible or is somehow disturbed. In addition, a number of factors, including hardware and software configuration, also affect the success of wireless communication via Wi-Fi network. The connection between the appliance and your Wi-Fi network can also be adversely affected by the surrounding Wi-Fi networks, which can be tuned to the same channel and thus interfere with the connection (e.g. in housing estates, apartment buildings, etc.). These facts are not a reason to claim the appliance.
- The application is owned and operated by a third party (the "Entity") different from Jindrich Valenta - CONCEPT (the "Seller"). No personal data is transferred to the Entity by the Seller. When registering for the application, the customer submits personal data directly to the Entity, who becomes the administrator of personal data. The application and the associated protection of personal data are governed by the Entity's rules.
SERVICE
Extensive maintenance or repair, which requires access to internal parts of the product, has to be performed by a qualified service centre.
ENVIRONMENTAL CONCERNS
- Packaging materials and old appliances should be recycled.
- Packaging materials may be disposed of as sorted waste.
- Dispose the plastic bags made of polyethylene (PE) of as sorted waste.
Recycling of the appliance at the end of its lifespan
This appliance is labelled in accordance with European Directive 2012/19/EU concerning used electrical and electronic appliances (Waste Electrical and Electronic Equipment - WEEE). The symbol on the product or on its packaging indicates that this product may not be treated as household waste. Instead, it should be taken to the appropriate collection point for the recycling of electrical and electronic equipment. By ensuring this product is disposed of correctly, you will help prevent potential negative consequences for the environment and human health, which could otherwise be caused by inappropriate waste handling of this product. The disposal of such material has to be done according to the recycling regulations. For more detailed information about recycling of this appliance see the authorized local office or service for household waste disposal or the shop, where you purchased the appliance.

The product meets all the necessary requirements of the EU directives applicable to the specific product.
Changes in text, design, and technical specifications are subject to change without notice and we reserve the right to change them.
DANKSAGUNG
CONCEPT POLSKA sp. z o.o.
ul Ostrowskiego 30, 53-238 Wroclaw
tel.:+48 71 339 04 44, fax: 71 339 04 14
The manufacturer (or importer) is responsible for ensuring the product complies with the requirements of applicable legal regulations as well as those of the relevant technical standards. Moreover, they are responsible for ensuring the product has the properties the manufacturer described in documents related to the goods or those reasonably expected by the customer with regard to the nature of the goods or based on advertising produced by the manufacturer, and further they are responsible for ensuring the product is fit for the purpose proposed by the manufacturer or that a product of the same type is normally used for.
The quality warranty term is 24 months from product takeover by the customer.
The warranty does not apply to wear and tear caused by regular use. The customer shall not be entitled to any warranty claims if, prior to taking the product over, they knew the product contained a defect or if the defect is attributable to the customer.
The warranty specifically does not apply:
- if the product installation, operation and service conditions stipulated in the product operating manual have not been adhered to.
- to malfunctions caused due to mechanical, heat or chemical damage, short circuit, over voltage or incorrect installation,
to malfunctions caused by an inexpert third-party intervention,
to malfunctions caused by natural disaster, - to malfunctions caused by insufficient or inappropriate maintenance in violation of the operating manual, including malfunctions caused by water and other sediments,
- to changes in colour of the heating surface or to scratching of the surface caused as a result of using the products in an unusual manner,
to appearance and functional changes caused by exposure to sunlight, thermal radiation of water and other sediments, - if the service life of certain product parts expires, e.g. for accumulators, bulbs, etc.
The warranty does not apply to any products and services provided along with the product (gifts, promotional articles, etc.).
Filing a complaint
A complaint against a product defect must be filed as soon as identified, yet no later than before the end of the warranty term.
The customer must file a product complaint with the dealer from which they have purchased the product, or with any authorised service centre, a list of which is included in the product package, or available at www.my-concept.com.
While filing a product complaint, the product must be duly cleaned and securely packed so as to prevent any damage during its transport to an authorised service centre, where relevant, unless the product is delivered in person.
The customer must submit proof of having concluded a purchase contract for the product by producing the receipt.
While filing their complaint, the customer must indicate the noted defect and identify the preferred complaint application method.
Complaints processing
As long as the noted defect may be removed, the user has the right to have the defect duly removed free of charge on a timely basis.
Where such a procedure is not reasonable with regard to the nature of the defect, the user may require to be supplied a new defect-free product (replacement), or, where the defect applies to a part of the product only, replacement of the part concerned. However, if replacement of the product or any part thereof is not proportionate with regard to the nature of the defect, especially if the defect can be removed without undue delay, the customer has the right to have the defect removed free of charge.
If the noted defect is not removable, or if the customer becomes entitled to replacement of the product or a part thereof, yet the replacement is not possible, for example due to the product having been sold out, the customer has the right to return the product (withdrawal from the contract).
The customer shall have the right to a new product (replacement) or to replacement of a part of the product even if the defect can be removed, provided they cannot properly use the product due to repeated occurrence of the defect or due to a high number of such defects. In such a case, the customer also has the right to return the product (by withdrawing from the contract).
If the product is not returned (the customer does not withdraw from the contract), or if the customer does not apply the right to a new defect-free product (replacement), to replacement of a part thereof or to repair of the product, they may request a reasonable discount. The customer also has a right to a reasonable discount if a new defect-free product cannot be supplied to them, or if a product part cannot be replaced or the product repaired unless the situation is remedied within a reasonable time limit, or if remedying the situation would create major discomfort on the part of the customer.
The seller, authorised service centre or a staff member authorised by them must decide about each complaint immediately or within three business days in complicated cases. This term does not include a reasonable period of time, depending on the type of product concerned,
required for the defect to be assessed by an expert. A complaint, including defect removal, must be dealt with without any undue delay, yet no later than within 30 calendar days of the complaint filing date, unless the seller and the customer agree on a later deadline.
On returning the product (withdrawing from the contract) the customer must return any accessories and documents supplied along with the product.
The customer does not have the right to keep the defective parts and components of the product replaced as part of a repair of the product.
This shall be without prejudice to any other rights the customer may have in relation to the purchase of the product.
Remark: Complaints against products damaged in transport are governed by the carrier's complaints procedure.
Manufacturer
Jindrich Valenta - Concept
Vysokomytska 1800,565 01 Chocen
Czech Republic
tel.: +420 465 471 400
fax +420 465 473 304
Company ID No. 13216660
email: servis@my-concept.cz
www: www.my-concept.com
Product data
| Model: | |
| Production number: | |
| Date of purchase: Seal and signature of vendor: | |
DE GARANTIEBEDINGUNGEN
Garantie
FR CONDITIONS DE GARANTIE
Garantie
EU Declaration of conformity
Product / model Air Humidifier ZV2021
Type: SPS-103W
Name and address of Jindrich Valenta -Concept
manufacturer: Vysokomytska 1800
565 01 Chocen
This declaration of conformity is issued under the sole responsibility of the manufacturer.
Subject of the declaration: The product is intended for household. The product is designed for humidification.
The product described above complies with the relevant harmonization legislation of the European Union:
directive 2014/35/EU (LVD),
directive 2014/30/EU (EMC),
directive 2011/65/EU (RoHS),
directive 2014/53/EU (RED)
| Frequency range (MHz) | Max. Transmit power (dBm) |
| 2412-2472 MHz | ≤ 17,30 dBm |
Relevant harmonized standards used:
EN 60335-2-98:2003+A1:2005+A2:2008+A11:2019
EN 60335-1:2012+A11:2014+A13:2017+A1:2019+A14:2019+A2:2019
EN 62233:2008
EN 55014-1:2017
EN301489-1V2.2.3
EN 301 489-17 V3.2.2
EN IEC 61000-3-2:2019
EN 61000-3-3:2013+A1:2019
EN 55014-2:2015
EN 300 328 V2.2.2
EN 62311:2020
Signed and followed by the name:
In: Chocen 8.6.2021
Name and function: Dominik Jehlicka, Product engineer SDA

concept
Jindfich Valenta-Concept
Vysokomytska 1800, 565 01 Choien Tel.: 465 471 400 - Fax: 465 473 304
IC:13216660-DIC:CZ6702171377
CZ Seznam servisnich mistr
SK Zoznam servisnych stredisiek
PL Wykaz punktów servisovych
HU Szolgáltatók listáját
HR Popis uslužnih mjesta
RO Lista unităților service
Česká republika
CONCEPT POLSKA sp.z o.o.
Ostrowskiego 30, 53-238 Wroclaw
Tel.: +48 713 390 444, Fax: 713 390 414
www.my-concept.pl
HU
ASPICO KFT

- IMPORTANT SAFETY PRECAUTIONS
- Damages from failure to follow the manufacturer's instructions are not covered by the warranty.
- CONSUMER SAFETY INFORMATION
- PRODUCT DESCRIPTION
- DISPLAY AND CONTROL PANEL
- USE
- BEFORE FIRST USE
- Adding essential oil
- Water filter
- Ideal relative air humidity:
- Remote control description
- Replacing the remote control battery
- CLEANING AND MAINTENANCE
- DAILY MAINTENANCE
- WEEKLY MAINTENANCE
- MAINTENANCEWARNINGS
- CLEANING OF CERAMIC FILTER BALLS
- STORAGE
- TROUBLESHOOTING
- Download and installation of the app
- Instructions for pairing the device
- Pairing troubleshooting
- Compatibility:
- WIRELESS CONNECTION AND COMPATIBILITY
- SERVICE
- ENVIRONMENTAL CONCERNS
- Recycling of the appliance at the end of its lifespan
- DANKSAGUNG
- Filing a complaint
- Complaints processing
- Manufacturer
- DE GARANTIEBEDINGUNGEN
- Garantie
- FR CONDITIONS DE GARANTIE
- EU Declaration of conformity
- Relevant harmonized standards used:
- CONCEPT POLSKA sp.z o.o.
- ASPICO KFT
Brand : Concept
Model : Perfect Air ZV2021
Category : Humidifier