
IAN 334250 - Alarm Clock AURIOL - Free user manual and instructions
Find the device manual for free IAN 334250 AURIOL in PDF.
| Product type | Radio-controlled alarm clock with temperature and humidity display |
| Model | IAN 334250 |
| Power supply | 2 batteries 1.5 V AA LR6 |
| Radio reception | DCF77 (range ~1500 km from Frankfurt) |
| Time display | 12 h / 24 h, adjustable |
| Date display | Day, month, year |
| Weekday display | Language selection: German (DE), French (F_), Italian (IT), Dutch (DU), Spanish (ES), Danish (DA) |
| Room temperature | Display in °C or °F, range 0 °C to 50 °C |
| Room humidity | Display of percentage, range 20% to 95% |
| Time zone | Adjustable, default UTC+1 (Central European Time) |
| Alarm | With 5-minute snooze function |
| Backlight | Activation via LIGHT/SNOOZE button |
| Low battery indicator | Icon displayed on the screen |
| Manual time setting | Possible if radio reception is faulty |
| Care and cleaning | Soft, dry, lint-free cloth; do not use aggressive cleaning agents |
| Safety | Do not expose to moisture, heat sources, direct sunlight; keep batteries out of reach of children |
| Box contents | 1 alarm clock, 2 AA batteries, 1 user manual |
| Warranty | 3 years, subject to conditions (see manual) |
Frequently Asked Questions - IAN 334250 AURIOL
User questions about IAN 334250 AURIOL
0 question about this device. Answer the ones you know or ask your own.
Ask a new question about this device
Download the instructions for your Alarm Clock in PDF format for free! Find your manual IAN 334250 - AURIOL and take your electronic device back in hand. On this page are published all the documents necessary for the use of your device. IAN 334250 by AURIOL.
USER MANUAL IAN 334250 AURIOL
GB RADIO-CONTROLLED ALARM CLOCK WITH TEMPERATURE & HUMIDITY DISPLAY - Usage and safety instructions
FR REVEIL RADIOGUIDE AVEC AFFICHAGE DE LA TEMPERATURE ET DU TAUX D'HUMIDITE ATMOSPHERIQUE
Mode d'emploi
NL RADIOWEKKER MET TEMPERATUUR-EN LUCHTVOCHTIGHEIDSWEEKGAVE - Gebruiksaanwijing
WARNING! OLESDHETISGFAHR! EXPLOSIONSGEFAHR!
Table of contents -15 Speed setting 23
Introduction -16- Basic settings 23
Intended use -16- Alarm -23
Scope of delivery -16- Activating and deactivating
Technical specifications - 16 - the alarm - 23 -
Important safety information important safety (SNOOZE) 24
Important safety information Battery low indicator . 24
for users -17- Cleaning instructions 24
Important safety information Simplified
for the batteries . - 17 - EU declaration of conformity . - 24 -
Do not allow a young child Disposal -24-
access to the alarm clock . .18 - Disposal of the electronic
Set up the alarm clock safely -18 - appliance -24
Display and controls . 19 Disposal of the batteries . -25
Setup -20- Recycling 25
Time zone adjustment -21 - Waste disposal 25
Restart -21 digi-tech gmbh warranty -25
Activating and deactivating Warranty conditions 25
radio control reception . - 22 - Warranty period and defects
Reception problems 22 liability 26
Light 22 - Scope of the warranty 26
Seconds display - 22 Warranty claim procedure - 26
Date display -22- Service -27-
Indoor humidity -23- Supplier. 28
Indoor temperature -23
12/24 hour time -23-
RADIO-CONTROLLED ALARM CLOCK WITH TEMPERATURE & HUMIDITY DISPLAY
Introduction
Congratulations on the purchase of your new alarm clock. You have chosen a high quality appliance. The manual is part of the appliance. It contains important safety, usage and disposal information. Please read all usage and safety instructions before using the appliance. Please only use the appliance as described and for the described uses. If you sell or give this alarm clock to someone else it is very important to also include this manual. Please keep the packaging and the instruction manual for future reference.
Intended use
This electronic appliance is intended for time display and the described additional features. Any other use or modification of the electronic appliance does not comply with the intended uses. The manufacturer is not liable for damages caused by improper use or misuse. The device is not intended for commercial use.
Scope of delivery
Please note: Check the scope of delivery after purchase. Please ensure that all parts are included and undamaged.
- 1 x Alarm clock
- 2× Batteries 1,5V AA LR6
- 1 x Instruction manual
Technical specifications
- Operating temperature (inside): 0°C - 50°C
- Operating humidity (inside): 20% ~95%
-
Batteries: 2 × 1,5 VA R6/LR6
-
Symbol for direct voltage

Important safety information
Important safety information for users

WARNING!
RISK OF INJURY!
This device may be used by persons (including children over 8 years of age) with reduced physical, sensory or mental abilities or lack of experience and knowledge, if they are supervised or instructed regarding the safe use of the device and understand the dangers that may arise. Children may not play with the device. Cleaning and user maintenance of the device may not be performed by children without supervision. Keep packaging films out of the hands of children. There is a danger of suffocation.
Important safety information for the batteries

WARNING!
HEALTH HAZARDI!
RISK OF EXPLOSION!
Keep batteries out of reach of small children. If a battery is swallowed, you must seek medical attention immediately. Batteries/rechargeable batteries must always be inserted in the correct polarity. If necessary, clean the battery and device contacts. Never attempt to recharge non-rechargeable batteries. Never short-circuit or attempt to open batteries. Never throw batteries into fire as they may explode. If the device will not be used for an extended time period, remove the battery and store the device in a dry and dust-free area. Improper use of the battery can lead to explosion or leakage.
If the battery leaks, avoid contact with skin, eyes and mucous membranes. Use gloves. If you are exposed to battery acid, rinse the affected areas with plenty of clean water and immediately seek medical attention. Remove discharged batteries from the device as they present an increased risk of leakage.
-17

Do not allow a young child access to the alarm clock

WARNING!
HEALTH HAZARDI!
DANGER TO LIFE!
This clock is not a child's toy!
Never let young children (0-8 years of age) use the clock while unsupervised.
Young children may not correctly recognize possible dangers.
Batteries/rechargeable batteries can be fatal if swallowed. Store batteries out of reach of young children. If a battery was swallowed, you must seek medical attention immediately.
Keep packaging foils away from children. There is a danger of suffocation!
Set up the alarm clock safely
The alarm clock is not intended for use in rooms with high humidity (example: bath room). Make sure that:
- the device isn't placed on a thick carpet or bed during operation;
- no direct heat sources (i.e. radiators) influence the device;
- no direct sunlight reaches the device;
- contact with splashing or dripping water must be avoided (don't place any items filled with liquids, i.e. vases, onto or next to the device);
the device doesn't stand near magnetic fields (i.e. speakers); - candles and other open flames must be kept away from this product at all times to prevent the spread of fire;
- no foreign objects penetrate the housing.


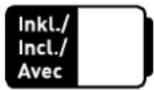
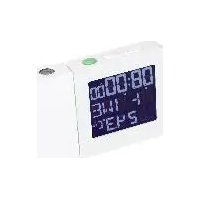
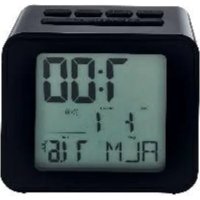
Display and controls
| 1 Battery low indicator 6 Day of the week display |
| 2 Hours of time display 7 Indoor humidity |
| 3 Minutes of time display 8 Indoor temperature |
| 4 Time zone and DST display 9 ALARM symbol |
| 5 Radio control symbol 10 Snooze symbol |
-19

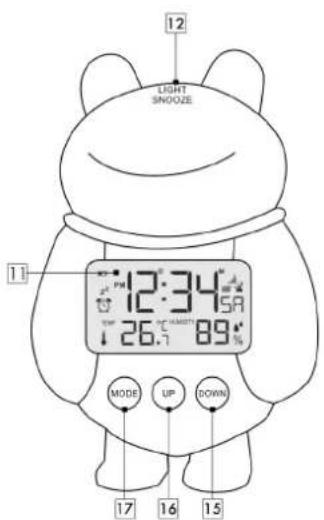
| 11 D | splay 15 DOWN button | ||
| 12 L | IGHT/SNOOZE touch control 16 | UP button | |
| 13 B | battery compartment 17 MODE button | ||
| 14 | Safety screw for battery compartment cover |
Setup
Remove the safety screw 14 from the battery compartment cover with a small screwdriver. Open the battery compartment 13.

Insert two 1.5V AA R6/LR6
batteries in the correct polarity.

-20
GB E
Close the battery compartment and refasten the screw. After inserting the batteries, the radio signal reception will begin automatically and the clock will emit a beep sound. The radio symbol 5 will blink on the display. This process can take around 3-10 minutes.
Note: Please do not move the clock during the reception process.
The clock synchronises the internal time daily from 01:00 to 04:00 o'clock at every full hour. If the reception attempt is unsuccessful, it will be repeated at 05:00 and 06:00 o'clock. If radio reception remains unsuccessful, please set the time manually (see Basic settings).
If radio signal reception is successful, the radio control symbol 5 will stay on the display permanently and the time, date and day of the week will be set automatically. During daylight saving time, DST 4 will appear on the display.

Time zone adjustment
If you are in a country in which the current time is incorrect even though the DCF77 signal was received, please use the time zone adjustment to adjust the time zone to a different setting than the standard setting (UTC+1 = Central European Time). Set the difference in hours (for example -01) to the required time zone. Press and hold MODE 17 in normal time display mode for about 3 seconds. The hours will blink. Press MODE 17 6x. The time zone [00] will blink and can be set by pressing UP 16 or DOWN 15. Confirm your setting by pressing MODE 17. Now perform a restart of the radio signal reception. The clock will continue to receive the DCF77 radio control signal but will show the adjusted time (1 hour less, for example). Once the time zone is set, ZONE appear on the display.
Restart
You may restart the radio signal reception manually by pressing and holding UP 16 for 4 seconds. The radio control symbol will blink on the display. This process may take from 3 to 10 minutes. If radio signal reception is successful, the radio control symbol will stay on the display permanently. If radio signal reception fails, the time must be set manually (see Basic settings).
-21-

Activating and deactivating radio control reception
You may deactivate radio control reception by pressing and holding
DOWN 15 for 4 seconds. The radio control symbol 5 will disappear from the display and only the radio waves will be visible. The clock will no longer receive the radio control signal. Set the time manually as described in Basic settings. The radio signal reception can be reactivated by pressing and holding DOWN 15 for 4 seconds. The radio waves will disappear from the display. The clock will now again receive the radio control signal and synchronize the internal time daily from 01:00 to 04:00 at every full hour. Now perform a restart.
If reception is successful, the radio control symbol 5 will appear on the display permanently.
Reception problems
The DCF77 radio signal is transmitted from a location near Frankfurt am Main and can be received within a radius of approximately 1500km around Frankfurt am Main. However, there are some obstacles and sources of interference, which may substantially hinder reception. If your alarm clock does not correctly receive the DCF77 radio signal, please hang or place the alarm clock a different location at your site. Please note that devices such as computers, telephones, radios and televisions may cause electromagnetic radiation which can interfere with the DCF77 signal reception. Other possible detriments to reception are: strong building insulation (metal building materials), nearby mountains or atmospheric interference. It may also be necessary to replace the batteries.
Light
Press LIGHT/SNOOZE 12 on the top of the clock to briefly activate the light.

Seconds display
Press MODE 17 1x to briefly show the seconds.
Date display
Press MODE 17 2x to briefly show the date.
-22-

Indoor humidity
Your alarm clock shows the indoor humidity 7.
Indoor temperature
Press UP 16 to select the temperature unit Celsius (^) or Fahrenheit (^) .


12/24 hour time
Press DOWN 15 to select the 12 or 24 hour time display. In 12 hour time display mode, AM (before noon) or PM (after noon) will appear on the display in front of the hours 2.
Speed setting
When setting numerical values, you may press and hold the setting buttons for speed setting.
Basic settings
You may perform the following settings: Hours, minutes, year, month, day, language of the day of the week display and time zone. Press and hold MODE 17 for about 3 seconds in normal time display mode. The hours 2 will blink and can be set by pressing UP 16 or DOWN 15. Confirm your setting by pressing MODE 17. Set the minutes, year, month, day, language of the day of the week (DE=German, FR=French, IT=Italian, DU=Dutch, ES=Spanish, DA=Danish, En=English) and the time zone in the same way.
Alarm
Press MODE 17 3x in normal time display mode to show the alarm time or OFF. Press and hold MODE 17 for 3 seconds to enter alarm time setting mode. The hours will blink on the display and can be set by pressing UP 16 or DOWN 15. Confirm you setting by pressing MODE 17. Set the minutes in the same way.
Activating and deactivating the alarm
Press MODE 17 3x in normal time display mode to show the alarm time or OFF.

Press UP 16 to activate the alarm. Will appear on the display and the alarm time will be shown briefly. Press DOWN 15 to turn the alarm off. OFF will appear on the display briefly.
-23-

Snoopze (SNOOZE)
Press LIGHT/SNOOZE 12 on the top of the clock when the alarm sound. The light is activated briefly and Z^2 10 will blink on the display. The alarm will be deactivated for 5 minutes and will then sound again.

Battery low indicator
If battery charge becomes too low to power the clock, the battery low indicator 1 will appear on the display. Replace the battery as soon as possible.
Cleaning instructions
Improper cleaning can damage the device. Do not submerge the device in water or other liquids. Do not use aggressive cleaners, brushes with metal or nylon bristles, or sharp or metallic cleaning tools such as knives, scrapers or similar implements. These may damage the surface of the device. Clean the device using a soft, dry, lint-free cloth, such as glasses cleaning cloth.
Simplified EU declaration of conformity
Hereby, digi-tech gmbh declares that the radio equipment type 4-LD5260 is in compliance with Directive RED 2014/53/EU. The full text of the EU declaration of conformity is available at the following internet address: http://www.digi-tech-gmbh.com/ce/334250_1907_FWE.pdf
Disposal
This device and all the packaging materials are recyclable. Please dispose of them separately for better waste handling. You can find out about disposal options for your product by contacting your municipality.
Please take note of the marking of packaging material when separating waste materials. They are marked with abbreviations (a) and numbers (b) with the following meanings: 1-7 plastics / 20-22; paper and cardboard / 80-98; composite materials.

Disposal of the electronic appliance
This alarm clock may not be disposed of with normal household waste. In the interest of the environment, when your device has reached the end of its usefulness, do no throw it in the normal household trash. Dispose of it in the proper and correct way. You can


-24-

find out about collection sites and their business hours from your public administration. Please adhere to applicable requirements.
Disposal of the batteries
Defective or spent batteries/rechargeable batteries must be recycled in accordance with directive 2006/66/EC and its revisions. Return batteries, rechargeable batteries or the device at the available collection sites.

Improper disposal of batteries/rechargeable batteries causes environmental damage!
Batteries/rechargeable batteries may not be disposed of in normal household waste. They may contain toxic heavy metals and are subject to hazardous waste treatment. The chemical symbols of the heavy metals are as follows: Cd = Cadmium, Hg = Mercury, Pb = lead. Therefore, please dispose of spent batteries/rechargeable batteries at a communal collection site.
Recycling
The product packaging consists of recyclable materials. Dispense of the packaging in an environmentally sound manner using the proper collection systems.

Waste disposal
Dispose of the packaging in an environmentally responsible fashion. Please note the marking of the different packaging materials and separate them if applicable.

digi-tech gmbh warranty
This alarm clock includes a 3 year warranty starting on the day of purchase. In case of defects of this alarm clock you have, by law, certain rights regarding the vendor of the alarm clock. These rights are not changed by the warranty which is described in the following paragraphs.
Warranty conditions
The warranty duration starts on the date of purchase. Please keep the original receipt in a safe place. The receipt is needed as a proof of purchase. If a defect occurs in the alarm clock within 3 years, the alarm clock will be repaired or replaced (according to our choice) free of charge. This warranty requires that, within the 3 year warranty period, the alarm clock and the receipt can be made available to us along with a short written description of the defect and when it
-25-

occurred. If the defect is covered by the warranty, you will receive the repaired alarm clock or a new alarm clock. Repair or replacement does not cause the warranty period to restart.
Warranty period and defects liability
The warranty period is not increased by the defect liability. This also applies to repaired or replaced parts. If defects are noticed at the time of purchase they must be reported immediately upon unpacking the item. Paid repair may be available after the end of the warranty period.
Scope of the warranty
The alarm clock was manufactured according to strict quality guidelines and was carefully inspected before delivery. The warranty does not include parts that experience normal wear and tear and can thus be seen as wear parts or fragile parts that are damaged. Examples include Switches, Batteries or parts made of glass. This warranty becomes void if the alarm clock is damaged, is not used in the recommended way or is improperly repaired. For proper use of the alarm clock all instructions in this manual must be adhered to exactly. Use of the alarm clock in a way that is discouraged in the manual must be avoided. The alarm clock not intended for commercial use. Abusive or improper use, excessive force and changes that are made by non-authorized repair centres will void the warranty.
Warranty claim procedure
To ensure that your call is processed in a fast and efficient manner please note the following directions:
- Have your receipt (as proof of purchase) and the article number (334250_1907) handy.
- The article number can be found on the type label, an engraving, the front page of the manual (bottom left) or a sticker on the backside or bottom side of the case.
- In case defects occur, please first contact the service centre (see below) by phone or email.

Visit www.lidl-service.com to download this and many other manuals, product videos and software.

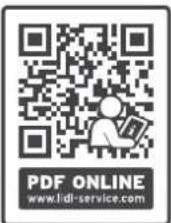
With this QR-Code you can reach the Lidl-Service-Site (www.lidl-service.com) directly and you can open your manual by entering the article number [334250_1907].
Service
Please note that the following address is not a service address.
Please first contact the service address (see above).
Name: digi-tech gmbh
Street: Valterweg 27A
Town: DE-65817 Eppstein
Country:GERMANY

-28-

Sommaire
Sommaire -29-
Introduction 30
WAARSCHUWING! GEZONDHEIDSGEVAAR!
Na www.lidl-service.com这其中 some of the most popular programmes in the UK are:

- WARNING! OLESDHETISGFAHR! EXPLOSIONSGEFAHR!
- RADIO-CONTROLLED ALARM CLOCK WITH TEMPERATURE & HUMIDITY DISPLAY
- Introduction
- Intended use
- Scope of delivery
- Technical specifications
- Important safety information
- Important safety information for users
- WARNING!
- RISK OF INJURY!
- Important safety information for the batteries
- HEALTH HAZARDI!
- RISK OF EXPLOSION!
- Do not allow a young child access to the alarm clock
- DANGER TO LIFE!
- This clock is not a child's toy!
- Set up the alarm clock safely
- Setup
- Time zone adjustment
- Restart
- Activating and deactivating radio control reception
- Reception problems
- Light
- Seconds display
- Date display
- Indoor humidity
- Indoor temperature
- 12/24 hour time
- Speed setting
- Basic settings
- Alarm
- Activating and deactivating the alarm
- Snoopze (SNOOZE)
- Battery low indicator
- Cleaning instructions
- Simplified EU declaration of conformity
- Disposal
- Disposal of the batteries
- Improper disposal of batteries/rechargeable batteries causes environmental damage!
- Recycling
- Waste disposal
- digi-tech gmbh warranty
- Warranty conditions
- Warranty period and defects liability
- Scope of the warranty
- Warranty claim procedure
- Service
- Sommaire
- WAARSCHUWING! GEZONDHEIDSGEVAAR!
Brand : AURIOL
Model : IAN 334250
Category : Alarm Clock