HP116 - Heating Bimar - Free user manual and instructions
Find the device manual for free HP116 Bimar in PDF.
User questions about HP116 Bimar
0 question about this device. Answer the ones you know or ask your own.
Ask a new question about this device
Download the instructions for your Heating in PDF format for free! Find your manual HP116 - Bimar and take your electronic device back in hand. On this page are published all the documents necessary for the use of your device. HP116 by Bimar.
USER MANUAL HP116 Bimar
This symbol invites you to read these instructions carefully before using the appliance, and also inform third parties of them, if necessary. Store this booklet for future reference and for the entire lifetime of the device. If any parts of these instructions prove difficult to understand or if in doubt, contact the company at the address written on the last page before using the product. WARNING! This symbol means :
DANGER! And invites you to read the safety conditions and installation adverisements This symbol indicates the isolation class IPX2. The appliance is protected against water drops with a maximum inclination of 15°. This symbol means : Attention the appliance is a second class appliance This symbol means : ATTENTION : to avoid overheating don’t cover the appliance. GENERAL ADVISE
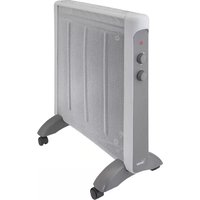
- This appliance is designed to heat indoor domestic and similar environments only; it must be installed only on the wall and used as specified in these instructions; furthermore, it is to be considered an additional heating unit, and not a source of primary / central heating. Examples of appliances for domestic use are those used for common house purposes, in domestic environments and that can be used by non-experts: - in shops, offices and other similar workplaces; - in farms or similar businesses; - by guests in hotels, motels and other residential type environments; - in bed and breakfast accommodation.15
- The appliance must be installed as specified in the “Installation” paragraph, must not be used in dusty areas or in areas with airborne particles/materials (which may block the grids), or in the presence of high humidity and flammable products.Any other use should be considered inappropriate and dangerous.
- The use of any electrical appliance always involves the observance of elementary safety precautions to avoid risks of electric shocks, physical injuries and fire. Among these precautions, we point out: a) do not touch the appliance with wet hands b) do not touch the appliance barefoot c) do not leave the appliance unattended when in operation, especially in the presence of children and vulnerable persons.
- Parts of this product can become hot and cause burns.Special care should be taken in the presence of children and vulnerable people.
- The appliance can be used by children over 8 and by people whose physical, mental or emotional capacity is limited or compromised, or who lack the appropriate experience or knowledge, only if they are supervised after receiving instructions about safe use of the appliance they understand the hazards.Children must not play with the appliance.Cleaning and maintenance that must be carried out by the user must not be performed by children unless they are supervised.
- Children under 3 years of age must be kept away from the appliance unless they are being constantly supervised.Children aged between 3 and 8 years should only turn on / off the appliance as long as it has been placed or installed in its normal operating position, and as long as they are supervised or receive instructions concerning the safe use of the appliance and16 understand the hazards involved.Children aged between 3 and 8 years should not plug it in, adjust or clean the appliance or perform user maintenance.
- Always unplug the appliance from the power socket: e. before installation f. when an operating fault is detected g. if you decide not to use the device for short or long periods h. before cleaning the appliance - The appliance must not be placed directly beneath a socket.
- The socket must be accessible so as to easily remove it in case of an emergency.
- Do not use the appliance near a bathtub, a shower, swimming pool or basin/sink, etc.
- If the power cord is damaged, it must be replaced by the manufacturer or its technical assistance centre or by someone who is similarly qualified, in order to prevent any risks.
- Do not pull on the power cord or the appliance itself to unplug the appliance from the power point.
- Do not use this heating appliance with programmers, timers or with any other device that automatically turns on the appliance, as this could pose a fire risk should the appliance be covered or positioned incorrectly.
- Check the integrity of the device at regular intervals.In case of imperfections or doubts, contact a qualified technician
- The grille does not provide complete protection to children or to people with reduced physical, sensory or mental capacity.17
- After unpacking, check the integrity of the appliance; if in doubt, do not use it and contact a qualified technician.The packaging materials (plastic bags, polystyrene, metal staples, etc.) must not be left within reach of children, as they are potentially hazardous.
- Before installing the appliance, make sure that: - the electrical system to which the appliance will be connected complies with current standards and has cables whose cross-section is suitable for the absorbed power - the voltage values on the nameplate correspond to those on the mains supply.Check that other appliances with high absorption are not connected to the power line to avoid overloading and fire hazards.In the event of incompatibility between the power socket and the appliance's plug, have the plug replaced with a suitable model by a qualified professional, who should ensure that the cable is appropriate for the power rating of the device.The use of adaptors or extensions is generally not advisable; if it is necessary to use them, they must comply with safety regulations and the total current (amperes) must not be rated lower than the maximum current of the appliance. - There are no water, gas or power lines inside the wall - The wall to which the appliance is to be fixed must be made of masonry and/or heat- resistant, fire-retardant and solid material (not wood or synthetic material), flat and free of irregularities; the ceiling must also be made of fire-retardant and heat-resistant material. - the appliance can be installed at least 2.0m from the ground (height referred to the lower edge of the appliance), is positioned so that it cannot suffer impacts and that the air outlet grid has a free space of at least 100cm, and at least 40cm at the sides.If installed in a bathroom, in addition to the height from the ground, it must be ensured that the switches and control devices cannot be touched or reached by a person in the bathtub or shower. - the appliance is away from other sources of heat, flammable materials (curtains, upholstery, etc.), flammable gases or explosive materials (spray cans) and materials that can be deformed by heat.
- This appliance must not be used in any type of vehicle or restricted space (lifts, camper vans, cars, cabins etc.).
- To install the appliance, proceed as follows and refer to the figures: - The appliance must be fixed in such a way that it is horizontal and the air outlet grid is on the underside. - the fixing is provided by means of 2 screws that engage in the 2 "lock hole" slots made on the rear panel.18 Drill 2 perfectly horizontal holes, with a distance of 39.5 cm and at least 215 cm from the floor (to draw the holes use the template obtained in the lower flap of the package).Insert the expansion dowel and drive in screws with head havinga 8mm diameter, suitable to fit in the slots (see figure on the side)
- Ensure that the power cord is correctly positioned and does not come into contact with hot parts or sharp edges, or become wound around the appliance itself and is not twisted.
- In the event of a fault or malfunction, switch off the appliance and have it checked by a qualified technician.
USO The functions of this appliance can be started using they keyboard of the control panel or the remote control which has to be pointed in the correct direction (at a max distance of 4m); for the first use remove the plastic tab from the battery (N.1 battery type: CR2025) To sobstitute the battery move the plastic tab to the centre and simultaneously remove the battery slot.
Sobstitute the battery (following the right polarity) and close the battery slot. For longer inactivity periods please remove the battery. The remote control is divided in 3 areas:
Area which contains the buttons for normal mode.
Area which contains the buttons to confirm the selected mode.
Area which contains planning buttons.19
To start the appliance insert the plug in the power grip: press the button on the side in pos.I, this should light up on the display (it means the appliance is in stand-by) to start the appliance press the ” ” button and select the right mode. The appliance can be used in two different modes: -Normal: power, temperature and time are regulated by the control panel and the remote control. -Weekly program: power, temperature and time are regulated and preset for the 7 weekdays, they are activated by the remote control. If there is no preset for the temperature the appliance will work for 12 hours and then go into stand-by. Normal mode L’apparecchio ha i seguenti elementi di regolazione e comando:
- Main switch(I/0) if it is in pos.”I” the appliance is in stand-by, in pos. “0” the appliance is off.
- The button “ ” on the keyboard and on the remote control“ ”: starts ventilation and activates the other functions. It puts the appliance in stand-by. This symbol lights up on the display “- -“.
Oscillation for alternative “front-low” air direction: function is active, by pressing the “ ” to the remote control. To delete the oscillation press again the button swing of the remote control.
- The “ ”button on the keyboard and on the remote control: it defines power of ventilation: - “I” (1000W): hot air - “I I” (2000W): very hot air - “- -“ only ventilation It lights up the symbol of the function activated on the display.
- The button “ ”on the keyboard and on the remote control; Is the timer when the appliance is on, every time you press the button it extends the working time of the appliance by one hour (max 12h), when the time runs out the appliance switches to off automatically. On the display appears the selected time next this simbol , beside the one of the active functions. To disable the timer press the button repeatedly until “ 00 “ appears. The picture shows the timer with “8 hours” selected.20 The timer is also a start programmer when the appliance is in stand-by: every time the button gets pressed the timer adds one hour of stand- by, when the time runs out the appliance starts automatically. The remaining time (in hours) is written on the display until the time runs out and the appliance starts to work. .
- The buttons and on the remote control: define the temperature (10- 49°C); the default temperature is 23°C and it increases if you press the button and decreases if you press the button. The power depends on the difference between the selected temperature nad the outside temperature and it can vary between 1000W, 2000W or “only ventilation” mode: when the selected temperature is reached the appliances stops automatically. If the appliance is in Stand-by and the temperature decreases 2°C from the selected temperature the program starts the appliance automatically. If the selected temperature is lower than the room temperature the appliance will not work. To leave out the room temperature press the button and select power I or II: the appliance works in this mode without temperature limit. The symbol °C disappears from the display and the symbol “- -“ appears. The appliance will work for 12 hours at the selected power, then it will work for 30 seconds as “only ventilation” and then go into stand-by.
- The button on the remote control confirms the selected temperature or the selected time. Weekly program (only remote control)
- The button on the remote control: shows the “window sensor” that checks if the temperature goes down by 5-10°C in less than 10 minutes and if it does it stops the appliance for 30 minutes and then goes in stand-by.
- The button on the remote control: chooses the days of the week (d1-d7).
- The button on the remote control: activates the weekly program.
- The button on the remote control: selects the start time of the daily program.
- The button on the remote control: activates the day program with a maximum of 6 periods (P1-P6) .21
- The button on the remote control: selects the stop time of tha daily program. These functions are regulated with the remote control:
HOUR/MINUTES/DAY setting (appliance has to be on or in stand-by). Press the , button, you should see the number “12” on the display, set the right hour with the and the button. Press the button again, you should see the number “30”on the display, set the correct minutes with the and the button. Press the button, you should see “ ” on the display, set the correct day with the and button. (d1=Monday; d2=Tuesday; d3=Wednesday; d4=Thursday; d5=Friday; d6=Saturday; d7=Sunday). Press the button to confirm, on the display you can see the information set. For example: 09.30 a.m., 3° day (Wednesday), 25°C, II power level. Note: if the appliance is switched off or if the plug is removed from the outlet the instructions are erased which mean they have to be reinserted.
TEMPERATURE regulation when the appliance is in function press the and or the button, on the display you’ll see the default temperature“23”. Press the and the button to decide the right temperature ( between 10°C and 49°C): press the button to confirm. For example: with a room temperature of 15°C and set temperature of 25°C, the display shows up like this.
If the room temperature is lower than the temperature shown on the display the appliance stays in stand-by.22
Daily program: can be activated only if minutes,hours and day are already set.
1. Press the button to start the appliance.
2. Press the button to start the programmation, display turns on.
3. Press the button (d1 will appear on the display)
to set the right day (d1= Monday; d2= Tuesday; d3=Wednesday; d4=Thursday; d5=Friday; d6=Saturday; d7=Sunday). For example “ d1 “is Monday.
4. Press the button, “P1” will appear on the screen
for the first daily program, if you press it again it will activate another daily program (maximum 6 programs). For example we have the first program (P1).
5. Press the button to select the starting time, “00”
appears on the display and every time the button is pressed it adds one hour to the starting time.
6. Press the button to set the shut-down time, the
display shows the starting time, every time the button is pressed it adds an hour to the shut-down time.
7. Set the temperature as explained in the previous chapter.
8. Repeat n.2 to n.7 to set the entire week, then press to confirm.
9. To stop the weekly program, press the button: the light next to “P” will shut
down, and the program is stopped. To restart the programmation press “P” again. To verify the programmation press the / / / buttons: the light next to “P” lights up. Note: there is no regulation in minutes. The shut-down time can not be lower than the starting time. If the starting time and the shut-down time coincide the appliance goes into stand-by.
1. Press the button: the appliance switches on.
2. Press the button to set the temperature: the
display shows“ 23” (the default temperature) press the or the button to increase or decrease temperature. The lights next to these symbols , °C, “I”e”II” should light up.
If the temperature goes down too quikly the program switches the appliance to stand-by mode: press the button to start the appliance. Press the button to disable the program: the corresponding light will shut-down and the appliance works with the previous functions.
3. When both “window sensor settings” and “weekly program” are active the
appliance is on when both functions are active and is off if the functions are inactive. To switch off the appliance, press the “ ” button, then eject the plug from the power outlet.
CLEANING AND MAINTENANCE
Attention: before cleaning the appliance, switch off, unplug and wait for before it has completely cooled down.
- To clean the body use a soft damp cloth; do not use abrasive products.
- Do not submerge any part of the heater in water or other liquids; if this should happen, do not put your hands into the liquid, firstly remove the plug from the power socket. Carefully dry the appliance and check that all the electrical parts are dry: if in doubt, contact professionally qualified personnel.
- From time to time clean the grid to remove fluff, dust or other deposits, to improve the performance. Use a vacuum cleaner or a cloth.
- If you decide not to use the appliance any more, we recommend making it inoperative by cutting the power cord (after making sure you have disconnected the plug from the socket) and make dangerous parts harmless if children are allowed to play with them.
- Used battery of the remote control must be disposed of at appropriate collection centres at your local authority or in suitable containers. In this way, local laws will be respected.24 IMPORTANT INFORMATION FOR CORRECT DISPOSAL OF THE PRODUCT IN ACCORDANCE WITH EC DIRECTIVE 2011/65/EU. At the end of its working life, the product must not be disposed of as urban waste. It must be taken to a special local authority differentiated waste collection centre or to a dealer providing this service. Disposing of a household appliance separately avoids possible negative consequences for the environment and health deriving from inappropriate disposal and enables the constituent materials to be recovered to obtain significant savings in energy and resources. As a reminder of the need to dispose of household appliances separately, the product is marked with a crossed-out wheeled dustbin.25