Aerostyle Wifi - Air purifier Venta - Free user manual and instructions
Find the device manual for free Aerostyle Wifi Venta in PDF.
User questions about Aerostyle Wifi Venta
0 question about this device. Answer the ones you know or ask your own.
Ask a new question about this device
Download the instructions for your Air purifier in PDF format for free! Find your manual Aerostyle Wifi - Venta and take your electronic device back in hand. On this page are published all the documents necessary for the use of your device. Aerostyle Wifi by Venta.
USER MANUAL Aerostyle Wifi Venta
natural_image
Two white and black rectangular electronic devices with blue trim, displayed against a blue gradient background (no visible text or symbols)SIMPLIFIED EU DECLARATION OF CONFORMITY
Herewith, Venta-Luftwäscher GmbH declares that the radio equipments LW73 WiFi / LW74 WiFi comply with Directive 2014/53/EU. The full text of the EU Declaration of Conformity is available at the Internet address: www.venta-air.com/en_de/service/manuals/
VIELEN DANK!
natural_image
Exterior view of a modern Kamba RoR heater with a flat top and power cord (no text or symbols visible)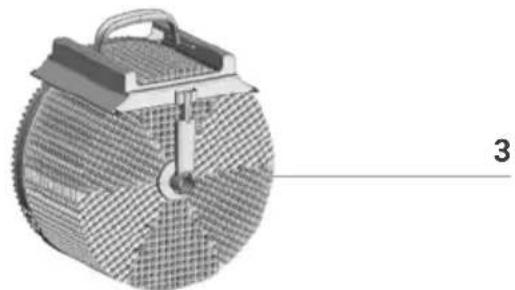
natural_image
3D rendered mechanical component with mesh pattern and labeled part '3' (no text or symbols on the object itself)
natural_image
3D model of a rectangular electronic device casing with internal compartments and labeled parts (no text or symbols beyond labels)
natural_image
3D model of a rectangular electronic device with layered top and side panels, labeled with number 6 (no text or symbols on the device itself)natural_image
3D diagram of a battery cell with internal components and external circuitry (no text or symbols)natural_image
Exploded view diagram of a food appliance showing internal components and assembly (no text or symbols)3
text_image
220-240V 50/60Hztext_image
45% RH humidityWiFi / Bluetooth
natural_image
3D rendering of a cylindrical mechanical component with threaded top and base (no text or symbols)Anzeige Funktion
natural_image
Technical diagram of a mechanical component with labeled parts a and b, showing internal grid structure (no text or symbols beyond labels)
natural_image
Circular mechanical component with ribbed texture and a small protrusion, labeled B (no text or symbols on the object itself)
natural_image
Mechanical gear assembly diagram showing a flanged shaft and housing (no text or symbols)natural_image
3D rendering of a rectangular electronic device with horizontal ridges and a labeled component 'A' (no text or symbols beyond the label)natural_image
3D rendering of a rectangular electronic component with a slot and labeled point A, showing internal structure and rotation arrow (no text or symbols beyond labels)natural_image
Close-up of a mechanical component with labeled part B, showing internal structure without any readable text or symbols.natural_image
3D diagram of a device with a component labeled 'A' and an arrow indicating assembly or operation (no text or symbols beyond label)natural_image
3D rendering of a rectangular electronic device with a labeled component 'A' and an arrow indicating rotation (no text or symbols beyond label)VENTA-SERVICE-TEAM
We are confident that the Venta Airwasher will exceed your expectations, and we hope you enjoy it.
Please register your Venta:
www.venta-air.com/en_de/Service/Product-registration/
Please read this operating manual in its entirety, keep it for later reference and note all safety instructions as well as instructions for the proper use of the device.
The most current version of the operating manual can be found on our website at www.venta-air.com
DEAR CUSTOMER,
With the Venta AeroStyle Airwasher LW73 or LW74, you have purchased a high-performing premium product. The AeroStyle promotes healthy humidity and naturally reduces harmful substances in the air.
Here's how the Venta principle works
A fan directs the ambient air into the water-filled Airwasher, where it travels through specially arrayed disk stacks. Hygienically clean air evaporates from their surfaces into the room. Simultaneously, the stacks trap harmful substances such as dust or pollen, which are then washed off in the water and collected in the Airwasher.
CONTENTS
Safety instructions 22
Scope of delivery 24
Symbols
Intended use 24
Overview
Before first use 25
Putting into operation 26
Configuration & Venta app 27
WiFi / Bluetooth 28
Displays, functions & settings 29
Cleaning & maintenance 31
Cleaning the upper housing 33
24 Accessories 33
Technical data 34
25 Recycling and disposal 35
Warranty 35
About your privacy 35
What to do if ... 36
Venta service team 37

SAFETY INSTRUCTIONS
- This appliance is not suitable for use by children over the age of 8 years and people with restricted physical, sensory, or mental capacities or lack of experience and knowledge unless they are supervised or have received instructions on the use of the appliance and understand the existing hazards.
- Read the operating instructions completely before putting the appliance into operation and keep them for later reference.
• The appliance is not a toy for children. - Cleaning and user maintenance may not be performed by children under the age of 8 years or without supervision.
- Keep the appliance and its power cable out of the reach of children under the age of 8 years.
- Improper use can damage the appliance and cause physical injuries.
- Plug the appliance into suitable power outlets only – the mains voltage must correspond to the nameplate data on the appliance.
- Only use the appliance with the following power cable: low-heat device socket with IEC 320 C5 cloverleaf connector.
- Never use the appliance if it has a damaged power cable.
- Disconnect the power plug before every cleaning or maintenance operation and before transportation of the appliance.
- Never use the Airwasher if it has been dropped or damaged in any other way.
- Electrical appliances should only be repaired by professional specialists. Amateur repairs could result in considerable danger to the user.
- Do not sit on the appliance and do not place any objects on it.
- Do not put any foreign objects into the appliance.
- Do not immerse the upper housing in water or any other liquid.
- Never overfill the Airwasher.
- Never transport or overbalance the Airwasher with a filled lower housing.
- Never disconnect the power plug by pulling on the cable or with wet hands.
- The Airwasher should only be operated when it is completely assembled.
-
Place the Airwasher on a stable surface which is flat and dry.
-
Set up the appliance so that it cannot be knocked over, and so that no one can trip over it or the cable.
-
Leave at least the following distances to other objects and walls:
-
In front and above: 50 cm
- On the left and right sides: 20 cm
- At the rear: 5 cm
• Maximum installation altitude: 2000 m
- Never cover or block the vents to prevent overheating/damage to the appliance.
- A persistent relative ambient humidity of more than 60 %, especially in winter, can enable the formation of biological organisms.
- The design of the appliance and the cold evaporation technology make it impossible for water to leak directly from the Airwasher in the form of droplets, vapor, mist or lime deposits, providing you use it correctly.
- Only operate the appliance with original Venta accessories designed for the purpose. Do not use aromatic oils or other additives. Venta-Luftwäscher GmbH accepts no liability for damage due to aromatic oils or other unsuitable additives.
- If you do not use the Airwasher for several days or put it into storage for a longer period, empty the water tray completely, clean it and dry thoroughly to prevent odors or biological organisms from developing in standing water or water residues.
- Disconnect the power plug from the power supply outlet when the appliance is not in use.
SCOPE OF DELIVERY
1 × Venta Airwasher
1 × Hygiene disk (pre-assembled)
1 × WiFi/WLAN module (pre-assembled)
1 × operating manual
If parts are missing or damaged, please contact the VENTA service team or your local dealer.
SYMBOLS

Safety instructions: Read and adhere to these instructions carefully, in order to avoid personal and material damages.

Supplementary information

Helpful tips
INTENDED USE
The Venta Airwasher is a domestic appliance for moistening and cleansing the air in homes, offices and leisure facilities. The appliance is not suitable for outdoor areas.
Any other use or modification of the appliance is considered to be improper use. The manufacturer is not liable for any damage or injuries resulting from improper use.
Using the appliance for something other than the intended purpose can endanger health and lives. This includes use under the following conditions:
- in rooms or locations where there is risk of explosion and/or where there is an aggressive atmosphere.
- in rooms where there is a high concentration of solvents.
- in the vicinity of swimming pools or other wet areas.
- In the outdoors.
OVERVIEW
LW73 WiFi / LW74 WiFi

natural_image
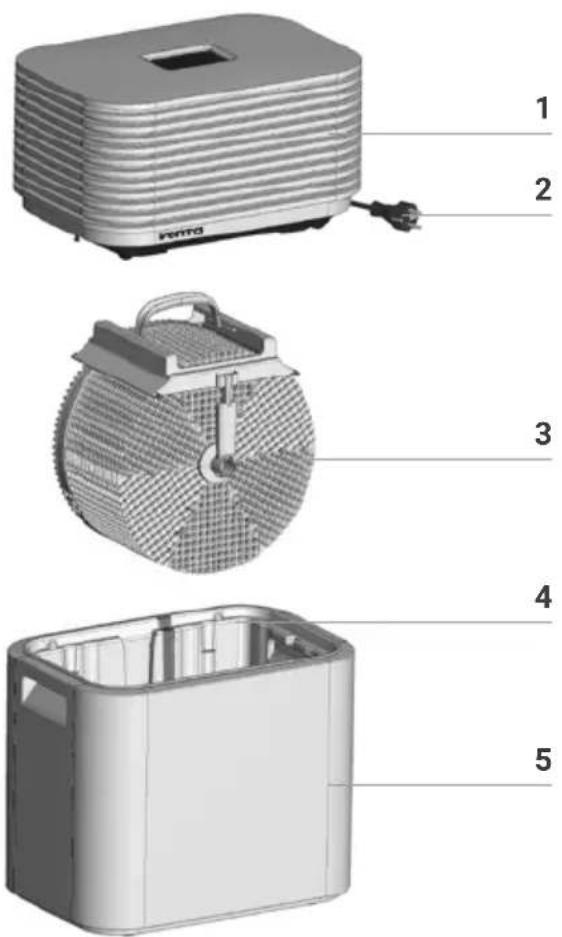
3D model of a rectangular electronic device with layered top and side panels, labeled with number 6 (no text or symbols on the device itself)1 Upper housing (technical unit)
2 Power cable
3 Evaporation unit (incl. hygiene disk, drive wheel, disk stacks)
4 Removable water tray
5 Lower housing
6 Removable cover for Venta WiFi/WLAN module
BEFORE FIRST USE
- Unpack the appliance and set it up.
- Remove upper housing 1.
- Remove evaporation unit 3 from water tray 4
natural_image
3D diagram of a battery cell with internal components and external circuitry (no text or symbols)Fill water tray in lower housing with fresh tap water (approx. 9 litres) until it is no more than half full.
2
C
natural_image
Exploded view diagram of a food appliance showing internal components and assembly steps (no text or symbols)3

text_image
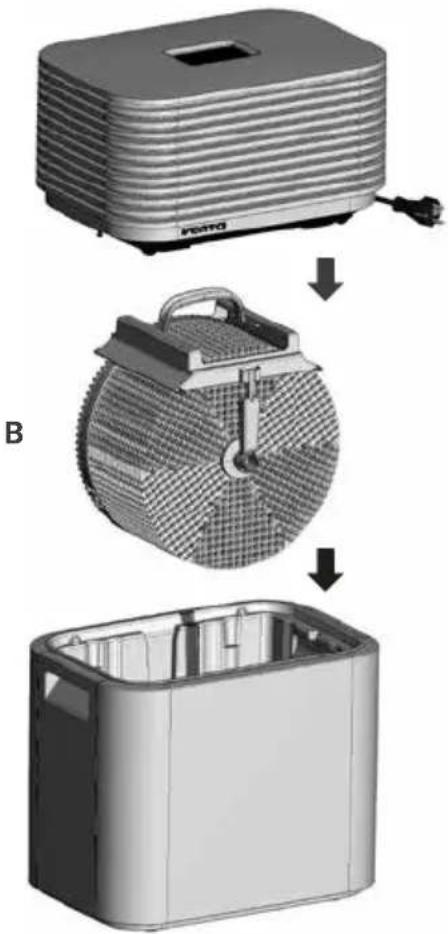
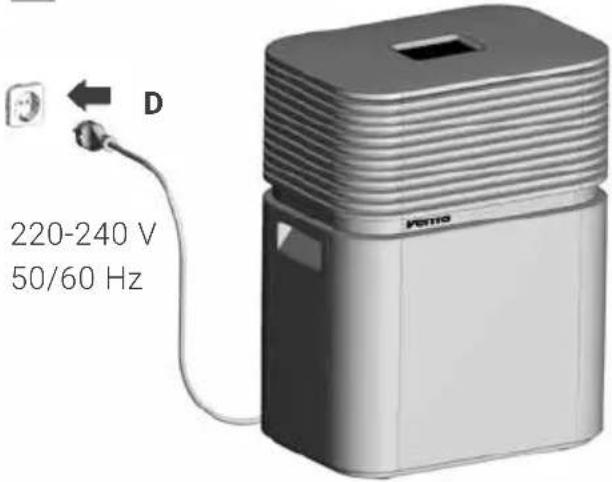
220-240V 50/60HzPlug power plug D into a mains socket and switch appliance on by tapping the Power button ⏻.
Place evaporation unit B into the water tray of the lower housing A and place upper housing C onto lower housing A, making sure it is the right way round.
i
The Power button ⏻ for switching the appliance on and off only lights up when the appliance is plugged in.
CONFIGURATION & VENTA APP
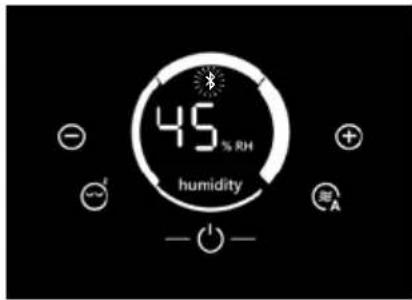
1. Activate Bluetooth on the Venta device
To do this, the symbol ✝ must be continuously flashing on the display of the LW73 WiFi or LW74 WiFi.

By touching the „WiFi / Bluetooth" display and control panel, you can choose between WiFi/Bluetooth OFF, Bluetooth ON and WiFi ON.
text_image
45 % RH humidity - -
The „WiFi / Bluetooth“ display and control panel is black when WiFi/Bluetooth is switched off. Touching this black box activates Bluetooth.
2. Enable Bluetooth an WiFi on your phone or tablet
Make sure that your smartphone or tablet is connected to your home WLAN network.
3. Download or install and open the VENTA app
The free Venta app gives you easy remote control of your AeroStyle LW73 / LW74. You can also use it for extended functions.


Please log in to the symbol menu ≡ or register once the Venta App has been downloaded and opened.

Only with completed registration you can use and control your AeroStyle LW73/74 also from on the road, wherever you are.
4. Set up the WiFi function using the VENTA app
The + search function automatically finds all local Venta devices. Now select your device with the Bluetooth icon. Then enter the name of your wireless network and the password for SSID and select SAVE. You are now connected to your Venta device and can monitor and control it.

During the entire procedure, the smartphone/tablet and the LW73 WiFi / LW74 WiFi must be in close proximity to each other and must be on the same WiFi network.

If problems occur during the setup process, read the information in the section "What to do if WiFi connection is not possible".
You will find further information at
www.venta-air.com/Service/WiFi-Control-App/
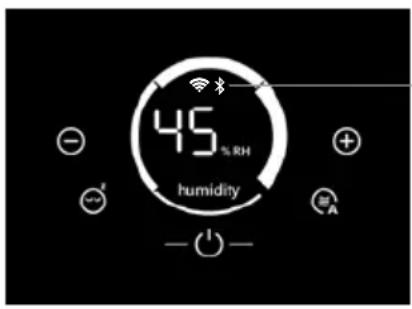
WIFI / BLUETOOTH

text_image
45% RH humidityWiFi / Bluetooth
Display Functions & settings on the display of the LW73 WiFi / LW74 WiFi
| WiFi or Bluetooth connection ON / enabled. | |
| Lights up | WiFi connection to the Venta server established. |
| Flashes slowly | WiFi connection to the local network established. |
| Flashes rapidly | WiFi connection disabled or waiting for WiFi connection. |
| Flashes rapidly | Waiting for Bluetooth connection or connection is disabled. |
WiFi and Bluetooth connection OFF / disabled.
No WiFi/Bluetooth symbol. (The display area is black.)
WiFi and Bluetooth modules are not transmitting or receiving data and are not connected to a network or appliance.
Switch WiFi/Bluetooth connection on and off, or respectively, (de)activate: Tap the WiFi/Bluetooth button to switch between WiFi/Bluetooth OFF, Bluetooth ON and WiFi ON.
In standby mode you can only switch between WiFi/Bluetooth OFF and WiFi ON.
To re-activate the WiFi/Bluetooth connection after switching off, simply tap the black button area on the display.
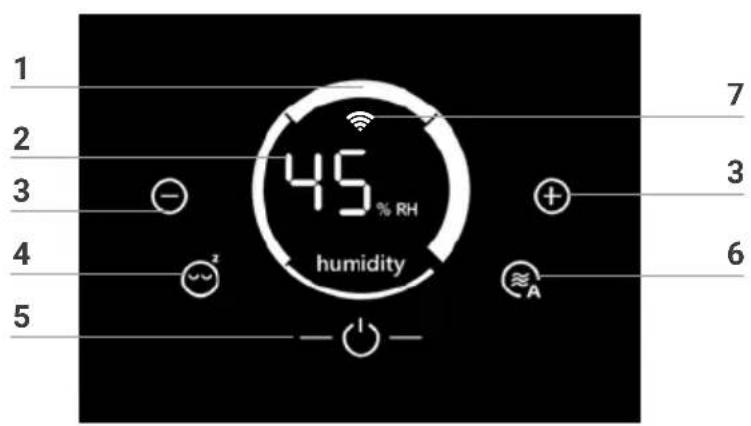
DISPLAYS, FUNCTIONS
& SETTINGS
text_image
1 2 3 4 5 45 % RH humidity + 7 3 6 A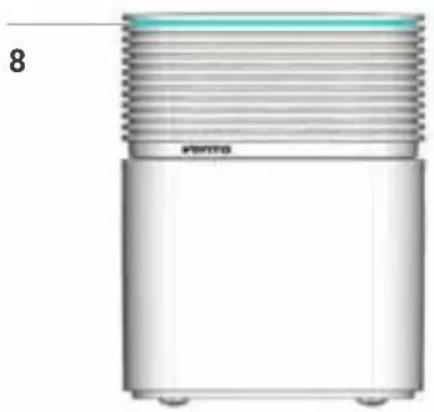
natural_image
3D rendering of a cylindrical mechanical component with threaded top and base (no text or symbols)Display Function
| 1 | Speed | Displays speed levels 1 - 2 - 3 - 4. i The speeds are represented in the form of ring segments. At a higher speed, the next ring segment in a clockwise direction becomes thicker. This starts with Level 1 as a thin ring segment at the bottom and progresses to Level 4 with the thickest ring segment on the right. The illustration shows Level 4. |
| 2 | Humidity | Displays ambient humidity (0 - 99 %). |
| 3 | ⊖ and ⚫et the speed by tapping: reduces and increases the speed. | |
| 4 | [zxk4] | Tap to switch sleep mode on or off.ON: Appliance dims the display illumination, reduces the speed to 1 and switches off LED strip 8. i You can change the speed 1 manually using button 3 with + or -. Automatic operation 6 is not possible. LED strip 8 can not be switched on.OFF: Display lit up, LED strip 8 switched on and appliance operates at selected speed 1 - 4. [yy8H] LED strip 8 does not switch on if it has been separately switched off previously. Touch and hold the sleep mode button 4 for approx. 3 seconds to switch it on again. |
| 5 | [x33H] | Switch the appliance off or on by tapping the power button. i The Power button for switching on or off only lights up when the appliance is plugged in. |
| 6 |  | Switch automatic mode on or off by tapping the button.ON: Indicator 🎨 on display flashes continuously and appliance automatically adjusts the speed to the ambient humidity. |
| When you switch on automatic mode, the humidity indicator 2 displays the desired humidity (50 % pre-set), which flashes twice, then the measured ambient humidity again. | ||
| OFF: Indicator 🎨 on display lights up continuously and appli-ance operates at selected speed 1 - 4. | ||
| Set desired humidity to 30 - 70 %: | ||
| Touch 🎨 -button 6 and hold for approx. 3 seconds until humidi-ty indicator 2 flashes. Set the humidity you want using button 3 with - or + (in 5 % increments). | ||
| Touch 🎨 -button 6 again and hold for approx. 3 seconds until humidity indicator 2 stops flashing and again indicates the measured ambient humidity. | ||
| Please ensure that automatic mode is switched on. The indica-tor on the display 🎨 flashes continuously. | ||
| 7 |  | Switch WiFi or Bluetooth on and off by touching briefly. For a precise description, see section “WiFi / Bluetooth” |
| 8 | LED strip | Continuous illumination signals that the appliance is operating.Continuous flashing signals that the appliance has automatically switched off due to lack of water. |
 You can separately switch the LED strip 8 on and off during operation by touching the sleep mode button 4 and holding for 3 seconds. You can separately switch the LED strip 8 on and off during operation by touching the sleep mode button 4 and holding for 3 seconds. | ||
 With the free Venta app, you can choose the colour you want. With the free Venta app, you can choose the colour you want. | ||
CLEANING & MAINTENANCE

text_image
9 WATER - - - + ≈A z - 1 -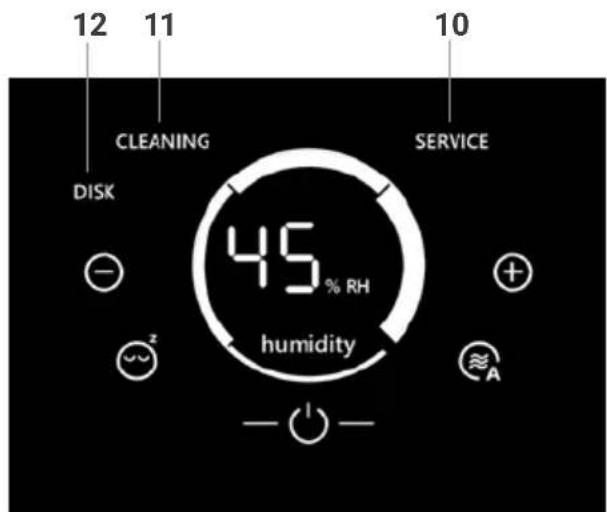
text_image
12 11 10 CLEANING SERVICE DISK 45 % RH humidity + ≈² A - ○ -
Attention! Ensure that the device is switched off during any measures and the power plug is disconnected from the mains socket.
Display Measures
| 9 | WATER | Remove upper housing. Fill water tray in lower housing with tap water until it is no more than half full. Place upper housing onto lower housing and switch appliance on again. | |
 | As soon as there is not enough water in the water tray, the appliance switches off automatically, LED 8 flashes continuously, and the WATER indicator appears on the display. In the humidity indicator 2, two dashes flash and the ambient humidity is not displayed. | ||
 | In order to continuously humidify the ambient air and reduce harmful substances (particles down to 10 μm), we recommend topping up the water daily. | ||
| 10 | SERVICE | Remove upper housing. Empty the residual water out of the water tray. Rinse out water tray and evaporation unit thoroughly. Fill water tray in lower housing with tap water until it is no more than half full. Reassemble appliance and switch it on. Touch SERVICE indicator 10 on the display and hold for approx. 3 seconds until it goes out. | |
 | For perfectly hygienic constant operation, the SERVICE indicator reminds you to carry out servicing every 14 days (also in standby mode). | ||
11 CLEANING
Remove upper housing. Empty residual water from water tray, fill with tap water until it is no more than half full and add 250 ml of Venta cleaner. Re-assemble appliance and let it run for approx. 2 hours at low speed. We recommend that you ventilate the room during this washing procedure to avoid any odors which can occur if the appliance is very dirty. Then remove upper housing and empty out dirty water. Rinse out water tray and evaporation unit thoroughly. Fill water tray in lower housing with tap water until it is no more than half full, re-assemble appliance, and switch it on. Touch CLEANING indicator 11 on the display and hold for approx. 3 seconds until it goes out.

Every 6 months (in case of 24-hour constant operation), the CLEANING indicator reminds you to carry out this action
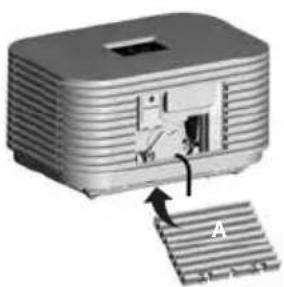
12 DISK
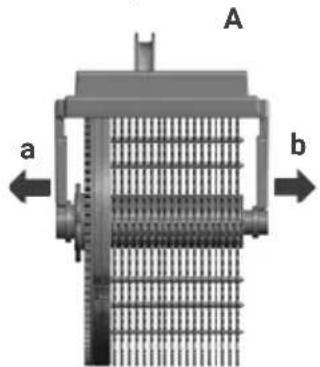
- Remove upper housing and take evaporation unit out of the water tray.
natural_image
Technical diagram of a mechanical component with labeled parts a and b, showing internal grid structure (no text or symbols beyond labels)
natural_image
3D rendering of a mechanical component with a cylindrical body and a small protrusion, labeled B (no text or symbols on the object itself)
natural_image
3D mechanical component diagram showing a gear and shaft assembly (no text or symbols)-
Carefully release holding arms a and b from the axle and remove bracket A from evaporation roller.
-
Unscrew cap B and remove it.
-
Remove hygiene disk C and replace it.
-
Re-assemble the appliance and switch it on.
-
Touch DISK indicator 11 on the display and hold it for approx. 3 seconds until it goes out

The service life of the hygiene disk is approx. 4 months (in the case of 24-hour constant operation). The service life depends on the water hardness, water quality, daily evaporation performance and number of operating hours. The DISK indicator reminds you to carry out this action every 4 months (in the case of 24-hour constant operation).

You can use the Venta ReNew recycling program to return the hygiene disk to us (see RECYCLING & DISPOSAL).
You can carry out care actions 10, 11 and 12 at any time, even if they are not indicated on the display. When you are finished, simply activate the RESET function for CLEANING, DISK, SERVICE: Touch the Power button ⏻ and hold for approx. 4 seconds until it flashes and SERVICE, CLEANING and DISK appear on the display. Now touch the actions you have performed and hold for approx. 3 seconds until they go out. Finally, touch the flashing Power button ⏻ and hold for approx. 4 seconds until it lights up constantly. The next reminders for the actions performed will be indicated at the normal intervals.
Any residues in the water tray and on the evaporation unit (white, greenish-yellow or brown deposits/discoloration) do NOT impair the function of the appliance.
CLEANING THE UPPER HOUSING

Attention! Ensure that the device is switched off during any measures and the power plug is disconnected from the mains socket.
Clean the upper housing with a dry cloth/cleaning brush or a slightly damp cloth.

Do not clean the upper housing under running water!
Only clean the display with a dry cloth or a display cleaning cloth.

Do not clean the display with a wet or too-damp cloth!
ACCESSORIES
- Venta hygiene disk for perfectly hygienic constant operation
- Venta cleaner for six-monthly cleaning
Additional AeroStyle accessories available online:
DE
www.venta-air.com
TECHNICAL DATA
| Model AeroStyle LW73 WiFi AeroStyle LW74 WiFi | ||
| Colors Signal white / Signal black | ||
| Suitable for room size Up to 70 m2 | Up to 90 m2 | |
| LED status display blue light strip | ||
| Interactive touch display Standard | ||
| App control WiFi/WLAN module | ||
| Measurement sensors Humidity | ||
| Water hygiene Standard | ||
| Performance levels 4 + automatic | ||
| Noise emission (Speeds 1-4) | 24 / 36 / 44 / 50 dB(A) | 27 / 35 / 41 / 47 dB(A) |
| Power consumption (Speeds 1-4) | 7 / 9 / 13 / 18 Watt | 11 / 14 / 17 / 24 Watt |
| Mains voltage | 220-240 V / 50/60 Hz | |
| Water capacity (max.) | 9 liters | |
| Dimensions (L x W x H) | 42 × 29 × 54 cm | |
| Weight | 9,5 kg | 10,5 kg |
| WLAN frequency range | 2.4 GHz | |
| WLAN transmission power | Maximum 20 dBm | |
May be subject to change/error
RECYCLING AND DISPOSAL

The packaging material is re-usable. Please dispose of the packaging in an environmentally friendly way and bring it to a collection centre for recyclable materials.
The device may not be disposed of in normal household waste! It must be disposed of at a selected collection point for the recycling of electric and electronic devices (WEEE). Please use the local return and collecting systems that are available to you. By doing so, you are making a valuable contribution to environmental protection and human health. For additional information, please contact the local authorities.
FREE Venta hygiene disk recycling program helps the environment
The Venta ReNew recycling program means original Venta hygiene disks can be recycled to a degree of 100%. By returning used Venta hygiene disks to us, you help conserve our planet's resources. You also receive your personal Venta ReNew eco-bonus which you can redeem with your next order for hygiene disks from Venta Luftwäscher GmbH. Our service team will be happy to give you more information.
NOTE: The Venta ReNew recycling program is limited to sales and shipping within Germany. Our Venta companies in other countries will be happy to give you information about their local/national programs. If no ReNew recycling program is available in your country, simply dispose of the hygiene disk in household waste.
WARRANTY
Due to the high quality of the product, the Venta-Luftwäscher GmbH guarantees that this product when used properly will not be defective for a duration of two years from the purchase date. If a material or processing error should occur anyway, please contact the VENTA service team or your dealer. Venta's general warranty conditions also apply: www.venta-air.com
ABOUT YOUR PRIVACY
Your information will be held by Venta Luftwäscher GmbH for marketing and servicing purposes. If your personal details change, if you change your mind about any of your marketing preferences or if you have any queries about how we use your information, please let us know by contacting Venta Luftwäscher GmbH, Weltestraße 5, 88250 Weingarten, Germany or by calling the VentaCare Customer Service: +49 751 5008 88. Or you can email us at service@venta-luftwaescher.de For more information on how we protect your privacy, please see our privacy policy on www.venta-air.com
WHAT TO DO IF ...

Ensure that the device is switched off during any measures and the power plug is disconnected from the mains socket.
... the Power button ⏻ for switching the appliance on does not appear on the display?
Please check whether the appliance is plugged in to the mains.
... "Water" is indicated on the display although there is water in the water tray?
Please check that there is enough water in the water tray and/or that the upper housing is on the lower housing the right way round.

Action: Remove upper housing. Fill water tray in lower housing with tap water until it is no more than half full. Place upper housing onto the lower housing, ring it is the right way round, and switch the appliance on again.
... white spots show up in the background when you touch the display?
In dry rooms, electrostatic charging can cause white areas to appear in the background on the display. These do not affect the functioning or ability to control the appliance and do not constitute a defect.
... LED strip does not light up although the appliance is in operation?
Check whether the LED strip has been switched off separately. Touch the sleep mode button on the appliance and hold for approx. 3 seconds to switch the LED strip on again. You can also use the Venta app for this function.

The LED strip can not be switched on in sleep mode.
... the LED strip flashes yellow?
This indicates that an automatic firmware update is taking place.
... WiFi connection is not possible?
Please check that:
- you are using a 2.4-GHz or a combined 2.4/5-GHz network. This is important because the WiFi/WLAN module in the appliance does not support 5-GHz networks.
- your router supports 802.11b/g/n.
- iOS version 11.0 or higher or Android version 8.0 or higher is installed in your phone or tablet.

If necessary, update the operating system of your phone or tablet.
... you can't switch on WiFi 📋 or Bluetooth ✝ on the display of your appliance? Please check that the WiFi/WLAN module is firmly plugged in inside the housing of your appliance.

Procedure: Remove cover A on the back of the appliance, check that WiFi/WLAN module B is correctly installed.

natural_image
3D rendering of a rectangular electronic component with ribbed top and mounting holes, no visible text or symbols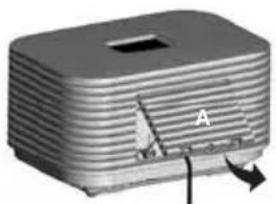
natural_image
3D rendered image of a rectangular electronic component with a slot and labeled point A, showing internal structure and rotation arrow (no text or symbols beyond label)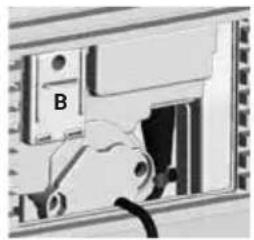
natural_image
Close-up of a mechanical component with labeled part B, showing internal structure without any readable text or symbols.Pull both locking tabs up. Tilt the cover towards you and pull down to remove.
Module B must be firmly plugged in inside the housing.
natural_image
3D diagram of a device with a labeled component 'A' and internal structure, showing no readable text or symbols.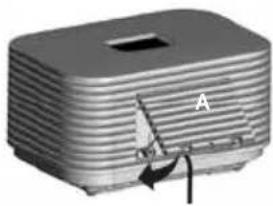
natural_image
3D rendering of a rectangular electronic device with a slot and labeled component A, showing internal structure and rotation arrow (no text or symbols beyond label)Then re-fit cover A. You should hear the two locking tabs snap into place.
VENTA SERVICE TEAM
Do you need additional information about the Venta Airwasher or do you want to order accessories? No problem: the VENTA service team will take care of it! Call the team directly or visit the Venta website.
DE
+49 751 5008 88, www.venta-air.com
MERCI BEAUCOUP!
natural_image
3D model of a rectangular electronic device with layered top and side panels, labeled with number 6 (no text or symbols on the device itself)natural_image
3D diagram of a battery cell with internal components and external circuitry (no text or symbols)natural_image
Exploded view diagram of a food appliance showing internal components and assembly steps (no text or symbols)3

text_image
220-240V 50/60HzCONFIGURATION & APPLI VENTA
text_image
45% RH humidityWiFi / Bluetooth
natural_image
3D rendering of a cylindrical mechanical component with threaded top and base (no text or symbols)Affichage Fonction
natural_image
Technical diagram of a mechanical component with labeled parts a and b, showing internal structure without any readable text or symbols.natural_image
3D rendered mechanical component with ribbed texture and a small protrusion labeled B (no text or symbols on the object itself)natural_image
3D mechanical component diagram showing a gear and shaft assembly (no text or symbols)natural_image
3D rendering of a rectangular electronic device with horizontal ridges and a labeled section 'A', showing two upward arrows (no text or symbols on the device itself)natural_image
3D rendered model of a rectangular electronic component with a slot and labeled section A (no text or symbols beyond label)natural_image
Close-up of a mechanical device with labeled component B, showing internal components and wiring (no readable text or symbols)natural_image
3D rendering of a mechanical device with a labeled component 'A' and an arrow indicating assembly (no text or symbols on the device itself)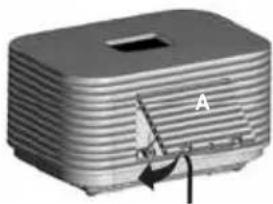
natural_image
3D rendering of a rectangular electronic device with a handle and labeled component 'A' (no text or symbols beyond label)natural_image
3D model of a rectangular electronic device with layered top and side panels, labeled with number 6 (no text or symbols on the device itself)natural_image
3D diagram of a battery cell with internal components and external circuitry (no text or symbols)natural_image
Exploded view diagram of a food appliance showing internal components and assembly steps (no text or symbols)3

text_image
220-240V 50/60Hztext_image
45% RH humidityWiFi / Bluetooth
natural_image
3D rendering of a cylindrical mechanical component with threaded top and base (no text or symbols)Weergave Functie
natural_image
Technical diagram of a mechanical component with labeled parts a and b, showing internal grid structure (no text or symbols beyond labels)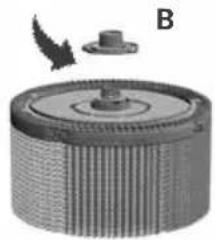
natural_image
Circular mechanical component with ribbed texture and a small protrusion, labeled B (no text or symbols on the object itself)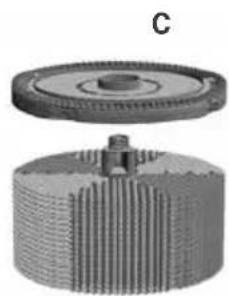
natural_image
3D mechanical component diagram showing a gear and shaft assembly (no text or symbols)natural_image
3D rendering of a rectangular electronic device with ribbed top and two upward arrows indicating ports (no text or symbols)natural_image
3D rendered image of a rectangular electronic component with layered structure and labeled point A (no text or symbols beyond label)natural_image
Close-up of a mechanical component with a labeled part 'B' and a cable inserted (no readable text or symbols)natural_image
3D diagram of a device with a labeled component 'A' and directional arrow, showing internal structure (no text or symbols beyond label)natural_image
3D rendering of a rectangular electronic device with a slot and labeled component A, showing internal structure and rotation arrow (no text or symbols beyond label)VENTA SERVICETEAM
natural_image
3D model of a rectangular electronic device with layered top and side panels, labeled with number 6 (no text or symbols on the device itself)natural_image
3D diagram of a battery pack with internal components and a circular component, showing no text or symbols.natural_image
Exploded view diagram of a food appliance showing internal components and assembly (no text or symbols)3

text_image
220-240V 50/60Hztext_image
45% RH humidityWiFi / Bluetooth
natural_image
Pure diagram of a cylindrical mechanical component with threaded top and base, no text or symbols presentIndicatore Funzioni
natural_image
Technical diagram of a mechanical component with labeled parts a and b, showing internal structure without any readable text or symbols.
natural_image
3D rendered mechanical component with ribbed texture and a small protrusion labeled B (no text or symbols)
natural_image
3D mechanical component diagram showing a gear and shaft assembly (no text or symbols)natural_image
3D rendering of a metallic electronic component with ribbed top and labeled section A (no text or symbols beyond label)natural_image
3D rendering of a rectangular electronic component with ribbed top and mounting holes, labeled 'A' (no text or symbols beyond label)natural_image
Close-up of a mechanical component with labeled part B, showing internal structure without any readable text or symbols.natural_image
3D rendering of a mechanical device with a labeled component 'A' and directional arrow (no text or symbols on the device itself)
natural_image
3D rendered image of a rectangular electronic device with a slot and a labeled arrow pointing to its side (no text or symbols on the device itself)natural_image
3D model of a rectangular electronic device with layered top and side panels, labeled with number 6 (no text or symbols on the device itself)natural_image
3D diagram of a battery cell with internal components and external circuitry (no text or symbols)natural_image
Exploded view diagram of a food appliance showing internal components and assembly (no text or symbols)3

text_image
220-240 V 50/60 Hztext_image
45% RH humidityWiFi / Bluetooth
natural_image
3D rendering of a cylindrical mechanical component with threaded top and base (no text or symbols)Indicador Función
natural_image
Technical diagram of a mechanical device with labeled parts (a and b) and no readable text or symbols.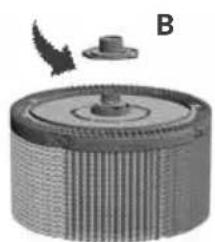
natural_image
3D rendered mechanical component with ribbed texture and a small protrusion labeled B (no text or symbols)
natural_image
3D mechanical component diagram showing a gear and shaft assembly (no text or symbols)natural_image
3D rendering of a rectangular electronic component with ribbed top and mounting holes, no visible text or symbolsnatural_image
3D rendering of a rectangular electronic component with a slot and labeled point A, showing internal structure (no text or symbols beyond label)natural_image
Close-up of a mechanical component with labeled part B, showing internal structure without any readable text or symbols.natural_image
3D diagram of a device with a labeled component 'A' and internal structure, showing no readable text or symbols.natural_image
3D rendering of a rectangular electronic device with a slot and labeled component 'A' (no text or symbols beyond label)EQUIPO DE SERVICIO DE VENTA
natural_image
3D model of a rectangular electronic device with layered top and side panels, labeled with number 6 (no text or symbols on the device itself)natural_image
3D diagram of a battery cell with internal components and external circuitry (no text or symbols)natural_image
Exploded view diagram of a food appliance showing internal components and assembly (no text or symbols)3

text_image
220-240 V 50/60 HzKONFIGURACJA I APLIKACJA VENTA
text_image
45% RH humidityWiFi / Bluetooth
natural_image
3D rendering of a cylindrical mechanical component with threaded top and base, labeled '8' on the left (no text or symbols on the object itself)Wyświetlacz Funkcja
natural_image
3D rendered mechanical component with ribbed texture and a small protrusion labeled B (no text or symbols)natural_image
3D rendered mechanical component with gear and shaft assembly (no text or symbols)RECYKLING I UTYLIZACJA

natural_image
3D rendering of a rectangular electronic device with horizontal ridges and a labeled section 'A' (no text or symbols beyond the label)natural_image
3D rendering of a rectangular electronic component with ribbed top and labeled section A (no text or symbols beyond label)natural_image
Close-up of a mechanical component with labeled part B, showing internal structure without any readable text or symbols.natural_image
3D diagram of a device with a component labeled 'A' and an arrow indicating rotation or assembly (no text or symbols beyond label)
natural_image
3D rendering of a rectangular electronic device with a slot and labeled component A (no text or symbols beyond label)natural_image
3D model of a rectangular electronic device with layered top and side panels, labeled with number 6 (no text or symbols on the device itself)natural_image
3D diagram of a battery pack with internal components and a circular component, showing no text or symbols.natural_image
Exploded view diagram of a food appliance showing internal components and assembly (no text or symbols)3

text_image
220-240 V 50/60 Hztext_image
45% RH humidityWiFi / Bluetooth
natural_image
3D rendering of a cylindrical mechanical component with threaded top and base (no text or symbols)Afişaj Functie
natural_image
Mechanical component with threaded base and central hub, labeled B (no text or symbols on the main subject)
natural_image
3D mechanical component diagram showing a gear and shaft assembly (no text or symbols)natural_image
3D rendering of a rectangular electronic device with horizontal ridges and a labeled component 'A' (no text or symbols beyond the label)natural_image
3D rendered image of a rectangular electronic component with a slot and arrow indicator (no text or symbols)natural_image
Close-up of a computer interface showing a device with a labeled component 'B' and a cable inserted (no readable text or symbols beyond the label)natural_image
3D diagram of a device with a component labeled 'A' and an arrow indicating rotation or assembly (no text or symbols beyond label)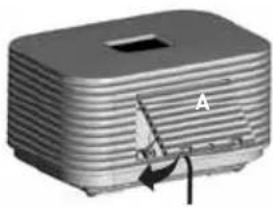
natural_image
3D rendering of a rectangular electronic device with a handle and internal structure, labeled 'A' (no text or symbols on the device itself)natural_image
3D model of a rectangular electronic device with layered top and side panels, labeled with number 6 (no text or symbols on the device itself)natural_image
3D diagram of a battery cell with internal components and external circuitry (no text or symbols)natural_image
Exploded view diagram of a food appliance showing internal components and assembly (no text or symbols)3
text_image
220-240 V 50/60 Hztext_image
45% RH humidityWiFi / Bluetooth
natural_image
3D rendering of a cylindrical mechanical component with threaded top and base (no text or symbols)Rādījums Funkcijas
natural_image
3D rendered mechanical component with ribbed texture and a small protrusion labeled B (no text or symbols on the object itself)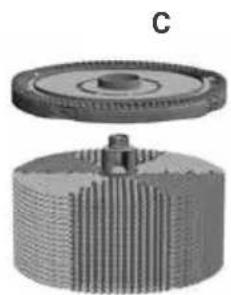
natural_image
3D rendered mechanical component with gear and shaft assembly (no text or symbols)natural_image
3D rendering of a rectangular electronic component with ribbed top and two small arrows pointing to its sides (no text or symbols visible)natural_image
3D rendering of a rectangular electronic device with a small boat and labeled component 'A' (no text or symbols beyond label)natural_image
Close-up of a mechanical device with labeled component B, showing internal components and a cable (no readable text or symbols)natural_image
3D diagram of a device with a labeled component 'A' and an arrow indicating assembly or insertion (no text or symbols beyond label)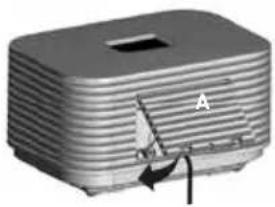
natural_image
3D rendering of a rectangular electronic component with a small triangular component labeled 'A' and an arrow indicating rotation (no text or symbols beyond label)natural_image
3D model of a rectangular electronic device with layered top and side panels, labeled with number 6 (no text or symbols on the device itself)natural_image
3D diagram of a battery casing with internal components and a circular component inserted (no text or symbols)natural_image
Exploded view diagram of a food appliance showing internal components and assembly steps (no text or symbols)3

text_image
220-240 B 50/60 Гц Kettotext_image
45% RH humidityWiFi / Bluetooth
natural_image
3D rendering of a cylindrical mechanical component with threaded top and base (no text or symbols)Индикатор Функция
text_image
9 WATER - - - + ≈A z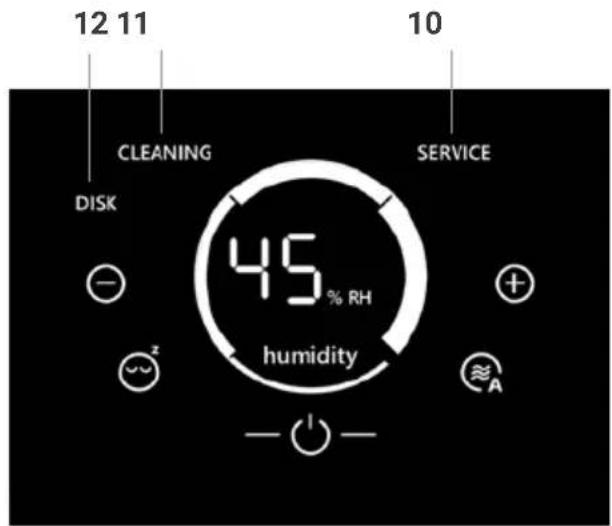
text_image
12 11 10 CLEANING SERVICE DISK 45 % RH humidity + ~ A -
natural_image
Technical diagram of a mechanical component with labeled parts a and b, showing internal grid structure (no text or symbols beyond labels)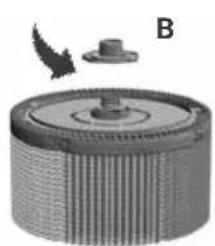
natural_image
3D rendered mechanical component with ribbed texture and a small inset showing a pin (no text or symbols)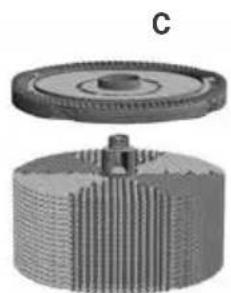
natural_image
3D mechanical component diagram showing gear and shaft assembly (no text or symbols)natural_image
3D rendering of a rectangular electronic device with labeled section A and two upward arrows (no text or symbols on body)natural_image
3D rendering of a rectangular electronic component with a slot and internal structure, labeled 'A' (no text or symbols beyond label)natural_image
Close-up of a mechanical component with labeled part B, showing internal structure without any readable text or symbols.natural_image
3D diagram of a device with a labeled component 'A' and internal structure, showing no readable text or symbols.
natural_image
3D rendering of a rectangular electronic device with a labeled component 'A' and an arrow pointing to its side (no text or symbols on the device itself)natural_image
3D model of a rectangular electronic device with layered top and side panels, labeled with number 6 (no text or symbols on the device itself)natural_image
3D diagram of a battery pack with internal components and a circular component, showing no text or symbols.natural_image
Exploded view diagram of a food appliance showing internal components and assembly (no text or symbols)3

text_image
100-120 V 50/60 Hz Kettowww.venta-air.com/Service/WiFi-Control-App/
WIFI / BLUETOOTH
text_image
45% RH humidityWiFi / Bluetooth
natural_image
3D rendering of a cylindrical mechanical component with threaded top and base, labeled '8' on the left (no text or symbols on the object itself)表示 機能
natural_image
Technical diagram of a mechanical component with labeled parts a and b, showing internal grid structure (no text or symbols beyond labels)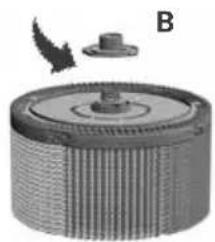
natural_image
3D rendered mechanical component with ribbed texture and a small protrusion labeled B (no text or symbols)
natural_image
Mechanical gear assembly with threaded shaft and flange (no text or symbols visible)natural_image
3D rendering of a rectangular electronic device with horizontal ridges and a central slot, marked with 'A' and two upward arrows (no text or symbols on the device itself)natural_image
3D rendered image of a rectangular electronic component with a slot and arrow indicator (no text or symbols)natural_image
Close-up of a mechanical component with labeled part B, showing internal structure without any readable text or symbols.natural_image
3D diagram of a device with a labeled component 'A' and internal structure, showing no readable text or symbols.
natural_image
3D rendering of a rectangular electronic device with a labeled component 'A' and an arrow indicating rotation (no text or symbols beyond label)United States of America
service-hu@venta-air.com
www.letmerepair.com
ITALY
LetMeRepair GmbH
Fichtestrasse 1a
02625 Bautzen
service-it@venta-air.com
www.letmerepair.com
JAPAN
Address Service Co., Ltd.
17-9, Shinoda, Togane-shi,
Chiba, 283-0013 Japan
Tel.: 0120-407-554
venta_support@adservice.
co.jp
CHILE
Venta Air Technologies Inc.
US Headquarters
300 North Elizabeth Street
Suite 220 B
Chicago, 11 60607
United States of America
No. 27, Jalan PP 11/4
Alam Perdana Industrial
Park, Taman Putra
Perdana, 47130 Puchong,
Selangor, Malaysia
Tel.: +603-8322 6628
Fax: +603-8322 6066
info@gasales.com.my
MONGOLIA
AERIS LLC
SUITE 316, Barilga
Architecture Building,
Chinggis Avenue, Oron
Suuts Street, 2nd horoo,
Khan-Uul district, Ulaan-
baatar, Mongolia 17032
Tel.: +976-99101185,
+976-99096696
sales@aeris.mn
www.aeris.mn
PORTUGAL
LetMeRepair GmbH
Fichtestrasse 1a
02625 Bautzen
service-pt@venta-air.com
www.letmerepair.com
RUSSIA
Venta Russia TSK IMPORT
Kelvin South Business
Park, East Kilbride, G75
OYB, Scotland, UK
Tel.: +44 (0) 1355 241 222
service-uk@venta-air.com
Fax+441355246575
SLOVAKIA
LetMeRepair GmbH
Fichtestrasse 1a
02625 Bautzen
service-sk@venta-air.com
www.letmerepair.com
SPAIN
LetMeRepair GmbH
Fichtestrasse 1a
02625 Bautzen
service-es@venta-air.com
www.letmerepair.com
SOUTH AFRICA
EUROCARE Wellness
5 Star Business Park,
Unit 2, Persimmon Close,
Honeydew, Johannesburg
Südafrika
Tel.: +27 11 888 3255
Fax: +27 11 888 9874
info@eurocarewellness.
co.za
SOUTH KOREA
VENTA KOREA CO., LTD
3/F., Seojin Bldg., 754
Seolleung-ro, Gangnam-
Gu, Seoul 135-948, Korea
Tel.: +82 22 03 40 114
Fax: +82 22 03 40 119
UKRAINE
Venta-Centre Ukrein
Schlichtera, 11
Kharkov, Ukraine
Tel.: +38 057 752 72 72
Fax: +38 057 768 01 57
venta@venta.com.ua
SERVICE AND SUPPORT
www.venta-air.com/Service/Service-Support/
VENTA WORLD WIDE
www.venta-air.com/en_de/Venta-worldwide/
EAC CE