USER MANUAL PMR 1612 OLYMPIA
Safety Instructions 12
Package Contents 13
Intended Use 14
Inserting the Battery Pack 14
Charging the Battery Pack. 14
Switching the Walkie-Talkies On 14
Switching the Walkie-Talkies Off 15
Operating the Walkie-Talkies 15
Disposal 17
Technical Data 18
Information on Conformity 18
Cleaning 18
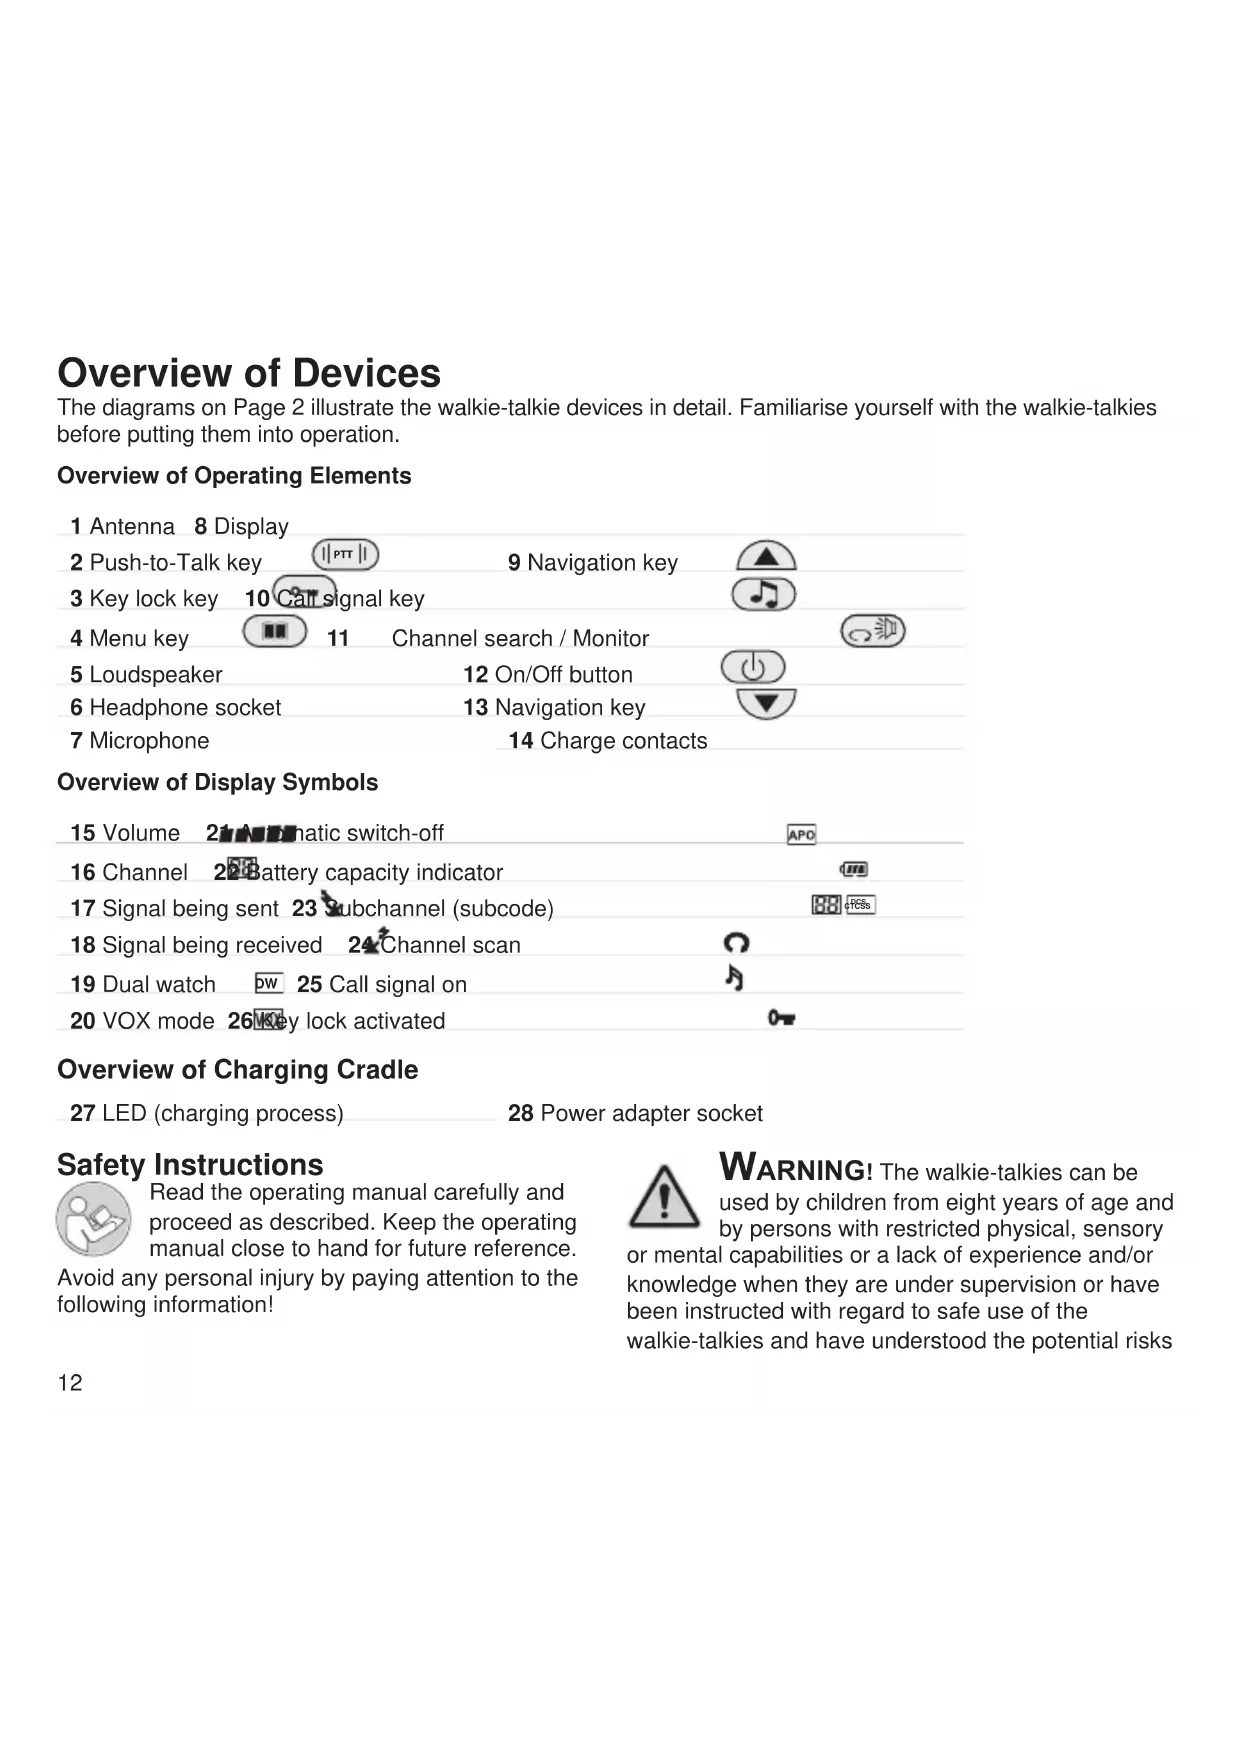
The diagrams on Page 2 illustrate the walkie-talkie devices in detail. Familiarise yourself with the walkie-talkies before putting them into operation.
Overview of Operating Elements
1 Antenna 8 Display
2 Push-to-Talk key
3 Key lock key 10 Car signal key
4Menukey
5 Loudspeaker
6 Headphone socket
7 Microphone
9 Navigation key


Overview of Display Symbols
15 Volume 21 automatic switch-off
16 Channel 2 battery capacity indicator
17 Signal being sent 23 Subchannel (subcode)
18 Signal being received 24 Channel scan
19 Dual watch 25 Call signal on
20 VOX mode 26key lock activated
APO
m
88PCs
Overview of Charging Cradle
27 LED (charging process)
28 Power adapter socket
Safety Instructions

Read the operating manual carefully and proceed as described. Keep the operating manual close to hand for future reference.
Avoid any personal injury by paying attention to the following information!

WARNING! The walkie-talkies can be used by children from eight years of age and by persons with restricted physical, sensory
or mental capabilities or a lack of experience and/or knowledge when they are under supervision or have been instructed with regard to safe use of the walkie-talkies and have understood the potential risks
which result if the instructions are ignored. Children may not be allowed to play with the walkie-talkies. Cleaning and user maintenance may not be completed by children without any supervision.

WARNING! Risk of suffocation! Keep away from children! Keep packaging and protective foils as well as batteries out of children. Keep the walkie-talkies out of reach. Small children can swallow small parts. If a has been swallowed, seek medical assistance

CAUTION! Risk of explosion due to use of the wrong type of battery! Only use rechargeable batteries which comply with the tions in Section "Technical Data". Do NOT to charge non-rechargeable batteries. Never types of batteries used.

CAUTION! Risk of explosion through improper replacement or removal of the rechargeable batteries! Only replace the with a type approved by the manufacturer, pose of used batteries according to the de laws.

CAUTION! Risk of explosion through improper replacement or removal of the rechargeable batteries! Do not remove the when they are being charged. Disconnect the cable from the device or remove the device charging cradle before replacing or removing ties.

CAUTION! Voice transmission is played through the loudspeaker. Hold the walkietalkies about 30~cm away when receiving voice transmissions.

IMPORTANT! Do not use the walkietalkies in prohibited or potentially explosive areas! Observe local regulations!

IMPORTANT! Protect the walkie-talkies from damp, dust, liquids, chemicals, vapours, heat and direct sunlight. The walkie-talkies
are not waterproof; therefore, keep them dry.

IMPORTANT! Do not use the walkietalkies in zones where private radio communication is prohibited. Emergency and
rescue services cannot be called using these walkie-talkies.

IMPORTANT! Observe local regulations regarding the use of radio communication equipment before putting the walkie-talkies
into operation.
Package Contents
Check the package contents before putting the walkie-talkies into operation. If anything is missing or damaged, please contact our Service department.
2 x walkie-talkies, PMR 1612
2x belt clips
2 x headsets (2.5 mm headset port)
1 x charging cradle
1 x power adapter
2 x battery compartment covers (for battery pack or alkaline batteries (AAA, 1.5 V))
2 x li-ion battery packs (3.7 V, 720 mA)
1 x operating manual
Intended Use
The walkie-talkies are designed for communication with other walkie-talkies equipped to the same standard (446 MHz PMR). Any other use is considered unintended use. Unauthorised modification or reconstruction is not permitted. Under no circumstances open the device or complete any repair work yourself.
Inserting the Battery Pack
Before you can start to use the walkie-talkies, insert the li-ion battery pack contained in the package contents or suitable batteries in your walkie-talkies. You must use the battery compartment cover depending on the batteries used.
1 Remove the battery compartment cover by pressing down lightly on the battery compartment cover and sliding it downwards.
2 Insert the li-ion battery pack in the battery compartment, paying attention to correct polarity.

Alternatively, you can insert rechargeable batteries (AAA, 1.2 V). Pay attention that the rechargeable batteries are inserted the right way around.
3 Replace the battery compartment cover. The battery compartment cover latches audibly in place.
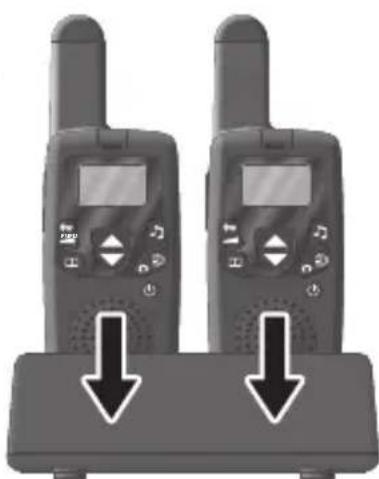
Charging the Battery Pack
Recharge the battery pack before it is fully discharged.
1 Connect the power adapter to a power socket which is easily accessible and close by.
2 Connect the other end of the power adapter cable to the power adapter connection on the charging cradle.
3 Place the walkie-talkies in the charging cradle. While the batthe control lamps on cradle light up red.
4 Remove the walkie-talkies from the charging cradle after 8 hours.
5 Disconnect the power adapter from the power socket.
Switching the Walkie-Talkies On
Press and hold the key for about three seconds. The walkie-talkie is switched on, the display indicates the selected channel the volume and the current battery charge status If only one bar is displayed, the batteries are almost empty. Recharge the batteries in good time.
Switching the Walkie-Talkies Off
Press and hold the key for about three seconds. The walkie-talkie is switched off and the display goes out.
Operating the Walkie-Talkies
When you want to communicate through the walkietalkies, you must switch the walkie-talkies on and set them to the same channel.
To ensure a connection is established successfully, the walkie-talkies must be within the reception range.
The elements selected in the menu flash when you are defining the respective setting.
Sending and Receiving Signals
1 Press and hold the |_PTT| key. Appears in the display. The walkie-talkie is in Transmit mode.
2 Hold the walkie-talkie close to your mouth and speak into the microphone.
All the walkie-talkies which are within range and are switched to the same channel receive your message. x appears in the display.
3 If you want to answer a signal received, press the key and speak into the microphone.
Scanning the Channels
Before scanning all the channels to receive possible radio signals within range of your walkie-talkie, ensure that the setting in the Subchannel menu is OF.
1 Press the key. The walkie-talkie scans all the channels in succession.
2 If you want to retain a channel, press the key again.
If you want to establish communication with other walkie-talkies, ensure that all the walkie-talkies in question are using the same channel and subchannel.
Setting the Channel
The walkie-talkies use free channels. The walkietalkies within range which are set to the same channel can receive signals. Also observe the information regarding the subchannels if you want to ensure that third-parties cannot participate in your communication.
1 Press the key appear in the display.
2 Use the and keys to set the required channel.
3 Confirm your input by pressing the |_PTT| key.
Setting the Subchannel (Subcode) CTCSS Code
In order to enable communication via a subchannel (CTCSS code), the walkie-talkies communicating with each other must be set to the same channel and same subchannel.
1 Press the key twice. appears in the display.
2 Use the and keys to select the required subchannel.
Select the setting if you do not wish to use a subchannel.
DCS Code
In order to enable communication via a subchannel (DCS code), the walkie-talkies communicating with each other must be set to the same channel and same subchannel.
1 Press the key three times. BB appears in the display.
2 Use the and keys to select the required subchannel.
Select the setting DF if you do not wish to use a subchannel.
Dual Watch
Use the Dual Watch function when you want to monitor two channels simultaneously.
1 Press the four times. display.
bw appears in the
2 Select the second channel required (in addition to the one currently set) using the and keys.
3 Confirm your input by pressing the |_PTT| key.
4 When the function is switched on, appears continuously in the display. The selected channels appear alternately in the display.
VOX Function
You can use the VOX function when the microphone should be activated automatically on detecting a sound. You can set one of three different sensitivity levels.
1 Press the key five times. VOX appears in the display.
2 Use the and keys to select the required sensitivity for the microphone.
3 Confirm your input by pressing the |_PTT| key. 16
Selecting and Transmitting a Call Signal
Select a call signal and transmit it to get the attention of other walkie-talkie users.
1 Press the key six times.
2 Select one of the 10 call signal tones available using the and keys
3 Confirm your input by pressing the |_PTT| key.
4 If you want to transmit a call signal, press the key. Your call signal is transmitted to the other walkie-talkies.
Setting the Key Tones
You can define whether a tone is issued each time a key is pressed.
1 Press the key seven times.
2 Use the and keys to switch the key tone on or off.
3 Confirm your input by pressing the key.
Confirmation Signal (Roger Beep)
You can define whether a short confirmation signal (Roger Beep) should be issued at the end of your voice transmission.
1 Press the key eight times. r_0 appears in the display.
2 Use the and keys to switch the roger beep on or off.
3 Confirm your input by pressing the |PTT| key.
Automatic Switch-Off
You can define whether the walkie-talkie should be switched off automatically after a certain period of time (1 to 6 hours).
1 Press the
key nine times. appear in y.
2 Use the
and keys to select the period of time.
3 Confirm your input by pressing the |_PTT| key.
Setting the Volume
You can set the volume of incoming signals when the walkie-talkie is in Standby mode.
Use the and keys to set the required volume. The volume set at the
bottom edge of the display. The more bars displayed, the higher the volume.
Time-Out Function
The time-out function helps to reduce power consumption. This function is automatically active.
If you press the |PTT| key continuously for more than 3 minutes, you will hear an acoustic signal. In this case, release the |PTT| key and resume your conversation.
If the VOX function is active, you will hear an acoustic signal after 3 minutes of uninterrupted detection of sounds and the VOX function is switched off.
Key Lock
You can lock the keys when you want to avoid accidentally activating any functions.
1 Press and hold the
key for three seconds.
The keys are locked and 0 appears in the display.
2 Press and hold the
key again for three seckeys.
Disposal

In order to dispose of your device, take it to a collection point provided by your local public waste authorities (e.g. recycling centre). According to laws on the disposal of electronic and electrical devices, owners are obliged to dispose of old electronic and electrical devices in a
separate waste container. The symbol indicates that the device must not be disposed of in normal domestic waste! Risks to health and the environment from batteries! Remove the batteries from the device before disposing of the device. Never open, damage or swallow batteries or allow them to pollute the environment. They may contain toxic, ecologically hazardous heavy metals. You are legally obliged to dispose of batteries at a battery retailer or in the corresponding containers provided at collection points by local public waste authorities. Disposal is free of charge. The symbol indicates that the batteries must not be disposed of in normal domestic waste and that they must be brought to collection points provided by local public waste authorities.

Packaging materials must be disposed of according to local regulations.
Always use batteries of the type stipulated in Section
"Technical Data". Never mix the types of batteries used. Remove the batteries if the device will not be used for longer periods.
When the batteries are almost empty, the walkietalkie issues a warning signal at regular intervals.
Technical Data
The technical data is provided on Page 54 of this operating manual.
Olympia Business Systems Vertriebs GmbH, Zum Kraftwerk 1, 45527 Hattingen hereby declares that these devices fulfil the requirements and comply with the regulations stipulated in the Directive 2014/53/ EC. The CE marks on these devices confirms their conformity.

The Declaration of Conformity for this product is available at http://productip.com/?f=5d2e7
Cleaning
Clean the surfaces of the housing with a dry, soft, lint-free cloth. Do not use any solvents or cleaning agents.
iAVISO! Los aparatos de radiotelefoníaSEOSEOSEOSEOSEOSEOSEOSEOSEOSEOSEOSEOSEOSEOSEOSEOSEOSEOSEOSEOSEOSEOSEOSEOSEOSEOSEOSEOSEOSEOSEOSEOSEOSEOSEOSEOSEOSEOSEOSEOSEOSEOSEOSEOSEOSEOSEOSEOSEOSEOSEOSEOSEOSEOSEOSEOSEOSEOSEOSEOSEOSEOSEOSEOSEOSEOSEOSEOSEOSEOSEOSEOSEOSEOSEOSEOSEOSEOSEOSEOSEOSEOSEOSEOSEOSEOSEOSEOSEOSEOSEOSEOSEOSEOSEOSEOSEOSEOSEOSEO SEOYO OJOOSOJOOSOJOOSOJOOSOJOOSOJOOSOJOOSOJOOSOJOOSOJOOSOJOOSOJOOSOJOOSOJOOSOJOOSOJOOSOJOOSOJOOSOJOOSOJOOSOJOOSOJOOSOJOOSOJOOSOJOOSOJOOSOJOOSOJOOSOJOOSOJOOSOJOOSOJOOSOJOOSOJOOSOjoosojoosojoosojoosojoosojoosojoosojoosojoosojoosojoosojoosojoosojoosojoosojoosojoosojoosojoosojoosojoosojoosojoosojoosojoosojoosojoosojoosojoosojoosojoosojoosojoosojoosofofofofofofofofofofofofofofofofofofofofofofofofofofofofofofofofofofofofofofofofofofofofofofofofofofofofofofofofofofofofofofofofofofofofofofofofofofofofofofofofofofofofofofofofofofofofofofofofofofofofo
Frequencies 446.00625 MHz - 446.09375 Mhz
Channels 8
Call coding 38 CTCSS codes 83 DCS codes
Range Up to 12 km (in open terrain)
Power supply
Transmission < 500mW PMR power
Channel bandwidth 12.5 kHz
Talk time Up to 16 hours
Dimensions 123× 45× 20mm
Weight 48g
Ports 2.5 mm headset port
Frequencies 446.00625 MHz - 446.09375 Mhz
Kanalen 8
1446.00625 5 446.05625
2446.01875 6446.06875
3446.031257446.08125
4 446.04375 8 446.09375
We reserve the rights to make technical modifications and change the contents without notification.
Art. No. 5396 (black) / Version 2017.05