
P324 - Walkie-talkie OLYMPIA - Free user manual and instructions
Find the device manual for free P324 OLYMPIA in PDF.


| Product Type | Talkie Walkie |
| Brand | Olympia |
| Model | P324 |
| Dimensions | 120 x 50 x 30 mm |
| Weight | 200 g (including batteries) |
| Power Supply | 3 x AAA batteries (not included) |
| Frequency Band | 446 MHz (PMR446) |
| Number of Channels | 8 |
| Maximum Range | Up to 5 km (depending on terrain) |
| Output Power | 0.5 W |
| Voice Activation (VOX) | Yes |
| Scan Function | Yes |
| Monitor Function | Yes |
| Automatic Squelch | Yes |
| Keypad Lock | Yes |
| Battery Level Indicator | Yes |
| Operating Temperature | -10°C to 50°C |
| Certification | CE |
| Spare Parts | Battery compartment cover, belt clip available |
| Repair Information | Contact Olympia customer service for authorized repairs |
| Maintenance | Clean with a soft, dry cloth; avoid water and solvents |
| Safety Instructions | Do not operate near explosive atmospheres; turn off in restricted areas |
| Package Contents | 2 x Talkie Walkies, belt clips, user manual |
Frequently Asked Questions - P324 OLYMPIA
User questions about P324 OLYMPIA
0 question about this device. Answer the ones you know or ask your own.
Ask a new question about this device
Download the instructions for your Walkie-talkie in PDF format for free! Find your manual P324 - OLYMPIA and take your electronic device back in hand. On this page are published all the documents necessary for the use of your device. P324 by OLYMPIA.
USER MANUAL P324 OLYMPIA
Olympia P324 Professional Hand-held UHF FM 2-Way Radio User Guide
KEM-PK28201A
OLYMPIA
natural_image
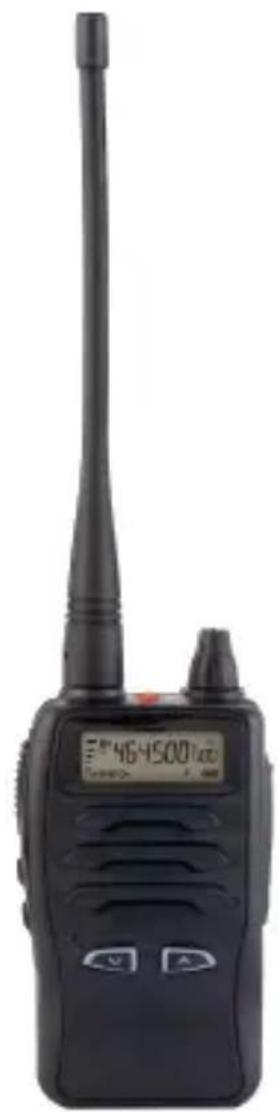
Black walkie-talkie with a digital display showing its model number 464500 (no visible text or symbols on device body)▲ Warning: This manual contains important safety and operating information. Please read, understand, and follow the instructions in this manual. Failure to do so could result in personal injury, death, and/or damage to your Olympia P324 radio, accessories and/or other property.
▲Caution
This device complies with Part 15 of the FCC rules. Operation is subject to the following two conditions: (1) This device may not cause harmful interference, and (2) this device must accept any interference received, including interference that may cause undesired operation.
Your Olympia radio generates RF electromagnetic energy during transmit mode. This radio is designed for and classified as "Occupational Use Only", meaning it must be used only during the course of employment by individuals aware of the hazards, and the ways to minimize such hazards.
This radio is NOT intended for use by the “General Population” in an uncontrolled environment.
Important: Your Olympia radio has been tested and complies with the FCC RF exposure limits for "Occupational Use Only." In addition, your radio complies with the following Standards and Guidelines with regard to RF energy and electromagnetic energy levels and evaluation of such levels for exposure to humans:
- FCC OET Bulletin 65 Supplement C, Edition 01-01, Evaluating Compliance with FCC Guidelines for Human Exposure to Radio Frequency Electromagnetic Fields.
- American National Standards Institute (C95.1 – 2005), IEEE Standard for Safety Levels with Respect to Human Exposure to Radio Frequency Electromagnetic Fields, 3 kHz to 300 GHz.
- American National Standards Institute (C95.3 – 2002), IEEE Recommended Practice for the Measurement of Potentially Hazardous Electromagnetic Fields – RF and Microwave.
• IEEE Standard 1528-2003.
To ensure that your exposure to RF electromagnetic energy is within the FCC allowable limits for occupational use, always adhere to the following guidelines:
- DO NOT operate the radio without a proper antenna attached, as this may damage the radio and may also cause you to exceed FCC RF exposure limits. A proper antenna is the antenna supplied with this radio by the manufacturer or an antenna specifically authorized by the manufacturer for use with this radio.
-
DO NOT transmit for more than 50% of total radio use time ("50% duty cycle"). Transmitting more than 50% of the time can cause FCC RF exposure compliance requirements to be exceeded. The radio is transmitting when the "TX indicator" light is red. You will cause the radio to transmit by pressing the "PTT" switch.
-
ALWAYS use Olympia authorized accessories (antennas, batteries, belt clips, speaker/microphones, etc). Use of unauthorized accessories can cause the FCC RF exposure compliance requirements to be exceeded.
- ALWAYS keep the antenna at least 1 inch (2.5 cm) away from the body when transmitting and only use the Olympia belt-clips, listed in this user manual, when attaching the radio to your belt, etc., to ensure FCC RF exposure compliance requirements are not exceeded. To provide the recipients of your transmission the best sound quality, hold the antenna at least 2 inches (5 cm) from your mouth, and slightly off to one side.
The information listed above provides the user with the information needed to make him or her aware of RF exposure, and what to do to assure that this radio operates within the FCC RF exposure limits of this radio.
Electromagnetic Interference/Compatibility
During transmissions, your Olympia radio generates RF energy that can possibly cause interference with other devices or systems. To avoid such interference, turn off the radio in areas where signs are posted to do so. DO NOT operate the transmitter in areas that are sensitive to electromagnetic radiation such as hospitals, aircraft, and blasting sites.
Important
CAUTION!
NEVER hold the transceiver so that the antenna is very close to, or touching exposed parts of the body, especially the face or eyes, while transmitting. The transceiver will perform best if the microphone is 2 to 4 inches (5 to 10 cm) away from the lips and the transceiver is vertical.
NEVER operate the transceiver with a headset or other audio accessories at high volume levels.
NEVER short the terminals of the battery pack.
DO NOT push the PTT key when not actually desiring to transmit.
DO NOT modify the transceiver for any reason.
AVOID using or placing the transceiver in direct sunlight or in areas with temperatures below -20^ C -60^ C / -5^ F -140^ F.
KEEP the transceiver from the heavy rain, and NEVER immerse it in water.
The transceiver construction is water resistant, not waterproof.
The use of non-Olympia battery packs/chargers may impair transceiver performance and invalidate the warranty.
Changes or modifications to this transceiver not expressly approved by Olympia could void your authority to operate this transceiver under FCC regulations.
FCC Licensing Information
Olympia Professional two-way radios operate on radio frequencies that are regulated by the Federal Communications Commission (FCC). To transmit on these frequencies, you are required to have a license issued by the FCC. Application is made available on FCC Form 601 and Schedules D, H, and Remittance Form 159. To obtain these FCC forms, request document 000601 which includes all forms and instructions. If you wish to have the document faxed, mailed or have questions, use the following contact information:
| Send fax to Fax-OnDemand system at: | Call the FCC formshotline at: | For questions regardingFCC license contact theFCC at: |
| 1-202-418-0177 1-800-418-FORM1-800-418-3676 | 1-888-CALL-FCC1-888-225-5322Or: http://www.fcc.gov | |
Before filling out your application, you must decide which frequency(ies) you can operate on. See "Pre-programmed Channel Frequency Table". For questions on determining the radio frequency, contact your dealer or distributor and they will contact Giant International Ltd.
Changes or modifications not expressly approved by Olympia, may void the user's authority granted by the FCC to operate this radio and should not be made. To comply with FCC requirements, transmitter adjustments should be made only by or under the supervision of a person certified as technically qualified to perform transmitter maintenance and repairs in the private land mobile and fixed services as certified by an organization representative of the user of those services.
Replacement of any transmitter component (crystal, semiconductor, etc.) not authorized by the FCC equipment authorization for this radio could violate FCC rules.
Use of this radio outside the country where it was intended to be distributed is subject to government regulations and may be prohibited.
In this User Guide
Packaging Content 11
Controls 12
Display Screen 13
Basic Operation 14
Menu Operation 19
Technical Specifications 23
Customizing your radio 26
Warranty 27
Contact information 31
Packaging Content
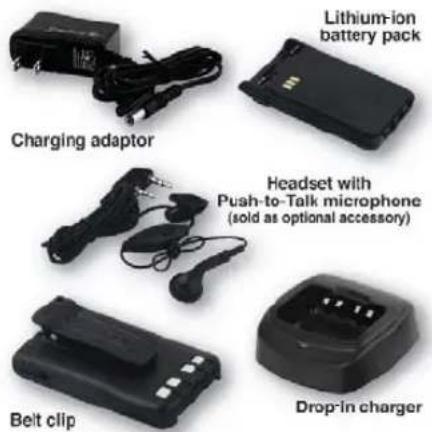
Radio, antenna, lithium-ion battery, drop-in charger, charging adaptor, belt clip, and user guide.
Available accessory sold separately: Headset with Push-to-Talk microphone.
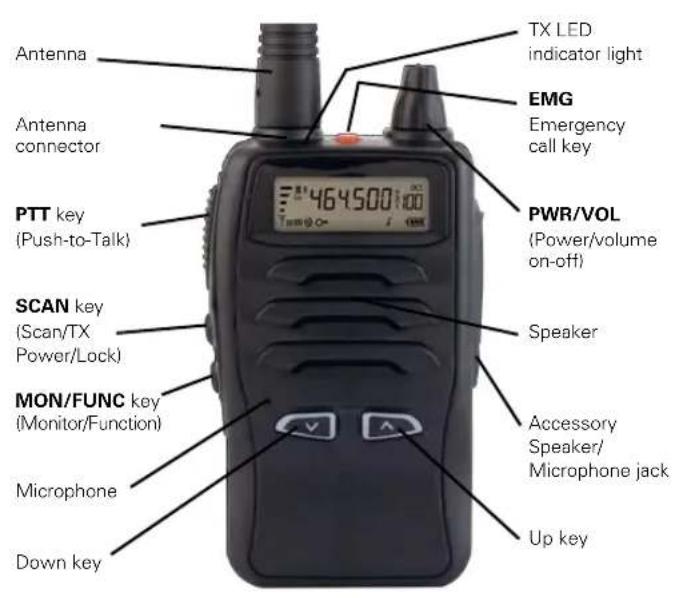
Olympia P324 Controls
Olympia P324 Display Screen
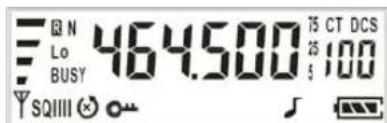
| Icon Definition | |
| RX signal strength indicator | |
| BUSY | Busy channel lockout indicator bcl |
| CT | The current code is CTCSS Code |
| DCS | The current code is CDCSS Code |
| SQIII | Indicates the squelch level |
| Indicates the radio is scanning | |
| Indicates channel is not on scanned list | |
| Key-lock indicator | |
| Keypad Tone enabling indicator | |
| VHPSDD | Channel or frequency display |
| I00 | Code display |
| Lo | Low TX Power (1W) indicator |
| Repeater indicator | |
| N | Narrow band (12.5 kHz) indicator |
| Battery Meter | |
Basic Operations
Connecting the antenna
Align the base of the antenna onto the SMA connector and turn clockwise until snug. Do not over tighten.
To disconnect antenna:
Turn the base of the antenna counter clockwise until it comes out from the SMA connector.
Connect the battery.
Connect the belt clip.
Turning your radio on and off
To turn on the power:
Rotate the PWR/VOL knob clockwise until "beep" is heard. All icons and frequencies will appear on the screen.
To turn off the power:
Rotate the PWR/VOL knob counterclockwise. All displays will disappear and the radio is off.
Adjusting the volume
Rotate PWR/VOL while holding down the MON/FUNC key until you reach a comfortable listening level.
Rotate PWR/VOL clockwise to increase the volume or counterclockwise to decrease the volume.
Backlight
Depress the PTT key or wait for 5 seconds to inactivate the backlight.
Monitor
Do not talk on a channel if someone else is talking on it. To check for activity on a channel before you talk, press and hold the MON/FUNC key.
If you hear static, the channel is clear to use.
To exit the function, release the MON/FUNC key.
Selecting the channel
The radio has 10 pre-programmed (see pre-programmed frequency table on page 23) channels to use and can be programmed up to 32 channels. You can press UP or DOWN to select a channel.
Basic Operations
Talking and listening
To communicate, all radios in your group must be set to the same channel and CTCSS\CDCSS codes.
To talk, press and hold the PTT key. The red TX indicator light glows continuously when transmitting.
To receive messages, release the PTT key.
For maximum clarity, hold the radio two to three inches away from your mouth and speak directly into the microphone. Do not cover the microphone while talking.
Transmit power setting
The radio can transmit at 1 watt or 4 watt. When 1 watt is selected, Lo will appear on the display. When this icon is off, the radio will transmit with high power. FCC law dictates, you should only increase power to 4 watts if your FCC license permits.
Press and hold the SCAN button for 2 seconds to switch the setting.
Basic Operations
Scan
Use scanning to monitor channels and codes for transmissions or to find someone in your group who has accidentally changed channels. When priority scan feature is enabled, the priority channel will be scanned after every normal channel, regardless of whether the priority channel is added into the scan list.
To start scanning, briefly press the SCAN key. The scan indicator will appear.
When the radio detects channel activity, it stops scanning and you can hear the transmission.
To respond to the transmission, press PTT.
If the scan stops on a channel that you don't want to listen to, briefly press the UP or DOWN button to resume scanning for the next active channel.
To exit the function, press the SCAN key again.
Emergency call\Hands-free function
The emergency call key is used to call others for help when emergency events happen.
To enter the radio's emergency mode, hold down the EMG button for 2 seconds.
The radio will alternately flash E_nnB and Channel number/Frequency. The radio will now alternate between 30 seconds of hands-free transmission and 30 seconds of hands-free receiving. This loop will continue until you exit the emergency mode.
To exit emergency mode, press the PTT button.
- The busy channel lockout feature will be disabled during emergency mode.
- When the battery is low, the radio can still transmit.
- Settings of the emergency mode can be altered by the distributor using the configuration software.
Menu Operation
Squelch Level Setting
The adjustable Squelch allows you to optimize the radio's sensitivity. It also allows you to increase the sensitivity and receive weaker signals. There are 5 sensitivity levels. The squelch level is indicated by the sq icon and bar icons next to it on the display.
- Press MON/FUNC until the current squelch level flashes and SL appears.
- Press UP/DOWN to increase or decrease the squelch level.
- Press PTT to set or MON/FUNC to continue set up.
Level 1 is the most sensitive level, which means the radio can receive a very weak signal. While at level 5, the radio can only receive stronger signals. In some cases the latter is preferable to prevent sensitivity to numerous strong signals in adjacent channels that might interfere (intermodulation). This can be especially true in the case of an environment with a high density of users.
Keypad Tone Setting
You may enable or disable the speaker key tones. You will hear the key tone each time a button is pushed.
- Press MON/FUNC until t appears. The current setting ON / OF flashes and J appears.
- Press UP/DOWN to turn on or off.
- Press PTT to set or MON/FUNC to continue set up.
Roger Beep Setting
If this feature is enabled, the radio transmits a unique tone when you finish transmitting. In the same way as saying "Roger" or "Over", it lets others know you are finished talking.
- Press MON/FUNC until r_h appears. The current setting ON / OF flashes.
- Press UP/DOWN to turn on or off.
- Press PTT to set or MON/FUNC to continue set up.
Menu Operation
Busy Channel Lockout Setting
The busy channel lockout feature helps to prevent interruption of communication between other radios using the channel you selected. When you press PTT to transmit, the radio will generate a beep and BUSY will appear to alert you that the channel you selected is busy.
- Press MON/FUNC until bcl appears. The current setting ON / OF flashes.
- Press UP/DOWN to turn on or off.
- Press PTT to set or MON/FUNC to continue set up.
Scan List Setting
The current channel can be added to the scan list or deleted from the scan list.
- Press MON/FUNC until Scn appears. The current setting ON / OF flashes.
- Press UP/DOWN to select. ON means add the channel to scan list and ⏻ will appear. OF means delete the channel from scan list and ⏻ will appear.
- Press PTT to set or MON/FUNC to continue set up.
Priority Channel Setting
Select one of the channels to be the priority channel. Once you select a priority channel, activity will be caught more frequently.
- Press MON/FUNC until p_r appears. The current setting flashes.
- Press UP/DOWN to select the desired channel or OF to disable the function.
- Press PTT to set or MON/FUNC to continue set up.
Keypad Lock Setting
The keypad lock disables all the button functions except the PTT, MON/FUNC and EMG. When the keypad is locked, the will appear in the display.
- Press MON/FUNC until appears. The current setting flashes.
- Press UP/DOWN to turn on or off.
- Press PTT or MON/FUNC to set.
To unlock the radio, press and hold SCAN for 3 seconds and until is no longer displayed.
Technical Specifications
| GENERAL SPECIFICATIONS* | |||
| Channel memories | 32 | ||
| CTCSS/CDCSS Codes | 50/83 | ||
| Frequency Band | 450-470 MHz | ||
| Channel BW | 12.5 and 25 kHz | ||
| LCD | 13 Icons8 digit frequency LCD Display3 digit CTCSS value LCD Display4 level RX strength indicator5 level SQ indicator3 level BAT indicatorBack light | ||
| Battery Type | 7.4V 1100mAh Li-ion | ||
| Antenna Connector | SMA top mount | ||
| Headset / Microphone Connector | Dual 3.5 mm / 2.5 mm | ||
| Battery Connector | Bottom Charging Contact | ||
| Controls | 2 front mount buttons (up/down)3 side buttons (PTT, Scan, Monitor)1 top button (Emergency)1 top rotary control (Volume, Power) | ||
| Power Switch | Rotary Knob | ||
| Channel Capacity | 32 | ||
| Charger | Drop-In Type | ||
| Power Supply | 100-240V 50/60 Hz 0.2A | ||
| Dimensions (without antenna) | 1.5 x 2.4 x 4.5 inches (38 x 62 x 114 mm) | ||
| Weight (with battery pack) | 7.9 oz (224 g) | ||
| Frequency Stability vs. temperature | <2.5ppm | ||
| Estimated Battery life(TX-RX-STBY duty cycle) | |||
| Power | 10-10-80duty cycle | 5-5-90duty cycle | |
| 1 Watt 8hrs. | 16hrs. | ||
| 4 Watt 5hrs. | 9hrs. | ||
| FCC Designator | K7GP1808 | ||
| RECEIVER SPECIFICATIONS* | |||
| Sensitivity (12 dB SINAD) ≤0.28uV | |||
| Adjacent Channel Selectivity 65dB/60dB (W/N Bandwidth) | |||
| Intermodulation 60dB | |||
| Spurious Rejection 70dB | |||
| Image Rejection 70dB | |||
| Audio Output Power 500mW | |||
| Audio Distortion ≤5% @ Rated output | |||
| Power Supply 100-240V 50/60 Hz 0.2A | |||
| Dimensions (without antenna) 1.5 x 2.4 x 4.5 inches (38 x 62 x 114 mm) | |||
| TRANSMITTER SPECIFICATIONS* | |||
| Modulation Designator25 kHz12.5 kHz | 11K6F3E6K12F3E | ||
| TX Output Power 4W/1W | |
| Spurious Output Per 90.210 (b) or (d) | |
| FM Hum and Noise | 40dB |
| Adjacent Channel Power Ratio | 65dB/60dB (W/N) |
| Modulated Audio Distortion | ≤5% @ Rated Deviation |
| ENVIRONMENTAL SPECIFICATIONS* | |
| Ingress Protection Rating | IP52 |
| Operating Temperature | -20°C - +60°C / -5°F - +140°F |
| Storage Temperature | -40°C - +65°C / -40°F - +150°F |
* All specifications subject to change without notice.
Customizing your Radio
Your radio can be customized to fit your specific needs. This can be done by your dealer or distributor using special configuration software. This configuration software is used to set all memory channel parameters including TX and RX frequency, TX power level, CTCSS or CDCSS settings, TX bandwidth, BCLO, Scan, and Priority Channel.
The software also allows for setting the Squelch level, Time Out timer value, Emergency Call enable and timing, Radio ID value, Display type, Power Save, and Low Battery Alert settings.
Pre-programmed Channel Frequency Table
| Channel Frequency Code (Hz) | |
| 1 464.5000 67.0 | |
| 2 464.5000 77.0 | |
| 3 464.5000 88.5 | |
| 4 464.5000 179.9 | |
| 5 464.5000 OFF | |
| 6 464.5500 67.0 | |
| 7 464.5500 82.5 | |
| 8 464.5500 94.8 | |
| 9 464.5500 179.9 | |
| 10 464.5500 OFF | |
Warranty
What does this warranty cover?
Giant International warrants the Olympia branded professional hand-held radios that it manufactures (“Products”), the Olympia branded or certified accessories sold for use with these Products that it manufactures (“Accessories”) to be free from defects in materials and workmanship under normal usage for the period(s) outlined below.
This limited warranty is a customer's exclusive remedy, and applies to new Olympia branded Products and Accessories purchased by customers in the United States, which are accompanied by this written warranty.
Product: Two (2) years from the date of purchase by the first customer purchaser of the product unless otherwise provided for below. This excludes the battery.
Accessories and batteries: Ninety (90) days from the date of purchase by the first customer purchaser of the product.
Headsets: One (1) year from the date of purchase by the first customer purchaser of the product.
Products and Accessories that are repaired or replaced:
The balance of the original warranty or for ninety (90) days from the date returned to the customer, whichever is longer.
Who is covered?
This warranty extends only to the first customer purchaser of the product. This warranty is not transferable.
ExCLUSIONS
Normal wear and tear: Periodic maintenance, repair and replacement of parts due to normal wear and tear are excluded from coverage.
Batteries: Only batteries whose fully charged capacity falls below 80% of their rated capacity and batteries that leak are covered by this limited warranty.
Warranty
Abuse and misuse: Defects or damage that results from: (a) improper operation, storage, misuse or abuse, accident or neglect, such as physical damage (cracks, scratches, etc.) to the surface of the product resulting from misuse; (b) contact with liquid, water, rain, extreme humidity or heavy perspiration, sand, dirt or the like, extreme heat, or food; (outside of the specified IP52 rating), (c) use of the Product or Accessory to abnormal usage or conditions; or (d) other acts which are not the fault of Giant International Ltd., are excluded from coverage.
Use of non-Olympia branded products and accessories:
Defects or damage that result from the use of non-Olympia branded or certified products, accessories, software or other peripheral equipment are excluded from coverage.
Unauthorized service or modification: Defects or damages resulting from service, testing, adjustment, installation, maintenance, alteration, or modification in any way by someone other than Giant International Ltd. or its authorized distributors, are excluded from coverage.
Altered products: Products or accessories with (a) serial numbers or date tags that have been removed, altered or obliterated; (b) broken seals that show evidence of tampering; (c) mismatched board serial numbers; or (d) nonconforming or non-Olympia branded housings, or parts, are excluded from coverage.
Communication services: Defects, damages, or the failure of Products or Accessories due to any communication service or signal you may subscribe to or use with the Products or Accessories is excluded from coverage.
What other limitations are there?
Any implied warranties, including without limitation the implied warranties of merchantability and fitness for a particular purpose, shall be limited to the duration of this limited warranty, otherwise the repair, replacement, or refund as provided under this express limited warranty is the exclusive remedy of the customer, and is provided in lieu of all other warranties, express or implied. In no event shall Giant International Ltd. be liable, whether in contract
Warranty
or tort (including negligence) for damages in excess of the purchase price of the product or consequential damages of any kind, or loss of revenue or profits, loss of business, loss of information or other financial loss arising out of or in connection with the ability or inability to use the products or accessories to the full extent these damages may be disclaimed by law.
Some states and jurisdictions do not allow the limitation or exclusion of incidental or consequential damages, or limitation on the length of an implied warranty, so the above limitation or exclusions may not apply to you. This warranty gives you specific legal rights, and you may also have other rights that vary from state to state or from one jurisdiction to another.
How to obtain warranty service or other information?
Contact your dealer or distributor and they will contact Giant International Ltd. For other questions, contact Giant International Ltd. at 1-866-537-0384 or giantintl@callcenter.com.
All warranty returns should be sent to the place of purchase.
Giant International Ltd.
3495 Piedmont Rd. NE
Bldg. Ten, Ste. 920
Atlanta GA 30305
E-mail: giantintl@callcenter.com
www.giantintl.com
Telephone +1 (866) 537-0384
© 2008 Giant International Limited. All rights reserved.
All registered trademarks and trade dress are the property of the respective owners.
- Olympia P324 Professional Hand-held UHF FM 2-Way Radio User Guide
- ▲Caution
- Electromagnetic Interference/Compatibility
- Important
- CAUTION!
- FCC Licensing Information
- In this User Guide
- Packaging Content
- Basic Operations
- Connecting the antenna
- To disconnect antenna:
- Connect the battery.
- Connect the belt clip.
- Turning your radio on and off
- To turn off the power:
- Adjusting the volume
- Backlight
- Monitor
- Selecting the channel
- Talking and listening
- Transmit power setting
- Scan
- Emergency call\Hands-free function
- Menu Operation
- Squelch Level Setting
- Keypad Tone Setting
- Roger Beep Setting
- Busy Channel Lockout Setting
- Scan List Setting
- Priority Channel Setting
- Keypad Lock Setting
- Customizing your Radio
- Warranty
- What does this warranty cover?
- Products and Accessories that are repaired or replaced:
- Who is covered?
- ExCLUSIONS
- Use of non-Olympia branded products and accessories:
- What other limitations are there?
- How to obtain warranty service or other information?
- Giant International Ltd.
Brand : OLYMPIA
Model : P324
Category : Walkie-talkie