MG 3000 Pro - Mincer STEBA - Free user manual and instructions
Find the device manual for free MG 3000 Pro STEBA in PDF.

| Product type | Meat grinder |
| Brand | Steba |
| Model | MG 3000 Pro |
| Power | 300 W |
| Power supply | 220-240 V ~ 50/60 Hz |
| Speeds | 2 speeds + reverse |
| Included cutting discs | 3 mm, 5 mm, 8 mm |
| Included accessories | Pusher, filling tray, knife, threaded ring, sausage accessory, kebbe accessory |
| Additional options | Multi grater available as option (ref. 99-47-00) |
| Blade material | Stainless steel |
| Safety | Motor overload protection, automatic stop in case of blockage |
| Maximum continuous use | 5 minutes, then 10 minutes cooling |
| Cleaning | Parts in contact with food washable in warm soapy water, do not put in dishwasher |
| Suitable foods | Raw or cooked meat, bacon, poultry, fish, vegetables (with optional grater) |
| Unsuitable foods | Bones, nuts, carrots, frozen meat, hard foods |
| Use | Household use only |
Frequently Asked Questions - MG 3000 Pro STEBA
User questions about MG 3000 Pro STEBA
0 question about this device. Answer the ones you know or ask your own.
Ask a new question about this device
Download the instructions for your Mincer in PDF format for free! Find your manual MG 3000 Pro - STEBA and take your electronic device back in hand. On this page are published all the documents necessary for the use of your device. MG 3000 Pro by STEBA.
USER MANUAL MG 3000 Pro STEBA
natural_image
Exterior view of a modern electrician's side menu tool with stainless steel feeder and various kitchen utensils (no text or symbols visible)220 - 240 V\~; 50/60 Hz; 1200 W (3000W locked Power)
Instructions for use 12
Mode d'emploi 22
This appliance is for private and indoor use only and must not be used commercially. Please read the instruction manual carefully and keep it at a safe place. When the appliance is given to another person the instruction manual should be passed to that person, too. Only use the appliance as described in the instruction manual and pay attention to the safety information. No liability for damages or accidents will be accepted, which are caused by not paying attention to the instruction manual. Remove all packaging and sticker. Wash up all parts carefully (see cleaning).
Safety information
- Connect and operate the appliance in accordance with the specifications shown on the rating label.
- Do not use if the plug cord is damaged. Verify before every use.
- Do not plug with wet hands.
- Connect the power plug to a properly installed and easily accessible socket only.
- To unplug the power plug, always pull the plug – not the cable.
- Plug off the appliance after each use or in case of failure.
- Do not pull at the cord. Don't pull it over edges and don't bend it too much.
- Keep the cord away from hot parts.
The appliance can be used by children aged 8 and above and persons with limited physical, sensory or mental capabilities or lack of experience/knowledge, provided that are supervised or have been provided with instruction in the safe use of the appliance and have understood the resulting dangers. Children must not use the packaging as a toy. Cleaning and user maintenance must not be carried out by children unless they are 8 years or older and are supervised.
- Children under the age of 8 must be kept away from the appliance and the connecting cable.
- Children should be supervised to ensure that they do not play with the appliance or packaging material (e.g. Plastic Bags).
- The appliance must not be operated using a timer or a separate remote system!
- Never leave the appliance unattended when in use.
- Do not leave the appliance outdoors or in a damp area.
- Never immerse the unit in water.
- Never use the device after a malfunction, e.g. if it felt down or has been damaged in any other manner.
- The manufacturer is not liable for damage which is occurring due to the usage of the appliance in a different way as described or a mistake in the handling has been made.
- To prevent injury, repairs such as replacing a damaged cord, should only be carried out by a customer service. Only original spare parts have to be used.
- Only use the device as described in this manual.
- This appliance is intended to be used in household and similar applications such as:
o staff kitchen areas in shops, offices and others working environments
o by clients in hotels, motels and other residential type environments
o bed and breakfast type environments.
- Before initial use: clean all parts carefully and leave to dry.
- If an extension cable is used, it has to have a cross-section of 1,5mm^2 . A cable drum must always be unwound.
- If a GS-tested 16 A multi-pin extension is used, it may not be charged with more than 3680 watts due to fire hazard.
- Make sure that children do not tease the cable or that a trip hazard occurs.
- The device must always be disconnected from the power supply if it is not supervised and before assembling, disassembling or cleaning.
- Hygiene: Please always clean the device to avoid bacteria and mould formation.
- Before every use, make sure that the winding ring is fastened tight.
- Never use your fingers to push food into the feeding tube!
- Do not give bones, nuts or any other hard items into the device.
- Do not let the device run longer than 5 minutes continuously. Leave to cool for about 10 minutes.
Cleaning

ttention! Pull the plug before cleaning.
- Never immerse the unit into water.
- Food residues must be removed for reasons of hygiene.
- Tip: Meat left behinds in the cutter housing may be removed from the inside of the appliance by passing a slice of bread through the cutter housing.
- Remove the stodge and the filling tray. Press the release button and turn the whole cutter housing to the right in order to remove it.
- Remove the disc, knife and worm out of the cutter housing.

Attention! Blades are sharp! Do not clean the parts in the dishwasher!
- Wash all parts that came into contact with meat in hot soapy water. Clean them immediately after use.
- Rinse all parts with clear hot water and dry them immediately. Tip: We advise you to lubricate the cutter unit and the grinding discs with some vegetable oil.
- Clean the housing with a damp cloth.
Workplace
Important:
Never place this device on or next to hot surfaces (e.g. hot stoves). Only use it on a even, stable and a heat resisting surface. It is important that no inflammable items are near to the device. Do not place the device on the edge of the table so that it cannot be touched by children or fall down when touched.

- Motor part
- Function button
- Release lever
- Driving toothed wheel
- Worm housing
- Worm
- Blades
- Discs 3/5/8mm
- Threaded ring
- Sausage attachments
- Kibbe attachment
- Tray / lid
- Stodger
- Filling tray
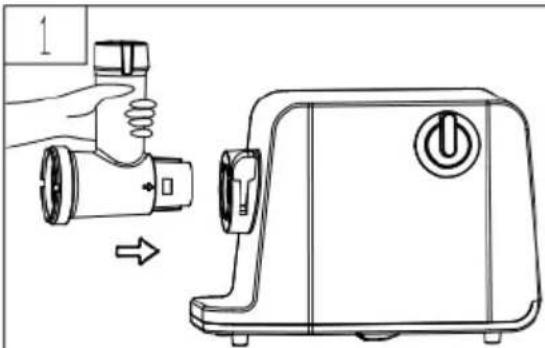
Assembly
- Place the worm housing on the driving toothed wheel and close the release lever downwards.
- Push the worm into the housing with the thicker end first and then put on the blade. Make sure that the cutting edge of the blade points in the direction of the perforated disc.
- Put on a perforated disk and then screw the threaded ring tightly onto the housing.
- Attach the filling tray. With the stodger the meat will be pushed gently into the worm housing.
natural_image
Line drawing of a hand holding a small cylindrical device next to a second-hand electric shaver (no text or symbols)
natural_image
Line drawing of a mechanical device with a valve and control knob (no text or symbols)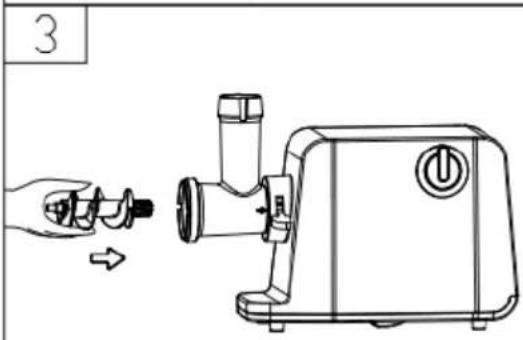
text_image
3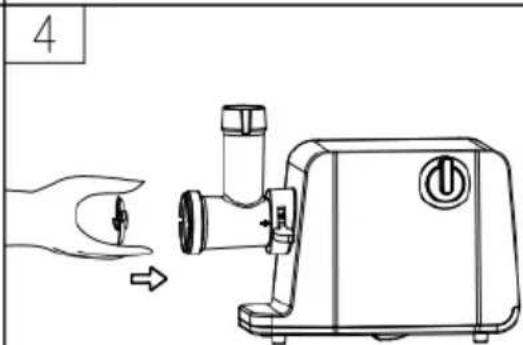
text_image
4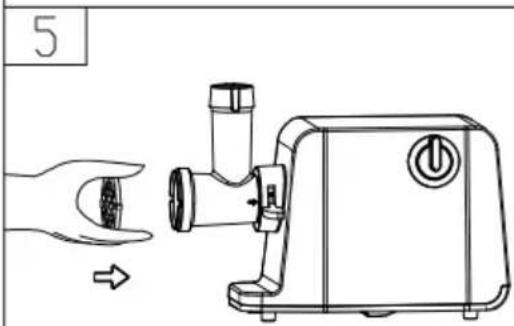
text_image
5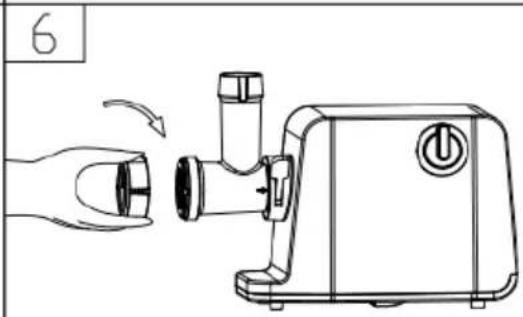
natural_image
Line drawing of a hand holding a small object next to a kitchen electric shaver (no text or symbols)
natural_image
Line drawing of a food grater machine with a bowl of noodles and a side panel (no text or symbols)
natural_image
Three circular objects arranged vertically on a plain background (no text or symbols)Application
For the use of raw or cooked meat, bacon, poultry, fish. Never use deeply frozen meat!
Discs: 3, 5, 8mm
Cut the food into dices
In order to produce tartare, mince the meat twice with the 3mm disc.
Do not push too hard with the stodger.
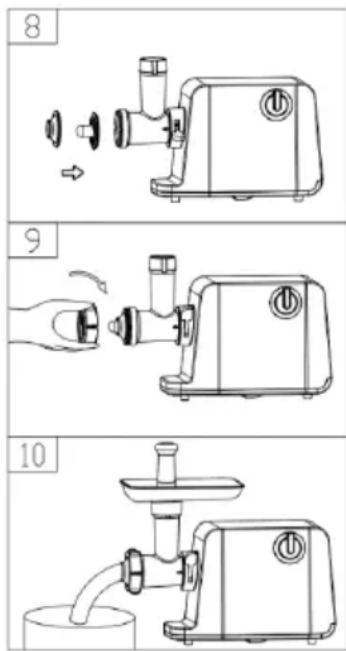
Usage
- Do not connect the device during assembly!
- Connect the device and select the speed at level 1 or 2.
o Level 1 (slow): for 8mm perforated disc, for sausage stuffing and kibbe
o Level 2 (fast): for perforated discs 5 and 3mm
- Use the stodger to gently push the food into the funnel.
Never put fingers or any other gadgets into the filling tube. Only use the provided stodger. Never put any bones, pits, fibres etc. into the device. Only use slightly frozen food, no deeply frozen. If the appliance is blocked, please press revers button. Turn off the device and open the threaded ring and remove the obstacle.
Protecting the motor:
- Do not operate the device without food
- Do not let the device run for more than 5 minutes.
- Leave a break of approx. 10 minutes between the work steps.
- If the motor is overloaded, the motor protection trips. Wait about 30 minutes and restart the device.
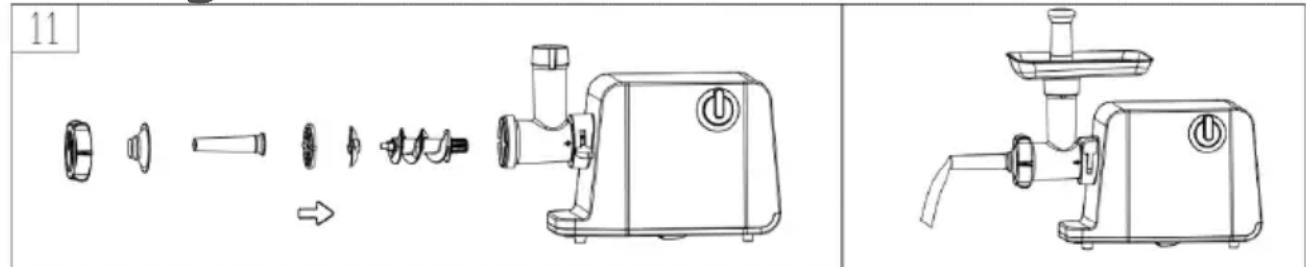
Sausage attachment
text_image
11 →- Unplug the device.
- Insert the worm into the worm housing.
- Insert the blade and the disc.
- Place the desired sausage attachment onto the disc and fasten by using the threaded ring.
- Place a lukewarm and soaked sausage skin onto the sausage attachment and fill the sausages with minced and seasoned meat. Do not fill too tight.
Bratwurst recipe
600g lean pork
400g pork belly
20g salt
12 teaspoon nutmeg
12 teaspoon garlic
1 teaspoon marjoram
Mince the meat twice with the 5mm perforated disc. Mix in the spices. Place the desired sausage filling attachment on the 3mm perforated disc and screw it tight with the threaded ring. Place a lukewarm and soaked sausage skin onto the sausage attachment and then pour the sausage mixture into the device via the filling tray.
Kibbe attachment
- For the production of Kibbe, the meat grinder is firstly used with a perforated disk, the Kibbe attachment is used later.
Kibbe recipe
Wrapping:
450g lean beef
150 - 200g flour for dusting
Salt, chilli, nutmeg to taste
Mix the ingredients and mince it twice with the 5mm perforated disc. Then, mince it again with the 3mm disc.
Assembly of the Kibbe attachment
• Pull out the power plug.
- Remove the perforated disc and the blade.
- The worm remains in the worm housing.
- Do not use the blade or a perforated disk!
• Instead, put the kibbe attachment on and fasten
- it with the threaded ring.
- Mince the meat mixture for the wrapping on level 1
• and cut into approx. 8cm tubes. Close one end of the
• the tube and freeze briefly.
Filling:
100g veal / lamb
1 ½ tbsp olive oil
1 ½ tbsp chopped, fried onion
12 teaspoon of allspice
1 ½ teaspoon flour
Spices and salt to taste
Mix the ingredients and mince them twice with the 5mm perforated disc.
You can fill the prepared wrappings with the filling by using a teaspoon, or you can use the sausage filling attachment. Then also close the second end of the wrapping.
Fry the kibbe in the deep fryer at 170 °C for approx. 2 - 3 minutes.
Accessories (not included)
Shredder for vegetable, fruits, cheese, nuts
- Unplug the device.
- Place the shredder attachment onto the driving toothed wheel and close the release lever downwards.
- Select a desired cutter drum and place it into the shredder. Then, fasten the threaded ring tightly.

Attention! The attachments are sharp!
- Turn on the device and ad the food by using the stodger.
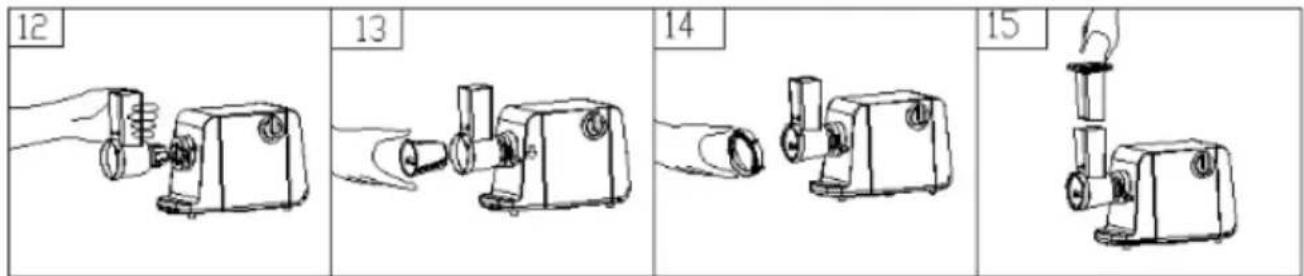
text_image
12 13 14 15Cleaning
- Unplug the device.
- Remove the shredder and carefully clean all parts in soapy water.
The shredder for the MG 3000 PRO meat grinder with item no. 99-47-00 is available from Steba Service.
Correct Disposal of this product

This marking indicates that this product should not be disposed with other household wastes throughout the EU. To prevent possible harm to the environment or human health from uncontrolled waste disposal, recycle it responsibly to promote the sustainable reuse of material resources. To return your used device, please use the return and collection systems or contact the retailer where the product was purchased. They can take this product for environmental safe recycling.
Packaging disposal: Do not throw away the package materials. Please put it in the recycling bin.


Gift box: Paper, should be put to the old paper collection point. Plastic packaging material and foils should be collected in the special collection containers.
Service and Repair:
If the appliance must be repaired, please get in touch with your trader or with the manufacturer:
text_image
Diagram showing a hand holding a cylindrical device next to a motor with an open button, illustrating the process of adjustment or assembly.
natural_image
Line drawing of a mechanical device with no visible text or symbols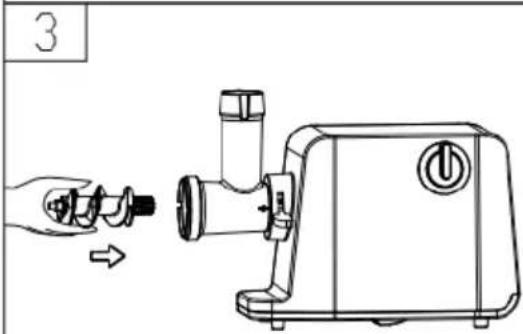
text_image
3
text_image
4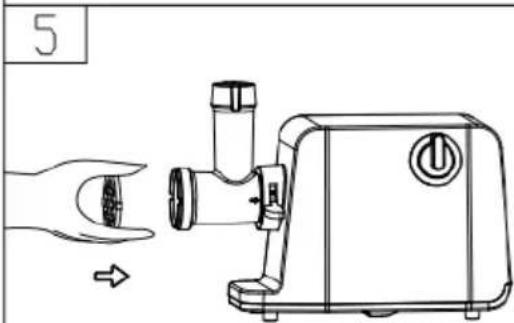
text_image
5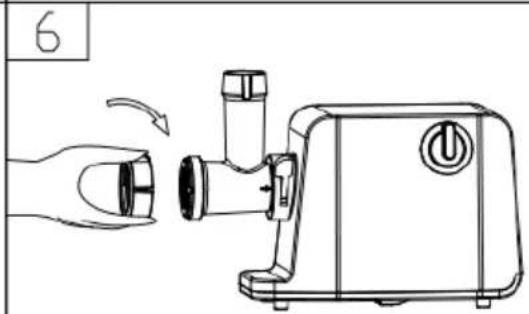
text_image
6
natural_image
Line drawing of a manual hand presser pouring liquid into a cylindrical container (no text or symbols)
Application
text_image
Technical diagram showing exploded view of a motor and gear assembly with labeled components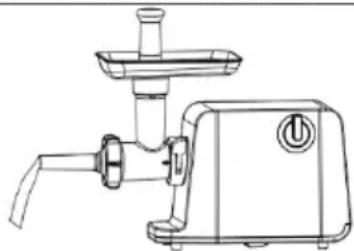
natural_image
Line drawing of a manual kitchen brush with handle and control panel (no text or symbols)Accessoires (non inclus)
natural_image
Line drawing of a hand holding a small device next to an electric shaver machine (no text or symbols)
natural_image
Line drawing of a mechanical device with a valve and button, no text or symbols present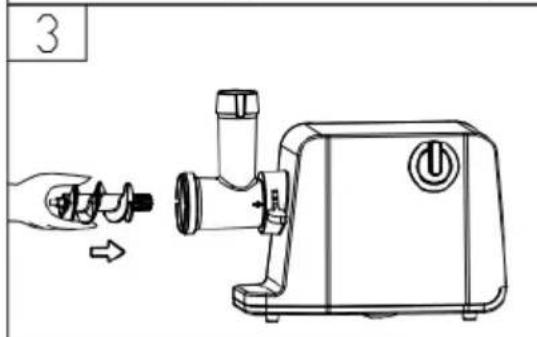
text_image
3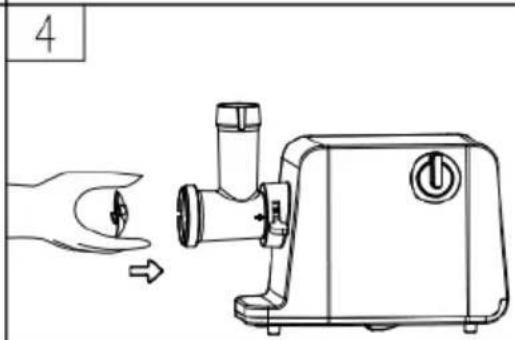
text_image
4
text_image
5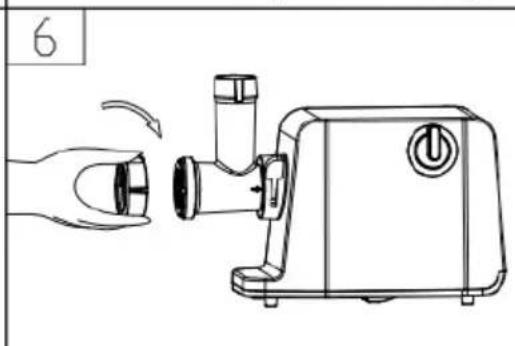
text_image
6
natural_image
Line drawing of a food grater machine pouring noodles into a bowl (no text or symbols)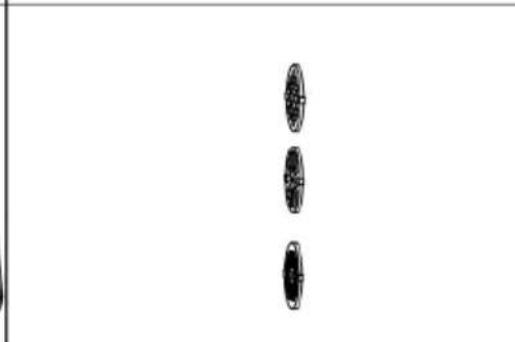
natural_image
Three identical circular objects arranged vertically on a plain background (no text or symbols)Toepassing
o bed and breakfast miljøer