
PHD 135 D3 - Pressure washer PARKSIDE - Free user manual and instructions
Find the device manual for free PHD 135 D3 PARKSIDE in PDF.
| Product type | High-pressure cleaner |
| Brand | Parkside |
| Model | PHD 135 D3 |
| Voltage | 230 V, 50 Hz |
| Working pressure | 9 MPa (130,5 psi) |
| Maximum pressure | 13,5 MPa |
| Nominal flow rate | 5,2 L/min |
| Maximum flow rate | 7 L/min |
| Max. water inlet pressure | 0,8 MPa |
| Max. inlet temperature | 40 °C |
| Power cable length | 5 m |
| High-pressure hose length | 7 m |
| Weight (with accessories) | 7,5 kg |
| Protection class | II (double insulation) |
| Protection rating | IPX5 |
| Guaranteed sound power level | 90 dB(A) |
| Sound pressure level | 75,25 dB(A) |
| Vibration (a_h) | ≤ 2,5 m/s² |
| Standard adjustable nozzle | Yes (adjustable fan jet and pencil jet) |
| Turbo dirt cutter | Yes |
| Cleaning agent tank | Integrated, 0,5 L |
| Child safety on trigger | Yes |
| Automatic motor shut-off | Yes (when trigger is released) |
| Warranty | 3 years |
Frequently Asked Questions - PHD 135 D3 PARKSIDE
User questions about PHD 135 D3 PARKSIDE
0 question about this device. Answer the ones you know or ask your own.
Ask a new question about this device
Download the instructions for your Pressure washer in PDF format for free! Find your manual PHD 135 D3 - PARKSIDE and take your electronic device back in hand. On this page are published all the documents necessary for the use of your device. PHD 135 D3 by PARKSIDE.
USER MANUAL PHD 135 D3 PARKSIDE
Translation of the original instructions
NL BE
Hogedrukreiniger
Before reading, unfold the page containing the illustrations and familiarise yourself with all functions of the device.
FR BE
GB/IE Translation of the original instructions Page 19
Proper use 19
Scope of delivery. 19
Description of functions 20
Overview. 20
Technical data 20
Safety information 21
Symbols on the device 21
Symbols on the cleaning agent bottle. 21
Correct handling of the device 21
Preparation 24
Operating elements and how they work.....24
Setting up 24
Establishing a water supply. 25
Selecting an attachment. 25
Fitting and removing attachments 25
Operation 26
Cleaning using cleaning agent. 26
Introduction
Congratulations on purchasing your new device. You have chosen a high-quality product.
This device was quality-tested and subjected to a final inspection during production, therefore ensuring proper functioning of your device. In some cases, residual amounts of water or lubricants may be present on or in the device or in hose lines. This is not a flaw or a defect and is no cause for concern.


The instruction manual forms part of this product. It contains impor
tant information on safety, use and disposal. Before using the product, you should familiarise yourself with all operating and safety instructions. Use the product only as described and for the stated fields of application. Store the manual carefully and ensure that all documents are handed over in the event that the product is passed on to another user.
Switching on 26
Interrupting operation. 26
Bleeding 27
Ending operation 27
Cleaning and maintenance 27
Cleaning. 27
Maintenance. 28
Troubleshooting 28
Storage 29
Disposal/environmental protection.. 29
Service 29
Guarantee. 29
Repair service 30
Service centre 30
Importer 30
Spare parts and accessories. 31
Translation of the original EC declaration of conformity. 32
Proper use
Only use this pressure washer in private households:
- This device is not suitable for commercial use. The warranty is void in the case of commercial use.
- To clean devices, vehicles, buildings, tools, facades, terraces, garden equipment etc. with a high-pressure water jet.
- With original accessories and spare parts.
- Following the manufacturer's instructions for the object being cleaned.
Scope of delivery
Unpack the device and check that everything is present. Dispose of the packaging material properly.
- Pressure washer with mains connection cable
- Pistol grip
- Lance
High-pressure hose - Standard Vario nozzle
Turbo dirt miller -
0.5 I cleaning agent, bottled
-
Quick connector with filter insert
- Nozzle cleaning needle
- Instruction manual
Description of functions
The pressure washer cleans using a water jet.
If necessary, it can also be operated with additional cleaning agents.
Please refer to the descriptions below for information on how the operating elements work.
Please note the safety information.
Overview

of the most impor
tant functional components can be found on the fold-out page.
1 Pistol grip
2 On/Off switch
3 Nozzle cleaning needle
4 Release for bow-type handle
5 Holder for high-pressure hose
6 Holder for mains connection cable
7 Sealing cap with suction hose
8 Cleaning agent tank
9 Mains connection cable
10 High-pressure connection
1.1 Threaded connection
12 Release for high-pressure hoses
13 Switch lever
14 Quick connector
15 Cleaning agent
16 Child safety lock
17 Standard Vario nozzle
18 Release button
19 Turbo dirt miller
20 Quick connector with filter insert
21 Water connection
22 Wheels
23 High-pressure hose
24 Lance
25 Holder for Pistol grip
26 Holder for lance
27 Holder for nozzle
28 Bow-type handle
Technical data
High-pressure washer ......PHD 135 D3
Rated voltage (U) 230 V, 50 Hz
Power consumption (P) 1800 W
Mains connection cable length. 5 m
Length of high-pressure hose. 7 m
Weight incl. accessories (m) 7.5 kg
Protection class.
Protection type. IPX5
Pressure rating/working pressure (p) 9 MPa
Max. permissible pressure (p max)......13.5 MPa
Max. intake pressure (p in max) 0.8 MPa
Max. inlet temperature (T in max) 40°C
Rated flow rate (Q) 5.2 l/min
Max. flow rate (Q max) 7 l/min
Sound pressure level (LpA)
75,25dB(A);KpA=3dB
Sound power level, (L_WA)
measured.87,8 dB(A); K_WA = 2,28 dB
guaranteed. 90 dB(A)
Vibration (a_b) 2.5 m/s2
The values for noise and vibration were determined according to EN 60335-2-79:2012.
The vibration emission value has been measured according to a standardised testing method and may be used for comparison with another power tool.
The indicated vibration emission value may also be used for an introductory assessment of the exposure.
WARNING! The vibration emission value whilst actually using the power tool may vary from the given values depending on the type and way in which the power tool is used.
Try to keep the exposure to vibrations as low as possible. Examples of measures to reduce vibration exposure are the wearing of gloves when using the tool and limiting the working hours. All parts of the operating cycle have to be considered while doing so (for example, times when the
power tool is switched off and times when it is switched on but running without any load).
Safety information
This section describes the basic safety rules when working with the pressure washer.
Symbols on the device

Caution!

Familiarise yourself with all operating elements before starting work, especially functions and modes of action. Ask a specialist if necessary.
Please read and comply with the instruction manual for the device!

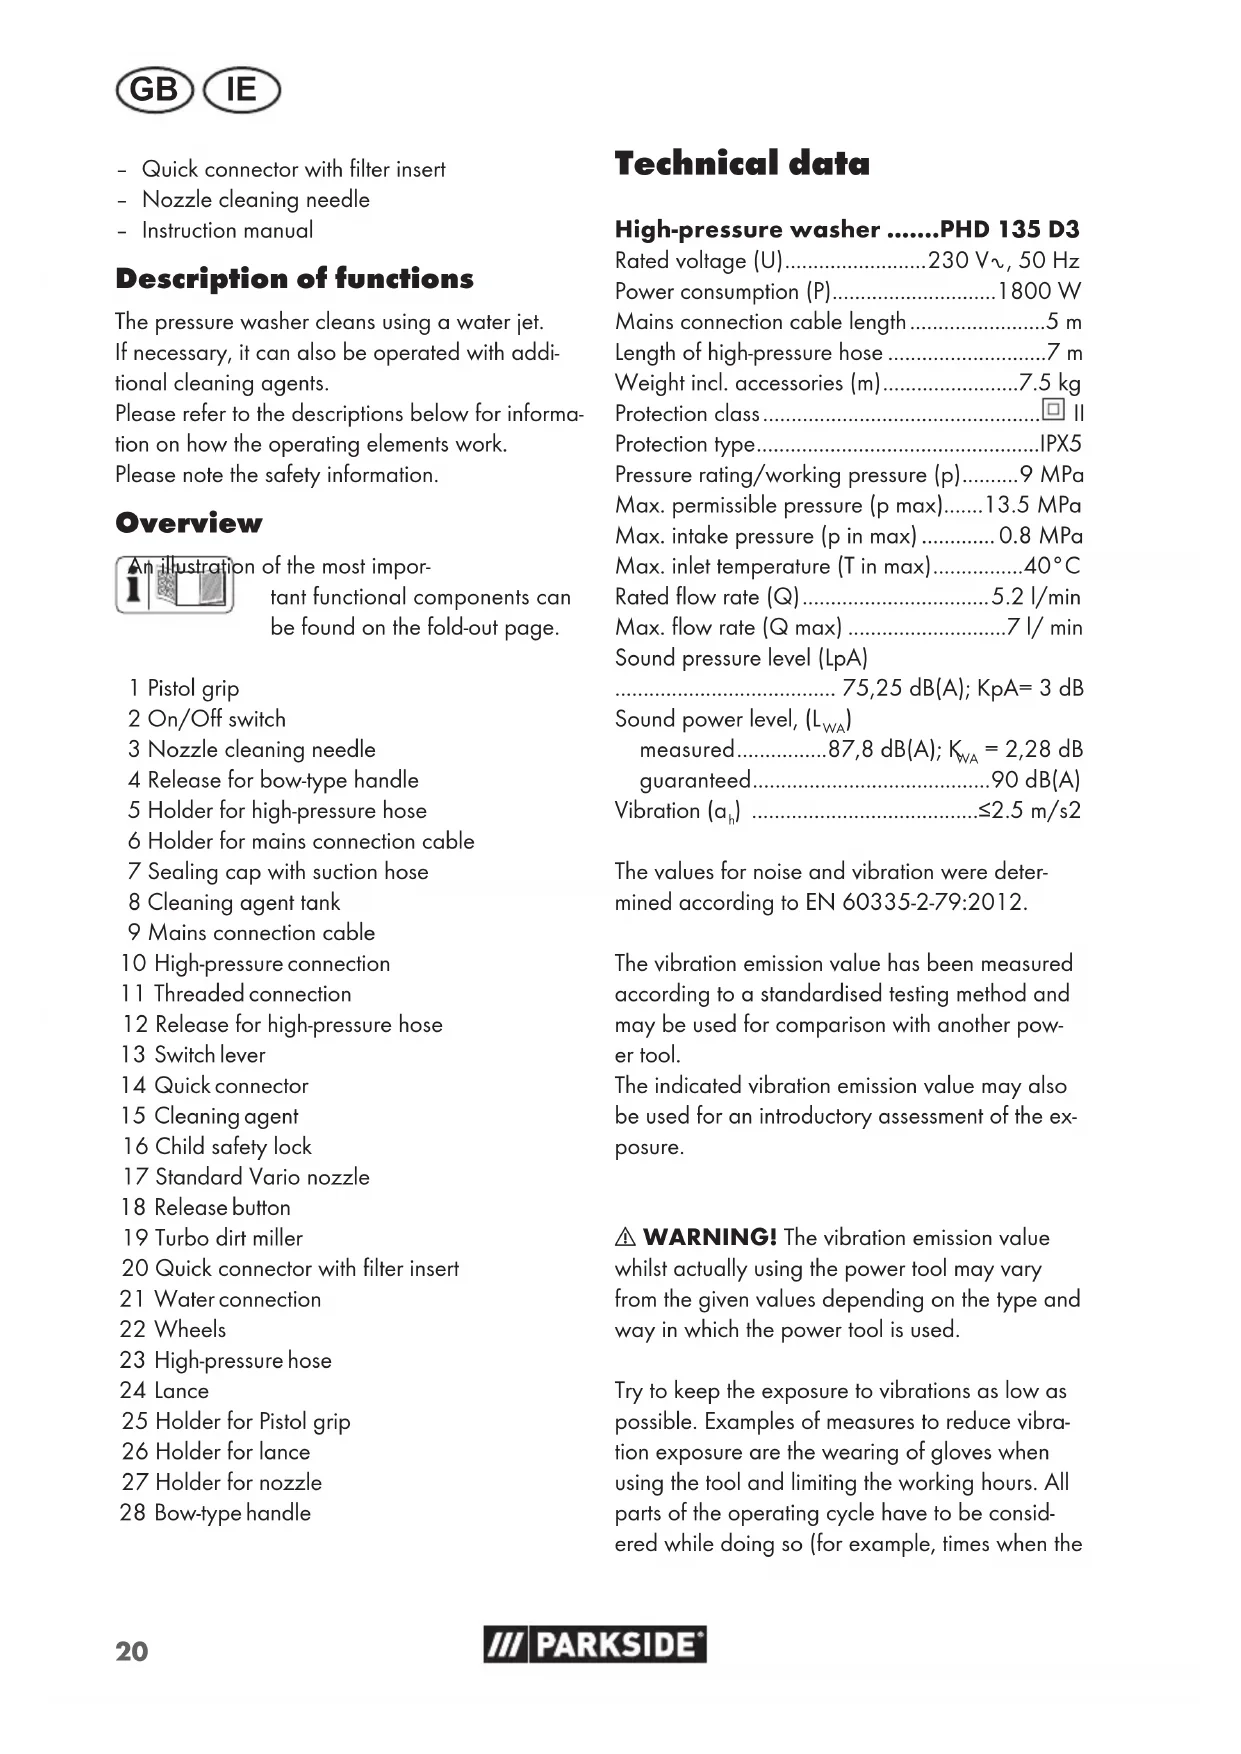
Caution! If the mains connection cable is damaged or cut through, immediately pull the plug from the socket. This also includes connecting to the water supply or trying to eliminate leaks.

The device is not suitable for connecting to a drinking water supply system.

Protection class II (double insulation)

Electrical devices must not be disposed of with domestic waste.

Sound power level L_WA indicated in dB.
High-pressure washers can be dangerous if used incorrectly. The jet must not be directed at persons, animals, active electrical equipment or the device itself.
Operate the device vertically only. Never use horizontally.
Symbols on the cleaning agent bottle

Caution! Corrosive! Irritant! May cause serious skin burns and eye damage.
Correct handling of the device
General information
-
Read the instruction manual carefully. Familiarise yourself with the controls and how to use the device correctly.
-
The device must not be used by children. Children should be supervised to ensure that they do not play with the device.
-
The device can be used by individuals with reduced physical, sensory or mental abilities or a lack of experience and knowledge if they are supervised or have been instructed in the safe use of the device and understand the resulting hazards.
-
People who are not familiar with the instruction manual may not use the device.
-
Pressure washers must not be operated by untrained persons.
In the case of a malfunction or defect during operation, the device must be switched off immediately and the mains plug unplugged. For possible causes of a malfunction, see Troubleshooting, p. 28. Or, contact our service centre.
GBIE
Note that the user is responsible for any accidents or risks to others and their property.
- Observe noise protection rules and other local regulations.
Initial start-up
- When using the device, always wear protective goggles.
- When using the device, always wear sturdy shoes and full-length trousers. Do not use the device barefoot or in light sandals.
- Do not work with a damaged or incomplete device or one which has been converted without the permission of the manufacturer. Before commissioning, have a specialist check that the required electrical protective measures are in place.
The device may only be connected to a socket that was installed by an experienced electrician in accordance with IEC 60364-1. - Prior to use, always check the connecting cable and extension cable for signs of damage or wear and tear. If the cable gets damaged during use, it must be disconnected from the supply network immediately. DO NOT TOUCH THE CABLE BEFORE IT HAS BEEN DISCONNECTED FROM THE POWER SUPPLY. Do not use the device if the cable is damaged or worn. To avoid haz
ards, a damaged mains connection cable may only be replaced by the manufacturer, their customer service or a similarly qualified person.
- Only connect the device to a power socket with a residual current device (RCD) with a rated residual current no more than 30mA .
- Unsuitable extension cables can be dangerous! Use only extension cables that are designed for outdoor use. The connection must be dry and routed above the ground. We recommend using a cable drum that holds the socket at least 60mm above the ground.
- Extension cables must have a minimum wire cross section of 2 × 2.5 mm².
- High-pressure hoses, fittings and couplings are important for device safety. Only use high-pressure hoses, fittings and couplings recommended by the manufacturer.
- Do not start the device up if the mains connection cable, water supply or other important parts such as the high-pressure hose or spray gun are damaged or leaky.
-
Only use the device standing and on a firm, level surface.
-
Never use the device if there are children or animals nearby. People nearby must wear protective clothing.
Operation
-
Pay attention! Be aware of what you are doing and take the utmost care when working with a power tool. Do not use power tools if you are tired or you are under the influence of drugs, alcohol or medication.
-
High-pressure jets can be dangerous if used incorrectly. The jet must not be directed at persons, animals, active electrical equipment or the device itself.
-
Do not direct the jet at yourself or others to clean clothing or shoes.
-
If you come into contact with cleaning agents, rinse them with sufficient clean water.
-
Never use the mains connection cable to pull the plug out of the socket or to pull the device. Protect the mains connection cable from heat, oil and sharp edges.
-
Risk of explosion - do not spray any flammable liquids.
-
Do not use the device near flammable liquids or gases. There is a risk of fire or explosion if this advice is not heeded.
-
Never transport the device while the drive is running.
-
Switch off the device and disconnect the mains plug from the socket. Make sure that all moving parts have come to a complete stop:
-
when leaving the device,
- before changing the accessories,
- before removing obstructions or loosening blockages,
- before checking the device, cleaning it or performing maintenance work on it.
If the device starts to vibrate abnormally strong, an immediate inspection is required:
- search for signs of damage,
- replace damaged parts,
- contact the service centre.
Cleaning, maintenance and storage
- Allow the motor to cool down before storing the device for a longer period.
- Replace worn or damaged parts in the interests of safety. Use only original spare parts and accessories.
The device may only be opened by an authorised electrician. Always contact our service centre for repairs. - Switch the drive off, disconnect the device from the power supply and allow the device to cool off if you want to clean, adjust, store
GBIE
the device or to exchange an accessory part.
- Handle the device with care and keep it clean.
- Store the device out of reach of children.
Preparation
WARNING! Risk of injury due to unintentional start-up. Do not insert the plug into the socket until the device is fully prepared for use.

According to current regulations, the pressure washer must never be connected to the drinking water network without a system separator. A suitable system separator must be used in accordance with EN 12729 Type BA.
Water that has flowed through a system separator is classified as non-potable.
System separators are available from specialist dealers.
A system separator (check valve) prevents the backflow of water and cleaning agent into the drinking water pipeline.
Use a standard garden hose for the water supply and make sure it is long enough.
- Use the device on a domestic water connection with an output of at least 450L / h .
Operating elements and how they work
Familiarise yourself with the operating elements before using the device for the first time.
Pistol grip (1)
- Switch lever (13)
Pulling the switch lever: Activates the pressure jet
- Releasing the switch lever: Deactivates the pressure jet
- Switch lever child safety lock (16) (seen from behind)
The switch lever is locked
→ You can pull the switch lever
WARNING! Risk of injury due to pressure jet! Lock the switch lever every time you take a break.
Bow-type handle (28)
With the bow-type handle folded out, you can conveniently roll the device.
The handle can only be folded out if the holder for the mains connection cable (6) and the high-pressure hose (5) are pushed in.
- Folding out the handle: Press the release (4) and fold the bow-type handle up.
- Putting the handle away: Press the release and fold the bow-type handle down.
Setting up
Setting up the device
- Place the device horizontally on a level surface.
- Plug the threaded connection (11) on the high-pressure hose (23) into the high-pressure connection (10) on the device. Fix the connection with the coupling nut.
- Plug the quick connector (14) on the high-pressure hose into the high-pressure connection on the pistol grip (1).
- Do not guide the hose through the bow-type handle (28) as to not obstruct the bow-type handle.
- Fit a suitable attachment.
Mains connection
WARNING! Risk of injury due to unintentional start-up. Do not insert the plug into the device until it is fully prepared for use
- Prior to use, always check the connecting cable and extension cable for signs of dam
age or wear and tear. If the cable gets damaged during use, it must be disconnected from the supply network immediately. DO NOT TOUCH THE CABLE BEFORE IT HAS BEEN DISCONNECTED FROM THE POWER SUPPLY. Do not use the device if the cable is damaged or worn.
- Only connect the device to a power socket with a residual current device (RCD) with a rated residual current no more than 30mA .
- Unsuitable extension cables can be dangerous. Use only extension cables that are designed for outdoor use. The connection must be dry and routed above the ground. We recommend using a cable drum that holds the socket at least 60mm above the ground.
Establishing a water supply
Requirements
Supply hose: Garden hose with fitted quick connector (not included in delivery); 13mm(12 " length between 5m and 30m
- Domestic water connection with a system separator; pump capacity of at least 450~l/h
System separator
A system separator (check valve) prevents the backflow of water and cleaning agent into the drinking water pipeline.
- According to current regulations, a pressure washer must never be connected to the drinking water network without a system separator. A suitable system separator must be used in accordance with EN 12729 Type BA.
Water that has flowed through a system separator is classified as non-potable. - System separators are available from specialist dealers.
Connecting the water supply
- Remove the quick connector with filter insert (20) from the device water connection (21).
- Connect the supply hose to the water supply.
- Bleed the supply hose: Open the water supply until the water flows bubble-free out of the
other end of the supply hose. Close the water supply.
- Connect the quick adapter on the supply hose to the quick connector with filter insert.
Selecting an attachment
Standard Vario nozzle (17)
The tip can be rotated and moved
Control elements
- Vario fan jet (direction of rotation as seen from behind)

U Wide jet

Narrow jet; spot jet
- Moveable tip

Low pressure for cleaning agent: Tip up front
High-pressure operation: Tip at rear
Turbo dirt miller (19)

The rotating water jet is suitable for working with low water consumption.
Fitting and removing attachments
Fitting the nozzle
- Fit the lance (24) on the pistol grip (1) by inserting and turning it (Bayonet locking device).
- Fit the attachment on the lance (24).
The attachment clicks into place.
Removing the nozzle
- Press the release button (18) on the front end of the lance (24) and remove the attachment.
- Remove the lance (24) from the pistol grip (1 by turning and pulling it (Bayonet locking device). (Bayonet locking device) from the pistol grip (1).
Operation
Cleaning using cleaning agent
Requirements for the cleaning agent
- This device has been designed to be used with a neutral cleaning agent based on biodegradable anionic surfactants.
- Use of other cleaning agents or chemicals can negatively impact the safety of the device and can cause damage. Such damage to the device is not covered by the warranty.
- You can buy cleaning agents from our online shop.
Requirements
- The cleaning agent tank is filled with cleaning agent.
The tip of the standard Vario nozzle is moved to the front.
Filling and emptying the cleaning agent tank
- Remove the sealing cap with suction hose (7) from the cleaning agent tank
- Pull the cleaning agent tank (8) upward and then to the front.
√ The cleaning agent tank is removed. You can fill or empty the cleaning agent tank.
- Insert the cleaning agent tank in reverse order.
- Seal the cleaning agent tank with the sealing cap.
- Push the suction hose into the cleaning agent tank until it reaches the bottom.
Switching on
WARNING! A leaky water system can result in electric shock! Move the On/Off switch (2) to the "O" (OFF) position. Unplug the plug. Try connecting the water connection again (see Connecting the water supply, p. 25).
WARNING! The device may only be used in an upright position! There is a risk of an electric shock if the device falls over. Turn the device off
immediately using the On/Off switch (2). Unplug the plug. Only now may you bring the device into the upright position. For your own safety, wait about five minutes until you restore the electrical connection.
WARNING! Unsuitable extension cables can be dangerous! Use only extension cables that are designed for outdoor use. The connection must be dry and routed above the ground. We recommend using a cable drum that holds the socket at least 60~mm above the ground.
- Ensure that the On/Off switch (2) is in the "O" position.
- Insert the mains plug into an earthed socket with residual current circuitry.
- Put the device in an upright position.
- NOTE! Dry running will damage the device. Do not operate the pressure washer with the tap turned off.
Turn the tap on fully.
- Move the On/Off switch (2) to the "I" (ON) position.
- The motor starts briefly to build pressure. Once the necessary pressure has been built, the motor stops.
- A WARNING! Be aware of the recoil force when the water jet commences. There is a risk of injuring yourself or other people. Ensure that your footing is secure. Keep a good hold on the pistol grip (1).
Press the switch lever (13) on the pistol grip (1).
The nozzle works with pressure and the motor starts. If you release the switch lever (13), the motor will stop. The high pressure is maintained in the system.
Interrupting operation
- Release the switch lever (13) on the pistol grip (1).
- If you put down the pistol grip: Lock the switch lever using the child safety lock (16) (seen from behind).
The switch lever is locked.
You can pull the switch lever
WARNING! Risk of injury due to pressure jet! Lock the switch lever every time you take a break.
- When taking longer breaks: Move the On/ Off switch (2) to the "O" (OFF) position.
Bleeding
Bleeding the supply hose
- Close the tap.
- Remove the supply hose from the device.
- For more, see: Connecting the water supply, p. 25
Bleeding the device
- Move the On/Off switch (2) to the "I" (ON) position.
- Wait until pressure has built up and the motor stops.
- Move the On/Off switch (2) to the "O" (OFF) position.
- Press the switch lever (13) on the pistol grip (1) until the pressure has been released.
- Repeat these steps several times until there is no more air in the device.
Ending operation
- After working with cleaning agents:
Empty the cleaning agent tank
- Rinse the device with clear water until the lines are free of cleaning agent.
- Release the switch lever (13) on the pistol grip (1).
- Move the On/Off switch (2) to the "O" (OFF) position.
- Close the tap.
- Press the switch lever on the pistol grip until the pressure has been released.
- Unplug the mains plug and wind up the mains connection cable (9).
- Disconnect the device from the water supply.
Cleaning and maintenance
WARNING! Electric shock! Protect yourself when performing maintenance or cleaning work. Turn off the device. Pull out the mains plug.
You should have any repair and maintenance work that is not described in these instructions carried out by our Service Centre. Only use original replacement parts.
Cleaning
NOTE! Risk of damage! Improper cleaning can damage the device. Never spray down the device with water. Do not clean the device under running water. Do not use any abrasive cleaning agents or solvents.
Always keep the device clean.
Cleaning after operation
- Move the On/Off switch (2) to the "O" (OFF) position.
- Pull out the mains plug.
- Keep the ventilation slits clean and free of objects.
- Clean the device with a soft brush or a slightly damp cloth.
Cleaning the standard Vario nozzle
In rare cases, the standard Vario nozzle may become clogged by foreign bodies.
- Remove the standard Vario nozzle (17).
- Remove the foreign body from the front using the nozzle cleaning needle (3).
- Rinse the standard Vario nozzle with water from the front to remove the foreign body.
Cleaning the quick connector with filter insert
-
Remove the quick connector with filter insert (20) from the device.
-
Remove the seal in the thread of the quick connector.
√ You can remove the filter.
- Clean the filter under running water.
- Fit the quick connector with filter insert in the opposite order.
Maintenance
The device is maintenance-free.
Troubleshooting
Problem Possible cause Troubleshooting
| Device does not work On/Off switch (2) turned off | Check the On/Off switch | |
| No mains power supply Check the socket, mains connection cable, plug and fuse and have them repaired by a qualified electrician if necessary. | ||
| Incorrect voltage supply Check whether the electrical system matches the information on the type plate | ||
| Device does not convey water | Air locks in the pressure washer | Turn the device on and activate the pistol grip (1). |
| Bleeding, p. 27 | ||
| No pressure in device Air locks in the pressure washer | Bleeding, p. 27 | |
| Pressure loss in line Check the water supply | ||
| Water system leaky Connections not correctly installed | Turn off the device and disconnect it from the mains. Reconnect the device to the water supply (see Setting up, p. 24) | |
| Water connection (21) leaky | Turn off the device and disconnect it from the mains. Replace the water connection coupling (20) incl. sealing ring (see Spare parts and accessories) | |
| Strong pressure fluctuations | Standard Vario nozzle (17) soiled | Rinse the standard Vario nozzle (17) with water. If required, clean the nozzle bore hole with a needle (see Cleaning, p. 27). |
| Standard Vario nozzle (17) blocked | Remove the standard Vario nozzle (17) and ensure that the water can discharge from the pistol grip (1) unimpeded. | |
Storage
Information on storage
Always store the device and accessories:
clean
dry
- protected against dust
- protected against frost
out of the reach of children
Preparing the device for storage
NOTE! The pressure washer and accessories will be destroyed by frost if they are not completely emptied of water.
-
Completely empty the water from the device.
-
Disconnect the device from the water supply.
- Turn on the pressure washer with the On/Off switch (2) for a maximum of 1 minute until there is no more water coming out of the pistol grip (1) or the attachments.
-
Turn off the device.
-
Completely empty the water from the accessories.
- Store all attachments upright in the holders with the connection facing downwards.
- Remove the high-pressure hose.
- Empty the high-pressure hose.
- Store the high-pressure hose and mains connection cable in the intended holders (5, 6).
Disposal/environmental protection
The device, accessories and packaging must be properly recycled.

Electrical devices must not be disposed of with domestic waste.
Take the device to a recycling plant. The plastic and metal parts used on your device can be properly sorted according to materials and grades and efficiently recycled.
Please contact our service centre for more information.
We will dispose of defective devices you ship to us free of charge.
Service
Guarantee
Dear Customer,
This equipment is provided with a 3-year guarantee from the date of purchase.
In case of defects, you have statutory rights against the seller of the product. These statutory rights are not restricted by our guarantee presented below.
Terms of Guarantee
The term of the guarantee begins on the date of purchase. Please retain the original receipt. This document is required as proof of purchase. If a material or manufacturing defect occurs within three years of the date of purchase of this product, we will repair or replace - at our choice - the product for you free of charge. This guarantee requires the defective equipment and proof of purchase to be presented within the three-year period with a brief written description of what constitutes the defect and when it occurred. If the defect is covered by our guarantee, you will receive either the repaired product or a new product. No new guarantee period begins on repair or replacement of the product.
Guarantee Period and Statutory Claims for Defects
The guarantee period is not extended by the guarantee service. This also applies for replaced or repaired parts. Any damages and defects already present at the time of purchase must be reported immediately after unpacking. Repairs arising after expiry of the guarantee period are chargeable.
Guarantee Cover
The equipment has been carefully produced in accordance with strict quality guidelines and conscientiously checked prior to delivery.
The guarantee applies for all material and manufacturing defects. This guarantee does not extend to cover product parts that are subject to normal wear and may therefore be considered as wearing parts (e.g. high pressure hose) or to cover damage to breakable parts (e.g. switches).
This guarantee shall be invalid if the product has been damaged, used incorrectly or not maintained. Precise adherence to all of the instructions specified in the operating manual is required for proper use of the product. Intended uses and actions against which the operating manual advises or warns must be categorically avoided.
The product is designed only for private and not commercial use. The guarantee will be invalidated in case of misuse or improper handling, use of force, or interventions not undertaken by our authorised service branch.
Processing in Case of Guarantee
To ensure efficient handling of your query, please follow the directions below:
-
Please have the receipt and item number (IAN 351661_2007) ready as proof of purchase for all enquiries.
-
Please find the item number on the rating plate.
-
Should functional errors or other defects occur, please initially contact the service department specified below by telephone or by e-mail. You will then receive further information on the processing of your complaint.
-
After consultation with our customer service, a product recorded as defective can be sent postage paid to the service address communicated to you, with the proof of purchase (receipt) and specification of what constitutes the defect and when it occurred. In order to avoid acceptance problems and additional costs, please be sure to use only the address communicated to you. Ensure that the consignment is not sent carriage forward or by
bulky goods, express or other special freight. Please send the equipment inc. all accessories supplied at the time of purchase and ensure adequate, safe transport packaging.
Repair service
You can have repairs which are not subject to warranty performed by our service branch for a charge. They will gladly create a cost estimate for you.
We can only work on devices which are sent in properly packed and with postage paid.
Caution: Please send your device cleaned and with an indication of the defect to our service centre.
Devices sent in where freight is not prepaid - as bulky goods, express or as other special freight will not be accepted.
We will dispose of any defective devices that you send to us free of charge.
Service centre
GB Service Great Britain Tel.:08004047657
E-Mail: grizzlyl@lidl.co.uk
IAN 351661_2007
IE Service Ireland Service Northern Ireland
Tel.: 1890 930 034
(0,08 EUR/Min., (peak))
(0,06 EUR/Min., (off peak))
E-Mail: grizzly@lidl.ie
IAN 351661_2007
Importer
Please note that the address below is not a service address. Contact the service centre named above first.
Spare parts and accessories
You can get spare parts and accessories from www.grizzlytools-service.eu
If you have any problems with your order, contact us via our online shop. If you have any other questions, contact the Service centre, p. 30.
Pos. Name Order no.
| 1 Pistol grip 91104824 |
| 10 High-pressure hose 91105606 |
| 24 Lance 91104539 |
| 19 Turbo dirt miller 91104540 |
| 17 Standard Vario nozzle 91105608 |
| 20 Quick connector with filter insert 91103746 |
| 15 Cleaning agent bottle (500 ml) 30990010 |
Translation of the original EC declaration of conformity
Device: Pressure washer; Model: PHD 135 D3; Serial number: 000001-195000
The object of the declaration described above meets the relevant harmonisation legislation of the European Union:
2014/30/EU · 2006/42/EC · 2000/14/EC · 2005/88/EC · 2011/65/EU* (EU) 2015/863
To ensure compliance, the following harmonised standards as well as national standards and regulations were applied:
EN 60335-1:2012/A2:2019 · EN 60335-2-79:2012
EN 55014-1:2017 · EN 55014-2:2015 · EN 62233:2008
EN IEC 61000-3-2:2019 · EN 61000-3-3:2013/A1:2019 · EN IEC 63000:2018
The following is also confirmed in accordance with the noise emission directive 2000/14/EC:
Sound power level
guaranteed: 90 dB(A)
measured: 87,8 dB(A); K_WA = 2,28 dB
Applied conformity assessment procedures in accordance with annex V/2000/14/EC
This declaration of conformity is issued under the sole responsibility of the manufacturer:

*The object of the declaration described above satisfies the provisions of Directive 2011/65/EU of the European Parliament and the Council of 8 June 2011 on limiting the use of certain harmful substances in electrical and electronic devices.
Sommaire
Introduction 33
Puisance absorbee P 1800 W
Chere cliente, cher client,
Chere cliente, cher client,
bent van drugs, alcohol of medication.
Zhotoveni privodu vody. 86
Vyber nastavce 86
Montaz a demontaz nastavce. 86
Provoz 87
Cisteni's cisticim prosteredkem. 87
Uvod
Zhotoveni privodu vody
Predpoklady
Rengoring after drift


- FR BE
- Technical data 20
- Safety information 21
- Preparation 24
- Operation 26
- Introduction
- Cleaning and maintenance 27
- Troubleshooting 28
- Storage 29
- Disposal/environmental protection.. 29
- Service 29
- Translation of the original EC declaration of conformity. 32
- Proper use
- Scope of delivery
- Description of functions
- Overview
- Technical data
- High-pressure washer ......PHD 135 D3
- Safety information
- Symbols on the device
- Caution!
- Symbols on the cleaning agent bottle
- Correct handling of the device
- General information
- GBIE
- Initial start-up
- Operation
- Cleaning, maintenance and storage
- Preparation
- Operating elements and how they work
- Pistol grip (1)
- Bow-type handle (28)
- Setting up
- Setting up the device
- Mains connection
- Establishing a water supply
- Requirements
- System separator
- Connecting the water supply
- Selecting an attachment
- Standard Vario nozzle (17)
- Control elements
- Turbo dirt miller (19)
- Fitting and removing attachments
- Fitting the nozzle
- Removing the nozzle
- Cleaning using cleaning agent
- Requirements for the cleaning agent
- Filling and emptying the cleaning agent tank
- Switching on
- Interrupting operation
- Bleeding
- Bleeding the supply hose
- Bleeding the device
- Ending operation
- Cleaning and maintenance
- Cleaning
- Cleaning after operation
- Cleaning the standard Vario nozzle
- Cleaning the quick connector with filter insert
- Maintenance
- Troubleshooting
- Storage
- Information on storage
- Preparing the device for storage
- Disposal/environmental protection
- Service
- Guarantee
- Terms of Guarantee
- Guarantee Period and Statutory Claims for Defects
- Guarantee Cover
- Processing in Case of Guarantee
- Repair service
- Service centre
- IE Service Ireland Service Northern Ireland
- Importer
- Spare parts and accessories
- Pos. Name Order no.
- Translation of the original EC declaration of conformity
- Sommaire
- Introduction 33
- Provoz 87
- Uvod
- Zhotoveni privodu vody
- Predpoklady
- Rengoring after drift
Brand : PARKSIDE
Model : PHD 135 D3
Category : Pressure washer