SOR 1500 D3 - Electric heater SILVERCREST - Free user manual and instructions
Find the device manual for free SOR 1500 D3 SILVERCREST in PDF.
| Brand | SilverCrest |
| Model | SOR 1500 D3 |
| Product type | Oil-filled radiator |
| Power supply | 220-240 V~, 50 Hz |
| Rated power | 2,400 W |
| Heat levels | 800 W (1), 1,200 W (2), 2,000 W (3) |
| Temperature control | Continuous mechanical thermostat |
| Number of fins | 9 |
| Recommended room volume | Up to 50-60 m³ |
| Frost protection function | Yes, maintains above 7 °C |
| Anti-tilt switch | Yes, via safety button |
| Turbo fan | Yes, with separate switch |
| Certification | TÜV SÜD / GS |
| Warranty | 3 years |
| Maintenance | Lint-free damp cloth, mild detergent |
| Material | Steel, dielectric oil |
| Swivel castors | Yes, with U-bolts and wing nuts |
| Power cord | With cord wrap |
Frequently Asked Questions - SOR 1500 D3 SILVERCREST
User questions about SOR 1500 D3 SILVERCREST
0 question about this device. Answer the ones you know or ask your own.
Ask a new question about this device
Download the instructions for your Electric heater in PDF format for free! Find your manual SOR 1500 D3 - SILVERCREST and take your electronic device back in hand. On this page are published all the documents necessary for the use of your device. SOR 1500 D3 by SILVERCREST.
USER MANUAL SOR 1500 D3 SILVERCREST
Operation and safety notes
This product is only suitable for well insulated spaces or occasional use.
FR BE
RADIATEUR À BAIN D'HUILE
GB/IE Operation and safety notes Page 15
natural_image
Technical line drawing of a mechanical device with wheels and a handle (no text or symbols)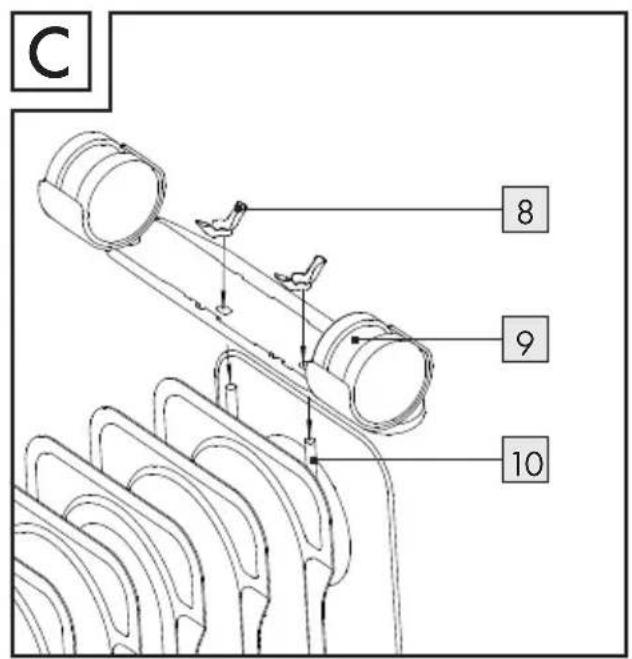
Intended use......Page 16
Part description......Page 16
Technical data....Page 16
Scope of delivery....Page 17
Safety notices......Page 17
Installation......Page 20
Operation Page 20
Reaching the decided room temperature....Page 20
Turbo heating Page 20
Switch off the product....Page 20
Frost protection function....Page 21
Use the heating fan only....Page 21
Care and cleaning......Page 21
Storage Page 21
Disposal Page 21
Warranty Page 22
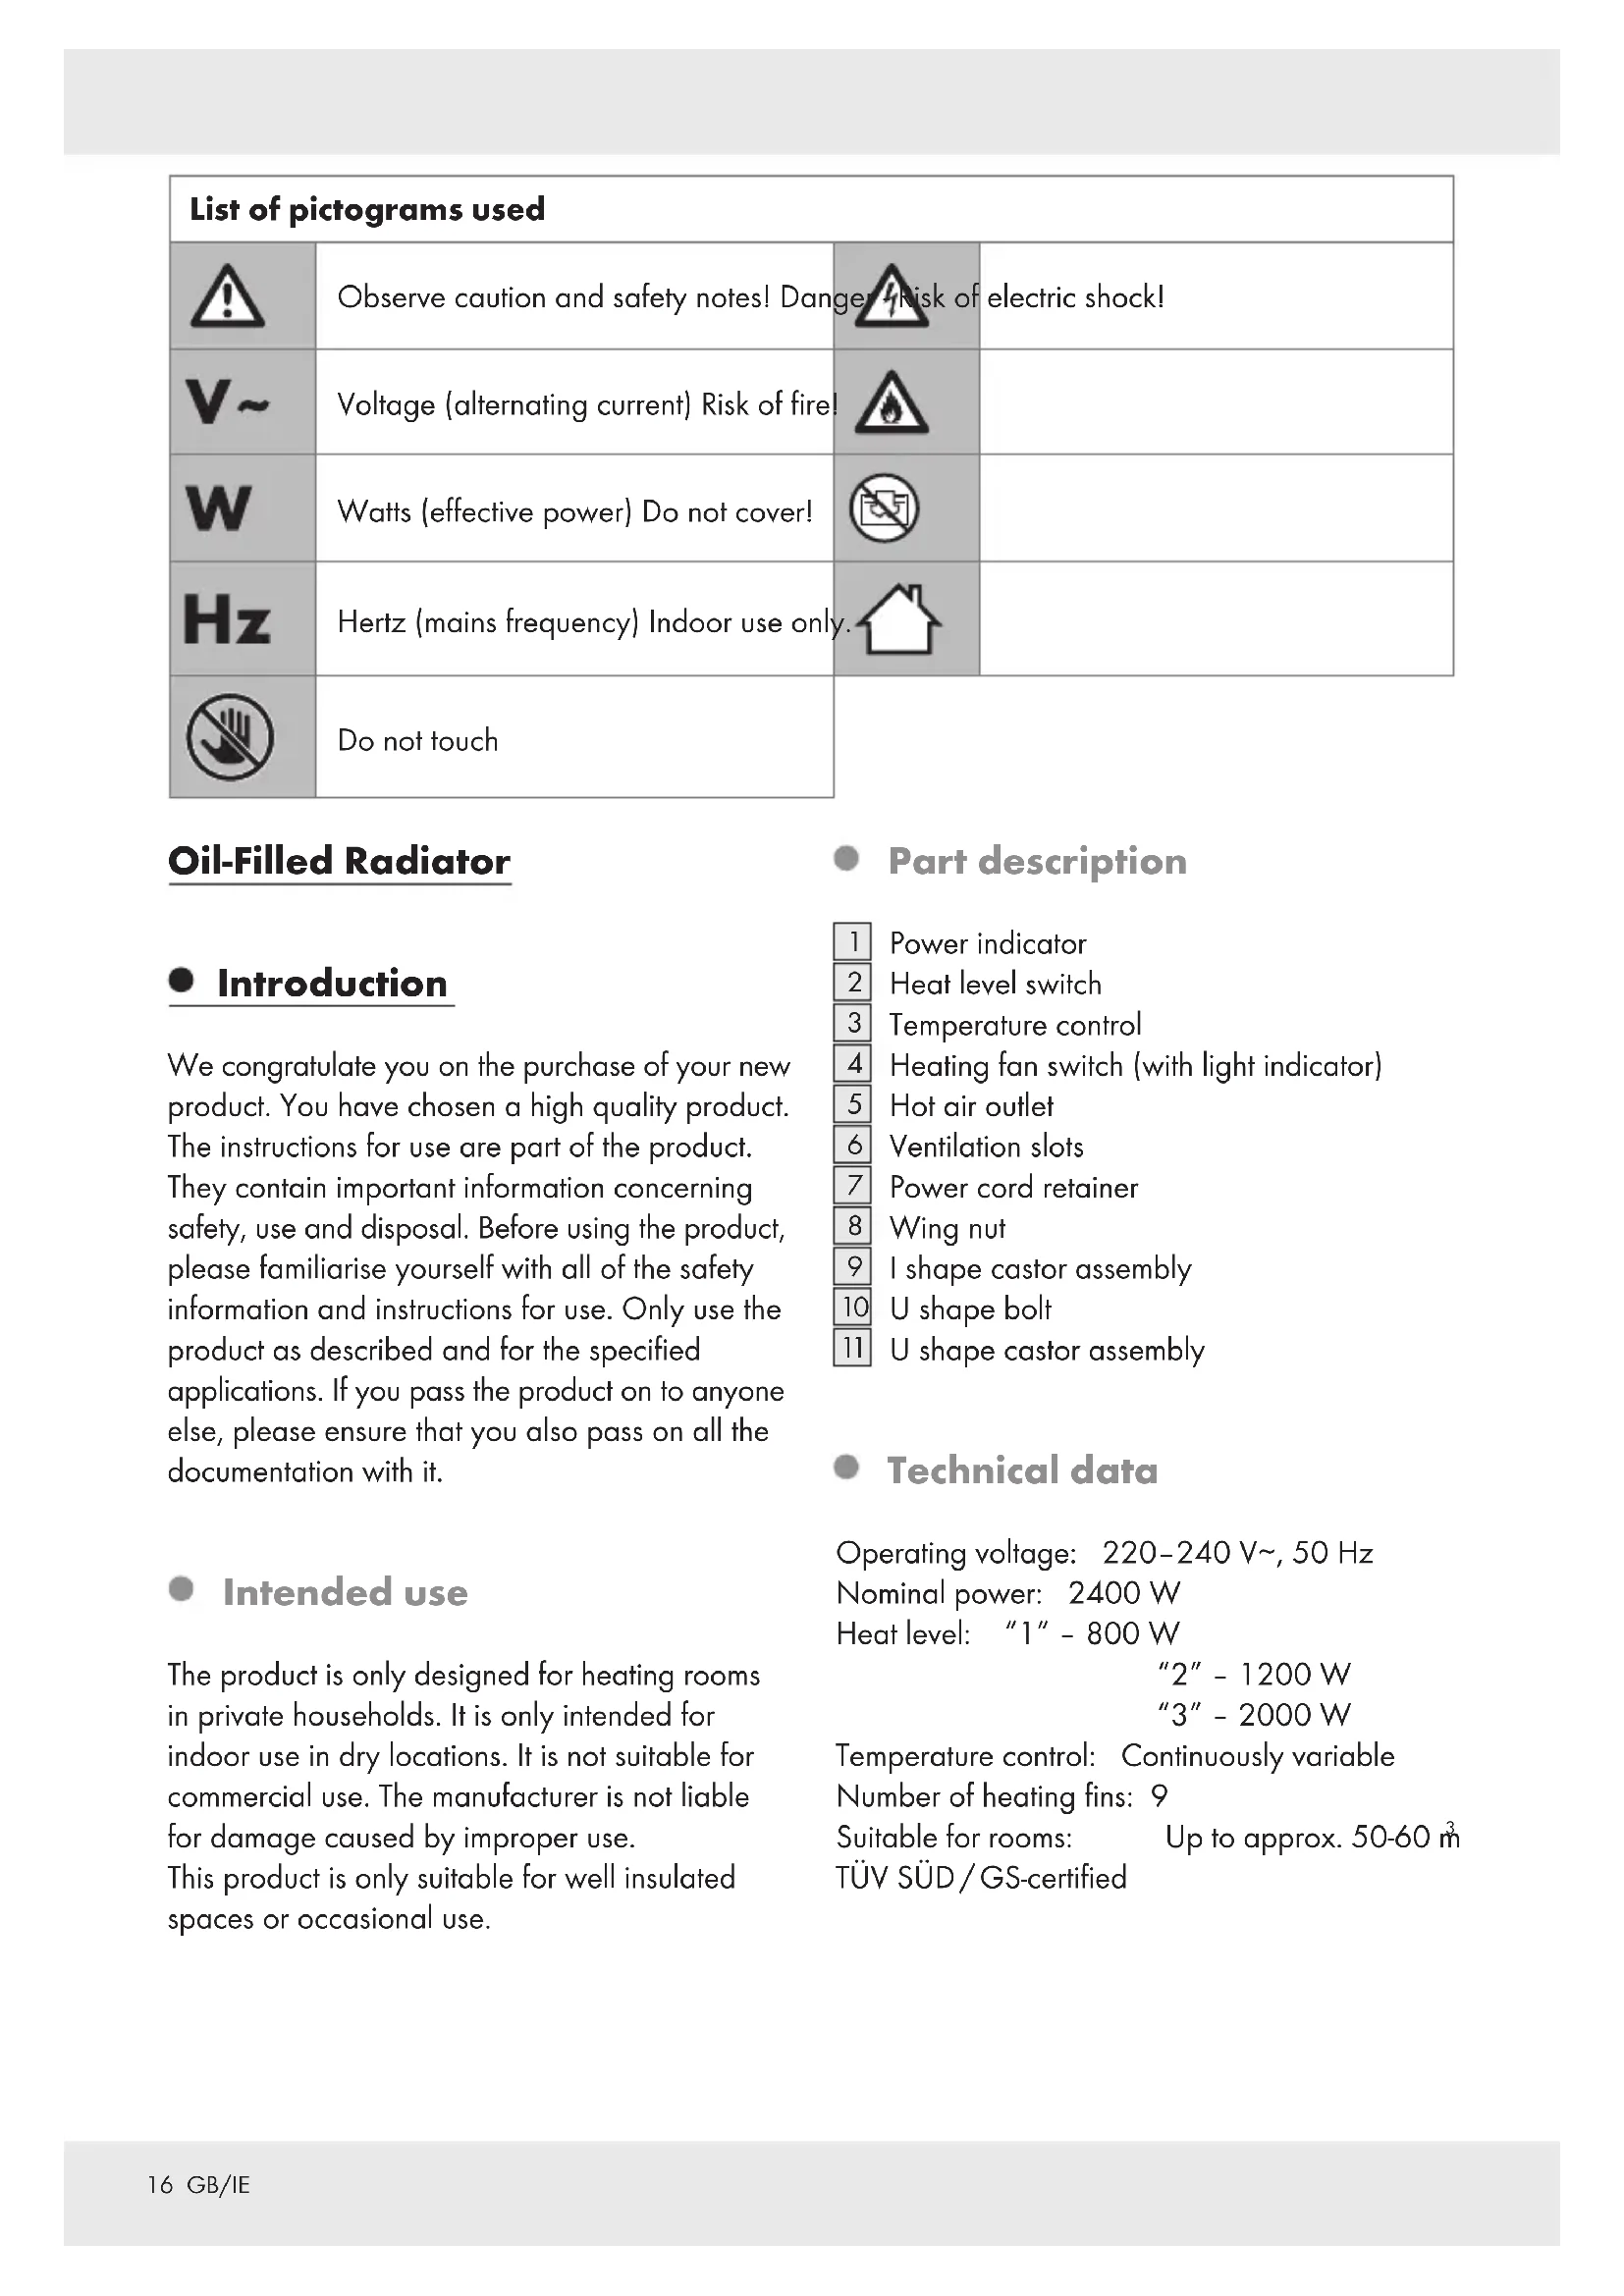
| List of pictograms used | |||
 | Observe caution and safety notes! Danger/Risk of electric shock! | ||
 | Voltage (alternating current) Risk of fire! | ||
 | Watts (effective power) Do not cover! | ||
 | Hertz (mains frequency) Indoor use only. | ||
 | Do not touch | ||
Oil-Filled Radiator
- Introduction
We congratulate you on the purchase of your new product. You have chosen a high quality product. The instructions for use are part of the product. They contain important information concerning safety, use and disposal. Before using the product, please familiarise yourself with all of the safety information and instructions for use. Only use the product as described and for the specified applications. If you pass the product on to anyone else, please ensure that you also pass on all the documentation with it.
Intended use
The product is only designed for heating rooms in private households. It is only intended for indoor use in dry locations. It is not suitable for commercial use. The manufacturer is not liable for damage caused by improper use. This product is only suitable for well insulated spaces or occasional use.
Part description
1 Power indicator
2 Heat level switch
3 Temperature control
4 Heating fan switch (with light indicator)
5 Hot air outlet
6 Ventilation slots
7 Power cord retainer
8 Wing nut
9 I shape castor assembly
10 U shape bolt
11 U shape castor assembly
- Technical data
Operating voltage: 220-240 V\~, 50 Hz
Nominal power: 2400 W
Heat level: "1" - 800 W
$$ " 2" - 1 2 0 0 \mathrm{W} $$
$$ " 3" - 2 0 0 0 \mathrm{W} $$
Temperature control: Continuously variable
Number of heating fins: 9
Suitable for rooms: Up to approx. 50-60 m³
TÜV SÜD / GS-certified
- Scope of delivery
Immediately after unpacking, please check the package contents for completeness and if the product and all parts are in good condition. Remove all packaging materials from the product.
1 Oil filled radiator
2 Castor assemblies
2 U shape bolts
4 Wing nuts
1 Instruction Manual

Safety notices
Read all safety advices and instructions. Non-observance of the safety advices and instructions may cause electric shock, fire and / or bad injuries.
KEEP ALL SAFETY NOTICES AND INSTRUCTIONS FOR FUTURE REFERENCE!
WARNING! DANGER TO LIFE
AND RISK OF ACCIDENTS FOR INFANTS AND
CHILDREN! Never leave children unsupervised with the packaging materials. The packaging material poses a suffocation hazard. Children frequently underestimate the dangers.
Always keep children away from the packaging material.
■ CAUTION! This product is not a toy for children! Children are not aware of the dangers associated with handling electrical products.
This product can be used by children aged from 8 years and above and persons with reduced physical, sensory or mental capabilities or lack of experience and knowledge if they have been given supervision or instruction concerning use of the product in a safe way and understand the hazards involved.
■ Children shall not play with the product.
■ Cleaning and user maintenance shall not be made by children without supervision.
■ Children of less than 3 years should be kept away unless continuously supervised.
Children aged from 3 years and less than 8 years shall only switch on / off the product provided that it has been placed or installed in its intended normal operating position and they have been given supervision or instruction
concerning use of the product in a safe way and understanding the hazards involved.
Children aged from 3 years and less than 8 years shall not plug in, regulate and clean the product or perform user maintenance.
■ CAUTION! Some parts of this product can become very hot and cause burns. Particular attention has to be given where children and vulnerable people are present.

WARNING!
In order to avoid
overheating, do not cover the product.
■ The product must not be located immediately below a socket-outlet.
- Do not use the product without feet properly installed; follow the assembly instructions within this instruction manual.
If the supply cord is damaged, it must be replaced by the manufacturer, its service agent or similarly qualified persons in order to avoid a hazard.
■ This product is filled with a precise quantity of special oil. Repairs requiring opening of
the oil container are only to be made by the manufacturer or his service agent. Contact them, if there is an oil leak.
■ When scrapping the product, follow the regulations concerning the disposal of oil.
⚠️ CAUTION! Avoid the hazard of life by electric shock:
■ Never use a damaged or oil leaking product.
■ Never immerse the product into water or any liquid.
■ Never touch the product, the power cord or the mains plug with wet hand or use it in very humid environments.
- Never place containers filled with liquid, such as drinking glasses, vases etc. on the product. If liquid should enter the product, unplug the mains plug immediately and have the product repaired by a qualified technician.
■ Make sure that the details on the rating label are in conformity with your mains voltage. Only connect the product to alternating current with an earthing contact as otherwise a protection against electric shock is not provided.
In the event of malfunctions, remove the mains plug from the mains socket.
- Do not open the product or attempt to repair it yourself. Defective products should only be repaired by qualified personal.
- Check the power cord regularly for damage or deterioration.
■ Always remove the mains plug from the mains socket after each use and before clean the product.
- Do not pull the power cord for unplugging the product. Unplug the product by pulling out the mains plug.
- Keep the power cord away from hot surfaces, sharp edges and mechanical forces.
■ Never let the power cord becomes a trip hazard, that no-one can get tangled in it or tread on it.
- Allow the product to cool down before moving it to a different location.
ATTENTION! HAZARD OF FIRE!
Do not operate the product close to or below curtains, wall cupboards or other inflammable materials.
■ Always operate the product in an upright position (controls on top, both castor assemblies 9 and 11 on the bottom). Any other position could cause a hazardous situation.
- Place the product on a level, stable and heat resistant floor.
- Do not place any open fire sources, such as candles, on the product.
■ Never block the hot air outlet or the ventilation slots 6.
- Do not use this product with a programmer, timer, separate remote-control system or any other device that switches the product on automatically, since a fire risk exists if the product is covered or positioned incorrectly.
■ Do not use an extension cord.
- Do not use this product in rooms with a room volume of less than 4 m ^3 .
■ Only use accessories and additional equipment stated in the instruction manual. The use of other products or accessories than recommended in the instruction manual may present a risk of injuries for you.
- Do not use this product near a bathtub, shower or swimming pool.
- Installation (see fig. A-C)
Place the product upside down on a soft underlay to avoid scratch on the surface, power cord retainer 7 upper than temperature control 3, see fig. A.
Attach the U shape b to the product between first two fins with the threaded ends pointing upward, see fig. A.
Place the U shape castor assembly over the U shape bolt 10 with both wheels pointing upward, see fig. B, ensure both threaded ends of U shape bolt 10 passing through both holes on the U shape castor assembly 11.
☐ Fasten wing not securely onto each threaded end of U shape bolt 10
Repeat above steps on the rear side of the product with the I shape castor assembly 9 and the U shape bolt 10 attached between last two fins, see fig C.
☐ etShe product back to upright position, wheels on the floor. It is now ready to use.
Note: The product is equipped with a tilt protection switch. It will shut down the product automatically if it falls over or is lying on its side.
Operation
□ Unwind the power cord completely from the power cord retainer 7.
Make sure that both, temperature control and heat level switch 2, are set to MIN and "0" respectively.
Connect the oil-filled radiator to a grounded electrical outlet protected by a residual current circuit breaker, see "Technical data" chapter.
- Reaching the decided room temperature
Set the temperature control to MAX. and the heat level switch 2 to "3", the power indicator 1 lights up.
When the desired room temperature is reached, turn the temperature control 3 gently counterclockwise until the product shuts off, a "click" sound is heard and the power indicator 1 goes off. Leave the temperature control 3 at the position and the room temperature is now retained.
The product automatically cycles on and off to keep the decided room temperature, the power indicator 1 light also cycles on and off to indicate when the product is heating up. As long as the heat level switch 2 is set to "1"/"2"/"3", the product operates even when the power indicator 1 is off.
☐ Use the heat level switch to select how quickly the product shall warm up. To warm up quickly, set the heat level switch 2 to "3".
Turbo heating
To heat the room more quickly, set the temperature control 3 to MAX. and the heat level switch 2 to "3", the power indicator 1 lights up.
Press the heating fan switch to position "I" to switch on the heating fan. An indicator in the heating fan switch 4 will light up. Hot air will be blown through the hot air outlet 5.
To switch off the hot air outlet, press the heating fan switch 4 to "0" position.
Using the temperature control to set the product to the desired temperature.
- Switch off the product
Press the heating fan switch to position "0" to switch off the hot air outlet 5.
Turn the temperature control to MIN and the heat level switch 2 to "0".
Remove the mains plug from the mains socket.
Frost protection function
The frost protection function automatically controls the product to keep the room temperature above 7 °C, steps are as follows:
Connect the product to an earthed socket protected by a residual current circuit breaker.
☐ Switch on the product by setting the heat level switch 2 to either "1", "2" or "3" and by setting the temperature control 3 to "MIN". The product switches on when the room temperature is approx. 7 °C. As soon as the room temperature is above 7 °C, the product automatically switches off again.
Note: The product will switch itself on and off automatically to maintain a temperature higher than 7 °C.
• Use the heating fan only
To use the hot air outlet 5 only on the product, steps are as follows.
☐ Connect the product to an earthed socket protected by a residual current circuit breaker.
Press the heating fan switch to position "1" to switch on the hot air outlet 5. An indicator in the heating fan switch 4 will light up. Hot air will be blown through the hot air outlet 5.
To switch off the hot air outlet, press the heating fan switch 4 to "0" position.
• Care and cleaning
WARNING! Let the product to cool down
beforecleaning.
WARNING! Never immerse the product, power cord or mains plug into water.
☐ Remove the mains plug from the mains socket and leave the product to cool completely before cleaning.
☐ Use a damp lint-free cloth to clean the product. Use a mild detergent on the cloth for stubborn dirt.
Do not use abrasive, aggressive or chemical cleaning agents. It could damage the surfaces of the product.
Storage
If the product not to be use for a long period of time, clean it as described in the section "Care and Cleaning".
Wind the power cord around the power cord retainer 7 clockwise tightly and let the mains plug being held at the upper part of power cord retainer 7, see fig D.
Store the product at a clean and dry location.
●Disposal
The packaging is made entirely of recyclable materials, which you may dispose of at local recycling facilities. The Green Dot is not valid for Germany.
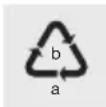
Observe the marking of the packaging materials for waste separation, which are marked with abbreviations (a) and numbers (b) with following meaning: 1-7: plastics/20-22: paper and fibreboard/80-98: composite materials.

The product and packaging materials are recyclable, dispose of it separately for better waste treatment. The Triman logo is valid in France only.
Contact your local refuse disposal authority for more details of how to dispose of your worn-out product.
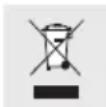
To help protect the environment, please dispose of the product properly when it has reached the end of its useful life and not in the household waste. Information on collection points and their opening hours can be obtained from your local authority.
Observe the current regulations for waste oil disposal.
Warranty
The product has been manufactured to strict quality guidelines and meticulously examined before delivery. In the event of product defects you have legal rights against the retailer of this product. Your legal rights are not limited in any way by our warranty detailed below.
The warranty for this product is 3 years from the date of purchase. Should this product show any fault in materials or manufacture within 3 years from the date of purchase, we will repair or replace it – at our choice – free of charge to you.
The warranty period begins on the date of purchase. Please keep the original sales receipt in a safe location. This document is required as your proof of purchase. This warranty becomes void if the product has been damaged, or used or maintained improperly.
The warranty applies to defects in material or manufacture. This warranty does not cover product parts subject to normal wear, thus possibly considered consumables (e.g. batteries) or for damage to fragile parts, e.g. switches, rechargeable batteries or glass parts.
CE
Information requirements for electric local space heaters
Model identifier(s): 284692/284701
| Item | Symbol Value | Unit Item Unit | ||||
| Heat output Type of heat input, for electric storage | local space heaters only (select one) | |||||
| Nominal heat output | P_nom | 1.7 kW manual heat charge control, with integrated thermostat | [yes/no] | |||
| Minimum heat output (indicative) | P_min | 0.4 kW manual heat charge control, with room and / or outdoor temperature feedback | [yes/no] | |||
| Maximum continuous heat output | P_max,c 1.7 kW electronic heat charge control with room and / or outdoor temperature feedback | room and / or outdoor temperature feedback | [yes/no] | |||
| Auxiliary electricity consumption | fan assisted heat output [yes | —/no] | ||||
| At nominal heat output | el_max | 1.700 kW | Type of heat output /room temperature control (select one) | |||
| At minimum heat output | el_min | 0.400 kW single stage heat output and no room temperature control | [yes/no] | |||
| In standby mode | el_SB | 0.000 kW Two or more manual stages, no room temperature control | [yes/no] | |||
| with mechanic thermostat room temperature control | [yes/no] | |||||
| with electronic room temperature control | [yes/no] | |||||
| electronic room temperature control plus day timer | [yes/no] | |||||
| electronic room temperature control plus week timer | [yes/no] | |||||
| Other control options (multiple selections possible) | ||||||
| room temperature control, with presence detection | [yes/no] | |||||
| room temperature control, with open window detection | [yes/no] | |||||
| with distance control option [yes | —/no] | |||||
| with adaptive start control [yes | —/no] | |||||
| with working time limitation [yes | —/no] | |||||
| with black bulb sensor [yes | —/no] | |||||
$$ " 2" - 1 2 0 0 \mathrm{W} $$
$$ " 3" - 2 0 0 0 \mathrm{W} $$