VGPUPR1 - Other computer accessories SONY - Free user manual and instructions
Find the device manual for free VGPUPR1 SONY in PDF.
Download the instructions for your Other computer accessories in PDF format for free! Find your manual VGPUPR1 - SONY and take your electronic device back in hand. On this page are published all the documents necessary for the use of your device. VGPUPR1 by SONY.
USER MANUAL VGPUPR1 SONY
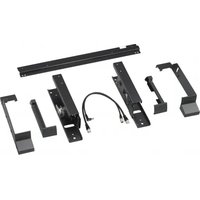
WARNING To reduce the risk of fire or electric shock, do not expose this apparatus to rain or moisture. To avoid electrical shock, do not open the cabinet. Refer servicing to qualified personnel only.
Use your product only with the AC adapter supplied with the unit. To disconnect it completely from the main voltage, unplug the AC adapter. The socket outlet shall be installed near the equipment and shall be easily accessible. For customers in the USA Owner’s Record The model number and serial number are located on the bottom of your docking station. Record the serial number in the space provided here. Refer to the model and serial number when you call your Sony Service Center.Model No. VGP-UPR1Serial No. WARNING This equipment has been tested and found to comply with the limits for a Class B digital device, pursuant to Part 15 of the FCC Rules. These limits are designed to provide reasonable protection against harmful interference in a residential installation. This equipment generates, uses, and can radiate radio frequency energy and, if not installed and used in accordance with the instructions, may cause harmful interference to radio communications. However, there is no guarantee that interference will not occur in a particular installation. If this equipment does cause harmful interference to radio or television reception, which can be determined by turning the equipment off and on, the user is encouraged to try to correct the interference by one or more of the following measures:– Reorient or relocate the receiving antenna.– Increase the separation between the equipment and receiver.– Connect the equipment into an outlet on a circuit different from that to which the receiver is connected.– Consult the dealer or an experienced radio/TV technician for help.You are cautioned that any changes or modifications not expressly approved in this manual could void your authority to operate this equipment.Only peripherals (computer input/output devices, terminals, printers, etc.) that comply with FCC Class B limits, may be attached to this computer product. Operation with non-compliant peripherals is likely to result in interference to radio and television reception.All cables used to connect peripherals must be shielded and grounded. Operation with cables, connected to peripherals, that are not shielded and grounded, may result in interference to radio and television reception.If you have any questions about this product, you can reach the Sony Customer Information Service Center at 1-888-476-6972 in the United States or 1-800-961-7669 in Canada; or write to the Sony Customer Information Service Center at 12451 Gateway Blvd, Ft. Meyers, FL 33913, or find Sony Customer Service on the Web athttp://www.sony.com/pcsupport. Declaration of Conformity Trade Name: SONYModel No.: VGP-UPR1Responsible Party: Sony Electronics Inc.Address: 16530 Via Esprillo, San Diego, CA 92127 U.S.A.Telephone No.: 858-942-2230(This phone number is for FCC-related matters only.)This device complies with Part 15 of the FCC Rules. Operation is subject to the following two conditions: (1) This device may not cause harmful interference, and (2) this device must accept any interference received, including interference that may cause undesired operation. For customers in Canada This Class B digital apparatus complies with Canadian ICES-003.VGP-UPR1 (JP/GB/FR/ES/CT/KR) 3-296-348-02(1)
Connecting to the personal computer ....
VAIO is a trademark of Sony Corporation. Microsoft, Windows, and Windows Vista are registered trademarks of Microsoft Corporation in the United States and/or other countries. Other names of systems mentioned within this document, product names are registered trademarks of each manufacturer. In addition, the marks
are not specified within this manual. In this manual, Windows Vista Home Basic, Windows Vista Home Premium, Windows Vista Business, and Windows Vista Ultimate are referred to as Windows Vista. For the rights of usage concerning the supplied software, refer to the license agreement for each software. Sony is not responsible for damages caused by this product, the software supplied within this product, passive damage, or claims from a third party. This product or the software supplied with this product may be subject to change without notice for modification. Connecting to the network (LAN) .............. 11 Connecting headphones ................................
Introduction Before use This product is a USB docking station designed for use with Sony VAIO notebook computers. However, it may not be used with some models. Confirm if your model is compatible. Compatible personal computers This product is compatible with Sony VAIO notebook computers which meet the following specifications.
CPU: 1.2GHz or higher processor
Windows Vista pre-installed models Notebook computers which do not meet the above conditions are unusable. For more information on specified models, refer to the websites described in “Getting Help” (page 16).VGP-UPR1 (JP/GB/FR/ES/CT/KR) 3-296-348-02(1)
Getting started Checking the supplied accessories After unpacking, check that the following accessories are included. If any items are missing or are damaged, consult your nearest Sony dealer. USB docking station AC adapter Power cord Installation CD Operating instructions Warranty* Safety regulations*
- Availability varies according to country or region. Installing the software Install the VGP-UPR1 device driver to use this product with your personal computer.Notes Do not connect the product with the personal computer before installing the software. Disconnect all USB devices connected to the personal computer. Keep disc drives such as CD-ROM drives, etc., at hand. In this manual, a disc drive for CD-ROM, etc., will be referred to as “CD-ROM drive.” For instructions on connecting the CD-ROM drive to the personal computer, refer to the instruction manual or the online manual supplied with the personal computer or CD-ROM drive. Before installing the software, ensure the latest Windows updates have been applied. Be sure to exit all other software. Log on as “Administrator.” Please refer to the websites described in “Getting Help” (page 16) for the latest version of the software.
Turn the personal computer on, and start Windows.VGP-UPR1 (JP/GB/FR/ES/CT/KR) 3-296-348-02(1)
Insert the supplied installation CD into the CD-ROM drive. The “AutoPlay” screen will appear.
If the screen does not appear automatically, right-click “Setup.exe” of the CD-ROM, then click “Run as administrator.”
Click “Run Setup.exe” in the “Install or run program” screen. If the “User Account Control” screen appears, click “Continue.”
Complete the installation by following the instructions on the screen.
After the installation is complete, a screen that requests to reboot the personal computer may appear. In this case, select “OK.” Connecting to the personal computer Notes
Install the software before connecting the product (page 5).
Be sure to connect the product directly to the USB connector of the personal computer. Do not connect through a USB hub.
When connecting to a personal computer for the first time, disconnect all devices from this product.
The product does not support Windows Aero. If the product is connected to a personal computer, it will change to the basic user interface.
Movie playback and software that requires 3D processing are not supported on the display connected to this product.
Connect the plug of the supplied AC adapter to the product.
Insert the plug of the supplied power cord into the AC adapter.
Insert the plug of the supplied power cord into the wall socket. The DC IN lamp will light up.
Connect the product to the USB connector of the personal computer. A screen that requests to reboot the personal computer may appear. In this case, select “Restart Now.”
The screen may dim for a moment after connecting the product to the personal computer. This is a normal characteristic of setup and is not a malfunction.
You can adjust the length of the product’s USB cable by using the drain at the bottom.VGP-UPR1 (JP/GB/FR/ES/CT/KR) 3-296-348-02(1)
Disconnecting the product Note
When disconnecting the product from the personal computer, confirm that the connected devices can be disconnected safely.
Exit the software being used by the USB device connected to the product.
Disconnect the USB connector connected to the personal computer.
If a USB HDD or USB memory is connected
Click “Safely Remove Hardware” on the taskbar. The “Safely Remove Hardware” screen will appear.
After selecting “USB Mass Storage Device” in the “Safely Remove Hardware” screen, click “Stop.” The “Stop a Hardware device” screen will appear.
Select the “USB Mass Storage Device” connected to the product, then click “OK.” The “Safe To Remove Hardware” screen will appear.
Click “OK.” Prepared for disconnection.
After the POWER lamp or Access lamp of the connected product turns off, disconnect the product.VGP-UPR1 (JP/GB/FR/ES/CT/KR) 3-296-348-02(1)
DVI-D connector Connects the display. Note
Cannot be used simultaneously with the MONITOR connector.
Cannot be used simultaneously with the DVI-D connector.
MIC connector Connects a monoaural microphone. Note
To distinguish the connector from the HEADPHONES connector, there is a protrusion above the MIC connector. Be careful not to connect the microphone to the HEADPHONES connector.
LAN connector Connects LAN cables, etc. For example, use when connecting to ADSL modems equipped with LAN ports.
USB connector Connects to USB terminals of devices which correspond to the USB standard.
DC IN Lamp Lights when connected to a power source.
DC IN 12V connector Connects to the AC adapter and to an electrical outlet.VGP-UPR1 (JP/GB/FR/ES/CT/KR) 3-296-348-02(1)
Connecting USB devices Before connecting USB devices such as printers, installation of the drivers supplied with the device may be necessary.For more information, refer to the instruction manual supplied with the connecting device.
Connect the device to the USB connector. Notes Do not connect a USB hub to the product. Depending on the printer, a screen to select the printer cable or printer port may appear during the driver installation. In this case, select the USB cable or USB port. If multiple USB devices are connected, the printer speed may decrease as a characteristic of the USB. Depending on the printer, the status monitor, remote panel, etc., of the utility supplied with the printer driver may be unusable. Contact the manufacturer of the printer. If a printer that is not Windows Vista-compatible is connected, it may not function properly. When disconnecting a USB speaker, etc., stop playback of DVD, music, etc., or turn off the power of the devices before disconnecting. If the device is disconnected during playback, it may cause a malfunction. For the procedure for disconnecting USB devices, refer to the instruction manual supplied with the device. To avoid malfunctions of this product or USB device, be sure to follow these precautions.– When moving the product with USB devices connected, avoid applying pressure or impact to the USB connector.– Do not put the product in a bag or carrying case with USB devices connected. Tips The USB connector of this product corresponds to USB 2.0. USB 2.0 is a new addition to USB (Universal Serial Bus) and is capable of more rapid data transfer compared to USB 1.1. Connectors that correspond to USB 2.0 can also be connected to devices that correspond to USB 1.1. USB 2.0 has three transfer modes.– High-speed: Fastest transfer mode of 480 Mbps.– Full-speed: Transfer mode of 12 Mbps.– Low-speed: Transfer mode of 1.5 Mbps. Used for low speed devices such as a mouse, keyboard, etc.VGP-UPR1 (JP/GB/FR/ES/CT/KR) 3-296-348-02(1)
Connecting the display Notes Before connecting a display to the product, first install the software of the supplied installation CD (page 5). This product has two connectors, the MONITOR connector and the DVI-D connector, for display connection. The connector to use depends on the type of display. For information, refer to the instruction manual of the display. The DVI-D connector and the MONITOR connector cannot be used simultaneously. When a personal computer is connected, a maximum of two screens can be displayed, including the LCD of the personal computer. The maximum output resolution of the product is 1680 × 1050 pixels. However, depending on the connected display, images may be displayed in lower resolution. The connected display will be identified as the third display in the Windows’ “Display Settings” screen. Depending on the software you use, the contents may not appear correctly on the connected display. Output from the product will be usable through Extended Desktop Mode. When connecting a DVI-D connector compatible display
Insert the display cable into the DVI-D connector of the product. Note
The DVI-D connector of this product does not comply to the requirements of HDCP (High-bandwidth Digital Content Protection). When connecting a MONITOR connector compatible display
Changing the settings from the icon on the taskbar A menu will appear when the icon on the taskbar is right-clicked. Settings for connected displays can be made from this menu. Setting options Explanation Screen Resolution Changes the screen resolution of the connected display. Color Quality Changes the color of the connected display. Extend To Changes the screen position of the connected display and the personal computer. Extend Changes the extended desktop setting. Off Invalidates the extended desktop. Advanced… Displays the Windows “Display Setting” screen.
This product supports the following resolutions. 800 × 600, 1024 × 768, 1280 × 768, 1280 × 1024, 1360 × 768, 1400 × 1050, 1440 × 900, 1600 × 1200, 1680 × 1050 All the resolutions may not be supported depending on the connected display. Depending on the output resolution, images may not be displayed normally. Select a resolution that can be displayed normally. Connecting to the network (LAN) You can directly connect an ADSL modem or network (LAN) at home or in the office to the LAN connector of this product. Connecting to the Internet and transferring data between different devices through the network is possible. The product may be connected to a 100BASE-TX or 10BASE-T type network. For peripheral devices necessary to connect to the network, refer to either the instruction manual supplied with the ADSL modem, or directly contact the system administrator of your network provider. Also, for settings to connect to the network, refer to the instruction manuals of your ADSL modem or connected peripheral devices, or check the settings of your provider, etc. For setups in your office, consult your office network administrator.
Select the option “Local Area Connection SONY VGP-UPR1 (Ethernet Adapter)” displayed in the “Network Connections” screen to change the setting of the network connected to the LAN connector. Notes
To connect to the network, install the software of the supplied installation CD (page 5). The LAN connector of this product does not support Network boot or Wake-on-LAN.VGP-UPR1 (JP/GB/FR/ES/CT/KR) 3-296-348-02(1)
Connecting headphones You can connect headphones to the HEADPHONES connector on this product. About volume Depending on sound effects, sound sources, software types, etc., the volume of the sound may differ although the volume setting is the same. Change the sound settings of your personal computer according to your usage environment. When you want to change the sound level in the sound settings of each device, double click the appropriate device, or select and display the properties of the device. For more information on sound settings, refer to the instruction manual or the online manual of your personal computer.Notes When connecting/disconnecting this product to/from a personal computer, the output setting from the personal computer changes. While the product is connected to a personal computer, the sound of the personal computer will be output through the HEADPHONES connector on this product. Depending on the software, the sound may not be output through the HEADPHONES connector on this product. In this case, exit the software, and then follow the procedure below to allow the sound to be output from the headphones of the connected personal computer, etc.
Right-click the icon on the taskbar, then select the playback device. The “Sound” screen appears.
From the displayed playback device, select speakers or headphones of the personal computer, then click “Set Default.” This product is identified as “Speakers C-Media….”
Click “OK.” Setting is complete and the sound will output from the personal computer. Connecting the microphone You can use the microphone by connecting it to the MIC connector of this product. Note
While the product is connected to a personal computer, the settings may change to activate the MIC connector of this product. To activate the microphone connector of the personal computer, follow the procedure below.
Right-click the icon on the taskbar, then select the recording device. The “Sound” screen appears.
From the displayed recording devices, select a device other than “Microphone C-Media…,” and click “Set Default.”
Click “OK.” The setting change is complete, and the microphone connector of the personal computer will activate. The microphone volume of this product may be set to mute. In this case, change the volume level according to your preference.
Right-click the icon on the taskbar, then select the recording device. The “Sound” screen appears.
From the displayed recording device, select “Microphone C-Media…,” and click “Properties.” “Microphone Properties” appears.
Select the “Levels” tab and set the microphone volume according to your microphone.VGP-UPR1 (JP/GB/FR/ES/CT/KR) 3-296-348-02(1)
When a personal computer is connected, a maximum of two screens can be displayed, including the LCD of the personal computer.
Do not use the product in the following ways: – Simultaneous usage of the MONITOR and DVI-D connectors of this product. – Simultaneous usage of the product’s display output and the personal computer’s exterior display output.
The LAN connector of this product does not support Network boot or Wake-on-LAN. When you want to use the Network boot or Wake-on- LAN features, use the LAN connector of your personal computer.
Depending on the instant mode, types of software or data, etc., the sound may not output from the HEADPHONES connector.
The product does not support Windows Aero. If the product is connected to a personal computer, it will change to the basic user interface.
When a display is connected to the product, the extended desktop mode will be set as the default setting. Use in clone mode (mirror mode) is not supported.
When multiple USB devices are connected, as a characteristic of the USB, CPU load of the personal computer may increase, resulting in a decrease in software speed or printing speed of the USB printer.
Playback of movies on the external display is not supported. It is not supported even if the display is connected as the primary monitor.
Movie playback and software that requires 3D processing are not supported on the display connected to this product.
The maximum bit and sampling rate of the headphones output is 16 bits, 48 KHz.
When starting or restoring Windows, a sound to notify the device connection/disconnection may sound. This is not a malfunction. To stop the sound, perform the following procedure. However, be aware that all other sound effects that notify the detection of other devices will turn off as well.
Click the button-“Control Panel.” The “Control Panel” screen appears.
Click “Hardware and Sound,” then click “Manage audio devices” in the “Sound” screen. The “Sound” screen appears.
Click the “Sounds” tab, then select “Device Connect” from the “Program” list.
Select “None” from the “Sounds” drop down list.
Also select “Device Disconnect” from the “Program” list, then select “None” from the “Sounds” drop down list.
Click “OK,” then close the “Sound” screen. The setting change is complete, and the sound to notify device connection/disconnection is turned off.14
Use the AC adapter (AC-NB12A) supplied with the product.
To disconnect the product completely from the main voltage, unplug the AC adapter.
Do not place the product in locations that are: – Extremely hot or cold – Dusty or dirty – Very humid – Vibrating – Subject to strong magnetic fields – Sandy – Subject to direct sunlight
Do not apply mechanical shock or drop the product.
Make sure that nothing metallic comes into contact with the metal parts of the product. If this happens, a short-circuit may occur and the product may be damaged.
Do not operate the product with a damaged cord.
Do not operate the product if the product itself has been dropped or damaged.
Always keep the metal contacts clean.
While in use, it is normal for the product to get warm.
Keep the product away from TV or AM receivers, because it may disturb TV or AM reception.
USB, Printer, DVI-D and MONITOR are not supplied with Limited Power Sources.
When connecting or disconnecting the product, handle it carefully.
When transporting your personal computer, be sure to remove the product first. Moving your personal computer with the product connected could cause it to fall off, resulting in personal injury, or damage to the product or your personal computer. Others Maintenance Clean the unit with a soft dry cloth or a soft cloth lightly moistened with a mild detergent solution (be careful not to wet the connector parts). Do not use any type of solvent, such as alcohol or benzine, which may damage the finish.15
Operating temperature 41 °F to 95 °F (5 °C to 35 °C) (temperature gradient less than 18 °F (10 °C)/hour) Operating humidity 20% to 80% (not condensed), provided that humidity is less than 65% at 95 °F (35 °C) (hygrometer reading of less than 84 °F (29 °C)) Storage temperature –4 °F to 140 °F (–20 °C to 60 °C) (temperature gradient less than 18 °F (10°C)/hour) Storage humidity 10% to 90% (not condensed), provided that humidity is less than 20% at 140 °F (60 °C) (hygrometer reading of less than 95 °F (35 °C)) Dimensions Approx. 10.9 (w) × 1.3 (h) × 2.8 (d) inches (Approx. 275 × 31.5 × 70 mm) Mass Approx. 1.1 lb. (470 g) Supplied accessories AC adapter (1) Power cord (1) Warranty
Operating instructions
The specifications are the same as those of the personal computer you are using. For details, refer to the installation manual provided with your personal computer.
May not be supplied in some countries or regions.
The number supplied varies depending on the countries or regions. Design and specifications are subject to change without notice.16
VGP-UPR1 (JP/GB/FR/ES/CT/KR) 3-296-348-02(1) Getting Help This section provides information on how to get help and support from Sony, and troubleshooting tips for your USB docking station. About Sony’s support options Sony provides several support options for your USB Docking Station. When you have questions about your USB Docking Station, refer to the following: This manual explains how to use your USB Docking Station. For customers in the United States and Canada The Sony Customer Information Service Center offers information about your VAIO computer and other Sony products that work with your computer. To contact Sony Customer Information Service Center, call 1-888-4SONYPC (1-888-476-6972). Sony Computing Support provides instant access to information on commonly encountered problems. Type a description of the problem and the Knowledge Database searches for corresponding solutions online. You can visit Sony Online Support at: http://www.sony.com/pcsupport . For customers in Europe VAIO-Link. For addresses and telephone numbers, refer to http://www.vaio-link.com/ For customers in other countries and regions VAIO Website provides Frequently Asked Questions and solutions. vaio-online.sony.com/17
VGP-UPR1 (JP/GB/FR/ES/CT/KR) 3-296-348-02(1) Troubleshooting If a problem occurs during operation of the product, refer to the information provided in this section. If the problem persists, consult your nearest Sony dealer. For contact information, see “Getting Help” (page 16). Also refer to the instruction manual or online manual provided with your personal computer. Overall Symptom Cause/Action The connected device is not detected by the personal computer. The device does not run properly.
Disconnect the USB connector of this product, wait for a few seconds, then reconnect it. See “Disconnecting the product” (page 7).
The product does not function without the connection of an AC adapter. Connect the AC adapter, then connect to the personal computer.
The product and the personal computer may not be correctly connected by the USB cable. Refer to “Connecting to the personal computer” (page 6) for the product’s connection method.
The display or network driver has not yet been installed. The devices will not function unless the necessary drivers are installed from the supplied installation CD. Refer to “Installing the supplied software” (page 5).
The product is connected to a personal computer that is not compatible. Check the specifications of compatible personal computers.An error message was displayed when I disconnected the USB cable.
When physically disconnecting a mass storage device, the disconnection operation is also necessary on Windows.
Exit any software used for a USB device (s) connected to the personal computer through this product, and then disconnect the product.The personal computer’s behaviour is not stable.
To reset the USB interface, turn off the personal computer and disconnect the USB cable. Refer to “Disconnecting the product” (page 7). The USB interface is designed to be used with multiple devices, but the stability of the function depends on the combination of the connected devices. In such a case, disconnect the USB devices that are not in use. For details on how to disconnect the USB devices, refer to the instructions of each device.
The product is connected to a personal computer that is not compatible. Check the specifications of compatible personal computers.
The product is connected to an external USB hub (connector). Connect to a USB connector of the personal computer itself. Troubleshooting18
VGP-UPR1 (JP/GB/FR/ES/CT/KR) 3-296-348-02(1) HEADPHONES Connector Symptom Cause/Action The sound is distorted.
The output signal is too strong. Decrease the volume of the personal computer. Decrease the volume of the playback software for music, DVD, etc. The sound level is too low or there is no sound at all.
If the product is connected, the product’s HEADPHONES connector output is prioritized. If you are willing to output from the personal computer, change the settings.
Disconnect the product from the personal computer and check if the playback sound is being output from the personal computer itself. For more information, refer to the instruction manual or online manual supplied with your personal computer.
The USB cable is not connected securely. Connect the USB cable correctly.
The output signal is too weak. Increase the volume of the personal computer. Increase the volume of the playback software for music, DVD, etc.
The product is not selected in the audio settings of the personal computer, or the sound setting is low. Check the audio settings of the personal computer. For more information, refer to the instruction manual or online manuals supplied with your personal computer.
The USB cable is disconnected or connected while the playback software is in use. If the USB cable is disconnected or connected while the playback software for music, DVD, etc., is activated, the sound output of the product and that of the personal computer (internal speakers, etc.) may not switch correctly. Connect or disconnect the USB cable after you have exited the playback software. Check the audio settings of the personal computer. For more information, refer to the instruction manual or online manuals supplied with your personal computer.
The device is set to mute. Turn off the mute setting.19
VGP-UPR1 (JP/GB/FR/ES/CT/KR) 3-296-348-02(1) Symptom Cause/Action The sound skips or noise occurs.
When connecting or disconnecting the product from a personal computer, or when restarting or setting the personal computer to power saving mode, there may be an abnormal noise. When connecting or disconnecting the product or other devices or when restarting or placing your personal computer in power saving mode, disconnect the headphones, or keep the sound level of the speaker at a minimum.
The anti-virus, system watch, or other memory-resident utility software may be active in the personal computer. When playing CDs or DVDs, exit off the memory-resident utility software.
Resource is not sufficient. Restart the personal computer.
Multiple files are open or many programs are in use. Exit files and programs that are not in use. If the sound still skips or if noise is still heard, restart the personal computer.
The product is placed on an unstable surface. Place the product or personal computer on a stable surface. Vibration may also cause the sound to skip. MIC Connector Symptom Cause/Action The sound cannot be input.
The microphone of the product is not selected. Follow the procedure below. Right-click the icon on the taskbar, and select the recording device. Check if “Microphone C-Media…,” is set to the default for the displayed recording devices.
The microphone volume is not set. Follow the procedure below. Right-click the icon on the taskbar, and select the recording device. From the displayed recording device, select “Microphone C-Media…,” and click “Properties.” “Microphone Properties” screen appears. Select the “Levels” tab and set the microphone volume according to your microphone.20
VGP-UPR1 (JP/GB/FR/ES/CT/KR) 3-296-348-02(1) Symptom Cause/Action The input sound is distorted.
The microphone volume is too high. Action 1 Right-click the icon on the taskbar, and select the recording device. From the displayed recording device, select “Microphone C-Media…,” and click “Properties.” “Microphone Properties” screen appears. Select the “Levels” tab and set the microphone volume according to your microphone. Action 2 Right-click the icon on the taskbar, and select the recording device. From the displayed recording device, select “Microphone C-Media…,” and click “Properties.” “Microphone Properties” screen appears. Select the custom tab and turn AGC (Automatic Gain Control) to off. External Display Symptom Cause/Action Nothing appears on the display, or images are displayed abnormally.
Disconnect the product from the personal computer or disconnect the display from the product, wait for a few seconds, then reconnect. See “Disconnecting the product” (page 7), “Connecting to the personal computer” (page 6).
The setup program did not finish. Install the driver from the installation CD.
The DVI-D connector and MONITOR connector cannot be used simultaneously. Connect the display to either the DVI-D or MONITOR connector.
Images are not displayed in the specified resolution. The maximum resolution for the product is 1680 × 1050 pixels. Resolution higher than 1680 × 1050 pixels will not be displayed.
There are conditions required by the software. This product does not meet the conditions required for 3D games. If software such as 3D games is activated with this product connected, the output from the product or the display of the personal computer will not be stable. Disconnect the product then use the software.
The product does not support Windows Aero. If the product is connected to a personal computer, it will change to the basic user interface. The personal computer screen does not appear on the display (clone (mirror) mode).
The display output of this product functions only in the extended desktop mode. For using clone mode (mirror mode), use the external display output of the personal computer.
The images of the extended desktop do not display. The output setting is set to “Off.” Right-click the icon on the taskbar, to display the menu. Select “Extend” from the menu.21
VGP-UPR1 (JP/GB/FR/ES/CT/KR) 3-296-348-02(1) Symptom Cause/Action The image distorts.
Keep any items that generate electromagnetic fields, such as a radio, away from this product. Would like to enlarge the font size of Windows.
Follow the operations below. Click the button-“Control Panel.” The “Control Panel” screen appears. Click “Appearance and Personalization”-“Personalization.” Click “Adjust font size (DPI)” on the left side of the screen. The “DPI Scaling” screen appears. Check “Large scale (120DPI)” then click “OK.” Click “Restart Now.” Restart your personal computer to have your font changes take effect. Images on the display connected to the product are not displayed correctly.
Depending on the software being used, images on the display connected to the product may not be displayed correctly. Software is not displayed correctly.
Depending on the software you use, images may not be displayed correctly. Exit the software once, then restart it. Cannot play movies on the display connected to the product.
The external display output of this product does not support movie playback. Movies can be watched on a personal computer display. With the product connected to the personal computer, output from the personal computer to the display was disabled.
Output from the personal computer to the display is available to either of the following display; − display connected to the MONITOR connector or DVI-D connector of the product − display connected to the external output connector of the personal computer Cannot connect two displays simultaneously.
Either the MONITOR connector or the DVI-D connector of this product can be connected. Two external displays cannot be connected simultaneously.22
VGP-UPR1 (JP/GB/FR/ES/CT/KR) 3-296-348-02(1) LAN Connector Symptom Cause/Action Cannot connect to the network.
Connect the LAN connector.
The setup is not complete. Install the driver from the installation CD.
For settings to connect to the network, refer to the instruction manuals of your ADSL modem or connected peripheral devices, or check the settings of your provider, etc. For setups in your office, consult your office network administrator.VGP-UPR1 (JP/GB/FR/ES/CT/KR) 3-296-348-02(1)
ManualGo.com