Sonicare 2100 Series HX3651 - Electric toothbrush PHILIPS - Free user manual and instructions
Find the device manual for free Sonicare 2100 Series HX3651 PHILIPS in PDF.
| Product Type | Electric toothbrush |
| Brand | Philips |
| Model | Sonicare 2100 Series HX3651 |
| Brushing Technology | Sonic |
| Functions | SmarTimer (2 min), QuadPacer (30 s intervals), EasyStart (gradual power increase over 14 brushings) |
| Intensity Levels | 2 (high, low) |
| Power Supply | USB charger (Philips WAA1001 or WAA2001 wall adapter) |
| Input Voltage | 100-240 V~, 50/60 Hz |
| Power | 3.5 W (input), 2.5 W (output) |
| Battery Type | Built-in rechargeable lithium-ion |
| Battery Life | About 28 two-minute brushing sessions (14 days at 2 brushings/day) |
| Charging Time | Up to 24 h for full charge |
| Charge Indicator | Green/orange LED |
| Brush Head | Replacement recommended every 3 months (Philips Sonicare models) |
| Included Accessories | Brush head(s), handle, USB charger, travel case (depending on version) |
| Maintenance | Rinse brush head after each use; clean handle and charger with a damp cloth |
| Safety | Do not use with essential oils; do not immerse charger; consult a doctor if you have a pacemaker |
| Intended Use | Home use, plaque removal and cavity prevention |
| Recycling | Device and battery to be recycled separately (consult local guidelines) |
| Warranty | Visit www.philips.com/support |
| Model Number | Starts with "HX" (e.g., HX123A) - located at bottom of handle |
| Maximum Operating Altitude | 4,500 m |
| Operating Temperature Range | 0 °C to 40 °C |
| Storage Temperature Range | -20 °C to +60 °C |
Frequently Asked Questions - Sonicare 2100 Series HX3651 PHILIPS
User questions about Sonicare 2100 Series HX3651 PHILIPS
0 question about this device. Answer the ones you know or ask your own.
Ask a new question about this device
Download the instructions for your Electric toothbrush in PDF format for free! Find your manual Sonicare 2100 Series HX3651 - PHILIPS and take your electronic device back in hand. On this page are published all the documents necessary for the use of your device. Sonicare 2100 Series HX3651 by PHILIPS.
USER MANUAL Sonicare 2100 Series HX3651 PHILIPS
natural_image
White Philips Sanicare electric toothbrush with toothbrush and brand logo (no text-heavy elements)1

-1
1_
-1
1
English 5
Azərbaycanca 18
Čeština 32
Dansk 45
Deutsch 58
Eesti 74
Español 87
Français 101
Hrvatski 115
Italiano 128
Latviešu 142
Lietuviškai 155
Magyar 168
Nederlands 181
Norsk 195
O'zbek 208
Polski 222
Português 236
Română 250
Shqip 264
Slovenščina 278
Slovensky 291
Srpski 304
Suomi 317
Svenska 330
Türkçe 343
Türkmençe 356
Ελληνικά 370
Български 385
Кыргызча 400
Македонски 414
Русский 428
Точикй 443
Українська 458
Қазақша 472
Ruijtntu 486
Jusmonyunn 501
הכלה 516
Introduction
Congratulations on your purchase and welcome to Philips! To fully benefit from the support that Philips offers, register your product at www.philips.com/welcome.
Important safety information
Only use the product for its intended purpose. Read this information carefully before you use the product and its batteries and accessories, and save it for future reference. Misuse can lead to hazards or serious injuries.
Accessories supplied may vary for different products.
Warnings
- Only use original Philips accessories or consumables. Only use the USB charger provided with the product.
- This appliance contains no user-serviceable parts. If the appliance is damaged, stop using it and contact the Consumer Care Center in your country (see 'Warranty and support').
- Keep adapters and chargers away from water.
- After cleaning, make sure the adapters, chargers, and travel cases are completely dry before connecting to power.
- This appliance can be used by children and persons with reduced physical, sensory or mental capabilities or lack of experience and knowledge if they have been given supervision or instruction concerning use of the appliance in a safe way and understand the hazards involved. Cleaning and user maintenance shall not be made by children without supervision.
- Children should be supervised to ensure that they do not play with the product.
- Do not clean any part of the product in the dishwasher unless otherwise instructed in the Cleaning section.
- Do not use adapters and chargers outdoors or near heated surfaces.
- If the power adapter, the USB charger or cable is damaged, stop using it and replace with a new one.
- This appliance has only been designed for cleaning teeth and gums.
- Replace the brush head every 3 months or sooner if signs of wear appear. Stop using a brush head with crushed or bent bristles.
- Rinse the handle, especially the brush head connection. Gently clean around the rubber seal.
- Make sure brush head and toothbrush are dry before storing in travel case.
- Avoid direct contact with products that contain essential oils or coconut oil. Contact may result in bristles dislodging.
- The maximum altitude of use is 4500 meters.
English
- Information on REACH substances, contained in Philips products, can be found on www.philips.com/REACH
Medical warnings
- Stop using the appliance and consult your dentist/doctor if excessive or prolonged bleeding occurs after use, or if you experience discomfort or pain during use.
- If you have a pacemaker or other implanted device, contact your doctor or the manufacturer of the implanted device prior to use.
- This appliance is a personal care device and is not intended to be shared by multiple users.
Battery safety instructions
- This appliance contains batteries that are only removable by skilled persons.
- Keep product and batteries away from fire and do not expose them to direct sunlight or high temperatures.
- If the product becomes abnormally hot or smelly, changes color or if charging takes longer than usual, stop using and charging the product and contact Philips.
- Do not place products and their batteries in microwave ovens or on induction cookers.
- Do not open, modify, pierce, damage or dismantle the product or battery to prevent batteries from heating up or releasing toxic or hazardous substances. Do not short-circuit, overcharge or reverse charge batteries.
- This appliance contains batteries that are non-replaceable. When the battery is at end of life, the appliance shall be properly disposed of, see section on Recycling.
- Charge only with Philips WAA1001, WAA2001, safety approved IPX4 adapters with input ratings (100-240 V\~; 50/60 Hz; 3.5 W) and output ratings (5 V dc; 2.5 W). For the list of adapters, please see www.philips.com/support.
- Charge and use the product at a temperature between 0 °C and 40 °C (32 °F and 104 °F).
Storage and transportation conditions
Temperature -20 °C to +60 °C (-4 °F to 140 °F).
Electromagnetic fields (EMF)
This Philips appliance complies with all applicable standards and regulations regarding exposure to electromagnetic fields.
LIST OF SYMBOLS USED
The following symbols may appear on the product:

natural_image
Simple line drawing of an open book with no text or symbols visibleThis symbol means read the instructions for use, before using the appliance.

This symbol means to use the indicated power supply.
Intended use
This Sonicare power toothbrush is intended to remove adherent plaque and food debris from the teeth to reduce tooth decay and improve and maintain oral health. This Sonicare power toothbrush is intended for consumer home use. Use by children should be with adult supervision.
Your Philips Sonicare (Fig 1.)
1 Brush head cap
2 Brush head(s)
3 Handle
4 Power on/off button
5 Battery indicator
6 USB charger (wall adapter not included)
7 Travel case
Note: Accessories included may vary based on the model purchased.
Getting started
Attaching the brush head
natural_image
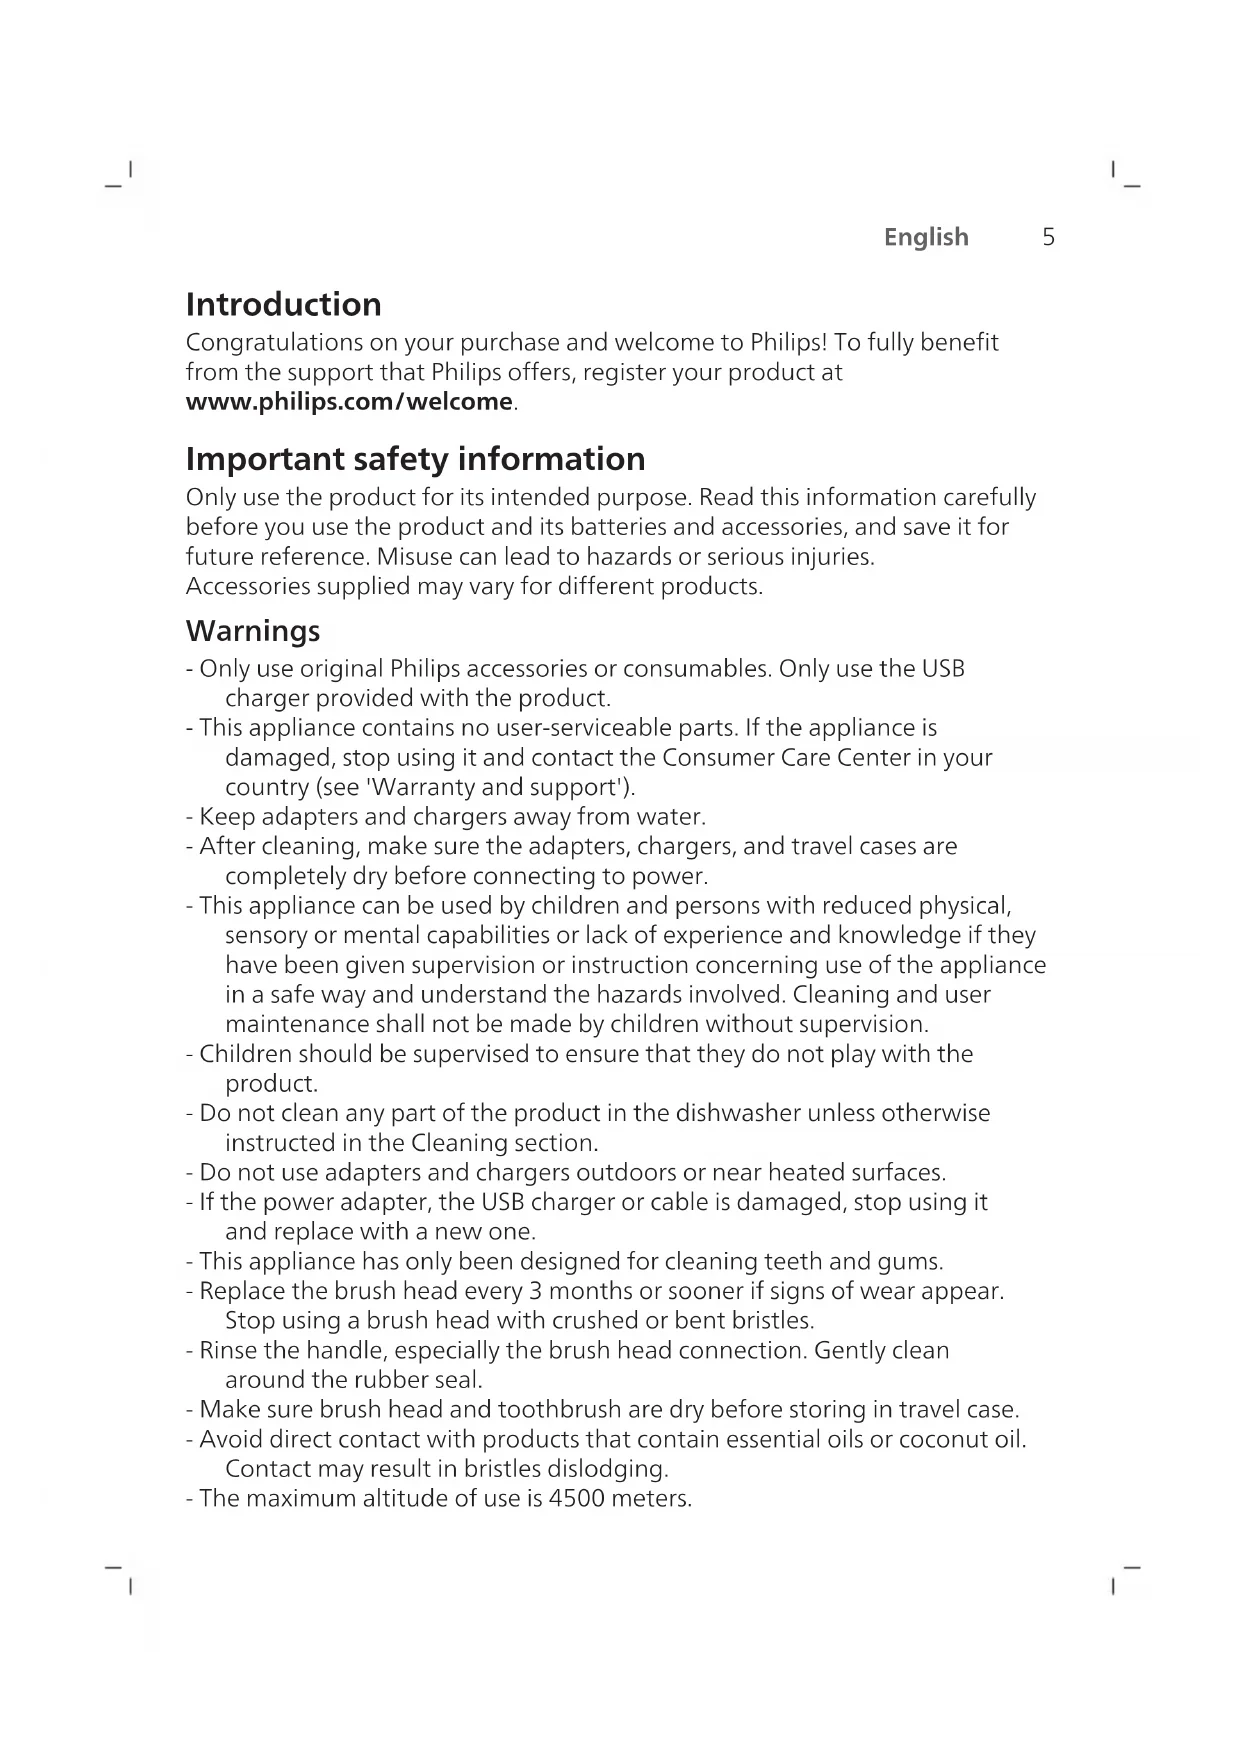
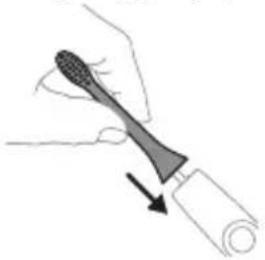
Illustration of a hand holding a tool with a pointed tip, showing a force or grip (no text or symbols present)1 Align the brush head so the bristles point in the same direction as the front of the handle.
natural_image
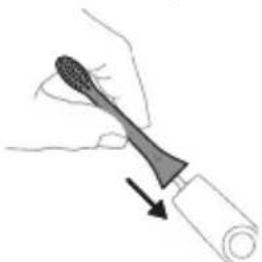
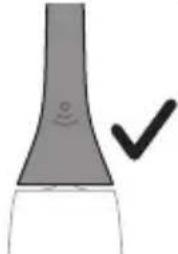
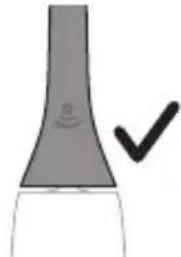
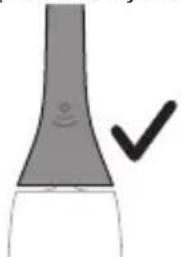
Simple line drawing of a curved object with a checkmark indicating a detail (no text or symbols)2 Firmly press the brush head down onto the metal shaft until it will not go any further.
Note: It is normal to see a slight gap between the brush head and the handle.
Using your Philips Sonicare toothbrush
If you are using your Sonicare toothbrush for the first time, it is normal to feel more vibration than when using a non-electric toothbrush. It is common for first time users to apply too much pressure. Only apply gentle pressure and let the toothbrush do the brushing for you. Please follow brushing instructions below for the best experience.
To help you transition to your new Sonicare power toothbrush, it comes with the EasyStart feature activated. This feature gradually increases the power over the first 14 brushing sessions to help you adapt to brushing with your Sonicare toothbrush.
Brushing instructions
natural_image
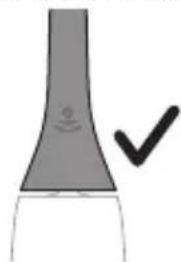
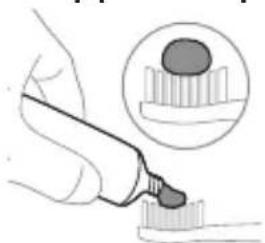
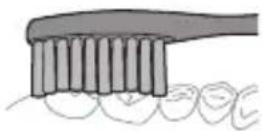
Illustration of a hand using a pipette to apply liquid onto a surface, with an inset showing a droplet on a surface (no text or symbols present)1 Wet the bristles and apply a small amount of toothpaste.

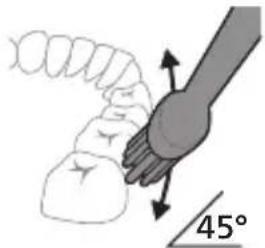
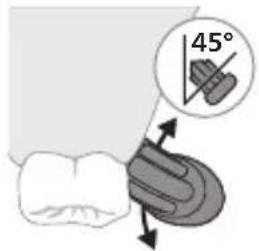
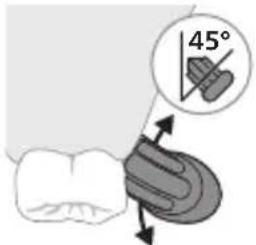
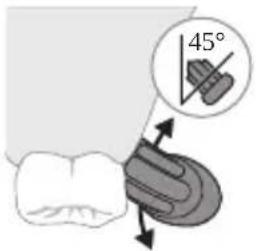
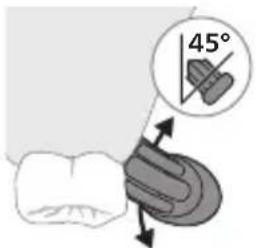
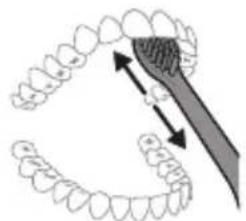
2 Place the toothbrush bristles against the teeth at a slight angle (45 degrees), pressing gently to make the bristles reach the gumline or slightly beneath the gumline.
Note: Keep the center of the brush in contact with the teeth at all times.
3 Press the power on/off button to turn on the Philips Sonicare.
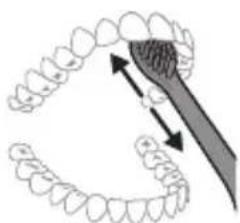
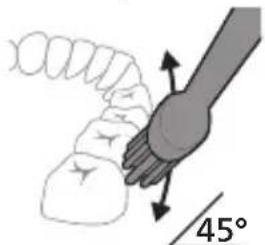
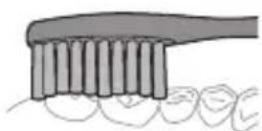
4 Gently keep the bristles placed on the teeth and in the gumline. Brush your teeth with small back and forth motion so the bristles reach between the teeth. Continue this motion throughout your brushing cycle.
Note: The bristles should slightly flare. It is not recommended to scrub as you would with a manual toothbrush.
natural_image
Illustration of a tooth being brushed with a tool, showing teeth and jawbone structure (no text or symbols)English
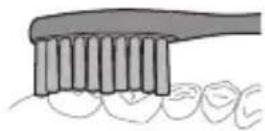
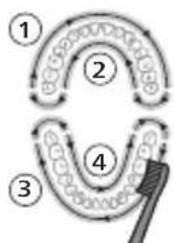
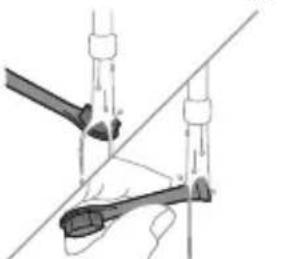
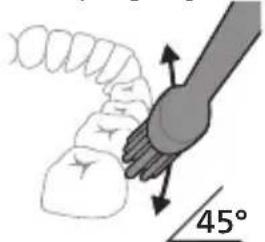
5 To clean the inside surfaces of the front teeth, tilt the brush handle semi-upright and make several vertical overlapping brushing strokes on each tooth.
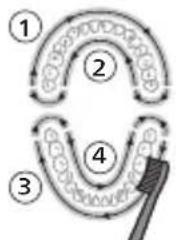
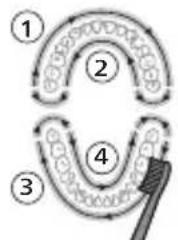
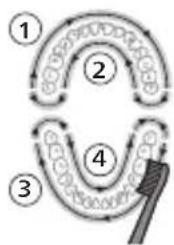
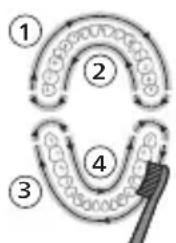
Note: To make sure you brush evenly throughout the mouth, divide your mouth into 4 sections using the QuadPacer feature (see chapter 'Features').
flowchart
graph TD
    A["①"] --> B["②"]
    B --> C["③"]
    C --> D["④"]
    D --> E["④"]
    style A fill:#f9f,stroke:#333
    style B fill:#f9f,stroke:#333
    style C fill:#f9f,stroke:#333
    style D fill:#f9f,stroke:#333
    style E fill:#f9f,stroke:#333
6 Begin brushing in section 1 (outside upper teeth) and brush for 30 seconds before you move to section 2 (inside upper teeth). Continue brushing in section 3 (outside lower teeth) and brush for 30 seconds before you move to section 4 (inside lower teeth).
7 After you have completed the brushing cycle, you can spend additional time brushing the chewing surfaces of your teeth and areas where staining occurs. You can also brush your tongue, with the toothbrush turned on or off, as you prefer. Your Philips Sonicare toothbrush should be safe to use on braces (brush heads wear out sooner when used on braces) and dental restorations (fillings, crowns, veneers) if they are properly adhered and not compromised. If a problem occurs, please follow up with a dental professional.
Note: When using the Philips Sonicare toothbrush in clinical studies, operate it at high intensity setting with the handle fully charged and the EasyStart feature deactivated.
Intensities
Intensity settings
Your power toothbrush comes with 2 different intensities:
- High intensity
- Low intensity
Note: We recommend high intensity for best results.
To manually select your desired intensity, press the power button within 2 seconds of starting or resuming the brushing when the toothbrush is on, to toggle between the options.
Features
- SmarTimer
- QuadPacer
- EasyStart
SmarTimer
The SmarTimer indicates that your brushing cycle is complete by automatically switching off the toothbrush at the end of the brushing cycle.
Dental professionals recommend brushing no less than 2 minutes twice a day.
Note: If you press the power on/off button after you started the brushing cycle, the toothbrush pauses. If you press the on/off button within 30 seconds, the timer resumes to allow you to finish your brushing cycle. After a pause of 30 seconds, the SmarTimer resets.
QuadPacer
flowchart
graph TD
    A["①"] --> B["②"]
    B --> C["③"]
    C --> D["④"]
    D --> E["④"]
    style A fill:#f9f,stroke:#333
    style B fill:#f9f,stroke:#333
    style C fill:#f9f,stroke:#333
    style D fill:#f9f,stroke:#333
    style E fill:#f9f,stroke:#333
The QuadPacer is an interval timer that has a short beep and pause to remind you to brush the 4 sections of your mouth evenly and thoroughly. This Philips Sonicare toothbrush comes with the QuadPacer feature activated.
EasyStart
This Philips Sonicare model comes with the EasyStart feature activated. The EasyStart feature gently increases the power over the first 14 brushing sessions to help you get used to brushing with the Philips Sonicare.
To activate or deactivate EasyStart, follow the instructions below:
1 Place the handle on the plugged-in charger.
2 Press and hold the power on/off button while the handle remains on the charger.
12 English
3 Keep the power on/off button pressed until you hear three short beeps (after 3 seconds).
4 Release the power on/off button.
- Triple tone of low-med-high means the EasyStart feature has been activated. The battery level indicator light will also blink green 2 times to confirm activation.
- Triple tone of high-med-low means the EasyStart feature has been deactivated. The battery level indicator light will blink amber 1 time to confirm deactivation.
Charging and battery status
This Philips Sonicare toothbrush is designed to provide on average 28 brushing sessions, each session lasting 2 minutes (14 days if used twice per day) on a fully charged battery. The battery indicator shows the battery status when you complete the 2-minute brushing session, when you pause the toothbrush, or while it is charging.
Note: It can take up to 24 hours to fully charge the battery before first use, but you can use the Philips Sonicare toothbrush before it is fully charged.
Charging
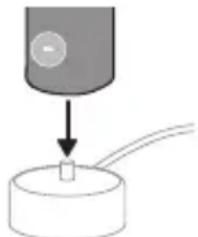
1 Attach the USB charging cord to a wall adapter, plug the wall adapter into an electrical wall outlet.
natural_image
Simple diagram showing a device with a circular button and a small rectangular object on a base, no text or symbols present.2 Place the handle on the charger.
3 Two short beeps are emitted to confirm that the handle is placed properly.
4 The flashing green light of the battery indicator shows that the toothbrush is charging.
5 Once the battery is fully charged, the green light remains solid for 30 seconds and then turns off.
Battery status (when handle is on plugged-in charger)
When the handle is plugged into the charger, the battery indicator at the bottom of the handle shows the battery level.
Battery status
LED color
Low Flashing green
Partially full Flashing green
Full Solid green for 30 seconds and then switches off
Battery status (when handle is not on plugged-in charger)
When the toothbrush is awake, the battery indicator at the bottom of the handle shows the battery level.
Battery status LED color
Full Solid green
Partially full Solid green
Medium low Flashing green
Low Flashing amber and 3 beeps after brushing
Empty Flashing amber and 2 sets of 5 beeps
Note: To save energy, the battery indicator will switch off when no longer charging.
Note: When the battery is completely empty, the toothbrush switches off. Plug the toothbrush into the charger to charge it.
Note: To keep the battery fully charged at all times, you may keep your toothbrush plugged into the charger when not in use.
Cleaning
Toothbrush handle
natural_image
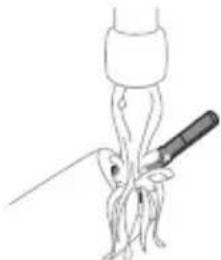
Simple line drawing of a medical procedure with a needle inserted into tissue (no text or symbols)1 Remove the brush head and rinse the metal shaft area with warm water. Make sure you remove any residual toothpaste on the handle and around the buttons at least once a week, but preferably after each use.
Caution: Do not push on the rubber seal on the metal shaft or around the buttons with sharp objects, as this may cause damage.
2 Wipe the entire surface of the handle with a damp cloth.
Caution: Do not tap the handle on the sink or counter to remove excess water.
3 Dry the handle with a soft cloth or towel.
Brush head
natural_image
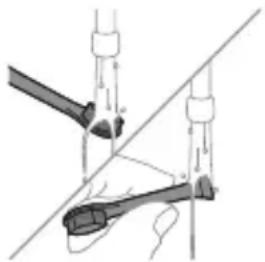
Diagram of mechanical components with no visible text or symbols1 Rinse the brush head and bristles after each use and allow to air dry.
2 Remove the brush head from the handle and rinse the brush head connection with warm water at least once a week.
Charger
1 Unplug the charger before you clean it.
2 Wipe the surface of the charger with a damp cloth.
3 Dry the charger with a soft cloth or towel.
Travel case
Rinse with warm water and use a damp cloth to clean the travel case and allow to air dry.
Storage
If you are not going to use the product for an extended period of time, unplug it from the electrical outlet, clean it and store it in a cool and dry place away from direct sunlight.
Replacement
Replace Philips Sonicare brush heads every 3 months to achieve optimal results. Use only Philips Sonicare replacement brush heads.
Locating the model number
The model number begins with "HX" (e.g. HX123A) and can be found on the bottom of your toothbrush.
Troubleshooting
This chapter summarizes the most common problems you could encounter with the appliance. If you are unable to solve the problem with the information below, visit www.philips.com/support and insert your model number for a list of frequently asked questions or contact the Consumer Care Center in your country.
Problem Possible Cause Solution
| I cannot fully attach the brush head. There is a gap between the brush head and handle. | This gap is normal and is needed for the brush head to vibrate appropriately. The brush head must be able to move to create the right amount of vibrations. | |
| My Philips Sonicare toothbrush vibration is less powerful than before. | The brush head is too close to the body of the toothbrush or the toothbrush needs to be charged. | Remove the brush head from the handle and re-set it on the metal shaft leaving a small gap. (1-2 mm).When charging, make sure the charger is plugged into a power supply and placed on a flat surface before placing the toothbrush on the charger. Allow the toothbrush to charge for 24 hours. |
| I charged my toothbrush, but it only works for a short time. | The base of the toothbrush is not placed flat on the charger when attempting to charge. | Make sure the charger is plugged into a power supply and placed on a flat surface before placing the toothbrush on the charger. Allow the toothbrush to charge for 24 hours. |
Warranty and support
Please visit www.philips.com/support and enter the model number located at the bottom of your device in the search bar in order to obtain more
information on how to register your device, warranty information, and other frequently visited support topics.
For all product support, power consumption details, and the EU Declaration of Conformity, please visit www.philips.com. After searching for your device, you can find information on your product's features, technical specifications, as well as available accessories.
Warranty exclusions
What is not covered under warranty:
- In mouth attachments including brush heads and nozzles.
- Damage caused by use of unauthorized replacement parts or unauthorized brush heads.
- Damage caused by misuse, abuse, neglect, alterations or unauthorized repair.
- Normal wear and tear, including chips, scratches, abrasions, discoloration or fading.
Recycling
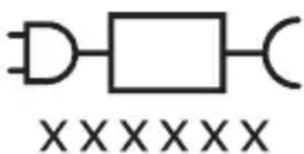
- This symbol means that electrical products and batteries shall not be disposed of with normal household waste.
- Follow your country's rules for the separate collection of electrical products and batteries.
Removal of built-in rechargeable battery
- CONTAINS LITHIUM-ION RECHARGEABLE CELL. MUST BE RECYCLED OR DISPOSED OF PROPERLY.
- The built-in rechargeable battery can be removed for disposal. If you are not comfortable disassembling electronics, please seek professional assistance at your local electronics recycling or repair shop.
- Instructions for removal of built-in rechargeable batteries can be found on www.philips.com/support. Use the Philips support home search bar to enter the toothbrush model number and find your product. The model number begins with "HX" (e.g. HX123A) and can be found on the bottom of your toothbrush. The battery removal instructions are in the Troubleshooting and Repair section of the product's support page.
- If batteries are damaged or leaking, avoid contact with the skin or eyes. If this occurs, immediately rinse well with water and seek medical care.
- When you handle batteries, make sure that your hands, the product and the batteries are dry.
- To avoid accidental short-circuiting of batteries after removal, do not let battery terminals come into contact with metal objects (e.g. coins, hairpins, rings). Do not wrap batteries in aluminum foil. Tape battery terminals or put batteries in a plastic bag before you discard them.
Giriş
natural_image
Simple line drawing of an open book with no text or symbols visiblenatural_image
Illustration of a hand holding a toothbrush with an arrow indicating force or direction (no text or symbols)natural_image
Simple line drawing of a bulb-like shape with a checkmark mark (no text or symbols)natural_image
Illustration of a hand using a pen to apply a sample onto a surface, with an inset showing a magnified view of the sample (no text or symbols present)natural_image
Illustration of a tooth being brushed with a tool, showing teeth and jawbone structure (no text or symbols)natural_image
Simple diagram showing a cylindrical object with a downward arrow pointing to a small rectangular component on a circular base (no text or symbols)natural_image
Line drawing of a medical procedure showing a tool interacting with a patient's leg and arm (no text or symbols)natural_image
Diagram of a mechanical or electrical component with two vertical rods and a central rod, intersected by a diagonal line (no text or symbols)natural_image
Simple line drawing of an open book with no text or symbols visiblenatural_image
Illustration of a hand holding a toothbrush with an arrow indicating force or direction (no text or symbols)natural_image
Simple line drawing of a bulb-like shape with a checkmark mark (no text or symbols)natural_image
Illustration of a hand holding a pen, with an inset showing a magnified view of a cylindrical object (no text or symbols present)natural_image
Diagram showing dental tool application on upper teeth with arrows indicating direction (no text or labels)natural_image
Simple diagram showing a device with a circular button and a small component inserted into a cylindrical base (no text or symbols)natural_image
Diagram of a medical procedure showing a needle inserted into tissue with a pen inserted (no text or labels)natural_image
Diagram of a mechanical clamp or lever mechanism with no visible text or symbolsnatural_image
Simple line drawing of an open book with no text or symbols visiblenatural_image
Illustration of a hand holding a toothbrush with an arrow indicating force or direction (no text or symbols)natural_image
Simple line drawing of a curved object with a checkmark (no text or symbols)natural_image
Illustration of a hand using a pipette to apply liquid onto a surface, with an inset showing a droplet on a surface (no text or symbols present)natural_image
Illustration of a tooth being brushed with a tool, showing teeth and jawbone structure (no text or symbols)Dansk
natural_image
Simple diagram showing a device with a circular component and a small rectangular object on a base, no text or symbols present.natural_image
Simple line drawing of a medical procedure with a needle inserted into tissue (no text or symbols)Dansk
natural_image
Diagram of a mechanical clamp or lever mechanism with no visible text or symbolsnatural_image
Simple line drawing of an open book with no text or symbols visiblenatural_image
Illustration of a hand holding a toothbrush with a black arrow indicating force (no text or symbols)natural_image
Simple line drawing of a bulb-like shape with a checkmark mark (no text or symbols)natural_image
Illustration of a hand using a pen to apply a small object, with an inset showing a magnified view of a textured surface (no text or symbols present)natural_image
Diagram showing a hand holding a 45-degree angle with a coiled spring and handle (no text or symbols)natural_image
Diagram showing dental tool application on upper teeth with magnified detail (no text or symbols)natural_image
Simple diagram showing a mechanical component with a downward arrow pointing to a small cylindrical object (no text or symbols)natural_image
Simple line drawing of a medical procedure with a needle inserted into tissue (no text or symbols)natural_image
Diagram of a hand holding a tool with a diagonal line, no text or symbols presentnatural_image
Simple line drawing of an open book with no text or symbols visiblenatural_image
Illustration of a hand holding a tool with a pointed tip, showing a force or grip (no text or symbols present)natural_image
Simple line drawing of a curved object with a checkmark indicating a detail (no text or symbols)natural_image
Illustration of a hand using a pen to apply a product to a surface, with an inset showing a textured surface (no text or symbols)natural_image
Diagram showing a hand holding a small object with directional arrows indicating movement, labeled '45°' (no text or symbols on the diagram itself)natural_image
Diagram showing dental tool interacting with teeth (no text or symbols)natural_image
Simple diagram showing a mechanical component with a downward arrow pointing to a small cylindrical object (no text or symbols)natural_image
Line drawing of a medical procedure showing a tool interacting with an anatomical structure (no text or symbols)natural_image
Diagram of two mechanical arms performing a tool manipulation or disassembly process (no text or symbols present)natural_image
Simple line drawing of an open book with no text or symbols visiblenatural_image
Illustration of a hand holding a tool with a pointed tip and arrow indicating direction (no text or symbols)natural_image
Simple line drawing of a vertical object with a checkmark mark, no text or symbols presentnatural_image
Illustration of a hand using a pipette to apply liquid onto a surface, with an inset showing a droplet on a surface (no text or symbols present)natural_image
Illustration of a hand holding a small object with directional arrows indicating movement, labeled '45°' (no text or symbols on the diagram itself)natural_image
Diagram showing dental tool application on upper teeth with magnified detail (no text or symbols)natural_image
Simple diagram showing a device with a circular component and a small square object on a base, connected by a cable (no text or symbols)natural_image
Simple line drawing of a biological structure with a pen inserted, no text or symbols presentnatural_image
Diagram of two mechanical components with a diagonal line intersecting them (no text or symbols)natural_image
Simple line drawing of an open book with no text or symbols visiblenatural_image
Illustration of a hand holding a toothbrush with an arrow indicating force (no text or symbols)natural_image
Simple line drawing of a bulb-like shape with a checkmark indicating a measurement or inspection (no text or symbols present)natural_image
Illustration of a hand using a pipette to apply liquid onto a surface, with an inset showing a droplet on a surface (no text or symbols present)natural_image
Illustration of a hand holding a small object with directional arrows indicating movement, labeled '45°' (no text or symbols on the diagram itself)natural_image
Diagram showing dental tool application on upper teeth with magnified view (no text or symbols)natural_image
Simple diagram showing a mechanical component with a downward arrow and a small central component, no text or symbols present.natural_image
Simple line drawing of a squid being cut with a knife (no text or symbols)natural_image
Diagram of a mechanical or electrical component with labeled parts (no text or symbols present)natural_image
Simple line drawing of an open book with no text or symbols visibleOvaj simbol znači da prije upotrebe uređaja morate pročitati upute za upotrebu.
Ovaj simbol znači da morate upotrijebiti naznačeno napajanje.
Namjena
Ova električna četkica za zube Sonicare namijenjena je za uklanjanje naslaga i ostataka hrane sa zuba kako bi se smanjio karijes te poboljšalo i održavalo oralno zdravlje. Ova električna četkica za zube Sonicare namijenjena je za kućnu uporabu. Djeca četkicu trebaju upotrebljavati uz nadzor odrasle osobe.
Vaš Philips Sonicare (Slika 1)
1 Poklopac glave četkice
2 glave četkice
3 Drška
4 Gumb za uključivanje/isključivanje
5 Indikator baterije
6 USB punjač (zidni adapter nije uključen)
7 Putna kutija
Napomena: priloženi dodaci mogu se razlikovati ovisno o kupljenom modelu.
Početak korištenja
Postavljanje glave četkice
natural_image
Diagram showing dental tool interacting with teeth (no text or symbols)5 Kako biste očistili unutarnje površine prednjih zubi, nagnite dršku četkice poluuspravno i izvršite nekoliko vertikalnih preklapajućih pokreta na svakom zubu.
Napomena: Kako biste osigurali ujednačeno četkanje svih zuba u ustima, podijelite svoja usta u 4 dijela pomoću funkcije QuadPacer (pogledajte poglavlje „Funkcije”).

flowchart
graph TD
    A["①"] --> B["②"]
    B --> C["③"]
    C --> D["④"]
    D --> E["③"]
    style A fill:#f9f,stroke:#333
    style B fill:#ccf,stroke:#333
    style C fill:#cfc,stroke:#333
    style D fill:#fcc,stroke:#333
    style E fill:#ffc,stroke:#333
natural_image
Simple diagram showing a device with a circular button and a small rectangular component inserted into a cylindrical base (no text or symbols)natural_image
Illustration of a medical procedure showing an incision or catheter inserted into a patient's abdomen (no text or labels)Hrvatski
1 Odvojite glavu četkice i isperite prostor oko metalne osovine toplom vodom. Najmanje jednom tjedno, a po mogućnosti nakon svake uporabe, obavezno uklonite svu preostalu zubnu pastu s drške i oko tipki.
natural_image
Diagram of a mechanical clamp or bracket assembly with no visible text or symbolsnatural_image
Simple line drawing of an open book with no text or symbols visiblenatural_image
Illustration of a hand holding a toothbrush with an arrow indicating force or direction (no text or symbols)natural_image
Simple line drawing of a curved object with a checkmark indicating a detail (no text or symbols)natural_image
Illustration of a hand using a pipette to apply liquid onto a surface, with an inset showing a droplet on a surface (no text or symbols present)natural_image
Illustration of a tooth being brushed with a tool, showing teeth and jawbone structure (no text or symbols)natural_image
Simple diagram showing a mechanical component with a downward arrow and a small cylindrical part attached to a circular base (no text or symbols)natural_image
Simple line drawing of a fork being inserted into a tube (no text or symbols)natural_image
Diagram of a mechanical or electrical component with two arms and a diagonal line, no visible text or symbolsnatural_image
Simple line drawing of an open book with no text or symbols visiblenatural_image
Illustration of a hand holding a toothbrush with an arrow indicating force or movement (no text or symbols)natural_image
Simple line drawing of a curved object with a checkmark indicating a detail (no text or symbols)natural_image
Illustration of a hand using a pipette to apply liquid onto a surface, with an inset showing a droplet on a surface (no text or symbols present)1 Samitriniet sarus un uzklājiet mazliet zobu pastas.
natural_image
Diagram showing dental tool application on upper teeth with magnified view of tooth structure (no text or labels)natural_image
Simple diagram showing a device pressing into a cylindrical component with wires (no text or symbols)natural_image
Simple line drawing of a medical procedure with a needle inserted into tissue (no text or symbols)natural_image
Diagram of a hand holding a tool with a diagonal line, no text or symbols presentnatural_image
Simple line drawing of an open book with no text or symbols visiblenatural_image
Illustration of a hand holding a toothbrush with an arrow indicating force or movement (no text or symbols)natural_image
Simple line drawing of a curved object with a checkmark mark (no text or symbols)natural_image
Illustration of a hand using a pipette to apply liquid onto a surface, with an inset showing a droplet on a surface (no text or symbols present)natural_image
Illustration of a hand holding a small object with directional arrows indicating movement, labeled '45°' (no text or symbols on the diagram itself)natural_image
Diagram of dental arching with tooth structure and shaded area (no text or labels)natural_image
Simple diagram showing a cylindrical object being inserted into a circular base with a small protrusion (no text or symbols)natural_image
Simple line drawing of a fork being inserted into a tube (no text or symbols)natural_image
Diagram of a mechanical or electrical component with two vertical rods and a diagonal line, no text or symbols present.natural_image
Simple line drawing of an open book with no text or symbols visiblenatural_image
Illustration of a hand holding a toothbrush with an arrow indicating force or movement (no text or symbols)natural_image
Simple line drawing of a curved object with a checkmark indicating a detail (no text or symbols)natural_image
Illustration of a hand using a pipette to apply liquid onto a surface, with an inset showing a magnified view of a cylindrical object (no text or symbols present)natural_image
Diagram showing a hand holding a small object with directional arrows indicating movement, labeled '45°' (no text or symbols on the diagram itself)natural_image
Diagram showing dental tool application on upper teeth with magnified view of tooth structure (no text or labels)natural_image
Simple diagram showing a device with a circular button labeled 'NO' and a downward arrow pointing to a small cylindrical component (no text or symbols present)natural_image
Simple line drawing of a medical procedure with a tool and tubing (no text or symbols)natural_image
Diagram of mechanical joint or clamp assembly with no visible text or symbolsnatural_image
Simple line drawing of an open book with no text or symbols visiblenatural_image
Illustration of a hand holding a toothbrush with an arrow indicating force or direction (no text or symbols)natural_image
Simple line drawing of a curved object with a checkmark indicating a detail (no text or symbols)natural_image
Illustration of a hand using a pipette to apply liquid onto a surface, with an inset showing a droplet on a surface (no text or symbols present)natural_image
Illustration of dental tool interacting with teeth (no text or symbols)natural_image
Diagram showing a mechanical component with a downward arrow pointing to a small cylindrical object on a base (no text or symbols)natural_image
Simple line drawing of a medical procedure with a needle inserted into tissue (no text or symbols)natural_image
Diagram of two mechanical components with arrows indicating motion or force direction (no text or symbols)natural_image
Simple line drawing of an open book with no text or symbols visiblenatural_image
Illustration of a hand holding a tool with a pointed tip and arrow indicating direction (no text or symbols)natural_image
Simple line drawing of a curved object with a checkmark mark (no text or symbols)natural_image
Illustration of a hand holding a pipette over a surface with an inset showing a magnified view of a textured surface (no text or symbols)natural_image
Diagram showing dental tool application on upper teeth with magnified view of tooth structure (no text or labels)natural_image
Simple diagram showing a device with a circular component and a small rectangular object on a base, connected by a cable (no text or symbols)2 Plasser håndtaket på laderen.
3 To korte pipetoner bekrefter at håndtaket er riktig plassert.
4 Det blinkende grønne lyset på batteriindikatoren viser at tannbørsten lades.
5 Når batteriet er fulladet, vil den grønne lampen lyse videre i 30 sekunder og deretter slukne.
natural_image
Line drawing of a medical procedure showing a needle inserted into a patient's leg, with no text or symbols present.natural_image
Diagram of a hand holding a tool with a ruler, showing alignment and measurement lines (no text or symbols)natural_image
Simple line drawing of an open book with no text or symbols visiblenatural_image
Illustration of a hand holding a toothbrush with an arrow indicating force or movement (no text or symbols)1 Cho'tka tuklari dastaning old qismi bilan bir xil yo'nalishda bo'lishi uchun cho'tka kallagini tekislang.
natural_image
Simple line drawing of a bulb-like shape with a checkmark indicating a detail (no text or symbols)2 Cho'tka kallagini u boshqa kirmagunigacha metall valga qattiq bosing.
Izoh: Cho'tka kallagi va dasta orasida kichik tirqish ko'rinishi – normal holat.
Philips Sonicare tish pastangizdan foydalanish
Agar Sonicare tish pastasidan birinchi marta foydalanayotgan bo'lsangiz, elektr bo'Imagan tish cho'tkasidan foydalanishga qaraganda ko'proq tebranish sezish normal holat. Odatda birinchi marta foydalanayotgan foydalanuvchilar ortiqcha bosim beradi. Faqat yumshoq bosib bering va tish cho'tkasi siz uchun tozalashiga imkon bering. Eng yaxshi taassurot uchun tish tozalash ko'rsatmalariga amal qiling.
212 O'zbek
natural_image
Illustration of a hand using a pipette to apply liquid onto a surface, with an inset showing a droplet on a surface (no text or symbols present)1 Cho'tkani namlang va unga kam miqdorda tish pastasi surting.
2 Tish cho'tkasini tishlar qarshisida kichik (45 daraja) burchak ostida tuting va cho'tkalar milk chizig'iga yoki uning tagiga yetishi uchun uni yengil dosing. Izoh: Cho'tka markazini tishlarga doimi to'liq tekkizib turing.
3 Philips Sonicare yoqilishi uchun yoqish/o'chirish tugmachasini bosing.
natural_image
Illustration of a hand holding a small object with directional arrows indicating movement, labeled '45°' (no text or symbols on the diagram itself)4 Cho'tkani tishlar va milk chizig'iga yengil tutib turing. Cho'tkalar tishlar orasiga kirishi uchun cho'tka kallagini oldinga-orqaqa kichik harakatlar bilan tishlaringizni tozalang. Bu harakatlarni tish tozalash siklingiz yakunlangunga qadar bajaring.
natural_image
Illustration of dental tool interacting with teeth (no text or symbols)5 Old tishlarning ichki yuzalarini tozalash uchun dastani yarim-vertikal qilib ushlang va har bir tishni bir necha vertikal harakatlar bilan birma-bir tozalab chiqing.
natural_image
Simple diagram showing a device pressing into a cylindrical component with wires (no text or symbols)2 Dastani quvvatlash moslamasiga joylang.
3 Dasta to'g'ri o'rnatilganini tasdiqlash uchun ikki marta qisqa signal chalinadi.
4 Batareyaning miltillovchi yashil indikatori tish cho'tkasi quvvatlanayotganini bildiradi.
5 Batareya to'liq quvvatlangach, yashil chiroq 30 soniya yonib turadi va keyin o'chadi.
natural_image
Simple line drawing of a medical procedure with a needle inserted into tissue (no text or symbols)1 Cho'tka kallagini chiqarib oling va metall val atrofini iliq suv bilan yuving. Dasta va tugmalar atrofidagi tish pastasi qoldiqlarini haftada kamida bir marta, lekin yaxshisi har foydalanishdan keyin tozalang.
Ogohlantirish: Metall valdagi yoki tugmalar atrofidagi rezina zichlagichni o'tkir narsalar bilan bosmang, bu shikastlanishga olib kelishi mumkin.
2 Dastaning butun yuzasini nam mato bilan artib oling.
Ogohlantirish: Ortiqcha suvni yo'qotish uchun dastani chanoq yoki stolga urmang.
3 Dastani yumshoq mato yoki sochiq bilan quriting.
Cho'tka kallagi
natural_image
Diagram of a mechanical or electrical component with two vertical rods and a handle, no text or symbols present1 Har foydalanishdan keyin cho'tka kallagi va cho'tkalarini yuving va havoda quriting.
2 Cho'tka kallagini dastadan chiqarib oling va cho'tka kallagi ulanish qismini kamida haftada bir marta iliq suv bilan yuving.
Quvvatlash moslamasi
1 Tozalashdan avval, quvvatlagichni tarmoqdan uzing.
2 Quvvatlash moslamasining butun yuzasini nam mato bilan artib oling.
3 Quvvatlagichni yumshoq mato yoki sochiq bilan quriting.
Sayohat g'ilofi
Iliq suv bilan yuving va sayohat g'ilofini tozalash uchun nam matodan foydalaning va havoda quriting.
Xotira
natural_image
Simple line drawing of an open book with no text or symbols visiblenatural_image
Illustration of a hand holding a toothbrush with an arrow indicating force or direction (no text or symbols)natural_image
Simple line drawing of a bulb-like shape with a checkmark mark (no text or symbols)natural_image
Illustration of a hand holding a pipette over a surface with an inset showing a magnified view of a textured surface (no text or symbols)natural_image
Diagram showing dental tool application on upper teeth with magnified view of tooth structure (no text or labels)natural_image
Diagram showing a mechanical component with a downward arrow pointing to a small cylindrical object on a base (no text or symbols)natural_image
Illustration of a medical procedure showing a needle inserted into a tube with an incision, no text or symbols presentnatural_image
Diagram of a hand holding a tool with labeled parts, no text or symbols presentnatural_image
Simple line drawing of an open book with no text or symbols visiblenatural_image
Illustration of a hand holding a toothbrush with an arrow indicating force (no text or symbols)natural_image
Simple line drawing of a curved object with a checkmark indicating a detail (no text or symbols)natural_image
Illustration of a hand using a pipette to apply liquid onto a surface, with an inset showing a droplet on a surface (no text or symbols present)natural_image
Illustration of dental tool interacting with teeth (no text or symbols)natural_image
Simple diagram showing a device with a circular button and a small square component inserted into a cylindrical base (no text or symbols)natural_image
Simple line drawing of a biological structure with a pen inserted, no text or symbols presentnatural_image
Diagram of a hand holding a tool with a ruler, against a diagonal line (no text or symbols)natural_image
Simple line drawing of an open book with no text or symbols visiblenatural_image
Illustration of a hand holding a toothbrush with an arrow indicating force or movement (no text or symbols)natural_image
Simple line drawing of a curved object with a checkmark indicating a detail (no text or symbols)natural_image
Illustration of a hand using a pipette to apply liquid onto a surface, with an inset showing a droplet on a surface (no text or symbols present)natural_image
Diagram showing dental tool application on upper teeth with magnified detail (no text or symbols)natural_image
Simple diagram showing a device with a circular button and a small rectangular component inserted into a cylindrical base (no text or symbols)natural_image
Simple line drawing of a fork being inserted into a tube (no text or symbols)natural_image
Diagram of a mechanical or electrical component with two rods and a triangular base, intersected by a diagonal line (no text or symbols)natural_image
Simple line drawing of an open book with no text or symbols visiblenatural_image
Illustration of a hand holding a toothbrush with an arrow indicating force or movement (no text or symbols)natural_image
Simple line drawing of a curved object with a checkmark indicating a detail (no text or symbols)natural_image
Illustration of a hand using a pipette to apply liquid onto a surface, with an inset showing a droplet on a surface (no text or symbols present)natural_image
Diagram showing dental tool application on upper teeth with magnified detail (no text or symbols)natural_image
Simple diagram showing a device with a circular component and a small protrusion, connected to a cylindrical base (no text or symbols)natural_image
Line drawing of a medical procedure showing a tool interacting with a bundle of tissue (no text or symbols)natural_image
Diagram of a mechanical or electrical component with two vertical rods and a diagonal line, no text or symbols present.natural_image
Simple line drawing of an open book with no text or symbols visibleTa simbol pomeni, da morate pred uporabo aparata prebrati navodila za uporabo.
Ta simbol pomeni, da morate uporabiti navedeni napajalnik.
Predvidena uporaba
natural_image
Illustration of a hand holding a toothbrush with an arrow indicating force or direction (no text or symbols)natural_image
Simple line drawing of a bulb-like object with a checkmark mark (no text or symbols)natural_image
Illustration of a hand using a pipette to apply liquid onto a surface, with an inset showing a microplate (no text or symbols present)natural_image
Diagram showing a hand holding a small object with directional arrows indicating movement, labeled '45°' (no text or symbols on the diagram itself)natural_image
Diagram showing dental tool application on upper teeth with magnified detail (no text or symbols)natural_image
Simple diagram showing a device with a circular component being inserted into a cylindrical base (no text or symbols)natural_image
Simple line drawing of a medical procedure with a needle inserted into tissue (no text or symbols)natural_image
Diagram of a mechanical or electrical component with two vertical rods and a central rod, intersected by a diagonal line (no text or symbols)natural_image
Simple line drawing of an open book with no text or symbols visibleTento symbol znamená, aby ste si pred použitím zariadenia prečítali návod na použitie.

natural_image
Illustration of a hand holding a toothbrush with an arrow indicating force or direction (no text or symbols)natural_image
Simple line drawing of a bulb-like object with a circular sensor symbol and a checkmark (no text or labels)natural_image
Illustration of a hand holding a pipette over a surface with an inset showing a magnified view of a textured surface (no text or symbols)1 Navlhčite štetiny a vytlačte na kefku trochu zubnej pasty.

natural_image
Diagram showing dental tool application on upper teeth with arrows indicating direction (no text or labels)Slovensky
natural_image
Simple diagram showing a device with a circular component and a small rectangular object on a base, no text or symbols present.natural_image
Simple line drawing of a medical procedure with a tool and tubing (no text or symbols)natural_image
Diagram of two mechanical components with arrows indicating motion or force direction (no text or symbols)natural_image
Simple line drawing of an open book with no text or symbols visibleOvaj simbol označava da je potrebno pročitati uputstvo za upotrebu pre korišćenja uređaja.

natural_image
Illustration of a hand holding a toothbrush with an arrow indicating force or direction (no text or symbols)1 Poravnajte glavu četkice tako da su vlakna okrenuta u istom smeru kao i prednja strana drške.
natural_image
Simple line drawing of a curved object with a checkmark indicating a detail (no text or symbols)2 Čvrsto pritisnite glavu četkice na metalnu osovinu do kraja.
natural_image
Illustration of a hand using a pipette to apply liquid onto a surface, with an inset showing a droplet on a surface (no text or symbols present)1 Pokvasite vlakna i nanesite malu količinu paste za zube.
2 Postavite vlakna četkice pod blagim uglom (45 stepeni) prema zubima i lagano pritisnite kako bi vlakna dosegnula liniju desni ili blago ispod linije desni.
natural_image
Diagram showing a hand holding a small object with directional arrows indicating movement, labeled '45°' (no text or symbols on the diagram itself)4 Nežno držite vlakna na zubima i desnima. Perite zube blagim pokretima unapred i unazad tako da vlakna mogu da dosegnu između zuba. Nastavite sa ovakvim pokretima tokom celog ciklusa pranja zuba.
natural_image
Diagram of dental arching with tooth arrangement and shaded area indicating a specific tooth (no text or labels)5 Da biste očistili unutrašnju površinu prednjih zuba, nagnite dršku četkice u poluuspravan položaj i predite vertikalno četkicom preko svakog zuba tako da se potezi preklapaju.
Napomena: Da biste bili sigurni da perete ravnomerno na svim mestima u ustima, podelite usta na 4 dela pomoću funkcije QuadPacer (pogledajte poglavlje „Karakteristike“).
flowchart
graph TD
    A["①"] --> B["②"]
    B --> C["③"]
    C --> D["④"]
    D --> A
6 Počnite pranje s odeljkom 1 (gornji zubi spolja) i četkajte 30 sekundi pre prelaska na odeljak 2 (gornji zubi iznutra). Nastavite četkanje s odeljkom 3 (donji zubi spolja) i četkajte 30 sekundi pre prelaska na odeljak 4 (donji zubi iznutra).
7 Nakon završetka ciklusa pranja zuba, možete dodatno da operete površine za žvakanje i područja u kojima dolazi do pojave fleka. Možete da operete i jezik pomoću uključene ili isključene četkice za zube, po želji. Vaša Philips Sonicare četkica za zube je bezbedna za upotrebu kod osoba sa fiksnim aparatima za zube (glave četkice se u tom slučaju brže troše), kao i za zubne nadoknade (plombe, krunice, fasete), pod uslovom da su pravilno postavljene i neoštećene. Ako dođe do problema, obratite se stomatologu.
Napomena: Kada se četkica za zube Philips Sonicare koristi u kliničkim studijama, treba da se koristi sa podešenim visokim intenzitetom, potpuno napunjenom drškom i deaktiviranom funkcijom EasyStart.
Intenziteti
Postavke intenziteta
Električna četkica za zube ima dva različita intenziteta:
- Veliki intenzitet
- Mali intenzitet
Napomena: za najbolje rezultate preporučujemo visok intenzitet.
Da biste ručno izabrali željeni intenzitet, pritisnite dugme za napajanje u roku od dve sekunde od početka ili nastavljanja pranja zuba kada je četkica za zube uključena, da biste prelazili sa jedne opcije na drugu.
Funkcije
- SmarTimer
- QuadPacer
- EasyStart
SmarTimer
natural_image
Simple diagram showing a cylindrical object being inserted into a circular base with a small protrusion (no text or symbols)natural_image
Simple line drawing of a medical procedure with a tool and tubing (no text or symbols)1 Skinite glavu četkice i isperite oblast oko metalne osovine toplom vodom. Obavezno uklonite ostatke paste sa drške i oko dugmadi najmanje jednom nedeljno, a po mogućstvu nakon svake upotrebe.
Oprez: Ne pritiskajte gumeni zaptivač na metalnom vratilu ili oko dugmadi oštrim predmetima, jer može doći do oštećenja.
2 Čitavu površinu drške obrišite vlažnom krpom.
natural_image
Diagram of a mechanical or electrical component with two vertical rods and a central rod, intersected by a diagonal line (no text or symbols)1 Isperite glavu četkice i vlakna nakon svake upotrebe i ostavite ih da se osuše na vazduhu.
2 Bar jednom nedeljno skinite glavu četkice sa drške i toplom vodom isperite njen priključak.
Punjač
1 Isključite punjač iz električne mreže pre čišćenja.
2 Obrišite površinu punjača vlažnom krpom.
3 Osušite punjač mekom krpom ili peškirom.
Putna torbica
Putnu torbicu isperite toplom vodom i očistite vlažnom krpom i ostavite da se osuši na vazduhu.
Skladištenje
Ako proizvod nećete koristiti duže vreme, isključite ga iz zidne utičnice, očistite ga i odložite na hladno i suvo mesto, dalje od direktne sunčeve svetlosti.
Zamena
Zamenite Philips Sonicare glave četkice na svaka 3 meseca kako biste postigli optimalne rezultate. Koristite samo zamjenske glave četkice Philips Sonicare.
natural_image
Simple line drawing of an open book with no text or symbols visiblenatural_image
Illustration of a hand holding a toothbrush with an arrow indicating force or movement (no text or symbols)natural_image
Simple line drawing of a curved object with a checkmark indicating a detail (no text or symbols)natural_image
Illustration of a hand using a pen to apply a small object to a surface, with an inset showing a magnified view of a textured surface (no text or symbols present)natural_image
Diagram showing dental tool interacting with teeth (no text or labels)322 Suomi
natural_image
Simple diagram showing a device with a circular button and a small rectangular object on a base, connected by a cable (no text or symbols)natural_image
Simple line drawing of a fork being inserted into a tube (no text or symbols)natural_image
Diagram of a mechanical or electrical component with two vertical rods and a diagonal line, no text or symbols present.natural_image
Simple line drawing of an open book with no text or symbols visiblenatural_image
Illustration of a hand holding a toothbrush with an arrow indicating force or direction (no text or symbols)natural_image
Simple line drawing of a curved object with a checkmark mark (no text or symbols)natural_image
Illustration of a hand holding a pen, with an inset showing a magnified view of a cylindrical object (no text or symbols present)natural_image
Diagram of dental arching with tooth structure and tool (no text or labels)natural_image
Simple diagram showing a mechanical component with a downward arrow and a small rectangular object inside a cylindrical base (no text or symbols)natural_image
Line drawing of a medical procedure showing a needle inserted into tissue (no text or symbols)natural_image
Diagram of a mechanical or electrical component with two arms and a central rod, connected by a diagonal line (no text or symbols)natural_image
Simple line drawing of an open book with no text or symbols visiblenatural_image
Illustration of a hand holding a toothbrush with an arrow indicating force or movement (no text or symbols)natural_image
Simple line drawing of a curved object with a checkmark mark (no text or symbols)natural_image
Illustration of a hand using a pipette to apply liquid onto a surface, with an inset showing a droplet on a surface (no text or symbols present)natural_image
Diagram showing dental tool application on upper teeth with magnified view (no text or symbols)natural_image
Simple diagram showing a device with a circular button and a small rectangular object on a base, connected by a cable (no text or symbols)natural_image
Illustration of a biological structure with an arrow pointing to a rod inserted into a tubular organ (no text or symbols present)Türkçe
natural_image
Diagram of a mechanical clamp or lever mechanism with no visible text or symbolsULANYLÝAN NYŞANLARYŇ SANAWY
natural_image
Simple line drawing of an open book with no text or symbols visibleBu nyşan enjamy ulanmazdan ozal ulanyş gözükdirijilerini okaň diýmegi aňladýar.
Bu nyşan görkezilen elektrik üpjünçiligini ulanmalydygyny aňladýar.
Niyetlenilýän ulanys
Bu Sonicare elektrikli diş çotgasy dişin çüyremegini azaltmak we agyz saglygyny saklamak maksady bilen, dişlerdäki daşy hem-de iýmit galyndylaryny aýryrmaklyga niyetlenilýär. Bu Sonicare elektrikli diş çotgasy diñe öýde ulanmaklyga niyetlenilýär. Çagalaryň ulanmagy ulularyň gözegçiligi astynda bolmalydyr.
Philips Sonicare enjamyňyz (Şek. 1.)
1 Nasadka gapajygy
2 Nasadka(lar)
3 Tutawaç
4 Aç/öçür düwmesi
natural_image
Illustration of a hand holding a toothbrush with an arrow indicating force or direction (no text or symbols)1 Gyllar tutawajyň öň tarapy bilen bir ugra seredip durar ýaly edip, nasadkany deňläň.
natural_image
Simple line drawing of a curved object with a checkmark indicating a detail (no text or symbols)2 Nasadkany metal walyň üstüne ol aňryk baryp direyänçä dözümli basyň.
Bellik: Nasadka bilen tutawajyň arasynda çalaja boşluk görmek adaty yagdaýdyr.
natural_image
Illustration of a hand using a pipette to apply liquid onto a surface, with an inset showing a droplet on a surface (no text or symbols present)1 Gyllary öllän we üstüne azajyk diş pastasyny çalyn.

natural_image
Diagram showing dental tool application on upper teeth with magnified view of tooth structure (no text or labels)natural_image
Simple diagram showing a cylindrical object with a downward arrow pointing to a small rectangular component on a circular base (no text or symbols)natural_image
Simple line drawing of a fork being inserted into a tube (no text or symbols)natural_image
Diagram of a mechanical or electrical component with two vertical rods and a diagonal line, no text or symbols present.1 Her gezek ulanylandan soň çotga nasadkasyny we gyllaryny yuwuň hem-de howada guramagyna maý beriň.
natural_image
Simple line drawing of an open book with no text or symbols visiblenatural_image
Illustration of a hand holding a toothbrush with an arrow indicating force or movement (no text or symbols)natural_image
Simple line drawing of a bulb-like shape with a checkmark indicating a measurement or inspection (no text or symbols present)natural_image
Illustration of a hand using a pipette to apply liquid onto a surface, with an inset showing a droplet on a surface (no text or symbols present)natural_image
Diagram showing dental tool application on upper teeth with magnified view (no text or symbols)natural_image
Simple diagram showing a mechanical component with a downward arrow pointing to a small cylindrical object (no text or symbols)natural_image
Line drawing of a medical procedure with a needle inserted into tissue (no text or symbols)natural_image
Diagram of two mechanical arms connected by a diagonal line, no text or symbols presentnatural_image
Simple line drawing of an open book with no text or symbols visiblenatural_image
Illustration of a hand holding a toothbrush with an arrow indicating force or direction (no text or symbols)natural_image
Simple line drawing of a bulb-like shape with a circular sensor icon and a checkmark (no text or symbols)natural_image
Illustration of a hand using a pen to apply a small object onto a surface, with an inset showing a magnified view of a cylindrical object (no text or symbols present)natural_image
Diagram showing a hand holding a 45-degree angle with a coiled spring (no text or symbols present)natural_image
Diagram showing dental tool application on upper teeth with magnified detail (no text or symbols)natural_image
Simple diagram showing a mechanical component with a downward arrow pointing to a small cylindrical object (no text or symbols)natural_image
Illustration of a medical procedure showing a needle inserted into a tube into a tubular structure (no text or symbols present)natural_image
Diagram of a mechanical assembly with two vertical rods and a central bracket, intersected by a diagonal line (no text or symbols)natural_image
Simple line drawing of an open book with no text or symbols visiblenatural_image
Illustration of a hand holding a toothbrush with an arrow indicating force (no text or symbols)natural_image
Simple line drawing of a curved object with a checkmark indicating a detail (no text or symbols)natural_image
Illustration of a hand using a pen to apply a product to a textured surface, with an inset showing a magnified view of a textured surface (no text or symbols present)natural_image
Diagram showing dental tool application on upper teeth with magnified view of tooth structure (no text or labels)natural_image
Simple diagram showing a device with a circular button and a small square component inserted into a cylindrical base (no text or symbols)natural_image
Line drawing of a medical procedure with a needle inserted into tissue (no text or labels)natural_image
Diagram of a hand holding a tool with labeled parts, no text or symbols presentnatural_image
Simple line drawing of an open book with no text or symbols visiblenatural_image
Illustration of a hand holding a toothbrush with an arrow indicating force or direction (no text or symbols)natural_image
Simple line drawing of a curved object with a checkmark indicating a detail (no text or symbols)natural_image
Illustration of a hand holding a pen with a magnified inset showing a droplet on a surface (no text or symbols)natural_image
Diagram showing dental tool application on upper teeth with magnified detail (no text or symbols)natural_image
Simple diagram showing a device pressing into a cylindrical component with wires (no text or symbols)natural_image
Simple line drawing of a medical procedure with an incision and needle (no text or symbols)natural_image
Diagram of a hand holding a tool with labeled parts, no text or symbols presentnatural_image
Simple line drawing of an open book with no text or symbols visiblenatural_image
Illustration of a hand holding a toothbrush with an arrow indicating force or movement (no text or symbols)432 Русский
natural_image
Simple line drawing of a bulb-like object with a checkmark indicating a detail (no text or symbols)natural_image
Illustration of a hand using a pipette to apply a sample onto a surface, with an inset showing a magnified view of the sample (no text or symbols present)natural_image
Diagram showing a hand holding a tool with directional arrows indicating movement, labeled '45°' (no text or symbols beyond the angle marker)natural_image
Illustration of a toothbrush applying sealant to teeth (no text or symbols)natural_image
Simple diagram showing a mechanical component with a downward arrow pointing to a small cylindrical object (no text or symbols)natural_image
Line drawing of a medical procedure with a tool and tubing (no text or symbols)natural_image
Diagram of a mechanical or electrical component with two vertical rods and a diagonal line, no visible text or symbolsnatural_image
Simple line drawing of an open book with no text or symbols visiblenatural_image
Illustration of a hand holding a toothbrush with an arrow indicating force or direction (no text or symbols)natural_image
Simple line drawing of a curved object with a checkmark (no text or symbols)natural_image
Illustration of a hand holding a pen with a magnified inset showing a droplet on a surface (no text or symbols)natural_image
Diagram showing a hand holding a tool with a 45-degree angle indicator (no text or symbols present)natural_image
Diagram showing dental tool interacting with teeth (no text or symbols)natural_image
Simple diagram showing a device pressing into a cylindrical component with wires (no text or symbols)natural_image
Simple line drawing of a medical procedure with a tool and tubing (no text or symbols)natural_image
Diagram of a mechanical or electrical component with two vertical rods and a central rod, intersected by a diagonal line (no text or symbols)natural_image
Simple line drawing of an open book with no text or symbols visiblenatural_image
Illustration of a hand holding a toothbrush with an arrow indicating force or direction (no text or symbols)natural_image
Simple line drawing of a curved object with a checkmark indicating a detail (no text or symbols)natural_image
Illustration of a hand using a pipette to apply liquid onto a surface, with an inset showing a droplet on a surface (no text or symbols present)natural_image
Diagram showing a hand holding a small object with directional arrows indicating movement, labeled '45°' (no text or symbols on the diagram itself)natural_image
Diagram showing dental tool application on upper teeth with magnified detail (no text or symbols)natural_image
Simple diagram showing a device pressing into a cylindrical component with wires (no text or symbols)natural_image
Line drawing of a biological structure with a pointed tool inserted, no text or symbols presentnatural_image
Diagram of a hand holding a tool with a ruler, against a diagonal line (no text or symbols)natural_image
Simple line drawing of an open book with no text or symbols visiblenatural_image
Illustration of a hand holding a toothbrush with an arrow indicating force or direction (no text or symbols)natural_image
Simple line drawing of a curved object with a checkmark indicating a detail (no text or symbols)natural_image
Illustration of a hand using a pipette to apply liquid onto a surface, with an inset showing a magnified view of a cylindrical object (no text or symbols present)natural_image
Diagram showing a hand holding a small object with directional arrows indicating movement, labeled '45°' (no text or symbols on the diagram itself)natural_image
Illustration of dental tool interacting with teeth (no text or symbols)natural_image
Simple diagram showing a device with a circular button and a small square component inserted into a cylindrical base (no text or symbols)natural_image
Simple line drawing of a plant stem being injected with a syringe (no text or symbols)natural_image
Diagram of two mechanical components with arrows indicating motion or force direction (no text or symbols)ETLHUNWUWQUHUWLYWU NW2INTN (EMF)
Philips-h wju uwnpn hwúwwuynwuhuwùniú 5 tǐtlynnwúwqúhuwlywù nwzuntnh waŋtgnipajwù yānwptnjwl yhnwnzlnn pnlnn uunwùnwnunutnhù lù ùnnútphù:
09SU9NROYUO 4RULCULTERH 3574
Ununwnnwuph ynw ywnn tü gnigwnnulti htinljuwl u2wüutpn.

natural_image
Simple line drawing of an open book with no text or symbols visibleUju ǔzùn gniq t unjhu, nn wùhnwdt2n t ywnw1 oqnwnannóuwu hnwhwùqutnn` uwhupwù uwnpù oqnwnannótiŋ:
Uju ǔ2wùn gnìg ǐ unwìhu, nn wǔhnpudtī2n ǐ oqúnwqnnòtǐ ǔ2uìwǒ hǐtyùnnuúwùnwwlqwnwnnún:
Lwwinnwlywjhù oqinwqnndniú
Sonicare-h wju hqn hwnwuh hnqwuwyn uwhwintuylwud 5 winwwutngh ywwud winwwutwwwnp u uutnh uuwgnnnutnp htnwgutni hwuwn' uuwqtgutinul winwwutph pwjpwjniun l pwntluwtini u wwhwwutini ptnwuh hunznh wnngnupjniun: Uju Sonicare wenwuh hnqwuwyn uwhwintuylwud 5 unuwjh uwwwnnnutph oqnuwqnnduiu hwuwn: tnthuwutnh lynzhg oqnuwqnndniun wtinp 5 jhuh utdowhwwuutnh utnwhulnnnupjwiü utnpn:
2tn Philips Sonicare-n (Uy. 1.)
1 lunqwùwùh qìhùh yìwùwnh
2 lunqwüwuh qlhuhy(utn)
3 FnUwU
4 3nuwuph uhwguwu/wugwinuwu ynawly
5 Uwnunlngh gnighs
6 USB lhgpwulnnhz (wwwnh hwnfwnwnlghzn ubtnwnnluwdr)
7 ดูดูดูดูดูดูดูดูดูดูดูดูดูดูดูดูดูดูดูดูดูดูดูดูดูดูดูดูดูดูดูดูดูดูดูดูดูดูดูดูดูดูดูดูดูดูดูดูดูดูด
L2niú 3tinn unwúwnnynn wputuniwnuttn ywnnn tǔ unwnptnulti qùuwó uñntihg ywhuulwó:
hùzhì guòu
Uünwgntp hunqwüwlyh qihuhyn
natural_image
Illustration of a hand holding a tool with a brush, showing a downward arrow (no text or symbols)1 lonquuwlyh qihuhyn hwwluwwntgntp wjuwtu, nn uwqhutnu ninnylwsh hutu unju ninnnajwup, huz pnuwlyh nhuwgh lnnun:
natural_image
Simple line drawing of a bulb-like object with a checkmark mark (no text or symbols)2 Uúnín utnúúp hunquùwlyh qíjuhún útnplú útunwnuǐwǔ jhutzh útg, u̅hùzì wjù lǚwùq wǔzh:
^12 nui' funquwuh qjuhuh u pnuwuh uhgu hnnp wugph wnlywnjajniun unnuwl 5:
2tn Philips Sonicare wunwutph junquwuh oqunwqndnuiŋ
tpati wnwghù wùqwiú tþ oqunwqnnðniú átn Sonicare winwúh hunqwùwʊŋ, wultih 2wn jænæng qquwln ñnpúwɪl ́ hwiútuwinwó nís ħtlynnwʊjwù hunqwùwʊlh htún: ñnpúwɪl ́, tþr wwnwghù wùqwiú oqunwqnnðnnútnŋ zwiuhg 2wn utnúniú tǔ qnpðwnnniú: Uhwjù yhnwntp üninp utnúniú u janyl unltp, nnwtuqh winwúh hunqwùwʊŋ átn yhnhuwntü úwpnh: hvünnniú túp htúnutí hunqwùwʊlh g oqunlṭīnì gnigniúutnhù ́ wwlwqnijù wnnjniúpūtn uwnwùwɪnì hwiúwn:
Sonicare ٤٣٥١٥١٥٠٥٠٠٠٠٠٠٠٠٠٠٠٠٠٠٠٠٠٠٠٠٠٠٠٠٠٠٠٠٠٠٠٠٠٠٠٠٠٠٠٠٠٠٠٠٠٠٠٠٠٠٢ hunquwlyhù wugniù wultgh hāzūn ṣwnàutīnì huuúwn, wjù wunwpǔniú ٤ wujnhulwgulwò EasyStart qnnòwnnyanq: Uju qnnòwnnyjəu wunhǎwùwpwn wultlwgūniú ٤ hnuwùpù wunwghù 14 úwppnniùtgh dwúwùwú` oqùtīnì àtiq unyñnti l àtin Sonicare wunwúh hunquwlyhg oqunutīniù:
Uwpnúwù hnwhuìqùtn
natural_image
Illustration of a hand using a pipette to apply liquid onto a surface, with an inset showing a magnified view of the liquid (no text or symbols present)1 陰ngtp hunqwùwuh ùwqhlyuttn u utiongntp wunwuh ùwðnilyh phz puìwūlniŋniú:
2 Stwnntp wunwuh hunqwuwgh uwqhlyuttn wunwutph ynw uh yhnpn wuljwu unwu (45 wunhǎwù) ̈ unpnntu utnútlnu, nnwbuqh uwqhlyuttn hwuutu juntph tqnwqðhu lywú juntnh tqnwqðhg uh yhnpn utnpu:
L2niú Úúpnng dwúwúwú hunqwúwúh ytúunnún wjuhtp wùnwútngh htún 2yhuúwú útúg:
3 Utnútip hnuwúph úhwugúwù/wùgwnúwù lynǎwūn` Philips Sonicare-n úhwugútīnì hwiúwùn:
4 Unpntü wuhtp hunquüwlyh üwqtnü wunwüutph ynw untnwnpnluwö u lüntnh tanwqdnü: Uwpntp wunwüutpn pätäluwlyh htün ni wizwg 2wndnüutpnü, npwtuqh hunquüwlyh üwqhüutpn hwuütü wunwüutphü: Cwnniüwlytp wju 2wndnüin ötn üwpnüwü yhnih wúpnng núpwgpniü:
L2niú hunquùwuh úwqhúutnn whtnp t úh ühnpn lujúwùwù: hunnhnìng sh unylniú wunwúutnn úwpntl wjùwǒu, hùzwtu ŋnip lúwwpnthp unylnnwlywù wunwúh hunquùwlynú:
natural_image
Diagram showing dental tool application on upper teeth with magnified view (no text or labels)5 Unguh wunwutph utnuh uwlntuutph swpntni hwiwn petptp hunqwuwlyh pnuwyn yhuwninhn nhnpnu u jninwpwugynih ynw uh pwuh ninnwhwjwg swpnnq qnndnnnyajniutph ywinwntp winwutph ynw:
L2niu 3wúnqutni hwiwn, nn hwiwwwnwuh tp úwpnni wúpnno ptnwùn, dtn ptnwùn 4 úwuh pudwùtp oqnwnqnδtlnj QuadPacer qnnδwnnyjān (untu «9nnδwnnyjātn» pudhùn):
flowchart
graph TD
    A["①"] --> B["②"]
    B --> C["③"]
    C --> D["④"]
    D --> E["③"]
    style A fill:#f9f,stroke:#333
    style B fill:#ccf,stroke:#333
    style C fill:#cfc,stroke:#333
    style D fill:#fcc,stroke:#333
    style E fill:#ffc,stroke:#333
6 Uyutp úwpntl hwnuqwδ 1-hg (utnluh wunwúutnh nnuh lynnún) u úwpntp 30 úwjnyjwiú úwhupwiú hwnuqwδ 2-hù wúgútln (utnluh wunwúutnh utnuh lynnún): Čwnniúwlytp úwpntl hwnuqwδ 3-niú (utnpluh wunwúutnh nnuh lynnún) u úwpntp 30 úwjnyjwiú úwhupwiú hwnuqwδ 4-hù wúgútln (utnpluh wunwúutnh utnuh lynnún):
7 Uwpntni yhniu wuwuntinig htunn ywnn b p jnwgnighs dwuwuwly hwnlywgutl wunwutph dwunn ywylnttuutpn uwpntniu l u wju hwnluwudtnhu, npuntn wnwgwuniu t powynnnui: ywnn b p uwu uwpntl taqniu' hunqwuwyn wuhtnul yhwgnw o ywu wugwnw o, huzwtu xuwhunwnpniu b p: 2tn Philips Sonicare winwuh hunqwuwyn wtup p 5 wwwhnu lhuh pntytunutph (pntytunutph ynw yhnwnzuwu dwuwuwly hunqwuwytph qihyutnp wulth 2niun yw2yniu t u) l wunwutph ytnwlywuqiwu hwuwn (ignunwutn, wuwyttn, yhuhnutn), tpt npwup wwn2w d ytnwnu lywylw o ti u stu yuuwuti: hunhn wenwgwuwini ntwpniu huynnniu bup hunphnnwlgtl winwutwprnyd-uwuwqtanh htun:
L2niú Philips Sonicare wunwúh hunqwùwūn yjhùhlywlywù htúnwqnunnijājnìùutīnniú oqnuwqnpòtāni nṭwypniú qnnδwnytp wjù pwnàn hùntìuuhlnijājwúp ywnqwulnnúwúp` pnùwūn jhnuhù yhgpwulnnuówð, huly EasyStart qnnδwnnnijān` wùgwunuówð:
hùntùuhúlnípíwù wùn hǎwùtǔn
hùntùuhúniējwù ywnqwúnnuìfūn
Etiynnwjuwu hunqwuwlyu niuh hùntüuhulniqjwi 2 unwnptn wuuuhǎwúutn.
- Fwnàn hùntǔu huìnǚ jǐ niǔ
- 3wòn hùnbuuhúniŋniù
L2niu' Lwuqwnyu wnnjniuputnh hwuwn hunhnnnn tup unwju pwnàn huntuuuhynujniu:
2tn gwúlywgwò hùntìuuhúlníajnìún àtnpnú nùunptāni huwúwn hunqwùwùn úhwgúwò dwúwùwù yutnútp hnuwùph úhwgúwù/wùgwùnúwù lynǎwùn’ wunwútph úwpnniǔ uúutīnig lywú utpulqutīnig htunn 2 qujnlywùh núpawgpniú’ unwnptnwúlútph úhglu uhnhuwnyltnì huwúwn:
9nρδωνηγρεύτη
- SmarTimer
- QuadPacer
- EasyStart
SmarTimer
SmarTimer-ŋ gnɪɡ ʒ unwɪhu, ηn úwɪpnúwɪ u̥hniʊ wʊlʊwnʊnʊwɔ̃ ʒ' úwɪpnúwɪ u̥hniʊ h ʊt̥ɪŋəniʊ wʊlʊnnúwɪn ʊt̥ɪnwʊnʊ w̥u̥gəwɪnt̥ɪŋʊ wʊnʊwɔ̃ hunqwi̥u̥wn: Uunw̥u̥uwpnɪy̥d-úwʊu̥uwḁqəti̥n̥ut̥əŋ hunphnɪŋ n̥u unwɪhu úwɪpnti wʊnʊw̥u̥ut̥əŋ onwʊw̥u̥ 2 w̥u̥qwi̥u̥hg n̥s w̥u̥wʊ̥wwu:
^12 niù ^b at utnútp hnuwùph úhwúwù/wùgwùnúwù lynǎwùn úwpnúwù hnìŋ ulyutīng htunn, wunwùh hunqwùwln ywùq ywnùh: ^b at 30 úwjnyjwùh nùpwgpniú utnútp hnuwùph úhwúwù/wùgwùnúwù lynǎwùn, wwwu dwuówzwiŋh yultnulyuqh` jānyl unwīnú àtiq wuļwnntī úwpnúwù zhniŋ: 30 úwjnyjwù āwnwunhg htunn SmarTimer-ŋ ʊt̥nwlywju̥niú ̥s:
QuadPacer
flowchart
graph TD
    A["①"] --> B["②"]
    B --> C["③"]
    C --> D["④"]
    D --> A
QuadPacer-ŋ nùnúhʒuúwù dwiúwʒwù h ʒ, nnù niùh lqunǎ wqniwùzwiù u ŋwnwn` hh2tɡiūtɪni hwiúwn, nn ðtɪn pītnwùh 4 hwnuļwðutɪŋ hwuļwuwwnʒwùh u úwùnwʊŋln yúwpntp: Uju Philips Sonicare wunwúh hunqwùwliù wzuwpūniú ʒ úhwguļwò QuadPacer qnpòwnnjuņu:
EasyStart
natural_image
Simple diagram showing a mechanical component with a downward arrow pointing to a small cylindrical component (no text or symbols)2 Stwnntp pnuwyn ihgpwwnnhsh ynw:
3 Enlyni lwnă wqnwi2wù 5 wnàwyljniú hwwunwintjni hwúwn, nn prùwlyn ǎh2n 5 untnnwnnuüd:
4 Uwnunlngh gnighsh rawnrann lquwus inijun gnug 5 unwihu, nn wunwuh hunqwuwyn ihgpwulnnuiui 5:
5 Uwnunlngn jhnuhu lhpwulnnulting htunn ywuwz lnjuh ywjniu yjwnuh 30 ywjnljuwu, wwwu ywugwinuh:
Uwnunlyngh jhpgh ywnqwuhǎwln (tnp fnùwln úhwgulwð ihgpwulnnhzh unw 5)
tnp pruwlyn uhwgulwɔt lhgpwlnnhshu, pruwlyh utnpluh uwwuni qunuyn uwnunlyngh gnighzn gnyg t unwlhu uwnunlyngh lhgph uwlqwnnwyn:
Uwnlnyngh lwnqwuhǎwly
LED-h qnjuŋ
Ph_2 Im Im Im Im Im Im Im Im
Uuuuuuuhhpul@wnpnnuwuw
natural_image
Simple line drawing of a medical procedure involving an incision or needle inserted into a patient's abdomen (no text or symbols)1 3tizwqntp hunqwùwuh qihuhyn u ltywgtp útunwnwlywù jhutnh hwinluwðn unwp qnnu: 3wuínqultp, nn htizwqntl tip prùwuh ynwjh u lynǎwylutnh 2ningn qunùlnn wunwúh úwðnilh úuwgnnnuttnn wnùluwqu 2wpwρen úty wùqwú, pwjg gwùlywuh 5' wútǔ wùqwú oqunwqnɒtɪng htunn:
2qnizwgniu' Uh hntp ntunhut yuhpn unin wnwnlywutpnu lntuw hutinh utg ywu lynawlyutph 2ninon, puwh nn wju lwwnn l hwuqtgutl yuwuuwoph:
2 Frùwùh wúpnnq úwútntún úwpntp hùnùwù qnnóu wǒpnú:
2qnizwgniu' Fnuwynu uh hwtp luygwwnwuhu ywu nwnwuhu' wultinnn gninp htnwgutini hwiwn:
3 Früwyn znnwgntp yhuynly yunnnyl yuwú unphynl:
hunquwuh qihuh

natural_image
Diagram of a mechanical or electrical component with two arms and a central rod, intersected by a diagonal line (no text or symbols)1 3nnpwpuynin oqnwnqndniwhg htunn nnnntp hunqwuwyh qihuhyn u hunqwuwyttn, www panntp, nn snpwuwu onniú:
2 3t#wqntp hunqw#uwlh qlnihn pn#uwlhg u wn#u#wq# 2wpwn# uby l#wgtp hunqw#uwlh qlhuhn unwp gnnu:
Lhgpwwlnnhz
1 Uugwuntap lhgpwulnnhyn` uwhupwù wju ùwpntln:
2 Lhgpwulnnhh uwwytnttun uwpntap huniwwu qnndwlwdpnu:
3 Lhgpwulnnhsn znnwqntap yhuwnly yunnnu lywi unphsnu:
phosphorus phosphate
natural_image
Simple line drawing of an open book with no text or symbols visiblegǔ lùnàdàmmm bùnàbúzǔ, bùnzhmbmm gùdmyjóbjònl nòlǚfúyjūnì dǎmbùmànmmònl gùdmyjóbjòsdāqǔ.

gl bndəmmm bndbuzl, gudmnygmon dnnnnngdymn 330dnl bysmm.
∂nδδmδπn3n δυδηγβδύς
natural_image
Illustration of a hand holding a toothbrush with an arrow indicating force or movement (no text or symbols)natural_image
Simple line drawing of a curved object with a checkmark indicating a detail (no text or symbols)natural_image
Illustration of a hand using a pipette to apply liquid onto a surface, with an inset showing a droplet on a surface (no text or symbols present)natural_image
Diagram of dental tool interacting with teeth (no text or symbols)azimuth azimuth azimuth azimuth azimuth azimuth azimuth azimuth azimuth azimuth azimuth azimuth azimuth azimuth azimuth azimuth azimuth azimuth azimuth azimuth azimuth azimuth azimuth azimuth azimuth azimuth azimuth azimuth azimuth azimuth azimuth azimuth azimuth azimuth azimuth azimuth azimuth azimuth azimuth azimuth azimuth azimuth azimuth azimuth azimuth azimuth azimuth azimuth azimuth azimuth azimuth azimuth azimuth azimuth azimuth azimuth azimuth azimuth azimuth azimuth azimuth azimuth azimuth azimuth azimuth azimuth azimuth azimuth azimuth azimuth azimuth azimuth azimuth azimuth azimuth azimuth azimuth azimuth azimuth azimuth azimuth azimuth azimuth azimuth azimuth azimuth azimuth azimuth azimuth azimuth azimuth azimuth azimuth azimuth azimuth azimuth azimuth azimuth azimuth azimuthazimuth 260000000
natural_image
Simple diagram showing a mechanical component with a downward arrow and a small central component, no text or symbols present.odds funds funds funds funds funds funds funds funds funds funds funds funds funds funds funds funds funds funds funds funds funds funds funds funds funds funds funds funds funds funds funds funds funds funds funds funds funds funds funds funds funds funds funds funds funds funds funds funds funds funds funds funds funds funds funds funds funds funds funds funds funds funds funds funds funds funds funds funds funds funds funds funds funds funds funds funds funds funds funds funds funds funds funds funds funds funds funds funds funds funds funds funds funds funds funds funds funds funds funds funds Funds
natural_image
Simple line drawing of a medical procedure with a tool and tubing (no text or symbols)natural_image
Diagram of a mechanical or electrical component with two vertical rods and a central rod, intersected by a diagonal line (no text or symbols)natural_image
Simple line drawing of an open book with no text or symbols visiblenatural_image
Illustration of a hand holding a toothbrush with an arrow indicating force or movement (no text or symbols)natural_image
Simple line drawing of a curved object with a circular mark and a checkmark (no text or symbols)natural_image
Illustration of a hand using a pipette to apply liquid onto a surface, with an inset showing a droplet on a surface (no text or symbols present)natural_image
Diagram showing dental alignment with a tool interacting with teeth (no text or labels)Philips Sonicare : This is a key for the purpose of this program.
.הַרְׁרָה
תָרִיְשָׁה
תְאָרִי הַעֹרִי
:הכלהה 2.
-בְרָה לַעֹרִי
-תְקַרָה בְאָרִי
"י" "י" "י" "י" "י" "י" "י" "י" "י" "י" "י" "י" "י" "י" "י" "י" "י" "י" "י" "י" "י" "י" "י" "י" "י" "י" "י" "י" "י" "י" "י" "י" "י" "י" "
EasyStart
EasyStart is. nis'jis EasyStart is. nis'jis Philips Sonicare is. nis'jis
.Philips Sonicare -הַרְבָרִיָאֶת
:יִרְׁהָרְׁהָרְׁהָרְׁהָרְׁהָרְׁהָרְׁהָרְׁהָרְׁהָרְׁהָרְׁהָרְׁהָרְׁהָרְू,EasyStart 710'71 710'71
1
natural_image
Simple diagram showing a cylindrical object being inserted into a circular base with a cable (no text or symbols)natural_image
Simple line drawing of a medical procedure with a tool and tubing (no text or symbols)1
natural_image
Illustration of a hand holding a tool with a tool, intersected by a diagonal line (no text or symbols)1
.הַרְשָׁ
הכלה 2
الله بابع ملاوي.
un
.הכלההוּרָהוּרָהוּרָהוּרָהוּרָהוּרָהוּרָהוּרָהוּרָהוּרָהוּרָהוּרָהוּרָהוּרָהוּרָה
www.philips.com/support
www.philips.com/support
.הכלההוּרָהוּרָהוּרָהוּרָהוּרָהוּרָהוּרָהוּרָהוּרָהוּרָהוּרָהוּרָהוּרָהוּרָהוּרָה
-ロナコウ
-.הַרְׁבָרִים
www.philips.com/support
Philips 7
הכלה (HX123A) "HX"-בְרַעֹרָה כִיֹשְׁת.
www.philips.com/Sonicare
Philips Consumer Lifestyle BV
Tussendiepen 4
9206 AD Drachten
The Netherlands
©2025 Koninklijke Philips N.V. (KPNV). All rights reserved. Philips and the Philips shield are trademarks of KPNV. Sonicare and the Sonicare logo are trademarks of Philips Oral Healthcare, LLC and/or KPNV.
300014957001(05/11/2025)