Zone 900 - Headphones LOGITECH - Free user manual and instructions
Find the device manual for free Zone 900 LOGITECH in PDF.
| Product type | Wireless audio headset |
| Brand | Logitech |
| Model | Zone 900 |
| Dimensions (headset) | 174.7 x 176.7 x 70.7 mm |
| Dimensions (ear cups) | 70.7 x 70.7 x 16.4 mm |
| Weight | 0.1808 kg |
| Power source | Rechargeable lithium-ion battery, charging via USB-C or Qi wireless charger (not included) |
| Talk time | 14 h (ANC on) / 15 h (ANC off) |
| Music play time | 14 h (ANC on) / 16 h (ANC off) |
| Microphone type | Two omnidirectional MEMS microphones |
| Frequency response (headset) | 30 ~ 13 kHz @ -10 dB (music), 100 ~ 8 kHz (conversation) |
| Frequency response (microphone) | 85 ~ 20 kHz @ -3 dB |
| Connectivity | Bluetooth 5.0, USB-A receiver (Unifying + audio), USB-C adapter included |
| Wireless range | Up to 30 m (open field) |
| Key features | Active noise cancellation (ANC), mute by flipping microphone, multifunction controls (volume, call, media), voice assistant, sidetone, adjustable sleep timer |
| Compatibility | Windows, Mac, Chrome, Android, iOS via USB-C, USB-A or Bluetooth |
| Package contents | Headset, USB-A Unifying + audio receiver, USB-C to A adapter, USB-A to USB-C charging cable (130 cm), carrying case, documentation |
| Customization software | Logi Tune (download at logitech.com/tune) |
| Warranty | Standard manufacturer warranty (not specified) |
Frequently Asked Questions - Zone 900 LOGITECH
User questions about Zone 900 LOGITECH
0 question about this device. Answer the ones you know or ask your own.
Ask a new question about this device
Download the instructions for your Headphones in PDF format for free! Find your manual Zone 900 - LOGITECH and take your electronic device back in hand. On this page are published all the documents necessary for the use of your device. Zone 900 by LOGITECH.
USER MANUAL Zone 900 LOGITECH
natural_image
Line drawing of a headband headset with connector pinout and external connector (no text or symbols)CONTENTS
English . . . . . . . . . . . . . . . . . . . . . . . . . . . . 3
Deutsch 11
Français 19
Italiano....27
Español....35
Português 43
Nederlands 51
Svenska. 59
Dansk. 67
Norsk....75
Suomi. 83
Ελληνικά. . . . . . . . . . . . . . . . 91
По-русски....99
Po polsku .....107
Magyar ..... 115
Česká verze. . . . . . . . . . . . . . . . 123
Slovenčina ..... 131
Українська. . . . . . . . . . . . . . . . . 139
Eesti .....147
Latviski .....155
Lietuvių .....163
Български ..... 171
Hrvatski .....179
Srpski....187
Slovenščina. 195
Română 203
Türkçe 211
- العربية
227
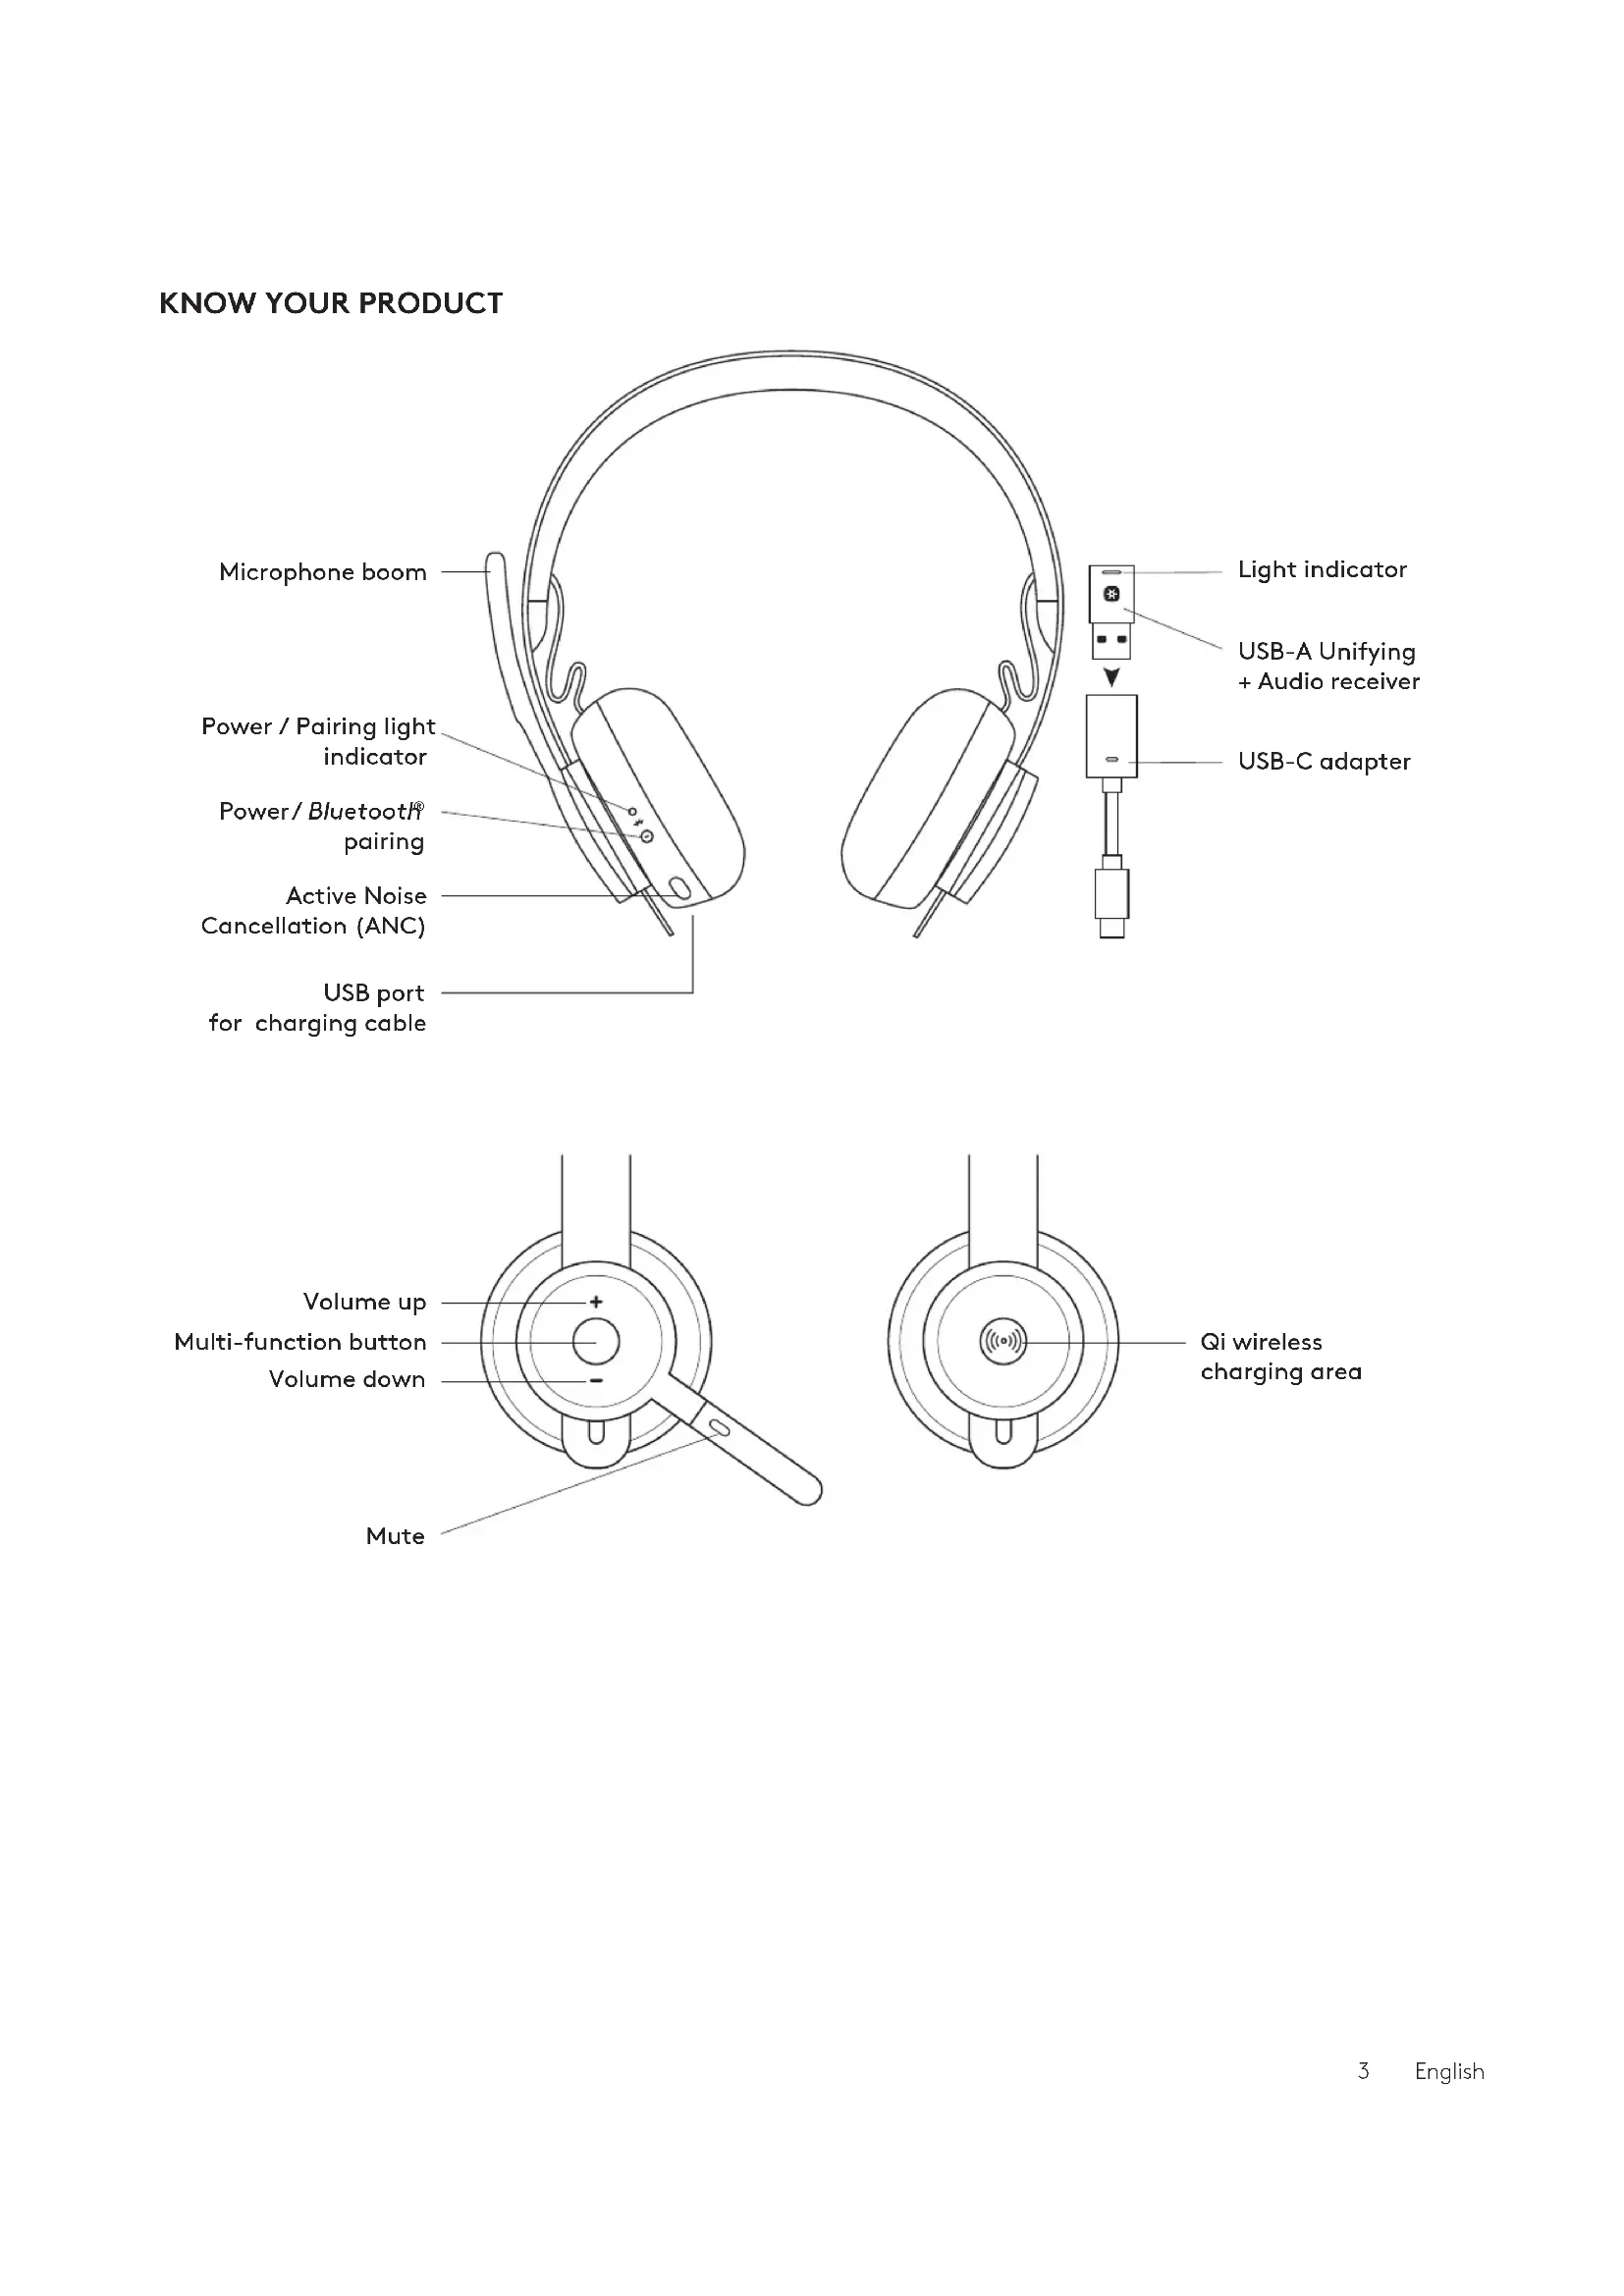
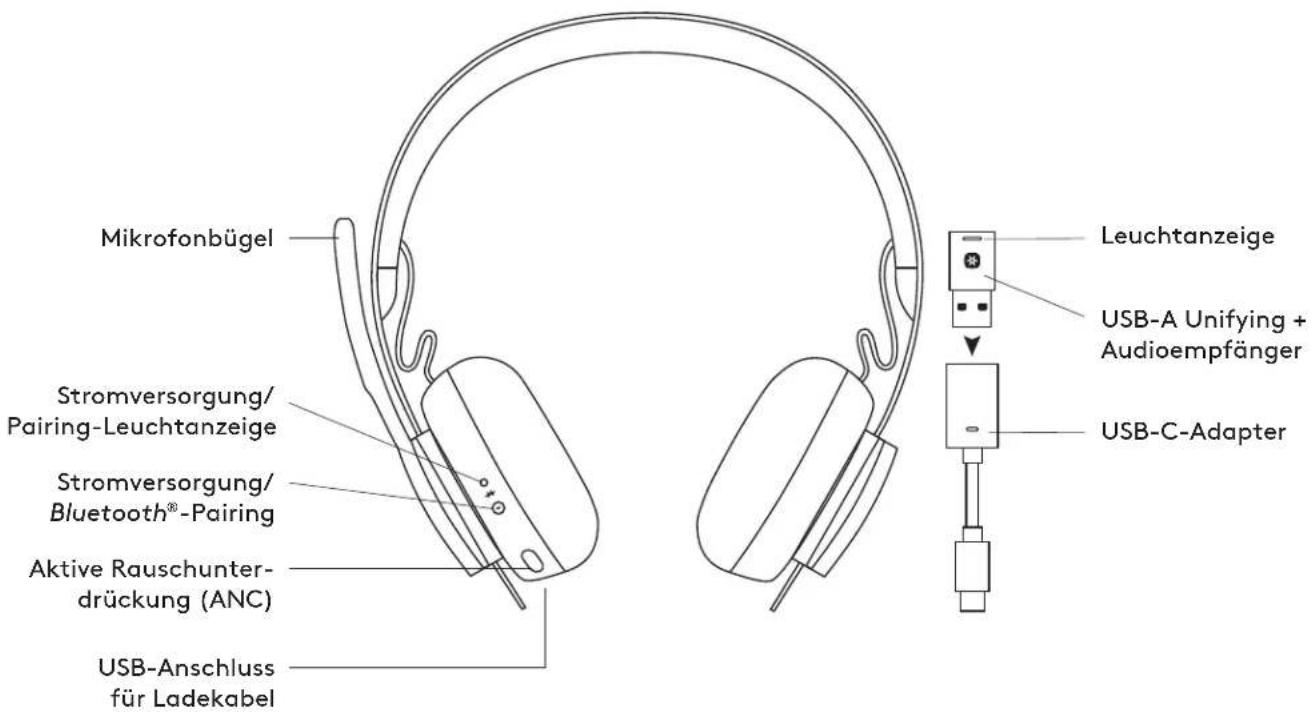
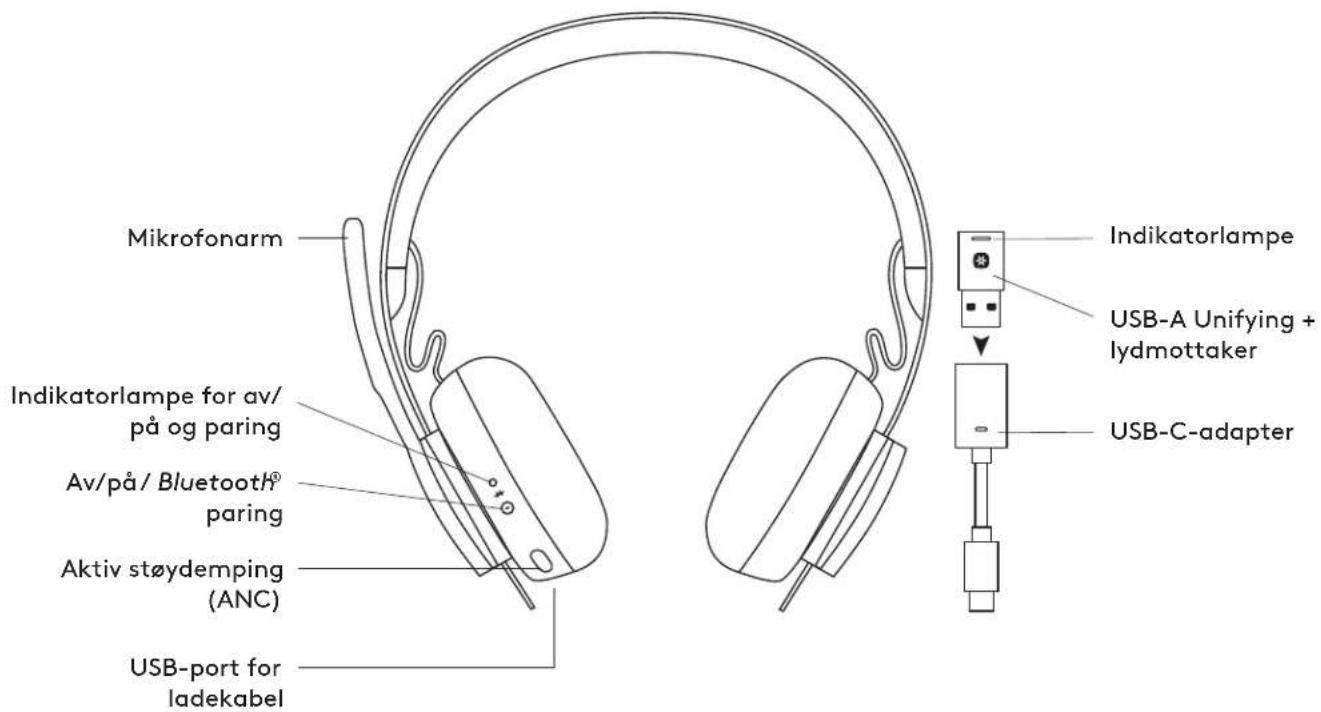
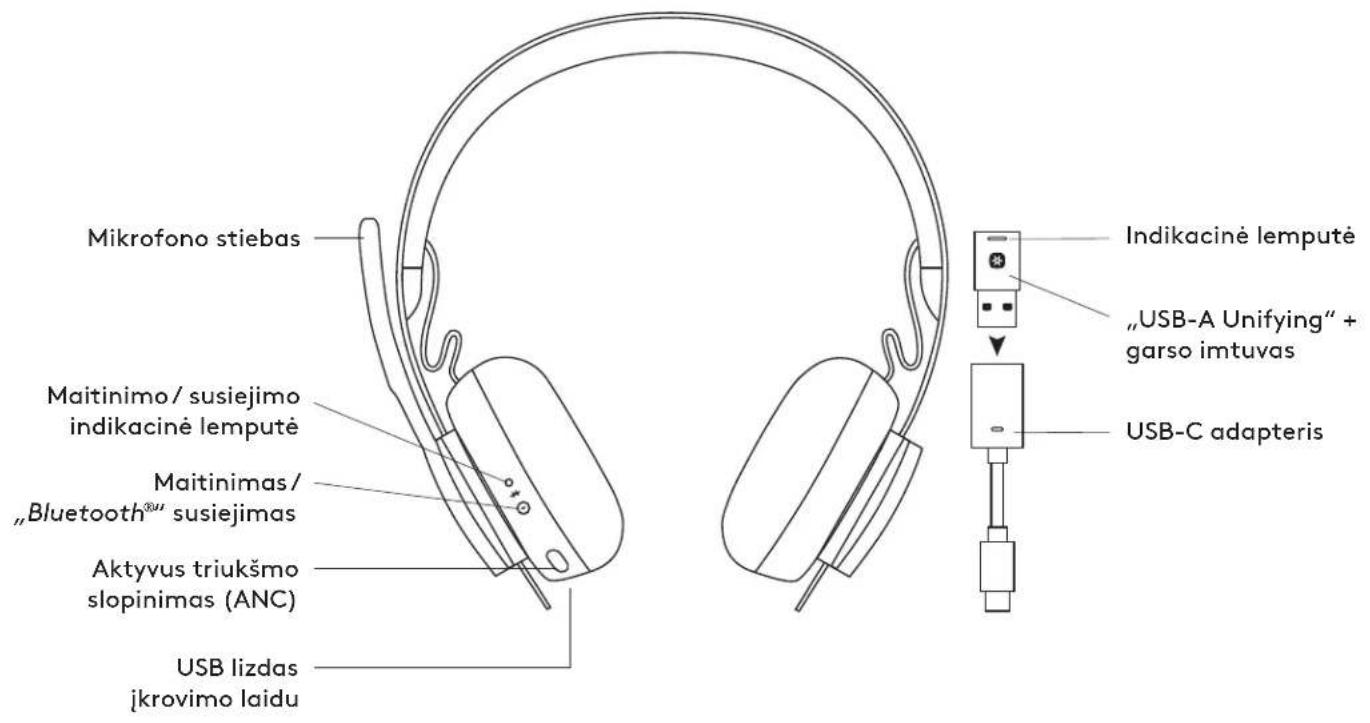
KNOW YOUR PRODUCT
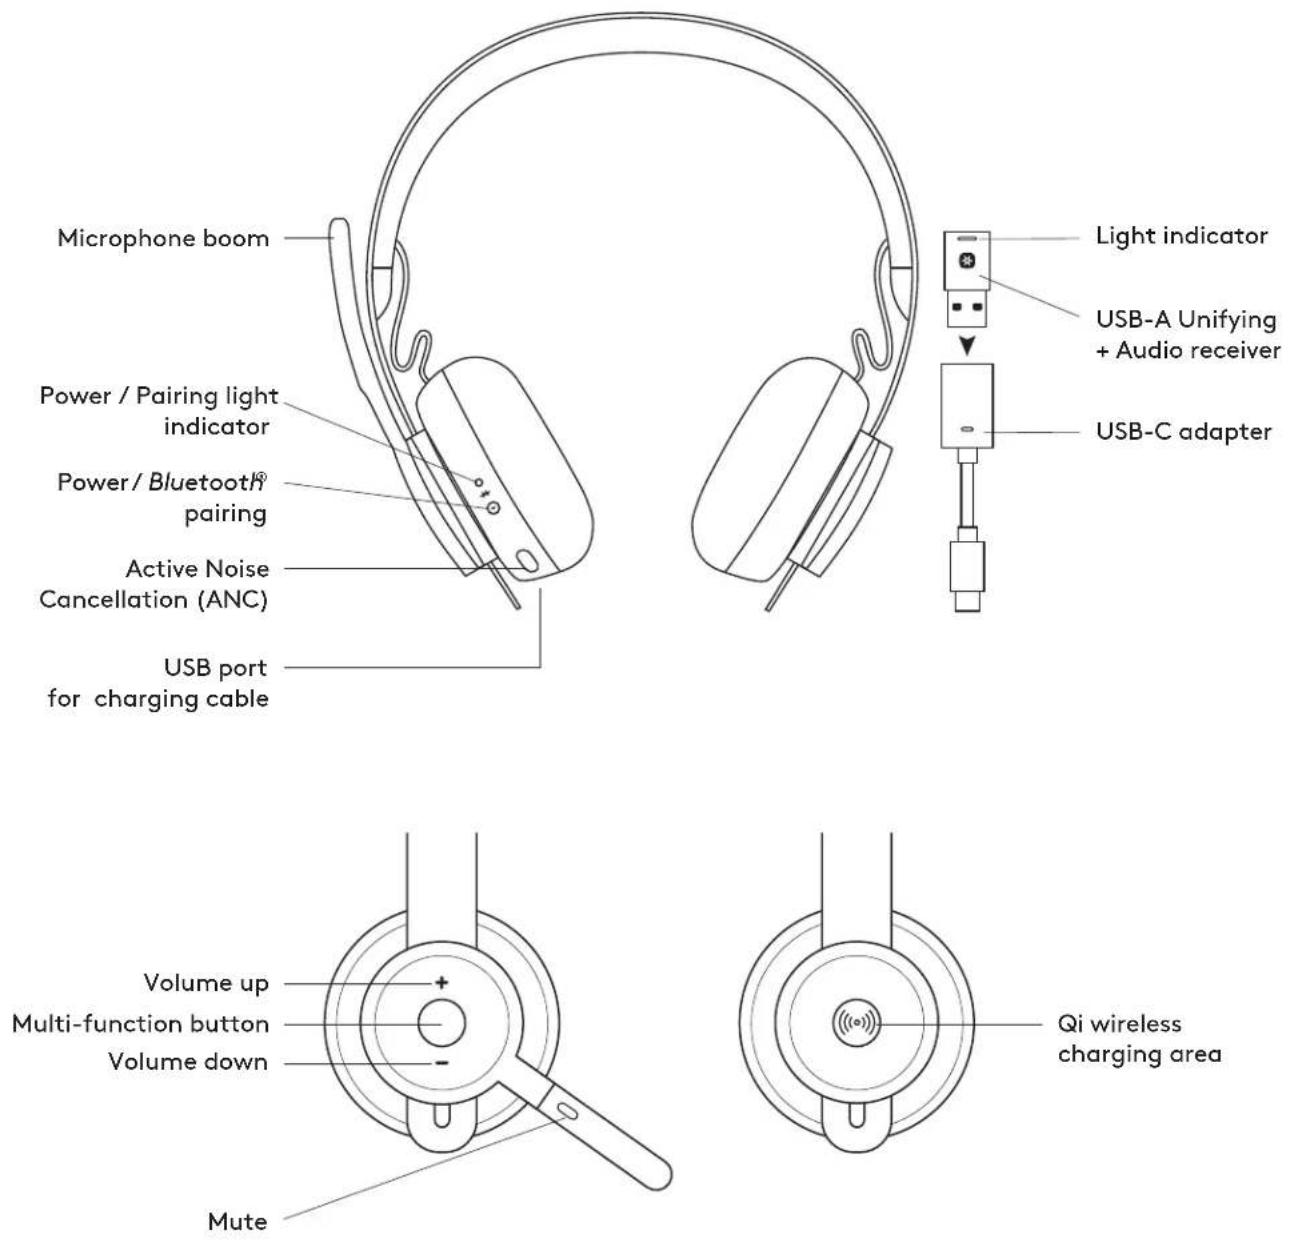
WHAT'S IN THE BOX
- Headset
- USB-A Unifying + audio receiver
- USB-C to A adapter
- USB-A to C charging cable
- Travel bag
- User documentation
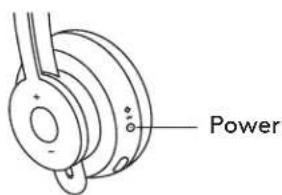
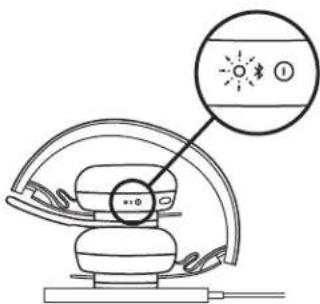
POWER ON/OFF
- Press power button for 1 second.
- Once powered on, light indicator turns white. If no device is connected, it will flash white slowly.
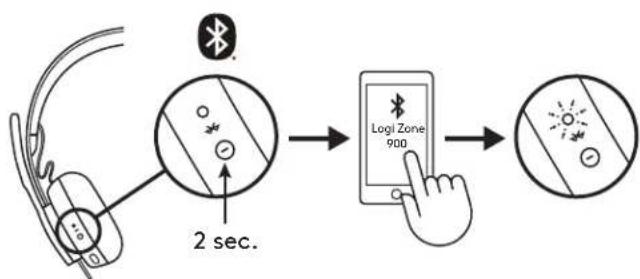
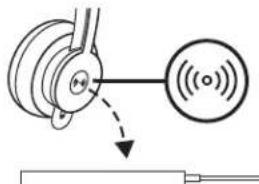
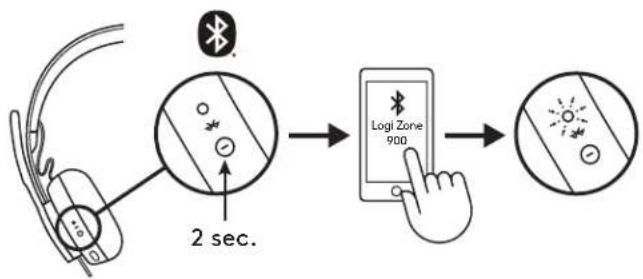
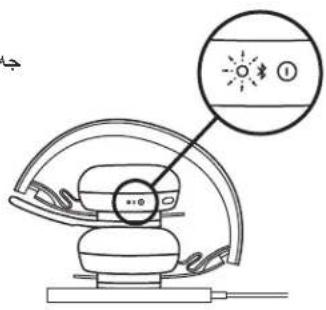
PAIRING VIA BLUETOOTH®
- Press power button for 2 seconds. Light indicator will flash white rapidly.
- Open Bluetooth ^® settings on your device.
- Select Logi Zone 900 in discoverable devices.
- Once successfully paired, light indicator will turn solid white.

flowchart
graph LR
    A["Device with Bluetooth icon"] -->|2 sec.| B["Log Zone 900"]
    B --> C["Hand pointing to the lock"]
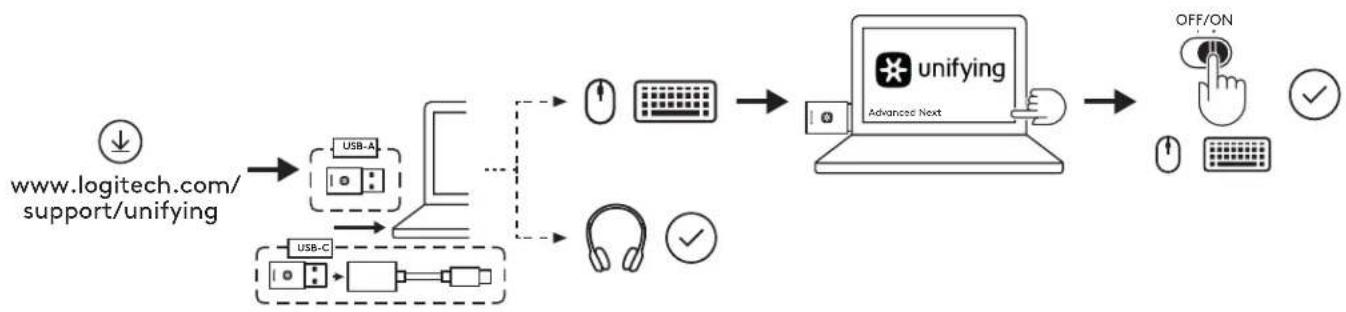
PAIRING HEADSET, KEYBOARD AND MICE VIA USB RECEIVER
flowchart
graph LR
    A["www.logitech.com/support/unifying"] --> B["USB-A"]
    B --> C["..."]
    C --> D["User Device"]
    D --> E["Advanced Next"]
    E --> F["OFF/ON"]
    F --> G["User Device"]
    G --> H["User Device"]
    H --> I["User Device"]
    I --> J["User Device"]
    J --> K["User Device"]
    K --> L["User Device"]
    L --> M["User Device"]
    M --> N["User Device"]
    N --> O["User Device"]
    O --> P["User Device"]
    P --> Q["User Device"]
    Q --> R["User Device"]
    R --> S["User Device"]
    S --> T["User Device"]
    T --> U["User Device"]
    U --> V["User Device"]
    V --> W["User Device"]
    W --> X["User Device"]
    X --> Y["User Device"]
    Y --> Z["User Device"]
    Z --> AA["User Device"]
    AA --> AB["User Device"]
    AB --> AC["User Device"]
    AC --> AD["User Device"]
    AD --> AE["User Device"]
    AE --> AF["User Device"]
    AF --> AG["User Device"]
    AG --> AH["User Device"]
    AH --> AI["User Device"]
    AI --> AJ["User Device"]
    AJ --> AK["User Device"]
    AK --> AL["User Device"]
    AL --> AM["User Device"]
    AM --> AN["User Device"]
    AN --> AO["User Device"]
    AO --> AP["User Device"]
    AP --> AQ["User Device"]
    AQ --> AR["User Device"]
    AR --> AS["User Device"]
    AS --> AT["User Device"]
    AT --> AU["User Device"]
    AU --> AV["User Device"]
    AV --> AW["User Device"]
    AW --> AX["User Device"]
    AX --> AY["User Device"]
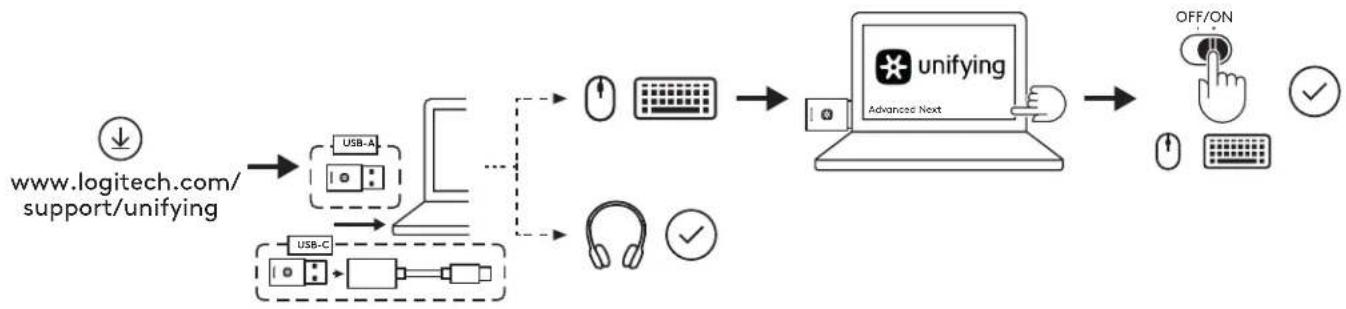
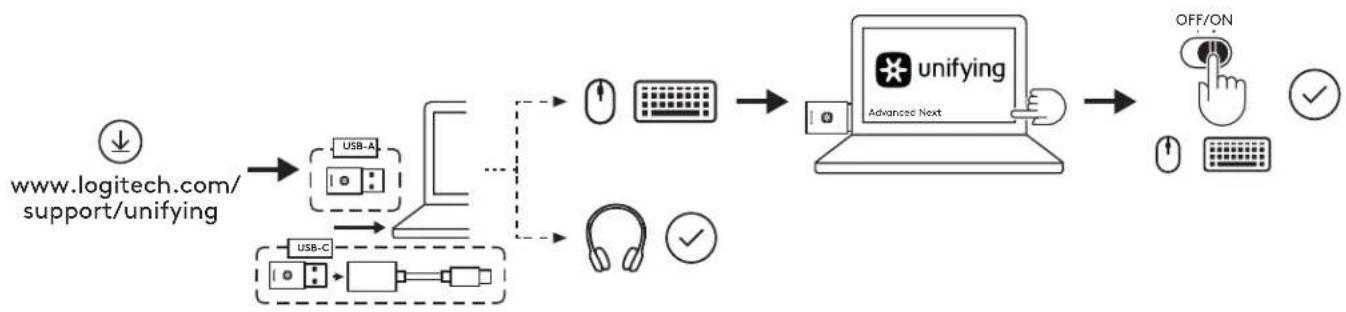
- Download Logitech® Unifying Software at www.logitech.com/support/unifying
- USB-A
Insert the Zone 900 receiver into the computer USB-A port.
USB-C
Insert the USB-A receiver into the USB-C adapter. Then insert the adapter into the computer USB-C port.
- Zone 900 headset is already paired to the receiver it ships with. Just power on the headset. Once successfully paired, the light indicator on the receiver will remain solid white. Light indicator on the headset will turn solid white.
- To pair mice and keyboard,
a. Open the software and continue clicking "Next" on the bottom right corner. If you already have other unifying receivers (with ✝go), please unplug them.
b. Locate the OFF-ON slider on your mice and keyboard. Turn each device off and back on to restart your devices and finish pairing.
- If paired, please follow the on-screen prompt and test it out to confirm successful pairing.
- If pairing failed, please retry or refer to troubleshooting on our support page www.logitech.com/support/zone900
NOTE: you can pair up to 6 Logitech Unifying peripherals.
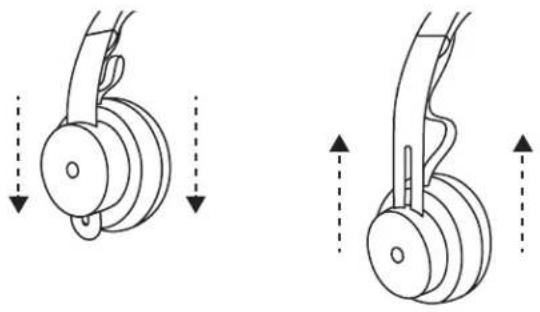
ADJUSTING HEADSET
- Adjust headset by sliding earcups up and down the headband.
- It may be easier to adjust the headset on your head. Move the earcups up and down the headband until they sit comfortably on your ears.
natural_image
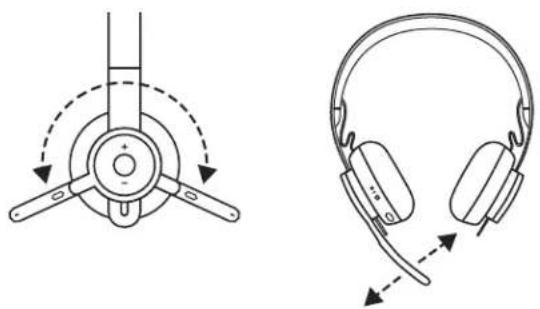
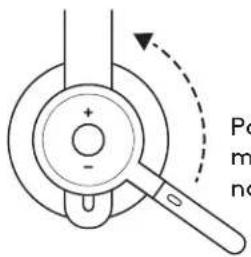
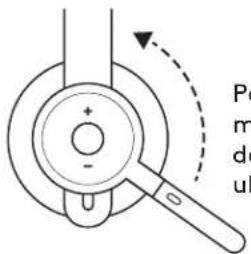
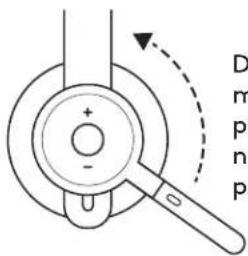
Diagram showing two mechanical components with downward arrows indicating motion or force direction (no text or symbols)- Microphone boom rotates 270 degrees. Wear it on either left or right side. Audio channel will switch automatically, depending on the direction you are wearing the microphone.
- Flexible microphone boom — adjust boom location to capture voice better.
natural_image
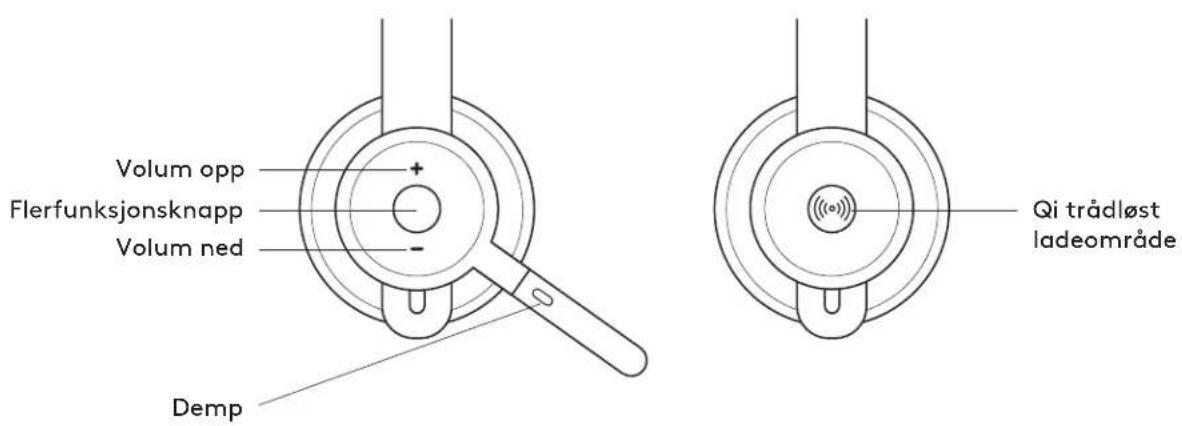
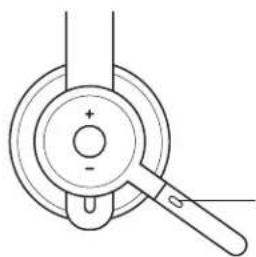
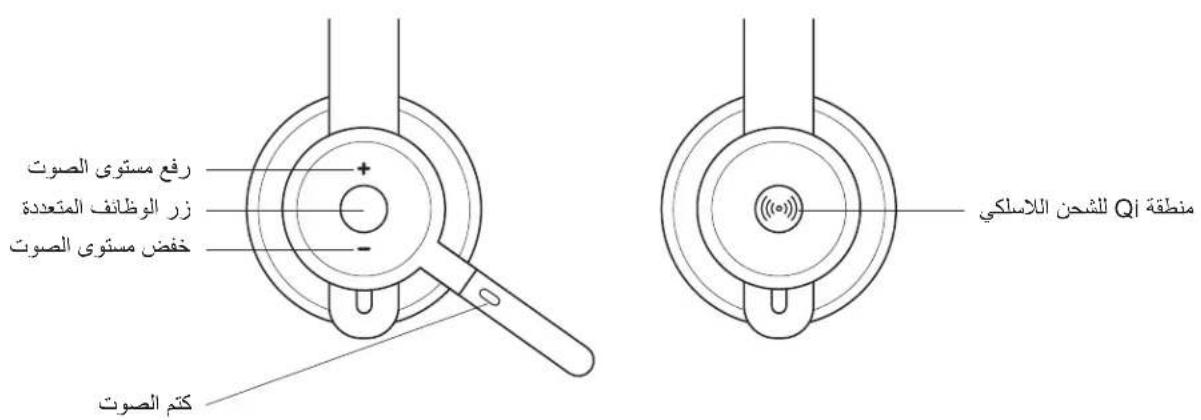
Technical line drawings of two types of headphones, one with a circular head and arrow indicating rotation, the other with a wide-angle earband (no text or symbols)HEADSET CONTROLS
| Usage Button Action | |||
| Call controls | Answer / End call | Multi-function | Short press |
| Reject call 2 second press | |||
| Voice assistant Multi-function | 2 second press | ||
| Media controls | Play / Pause Multi-function Double press | ||
| Track forward | Multi-function and “+” | Short press | |
| Track backward | Multi-function and “-” | Short press | |
| Volume | Volume up | “+” | Short press |
| Volume down | “-” | Short press | |
| Headset status | Check connectivity and battery life | “+” and “-” | Short press |

natural_image
Pure mechanical diagram showing a lever and circular components with no text or symbolsNote:
- Media control functionality depends on type of application.
- Call activities are always the first priority. When two devices are connected, the Bluetooth ^ connection will be prioritized over receiver. When two Bluetooth ^ devices are connected, the last active device will override the other.
Tip: Button customizations and Music EQ controls available on Logi Tune.
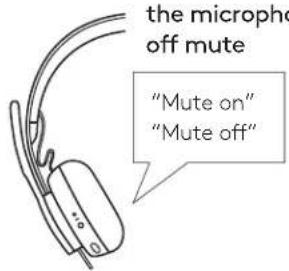
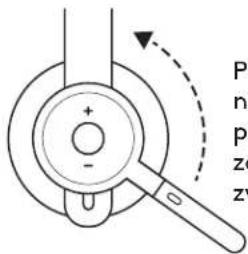
MUTE
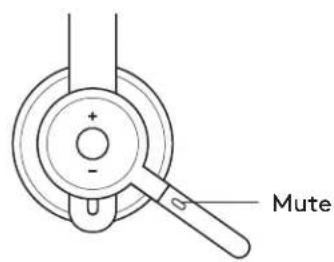
Move mic boom up to mute
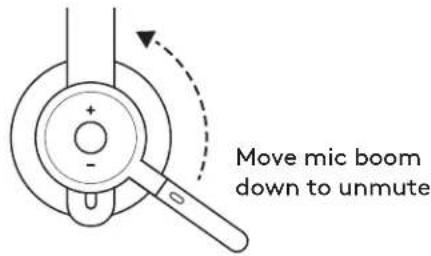
Voice notifications indicate when the microphone is on/off mute
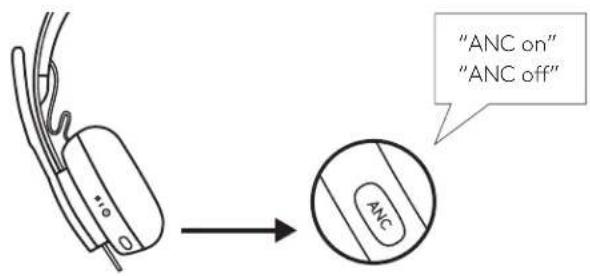
ACTIVE NOISE CANCELLATION (ANC)
ANC blocks out the noise around you to help you concentrate on the task at hand.
- Press the ANC button on the side of the earcup.
- There will be voice notifications when turning ANC on and off. These can be turned off in Logi Tune.
HEADSET LIGHT INDICATOR
| Light Status | ||
| White | Solid Powered on or fully charged | |
| Breathing Battery charging | ||
| Fast pulsing Bluetooth ^® pairing mode | ||
| Slow pulsing No paired device | ||
| Red | Solid Low battery | |
| Fast pulsing Bluetooth ^® pairing mode while low battery | ||
| Slow pulsing No paired device while low battery | ||

flowchart
graph LR
    A["Motor with +/- terminals"] --> B["Electric motor with battery"]
    B --> C["Low battery: red dot"]
    B --> D["Bluetooth® pairing mode while low battery: red dot with sun icon"]
    B --> E["No paired device: red dot with sun icon"]
    C --> F["Bluetooth® pairing mode"]
    D --> G["Battery charging: sun icon"]
    E --> H["Powered on or fully charged: circle"]
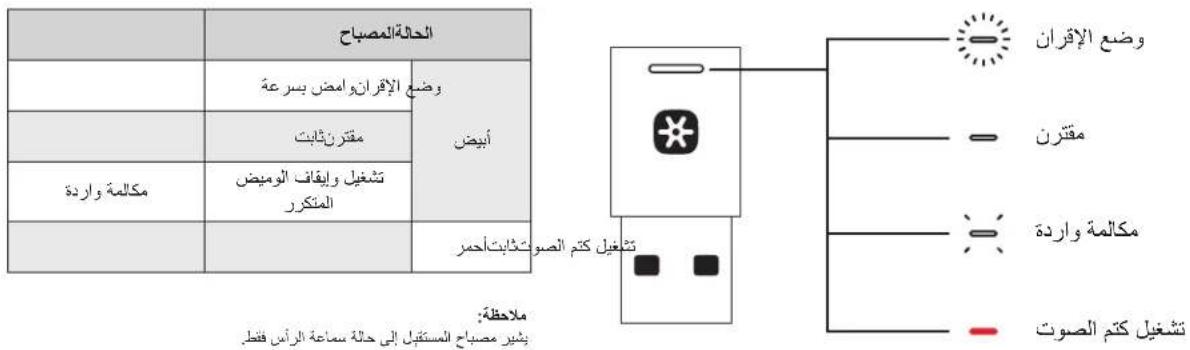
RECEIVER INDICATOR LIGHT
| Light Status | ||
| White | Fast flashing Pairing mode | |
| Solid Paired | ||
| Repeat flashing on and off | Incoming call | |
| Red Solid | Mute on | |
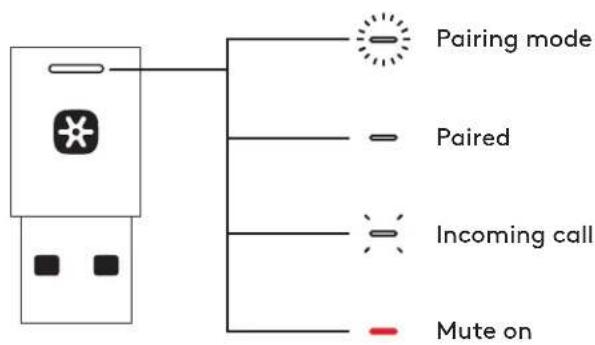
Note:
Receiver light indicates headset status only.
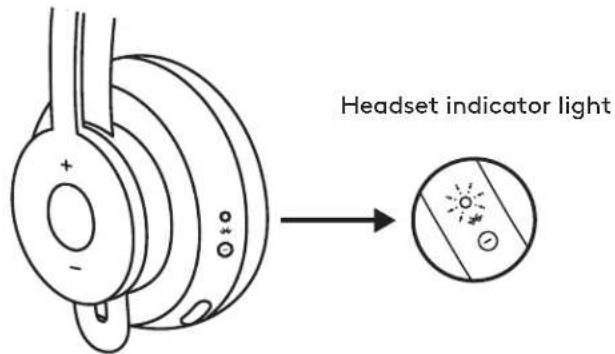
CHARGING
Headset automatically powers off when left idle. Sleep timer can be changed in the Logi Tune.
Headset indicator light will turn RED when battery is low.
Charging via USB cable
-
Plug the USB-C cable end into the USB-C port on the bottom of the earcup.
-
Plug the USB-A end into the USB-A charging port on your computer or AC adapter.
-
Indicator light will be a breathing white light for charging.
-
Indicator light will be solid white when fully charged.
- 2 hours will fully charge the battery.
- 5 minutes will give you 1 hour of talk time.
- Headset can be used with receiver and Bluetooth ^® paired while charging.
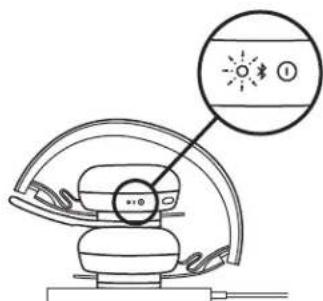
Charging via Qi wireless charger
-
Fold headset with the wireless charging icon on the earcup to the outside.
-
Place earcup with wireless charging icon on top of any Qi wireless charging base.*
-
Indicator light will be a breathing, white light when charging.
-
Indicator light will be solid white when fully charged.
- 2 hours of charging fully charges the battery.
* Qi wireless charging base is not included.


LOGI TUNE APP
Install application
Download Logi Tune from www.logitech.com/tune
ADJUSTING SIDETONE
Sidetone lets you hear your own voice during conversations so you are aware of how loud you are talking. In Logi Tune, select the sidetone feature, and adjust the dial accordingly.
- A higher number means you hear more external sound.
- A lower number means you hear less external sound.
AUTO SLEEP TIMER
By default, your headset will automatically power off when not in use for one hour. Adjust the sleep timer in Logi Tune.
UPDATE YOUR HEADSET
It is recommended to update both your headset and receiver. To do so, download Logi Tune from www.logitech.com/tune
RESET YOUR HEADSET
To reset your headset back to its original state, power headset on, press and hold the ANC button and volume '-' button for 5 seconds. The headset is successfully reset when it powers off and indicator light turns off.
DIMENSIONS
HEADSET:
Height x Width x Depth: 174.7 x 176.7 x 70.7 mm
WEIGHT:
0.1808 Kg
EARPADS:
Height x Width x Depth: 70.7 x 70.7 x 16.4 mm
RECEIVER:
Height x Width x Depth: 35.5 x 16.2 x 5.3 mm
ADAPTER:
Height x Width x Depth: 106.7 x 17.5 x 10.1 mm
SYSTEM REQUIREMENTS
Works with common calling applications across almost all platforms and operating systems.
Works with Windows ^® , Mac, or Chrome ^™ based computer via USB-C, USB-A, Bluetooth ^® and iOS or Android ^™ Bluetooth ^® enabled devices.
TECHNICAL SPECIFICATIONS
Microphone Type: Omni-directional dual MEMS mic array
Frequency response (Headset): 30\~13 kHz @ -10 dB (music mode), 100\~8 kHz (talk mode)
Frequency response (Microphone): 85\~20 kHz @-3 dB
Battery type: Built-in battery (Lithium ion)
Battery life (talk time): 14 hrs (ANC on), 15 hrs (ANC off)
Battery life (listening time): 14 hrs (ANC on), 16 hrs (ANC off)
Bluetooth ^® version: 5.0
Wireless range: Up to 30 m/100 ft (open field line of sight)
Qi Wireless charging enabled
USB-A to C charging cable: 4.25 ft (130 cm)
www.logitech.com/support/zone900
PRODUKT AUF EINEN BLICK
flowchart
graph LR
    A["www.logitech.com/support/unifying"] --> B["USB-A"]
    B --> C["..."]
    C --> D["User Device"]
    D --> E["Advanced Next"]
    E --> F["OFF/ON"]
    F --> G["User Interface"]
    G --> H["User Hand"]
    H --> I["User Button"]
    I --> J["User Interface Check"]
    J --> K["User Interface Sign"]
natural_image
Diagram of a mechanical component with two dashed arrows indicating downward motion (no text or symbols)
natural_image
Diagram of a mechanical device with curved and straight ends, showing directional arrows (no text or symbols)natural_image
Pure mechanical diagram showing a rotating component with two blades and a central hub, no text or symbols present.
natural_image
Line drawing of a pair of headphones with headband and earplugs, showing signal propagation (no text or symbols)BEDIENELEMENTE AM HEADSET
natural_image
Technical line drawing of a mechanical component with a handle and circular base (no text or symbols)Hinweis:
natural_image
Pure mechanical diagram showing a lever and circular component without any text or symbolsStumm- schaltung
LOGI TUNE APP
flowchart
graph LR
    A["User with Bluetooth icon"] --> B["2 sec."]
    B --> C["Logi Zone 900"]
    C --> D["Signal Detection"]
COUPLER LE CASQUE, LE CLAVIER ET LES SOURIS VIA UN RÉCEPTEUR USB

flowchart
graph LR
    A["www.logitech.com/support/unifying"] --> B["USB-A"]
    B --> C["..."]
    C --> D["UNIFYING Advanced Next"]
    D --> E["OFF/ON"]
    E --> F["OK"]
    F --> G["✓"]
    C --> H["USB-C"]
    H --> I["+"]
    I --> J["+"]
    J --> K["+"]
    K --> L["+"]
    L --> M["+"]
    M --> N["+"]
    N --> O["+"]
    O --> P["+"]
    P --> Q["+"]
    Q --> R["+"]
    R --> S["+"]
    S --> T["+"]
    T --> U["+"]
    U --> V["+"]
    V --> W["+"]
    W --> X["+"]
    X --> Y["+"]
    Y --> Z["+"]
    Z --> AA["+"]
    AA --> AB["+"]
    AB --> AC["+"]
    AC --> AD["+"]
    AD --> AE["+"]
    AE --> AF["+"]
    AF --> AG["+"]
    AG --> AH["+"]
    AH --> AI["+"]
    AI --> AJ["+"]
    AJ --> AK["+"]
    AK --> AL["+"]
    AL --> AM["+"]
    AM --> AN["+"]
    AN --> AO["+"]
    AO --> AP["+"]
    AP --> AQ["+"]
    AQ --> AR["+"]
    AR --> AS["+"]
    AS --> AT["+"]
    AT --> AU["+"]
    AU --> AV["+"]
    AV --> AW["+"]
    AW --> AX["+"]
    AX --> AY["+"]
    AY --> AZ["+"]
    AZ --> BA["+"]
    BA --> BB["+"]
    BB --> BC["+"]
    BC --> BD["+"]
    BD --> BE["+"]
    BE --> BF["+"]
    BF --> BG["+"]
    BG --> BH["+"]
    BH --> BI["+"]
    BI --> BJ["+"]
    BJ --> BK["+"]
    BK --> BL["+"]
    BL --> BM["+"]
    BM --> BN["+"]
    BN --> BO["+"]
    BO --> BP["+"]
    BP --> BQ["+"]
    BQ --> BR["+"]
    BR --> BS["+"]
    BS --> BT["+"]
    BT --> BU["+"]
    BU --> BV["+"]
    BV --> BW["+"]
    BW --> BX["+"]
    BX --> BY["+"]
    BY --> BZ["+"]
natural_image
Diagram of a mechanical component with two downward arrows indicating direction (no text or symbols)
natural_image
Diagram of a mechanical device with curved and straight ends, showing motion direction arrows (no text or symbols)AJUSTEMENT DE LA TIGE DU MICRO
natural_image
Pure mechanical diagram showing a rotating component with two blades and a central hub, no text or symbols present.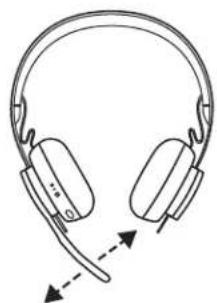
natural_image
Line drawing of a pair of headphones with headband and earplugs, showing motion arrows (no text or symbols)COMMANDES DU CASQUE
natural_image
Technical line drawing of a mechanical component with a handle and circular base (no text or symbols)Remarque:
natural_image
Pure mechanical diagram showing a lever and pivot point without any text or symbolsSourdine
APPLICATION LOGI TUNE
Installer l'application
flowchart
graph LR
    A["www.logitech.com/support/unifying"] --> B["USB-A"]
    B --> C["..."]
    C --> D["User Device"]
    D --> E["Advanced Next"]
    E --> F["OFF/ON"]
    F --> G["User Interface"]
    G --> H["User Hand"]
    H --> I["User Button"]
    I --> J["User Interface Check"]
    J --> K["User Interface Sign"]
- Scarica Logitech® Unifying Software all'indirizzo www.logitech.com/support/unifying
- USB-A
natural_image
Diagram showing two mechanical components with downward arrows indicating motion or force direction (no text or symbols)REGOLAZIONE DEL BRACCIO DEL MICROFONO
natural_image
Technical line drawings of two types of headphones, one with a circular head and arrow indicating rotation, the other with a flathead and earbell (no text or symbols)CONTROLLI DELLA CUFFIA CON MICROFONO
natural_image
Pure mechanical diagram showing a lever handle and circular components with no text or symbolsNota:
natural_image
Pure mechanical diagram showing a lever and circular component without any text or symbolsAPP LOGI TUNE
Versione Bluetooth®: 5,0
flowchart
graph LR
    A["www.logitech.com/support/unifying"] --> B["USB-A"]
    B --> C["..."]
    C --> D["User Device"]
    D --> E["Advanced Next"]
    E --> F["OFF/ON"]
    F --> G["User Device"]
    G --> H["User Device"]
    H --> I["User Device"]
    I --> J["User Device"]
    J --> K["User Device"]
    K --> L["User Device"]
    L --> M["User Device"]
    M --> N["User Device"]
    N --> O["User Device"]
    O --> P["User Device"]
    P --> Q["User Device"]
    Q --> R["User Device"]
    R --> S["User Device"]
    S --> T["User Device"]
    T --> U["User Device"]
    U --> V["User Device"]
    V --> W["User Device"]
    W --> X["User Device"]
    X --> Y["User Device"]
    Y --> Z["User Device"]
    Z --> AA["User Device"]
    AA --> AB["User Device"]
    AB --> AC["User Device"]
    AC --> AD["User Device"]
    AD --> AE["User Device"]
    AE --> AF["User Device"]
    AF --> AG["User Device"]
    AG --> AH["User Device"]
    AH --> AI["User Device"]
    AI --> AJ["User Device"]
    AJ --> AK["User Device"]
    AK --> AL["User Device"]
    AL --> AM["User Device"]
    AM --> AN["User Device"]
    AN --> AO["User Device"]
    AO --> AP["User Device"]
    AP --> AQ["User Device"]
    AQ --> AR["User Device"]
    AR --> AS["User Device"]
    AS --> AT["User Device"]
    AT --> AU["User Device"]
    AU --> AV["User Device"]
    AV --> AW["User Device"]
    AW --> AX["User Device"]
    AX --> AY["User Device"]
- Descargue el software Logitech® Unifying desdewww.logitech.com/support/unifying
- USB-A
natural_image
Diagram of a mechanical component with two dashed arrows indicating downward motion (no text or symbols)
natural_image
Diagram of a mechanical device with two upward arrows indicating motion or force direction (no text or symbols)AJUSTAR LA VARILLA DEL MICRÓFONO
natural_image
Pure mechanical diagram showing a rotating component with two blades and a central hub, no text or symbols present.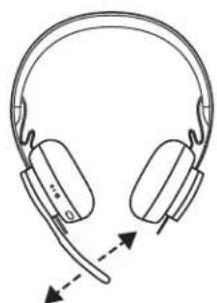
natural_image
Line drawing of a pair of headphones with headband and earplugs, showing signal propagation (no text or symbols)CONTROLES DE AURICULARES
natural_image
Technical line drawing of a mechanical component with a handle and circular base (no text or symbols)Nota:
INDICADOR LUMINOSO DE AURICULARES
flowchart
graph LR
    A["www.logitech.com/support/unifying"] --> B["USB-A"]
    B --> C["..."]
    C --> D["User Device"]
    D --> E["Advanced Next"]
    E --> F["OFF/ON"]
    F --> G["User Device"]
    G --> H["User Device"]
    H --> I["User Device"]
    I --> J["User Device"]
    J --> K["User Device"]
    K --> L["User Device"]
    L --> M["User Device"]
    M --> N["User Device"]
    N --> O["User Device"]
    O --> P["User Device"]
    P --> Q["User Device"]
    Q --> R["User Device"]
    R --> S["User Device"]
    S --> T["User Device"]
    T --> U["User Device"]
    U --> V["User Device"]
    V --> W["User Device"]
    W --> X["User Device"]
    X --> Y["User Device"]
    Y --> Z["User Device"]
    Z --> AA["User Device"]
    AA --> AB["User Device"]
    AB --> AC["User Device"]
    AC --> AD["User Device"]
    AD --> AE["User Device"]
    AE --> AF["User Device"]
    AF --> AG["User Device"]
    AG --> AH["User Device"]
    AH --> AI["User Device"]
    AI --> AJ["User Device"]
    AJ --> AK["User Device"]
    AK --> AL["User Device"]
    AL --> AM["User Device"]
    AM --> AN["User Device"]
    AN --> AO["User Device"]
    AO --> AP["User Device"]
    AP --> AQ["User Device"]
    AQ --> AR["User Device"]
    AR --> AS["User Device"]
    AS --> AT["User Device"]
    AT --> AU["User Device"]
    AU --> AV["User Device"]
    AV --> AW["User Device"]
    AW --> AX["User Device"]
    AX --> AY["User Device"]
- Transfira o Logitech® Unifying Software em www.logitech.com/support/unifying
- USB-A
natural_image
Diagram showing two mechanical components with downward arrows indicating motion or force direction (no text or symbols)AJUSTAR A HASTE DO MICROFONE
natural_image
Technical line drawings of a mechanical device and its corresponding headhead assembly (no text or symbols)natural_image
Technical line drawing of a mechanical component with a handle and circular base (no text or symbols)Nota:
natural_image
Pure mechanical diagram showing a lever and circular component with no text or symbolsSem som
APLICAÇÃO LOGI TUNE
flowchart
graph LR
    A["www.logitech.com/support/unifying"] --> B["USB-A"]
    B --> C["..."]
    C --> D["User Interface"]
    D --> E["Advanced Next"]
    E --> F["OFF/ON"]
    F --> G["OK"]
    G --> H["User Interface"]
    H --> I["OFF/ON"]
    I --> J["OK"]
    J --> K["User Interface"]
    K --> L["OFF/ON"]
    L --> M["OK"]
    M --> N["User Interface"]
    N --> O["OFF/ON"]
    O --> P["OK"]
    P --> Q["User Interface"]
    Q --> R["OFF/ON"]
    R --> S["OK"]
    S --> T["User Interface"]
    T --> U["OFF/ON"]
    U --> V["OK"]
- Download Logitech® Unifying Software via www.logitech.com/support/unifying.
- USB-A
natural_image
Diagram of a mechanical component with two dashed arrows indicating direction (no text or symbols)
natural_image
Diagram of a mechanical device with curved and straight ends, showing directional arrows (no text or symbols)DE MICROFOONARM BIJSTELLEN
natural_image
Pure mechanical diagram showing a rotating component with two blades and a central hub, no text or symbols present.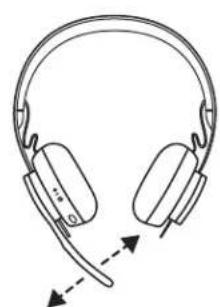
natural_image
Line drawing of a pair of headphones with headband and earplugs, showing motion arrows (no text or symbols)HEADSETKNOPPEN
natural_image
Technical line drawing of a mechanical component with a handle and circular base (no text or symbols)Opmerking:
natural_image
Simple line drawing of a mechanical component with a handle and circular base (no text or symbols)Dempen
natural_image
Pure mechanical diagram showing a lever mechanism with no text or symbolsMicrofoonarm omlaag zetten om dempen op te heffen
LOGI TUNE-APP
App installeren
Download Logi Tune via www.logitech.com/tune
SIDETONE AANPASSEN
flowchart
graph LR
    A["www.logitech.com/support/unifying"] --> B["USB-A"]
    B --> C["..."]
    C --> D["User Device"]
    D --> E["Advanced Next"]
    E --> F["OFF/ON"]
    F --> G["User Interface"]
    G --> H["User Hand"]
    H --> I["User Button"]
    I --> J["User Interface Check"]
    J --> K["User Interface Sign"]
- Ladda ner Logitech® Unifying-programvara på www.logitech.com/support/unifying
- USB-A
natural_image
Diagram of a mechanical component with two dashed arrows indicating direction (no text or symbols)
natural_image
Diagram of a mechanical device with two arrows indicating direction (no text or symbols)JUSTERA MIKROFONARMEN
natural_image
Pure mechanical diagram showing a rotating component with two blades and a central hub, no text or symbols present.
natural_image
Line drawing of a pair of headphones with headband and earplugs, showing signal propagation (no text or symbols)HEADSETREGLAGE
natural_image
Pure mechanical diagram showing a lever and circular components with no text or symbolsLOGI TUNE-APPEN
Installera applikationen
DET INDEHOLDER KASSEN
natural_image
Diagram showing two mechanical components with downward arrows indicating motion or force direction (no text or symbols)TILPASNING AF MIKROFONARMEN
natural_image
Technical line drawings of a mechanical device and its corresponding headhead assembly (no text or symbols)KONTROLKNAPPER PÅ HEADSET
natural_image
Technical line drawing of a mechanical component with a handle and circular base (no text or symbols)Bemærk:
natural_image
Pure mechanical diagram showing a lever and pivot (no text or symbols)Mikrofon til/fra
BATTERIINDIKATOR
BLI KJENT MED PRODUKTET
- Last ned Logitech® Unifying Software fra www.logitech.com/support/unifying
- USB-A
Sett inn Zone 900-mottakeren i datamaskinens USB-A-port.
USB-C
Sett inn USB-A-mottakeren i USB-C-adapteren. Deretter setter du inn adapteren i datamaskinens USB-C-port.
natural_image
Diagram showing two mechanical components with downward arrows indicating motion or force direction (no text or symbols)JUSTERE MIKROFONARMEN
natural_image
Technical line drawings of two types of headphones, one with a circular head and arrow indicating rotation, the other with a wide-angle earband (no text or symbols)HODESETTKONTROLLERE
natural_image
Pure mechanical diagram showing a lever handle and circular components with no text or symbolsMerk:
AKTIV ST∅YDEMPING (ANC)
flowchart
graph LR
    A["www.logitech.com/support/unifying"] --> B["USB-A"]
    A --> C["USB-C"]
    B --> D["..."]
    C --> D
    D --> E["User Interface"]
    E --> F["UNIFYING Advanced Next"]
    F --> G["OFF/ON"]
    G --> H["User Interface"]
    H --> I["OK"]
    I --> J["User Interface"]
natural_image
Diagram showing two mechanical components with directional arrows indicating motion or force (no text or symbols)MIKROFONIPUOMIN SÄÄTÄMINEN
natural_image
Technical line drawings of two types of headphones, one with a circular head and arrow indicating rotation, the other with a wide-angle earband (no text or symbols)KUULOKEMIKROFONIN SÄÄTIMET
natural_image
Pure technical line drawing of a mechanical component with no text or symbolsHuomaa:
natural_image
Pure mechanical diagram showing a lever and circular component without any text or symbolsMykistys

LOGI TUNE -SOVELLUS
natural_image
Simple line drawing of a mechanical component with two downward arrows indicating direction (no text or symbols)
natural_image
Diagram of a mechanical device with curved and straight ends, showing motion direction arrows (no text or symbols)natural_image
Pure mechanical diagram showing a rotating component with two blades and a central hub, no text or symbols present.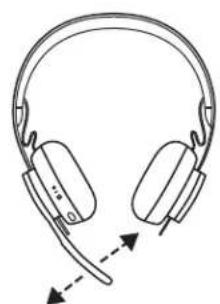
natural_image
Line drawing of a pair of headphones with headband and earplugs, showing motion arrows (no text or symbols)natural_image
Technical line drawing of a mechanical component with a handle and circular base (no text or symbols)Σημείωση:

ΕΦΑΡΜΟΓΗ LOGI TUNE
flowchart
graph LR
    A["www.logitech.com/support/unifying"] --> B["USB-A"]
    B --> C["..."]
    C --> D["User Device"]
    D --> E["Advanced Next"]
    E --> F["OFF/ON"]
    F --> G["User Device"]
    G --> H["User Device"]
    H --> I["User Device"]
    I --> J["User Device"]
    J --> K["User Device"]
    K --> L["User Device"]
    L --> M["User Device"]
    M --> N["User Device"]
    N --> O["User Device"]
    O --> P["User Device"]
    P --> Q["User Device"]
    Q --> R["User Device"]
    R --> S["User Device"]
    S --> T["User Device"]
    T --> U["User Device"]
    U --> V["User Device"]
    V --> W["User Device"]
    W --> X["User Device"]
    X --> Y["User Device"]
    Y --> Z["User Device"]
    Z --> AA["User Device"]
    AA --> AB["User Device"]
    AB --> AC["User Device"]
    AC --> AD["User Device"]
    AD --> AE["User Device"]
    AE --> AF["User Device"]
    AF --> AG["User Device"]
    AG --> AH["User Device"]
    AH --> AI["User Device"]
    AI --> AJ["User Device"]
    AJ --> AK["User Device"]
    AK --> AL["User Device"]
    AL --> AM["User Device"]
    AM --> AN["User Device"]
    AN --> AO["User Device"]
    AO --> AP["User Device"]
    AP --> AQ["User Device"]
    AQ --> AR["User Device"]
    AR --> AS["User Device"]
    AS --> AT["User Device"]
    AT --> AU["User Device"]
    AU --> AV["User Device"]
    AV --> AW["User Device"]
    AW --> AX["User Device"]
    AX --> AY["User Device"]
- Загрузите ПО Logitech* Unifying на странице www.logitech.com/support/unifying.
- USB-A
natural_image
Diagram of a mechanical component with two dashed arrows indicating direction (no text or symbols)
natural_image
Diagram of a mechanical device with curved and straight ends, showing directional arrows (no text or symbols)natural_image
Pure mechanical diagram showing a rotating component with two blades and a central hub, no text or symbols present.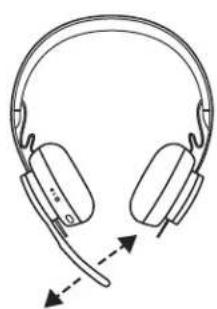
natural_image
Line drawing of a pair of headphones with headband and earplugs, showing motion arrows (no text or symbols)natural_image
Pure mechanical diagram showing a lever and circular components with no text or symbolsПримечание.
natural_image
Pure mechanical diagram showing a lever and circular component without any text or symbolsnatural_image
Diagram of a mechanical component with two dashed arrows indicating direction (no text or symbols)
natural_image
Diagram of a mechanical device with curved and straight ends, showing directional arrows (no text or symbols)REGULOWANIE WYSIĘGNIKA MIKROFONU
natural_image
Pure mechanical diagram showing a rotating component with two blades and a central hub, no text or symbols present.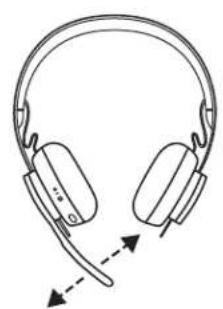
natural_image
Line drawing of a pair of headphones with sound waves and signal arrows (no text or symbols)PRZYCISKI STEROWANIA ZESTAWEM SŁUCHAWKOWYM
natural_image
Technical line drawing of a mechanical component with a handle and circular base (no text or symbols)Uwaga:
natural_image
Pure mechanical diagram showing a lever and circular component without any text or symbolsWyciszenie
APLIKACJA LOGI TUNE
flowchart
graph LR
    A["User with Bluetooth icon"] --> B["2 mp"]
    B --> C["Logi Zone 900"]
    C --> D["Final Detection with wireless signal"]
MIKROFONOS FEJHALLGATÓ, BILLENTYÜZET ÉS EGÉR PÁROSÍTÁSA USB-VEVÖEGYSÉGEN KERESZTÜL

flowchart
graph LR
    A["www.logitech.com/support/unifying"] --> B["USB-A"]
    B --> C["..."]
    C --> D["User Device"]
    D --> E["Advanced Next"]
    E --> F["OFF/ON"]
    F --> G["User Device"]
    G --> H["User Device"]
    H --> I["User Device"]
    I --> J["User Device"]
    J --> K["User Device"]
    K --> L["User Device"]
    L --> M["User Device"]
    M --> N["User Device"]
    N --> O["User Device"]
    O --> P["User Device"]
    P --> Q["User Device"]
    Q --> R["User Device"]
    R --> S["User Device"]
    S --> T["User Device"]
    T --> U["User Device"]
    U --> V["User Device"]
    V --> W["User Device"]
    W --> X["User Device"]
    X --> Y["User Device"]
    Y --> Z["User Device"]
    Z --> AA["User Device"]
    AA --> AB["User Device"]
    AB --> AC["User Device"]
    AC --> AD["User Device"]
    AD --> AE["User Device"]
    AE --> AF["User Device"]
    AF --> AG["User Device"]
    AG --> AH["User Device"]
    AH --> AI["User Device"]
    AI --> AJ["User Device"]
    AJ --> AK["User Device"]
    AK --> AL["User Device"]
    AL --> AM["User Device"]
    AM --> AN["User Device"]
    AN --> AO["User Device"]
    AO --> AP["User Device"]
    AP --> AQ["User Device"]
    AQ --> AR["User Device"]
    AR --> AS["User Device"]
    AS --> AT["User Device"]
    AT --> AU["User Device"]
    AU --> AV["User Device"]
    AV --> AW["User Device"]
    AW --> AX["User Device"]
    AX --> AY["User Device"]
natural_image
Diagram of a mechanical component with two dashed arrows indicating downward motion (no text or symbols)
natural_image
Diagram of a mechanical device with curved and straight ends, showing directional arrows (no text or symbols)natural_image
Pure mechanical diagram showing a rotating component with two blades and a central hub, no text or symbols present.
natural_image
Line drawing of a pair of headphones with headband and earplugs, showing signal propagation (no text or symbols)A MIKROFONOS FEJHALLGATÓBA ÉPÍTETT KEZELŐSZERVEK
natural_image
Technical line drawing of a mechanical component with a handle and circular base (no text or symbols)Megjegyzés:
natural_image
Pure mechanical diagram showing a lever and circular component without any text or symbolsNémítás
LOGI TUNE ALKALMAZÁS
flowchart
graph LR
    A["www.logitech.com/support/unifying"] --> B["USB-A"]
    A --> C["USB-C"]
    B --> D["..."]
    C --> D
    D --> E["User Device"]
    E --> F["Advanced Next"]
    F --> G["OFF/ON"]
    G --> H["User Interface"]
    H --> I["OK/Cancel"]
natural_image
Diagram of a mechanical component with two downward arrows indicating direction (no text or symbols)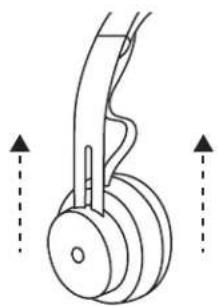
natural_image
Diagram of a mechanical device with curved and straight ends, showing directional arrows (no text or symbols)NASTAVENÍ DRŽÁKU MIKROFONU
natural_image
Diagram of a mechanical component with two blades and a central hub, showing rotational motion arrows (no text or symbols)
natural_image
Line drawing of a pair of headphones with headband and earplugs, showing sound waves (no text or symbols)OVLÁDÁNÍ NÁHLAVNÍ SOUPRAVY
natural_image
Pure mechanical diagram showing a lever and circular components with no text or symbolsPoznámka:
natural_image
Pure mechanical diagram showing a lever and pivot (no text or symbols)Ztlumení
INDIKÁTOR NÁHLAVNÍ SOUPRAVY
APLIKACE LOGI TUNE
Instalace aplikace
flowchart
graph LR
    A["www.logitech.com/support/unifying"] --> B["USB-A"]
    A --> C["USB-C"]
    B --> D["..."]
    C --> D
    D --> E["User Interface"]
    E --> F["UNIFYING Advanced Next"]
    F --> G["OFF/ON"]
    G --> H["User Interface"]
    H --> I["OK"]
    I --> J["User Interface"]
- Prevezmite si Logitech® Unifying Software zo stránky www.logitech.com/support/unifying
- USB-A
Zapojte prijímač Zone 900 do portu USB-A počitača.
USB-C
Zapojte prijímač USB-A do adaptéra USB-C. Potom zapojte adaptér do portu USB-C počítača.
natural_image
Diagram of a mechanical component with curved and dashed arrows indicating direction (no text or symbols)
natural_image
Diagram of a mechanical device with two arrows indicating upward motion (no text or symbols)NASTAVENIE DRŽIAKA MIKROFÓNU
natural_image
Pure mechanical diagram showing a rotating component with two blades and a central hub, no text or symbols present.
natural_image
Line drawing of a pair of headphones with sound waves and earphones (no text or symbols)OVLÁDANIE NÁHLAVNEJ SÚPRAVY
natural_image
Technical line drawing of a mechanical component with a handle and circular base (no text or symbols)Poznámka:
natural_image
Pure mechanical diagram showing a lever and circular component without any text or symbolsStlmenie
Posuňte držiak mikrofónu nahor na stlmenie
APLIKÁCIA LOGI TUNE
flowchart
graph LR
    A["www.logitech.com/support/unifying"] --> B["USB-A"]
    B --> C["..."]
    C --> D["+"]
    C --> E["✓"]
    D --> F["Desktop"]
    E --> G["Headphones"]
    F --> H["Laptop with 'unifying' status"]
    G --> H
    H --> I["OFF/ON"]
    I --> J["User Interface"]
natural_image
Diagram of a mechanical component with two dashed arrows indicating downward motion (no text or symbols)
natural_image
Diagram of a mechanical device with curved and straight ends, showing directional arrows (no text or symbols)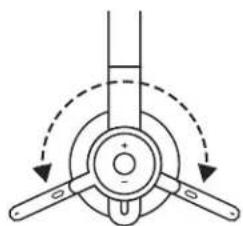
natural_image
Pure mechanical diagram showing a rotating component with two blades and a central hub, no text or symbols present.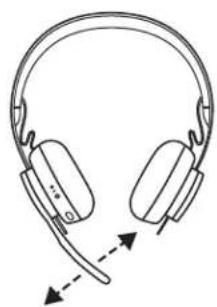
natural_image
Line drawing of a pair of headphones with headband and earplugs, showing signal propagation (no text or symbols)natural_image
Pure mechanical diagram showing a lever and circular components with no text or symbolsПримітки
natural_image
Pure mechanical diagram showing a lever and circular component with no text or symbolsВимкнення звуку
natural_image
Diagram of a mechanical component with two downward arrows indicating direction (no text or symbols)
natural_image
Diagram of a mechanical device with curved and straight ends, showing motion direction arrows (no text or symbols)MIKROFONIVARRE KOHANDAMINE
natural_image
Pure mechanical diagram showing a rotating component with two blades and a central hub, no text or symbols present.
natural_image
Line drawing of a pair of headphones with headband and earplugs, showing sound waves (no text or symbols)PEAKOMPLEKTI JUHTNUPUD
natural_image
Technical line drawing of a mechanical component with a handle and circular base (no text or symbols)Märkus.
natural_image
Pure mechanical diagram showing a lever and circular component without any text or symbolsVaigistus
RAKENDUS LOGI TUNE
Rakenduse instalimine
Laadige Logi Tune alla aadressilt www.logitech.com/tune
OMA HÄÄLE TAGASISIDE KOHANDAMINE
flowchart
graph LR
    A["Device with Bluetooth icon"] -->|2 s| B["Signal transmission"]
    B --> C["Logi Zone 900"]
    C --> D["Device with Bluetooth icon"]
AUSTINU, TASTATURAS UN PELES SAVIENOŠANA PARI, IZMANTOJOT USB UZTVEREU
flowchart
graph LR
    A["www.logitech.com/support/unifying"] --> B["USB-A"]
    B --> C["..."]
    C --> D["User Device"]
    D --> E["Advanced Next"]
    E --> F["OFF/ON"]
    F --> G["User Device"]
    G --> H["User Device"]
    H --> I["User Device"]
    I --> J["User Device"]
    J --> K["User Device"]
    K --> L["User Device"]
    L --> M["User Device"]
    M --> N["User Device"]
    N --> O["User Device"]
    O --> P["User Device"]
    P --> Q["User Device"]
    Q --> R["User Device"]
    R --> S["User Device"]
    S --> T["User Device"]
    T --> U["User Device"]
    U --> V["User Device"]
    V --> W["User Device"]
    W --> X["User Device"]
    X --> Y["User Device"]
    Y --> Z["User Device"]
    Z --> AA["User Device"]
    AA --> AB["User Device"]
    AB --> AC["User Device"]
    AC --> AD["User Device"]
    AD --> AE["User Device"]
    AE --> AF["User Device"]
    AF --> AG["User Device"]
    AG --> AH["User Device"]
    AH --> AI["User Device"]
    AI --> AJ["User Device"]
    AJ --> AK["User Device"]
    AK --> AL["User Device"]
    AL --> AM["User Device"]
    AM --> AN["User Device"]
    AN --> AO["User Device"]
    AO --> AP["User Device"]
    AP --> AQ["User Device"]
    AQ --> AR["User Device"]
    AR --> AS["User Device"]
    AS --> AT["User Device"]
    AT --> AU["User Device"]
    AU --> AV["User Device"]
    AV --> AW["User Device"]
    AW --> AX["User Device"]
    AX --> AY["User Device"]
- Lejupielādējiet "Logitech® Unifying" programmatūru vietnē www.logitech.com/support/unifying
- USB-A
natural_image
Diagram of a mechanical component with two downward arrows indicating direction (no text or symbols)
natural_image
Diagram of a mechanical device with curved and straight ends, showing motion direction arrows (no text or symbols)MIKROFONA KĀTA PIELĀGOŠANA
natural_image
Pure mechanical diagram showing a rotating component with two blades and a central hub, no text or symbols present.
natural_image
Line drawing of a pair of headphones with headband and earplugs, showing sound waves (no text or symbols)AUSTINU VADIKLAS
natural_image
Technical line drawing of a mechanical component with a handle and circular base (no text or symbols)Piezime.
natural_image
Simple line drawing of a mechanical component with a handle and circular base (no text or symbols)natural_image
Simple line drawing of a medical or laboratory device with tubing and a central button (no text or symbols)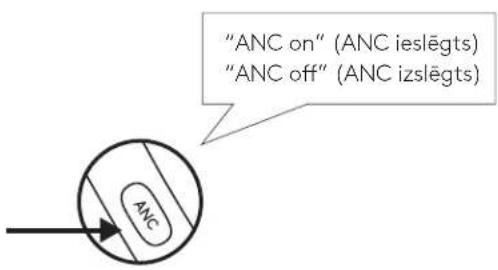
AUSTINU GAISMAS INDIKATORS

"LOGI TUNE" LIETOTNE
SUSIPAŽINKITE SU SAVO PRODUKTU
natural_image
Diagram of a mechanical component with two dashed arrows indicating direction (no text or symbols)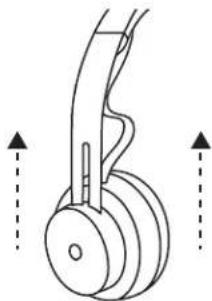
natural_image
Diagram of a mechanical device with curved and straight ends, showing motion direction arrows (no text or symbols)MIKROFONO STIEBO REGULIAVIMAS
natural_image
Pure mechanical diagram showing a rotating component with two blades and a central hub, no text or symbols present.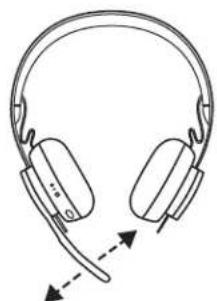
natural_image
Line drawing of a pair of headphones with headband and earplugs, showing motion arrows (no text or symbols)AUSINIŲ VALDIKLIAI
natural_image
Technical line drawing of a mechanical component with a handle and circular base (no text or symbols)Pastaba:
natural_image
Simple line drawing of a mechanical component with a handle and circular base (no text or symbols)Nutildymas
„LOGI TUNE“ PROGRAMÉLÉ
flowchart
graph LR
    A["www.logitech.com/support/unifying"] --> B["USB-A"]
    B --> C["..."]
    C --> D["+"]
    C --> E["✓"]
    D --> F["Desktop"]
    E --> G["Headphones"]
    F --> H["Laptop with 'unifying' status"]
    G --> H
    H --> I["OFF/ON"]
    I --> J["User Interface"]
- Изтеглете софтуера Logitech® Unifying Software на адрес www.logitech.com/support/unifying.
- USB-A
natural_image
Diagram of a mechanical component with two downward arrows indicating direction (no text or symbols)
natural_image
Diagram of a mechanical device with curved and straight ends, showing directional arrows (no text or symbols)natural_image
Pure mechanical diagram showing a rotating component with two blades and a central hub, no text or symbols present.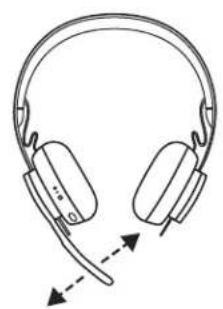
natural_image
Line drawing of a pair of headphones with headband and earplugs, showing motion arrows (no text or symbols)natural_image
Technical line drawing of a mechanical component with a handle and central hub (no text or symbols)Забележка:
natural_image
Simple line drawing of a mechanical component with a handle and circular base (no text or symbols)Изключване на звука
- Preuzmite softver Logitech® Unifying na www.logitech.com/support/unifying
- USB-A
natural_image
Diagram of a mechanical component with two downward arrows indicating direction (no text or symbols)
natural_image
Diagram of a mechanical device with curved and straight ends, showing motion direction arrows (no text or symbols)NAMJEŠTANJE NOSAČA MIKROFONA
natural_image
Pure mechanical diagram showing a rotating component with two blades and a central hub, no text or symbols present.
natural_image
Line drawing of a pair of headphones with sound waves and motion arrows indicating sound or vibration (no text or symbols)KONTROLE NA SLUŠALICAMA
natural_image
Technical line drawing of a mechanical component with a handle and circular base (no text or symbols)Napomena:
- Funkcija upravljanja medijima ovisi o vrsti aplikacije.
- Aktivnosti poziva uvijek imaju najviši prioritet. Kada su dva uređaja povezana, povezivanje putem Bluetooth ^8 veze imat će prednost u odnosu na prijemnik. Kada su dva Bluetooth ^8 uređaja povezana, zadnji aktivni uređaj nadjačot će drugoga.
Savjet: Prilagodba gumba i kontrole za Music EQ dostupne u Logi Tune.
ISKLJUČIVANJE ZVUKA
natural_image
Pure mechanical diagram showing a lever and circular component without any text or symbolslsključivanje zvuka
Pomaknite nosač mikrofona gore za utišavanje
flowchart
graph LR
    A["Device with Bluetooth icon"] -->|2 s| B["Signal transmission"]
    B --> C["Logi Zone 900"]
    C --> D["Device with Bluetooth icon"]
UPARIVANJE SLUŠALICA, TASTATURE I MIŠA PUTEM USB PRIJEMNIKA
flowchart
graph LR
    A["www.logitech.com/support/unifying"] --> B["USB-A"]
    B --> C["..."]
    C --> D["+"]
    C --> E["+"]
    C --> F["+"]
    D --> G["Desktop"]
    E --> H["Desktop"]
    F --> I["Desktop"]
    G --> J["Advanced Next"]
    H --> J
    I --> J
    J --> K["OFF/ON"]
    K --> L["+"]
    K --> M["+"]
    K --> N["+"]
    L --> O["Desktop"]
    M --> P["Desktop"]
    N --> Q["Desktop"]
- Preuzmite softver Logitech® Unifying sa stranice www.logitech.com/support/unifying
- USB-A
natural_image
Diagram of a mechanical component with two dashed arrows indicating direction (no text or symbols)
natural_image
Diagram of a mechanical device with curved and straight ends, showing motion direction arrows (no text or symbols)PRILAGOĐAVANJE DRŽAČA MIKROFONA
- Držač mikrofona se rotira za 270 stepeni. Nosite ga bilo na levoj ili desnoj strani. Audio kanal će se automatski promeniti, u zavisnosti od pravca u kom nosite mikrofon.
- Fleksibilni držač mikrofona – prilagodite lokaciju držača da biste bolje preneli glas.

natural_image
Pure mechanical diagram showing a rotating component with two blades and a central hub, no text or symbols present.
natural_image
Line drawing of a pair of headphones with headband and earplugs, showing motion arrows (no text or symbols)KONTROLE SLUŠALICA
| Korišćenje Dugme Radnja | |||
| Kontrole poziva | Javljanje/ prekidanje poziva | Multifunkcionalno | Kratak pritisak |
| Odbijanje poziva | Pritisak od 2 sekunde | ||
| Glasovni pomoćnik Multifunkcionalno | Pritisak od 2 sekunde | ||
| Medijske komande | Reprodukcija/ pauza | Multifunkcionalno Dvostruki pritisak | |
| Kretanje unapred | Multifunkcionalno i „+“ | Kratak pritisak | |
| Kretanje unazad | Multifunkcionalno i „-“ | Kratak pritisak | |
| Jačina zvuka | Pojačavanje zvuka | „+“ | Kratak pritisak |
| Utišavanje zvuka | „-“ | Kratak pritisak | |
| Status slušalica | Provera veze i trajanja baterije | „+“ i „-“ | Kratak pritisak |

natural_image
Technical line drawing of a mechanical component with a handle and circular base (no text or symbols)Napomena:
- Funkcije kontrole medija zavise od tipa aplikacije.
natural_image
Pure mechanical diagram showing a lever and circular component without any text or symbolslsključivanje zvuka
Pomerite držač mikrofona nagore da biste isključili zvuk
natural_image
Diagram of a mechanical component with two dashed arrows indicating downward motion (no text or symbols)
natural_image
Diagram of a mechanical device with curved and straight ends, showing directional arrows (no text or symbols)PRILAGODITEV DRŽALA MIKROFONA
natural_image
Pure mechanical diagram showing a rotating component with two blades and a central hub, no text or symbols present.
natural_image
Line drawing of a pair of headphones with headband and earplugs, showing motion arrows (no text or symbols)KONTROLNIKI NA SLUŠALKAH
natural_image
Technical line drawing of a mechanical component with a handle and circular base (no text or symbols)Opomba:
- Funkcionalnost nadziranja medijev je odvisna od vrste aplikacije.
natural_image
Pure mechanical diagram showing a lever and pivot (no text or symbols)Utišanje
Držalo mikrofona pomaknite navzgor za utišanje.
Držalo mikrofona pomaknite navzdol za preklic utišanja
APLIKACIJA LOGI TUNE
flowchart
graph LR
    A["www.logitech.com/support/unifying"] --> B["USB-A"]
    B --> C["..."]
    C --> D["User Device"]
    D --> E["Advanced Next"]
    E --> F["OFF/ON"]
    F --> G["User Device"]
    G --> H["User Device"]
    H --> I["User Device"]
    I --> J["User Device"]
    J --> K["User Device"]
    K --> L["User Device"]
    L --> M["User Device"]
    M --> N["User Device"]
    N --> O["User Device"]
    O --> P["User Device"]
    P --> Q["User Device"]
    Q --> R["User Device"]
    R --> S["User Device"]
    S --> T["User Device"]
    T --> U["User Device"]
    U --> V["User Device"]
    V --> W["User Device"]
    W --> X["User Device"]
    X --> Y["User Device"]
    Y --> Z["User Device"]
    Z --> AA["User Device"]
    AA --> AB["User Device"]
    AB --> AC["User Device"]
    AC --> AD["User Device"]
    AD --> AE["User Device"]
    AE --> AF["User Device"]
    AF --> AG["User Device"]
    AG --> AH["User Device"]
    AH --> AI["User Device"]
    AI --> AJ["User Device"]
    AJ --> AK["User Device"]
    AK --> AL["User Device"]
    AL --> AM["User Device"]
    AM --> AN["User Device"]
    AN --> AO["User Device"]
    AO --> AP["User Device"]
    AP --> AQ["User Device"]
    AQ --> AR["User Device"]
    AR --> AS["User Device"]
    AS --> AT["User Device"]
    AT --> AU["User Device"]
    AU --> AV["User Device"]
    AV --> AW["User Device"]
    AW --> AX["User Device"]
    AX --> AY["User Device"]
- Descărcați software-ul Unifying de la Logitech® de la adresa: www.logitech.com/support/unifying
- USB-A
natural_image
Diagram showing two mechanical components with downward arrows indicating motion or force direction (no text or symbols)AJUSTAREA BRATULUI MICROFONULUI
natural_image
Technical line drawings of a mechanical device and its corresponding headhead assembly (no text or symbols)COMENZILE CĂŞTILOR
natural_image
Pure technical line drawing of a mechanical component with no text or symbolsNotă:
- Functionalitatea comenzilor media depinde de tipul de aplicatie.
natural_image
Pure mechanical diagram showing a lever and circular component without any text or symbolsDezactivare sunset
APLICATIA LOGI TUNE
flowchart
graph LR
    A["www.logitech.com/support/unifying"] --> B["USB-A"]
    A --> C["USB-C"]
    B --> D["..."]
    C --> D
    D --> E["User Device"]
    E --> F["Advanced Next"]
    F --> G["OFF/ON"]
    G --> H["User Interface"]
    H --> I["OK/Cancel"]
- www.logitech.com/support/unifying adresinden Logitech® Unifying Yazılımı'ni indirin
- USB-A
natural_image
Diagram of a mechanical component with two dashed arrows indicating downward motion (no text or symbols)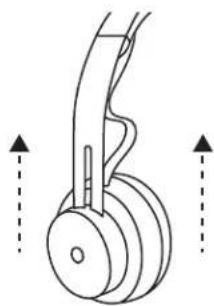
natural_image
Diagram of a mechanical device with curved and straight ends, showing motion direction arrows (no text or symbols)MİKROFON KOLUNU AYARLAMA
natural_image
Pure mechanical diagram showing a rotating component with two blades and a central hub, no text or symbols present.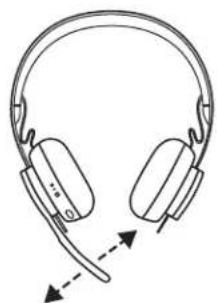
natural_image
Line drawing of a pair of headphones with headband and earplugs, showing motion arrows (no text or symbols)KULAKLIK KONTROLLERİ
natural_image
Technical line drawing of a mechanical component with a handle and circular base (no text or symbols)Not:
LOGI TUNE UYGULAMASI
Uygulamayı yükleme
Logi Tune uygulamasini www.logitech.com/tune adresinden indirin
YAN SESİ AYARLAMA
natural_image
Diagram of a mechanical component with two dashed arrows indicating direction (no text or symbols)
natural_image
Diagram of a mechanical device with curved and straight ends, showing motion direction arrows (no text or symbols)ضبط حامل الميكروفون
natural_image
Pure mechanical diagram showing a rotating component with two blades and a central hub, no text or symbols present.
natural_image
Line drawing of a pair of headphones with headband and earplugs, showing motion arrows (no text or symbols)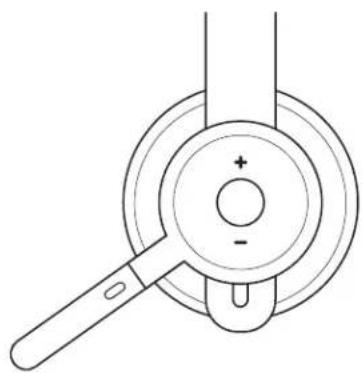
natural_image
Pure diagram of a mechanical component with no text, numbers, or symbolsnatural_image
Pure mechanical diagram showing a lever and pivot point without any text or symbolsكتم الصوت
flowchart
graph LR
    A["Device"] --> B["Mobile Device"]
    B --> C["Bluetooth®: Weather icon"]
    C --> D["Bluetooth®: Weather icon with sun icon"]
    D --> E["Bluetooth®: Weather icon with red circle icon"]
    E --> F["Bluetooth®: Weather icon with red sun icon"]
    F --> G["Bluetooth®: Weather icon with red circle icon"]
    G --> H["Bluetooth®: Weather icon with red sun icon"]
    H --> I["Bluetooth®: Weather icon with red sun icon"]
    I --> J["Bluetooth®: Weather icon with red sun icon"]
    J --> K["Bluetooth®: Weather icon with red sun icon"]
    K --> L["Bluetooth®: Weather icon with red sun icon"]
    L --> M["Bluetooth®: Weather icon with red sun icon"]
    M --> N["Bluetooth®: Weather icon with red sun icon"]
    N --> O["Bluetooth®: Weather icon with red sun icon"]
    O --> P["Bluetooth®: Weather icon with red sun icon"]
    P --> Q["Bluetooth®: Weather icon with red sun icon"]
    Q --> R["Bluetooth®: Weather icon with red sun icon"]
    R --> S["Bluetooth®: Weather icon with red sun icon"]
    S --> T["Bluetooth®: Weather icon with red sun icon"]
    T --> U["Bluetooth®: Weather icon with red sun icon"]
    U --> V["Bluetooth®: Weather icon with red sun icon"]
    V --> W["Bluetooth®: Weather icon with red sun icon"]
    W --> X["Bluetooth®: Weather icon with red sun icon"]
    X --> Y["Bluetooth®: Weather icon with red sun icon"]
    Y --> Z["Bluetooth®: Weather icon with red sun icon"]
    Z --> AA["Bluetooth®: Weather icon with red sun icon"]
    AA --> AB["Bluetooth®: Weather icon with red sun icon"]
    AB --> AC["Bluetooth®: Weather icon with red sun icon"]
    AC --> AD["Bluetooth®: Weather icon with red sun icon"]
    AD --> AE["Bluetooth®: Weather icon with red sun icon"]
    AE --> AF["Bluetooth®: Weather icon with red sun icon"]
    AF --> AG["Bluetooth®: Weather icon with red sun icon"]
    AG --> AH["Bluetooth®: Weather icon with red sun icon"]
    AH --> AI["Bluetooth®: Weather icon with red sun icon"]
    AI --> AJ["Bluetooth®: Weather icon with red sun icon"]
    AJ --> AK["Bluetooth®: Weather icon with red sun icon"]
    AK --> AL["Bluetooth®: Weather icon with red sun icon"]
    AL --> AM["Bluetooth®: Weather icon with red sun icon"]
    AM --> AN["Bluetooth®: Weather icon with red sun icon"]
    AN --> AO["Bluetooth®: Weather icon with red sun icon"]
    AO --> AP["Bluetooth®: Weather icon with red sun icon"]
    AP --> AQ["Bluetooth®: Weather icon with red sun icon"]
    AQ --> AR["Bluetooth®: Weather icon with red sun icon"]
    AR --> AS["Bluetooth®: Weather icon with red sun icon"]
    AS --> AT["Bluetooth®: Weather icon with red sun icon"]
    AT --> AU["Bluetooth®: Weather icon with red sun icon"]
    AU --> AV["Bluetooth®: Weather icon with red sun icon"]
    AV --> AW["Bluetooth®: Weather icon with red sun icon"]
    AW --> AX["Bluetooth®: Weather icon with red sun icon"]
    AX --> AY["Bluetooth®: Weather icon with red sun icon"]
مصباح مؤشر المستقبل
LOGI TUNE تطبيق
تثbyit التعليم
www.logitech.com/tune من Logi Tune قم بتنزيل
ضبط النغمة الثانوية
www.logitech.com/tune
www.logitech.com/support/unifying LogitechLogitech® Unifying
2 .USB-A
. USB-A
USB-C
natural_image
Diagram of a mechanical component with two dashed arrows indicating direction (no text or symbols)
natural_image
Diagram of a mechanical device with two arrows indicating upward motion (no text or symbols)natural_image
Pure mechanical diagram showing a lever handle and circular components with no text or symbolsתְׁרָהִיַעֹ
| اللهاللهاللهاللهاللهاللهاللهاللهاللهاللهاللهاللهاللهاللهاللهاللهاللهاللهاللهاللهاللهاللهاللهاللهاللهاللهاللهاللهاللهاللهاللهاللهاللهاللهاللهاللهاللهاللهاللهاللهاللهاللهاللهاللهاللهاللهاللهاللهاللهاللهالLife | |||
| "اللهاللهاللهاللهاللهاللهاللهاللهاللهاللهاللهاللهاللهاللهاللهاللهاللهاللهاللهاللهاللهاللهاللهاللهاللهاللهاللهاللهاللهاللهاللهاللهاللهاللهاللهاللهاللهاللهاللهاللهاللهاللهاللهاللهاللهاللهاللهاللهاللهال Life | |||
| اللهاللهالLife | |||
| اللهالLife | |||
| اللهالLife | |||
| "—"الLife | |||
| الLife | |||
| "—" | |||
| الLife | |||
| "—" | |||
תָאַעְה
:
- Cover U.S.A.
* - אַרְהָר, אַרְהָר, אַרְהָר, אַרְהָר, אַרְהָר, אַרְהָר, אַרְהָר, אַרְהָר, אַרְהָר, אַרְהָר,
תְרָה בַלְשִׁעֹם
תָרִי
www.logitech.com/tune