
HOVEN STEAM 700 PLUS HOZP0447BI - Oven HOOVER - Free user manual and instructions
Find the device manual for free HOVEN STEAM 700 PLUS HOZP0447BI HOOVER in PDF.
User questions about HOVEN STEAM 700 PLUS HOZP0447BI HOOVER
0 question about this device. Answer the ones you know or ask your own.
Ask a new question about this device
Download the instructions for your Oven in PDF format for free! Find your manual HOVEN STEAM 700 PLUS HOZP0447BI - HOOVER and take your electronic device back in hand. On this page are published all the documents necessary for the use of your device. HOVEN STEAM 700 PLUS HOZP0447BI by HOOVER.
USER MANUAL HOVEN STEAM 700 PLUS HOZP0447BI HOOVER
- When filling in the water tank the level of the water must not exceed the maximum level indicated on the tank
- WARNING: Risk of burn and damage to the appliance: using the steam function released steam can cause burns: Open the door carrefully to avoid injury after using a cooking function with steam.
- During cooking, moisture may condense inside the oven cavity or on the glass of the door. This is a normal condition. To reduce this effect, wait 10-15 minutes after turning on the power before putting food inside the oven. In any case, the condensation disappears when the oven reaches the cooking temperature.
- Cook the vegetables in a container with a lid instead of an open tray.
- Avoid leaving food inside the oven after cooking for more than 15/20 minutes.
- WARNING: the appliance and accessible parts become hot during use. Be careful not to touch any hot parts.
- WARNING: the accessible parts can become hot when the oven is in use. Children must be kept at a safe distance.
- WARNING: ensure that the appliance is switched off before replacing the bulb, to avoid the possibility of electric shocks.
- WARNING: in order to avoid any danger caused by the accidental resetting of the thermal interruption device, the appliance should not be powered by an external switching device, such as a timer, or be connected to a circuit that is regularly switched on and off.
- Children under 8 must be kept at a safe distance from the appliance if not continuously supervised.
- Children must not play with the appliance. The appliance can be used by those aged 8 or over and by those with limited physical, sensorial or mental capacities, without experience or knowledge of the product, only if supervised or provided with instruction as to the operation of the appliance, in a safe way with awareness of the possible risks.
- Cleaning and maintenance should not be carried out by unsupervised children.
-
Do not use rough or abrasive materials or sharp metal scrapers to clean the oven door glasses, as they can scratch the surface and cause the glass to shatter.
-
The oven must be switched off before removing the removable parts and, after cleaning, reassemble them according the instructions.
- Only use the meat probe recommended for this oven.
- Do not use a steam cleaner for cleaning operations.
- Connect a plug to the supply cable that is able to bear the voltage, current and load indicated on the tag and having the earth contact. The socket must be suitable for the load indicated on the tag and must be having the earth contact connected and in operation. The earth conductor is yellow-green in colour. This operation should be carried out by a suitably qualified professional. In case of incompatibility between the socket and the appliance plug, ask a qualified electrician to substitute the socket with another suitable type. The plug and the socket must be conformed to the current norms of the installation country. Connection to the power source can also be made by placing an omnipolar breaker between the appliance and the power source that can bear the maximum connected load and that is in line with current legislation. The yellow-green earth cable should not be interrupted by the breaker. The socket or omnipolar breaker used for the connection should be easily accessible when the appliance is installed.
- The disconnection may be achieved by having the plug accessible or by incorporating a switch in the fixed wiring in accordance with the wiring rules.
- If the power cable is damaged, it must be substituted with a cable or special bundle available from the manufacturer or by contacting the customer service department.
- The type of power cable must be H05V2V2-F.
This operation should be carried out by a suitably qualified professional. The earth conductor (yellow-green) must be approximately 10 mm longer than the other conductors. For any repairs, refer only to the Customer Care Department and request the use of original spare parts. -
Failure to comply with the above can compromise the safety of the appliance and invalidate the guarantee.
-
Any excess of spilled material should be removed before cleaning.
- A long power supply failure during an occurring cooking phase may cause a malfunction of the monitor. In this case contact customer service.
- The appliance must not be installed behind a decorative door in order to avoid overheating.
- When you place the shelf inside, make sure that the stop is directed upwards and in the back of the cavity.
The shelf must be inserted completely into the cavity - WARNING: Do not line the oven walls with aluminum foil or single-use protection available from stores. Aluminum foil or any other protection, in direct contact with the hot enamel, risk melting and deteriorating the enamel of the insides.
- WARNING: Never remove the oven door seal.
- CAUTION: Do not refill the cavity bottom with water during cooking or when the oven is hot.
- No additional operation/setting is required in order to operate the appliance at the rated frequencies.
General Instructions
5
1.1 Safety indications
1.2 Electrical safety
1.3 Recommendations
1.4 Installation
1.5 Waste management
1.6 Conformity declaration
Product Description
6
2.1 Overview
2.2 Accessories
2.3 First use
2.4 Use of steam functions
Use of the Oven
8
3.1 Display description
3.2 Product setting
3.3 Operating in manual mode
3.4 Operating in recipes mode
3.5 Operating in my chef mode
3.6 Operating in steam cooking mode
3.7 Function descriptions
3.8 Cooking modes
3.9 Operating in special functions mode
3.10 Steam function modes
3.11 WIFI function
3.12 Recipes
Oven Cleaning and Maintenance
16
4.1 General notes on cleaning
4.2 Maintenance
- Removal and cleaning of grills
- Removal of the oven window
- Removal and cleaning of the glass door
Troubleshooting
16
5.1 F.A.Q.
1. General Instructions
We thank you for choosing one of our products. For the best results with your oven, you should read this manual carefully and retain it for future reference. Before installing the oven, take note of the ser number so that you can give it to customer service staff if any repairs are required. Having removed the oven from its packaging, check that it has not been damaged during transportation. If you have doubts, do not use the oven and refer to a qualified technician for advice. Keep all of the packaging material (plastic bags, polystyrene, nails) out of the reach of children. When the oven is switched on for the first time, strong smelling smoke can develop, which is caused by the glue on the insulation panels surrounding the oven heating for the first time. This is absolutely normal and, if it occurs, you should wait for the smoke to dissipate before putting food in the oven. The manufacturer accepts no responsibility in cases where the instructions contained in this document are not observed.
NOTE: the oven functions, properties and accessories cited in this manual will vary, depending on the model you have purchased.
natural_image
Exterior view of a modern stainless steel oven with ventilation grilles (no visible text or symbols)1.1 Safety Indications
Only use the oven for its intended purpose, that is only for the cooking of foods; any other use, for example as a heat source, is considered improper and therefore dangerous. The manufacturer cannot be held responsible for any damage resulting from improper, incorrect or unreasonable usage.
The use of any electrical appliance implies the observance of some fundamental rules:
- do not pull on the power cable to disconnect the plug from the socket;
- do not touch the appliance with wet or damp hands or feet;
- in general the use of adaptors, multiple sockets and extension cables is not recommended;
- in case of malfunction and/or poor operation, switch off the appliance and do not tamper with it.
1.2 Electrical Safety
ENSURE THAT AN ELECTRICIAN OR QUALIFIED TECHNICIAN MAKES THE ELECTRICAL CONNECTIONS.
The power supply to which the oven is connected must conform with the laws in force in the country of installation. The manufacturer accepts no responsibility for any damage caused by the failure to observe these instructions. The oven must be connected to an electrical supply with an earthed wall outlet or a disconnector with multiple poles, depending on the laws in force in the country of installation. The electrical supply should be protected with suitable fuses and the cables used must have a transverse section that can ensure correct supply to the oven.
CONNECTION
The oven is supplied with a power cable that should only be connected to an electrical supply with 220-240 Vac 50 Hz power between the phases or between the phase and neutral. Before the oven is connected to the electrical supply, it is important to check:
- power voltage indicated on the gauge;
- the setting of the disconnector.
The grounding wire connected to the oven's earth terminal must be connected to the earth terminal of the power supply.
WARNING
Before connecting the oven to the power supply, ask a qualified electrician to check the continuity of the power supply's earth terminal. The manufacturer accepts no responsibility for any accidents or other problems caused by failure to connect the oven to the earth terminal or by an earth connection that has defective continuity.
NOTE: as the oven could require maintenance work, it is advisable to keep another wall socket available so that the oven can be connected to this if it is removed from the space in which it is installed. The power cable must only be substituted by technical service staff or by technicians with equivalent qualifications.
1.3 Recommendations
After each use of the oven, a minimum of cleaning will help keep the oven perfectly clean.
Do not line the oven walls with aluminium foil or single-use protection available from stores. Aluminium foil or any other protection, in direct contact with the hot enamel, risks melting and deteriorating the enamel of the insides. In order to prevent excessive dirtying of your oven and the resulting strong smokey smells, we recommend not using the oven at very high temperature. It is better to extend the cooking time and lower the temperature a little. In addition to the accessories supplied with the oven, we advise you only use dishes and baking moulds resistant to very high temperatures.
1.4 Installation
The manufacturers have no obligation to carry this out. If the assistance of the manufacturer is required to rectify faults arising from incorrect installation, this assistance is not covered by the guarantee. The installation instructions for professionally qualified personnel must be followed. Incorrect installation may cause harm or injury to people, animals or belongings. The manufacturer cannot be held responsible for such harm or injury.
The oven can be located high in a column or under a worktop. Before fixing, you must ensure good ventilation in the oven space to allow proper circulation of the fresh air required for cooling and protecting the internal parts. Make the openings specified on last page according to the type of fitting.
1.5 Waste management and environmental protection
This appliance is labelled in accordance with European Directive 2012/19/EU regarding electric and electronic appliances (WEEE). The WEEE contain both polluting substances (that can have a negative effect on the environment) and base elements (that can be reused). It is important that the WEEE undergo specific treatments to correctly remove and dispose of the pollutants and recover
all the materials. Individuals can play an important role in ensuring that the WEEE do not become an environmental problem; it is essential to follow a few basic rules:
- the WEEE should not be treated as domestic waste;
- the WEEE should be taken to dedicated collection areas managed by the town council or a registered company.
In many countries, domestic collections may be available for large WEEEs. When you buy a new appliance, the old one can be returned to the vendor who must accept it free of charge as a one-off, as long as the appliance is of an equivalent type and has the same functions as the purchased appliance.
SAVING AND RESPECTING THE ENVIRONMENT
Where possible, avoid pre-heating the oven and always try to fill it. Open the oven door as infrequently as possible, because heat from the cavity disperses every time it is opened. For a significant energy saving, switch off the oven between 5 and 10 minutes before the planned end of the cooking time, and use the residual heat that the oven continues to generate. Keep the seals clean and in order, to avoid any heat dispersal outside of the cavity. If you have an electric contract with an hourly tariff, the "delayed cooking" programme makes energy saving more simple, moving the cooking process to start at the reduced tariff time slot.
1.6 Declaration of compliance
By placing the C mark on this product, we are confirming compliance to all relevant European safety, health and environmental requirements which are applicable in legislation for this product.
With this the Candy Hoover Group, declares that this appliance marked with CE complies with the essential requirements of the Directive 2014/53/EU.
To receive a copy of the declaration of conformity, please contact the manufacturer at: www.candy-group.com.
2. Product Description
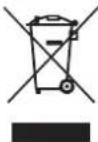
2.1 Overview
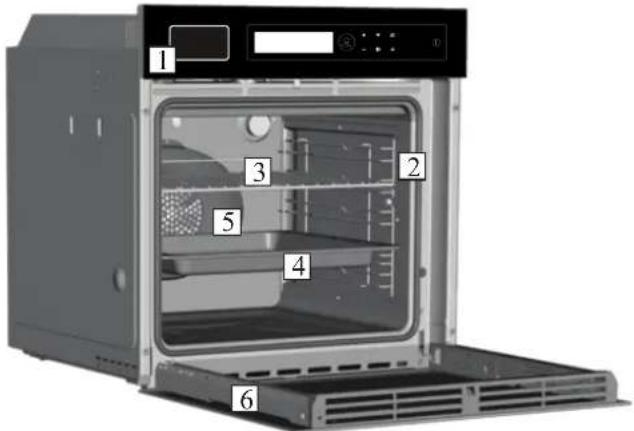
text_image
Labeled diagram of an oven with numbered components for identification- Control panel
- Shelf positions
- Metal grill
- Drip pan
- Fan (behind the steel plate)
- Oven door
2.2 Accessories
1 Drip pan

natural_image
3D rendering of a gray rectangular tray or baking tray with side brackets (no text or symbols)It collects the residues that drip during the cooking of foods on the grills.
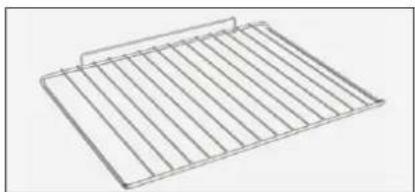
2 Metal grill
natural_image
Line drawing of a rectangular metal grate with evenly spaced slats (no text or symbols)It holds baking trays and plates.
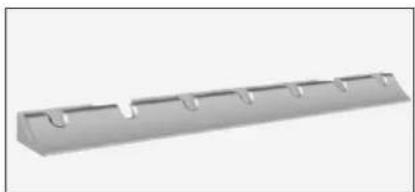
3 Led vision
natural_image
Exterior view of a gray metal grate with evenly spaced slots (no text or symbols)It is an illumination system which replaces the traditional « light bulb ». 14 LED (for non-pyrolitic versions) or 10 High Power LED (for pyrolitic versions) lights are integrated within the door. These produce white high quality illumination which enables to view the inside of the oven with clarity without any shadows on all the shelves.
Advantages :
This system, besides providing excellent illumination inside the oven, lasts longer than the traditional light bulb its easier and to maintain and most of all saves energy.
-Optimum view
-Long life illumination
-Very low energy consumption, -95% in comparison with the traditional illumination.
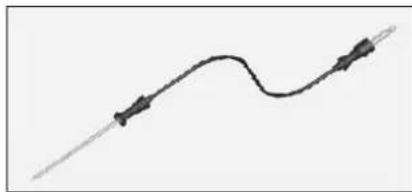
4 Meat-probe (depends on the oven model)
natural_image
Pure electrical circuit lines without any symbolsIt measures the internal temperature of food during cooking.
- Insert the meat-probe into the hole on the top of the cavity.
- Prepare the food and properly insert the meat probe into the food.
Warning
- Do not preheat or start cooking before properly inserting the meat probe. Probe should be inserted into the food and receptacle while the oven is still cool.
- Do not insert the meat probe in the frozen food.
- Do not leave the meat probe inside the oven when it's not used: it could damage.
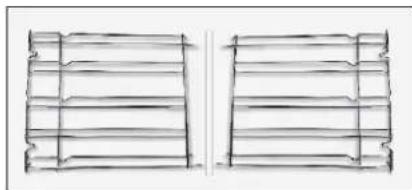
5 Lateral wire grids
natural_image
Two identical wireframe diagrams of rectangular panels, no text or symbols presentThey are placed to drip pan and metal grill side shelves.
2.3 First Use
ABOUT APPLIANCE BEFORE FIRST USE
- Before the first use, fill the tank with 300 ml of water when the oven is empty and press the steam icon to start the engine.
- Select a cooking program (steam program or ventilated one).
WARNING
- Only with a ventilated program the steam icon works.
- The temperature of the water in the tank should be 22^ C at room temperature.
PRELIMINARY CLEANING
-
Clean the oven before using for the first time. Wipe over external surfaces with a damp soft cloth.
-
Wash all accessories and wipe inside the oven with a solution of hot water and washing up liquid.
-
Set the empty oven to the maximum temperature and leave on for about 1 hour, this will remove any lingering smells of newness.
2.4 Use of steam functions
WATER DRAWER
natural_image
Hand inserting a button into a refrigerator (no text or symbols visible)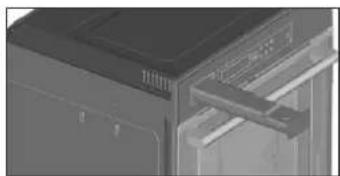
natural_image
Close-up of a mechanical or electronic component with no visible text or symbolsFigure 1 Figure 2
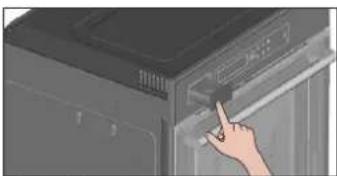
- Please push slowly and pull the drawer in order to pour water. (Figure 1)
- Pour water with a jug or remove the tank and fill in with the water from the sink. (Figure 2)
- Please insert 300 ml of water.
- Select from steam functions the proper cycle among fish, meat, vegetables, pasta&bakery.(Figure 3)
- For more details, please refer to section n. 3.4.

text_image
FISH MEAT VEGETABLESFigure 3
- Set temperature and timing according to the recipe.
- Please push start.
NOTE: The display will show "COOKING". Some drops of water could fall into the cavity even during cooking. It's normal and it doesn't affect proper cooking.
- At the beginning of the cycle the pump will make a noise for around 1 minute: it's normal working.
- At the end of cooking a buzzer will sound and the display will show: "COOKING ENDED".
- Before starting another steam cooking cycle, please wait around 60-90 minutes that the oven completely cooled down.
- The possible remaining water will be loaded back to the tank after one hour from end of cooking. A buzzer will notify.
- The pump will make a noise for around 1 minute: it's normal working.
- Discharge water by extracting the tank.
WARNING
- Water should only be filled into the tank, no liquids other than water.
- Tank must be filled to 300 ml.
- The water in the tank must be drained after each use.
- If water filled less than 300 ml, steam generation can be finished before steam program ended.
- If water filled more than 300 ml, water presence can be occur at the end of steam program.
- Please close the drawer properly. If the drawer is not closed properly, a message will appear on the display: "tank is missing".
- Water must be at room temperature.
- Do not open the drawer into cooking.
- Do not add water during cooking cycle.
- Avoid to open the door during cooking to ensure efficiency and steam cooking performances.
STEAM BUMP
By touching the electronic button it is possible to steam all the water at once.
It's ideal to cook vegetables or fish in the gentlest and healthiest way since the needed amount of fat and oil is reduced.
- The user can have a steam bump by pressing the steam button.
- When the button is pressed the steam icon blinks.
- During the steam generation the icon is switched on without blinking; at the end of the steam generation the steam icon is switched off.
- The first time that the steam button is pressed, the screen asks to load the water.
- Follow the steps at paragraph "2.4 Use of steam functions" before starting the cycle.
- Push for a maximum of 5 times the steam button on the user interface to inject steam into the cavity.
WARNING
Take note that this function is only allowed in combination with fan-assisted cycles which are ;
- Bottom heating + fan
- Convection + fan
- Grill +fan
- Multilevel
SANIFICATION CYCLE
- Sanification is useful to sterilize the cyrcuit. A message will appear in order to activate it at first use, then the user can decide whether to use it or not.
- It is required to add disinfectant detergent to water and afterwards the oven will guide the user in the whole process.
- Sanification cycle is present in the cleaning system menu.
DESCALING
- After 10 times water loaded, the display shows the message cycles "DESCALING SUGGESTED".
• After 15 times water loaded, the display shows the message "DESCALING MANDATORY" and the steam function is no more available if the user doesn't perform a descaling cycle. - Descaling cycle is present in the cleaning system menu.
- Descaling cycle must be performed with a commercial food compliant descaling product.
3. Use of the Oven
3.1 Display description

text_image
MY CHEEON / OFF ① → The oven is switched on and off with this button.
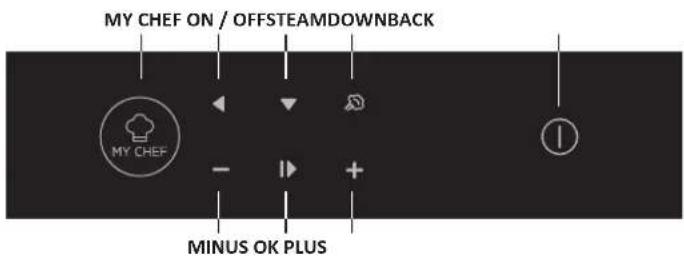
text_image
MY CHEF ON / OFFSTEAMDOWNBACK MY CHEF - + - MINUS OK PLUS3.2 Product Setting
- At first launch you need to follow an installation process to be able to use the oven. Press ON/OFF to go ahead. (Figure 4)

text_image
14:30 HY CHEF Figure 4Figure 4
- Please enter in the settings section and select the language from the drop down menu (Figure 5).

text_image
ITALIANO ENGLISH FRANCAISFigure 5
- Press OK to go ahead. (Figure 6)

text_image
ITALIANO ENGLISH IFRANCAISFigure 6
- Set the time by pressing the PLUS and MINUS buttons. Press OK to go ahead. (Figure 7)

text_image
ICLOCK SET 14:30 MY CHEF ①Figure 7
- The installation process is com Pleted. Press OK then go to home page to start use the oven For more details please check the related quick guide.
3.3 Operating In Manual Mode
- Press the OK button when arrow on the display at MANUAL to set a cooking in 3 simple steps. (Figure 8)

text_image
IMANUAL RECIPES SPECIAL FUNCTIFigure 8
- If the oven is switched off, the display shows the clock. When the oven is inactive, all the functions are available except the cooking duration and end of cooking.
- If the clock is not set, the oven does not work: the display flashes, showing "12:00".
- Select the desired Cooking mode by pressing OK while arrow on the display at desired function. Press DOWN in order to see all available functions. (Figure 9)

text_image
MULTIFUNCTION IGRILL·FAN GRILL MY CHEE ①Figure 9
- Press PLUS or MINUS to select the desired temperature in selected function. Press OK to go ahead or BACK to return to the cooking functions selection. (Figure 10)

text_image
IGRILL·FAN 180° DURATION OPTIONS MY CHEFFigure 10
- Press DOWN to change the cooking duration. It is done by pressing PLUS and MINUS Buttons while arrow on the display at DURATION Tab. Press OK to begin the cooking or BACK to return to the temperature setting. (Figure 11)

text_image
GRILL·FAN 190° IDURATION 00:00 % OPTIONS MY CHEF - + ①Figure 11
- In the OPTIONS, it is possible to:
- exclude pre heating,
- set end of cooking time.
- When a cooking is running you can:
- change the temperature
- change the cooking duration
- press STOP to finish the cooking

text_image
GRILL·FAN 190 OPTIONS MY CHEF - + ①Figure 12
3.4 Operating In Steam Cooking Mode
Please refer to chapter 3.8 Function Descriptions.

text_image
ISTEAM COOKING RECIPIES SPECIAL FUNCTIONFigure 13
3.5 Operating In Recipes Mode

text_image
STEAM COOKING IRECIPES SPECIAL FUNCTION MY CHEF ①Figure 14
Navigate the HOME menu till reaching the Recipes area
-
Enter the area and navigate to select the recipe.
-
Set weight or portions.
-
Look at the table 3.12 to discover if the recipe requires steam..
-
If it requires steam please follow steps before starting cycle on section 2.4 Use of Steam Functions.
Please refer to chapter 3.12 Recipes.
Please note that automatic recipes are available in the UI and in APP
3.8 Function Descriptions
| FUNCTION | DESCRIPTION |
 | CHILD LOCKEntering in the setting menu from the home page, with this function it is possible to lock the oven when it is off.When the child lock is set the icon is on. |
 | MEAT PROBEIf the meat probe is detected (by the Sys Info message) the icon is switched on and any running cooking program is stopped. If the meat probe is removed while a cooking program is running, the program is stopped and return home menu. |
 | ONE-FIEntering in One-fi menu from the home page, with this function it is possible to set the WiFi. See the dedicated chapter. |
 | LOCKAt the end of a pyrolysis or if the pyrolysis is interrupted, it is not possible to start any program until the door is unlocked.Pyrolysis is not available if separator or side grids or the meat probe are detected, and by WiFi; if this happens during a pyrolysis, the pyrolysis is stopped.When the door is locked the icon of the padlock is switched on. |
| FUNCTION | DESCRIPTION |
 | STEAM COOKINGSelecting a steam cooking program, the steam icon is switched onAfter the selection of the steam program, when it is confirmed, the display askes to load the water (the user should have put the tank with water in the oven).The display has in charge to manage the water load, the water unload, steam blow, descaling and sanification. |
 | MY CHEFWith this button, when the oven is not off or it is not cooking, it is possible to enter in a special menu where there are;“MY RECIPES” (that is a list of stored recipes, max 5; if no recipe is stored it is shown a black display with “- - -”),“MY WIZARD” (that is the last program received by App; if no programs were received it is shown a black display with “- - -”)“LAST USED” (that is the last cooking program used, different from Preservation cooking programs; if no program is stored it is shown a black display with “- - -”) |
3.6 Operating In Special Functions Mode
Please refer to chapter 3.9 Cooking Modes.

text_image
SPECIAL FUNCTION CLEANING SYST SETTINGS MY CHEE ①Figure 15
3.7 Operating In My Chef Mode
Please refer to chapter 3.8 Function Descriptions.

text_image
MY RECIPES MY WIZARD LAST USEDFigure 16
3.9 Cooking Modes
| Symbol | Sugestation | |
 | GrillL5 (power) ** 3^/4^/5^ level | IDEAL FOR:gratin, grilled meat, fish, vegetables.This function uses only the top heating element, and the grill level can be adjusted. Use with the dooclosed. Place white meats at a distance from the grill. Red meats and fish fillets can be placed on the shelf with the drip tray underneath. Preheat for 5 minutes. When grilling meat, it is advisable to use the drip-tray to collect the cooking juices. Adding approx. half a litre of water. |
 | Multi-level180-200°C ** 1^/3^ level | IDEAL FOR:pastries, biscuits, cakes, stuffed and braised.Use this function to cook different foods at the same time on one or more shelf positions. Heat is distributed better and penetrates food better, reducing both preheating and cooking times. Aromas are not mixed. Allow about 10 minutes extra when cooking different foods togethere. |
 | Convection + Fan240°C ** 1^ level | IDEAL FOR:pizza, focaccia, lasagna.This function distributes heat better due to the combination of fan and heating elements, ensuring evenly baked results. |
 | Grill + Fan200°C ** 4^ level | IDEAL FOR:whole pieces of meat (roasts).Uses the top heating element with the fan to circulate the air inside the oven. Use with the door closed. It advisable to use the drip-tray to collect the cooking juices. Adding approx. half a litre of water. Turn food over halfway through cooking. Preheating is required for red meats but not for white meats. |
 | Bottom heating + Fan210°C ** 1^ level | IDEAL FOR:tarts.The bottom heating element is used with the fan circulating the air inside the oven. It prevents food from drying and encourages the rising process for perfect results. |
 | Conventional***160-200°C ** 2^ level | IDEAL FOR:brioche, croissants, flans, puddings, creams.This function uses both top and bottom heating elements. Preheat the oven for 10 minutes. |
 | Defrost40°C 2^ level | The fan circulates air at room temperature around frozen food so that it defrosts in a few minutes without altering food properties. |
| Master bake***180-200°C ** 2^ level | Ideal to keep food soft inside and crunchy outside.For healthy cooking, this function reduces the amount of fat or oil required. The combination of heating elements with a pulsating cycle of air ensures even baking results. |
* Depending on the oven model.
** Ideal temperature for suggested foods.
*** Tested in accordance with the CENELEC EN 60350-1 used for definition of energy class for ventilated function.
3.10 Steam Function Modes
| Function Dial | Suggested temperature °C | Steam Functions (Depends on the oven model) |
 | 180°C | PASTA & BAKERY: This function ensures a Perfectly cooked pasta and suitable surface gratin. |
 | 210°C | MEAT: This function allows to cook meat in a perfect way, even in the centre, ensuring caramelized or crispy surface and juicy meat. |
 | 210°C | FISH: This function ensures Homogeneous cooking even on higher parts, crisp outside and juicy inside fish. |
 | 200°C | VEGETABLES: This function allows to cook vegetables ensuring perfect cooking results and maintaining all nutritional properties. |
For more details, please check related Quick Guide, available also online at the following link: http://go.candy-group.com/hoover-ov.
WIRELESS PARAMETERS
| Parameter | Specifications (Wi-Fi) | Specifications (Bluetooth) |
| Wireless Standart | 802.11 b/g/n | Bluetooth v4.2 |
| Frequency Range | 2,412 GHz. - 2,484 GHz | 2,412 GHz. - 2,484 GHz |
| Max Transmit Power | 802.11b. DSSS 1 Mbps= +19.5 dBm | Basic data rate: RF Transmit Power (Typ): +4 dBmEnhanced data rate: RF Transmit Power (Typ): +2 dBmBLE: RF Transmit Power (Typ): +7.5 dBm |
| 802.11b. CCK 11 Mbps= +18.5 dBm | ||
| 802.11g. OFDM 54 Mbps= +18.5 dBm | ||
| 802.11n. MCS7= +14 dBm | ||
| Minimum Receiving | 802.11b =1024 bytes -80 dBm | Basic data rate: Sensitivity@ 0.1% BER: -98 dBmEnhanced data rate: Sensitivity@ 0.01% BER: -98 dBmBLE: Sensitivity@ 0.1% BER: -98 dBm |
| 802.11g =1024 bytes -70 dBm | ||
| 802.11n =1024 bytes -65 dBm | ||
| 802.11n HT40 =1024 bytes -65 dBm |
| Product information for networked equipment | |
| Power consumption of the product in networked standby if all wired network ports are connected and all wireless network ports are activated: | 2,0 W |
| How to activate wireless network port: | Navigate to settings -> ONE-FI ->If display shows ONE-FI RESET (means that oven is not enrolled wifi module is off and user can only start a new 5nrol5ent)Press the confirm button ▶ .Wifi module is switched on and wifi icon blinks 1s on 1s off.If display shows ONE-FI OFF (means that oven is enrolled but w module is off)Press the up or down arrow to toggle to ONE-FI ON and press the confirm button ▶ .Wifi module is switched on and wifi icon is always on. |
| How to deactivate wireless network port:Sensitivity | Navigate to settings -> ONE-FI ->If display shows ONE-FI READ ONLY (means that oven is enrolled and wifi module is on)Press the up or down arrow to toggle to ONE-FI OFF and press the confirm button ▶ .Wifi module is switched off and wifi icon is not shown. |
Quick Guide Hoover OVEN - Enrollment on App Procedure for devices with Bluetooth 4.0 (or higher)
This quick guide illustrates the steps to follow to enroll your appliance on the App Hoover Wizard, using a device with Bluetooth 4.0 (or higher) technology. In this case, the procedure is simplified and faster (Easy Enrollment).
If you are using a device without Bluetooth technology (or less than 4.0), please follow the instructions described on the next section.
STEP 1
- Mark down the appliance Serial Number.
- Mark down the Wi-Fi Name and Password (WPA/ WEP Key) which are normally placed on the back of your Wi-Fi router. NOTES
- The frequency of the home Wi-Fi network has to be set on the 2.4 GHz band. You cannot configure the appliance if your home network is set to the 5 GHz band.
- If you are having trouble locating the WPA/WEP Password, please contact your Internet Provider.
Please make sure your smartphone is connected to the same Wi-Fi network and has the Bluetooth enabled within the "Settings". Refer to the manual for more details.
STEP 2
- Download the Hoover Wizard App from the Store.
- Open the Hoover Wizard App and create your user profile by taping on "Register". Accept the privacy policy and fill in the required fields.
NOTES
- The App is available for Android (version 4.4 or higher) and iOS (version 8.0 or higher) devices.
- If you already have a Hoover Wizard user profile, you can login using your credentials.
STEP 3
- In the homepage, tap on the icon with the three bars on the top left to enter your profile, then tap on “REGISTER NEW APPLIANCE” and select the name of the product that you want to enroll.
STEP 4
- Insert the purchase date of your appliance (DD/MM/YYYY), then tap on "Proceed".
STEP 5
- Insert the 16 digits of the serial number or scan the QR code on the appliance. Tap on "Next". Check data correctness of the data and tap on "Confirm". Once the system has recognized the product, tap on "Next".
STEP 6
1) Tap on the icon ONE-FI.
2) Set the oven on ONE-FI RESET (the oven will beep).
3) The WIFI icon will blink.
- In App - Tap on "Confirm". Wait for APP to connect to the appliance.
NOTES
- Enrollment must be completed within 5 minutes.
- In case of any issue, tap "Retry", making sure you have enabled Bluetooth on your device (smartphone / tablet). If the process has not been completed correctly yet, tap on "Proceed with Standard Enrollment".
- To ensure correct data transfer, we recommend you to stay with the device close to the appliance.
STEP 7
- Insert the password of your home Wi-Fi network.
- Select the type of password (WEP or WPA), then tap on "Confirm".
•The enrollment process is now finished.
NOTES
- If this is not automatically synchronised by the App, please insert the name of your home Wi-Fi network in the first box; pay attention to the difference between lowercase and uppercase.
IF THE SET UP IS NOT SUCCESSFUL
It's important to establish a good Wi-Fi signal strength between the home router and the appliance: low Wi-Fi signal strength would cause the failure of the final stage of the set up. To assess if this is the case, start the connection process again from Step 1; when you get to Step 6, when you get to Step 6, place your device (smartphone or tablet) next to the router and search for "WIFIOVEN-xyzk" net generated by the appliance. If this does not come up as an option, it means that the router cannot see the appliance. In this case, we highly recommend you to bring the router near the appliance (if possible) or contact your internet provider to purchase a compatible "Wi-Fi Range Extender" to increase the signal strength.
Remote control mode
- Tap on the icon ONE-FI.
- Set the oven on ONE-FI ON (the oven will beep).
•The WIFI icon will blink.
Quick Guide Hoover OVEN - Enrollment on App
Procedure for devices without Bluetooth 4.0 (or less than 4.0) This quick guide outlines the steps you should follow to enroll your appliance using the App Hoover Wizard, utilizing a device without Bluetooth technology. We recommend you to proceed with a smartphone/tablet equipped with this technology to make the procedure simpler.
STEP 1
- Make a note of the appliance Serial Number and Wi-Fi Name and Password (WPA/WEP Key), which are normally found on the back of your Wi-Fi router.
- Please make sure that your smartphone/ tablet is connected to the same Wi-Fi network.
NOTES
- The frequency of the home Wi-Fi network has to be set on the 2.4 GHz band. You can not configure the appliance if your home network is set to the 5 GHz band.
-If you are having trouble locating the WPA/WEP Password, please contact your Internet Provider.
STEP 2
- Download the Hoover Wizard App from the Store.
- Open the Hoover Wizard App and create your user profile by taping on "Register". Accept the privacy policy and fill in the required fields.
NOTES
- The App is available for Android (version 4.4 or higher) and iOS (version 8.0 or higher) devices.
- If you already have a Hoover Wizard user profile, you can login using your credentials.
STEP 3
- In the homepage, tap on the icon with the three bars on the top left to enter your profile, then tap on "REGISTER NEW APPLIANCE" and select the name of the product that you want to enroll.
STEP 4
- Insert the purchase date of your appliance (DD/MM/YYYY), then tap on "Proceed".
- Insert the 16 digits of the serial number or scan the QR code on the appliance. Tap on "Next". Check data correctness and tap on "Confirm". Once the system has recognized the product, tap on "Next".
STEP 5
1) Tap on the icon ONE-FI.
2) Set the oven on ONE-FI RESET (the oven will beep) and wait 5 min.
3) The WIFI icon will blink.
- In App - Tap on "Confirm". NOTES
- Enrollment must be completed within 5 minutes.
- To ensure correct data transfer, we recommend that you stay with the device close to the appliance.
STEP 6
- Exit the Hoover Wizard App.
- Go to your device Wi-Fi settings.
STEP 7
- In the list of available Wi-Fi networks, select "WIFIOVEN-xyzk". NOTES
- If you do not find it, wait few more seconds or proceed with a new scan.
STEP 8
- Exit from the settings of your device.
- Return to the Hoover Wizard App and wait for the App to detect the appliance.
- Once the "Wi-Fi Network is active" screen appears, tap on "Next".
STEP 9
- Insert the password of your home Wi-Fi network.
- Select the type of password (WEP or WPA), then tap on "Confirm". NOTES
- If this is not automatically synchronised by the App, please insert the name of your home Wi-Fi network in the first box; pay attention to the difference between lowercase and uppercase.
STEP 10
- Wait until the end of the data transfer process between the App and the product, then tap on "Confirm". "CONNECTED" appears on the appliance display and then "REMOTE CONTROL ON".
•The enrollment process is now finished.
IF THE SET UP IS NOT SUCCESSFUL
It's important to establish a good Wi-Fi signal strength between the home router and the appliance: low Wi-Fi signal strength would cause the failure of the final stage of the set up. To assess if this is the case, start the connection process again from Step 1; when you get to Step 5, place your device (smartphone or tablet) next to the router and search for "WIFIOVEN-xyzk" net generated by the appliance. If this does not come up as an option, it means that the router cannot see the appliance. In this case, we highly recommend you to bring the router near the appliance (if possible) or contact your internet provider to purchase a compatible "Wi-Fi Range Extender" to increase the signal strength.
Remote control mode
- Tap on the icon ONE-FI.
- Set the oven on ONE-FI ON (the oven will beep).
- The WIFI icon will blink.
3.12 Recipes
| Dish Accessories Level Oven type Category | Cooking time (min) | Number of portions | Portion type (people/kg/gr) | |||||
| Chicken Tandoori | Tray 4 | Convection + fan | Meat | 170°C 50 4 | People | |||
| Meatloaf | Tray 3 | Convection + fan | 170°C 37 4 | People | ||||
| Lamb | Casserole dish 3 Convection + fan 170°C 40 4 People | |||||||
| Veal | Tray 3 | Convection + fan | 170°C 50 4 | People | ||||
| Roasted chicken | Tray 3 | Convection + fan | 180°C 50 4 | People | ||||
| Roasted pork | Tray 3 | Convection + fan | 180°C 50 4 | People | ||||
| Dish Accessories Level Oven type Category | Cooking time (min) | Number of portions | Portion type (people/kg/gr) | |||||
| Salmon | Casserole dish/Tray | 3 | Bottom heating + fan | Fish | 160°C 15 4 | People | ||
| Turbot | Tray 3 | Bottom heating + fan | 160°C 25 4 | People | ||||
| Monkfish | Tray 3 | Bottom heating + fan | 150°C 28 4 | People | ||||
| Stuffed calamari | Tray 3 | Bottom heating + fan | 160°C 20 4 | People | ||||
| squid skewers | Tray 3 | Bottom heating + fan | 150°C 28 4 | People | ||||
| Swordfish rolls | Tray 3 | Bottom heating + fan | 150°C 28 4 | People | ||||
| Sea bream | Casserole dish/Tray | 3 | Bottom heating + fan | 160°C 28 4 | People | |||
| Dish Accessories Level Oven type Category | Cooking time (min) | Number of portions | Portion type (people/kg/gr) | |||||
| Vegetable gratin | Casserole dish/Tray | 4 | Grill + Fan | Vegetables | 180°C 36 4 | People | ||
| Parmigiana | Tray 4 | Grill + Fan | 180°C 36 4 | People | ||||
| Courgette and ricotta tart | Single-portion moulds /Tray | 5 | Grill + Fan | 155°C 35 4 | People | |||
| Veggie-stuffed courgettes | Tray 5 | Grill + Fan | 160°C 28 4 | People | ||||
| Baked potatoes | Casserole dish/Tray | 4 | Grill + Fan | 170°C 38 4 | People | |||
| Cabbage rolls | Casserole dish/Tray | 4 | Grill + Fan | 160°C 25 4 | People | |||
| Vegetable mille-feuille | Moulds/Tray | 5 | Grill + Fan | 160°C 35 4 | People | |||
| Dish Accessories Level Oven type Category | Cooking time (min) | Number of portions | Portion type (people/kg/gr) | |||||
| Carrot cake | Cake tin/Tray | 4 | Multi-level | Pasta & Bakery | 170°C 45 4 | People | ||
| Focaccia | Tray 3 | Multi-level | 200°C | 35 4 People | ||||
| Soda bread | Tray 3 | Multi-level | 170°C | 40 | 4 | People | ||
| Banana cake | Cake mould/Tray | 3 | Multi-level | 170°C | 40 4 People | |||
| Apple tart | Cake tin/Tray | 4 | Multi-level | 170°C 38 4 | People | |||
| Milk bread rolls | Tray 3 | Multi-level | 180°C 25 4 | People | ||||
| Vegetarian lasagna | Tray 4 | Multi-level | 200°C 40 4 | People | ||||
| Vegetable quiche | Cake tin/Tray | 4 | Multi-level | 180°C 35 4 | People | |||
| Vegetable strudel | Tray 4 | Multi-level | 180°C 35 4 | People | ||||
| Farro and vegetable pie | Casserole dish/Tray | 5 | Multi-level | 160°C 35 4 | People | |||
4. Oven cleaning and maintenance
4.1 General notes on cleaning
- The lifecycle of the appliance can be extended through regular cleaning.
- Wait for the oven to cool before carrying out manual cleaning operations.
- Never use abrasive detergents, steel wool or sharp objects for cleaning, so as to not irreparably damage the enamelled parts.
- Use only water, soap or bleach-based detergents (ammonia).
WARNING
GLASS PARTS
It is advisable to clean the glass window with absorbent kitchen towel after every use of the oven. To remove more obstinate stains, you can use a detergent-soaked sponge, well wrung out, and then rinse with water.
OVEN WINDOW
If dirty, the seal can be cleaned with a slightly damp sponge.
ACCESSORIES
Clean accessories with a wet, soapy sponge before rinsing and drying them: avoid using abrasive detergents.
DRIP PAN
After using the grill, remove the pan from the oven. Pour the hot fat into a container and wash the pan in hot water, using a sponge and washing-up liquid.
If greasy residues remain, immerse the pan in water and detergent. Alternatively, you can wash the pan in the dishwasher or use a commercial oven detergent. Never put a dirty pan back into the oven.
4.2 Maintenance
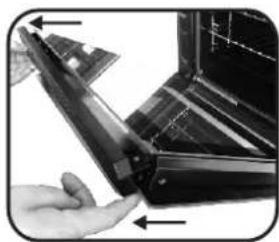
REMOVAL AND CLEANING OF THE SIDE RACKS
- Unscrew the bolt in an anti-clockwise direction.
- Remove the side racks by pulling them towards you.
- Clean the side racks in a dishwasher or with a wet sponge and then dry them immediately.
- Having cleaned the side racks, put them back in and reinsert the bolts, ensuring that they are fully tightened.
text_image
A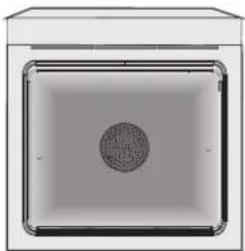
natural_image
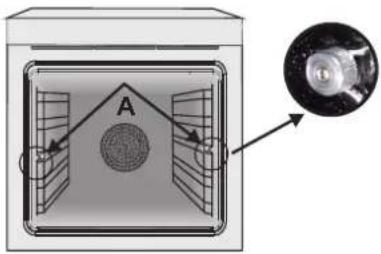
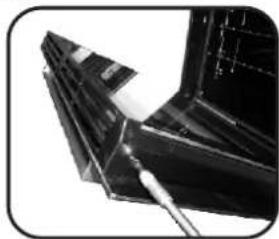
Top-down view of a rectangular frame with a central circular pattern (no text or symbols)REMOVAL OF THE OVEN DOOR
- Open the front window.
- Open the clamps of the hinge housing on the right and left side of the front window by pushing them downwards.
- Replace the window by carrying out the procedure in reverse.
5. Troubleshooting
5.1 FAQ
| PROBLEM POSSIBLE CAUSE SOLUTION | ||
| The oven does not heat up | The clock is not set Set the clock | |
| The oven does not heat up | The child lock is on | Deactivate the child lock |
| The oven does not heat up | A cooking function and temperature has not been set | Ensure that the necessary settings are correct |
| No reaction of the touch user interface | Steam and condensation on the user interface panel | Clean with a microfiber cloth the user interface panel to remove the condensation layer |
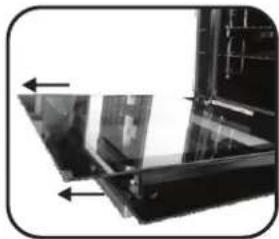
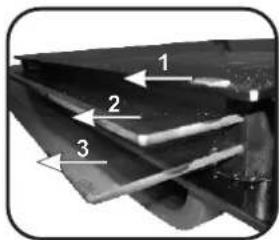
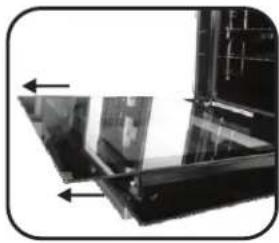
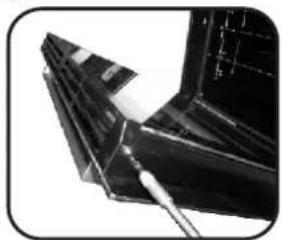
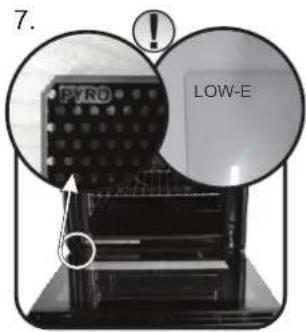
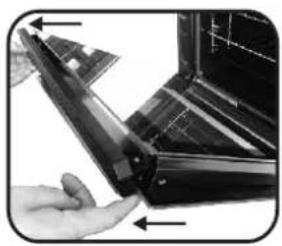
REMOVAL AND CLEANING OF THE GLASS DOOR
- Open the oven door.
2.3.4. Lock the hinges, remove the screws and remove the upper metal cover by pulling it upwards.
5.6. Remove the glass, carefully extracting it from the oven door. -
At the end of cleaning or substitution, reassemble the parts in reverse order.
-
natural_image
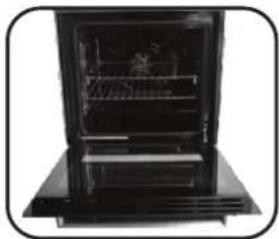
Interior view of a black oven with open door and side panel (no visible text or symbols)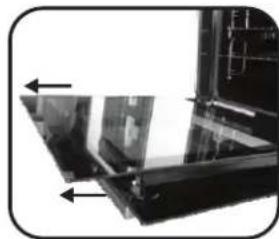
natural_image
Close-up of a mechanical component with two arrows indicating direction (no visible text or symbols)
natural_image
Close-up of mechanical components with circular annotations highlighting features (no text or symbols visible)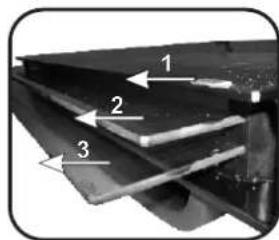
text_image
1 2 3
natural_image
Close-up of a mechanical component with a tool inserted, no visible text or symbols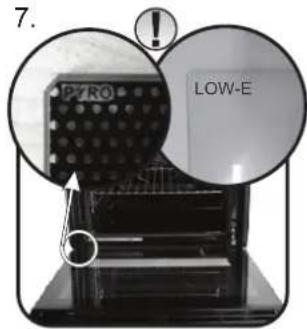
text_image
7. IPYRO LOW-E
natural_image
Close-up of a hand interacting with a black metal bracket or panel, showing a left-pointing arrow (no text or symbols visible)natural_image
Exterior view of a modern kitchen appliance with ventilation grilles and a door (no visible text or symbols)text_image
Diagram of an oven with numbered parts labeled for identificationnatural_image
3D rendering of a gray rectangular tray or baking tray with side brackets (no text or symbols)natural_image
Line drawing of a rectangular metal grate with vertical slats (no text or symbols)natural_image
Exterior view of a gray metal bracket with multiple slots and a central slot (no text or symbols)natural_image
Pure electrical circuit lines without any symbolsnatural_image
Two identical wireframe grid structures with horizontal lines, no text or symbols presentnatural_image
Hand inserting a component into a washing machine (no text or symbols visible)
natural_image
Close-up of a mechanical or electronic component with no visible text or symbolsFigura 1 Figura 2
natural_image
Pure electrical circuit lines without any symbolsFigura 3
text_image
Diagram of a room layout with labeled components and an inset showing a circular object, likely illustrating a mechanical or optical setup.
natural_image
Simple 3D rendering of a square frame with a central circular pattern (no text or symbols)STACCO DELLA PORTA DEL FORNO
natural_image
Exterior view of a black oven with open lid and side-mounted rack (no visible text or symbols)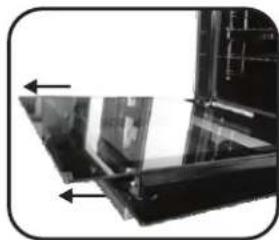
natural_image
Close-up of a mechanical component with two arrows pointing to specific areas (no visible text or symbols)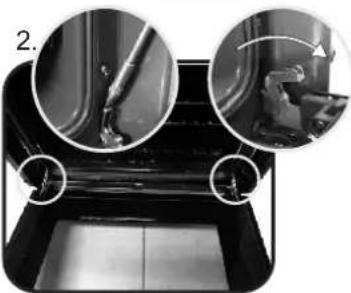
natural_image
Close-up of mechanical components with circular insets showing tool and component details (no visible text or symbols)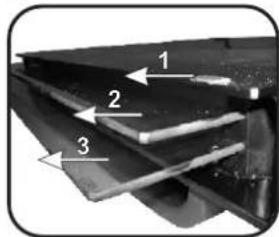
text_image
1 2 3
natural_image
Close-up of a mechanical component with a tool inserted, showing no visible text or symbols.
text_image
7. IPYRO LOW-E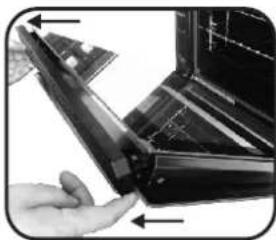
natural_image
Close-up of a hand holding a black plastic component with arrows indicating direction (no text or symbols visible)natural_image
Exterior view of a modern container with lid and side panel (no visible text or symbols)text_image
Labeled diagram of an oven with numbered parts for identificationnatural_image
3D rendering of a gray rectangular tray or baking tray with no text or symbolsnatural_image
Line drawing of a rectangular metal grate with vertical slats (no text or symbols)natural_image
Metallic rectangular object with evenly spaced notches and a central hole, shown in gray (no text or symbols)natural_image
Pure electrical circuit lines without any symbolsnatural_image
Two hand-drawn sketch-style panels showing horizontal grid lines, no text or symbols presentnatural_image
Hand inserting a button into an oven (no text or symbols visible)
natural_image
Close-up of a mechanical or electronic component with no visible text or symbolstext_image
Diagram of a device with labeled components and an inset showing a circular object, likely illustrating a mechanical or optical setup.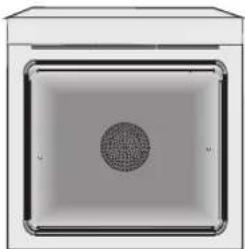
natural_image
Simple 3D-rendered square with a central circular pattern, no text or symbols present.ENTFERNEN DER OFENTÜR
natural_image
Interior view of a black oven with open door and side legs (no visible text or symbols)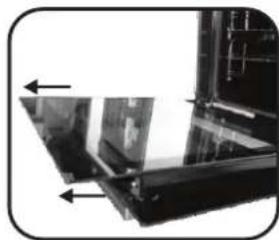
natural_image
Close-up of a mechanical component with two arrows pointing to features (no visible text or symbols)
natural_image
Close-up of mechanical components with circular insets showing close-ups of a tool and a bracket (no text or symbols visible)
text_image
1 2 3
natural_image
Close-up of a mechanical component with a tool inserted, showing no visible text or symbols.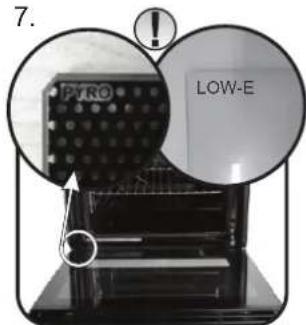
text_image
7. IPORO LOW-E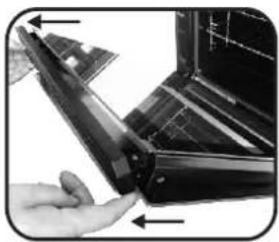
natural_image
Close-up of a hand inserting a black plastic component into a metal bracket (no visible text or symbols)5. Fehlerbehebung
5.1 FAQ
natural_image
Interior view of a modern oven with ventilation grilles and a side panel (no visible text or symbols)text_image
Diagram of an oven with numbered parts labeled 1 through 6, showing interior layout and ventilation system.natural_image
3D rendering of a gray rectangular tray or baking tray with no visible text or symbolsnatural_image
Line drawing of a rectangular metal grate with vertical slats (no text or symbols)natural_image
Exterior view of a gray metal bracket with multiple slots and cutouts (no text or symbols)natural_image
Pure electrical circuit lines without any symbolsnatural_image
Two hand-drawn sketch-style panels showing horizontal lines with rounded ends, no text or symbols present.natural_image
Illustration of a hand inserting a button into a kitchen appliance (no text or symbols visible)
natural_image
Close-up of a mechanical or electronic component with no visible text or symbolsFigure 1 Figure 2
natural_image
Pure electrical circuit lines without any symbolsFigure 3
text_image
IGRILL·FAN 180° DURATION: ---% OPTIONS MY CHIEF ①Figure 10
- Insert the 16 digits of the serial number or scan the QR code on the appliance. Tap on "Next". Check data correctness of the data and tap on "Confirm". Once the system has recognized the product, tap on "Next".
L'ÉTAPE 6
text_image
Diagram of a device with labeled components and an inset showing a circular object, likely illustrating a mechanical or optical setup.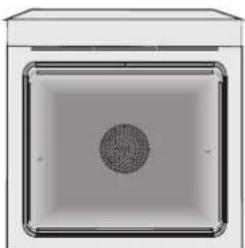
natural_image
Simple 3D diagram of a square with a central circular pattern, no text or symbols present.DÉMONTAGE DE LA PORTE DU FOUR
natural_image
Exterior view of a black oven with open lid and side grilles (no visible text or symbols)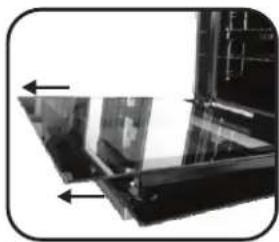
natural_image
Close-up of a mechanical component with two arrows indicating direction (no visible text or symbols)
natural_image
Close-up of mechanical components with circular insets showing tool and component alignment (no text or symbols visible)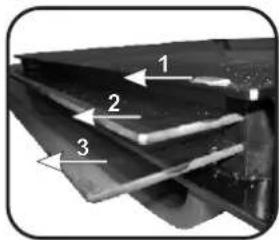
text_image
1 2 3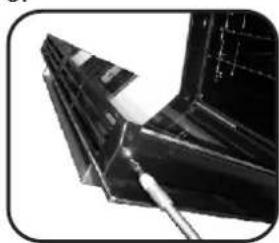
natural_image
Close-up of a mechanical component with a tool inserted, showing no visible text or symbols.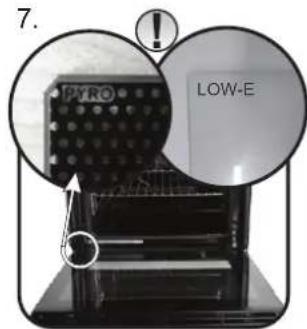
text_image
7. IPYRO LOW-E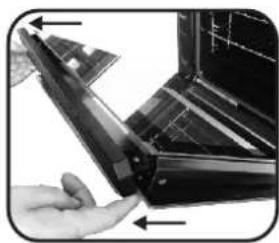
natural_image
Close-up of a hand holding a metal bracket with arrows indicating direction (no text or symbols visible)5. Dépannage
5.1 FAQ
natural_image
Exterior view of a modern container with lid and side panel (no visible text or symbols)text_image
Labeled diagram of an oven with numbered parts for identificationnatural_image
3D rendering of a gray rectangular tray or baking tray with no visible text or symbolsnatural_image
Line drawing of a rectangular metal grate with vertical slats (no text or symbols)natural_image
Metallic rectangular object with four recessed slots and a flat top edge (no text or symbols)natural_image
Pure electrical circuit lines without any symbolsnatural_image
Two identical hand-drawn wireframe diagrams of rectangular grids, no text or symbols presentnatural_image
Hand inserting a button into a refrigerator (no text or symbols visible)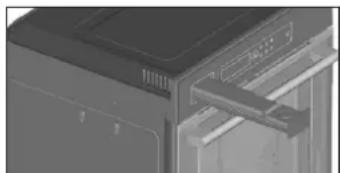
natural_image
Close-up of a kitchen appliance interior showing a door, ventilation duct, and tray (no visible text or symbols)Figuur 1 Figuur 2
natural_image
Simple 3D rendering of a rectangular frame with a central circular pattern (no text or symbols)natural_image
Exterior view of a black oven or oven with internal structure (no visible text or symbols)5.
natural_image
Close-up of a mechanical component with two arrows indicating direction (no visible text or symbols)
natural_image
Close-up of mechanical components with circular insets showing tool and component details (no text or symbols visible)6.
text_image
1 2 33.
natural_image
Close-up of a metallic mechanical component with a tool inserted, showing no visible text or symbols.7.
text_image
7. FYRO LOW-E4.
natural_image
Close-up of a hand holding a black metal bracket with arrows indicating direction (no text or symbols visible)5. Problemen oplossen
5.1 FAQ
natural_image
Exterior view of a modern kitchen oven with open door and side panel (no visible text or symbols)text_image
Labeled diagram of an oven with numbered parts for identificationnatural_image
3D rendering of a gray rectangular tray or baking tray with no text or symbolsnatural_image
Line drawing of a rectangular metal grate with vertical slats (no text or symbols)natural_image
Exterior view of a gray metal bracket with multiple slots and mounting holes (no text or symbols)natural_image
Pure electrical circuit lines without any symbolsnatural_image
Two hand-drawn wireframe panels showing horizontal lattice structures (no text or symbols)natural_image
Hand inserting a button into a refrigerator (no visible text or symbols)
natural_image
Interior view of a server room with ventilation ducts and doorways (no visible text or symbols)Figura 1 Figura 2
natural_image
Pure electrical circuit lines without any symbolsFigura 3
natural_image
Simple 3D diagram of a square with a central circular pattern, no text or symbols present.DESMONTAJE DE LA PUERTA DEL HORNO
natural_image
Black oven with open door and side panel, no visible text or symbols5.
natural_image
Close-up of a mechanical component with two arrows indicating direction (no visible text or symbols)
natural_image
Close-up of mechanical components with circular insets showing tool manipulation (no text or symbols visible)6.

text_image
1 2 33.
natural_image
Close-up of a mechanical component with a tool inserted, showing no visible text or symbols.7.
text_image
7. PYRO LOW-E4.
natural_image
Close-up of a hand holding a black metal bracket with arrows pointing to the edge (no visible text or symbols)natural_image
Interior view of a stainless steel oven with open door and ventilation grilles (no visible text or symbols)text_image
Labeled diagram of an oven with numbered parts for identificationnatural_image
3D rendering of a gray rectangular tray or baking tray with no text or symbolsnatural_image
Line drawing of a rectangular metal grate with evenly spaced slats (no text or symbols)natural_image
Metallic rectangular object with multiple recessed slots and a central slot, shown against a plain background (no text or symbols)natural_image
Pure electrical circuit lines without any symbolsMede a temperatura interna dos alimentos durante a cozedura.
natural_image
Two hand-drawn sketch-style panels showing horizontal lines with rounded ends, no text or symbols present.natural_image
Illustration of a hand inserting a component into a refrigerator (no text or symbols visible)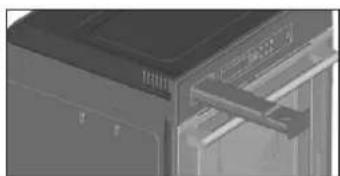
natural_image
Close-up of a mechanical or electronic component with no visible text or symbolsFigura 1 Figura 2
text_image
IGRILL·FAN 180 DURATION: ---% OPTIONS MY CHEE ①Figura 10
natural_image
Diagram of a mechanical or electrical enclosure with labeled components and an inset showing a circular component (no text or symbols present)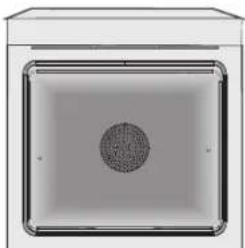
natural_image
Top-down view of a rectangular panel with a central circular pattern (no text or symbols)natural_image
Interior view of a black oven with open door and side legs (no visible text or symbols)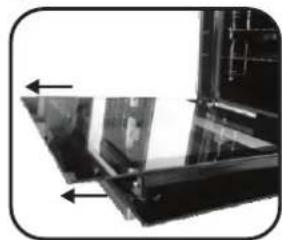
natural_image
Close-up of a mechanical component with two arrows indicating direction (no visible text or symbols)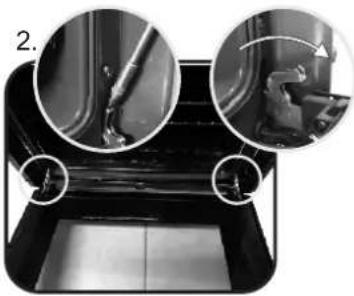
natural_image
Close-up of mechanical components with circular insets showing a tool interacting with a component (no visible text or symbols)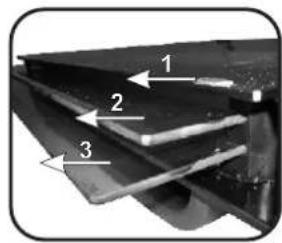
text_image
1 2 3
natural_image
Close-up of a mechanical component with a tool inserted, showing no visible text or symbols.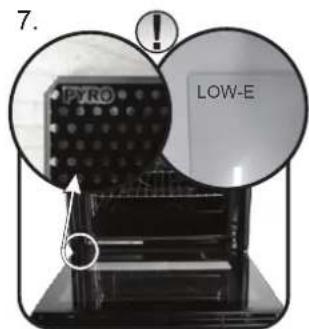
text_image
7. PYRO LOW-E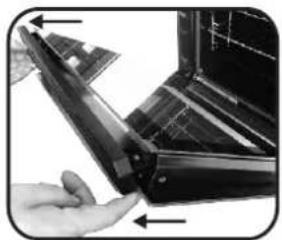
natural_image
Close-up of a hand inserting a black plastic component into a metal bracket (no text or symbols visible)natural_image
Exterior view of a modern office building (no signage)text_image
Labeled diagram of an oven with numbered parts for identificationnatural_image
3D rendering of a gray rectangular tray or baking tray with no text or symbolsnatural_image
Line drawing of a rectangular metal grate with vertical slats (no text or symbols)natural_image
Exterior view of a gray metal bracket with multiple slots and mounting holes (no text or symbols)natural_image
Pure electrical circuit lines without any symbolsnatural_image
Two hand-drawn sketch-style grid-like structures with horizontal lines, no text or symbols presentnatural_image
Hand inserting a component into a refrigerator (no visible text or symbols)
natural_image
Close-up of a mechanical or electronic component with no visible text or symbolsRysunek 1 Rysunek 2
natural_image
Pure electrical circuit lines without any symbolsRysunek 3
text_image
Technical diagram showing a mechanical or electrical component with labeled section A and an inset close-up view of a device.
natural_image
Simple 3D diagram of a square frame with a central circular pattern, no text or symbols present.WYJMOWANIE DRZWICZEK PIEKARNIKA
natural_image
Exterior view of a black oven with open door and side panel (no visible text or symbols)
natural_image
Close-up of a mechanical component with two arrows pointing to features (no visible text or symbols)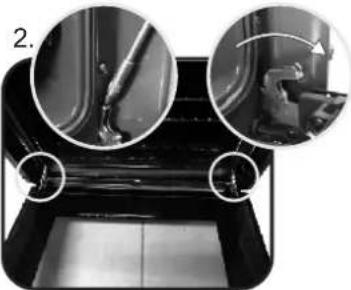
natural_image
Close-up of mechanical components with magnified views showing internal features (no text or symbols visible)
text_image
1 2 3
natural_image
Close-up of a mechanical component with a tool inserted, no visible text or symbols
text_image
7. PYRO LOW-E
natural_image
Close-up of a hand interacting with a black metal bracket or panel, showing a left-pointing arrow (no text or symbols visible)| INSTALLATION EN | |
| INSTALLAZIONE IT | |
| MONTAGE DE INSTALACIÓN ES | |
| INSTALLATION FR | |
| INSTALLATIE NL |
text_image
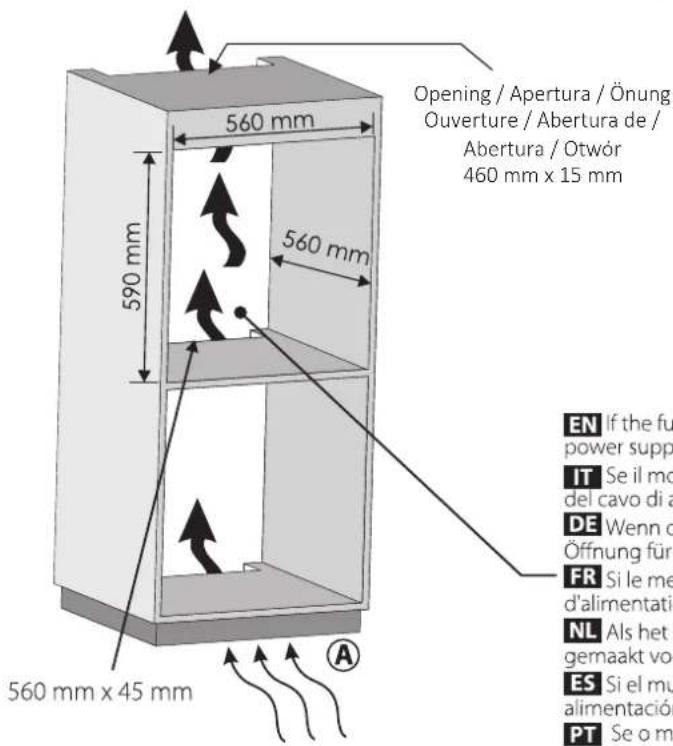
Opening / Apertura / Önung Ouverture / Abertura de / Abertura / Otwór 460 mm x 15 mm 560 mm 590 mm 560 mm 560 mm x 45 mm EN If the fu power supp IT Se il mo del cavo di a DE Wenn d Öffnung für FR Si le me d'alimentatio NL Als het r gemaakt vo ES Si el mu alimentacióra PT Se o m| INSTALAÇÃO | PT | |
| INSTALACJA | PL | |
text_image
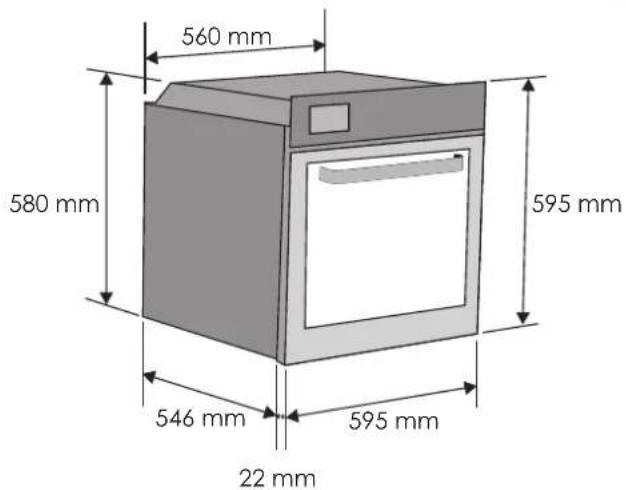
560 mm 580 mm 595 mm 546 mm 595 mm 22 mmEN If the furniture is coverage with a bottom at the back part, provide an opening for the power supply cable.
IT Se il mobile ha una copertura con fondo posteriore, praticare un foro per il passaggio del cavo di alimentazione.
DE Wenn das Möbel mit einem Boden im hinteren Teil ausgestattet ist, sehen Sie eine Öffnung für das Netzkabel vor.
FR Si le meuble est recouvert d'un fond à l'arrière, prévoyez une ouverture pour le câble d'alimentation électrique.
NL Als het meubel een paneel heeft aan de achterkant, moet er een opening worden gemaakt voor de stroomkabel.
ES Si el mueble está cubierto con un panel posterior, haga un orificio para el cable de alimentación.
PT Se o móvel tiver um tampo com um fundo na parte de trás, faça uma abertura para o cabo de alimentação.
PL Jeśli meble są wyposażone w spód w tylnej części, należy zapewnić otwór na przewód zasilający.
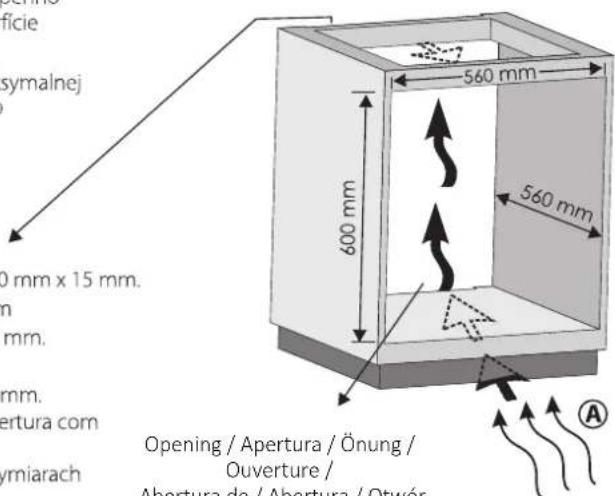
A EN If the mounting of the plinth does not allow air circulation, to obtain the maximum performance of the oven it is necessary to create an opening of 500x10 mm or the same surface in 5.000 mm ^2 .
A IT Se il montaggio dello zoccolo non consente la circolazione dell'aria, per ottenere il massimo rendimento del forno è necessario creare un'apertura di 500x10 mm o la stessa superficie in 5.000 mm ^2 .
A DE Wenn die Montage des Sockels keine Luftzirkulation erlaubt, ist es notwendig, eine Öffnung von 500 x 10 mm oder die gleiche Oberfläche in 5,000 mm² zu schaffen, um die maximale Leistung des Ofens zu erhalten.
A FR Si le montage de la plinthe ne permet pas la circulation de l'air, il faut créer une ouverture de 500x10 mm ou une surface équivalente à 5000 mm ^2 pour bénéficier des performances maximales du four.
A NL Als de montage van de plint de luchtcirculatie verhindert, is het voor de maximale ovenprestaties noodzakelijk een opening te maken van 500x10 mm of hetzelfde oppervlak van 5.000 mm ^2 .
A ES Si el montaje del zócalo no permite la circulación de aire, para obtener el máximo rendimiento del horno es necesario crear una abertura de 500x10 mm o la misma superficie en 5000 mm².
A PT Se a montagem do rodapé não permitir a circulação de ar, para obter o desempenho máximo do forno é necessário criar uma abertura de 500x10mm ou a mesma superfície em 5.000 mm ^2 .
A PL Jeśli montaż cokołu nie pozwala na cyrkulację powietrza, w celu uzyskania maksymalnej wydajności piekarnika konieczne jest wykonanie otworu o wymiarach 500 x 10 mm lub takiej samej powierzchni o wymiarze 5 000 mm².
EN If the oven does not have a cooling fan, create an opening 460 mmx15 mm.
IT Se il forno non dispone di una ventola di raffreddamento, creare un'apertura di 460 mm x 15 mm.
DE Wenn der Ofen keinen Lüfter hat, erzeugen Sie eine Öffnung von 460 mm x 15 mm
FR Si le four n'a pas de ventilateur de refroidissement, créez une ouverture de 460x15 mm.
NL Maak een opening van 460 mm x 15 mm als de oven geen koelventilator heeft.
ES Si el horno no tiene ventilador de refrigeración, practique una abertura de 460x15 mm.
PT Se o forno não estiver equipado com uma ventoinha de refrigeração, faça uma abertura com 460 mm x 15 mm.
PL PLjeśli piekarnik nie posiada wentylatora chłodzącego, należy wykonać otwór o wymiarach 460 mm x 15 mm.
text_image
Officie symalnej 0 mm x 15 mm. mm mm. ertura com ymiarach 600 mm 560 mm 560 mm Opening / Apertura / Önung / Ouverture / Abertura de / Abertura / OtwórAbertura de / Abertura / Otwór 560 mm x 45 mm
EN
The manufacturer will not be responsible for any inaccuracy resulting from printing or transcript errors contained in this brochure. We reserve the right to carry out modifications to products as required, including the interests of consumption, without prejudice to the characteristics relating to safety or function.