
Sabre 15K - Laptop GIGABYTE - Free user manual and instructions
Find the device manual for free Sabre 15K GIGABYTE in PDF.

| Product Type | Gaming Laptop |
| Brand | GIGABYTE |
| Model | Sabre 15K |
| Screen Size | 15.6 inches (estimated) |
| Operating System | Windows 10 (pre-installed) |
| Connectivity | 1x USB 3.1 Gen2, 1x USB 3.1 Gen1, 1x USB 2.0, HDMI, Mini DisplayPort, RJ45, headphone jack, microphone input, card reader |
| Power Supply | AC adapter, Lithium-ion battery |
| Shortcut Keys | Fn+F1 (Touchpad), Fn+F2 (Display), Fn+F3 (Sound), Fn+F4 (Backlight), Fn+F5/F6 (Volume), Fn+F7 (Screen sharing), Fn+F8/F9 (Brightness), Fn+F10 (Webcam), Fn+F11 (Airplane Mode), Fn+F12 (Sleep) |
| Keyboard Backlight | White or RGB depending on configuration |
| Smart USB Backup | Backup of recovery image to USB drive |
| System Restore | Via F9 at startup (Reset this PC or GIGABYTE Smart Recovery) |
| Webcam | Built-in with operation LED |
| Touchpad | Touchpad with buttons |
| Maintenance | Avoid soft surfaces, temperatures >45°C, do not block ventilation |
| Security | Kensington lock slot |
| Support and warranty | See warranty card or gigabyte.fr website |
Frequently Asked Questions - Sabre 15K GIGABYTE
User questions about Sabre 15K GIGABYTE
0 question about this device. Answer the ones you know or ask your own.
Ask a new question about this device
Download the instructions for your Laptop in PDF format for free! Find your manual Sabre 15K - GIGABYTE and take your electronic device back in hand. On this page are published all the documents necessary for the use of your device. Sabre 15K by GIGABYTE.
USER MANUAL Sabre 15K GIGABYTE
- Only use batteries designed for this computer. The wrong battery type may explode, leak or damage the computer.
- Do not remove any batteries from the computer while it is powered on.
- Do not continue to use a battery that has been dropped, or that appears damaged (e.g. bent or twisted) in any way. Even if the computer continues to work with a damaged battery in place, it may cause circuit damage, which may possibly result in fire.
- Recharge the batteries using the Notebook's system. Incorrect recharging may make the battery explode
- Do not try to repair a battery pack. Refer any battery pack repair or replacement to your service representative or qualified service personnel.
- Keep children away from, and promptly dispose of a damaged battery. Always dispose of batteries carefully. Batteries may explode or leak if exposed to fire, or improperly handled or discarded.
- Keep the battery away from metal appliances.
• Affix tape to the battery contacts before disposing of the battery. - Do not touch the battery contacts with your hands or metal objects.

CAUTION: RISK OF EXPLOSION IF BATTERY IS REPLACED BY AN INCORRECT TYPE.
DISPOSE OF USED BATTERIES ACCORDING TO THE INSTRUCTIONS
RF Exposure :
This equipment must be installed and operated in accordance with provided instructions and must not be co-located or operating in conjunction with any other antenna or transmitter. End-users are must be provided with antenna installation instructions and transmitter operating conditions for satisfying RF exposure compliance.
CE Notice (European Union) :
This symbol C indicates this notebook complies with the EMC Directive and the European
Union's Low Voltage Directive This symbol also indicates that this notebook meets the following technical standards:
• EN 55032 - Electromagnetic compatibility of multimedia equipment -- Emission requirements
- EN 55024 — “Information technology equipment - Immunity characteristics - Limits and methods of measurement.”
- EN 61000-3-2 — “Electromagnetic compatibility (EMC) - Chapter 3: Limits - Section 2: Limits on the harmonic current emissions (Equipment input current up to and including 16 A per phase).”
- EN 61000-3-3 — “Electromagnetic compatibility (EMC) - Chapter 3: Limits - Section 3: Limits on the voltage fluctuations and flicker in low-voltage power supply systems for equipment with rate current up to and including 16 A.”
Declaration of Conformity for EU countries
Hereby, GIGABYTE, declares that this Notebook series is in compliance with the essential requirements and other relevant provisions of RE Decective 2014/53/EU.
Radio Equipment-Directive 2014/53/EU
The following items were completed and are considered relevant and sufficient:
Essential requirements as in [Article 3]
Protection requirements for health and safety as in [Article 3.1a]
Testing for electric safety according to [EN60950]
Protection requirements for electromagnetic compatibility in [Article 3.1b]
Testing for electromagnetic compatibility in [EN 301 489-1] & [EN 301]
Testing according to [489-17]
Effective use of the radio spectrum as in [Article 3.2]
Radio test suites according to [EN300 328-2]
CE Mark Warning
This is a Class B product, in a domestic environment, this product may cause radio interference, in which case the user may be required to take adequate measures.
BSMI Notice (Taiwan Only)

- The symbol above must be attached to the product indicating compliance with the BSMI standard.
- Most Notebook are classified by the Bureau of Standards, Meteorology and Inspection (BSMI) as Class B information technology equipment (ITE).
- Caution: Suggest to operate under 35°C
CCC (China only)
- On Class A systems, the following warning will appear near the regulation label:
- Warning: This is a Class A product. In a domestic environment, this product may cause radiointerference, in which case users may be required to take adequate measures.
Federal Communications Commission Notice :
This equipment has been tested and found to comply with the limits for a Class B digital service, pursuant to Part 15 of the FCC rules. These limits are designed to provide reasonable protection against harmful interference in a residential installation. Any changes or modifications made to this equipment may void the user's authority to operate this equipment. This equipment generates, uses, and can radiateradio frequency energy, and if not installed and used in accordance with the instructions, may cause harmful interference to radio communications. However, there is no guarantee that interference will not occur in a particular installation. If this equipment does cause harmful interference to radio or television reception, which can be determined by turning the equipment off and on, the user is encouraged to try to correct the interference by one or more of the following measures:
• Reorient or relocate the receiving antenna.
- Increase the separation between the equipment and receiver.
- Connect the equipment into an outlet on a circuit different from that to which the receiver is connected.
- Consult the dealer or an experienced radio/TV technician for help.
- All external cables connecting to this basic unit must be shielded.
This device complies with Part 15 of the FCC Rules. Operation is subject to the following two conditions:
(1) This device may not cause harmful interference, and
(2) This device must accept any interference received, including interference that may cause undesired operation.

CAUTION: Any changes or modifications not expressly approved by the grantee of this device could void the user's authority to operate the equipment.
CAN ICES-3 (\*)/NMB-3(\*)
* Insert either "A" or "B" but not both to identify the applicable Class of ITE.
KCC Notice :
- “B” class equipment (telecommunications equipment for household purpose)
- As this equipment has undergone EMC registration for house hold purpose (“B” Class), this product can be used in any area and designed to be used mainly in a household.
Battery Maintenance Guidance
Before you use your Notebook on the road, you will have to charge the battery pack. The battery pack begins to charge as soon as the Notebook is connected to external power using the power adapter. Fully charge the battery pack before using it for the first time. A new battery pack must completely charge before the Notebook is disconnected from external power. It takes a few hours to fully charge the battery when the Notebook is turned OFF. Please note the battery stops charging if the temperature is too high or the battery voltage is too high.

NOTE: Do not leave the battery pack discharged. The battery pack will discharge over time. If not using a battery pack, it must continued to be charged every three month to extend recovery capacity or else it may fail to charge in the future. rechargeable Li-Ion batteries require routine maintenance and care in their use and handling. Read through below instruction and your Notebook will achieve the maximum battery life span.
Battery Maintenance :
- Do not leave batteries unused for extended periods of time, either in the Notebook or in storage. When a battery has been unused for 3 months, check the charge status and charge or dispose of the battery as appropriate.
- The typical estimated life of a Rechargeable Li-Ion batteries is about two to three years or 300 to 500 charge cycles, whichever occurs first. One charge cycle is a period of use from fully charged, to fully discharged, and fully recharged again. Use a two to three year life expectancy for batteries that do not run through complete charge cycles.
- Rechargeable Li-Ion batteries have a limited life and will gradually lose their capacity to hold a charge. This loss of capacity is irreversible. As the battery loses capacity, the length of time it will power the Notebook decreases.
- The run time of your battery will vary depending on the product's configuration and the applications that you run. Routinely check the battery's charge status.
- Battery terminals must avoid contact with any metallic substance. For preventing shortage, avoid silver coins, tinsels and any other metallic substances to contact the + and - terminals of the battery. For example, It might happen by inserting the batteries to a coat pocket or a leather handbag with some metallic substances mounted on it (metal buttons or zippers). There is high possibility of causing short circuits and connection damage of the battery.
- Consider replacing the battery with a new one if you note either of the following conditions:
(1) The battery run time drops below about 80% of the original run time.
(2) The battery charge time increases significantly.
(3) If a battery is stored or otherwise unused for an extended period, be sure to follow the storage instructions. If you do not follow the instructions, and the battery has no charge remaining when you check it, consider it to be damaged. Do not attempt to recharge it or to use it. Replace it with a new battery.
Charging :
The rechargeable Li-Ion batteries is recharged internally using the AC adapter. To recharge the battery, make sure the battery is installed and the Notebook is connected to the AC adapter. The charge times will be significantly longer if your Notebook is in use while the battery is charging. If you want to charge the battery more quickly, put your computer into Suspend mode or turn it off while the adapter is charging the battery. Please always follow the charging instructions provided with your Notebook.
Low Battery State :
When the battery level is low, a notification message appears. If you do not respond to the low battery message, the battery continues to discharge until it is too low to operate. When this happens, your Notebook goes into Suspend mode. There is no guarantee your data will be saved once the Notebook reaches this point.

CAUTION: To protect your Notebook from damage, use only the power adapter that came with it because each power adapter has its own power output rating.
Once your Notebook goes into suspend mode as a result of a dead battery, you will be unable to resume operation until you provide a source of power either from an adapter or a charged battery. Once you have provided power, you can press the Suspend/Resume button to resume operation. In Suspend mode, your data is maintained for some time, but if a power source is not provided promptly, the power indicator stops flashing and then goes out, in which case you have lost the data that was not saved. Once you provide power, you can continue to use your computer while an adapter charges the battery.
Storage :
- Charge or discharge the battery to approximately 50% of capacity before storage.
- Charge the battery to approximately 50% of capacity at least once every three months.
- Remove the battery and store it separately from the Notebook.
- Store the battery at temperatures between 5°C and 20°C (41°F and 68°F).

CAUTION: The battery self-discharges during storage. Higher temperatures (above 20^ C or 68^ F) reduce the battery storage life.
Handling Precautions :
- Do not disassemble, crush, or puncture a battery.
- Do not short the external contacts on a battery.
- Do not dispose of a battery in fire or water.
- Do not expose a battery to temperatures above 60°C (140°F).
- Keep the battery away from children.
- Avoid exposing the battery to excessive shock or vibration.
- Do not use a damaged battery.
- If a battery pack has leaking fluids, do not touch any fluids. Dispose of a leaking battery pack (see Disposal and Recycling section). In case of eye contact with fluid, do not rub eyes. Immediately flush eyes thoroughly with water for at least 15 minutes, lifting upper and lower lids, until no evidence of the fluid remains. Seek medical attention.
Transportation :
Always check all applicable local, national, and international regulations before transporting a Rechargeable Li-Ion batteries. Transporting an end-of-life, damaged, or recalled battery may, in certain cases, be specifically limited or prohibited.
Disposal and Recycling :
Rechargeable Li-Ion batteries are subject to disposal and recycling regulations that vary by country and region. Always check and follow your applicable regulations before disposing of any battery. Contact your local battery recycling organization. Many countries prohibit the disposal of waste electronic equipment in standard waste receptacles. Place only discharged batteries in a battery collection container. Use electrical tape or other approved covering over the battery connection points to prevent short circuits.

The symbol of the crossed out wheeled bin indicates that the product (electrical and electronic equipment) should not be placed in municipal waste. Please check local regulations for disposal of electronic products.
Rechtliche Hinweise
Akkus:
Congratulations on your purchase of the GIGABYTE Notebook.
This manual will help you to get started with setting up your notebook. The final product configuration depends on the model at the point of your purchase. GIGABYTE reserves the right to amend without prior notice. For more detailed information, please visit our website at www.gigabyte.com.
Using GIGABYTE Notebook for the First Time
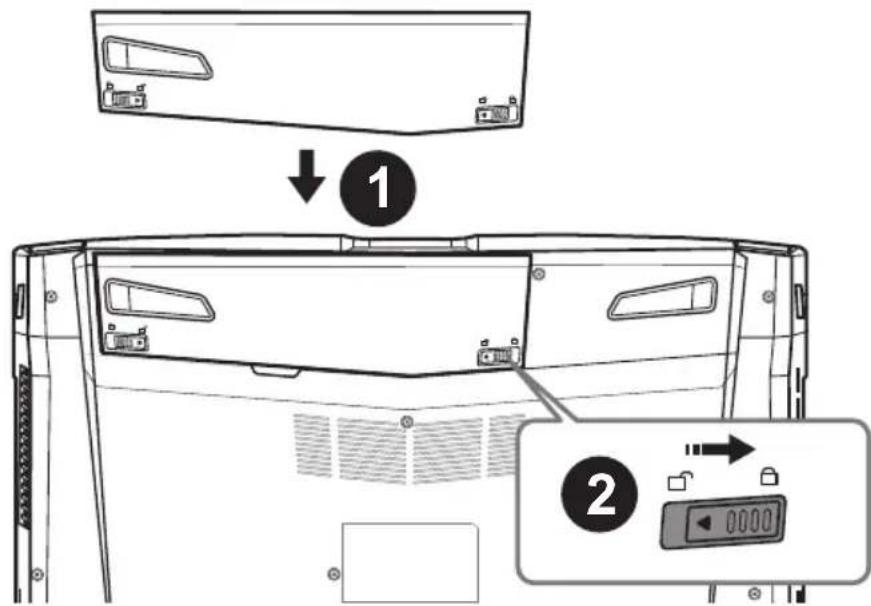
To install the battery please follow these steps:
① Insert the battery pack into the compartment.
② Remember to slide the switch to the "Lock" position.
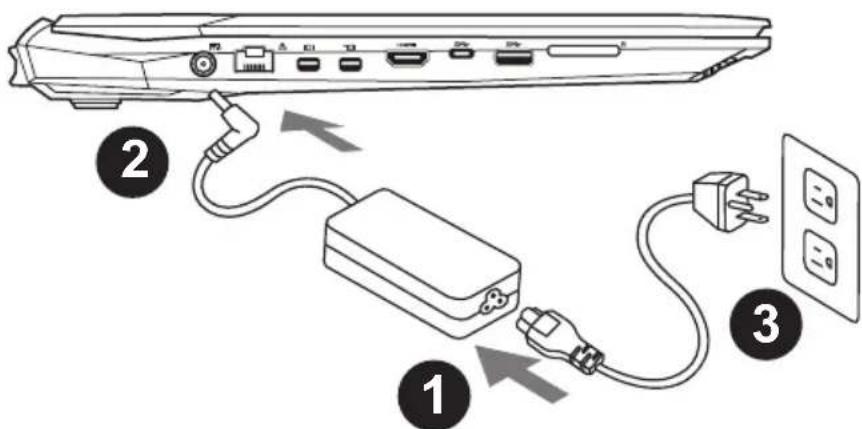
1 Connect the the power cord to the AC adapter.
2 Connect the AC adapter to the DC-in jack on the left side of the notebook.
③ Connect the power cord to the power outlet.

IMPORTANT
● Ensure that your Notebook PC is connected to a grounded power adapter before turning it on for the first time.
- When using your Notebook PC on power adapter mode, the socket outlet must be near to the unit and easily accessible.
- Locate the input/output rating label on your Notebook PC and ensure that it matches the input/output rating information on your power adapter. Some Notebook PC models may have multiple rating output currents based on the available SKU.
● Power adapter information: Input voltage: 100-240Vac, - Input frequency: 50-60Hz, - Rating output voltage: 19.5V 6.15A
natural_image
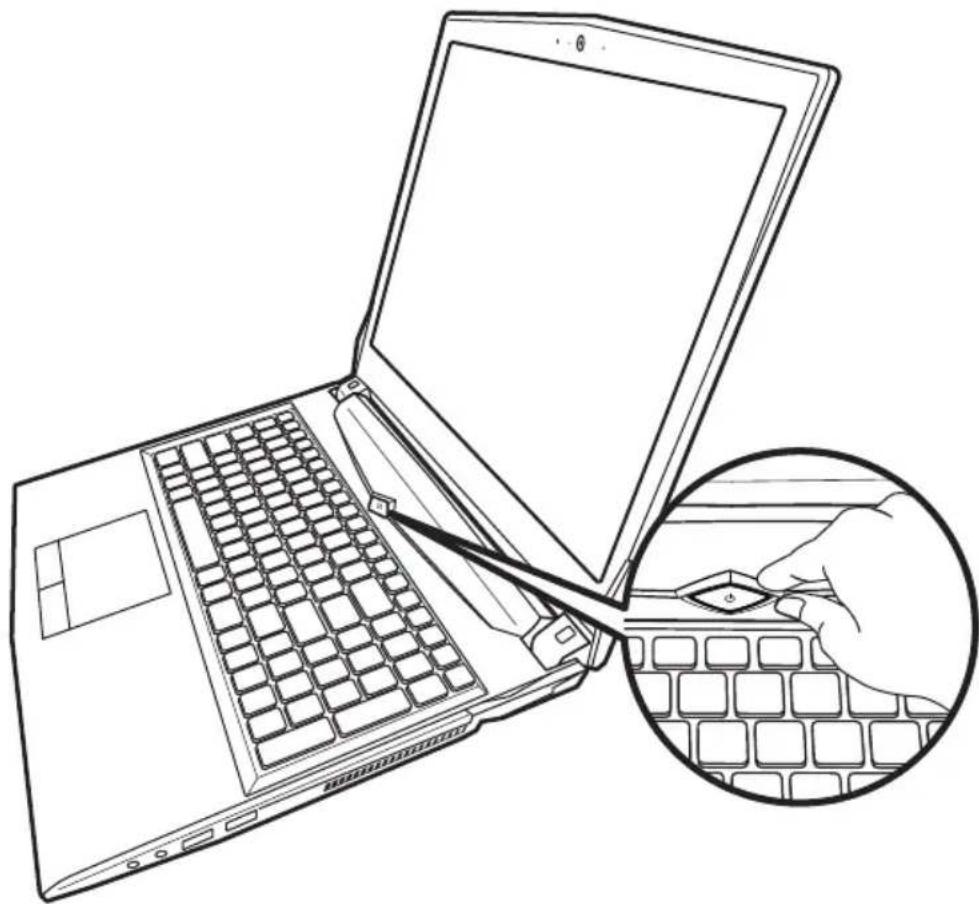
Line drawing of a laptop with a keyboard and a magnified inset showing the hand holding a key (no text or symbols present)Switching on the Power
After you turn on the Notebook for the very first time, do not turn it off until the operating system has been configured. Please note that the volume for the audio will not function until Windows Setup has completed.
Booting Up the Notebook for the First Time
Depending on your configuration, the Microsoft ^® Windows ^® Boot Screen will be the first screen that you will see as the notebook starts up. Follow the on-screen prompts and instructions and enter your personal information to complete the setup of the Windows ^® Operating System.
Top View

① Webcam on/off Indicator
② Webcam
③ Built-In Mic
4 Power Button
5 Touchpad and buttons
⑥ LED Indicators
① Power Status LED
Battery Status LED
Airplane Mode Status LED
HDD Status LED
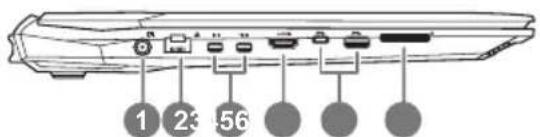
Left View
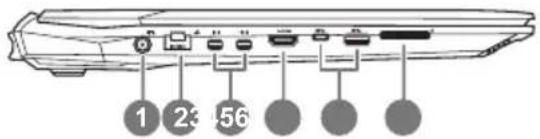
1 Power DC input
② LAN RJ 45
③ Mini Display Port
4 HDMI
⑤ USB Port 3.1 Gen.2 (10Gbps)
⑥ Flash Memory Card Reader
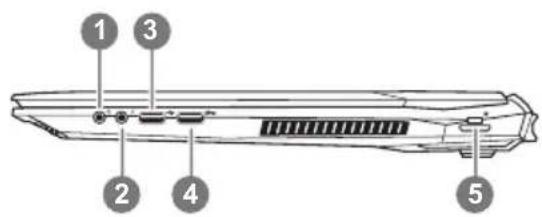
Right View
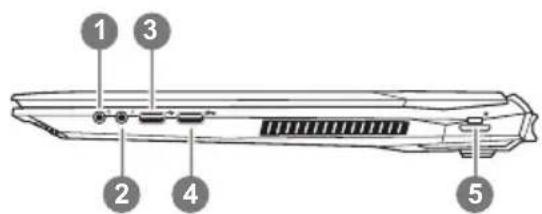
1 Headphone output Jack
② Microphone input Jack
③ USB Port(2.0)
4 USB Port 3.1 Gen.1(5Gbps)
⑤ Kensington Lock Port
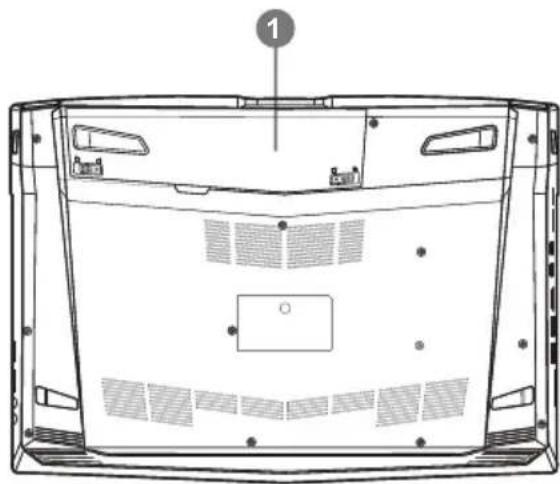
Bottom View

natural_image
Technical line drawing of a device rear panel with ventilation grilles and mounting holes (no text or symbols)① Battery

Warning:
- Do not install the Notebook PC on a slant or a place prone to vibrations, or avoid using the Notebook PC in that location for a long time. This increases the risk that a malfunction or damage to the product will occur.
- Do not store and use Notebook PC in direct sunlight or the location where temperatures exceed 112°F (45°C) such as inside a vehicle. There is a danger of Lithium-ion battery expansion and aging.
- Do not use the Notebook PC in a badly ventilated location such as on bedding, on a pillow or cushion, etc, and do not use it in a location such as room with floor heating as it may cause the computer to overheat. Take care that the Notebook PC vents (on the side or the bottom) are not blocked especially in these environments. If the vents are blocked, it may be dangerous and cause the Notebook PC to overheat.
Hotkeys
The computer employs hotkeys or key combinations to access most of the computer's controls like screen brightness and volume output. To activate hotkeys, press and hold the
Hotkey Description
| Fn+~ Play/ Pause (in Audio/Video Programs) |
| Fn+F1 Touchpad Toggle |
| Fn+F2 Turn LCD Backlight OFF |
| Fn+F3 Mute Toggle |
| Fn+F4 Toggle Keyboard Illumination (For White LED Keyboard) |
| Fn+F5/F6 Volume Decrease/Increases |
| Fn+F7 Display Toggle |
| Fn+F8/F9 Bright Descreases/Increases |
| Fn+10 PC Camera Power on and off |
| Fn+F11 Airplane Mode Toggle |
| Fn+F12 Sleep Toggle |
| NumLK Number Lock Toggle |
| Fn+ScrLK Scroll Lock Toggle |
| Caps Lock Caps Lock Toggle |
| Fn+Esc Control Center Toggle |
| Fn+! Fan Automatic Control/Full Power |
| Fn+Backspace Disable/Enable Flexikey® |
*For RGB backlit keyboard only
| Fn+ | Launch Backlit Keyboard Application |
| Fn+ | |
| Fn+ | |
| Fn+ |
Smart USB Backup Guide (Original: Recovery Image USB)
WARNING
● You can backup original recovery image through this application in case of losing by device damage.
- You can backup original recovery image to USB disk and restore the system if any storage system replacement with the recovery USB disk.
Before you restore the system through the recovery USB disk, please make sure that you have already made the backup of your data.
- Please DO NOT shut down or un-plug the system when performing backup through recovery USB disk.
1
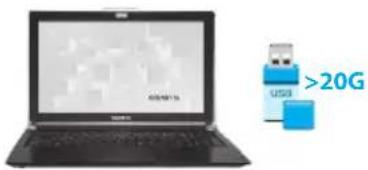
- Please plug in the USB disk which is at least 20GB in capacity to make the original image (backup the data in USB first. All data will be eliminated during the creation of recovery USB disk)
2

- Insert the driver disk to your optical drive and run the install of "Smart USB Backup" (for none-ODD model, please use USB ODD device or download from http://www.gigabyte.com
3

- Run the "Smart USB Backup" after finishing the install.
4
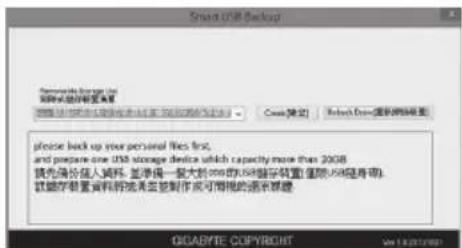
- Select your USB disk from the dropdown list and start to create the recovery USB disk.
5
- The window will pop out when the creation of recovery disk is done.
- Please press F12 on starting the system when you need to restore the system. Select "boot from recovery USB disk" and the system will be restored."
- The time needed for restore will be around 30 mins(time needed may vary by USB disk model).
System Recovery (Restore your laptop operating system):
When something is going wrong with the laptop operating system, the storage of the laptop has a hidden partition containing a full back up image of the operating system that can be used to restore the system to factory default settings.

Note
- If the storage has been switched or the partition deleted, the recovery option will no longer be available and a recovery service will be needed.
- The recovery function is only available on devices with O/S preinstalled. Devices with DOS do not have the recovery function.
Launch System Recovery:
The system recovery feature is preinstalled before the laptop is shipped from the factory. The option menu allows you to launch the Windows recovery tool to reinstall the operating system to factory default.
The brief introduction below will show you how to start the recovery tool and restore your system.

All ready to go
Make sure your PC is plugged in. This will take a few minutes.
Windows 10 Recovery Guide
1 Turn off and restart the laptop.
2
During the laptop turn on process, press and hold F9 key to launch the tool.
3

Choose "Troubleshoot" to enter the recovery settings. (Also you can choose "Continue" to exit recovery system and continue to Windows 10 for files or data backup.)

There are two options for system recovery
- Refresh your PC
- You can refresh your laptop to improve the system stability without losing your files.
• GIGABYTE Smart Recovery
Your PC settings will be restored to factory default settings.
Caution: All personal data and files will be lost.
4

- Choose "Refresh your PC"
▶ Keep my files
Choose an account to continue. All apps will be removed, and settings will back to pure O/S (without GIGABYTE app), but your personal files will be kept.
▶ Remove everything
All apps, setting and personal files will be removed.
→ Just remove my files
Only personal data and files will be removed, but computer settings will be kept.
→Fully clean the drive
The drive will be completely restored to factory default settings. It takes more time. > [Click on "Reset" to execute recovery function.]

Here are what will happen
- All of your personal files and apps will be removed.
- Your PC settings will be restored to factory default settings.

GIGABYTE Smart Recovery
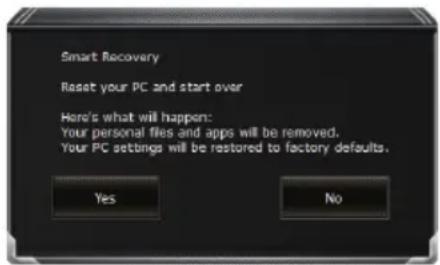
The recovery will be activated and you will see the option buttons on the window. Click on "Yes" to start it.

Caution
- Once the "Recovery" is selected, your personal data and files will be deleted after the laptop starts restoring, and the operating system will be reset to factory default settings.
- A progress indicator bar will show on the window when the recovery process is running. Please make sure the AC-adapter is plugged in and do not turn off the laptop.
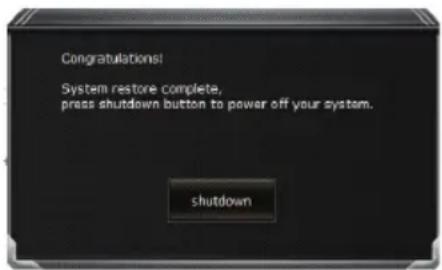
After the system recovery is completed, you will see the option button on the window, please click on "Shutdown".

■ Advanced options

System Restore
Use a restore point recorded on your PC to restore Windows

System Image Recovery
Recover Windows using a specific system image file.

Automatic Repair
Fix problems that keep Windows from loading.

Command Prompt
Use the Command Prompt for advanced trobleshooting.

UEFI Firmware Settings
Change settings in your PC's UEFI firmware.

Startup Settings
Change Windows Startup behavior.
Appendix
- Warranty & Service :
Warranty and service and related information please refer to the warranty card or GIGABYTE service website as the below link:
http://www.gigabyte.com/support-downloads/technical-support.aspx
- FAQ:
FAQ (Frequent Asked Questions) please refer to the following link:
http://www.gigabyte.com/support-downloads/faq.aspx
● Full User Manual:
For more user guide and software instruction, please refer to the below link:
http://www.gigabyte.com/support-downloads/download-center.aspx
Flexikey® Application
The Flexikey® application is a quick hotkey configuration application, which allows you to assign a single key to launch multiple key combinations, or to launch programs and applications, to create text macros and to disable certain keys. The application can also be used to configure the mouse buttons to create hotkeys for gaming etc.
All the configuration settings are retained under (up to 12) profiles to which the settings are applied.
Click Flexikey® in the Gaming section of the Control Center, or the click the icon

notification area of the taskbar, to launch the application.
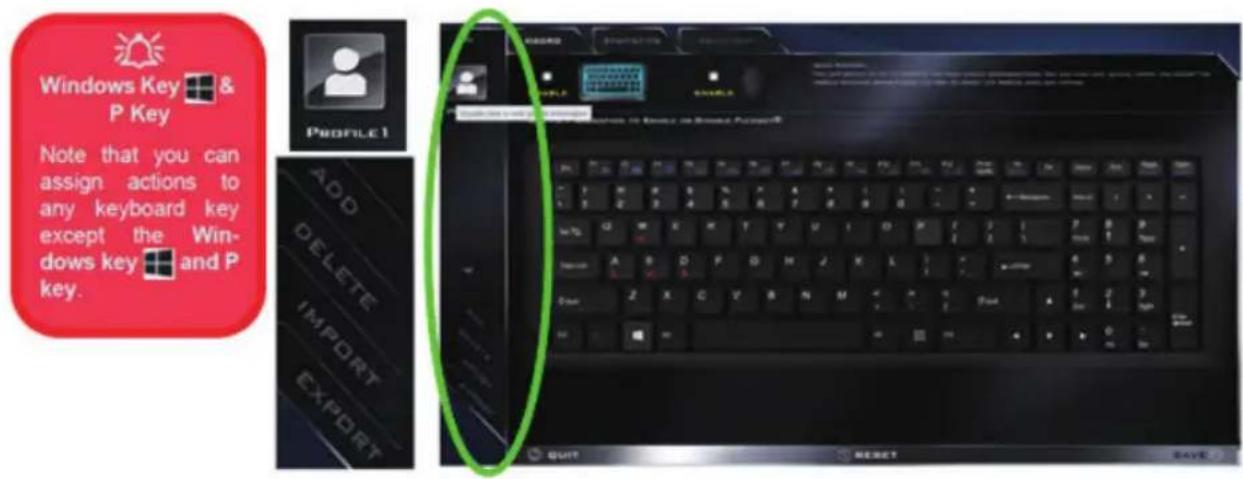
Profiles
The menus on the left side of the application relate to Profiles. You can Add or Delete Profiles (you can maintain 12 active Profiles), Export and Import profiles from the menus. If you double-click on a Profile you can change the Profile Name, and change an Image file (images created using PNG files).
Flexikey® Application Features
- EXPRESS KEY: This feature allows you to configure a single key to send multiple key combinations or to create more useful shortcut keys.
- LAUNCH APP: This simply assigns single keys to launch any program's or application's executable file.
- EXPRESS TEXT: With this you can assign single keys to send commonly used strings of text.
- DISABLE: Use this function to disable any keyboard keys.
- STATISTICS: Use this to quickly record keys in use in any application, and to disable unused keys.
Keyboard and Mouse Settings
Click Enable to create settings for the keyboard and/or mouse by clicking the button on the top left of the screen (e.g. you may wish to create a profile with settings only for the mouse or keyboard). Clicking on the keyboard or mouse icons will allow you to access the settings page for the either the keyboard or mouse.

Language Interface
You can change the language interface by right-clicking the icon in the notification area of the taskbar and selecting the language from the menu.

Enabling or Disabling Flexikey®
You can enable or disable Flexikey® by using the Fn + Backspace key combination. Pressing this key combination will toggle you between the currently selected keyboard or mouse profile to the standard keyboard and/or mouse settings, and back again.
The icon Flexikey ^® icon in the notification area of the taskbar will appear grayed out when Flexikey ^® is off, and in color when on (an on screen icon will also pop-up to display the status of the application as it is toggled on/off).
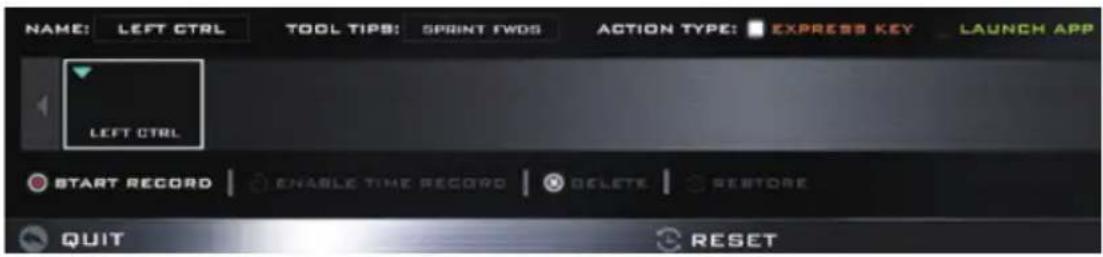
A. EXPRESS KEY:
To configure a single key to send multiple key combinations, or to create more useful shortcut keys, use Express Key.
- Enable and select the keyboard under your chosen profile, click on a key to select it, and then click to select Express Key in Action Type.
- In the following example we want to change an existing game key configuration which uses the left shift key for sprinting, and the W key for moving forwards, to use the left Ctrl key to combine this movement to sprint forward.
- Click on the chosen key for the shortcut action.
- Click in the Tool Tips field and type to give the key combination a name e.g. "Sprint Fwds", then click back in the Name field (to avoid adding the recorded keys to the Tool Tips name).
- Click Start Record and then press the key or keys (in this case we will press Left Shift and W) required (make sure you press the key(s) required and do not click on them).
- Click Stop Record to complete the process.7. Click Save to save the settings within your chosen profile.
- If you want to remove any individual key click to select it, and then click Delete.
- If you want to clear all the settings click Restore to return to the default key setting.
- Any assigned Express Keys will appear in orange.

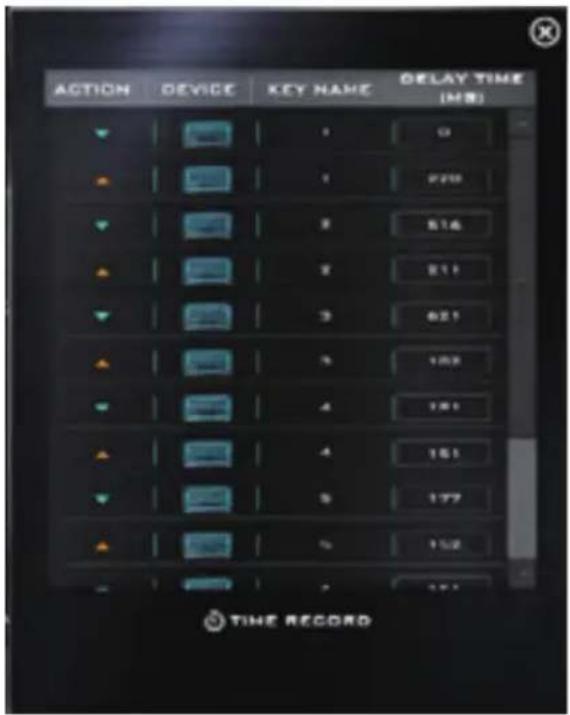
\*Enabling Time Record\*
If you want to create a delay between key presses within the key combination, then you can use Time Record function to do so.
- Enable and select the keyboard under your chosen profile, click to select a key for the shortcut action, and then click to select Express Key in Action Type.
- Click in the Tool Tips field and type to give the key combination a name, then click back in the Name field (to avoid adding the recorded keys to the Tool Tips name).
- Click Start Record and then press the key or keys required in the sequence and time delay between key presses required (make sure you press the key(s) required and do not click on them).
- Click Stop Record.
- Click to select a key in the sequence and click Enable Time Record, then click a key to view the time delay.
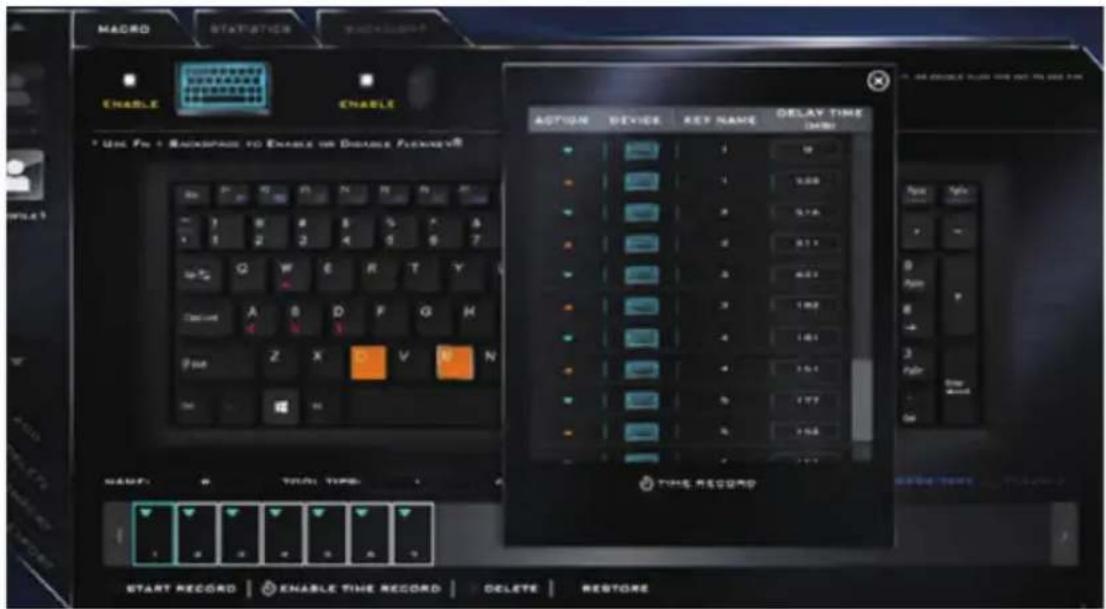
- You can edit the delay between key presses by clicking in the Delay Time (MS) field and typing a new number for the delay between the key presses.
- Click to close the Time Record window.
- Click Save to save the settings within your chosen profile.
- If you want to remove any individual key click to select it, and then click Delete.
- If you want to clear all the settings click Restore to return to the default key setting.
B. Launch App:
- Enable and select the keyboard under your chosen profile, click to select a key to launch the application, and then click to select Launch App in Action Type.
- Click Browse... at the bottom right of the application window.
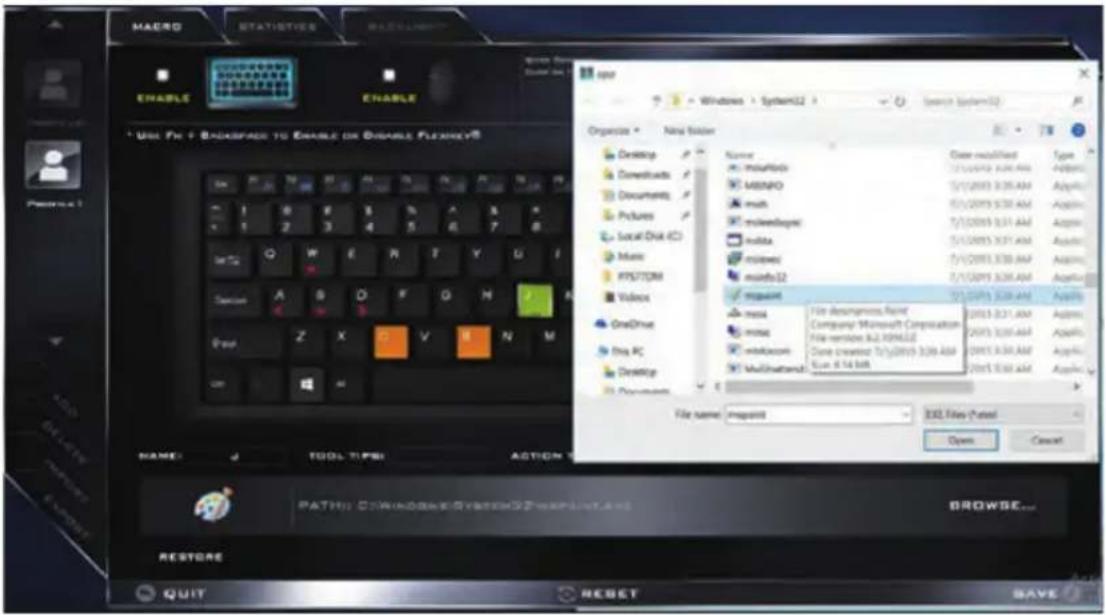
- Navigate to the executable file of the application and click Open.
- The key will now be configured to open the selected application under your chosen Profile, and the key will appear in green.
- If you want to remove any Launch App Key, select it and click on Restore.
- Click Save to save the settings within your chosen profile.
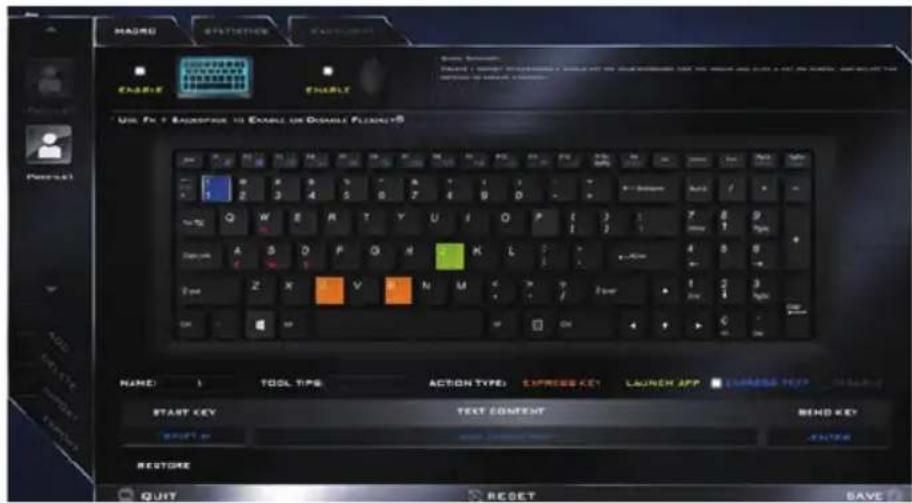
C. Express Text:
A single key can be set to send a string of text within any application using Express Text.
- Enable and select the keyboard under your chosen profile, click to select a key, and then click to select Express Text in Action Type.
- Click in Start key if required (the Start key is the key used to in your target program to open a text message), or you can leave it blank if you prefer.
- Click in the Click to type field and type in your message.
- Click in Send key if required (the Send key is the key used to in your target program to send a text message e.g the Enter key would be the most commonly used), or you can leave it blank if you prefer.
- The key will now be configured to send the text message in the target program under your chosen Profile, and the key will appear in blue.
- If you want to remove any Express Text key, select it and click on Restore.
- Click Save to save the settings within your chosen profile.
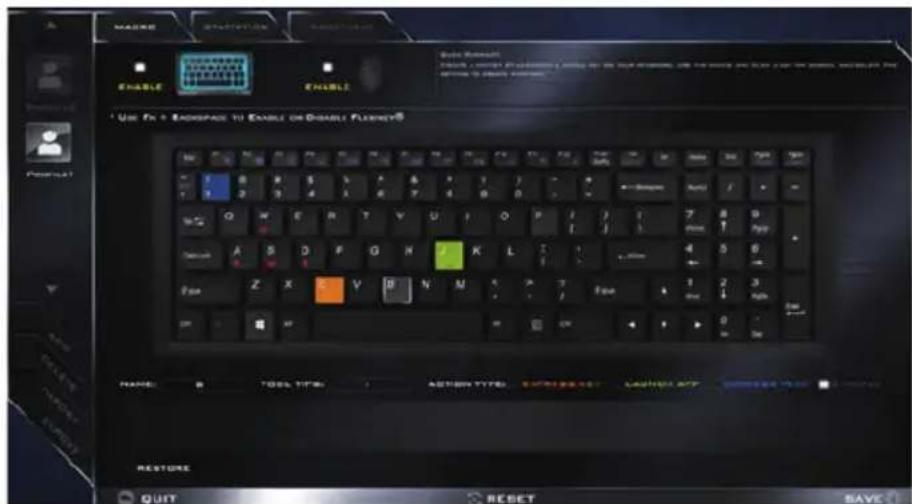
D. Disable:
You can use the program to disable any keys not required.
- Enable and select the keyboard under your chosen profile, click to select a key to disable, and then click to select Disable in Action Type.
- The key will now be disabled.
- If you want to enable the key again, select it and click on Restore.
- Click Save to save the settings within your chosen profile.
- The key will be disabled under your chosen Profile, and the key will appear in Gray.
Mouse Settings
When an external mouse is attached, the mouse settings allow you to configure actions for the left (#1), right (#2) and middle (#3) buttons of the attached mouse, and also for any backward (#4) and forward (#5) buttons if applicable (on a gaming type mouse). Click the button number and then select the Action Type (Express Key, Launch App, Express Text or Disable) from the menu at the bottom of the page. You can rename the action by clicking in the Name box, and click in Tool Tips to type in a note to remind you of the action's function.
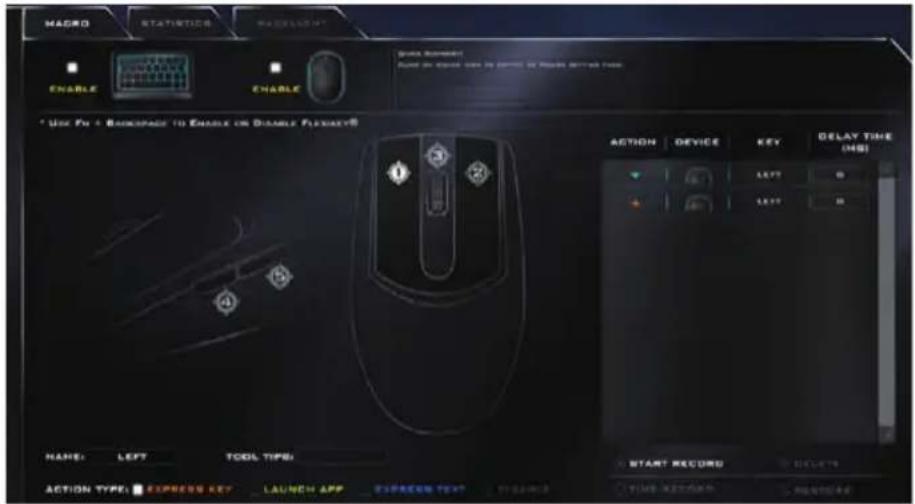
A. EXPRESS KEY:
To assign a mouse button click to send multiple key combinations (an external mouse must be attached), or to create more useful shortcut keys, use Express Key.
- Enable and select the mouse under your chosen profile, click on a mouse button to select it, and then click to select Express Key in Action Type.
- In the following example we will configure the central mouse wheel to combine the actions of left shift key for sprinting, and the W key for moving forwards in a game program.
- Click on the central mouse wheel for the shortcut action.
- Click in the Tool Tips field and type to give the key combination a name e.g. "Sprint Fwds", then click back in the Name field (to avoid adding the recorded keys to the Tool Tips name).
- Click Start Record and then press the key or keys (in this case we will press Left Shift and W) required (make sure you press the key(s) required and do not click on them).
- Click Stop Record to complete the process.

- Click Save to save the settings within your chosen profile.
- If you want to remove any mouse setting click to select it, and then click Delete.
- If you want to clear all the settings click Restore to return to the default mouse setting.
- The mouse button for any assigned Express Keys will appear in orange.
B. Launch App:
You can assign a mouse button click to launch any application or program as follows:
- Enable and select the mouse under your chosen profile, click on a mouse button to select it, and then click to select Express Key in Action Type.
- Click Browse... at the bottom right of the application window.
- Navigate to the executable file of the application and click Open.
- The mouse click will now be configured to open the selected application under your chosen Profile, and the button will appear in green
- Click Save to save the settings within your chosen profile.

C. Express Text:
A mouse button click can be set to send a string of text within any application using Express Text.
- Enable and select the mouse under your chosen profile, click on a mouse button to select it, and then click to select Express Text in Action Type.
- Click in Start key if required (the Start key is the key used to in your target program to open a text message), or you can leave it blank if you prefer.
- Click in the Text Context field and type in your message.
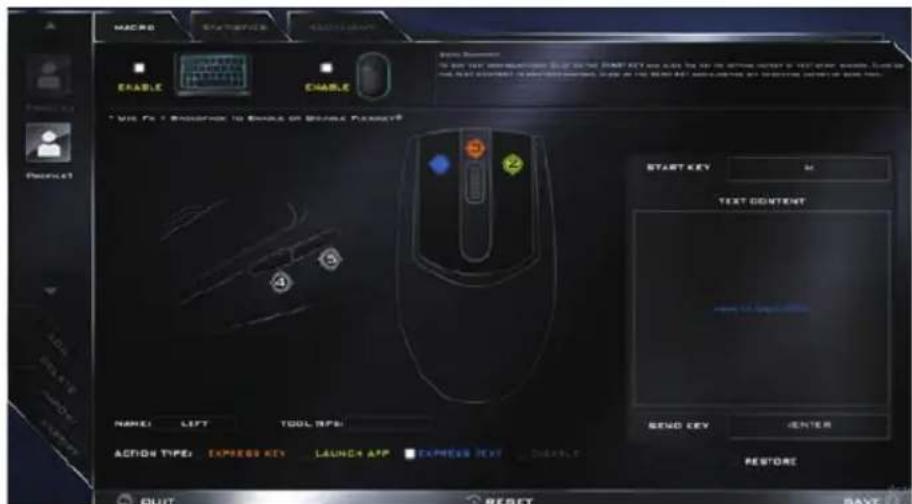
- Click in Send key if required (the Send key is the key used to in your target program to send a text message e.g the Enter key would be the most commonly used), or you can leave it blank if you prefer.
- The mouse button click will now be configured to send the text message in the target program under your chosen Profile, and the button will appear in blue.
- If you want to remove any Express Text mouse button, select it and click on Restore.
- Click Save to save the settings within your chosen profile.
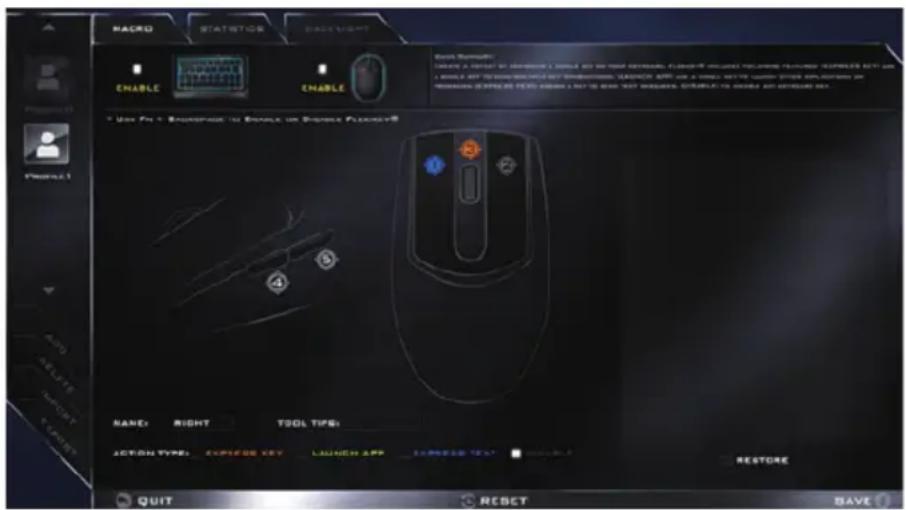
D. Disable
You can use the program to disable any mouse button clicks if not required.
- Enable and select the mouse under your chosen profile, click on a mouse button to select it, and then click to select Disable in Action Type.
- The button click will now be disabled.
- If you want to enable the button again, select it and click on Restore.
- Click Save to save the settings within your chosen profile.
- The button click will be disabled under your chosen Profile, and the key will appear in Gray.
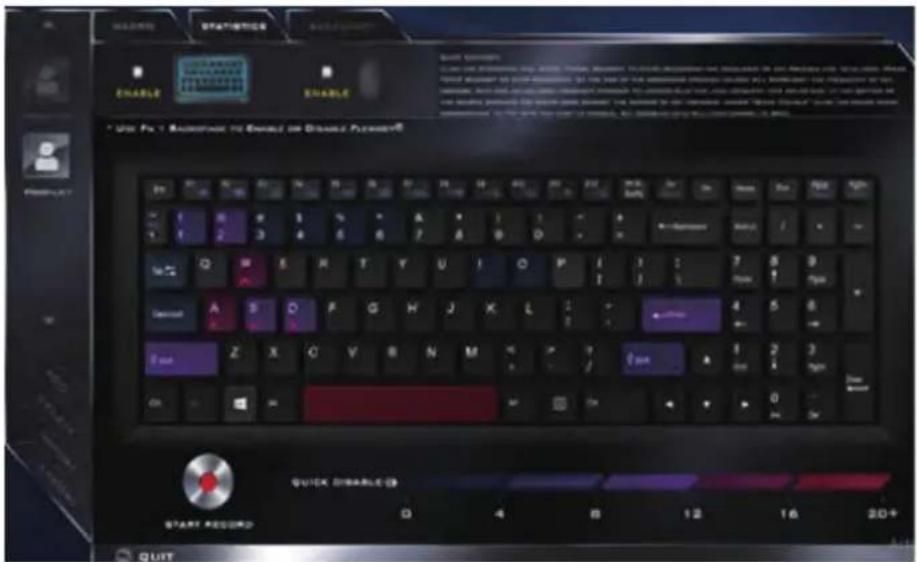
Statistics
The Statistics tab allows you to record keys used in any application, and to disable any infrequently, or unused, keys to save any accidental incorrect key presses.
- Click the Statistics Tab, and press Start Record to start recording the frequency of key presses for keys used.
- You can then go to the application you wish to use the profile for, and use the application as normal so that a standard set of keys used may be recorded.
- Return to the Flexikey ^® application and press Stop Record to stop recording.
- At the end of the recording process colors will represent the frequency of key presses, with red as the most frequent through to lighter blue the less frequent (the color bar at the bottom of the screen displays the color code against the number of key presses).
- Under Quick Disable click the color which corresponds to the keys you wish to disable.
- All disabled keys will then change to gray and will be disabled under this profile.
Keyboard Backlight Application (for Illuminated Colored Keyboards)
The Keyboard Backlight application can be accessed by clicking the Flexikey button in the Gaming section of the Control Center, and then clicking the Backlight tab).
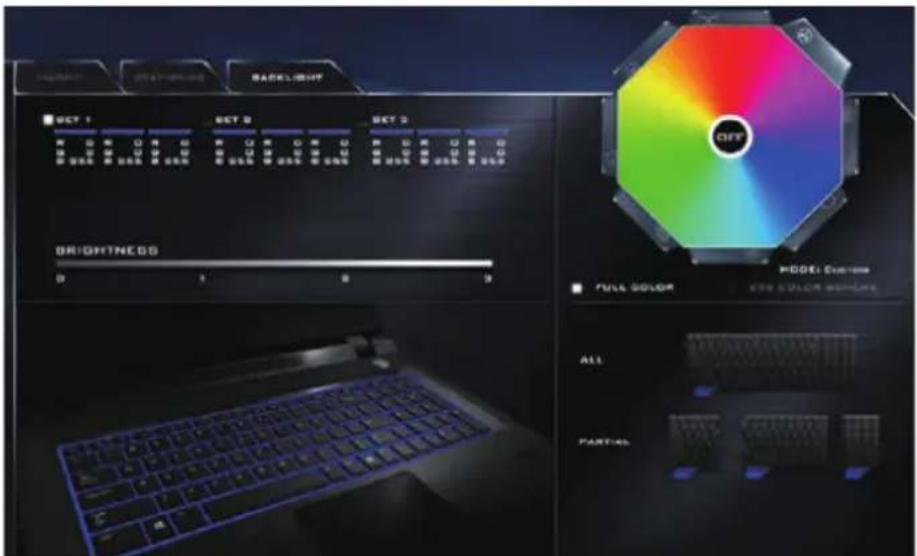
A. Brightness
Click on any of the numbers (0 - 3) on the brightness bar to set the brightness level of the keyboard backlight.
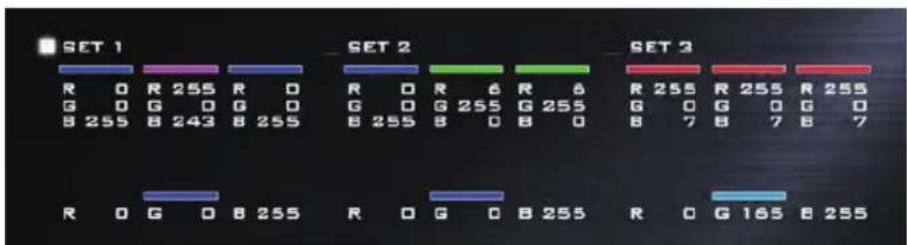
B. Color Swatch
The color swatch in the top right of the screen allows you to select a range of colors for your keyboard backlight by clicking on the color required. You can choose to display the swatch either in Full Color or as a 256 Color Scheme. Click the Custom mode button to select any colors from the swatch and to apply your chosen colors to parts of the keyboard (and Top Case Logo LED if applicable).

natural_image
Color wheel with hexagonal frame and 'CFF' label, no readable text or symbols beyond brandingFull Color Swatch
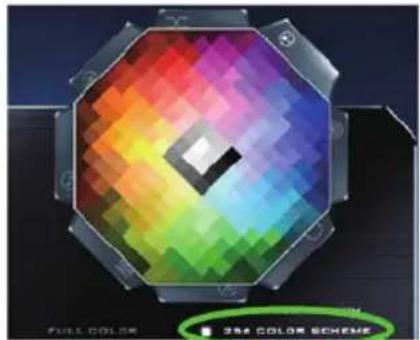
natural_image
Color scheme display on a hexagonal panel, featuring rainbow pixels and a central diamond shape (no text or symbols)256 Color Scheme Swatch
C. LIGHT EFFECTS
The buttons surrounding the swatch allow you to alter the effects of the keyboard backlight. Click on any of the buttons to view the effects on the keyboard. Click Save when exiting the application to retain the setting.
| Mode Buttons | ||||
| Random Color | Wave Up/Down | |||
| Custom - Display & Configure Keyboard Sections & Colors | Dancing Effect | |||
| Breathe (All Colors) | Tempo Beat | |||
| Cycle Colors | Flashing | |||
D. Keyboard LED Sections
The bottom right section of the application allows you to select partial areas, or all, of the keyboard on which to apply the color changes and effects.
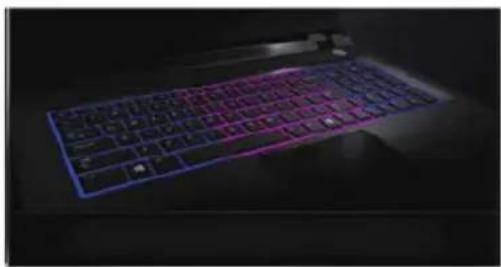
natural_image
Close-up of a glowing, blue-tinted keyboard with purple and pink lighting (no text or symbols visible)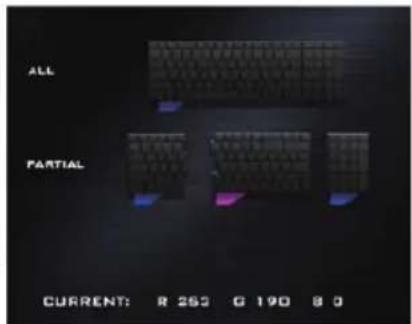
E. PROFILES
The application allows you to save up to 3 sets of color and effect combinations. Click Save when exiting the application to retain the settings.
感謝您選擇技嘉筆記型電腦
請依下列步驟裝入電池:
natural_image
Line drawing of a laptop with a keyboard and a magnified inset showing the hand using a pen to clean a grid-patterned keyboard (no text or symbols present)開啟筆記型電腦
電源指示燈會顯示機器是否為通電的狀態。
natural_image
Technical line drawing of a device rear panel with ventilation grilles and mounting holes (no text or symbols)① 電池

警語:
→Fully clean the drive - 完整還原
檔案
語言介面
natural_image
Color scheme display with a hexagonal grid pattern and central square (no text or symbols on the diagram itself)256 Color Scheme Swatch
C. 燈光效果
| Mode Buttons | ||||
| Random Color | Wave Up/Down | Illumination Keys Note that the keyboard ilumi- nation (increase/decrease) keys may be used to config- ure the keyboard LED in Cus- tom Node only. | ||
| Custom - Display & Configure Keyboard Sections & Colors | Dancing Effect | |||
| Breathe (All Colors) | Tempo Beat | |||
| Cycle Colors | Flashing | |||
D. 鍵盤燈光部分
natural_image
Close-up of a glowing, blue-tinted keyboard with purple and pink lighting (no text or symbols visible)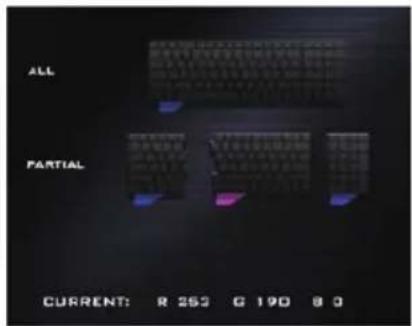
E. 檔案
请依下列步骤装入电池:
natural_image
Line drawing of a laptop with a keyboard and a magnified inset showing the hand using a pen to adjust the keyboard (no text or symbols present)开启笔记型电脑
电源指示灯会显示机器是否为通电的状态。
natural_image
Technical line drawing of a rear panel with ventilation grilles and mounting holes (no text or symbols)① 电池

警语:
→ Fully clean the drive - 完整还原
natural_image
Line drawing of a laptop with a keyboard and a magnified inset showing the hand using a pen to adjust the keyboard (no text or symbols present)전원 켜기
natural_image
Technical line drawing of a laptop rear panel with ventilation grilles and mounting holes (no text or symbols)① 배터리
⚠️ 경고
natural_image
Line drawing of a laptop with a keyboard and a magnified inset showing the keyboard being inserted (no text or symbols)natural_image
Technical line drawing of a computer monitor rear panel with ventilation grilles and mounting holes (no text or symbols)1 Akku
Achtung:
natural_image
Line drawing of a laptop with a keyboard and a magnified inset showing the keyboard being inserted (no text or symbols)Mise sous tension
natural_image
Technical line drawing of a device rear panel with ventilation grilles and mounting holes (no text or symbols)1 Batterie
⚠ Attention:
▶ Remove everything : Tout effacer
natural_image
Line drawing of a laptop with a keyboard and a magnified inset showing the keyboard being inserted (no text or symbols)Включение ноутбука
natural_image
Technical line drawing of a device rear panel with ventilation grilles and mounting holes (no text or symbols)① Батарея

Предупреждение:
natural_image
Line drawing of a laptop with a keyboard and a magnified inset showing the keyboard being inserted (no text or symbols)Activar el equipo
natural_image
Technical line drawing of a device rear panel with ventilation grilles and mounting holes (no text or symbols)① Batería

Advertencia:
① Hubungkan kabel listrik ke adaptor AC.
② Hubungkan adaptor AC ke DC-in jack di sisi kiri notebook.
③ Hubungkan kabel daya ke stopkontak.

natural_image
Line drawing of a laptop with a keyboard and a magnified inset showing the keyboard being inserted (no text or symbols)Peralihan Daya
1 Indikator on/off Kamera Web
② Kamera web
③ Mikrofon dari pabrikannya
4 Tombol Daya
5 Panel sentuh dan tombol
6 Indikator lampu LED
① Status daya LED
Status baterai LED
Status Mode Pesawat LED
Status HDD LED
Penampakan Kiri
① Input daya DC
② LAN RJ 45
③ Mini Display Port
4 HDMI
5 USB Port 3.1 Generasi 2 (10Gbp/s)
6 Pembaca Kartu Memori Flash
Penampakan Kanan
① Colokan soket Headphone
② Colokan soket Mikrofon
③ USB Port(2.0)
4 USB Port 3.1 Generasi 1 (5Gbp/s)
5 Kunci Kensington
Penampakan Bawah
natural_image
Technical line drawing of a flat-screen computer chassis with ventilation grilles and mounting holes (no text or symbols)① Baterai

PERINGATAN:
natural_image
Line drawing of a laptop with a keyboard and a hand inserting a key into it, showing the keyboard being inserted (no text or symbols present)ノートパソコンを起動
natural_image
Technical line drawing of a device rear panel with ventilation grilles and mounting holes (no text or symbols)① バッテリー
警告:
natural_image
Line drawing of a laptop with a keyboard and a magnified inset showing the keyboard being inserted (no text or symbols)natural_image
Technical line drawing of a flat-screen computer chassis with ventilation grilles and mounting holes (no text or symbols)① Batteria

Avvertenza:

- RF Exposure :
- CE Notice (European Union) :
- Declaration of Conformity for EU countries
- Radio Equipment-Directive 2014/53/EU
- CE Mark Warning
- BSMI Notice (Taiwan Only)
- Federal Communications Commission Notice :
- CAN ICES-3 (\*)/NMB-3(\*)
- KCC Notice :
- Battery Maintenance Guidance
- Battery Maintenance :
- Charging :
- Low Battery State :
- Storage :
- Handling Precautions :
- Transportation :
- Disposal and Recycling :
- Rechtliche Hinweise
- Akkus:
- Congratulations on your purchase of the GIGABYTE Notebook.
- Using GIGABYTE Notebook for the First Time
- To install the battery please follow these steps:
- IMPORTANT
- Switching on the Power
- Booting Up the Notebook for the First Time
- Top View
- Left View
- Right View
- Bottom View
- Warning:
- Hotkeys
- Smart USB Backup Guide (Original: Recovery Image USB)
- WARNING
- 1
- 2
- 3
- 4
- 5
- System Recovery (Restore your laptop operating system):
- Note
- Launch System Recovery:
- All ready to go
- Windows 10 Recovery Guide
- There are two options for system recovery
- - Choose "Refresh your PC"
- ▶ Keep my files
- ▶ Remove everything
- → Just remove my files
- →Fully clean the drive
- Here are what will happen
- GIGABYTE Smart Recovery
- Caution
- ■ Advanced options
- System Restore
- System Image Recovery
- Automatic Repair
- Command Prompt
- UEFI Firmware Settings
- Startup Settings
- Appendix
- - Warranty & Service :
- - FAQ:
- ● Full User Manual:
- Flexikey® Application
- Profiles
- Flexikey® Application Features
- Keyboard and Mouse Settings
- Language Interface
- Enabling or Disabling Flexikey®
- EXPRESS KEY:
- \*Enabling Time Record\*
- Launch App:
- Express Text:
- Disable:
- Mouse Settings
- Disable
- Statistics
- Keyboard Backlight Application (for Illuminated Colored Keyboards)
- Brightness
- Color Swatch
- LIGHT EFFECTS
- Keyboard LED Sections
- PROFILES
- 感謝您選擇技嘉筆記型電腦
- 請依下列步驟裝入電池:
- 開啟筆記型電腦
- 警語:
- 檔案
- 語言介面
- 燈光效果
- 鍵盤燈光部分
- 檔案
- 请依下列步骤装入电池:
- 开启笔记型电脑
- 警语:
- 전원 켜기
- ⚠️ 경고
- Achtung:
- Mise sous tension
- ⚠ Attention:
- ▶ Remove everything : Tout effacer
- Включение ноутбука
- Предупреждение:
- Activar el equipo
- Advertencia:
- Peralihan Daya
- Penampakan Kiri
- Penampakan Kanan
- Penampakan Bawah
- PERINGATAN:
- ノートパソコンを起動
- 警告:
- Avvertenza:
Brand : GIGABYTE
Model : Sabre 15K
Category : Laptop