Unico Easy S1 SF - Air Conditioning OLIMPIA SPLENDID - Free user manual and instructions
Find the device manual for free Unico Easy S1 SF OLIMPIA SPLENDID in PDF.
User questions about Unico Easy S1 SF OLIMPIA SPLENDID
0 question about this device. Answer the ones you know or ask your own.
Ask a new question about this device
Download the instructions for your Air Conditioning in PDF format for free! Find your manual Unico Easy S1 SF - OLIMPIA SPLENDID and take your electronic device back in hand. On this page are published all the documents necessary for the use of your device. Unico Easy S1 SF by OLIMPIA SPLENDID.
USER MANUAL Unico Easy S1 SF OLIMPIA SPLENDID
1 -DESCRIPTION OF THE APPLIANCE 10
1.1- LIST OF THE COMPONENTS SUPPLIED 10
1.2 - IDENTIFICATION OF THE MAIN COMPONENTS 10
INFORMATION RESERVED FOR THE "INSTALLATION TECHNICIAN"
2-INSTALLATION 11
2.1 - HOW TO TRANSPORT THE CONDITIONER 11
2.2 - WARNINGS 11
2.3- INSTALLATION 11
2.4 - DRILLING THE WALL 12
2.5 - ASSEMBLY OF THE AIR DUCTS AND EXTERNAL GRIDS 12
2.6 - ELECTRICAL CONNECTION 13
2.7 - POSITIONING OF THE APPLIANCE ON THE BRACKET 13
2.8 - DRAINAGE 13
SECTION FOR THE TECHNICIAN AND USER
3 - USE OF THE APPLIANCE 14
3.1- CONTROL PANEL SYMBOLS AND KEYS 14
3.2 - REMOTE CONTROL KEYS 15
3.3 - USE OF THE REMOTE CONTROL 16
3.3.a - Insertion of batteries 16
3.3.b - Replacement of batteries 16
3.3.c - Location of the remote control 17
3.4 - USE OF THE APPLIANCE 17
3.4.a- Preliminary operations 17
3.4.b- Appliance switching on/off 17
3.5 - AUTO MODE (AUTOMATIC) 18
3.6 - COOLING MODE (COOL) 18
3.7 - TURBO COOLING MODE 18
3.8- DEHUMIDIFICATION MODE (DRY) 18
3.9 - VENTILATION MODE (FAN) 19
3.10 - HEATING MODE (HEAT) 19
3.11- TIMER MODE 19
3.11.a-Programmed switching on 19
3.11.b-Programmed switching off 20
3.12-OTHER FUNCTIONS 20
3.12.a-Auto-Restart 20
3.12.b-SLEEP function 20
3.12.c-FOLLOW ME function 21
3.12.d-Setting the unit of measurement of temperature 21
3.12.e-Directing the air flow 21
3.12.f -Short Cut function 21
4 - MAINTENANCE AND CLEANING 22
4.1 - CLEANING 22
4.1.a - Cleaning the appliance and the remote control 22
4.1.b - Servicing and cleaning the air filters 22
4.1.c - Recommendations for energy saving 23
4.2 - MAINTENANCE 23
4.2.a - Discharging condensation 23
5-TECHNICAL DATA 23
6 - INCONVENIENCES AND POSSIBLE REMEDIES 24
m - 1 0 ;
symbol on the product or its packaging indicates that the appliance cannot be treated as normal domestic trash, but must be handed in at a collection point for recycling electric and electronic appliances.
Your contribution to the correct disposal of this product protects the environment and the health of your fellow men. Health and the environment are endangered by incorrect disposal.
Further information about the recycling of this product can be obtained from your local town hall, your refuse collection service, or in the store at which you bought the product.
This regulation is valid only in EU member states.
EN-2
MAIN INDEX
The main index of this manual is given on page "EN-1"
0 - WARNINGS
0.1 - GENERAL INFORMATION
First of all, we would like to thank you for choosing our appliance.
0.2 - SYMBOLS
The pictograms in the next chapter provide the necessary information for correct, safe use of the machine in a rapid, unmistakable way.
0.2.1 - Editorial pictograms

Service
Refers to situations in which you should inform the SERVICE department in the company:
CUSTOMER TECHNICAL SERVICE.

Index
Paragraphs marked with this symbol contain very important information and recommendations, particularly as regards safety.
Failure to comply with them may result in:
- danger of injury to the operators
- loss of the warranty
- refusal of liability by the manufacturer.

Raised hand
Refers to actions that absolutely must not be performed.

HAZARD
cates that the appliance uses inflammable refrigerant. If the refrigerant escapes and is exposed to a source of external ignition, there is a fire risk.
als to the personnel that the operation described could cause electrocution if not performed according to the safety rules.

GENERIC DANGER
It informs the personnel concerned that if the operation is not carried out in compliance with the safety regulations, it presents the risk of suffering physical damage.

DANGER DUE TO HEAT
It informs the personnel concerned that if the operation is not carried out in compliance with the safety regulations, it presents the risk of burns due to contact with components at very high temperatures.

DO NOT COVER
ates to the personnel concerned, that it is prohibited to cover the appliance, to prevent over-heating.

ATTENTION
indicates that this document must be read carefully before installing and/or using the appliance.
- Indicates that the assistance personnel must handle the appliance following the installation manual.

ATTENTION
indicates that there may be additional information in attached manuals.
indicates that information is available in the user manual or in the installation manual.

ATTENTION
states that the assistance personnel must handle the appliance following the installation manual.
0.3 - GENERAL WARNINGS
WHEN USING ELECTRICAL EQUIPMENT,
BASIC SAFETY PRECAUTIONS MUST ALWAYS BE FOLLOWED IN ORDER TO REDUCE RISKS OF FIRE, ELECTRIC SHOCKS AND INJURY, INCLUDING THE FOLLOWING:

event possible damages to the compressor, each start is delayed by 30 minutes with respect to the last switching off.

- This document is restricted in use to the terms of the law and may not be copied or transferred to third parties without the express authorization of the manufacturer, OLIMPIA SPLENDID.
Our machines are subject to change and some parts may appear different from the ones shown here, without this affecting the text of the manual in any way.

Read this manual carefully before performing any operation (installation, maintenance, use) and follow the instructions contained in each chapter.

Keep the manual carefully for future reference.
-
After removing the packaging, check that the appliance is in perfect condition. The packaging materials must not be left within reach of children as they can be dangerous.
-
THE MANUFACTURER IS NOT RESPONSIBLE FOR DAMAGES TO PERSONS OR PROPERTY CAUSED BY FAILURE TO FOLLOW THE INSTRUCTIONS IN THIS MANUAL.
-
The manufacturer reserves the right to make any changes it deems advisable to its models, although the essential features described in this manual remain the same.

-
The installation and maintenance of air-conditioners like this one may be hazardous as they contain a cooling gas under pressure as well as powered parts. Therefore, the installation, first startup and subsequent maintenance should be carried out exclusively by authorized, qualified personnel.
-
Failing to comply with the instructions contained in this manual, and using the unit with temperatures exceeding the permissible temperature range will invalidate the warranty.
-
Routine maintenance of the filters and general external cleaning can be done by the user as these operations are not difficult or dangerous.
EN-5
- During assembly and at each maintenance operation, it is necessary to respect the precautions indicated in this manual and on the labels located inside or on the appliance, as well as to take all the precautions suggested by common sense and by the Safety Regulations in force in the country of installation.

- In case of replacement of parts, use only original OLIMPIA SPLENDID parts.

- If the unit is unused for a long period, or no-one uses the climate-controlled room, it is recommended to disconnect the electric power supply in order to prevent accidents.

- Do not use liquid or corrosive detergents to clean the unit, do not spray water or other liquids onto the unit, since they could damage the plastic components or even cause electric shocks.

- Do not wet the indoor unit and the remote control port circuits or fires may occur.

- In case of functioning anomalies (for example: abnormal noise, bad smell, smoke, abnormal increase in temperature, electrical dispersions, etc.), immediately switch off the appliance and disconnect the plug from the power socket.
For repair work contact solely the technical service centres authorised by the manufacturer and ask for original spare parts to be used. Failure to do this can affect the safety of the appliance.
- Do not let the air conditioner run for a long time when the humidity is very high and a door or a windows is left open.
Moisture may condense and wet or damage furniture.

-
Do not disconnect the power plug during functioning or electrical shocks hazard.
-
Do not place heavy or hot objects on top of the appliance.
-
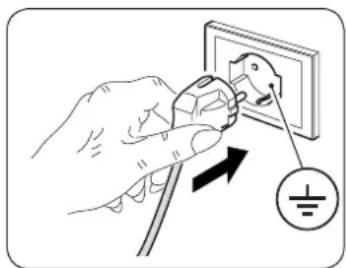
Before electrically connecting the appliance, make sure the plate data correspond to those of the distribution network. The power socket must be equipped with a Ground System. The plate is located on one side of the appliance.
-
Install the appliance according to the manufacturer's instructions. An incorrect installation can cause damage to people, animals or property for which the manufacturer accepts no responsibility.
-
If the appliance's plug is incompatible with the socket, have the socket replaced with a suitable one by a qualified technician, who must ascertain that the section of the socket cables is compatible with the power absorbed by the appliance. We do not recommend using adaptors and/or extension cables. If they cannot be avoided, however, they must comply with current safety regulations and their ampacity (A) must not be below the maximum ampacity of the appliance.
EN-6
-
This appliance is not intended to be operated by an external timer or a control system different from that supplied.
-
Always and only use the appliance in a vertical position.
- Do not obstruct the air inlet and outlet grids in any manner.
- Do not insert extraneous items in the air inlet and outlet grids as this will create the risk of electrical shocks, fire or damages to the appliance.
-
Do not use the appliance:
-
with wet or damp hands;
barefoot.
- Do not pull the power cable or the appliance itself to remove the plug from the socket.
- Do not use this product under direct sunlight or near a heat source such as a stove, heater or radiator (Fig.3).
- Do not use the appliance near gas equipment (Fig.3).
- Always place the appliance on a stable, plane and levelled surface.
- Leave at least 30cm of free space on both sides and behind the appliance and leave at least 30cm of free space above it (Fig.1).
- Do not place the appliance near a power socket (Fig.4).
- The socket must be easily accessible so that the plug can be removed easily in an emergency.
- Do not handle the plug with wet hands.
- Do not excessively bend, twist, pull or damage the power cord.
- Do not run the cord under carpeting, throw rugs or runners etc. Arrange cord away from traffic areas so that it will not be tripped over.
- Unplug the cord when unit is not in use for an extended period of time and/or when no one is home.
-
Do not use the appliance in particularly moist environments (bathroom, kitchen, etc.).
-
Do not use the appliance outdoors or on wet surfaces. Avoid dropping liquids on the appliance. Do not use the appliance near sinks and taps.
-
Do not immerse the appliance in water or in other liquids.
-
Clean the appliance with a damp cloth; do not use abrasive products or materials. See the appropriate paragraph for the filters cleaning.
-
The most common cause of overheating is dust or lint deposit in the appliance. Regularly remove these accumulations by disconnecting the appliance from the power socket and vacuuming the grids.
-
Do not use the appliance in environments subject to significant temperature changes as condensation could form inside the appliance itself.
-
Install the appliance at at least 2 meters from other electronic devices (TV, radio, computer,DVD player, etc.) in order to avoid disturbances (Fig.2).
-
Do not use the appliance if insecticide gas has just been sprayed in the room or in the presence of burning incenses, chemical vapours or oily residues.
-
Do not use the appliance if the filters are not positioned correctly.
-
Disassembly, repair or reconversion performed by an unauthorized person could cause heavy damages and will cancel the manufacturer warranty.
-
Do not use the appliance in case of malfunctioning or faults, if the cord or plug are damaged, or if it has been dropped or damaged in any manner. Turn the appliance off, disconnect the plug from the socket and let it be checked by professionally qualified personnel.
-
Neither disassemble nor modify the appliance.
-
Repairing the appliance by yourself is extremely dangerous.
-
If you no longer wish to use this appliance, it must be made inoperative by cutting the power supply cable after removing the plug from the power socket. Hazardous parts of the appliance must be rendered harmless, especially as there is a risk of children playing with it.
-
Do not use tools different from those recommended by the manufacturer for the defrosting process and for the appliance cleaning.
-
The appliance is equipped with a thermal protector which preserves the circuit board in case of over-temperature. If this safety device intervenes, disconnect the plug from the power socket and wait for the appliance to completely cool down (at least 20 ÷ 30 minutes) and then reconnect the plug to the power socket and restart the appliance.
If the appliance doesn't restart, disconnect the plug from the power socket and contact an Assistance Centre.
0.4 - PROPER USE
- The air conditioner must be used exclusively to produce warm* or cold air or to dehumidify air (upon choice) with the only purpose to make the environment temperature comfortable.
- This appliance is only intended for a domestic use or similar.
- An improper use of the appliance with possible damages caused to people, things or animals releases OLIMPIA SPLENDID from any responsibility.
0.5 - HAZARDOUS ZONES
- The climate controllers must not be installed in environments with the presence of inflammable gases, explosive gases, in very humid environments (laundries, greenhouses, etc.), or in places with other machines that generate a strong heat source, in proximity of a sources of salt water or sulphurous water.

-
DO NOT use gas, gasoline or other inflammable liquids near to the climate controller.
-
Only use supplied components (see paragraph 1.1). The use of non-standard parts may cause water leaks, electric shocks, fires and injuries or damages to things.
This product must be used exclusively according to the specifications indicated in this manual. Use different to that specified, could cause serious injuries.
THE MANUFACTURER IS NOT LIABLE FOR INJURY/Damage TO PERSONS/OBJECTS DERIVING FROM FAILURE TO COMPLY WITH THE REGULATIONS CONTAINED IN THIS MANUAL.
1 - DESCRIPTION OF THE APPLIANCE
1.1 - LIST OF THE COMPONENTS SUPPLIED (Fig.5)
The appliance is packaged singularly in a cardboard packaging.
The packaging can be transported by hand by two operators or loaded on a forklift.

Store the packaging singularly; do not stack it.
- Wall anchoring bracket
- Remote control
2a. Battery for remote control quantity 2 - AAA type x 1.5V - Use and maintenance booklets + warranty
- Paper template to make holes
-
Air inlet and outlet external grids including chains and kit for installing the grids (x 2)
-
Internal flanges (x 2)
- Sheet for wall pipes (x 2)
- Kit of screws and anchor bolts
- Condensation drain pipe
- Feet cover (x 2)
- Gasket (x 2)
- Spacer
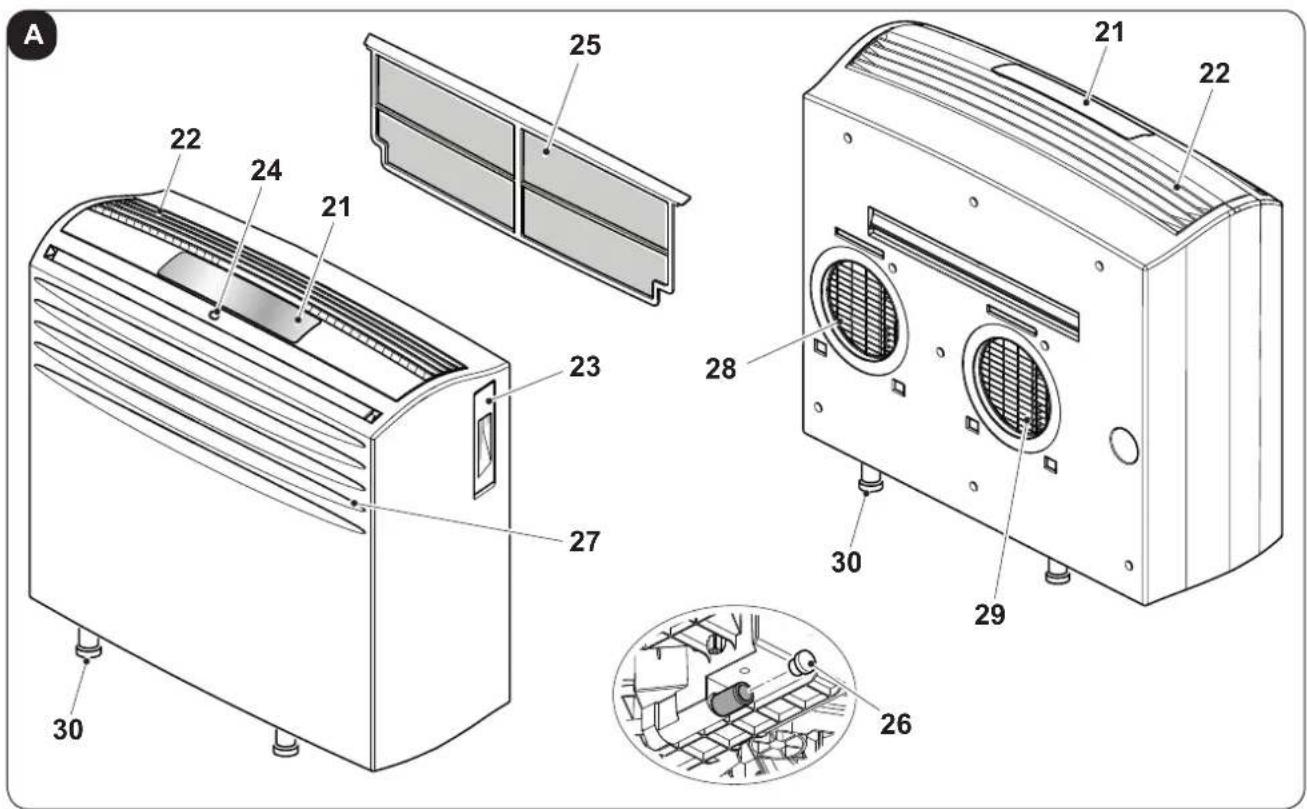
1.2 - IDENTIFICATION OF THE MAIN COMPONENTS (Fig.A)
- Control panel
- Air outlet grille
- Remote control compartment
- IR remote control receiver
-
Extractable air filter
-
Condensation drain cap
- Air inlet grille
- Air outlet grille
- Air inlet grille
- Fee
EN-10
2 - INSTALLATION
2.1 - HOW TO TRANSPORT THE CONDITIONER
- Transport and handling of the appliance must be carried out in vertical position.
If it is transported in a horizontal position, wait at least one hour before starting it.
- Before moving or transporting the appliance, completely drain condensation by working as described in paragraph 4.2.

CAUTION
Moving the air conditioner on delicate flooring (e.g. wooden flooring):
- Completely drain condensation.
- Take great care when moving the conditioner as the wheels could mark the flooring. Although the wheels are made from a rigid material and are swivelling, they could get damaged by use or excessive dirt.
It is recommended to check that the wheels are clean and that they can move freely.
2.2 - WARNINGS

A failure to respect what follows may cause damages to the appliance.
a. Install the air conditioner on flat and stable surfaces and on the floor.
b. Only connect the air conditioner to power sockets equipped with a ground system.
c. Make sure that curtains or other objects do not obstruct the air suction filters.
d. Make sure to keep a minimum distance of 30~cm (Fig.1) between the air conditioner and the adjacent figures.
e. The appliance must always be activated paying attention that there are no obstacles for air suction and output.
f. The air conditioner must not be used in laundries.
g. The air conditioner must be installed in a dry place only.
h. The air conditioner must not be started in presence of dangerous materials, steams or liquids.
i. Clean the air filters at least once a week.
2.3 - INSTALLATION
The air conditioner must be installed in a suitable environment.
It is recommended to reduce solar radiation through curtains, Venetian blinds and to keep doors and windows closed.
EN-11
2.4 - DRILLING THE WALL
This operation should be carried out using the proper tools to facilitate your work and prevent excess damage or disturbance to your client.
The best tools for drilling large holes in walls are special drills called core borers with very high twisting torque and adjustable rotation speed depending on the diameter of the hole to be drilled.
To prevent the creation of large amounts of dust and rubble due to drilling, the core borer can be fitted with a vacuum system applied by means of suction cups to the drilling zone.
Our Service Department can give you all necessary information to enable you to find these devices.
2.5 - ASSEMBLY OF THE AIR DUCTS AND EXTERNAL GRIDS
After drilling the holes (with the core drill), insert the plastic sheet (7) supplied with the air conditioner (fig. 7) inside them.

The sheets must be 65mm shorter than the length of the wall.
- Roll the sheet (7) and insert it into the hole, paying attention to the splicing line, which must always face upwards. (fig.8).
Use an ordinary cutter for the foregoing operation (fig.8).
To position the external grids, proceed as follows:
a. Check that the plastic sheet (7) is correctly inserted in the hole.
b. Fix the two flanges (6) using 2 pegs having a diameter of 6mm and check that the two fixing holes are horizontal (fig. 9-10-11).
c. Fit the small eyelet of the spring, with the long stem, on the cap pin (on both components) (fig.14).
d. Insert the two caps (with spring), on the front part of the external grid, on its two housings, pulling until it clicks (fig.15) and couple the two chains to the large eyelet of the spring.
e. Using one hand, grip the two chains connected to the grid;
f. Bend the external grids back, gripping them with your free hand where they bend, and insert your fingers inside the single fins (fig.16).
g. Insert your arm into the pipe until the grid protrudes completely outwards.
h. Reopen the grid, being careful to keep your fingers inside the fins.
i. Turn the grid until the fins are fully horizontal and tilted downwards.
I. Pull the chain, tensioning the spring, and couple the chain ring to the pin of the inner flange through which the pipes pass (fig. 17).
m. Use hand shears to cut off any excess chain links.

Use exclusively the supplied grids (5), or grids with like characteristics.
EN-12
2.6 - ELECTRICAL CONNECTION
The appliance is fitted with a power cable with plug.
Before connecting the air conditioner ensure that:
- The voltage and power frequency values match those specified on the appliance plate data.
- The power line is equipped with an effective earth connection and is correctly sized for maximum power consumption of the air conditioner.
- The appliance's power network must be equipped with a suitable omnipolar disconnection device compliant with national installation regulations.
- The appliance is powered solely through a socket compatible with the plug provided.

CAUTION
y replacement of the power cable must be carried out solely by Olimpia Splend did technical support or by similarly qualified personnel.
2.7 - POSITIONING OF THE APPLIANCE ON THE BRACKET
a. Before fastening the machine to the fixing bracket, apply the three supplied seals to the backrest (fig. 6).
b. Check that the wall fixing bracket (1) has been positioned correctly and fasten the air conditioner. Slightly lift it holding by the sides of the lower base and position it against the wall.
Check that the air conditioner has hooked to the bracket (1) and put it on the floor (fig. 12).

Pay the utmost attention since the bracket (1) must not bear the weight of the air conditioner, it only has to prevent possible accidental movements which may hinder its correct aligning with the holes on the wall. Adjust the height of the air conditioner using the adjustable feet (30) it is equipped with if necessary.
c. At the end of the work, carefully check that no cracks remained behind the backrest of the appliance (the insulating seal must adhere to the wall well), especially in the area of the air inlet and outlet ducts.
d. Once the air conditioner has been successfully installed, place the two aesthetic covers (10) snapping them on the lower feet (30) (fig.13).
2.8 - DRAINAGE
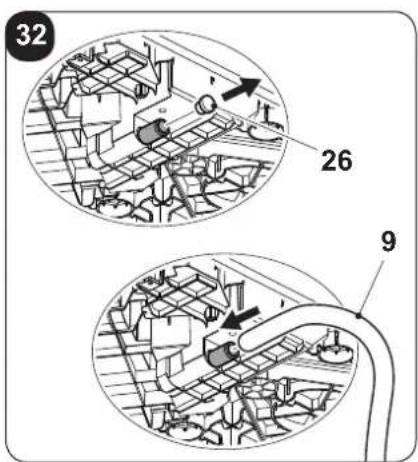
For the correct use of the appliance, work as follows (figure 32):
a. Remove the cap (26).
b. Insert the supplied pipe (9) in the connector.

Make sure the end of the discharge pipe (9) is positioned on a drain well or in a container.
Make sure the pipe (9) is not clogged.
EN-13
3 - USE OF THE APPLIANCE
The functioning modes if the air conditioner can be selected both through the remote control and through the control panel located on board of the air conditioner.
The reception of the selected function is confirmed by the emission of a "beep" by the buzzer.
3.1 - CONTROL PANEL SYMBOLS AND KEYS (Fig.B)
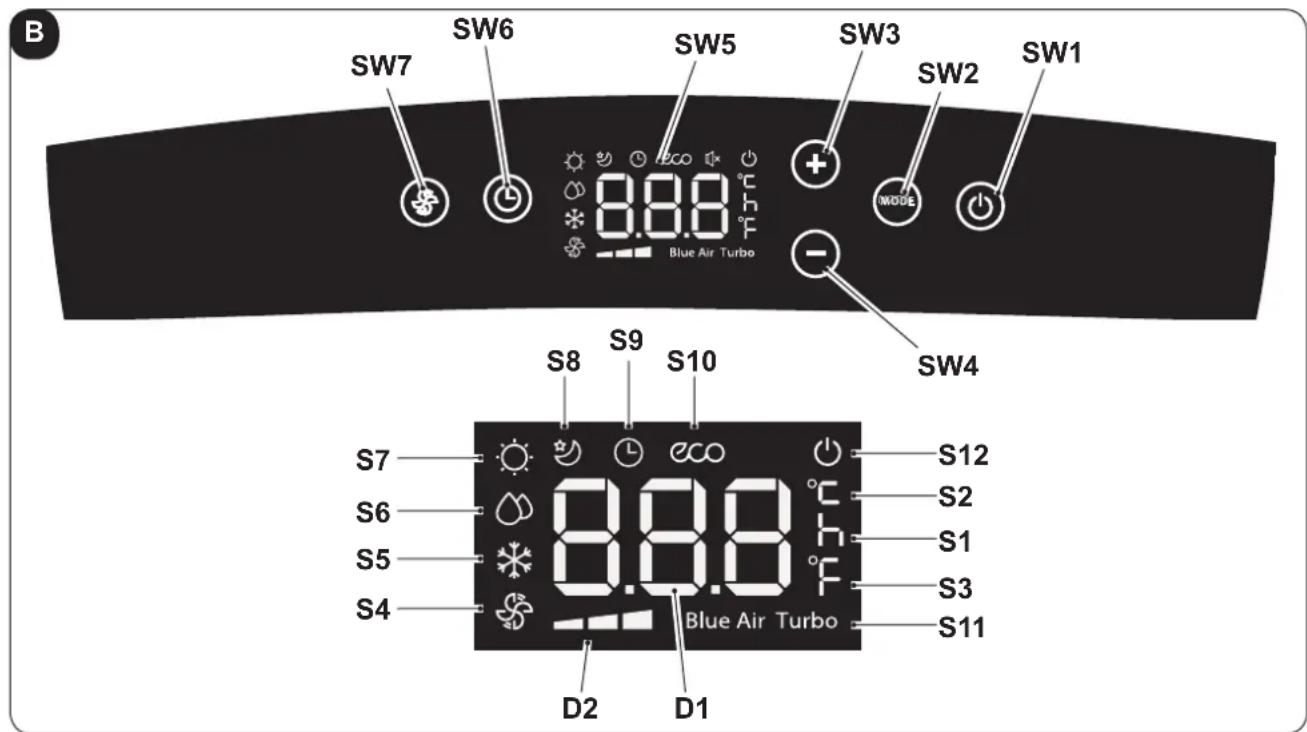
- SW1: ON/Stand-by;
- SW2: Operation mode selection
ECO - Blue air (auto) =>
=> fan only =>
=> dehumidification =>
=> heating
(active only in the version with heat pump) =>
=> cooling =>
=> turbo cooling => ...
- SW3: Temperature/delay increase
- SW4: Temperature/delay decrease
- SW5: Display
-
SW6: Confirmation/cancellation unit switching on/off delay
-
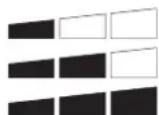
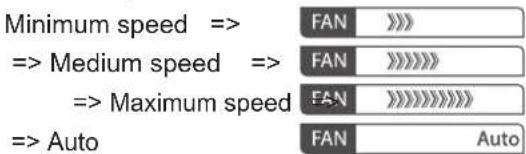
SW7: Fan speed selection
Minimum speed =>
= > Medium speed = >
=> Maximum speed =>
Blue air (auto)
D1: Set temperature/Timer
D2: Fan speed indication (see "SW7")
- S1: Hour indicator
S2: Temperature indicator in ^ C - S3: Temperature indicator in F
• S4: Fan only mode
S5:Cooling mode - S6: Dehumidification mode
- S7: Heating mode (active only in the version with heat pump)
• S8: Sleep mode - S9: Timer mode (programmed switching on/off)
- S10: Automatic mode (ECO)
S11: Turbo function
S12: Appliance electrically powered indicator
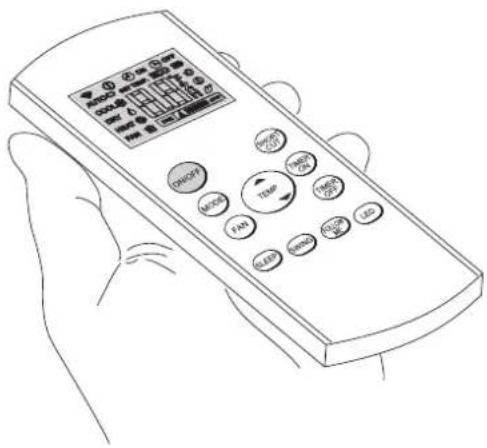
3.2 - REMOTE CONTROL KEYS (Fig. C)
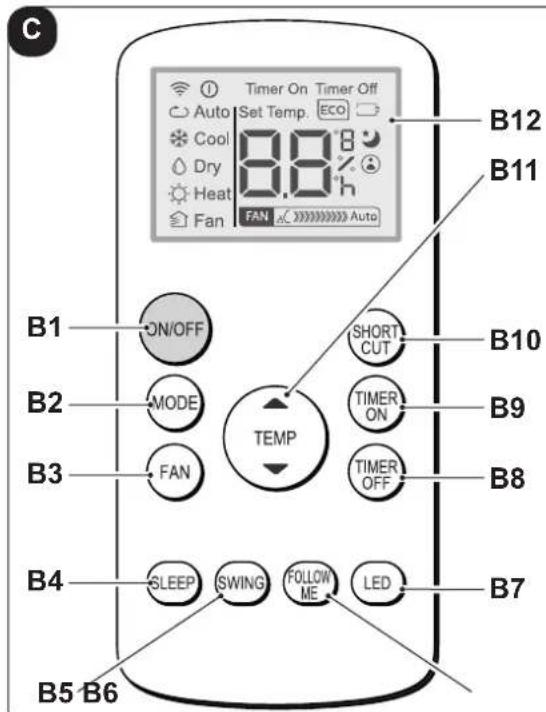
B1: On/Off key for the appliance switching on/off
- Symbol (D1) turned on: appliance On
Symbol (D2) turned off: appliance in Stand-by
B2: Operation mode selection
AUTO (Automatic) ECO =>
cooling
dehumidification
heating (active only in the version with heat pump)
fan only ...
B3: Fan speed selection
B4: SLEEP mode activation (ON/OFF)
B5: NOT ENABLED
B6: Activate/deactivate FOLLOW ME function
B7: Activate/deactivate display on machine control panel
B8: Unit switch OFF delay setting
B9: Unit programmed switch-on setting
B10: SHORT CUT
B11: Temperature set increase
Temperature set decrease
B12: Display
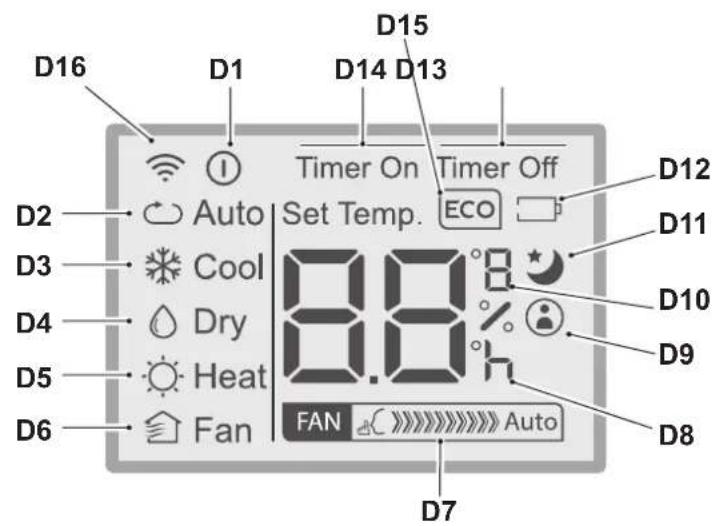
D1: Appliance running indicator
D2: Automatic mode (ECO)
D3: Cooling mode (COOL)
D4: Dehumidification mode (DRY)
D5: Heating mode (HEAT) (active only in the version with heat pump)
D6: Fan only mode (FAN)
D7: Fan speed indication (vederte "B3")
D8: Programmed switching on/off "hour" indicator
D9: "FOLLOW ME" function active indicator
D10: Temperature indicator in ^ C (F)
D11: "SLEEP" function active indicator
D12: Remote control battery low indicator
D13: "TIME OFF" function active indicator
D14: "TIME ON" function active indicator
D15: "ECO" function active indicator
D16: Remote control transmission signal
3.3 - USE OF THE REMOTE CONTROL
The remote control supplied with the air conditioner is the tool which allows You to use the appliance in the most comfortable manner.
It should be handled with care and in particular:
- Keep it dry (do not clean it with water or leave it outdoors in bad weather).
- Avoid dropping or bumping it.
- Keep it out of direct sunlight.

The remote control operates by means of an infrared beam.
- During use, there must not be any obstacle between the remote control and the air-conditioner.
If other appliances in the room have remote controls (TV, stereo, etc...), there may be interference. - Electronic and fluorescent lights may also interfere with transmissions between remote control and air-conditioner.
- Remove the batteries in case of prolonged disuse of the remote control.
3.3.a - Insertion of batteries
The batteries are supplied with the machine.
To insert the batteries correctly:
a. Remove the batteries compartment cover (figure 18).
b. Insert the batteries into the relevant compartment (figure 18).

Check the polarity indicated on the bottom of the compartment.
c. Close the compartment correctly (figure 19).
3.3.b - Replacement of batteries
The batteries must be replaced when the icon (D12) appears on the display.

Always use new batteries.
The use of old or different batteries could generate malfunctioning of the remote control.
The remote control uses two dry alkaline 1.5V batteries (AAA.) (Fig.18).

When replacing batteries, replace both and dispose of the dead batteries in the appropriate collection centres and as required by law.
- If the remote control is not used for several weeks or longer, remove the batteries.
Any leaks from the batteries could damage the remote control.

Do not re-charge or disassemble the batteries. Do not throw the batteries into the fire. They can burn and explode.
EN-16


If the battery liquid falls onto the skin or clothes, wash well with clean water. Do not use the remote control with batteries that have leaked.
The chemical products contained in the batteries can cause burns or other risks to health.
3.3.c - Location of the remote control
- Keep the remote control in a position from which the signal can reach the receiver (24) of the appliance (maximum distance is approx. 8 metres - with charged batteries) (figure 24).
The presence of obstacles (furniture, curtains, walls, etc.) between the remote control and the appliance reduces the remote control range.
3.4 USE OF THE APPLIANCE
Work as follows in order to use the appliance.

To prevent possible damages to the compressor, each start is delayed by 3 minutes with respect to the last switching off.
3.4.a Preliminary operations
- Place the appliance on a stable and not inclined base, at at least 30~cm from the wall or from any other object, in order to ensure the correct air circulation. Place it on a water-resistant surface since the possible water leakage could damage furniture or the floor.
- Do not place the appliance directly on carpets, towels, blankets or other absorbent surfaces.
- Insert the plug in the power socket; the appliance emits a "beep", on the display appears the icon () and the environment temperature in ^ C .

Before electrically connecting the appliance, make sure the plate data correspond to those of the electricity distribution network.
3.4.b Appliance switching on/off
a. To start the appliance, press the key "ON/OFF" on the remote control or the key on the control panel.
b. A beep signals that the appliance is operating.
c. The icon (^1) switches on on the control panel.
d. appears on its display 1 appears on its display.
e. In case of prolonged stop of the appliance, it must be reset by removing the plug from the power socket, wait 5 ÷ 10 seconds and then reinsert it; a beep signals that the appliance is ready for use.
EN-17
3.5 AUTO MODE (Automatic)
a. When this mode is selected, the appliance automatically activates the COOLING, HEATING (only for version with heat pump) or FAN functions depending on the environment temperature and on the set one. The environment temperature is continuously checked to obtain an optimal comfort in the air conditioned room.
b. This mode can be selected by pressing the key "MODE" once or more (on the remote control or on the control panel) until when the specific icon ECO and Blue Air is shown on the display of the control panel and/or when the icon Auto appears on the remote control display.
c. It is not possible to select the fan speed in AUTO mode.
3.6 COOLING MODE (COOL)
a. When this mode is selected, the appliance dehumidifies and cools the environment.
This mode can be selected by pressing the key "MODE" once or more (on the remote control or on the control panel) until when the specific icon appears on the display.
b. In this mode, the fan is always switched on and it is possible to select its desired speed by pressing the key "FAN" on the remote control or the key on the control panel.
The fan speed is displayed as indicated in paragraphs "3.1" (point SW7) and "3.2" (point B3).
c. The temperature set-point is included between 17^ and 30^ (from 62 F and 86 F) with 1^ variations and it can be set using the keys +/- on the control panel or with the keys on the remote control.
d. After a certain time (maximum three minutes) after the activation of the operation mode, the compressor activates and the appliance starts delivering cold air.
3.7 TURBO COOLING MODE
- This function can be activated only from the control panel of the appliance.
a. This mode can be selected by pressing key "MODE" once or more on the control panel until the icons and "Turbo" appear on the display.
b. The function sets the appliance directly to cooling mode with a temperature of 17^ and maximum speed of the fan in order to reach the set temperature more quickly.
c. In this mode it is not possible to select either the fan speed and the temperature.
d. To switch off the function, press key "MODE" on the control panel or switch off the appliance.
3.8 DEHUMIDIFICATION MODE (DRY)
a. When this mode is selected, the appliance dehumidifies the environment.
This mode can be selected by pressing the key "MODE" once or more (on the remote control or on the control panel) until when the specific icon appears:
- on the control panel -
on the remote control display.
b. In DRY mode, it is not possible to select the fan speed or to adjust temperature.
The fan motor works at low speed.
c. Keep doors and windows closed to achieve the best dehumidifying effect.
Do not place the air outlet pipe out of a window.
d. Connect the condensation discharge pipe (paragraph 2.8)
3.9 VENTILATION MODE (FAN)
a. When this mode is selected, the appliance doesn't perform any action both on temperature or on air humidity in the environment, but only maintains it in circulation.
b. This mode can be selected by pressing the key "MODE" once or more (on the remote control or on the control panel) until when the specific icon is shown on the display of the control panel and/or of the remote control.
- ⑤ icon on the control panel -
icon on the remote control display
c. In this mode, the fan is always switched on and it is possible to select its desired speed by pressing the key "FAN" on the remote control or the key on the control panel.
d. The fan speed is displayed as indicated in paragraphs "3.1" (point SW7) and "3.2" (point D7).
3.10 HEATING MODE (HEAT)
(only for version with heat pump)
a. When this mode is selected, the appliance heats the environment.
b. This mode can be selected by pressing the key "MODE" once or more (on the remote control or on the control panel) until when the specific icon is shown on the display.
c. In this mode, the fan is always switched on and it is possible to select its desired speed by pressing the key "FAN" on the remote control or the key 串 on the control panel.
The fan speed is displayed as indicated in paragraphs "3.1" (point SW7) and "3.2" (point D7).
d. The temperature set-point is included between 17^ and 30^ (from 62 F and 86 F) with 1^ variations and it can be set using the keys +/- on the control panel or with the keys on the remote control.
e. After a certain time (maximum three minutes) after the activation of the operation mode, the heat pump activates and the appliance starts delivering warm air.
f. Connect the condensation discharge pipe (paragraph 2.8)
3.11 TIMER MODE
a. This mode allows to program the switching on or the switching off of the appliance.
b. The delay time can be set, activated and cancelled both from the remote control and from the control panel.
3.11.a Programmed switching on
a. When the appliance is in standby mode, select the operation mode, the desired temperature and ventilation speed.
-
On the control panel: - press and set the switching on delay time with the keys +/-
-
To activate the function, press or wait approximately 5 seconds so that the set time on the display stops flashing (the display returns to showing the environment temperature).
The icon L lights up.
-
On the remote control: - press the key "TIMER ON" to access the function and then press the key "TIMER ON" once or more until the switching on delay time is set.
-
Direct the remote control towards the appliance; a beep confirms the activation of the function.
- The icon on the control panel and the indicator "Timer On" on the remote control display light up.
EN-19
b. Once the set time has passed, the appliance starts with the same settings (mode, temperature and ventilation speed) as those before switching off.
c. Time can be set with 30 minutes steps up to 10 hours and with 60 minutes steps from 10 to 24 hours.
d. Starting the appliance or adjusting the timer setting to "0.0h" will cancel the programmed switching on function.
3.11.b Programmed switching off
a. When the appliance is running, set the delayed switching off time.
-
On the control panel: - press and set the switching off delay time with the keys +/-.
-
To activate the function, press ⑨ or wait approximately 5 seconds so that the set time on the display stops flashing (the display returns to showing the environment temperature).
The icon
lights up.
-
On the remote control: - press the key "TIMER Off" to access the function and then press the key "TIMER Off" once or more until the switching off delay time is set.
-
Direct the remote control towards the appliance; a beep confirms the activation of the function.
-
The icon
on the control panel and the indicator "Timer Off" on the remote isplay light up.
b. Once the set time has passed, the appliance switches off.
c. Time can be set with 30 minutes steps up to 10 hours and with 60 minutes steps from 10 to 24 hours.
d. Switching off the appliance or adjusting the timer setting to "0.0h" will cancel the programmed switching off function.
3.12 OTHER FUNCTIONS
3.12.a Auto-Restart
a. If the appliance switches off due to interruption of power supply, it automatically restarts with the previous settings when electrical power is restored.
3.12.b SLEEP function
- This function can be activated only from the remote control.
- This function is not available while the Dehumidification (DRY) and Fan Only (FAN) modes are active.
a. When the appliance is running, press the key "SLEEP" on the remote control.
The icon appears on the control panel and on the remote control display.
The appliance will decrease (when cooling) or increase (when heating) the set temperature by 1^ (1 or 2 F) for 30 minutes.
b. Then, the appliance will decrease (when cooling) or increase (when heating) the set temperature by 1^ (1 or 2 F) for an additional 30 minutes.
c. This temperature will be maintained for 7 hours before returning to the originally selected temperature. Once this time has passed, the appliance will restart working as originally programmed.
d. Press the key "SLEEP" on the remote control to stop the function; the icon on the control panel and on the remote control display turn off.
3.12.c FOLLOW ME function
- This function can be activated only from the remote control.
- This function is not available while the Dehumidification (DRY) and Fan Only (FAN) modes are active.
In this function, the remote control serves as a thermostat.
a. When the appliance is running, press the key "FOLLOW ME" on the remote control.
b. Move with the remote control in an area of the room different from where the appliance is positioned (maximum distance is 7÷ 8 metres) directing it towards the appliance itself and making sure there are no obstacles between them.
c. Set the desired temperature on the remote control; the appliance works until it takes the temperature of the area where the remote control is positioned to the value set on the remote control itself.
d. The remote control sends a signal to the appliance and, if it doesn't receive a response within a maximum time of 7 minutes, the function deactivates.
e. Press the key "FOLLOW ME" on the remote control or switch the appliance off to stop the function.
3.12.d Setting the unit of measurement of temperature
It is possible to choose the set and environment temperature unit of measurement choosing between ^ C (Celsius) or F (Fahrenheit).
Work as follows:
- On the control panel, press the keys + and - at the same time for approximately three seconds.
The desired unit of measurement appears on the display of the control panel.
- On the remote control, keep the central key TEMP pressed for approximately three seconds.
The desired unit of measurement appears on the display of the remote control.

The unit of measurement change must be performed both on the control panel and on the remote control.
3.12.e Directing the air flow
- This function can be activated only from the remote control.
a. When the appliance starts, the flap opens completely.
b. Press the key "SWING" on the remote control and the flap starts oscillating automatically.
c. Press the key "SWING" to stop the flap in a certain position.
Press it again to restart oscillation.
3.12.f Short Cut function
- This function can be activated only from the remote control.
a. When the appliance is running in any of its modes, press the key "SHORT CUT" on the remote control and the appliance automatically configures itself to "AUTO" with a set temperature of 26^ (80 F).
EN-21
4 - MAINTENANCE AND CLEANING

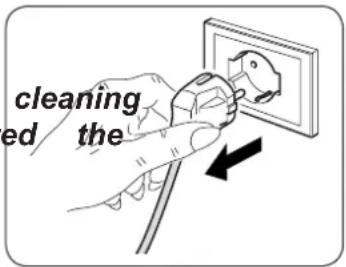
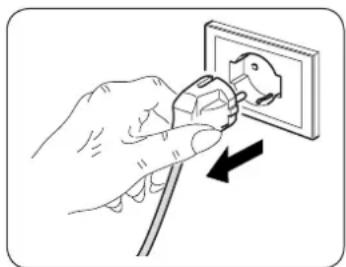
Before proceeding with any maintenance and intervention, always make sure you disconnected power plug from the power socket.

Do not touch the metal parts of the appliance when you remove the filter.
There is a risk of injury due to the sharp metal edges.

Do not use water to clean the internal parts of the air conditioner. Exposure to water can ruin the isolation, with the risk of electric shocks.
4.1 - CLEANING
4.1.a - Cleaning the appliance and the remote control
a. Use a dry cloth to clean the appliance and the remote control.
b. It is possible to use a cloth moistened with cold water to clean the appliance in case it's very dirty.

Do not use a chemically treated or antistatic cloth to clean the appliance.

- Do not use gasoline, solvent, polish or similar solvents.
These products could cause the breakage or deformation of the plastic surface.
4.1.b - Servicing and cleaning the air filters
To ensure the indoor air is filtered correctly and to guarantee that your air conditioner runs efficiently, it is vital to clean the air filters regularly.
A dirty air filter reduces the cooling capacity of the appliance.
Please clean the filter once every 2 weeks.
a. Stop the air conditioner and disconnect the power supply.
b. Remove the filter from the conditioner (fig.20).
c. Wash the filters with a water jet aimed at the side opposite the accumulation of dust. If the dirt is particularly difficult to remove (such as grease or other types of deposit), first immerse the filter in a solution of water and a neutral detergent.
d. Shake off any water before reinserting the filters (fig.21).
4.1.c - Recommendations for energy saving
Below find simple recommendations for reducing consumption:
- Always and constantly keep the filters clean (see maintenance and cleaning chapter).
- Keep the doors and windows of the rooms to be climate controlled closed.
- Do not let sun rays penetrate freely into the room (we recommend using curtains or lowering blinds or closing the shutters).
- Do not obstruct the air flow path (input and output) of the appliance; this, in addition to obtaining a non-optimal yield, also affects the correct operation of the appliance and the possibility of irreparable damages to the appliance itself.
4.2 - MAINTENANCE
If you do not intend to use the appliance for a long period of time, work as follows:
a. Stop the air conditioner and disconnect the power supply.
b. Clean the air filters.
c. Completely discharge condensation.
d. Remove the batteries from the remote control.
Checks before resuming use of the air conditioner:
a. Clean the filters after a long period of inactivity of the air conditioner.
b. Check that the air outlet or inlet are not obstructed (especially after a long period of inactivity of the air conditioner).
4.2.a - Discharging condensation
a. Disconnect the plug from the power socket.
b. Carefully move the appliance in position suitable to unload water.
c. Remove the drain cap (26) (Fig.22).

Make sure you correctly tightened the drain cap (26) in order to avoid water leak.
d. Make water unload completely.
e. Tighten the drain cap (26) (Fig.23).
f. Insert the plug into the power outlet and re-start the machine.
5 - TECHNICAL DATA
For the technical data, please consult the data plate applied to the product.
The unit's circuit board (PCB) is designed with a fuse to provide overcurrent protection. The specifications of the fuse are printed on the circuit board, such as: T 3.15A/250V, etc.
| • Dimensions (W x H x D) 693 x 665 x | 276 mm |
| • Working temperature limits in Cooling function | 18° - 32° |
| • Working temperature limits in heating function | 16° - 27° |
| • Working temperature limits in Dehu-midification function | 18° - 32° |
| • Refrigerant gas R410 |
EN-23
6 - INCONVENIENCES AND POSSIBLE REMEDIES
| Malfunction Cause What do i do? | ||
| The appliance doesn't work. Current | failure Wait for the current to be restored. | |
| The unit is disconnected from the current. | Check that the plug is inserted in the wall socket. | |
| The appliance doesn't switch on. | Too much water has collected inside the air conditioner. | Drain the water off by removing the plug (28). Call the Assistance Centre if this alarm occurs too often. |
| Timer is ON. Switch off the timer. | ||
| The appliance only works for a small amount of time. | The temperature set is too close to ambient temperature. | Lower the temperature set. |
| Suction of outside air is obstructed. | Remove the obstructions. Call the Service Centre. | |
| The appliance doesn't cool efficiently. | The air filters are clogged by dust, fluff or animal hair. | Switch off the appliance and clean the filters following the instructions. |
| Temperature setting is too high. Reduce the set temperature. | ||
| The windows or doors of the room are open. | Make sure all the windows and the doors are closed. | |
| The room area is too large. Check the cooling area again. | ||
| Heat sources are present inside the room. | Remove the heat sources if possible. | |
| The appliance is noisy and vibrates excessively. | The appliance bearing surface is not levelled. | Place the appliance on a flat levelled surface. |
| The air filters are clogged by dust, fluff or animal hair. | Switch the appliance off and clean the filters following the instructions. | |
| The appliance emits an abnormal sound. | This sound is caused by the refrigerant flow inside the unit. | It is totally normal. |
| Water leaks from the conditioner during transport. | The conditioner has been tilted or laid flat. | Empty water before moving the appliance. |
| In cooling, night-time or automatic mode, minimum speed cannot be selected. | Ambient temperature too low. Air conditioner behaviour is normal. | |
| If the problem has not been solved, please contact the nearest technical assistance service. Please give detailed information about the malfunction and on the equipment version. | ||
EN-24
TABLE DES MATIÈRES GÉNÉRALE
0-MISES EN GARDE 3
0.1 - INFORMATIONS GENE RALES 3
0.2 - SYMBOLOGIE 3
0.2.1 - Pictogrammes rédactionnels 3
0.3 - MISES EN GARDE GENÉRALES 5
0.4- UTILISATION PRÉVUE 9
0.5- ZONES A RISQUE 9
1 -DESCRIPTION DE L'APPAREIL 10
1.1- LISTES DES COMPOSANTS FOURNIS 10
1.2 - IDENTIFICATION DES PARTIES PRINCIPALES 10
These Symbols on the Product of the Verpackung.
1 - OMSCHRIJVING VAN HET APPARAAT
1.1 - LIJST VAN DE MEEGELEVERDE ONDERDELEN (Afb.5)
2.2 - WAARSCHUWINGEN

of wacht circa 5 seconden