
SJ 8640 - Juicer GRUNDIG - Free user manual and instructions
Find the device manual for free SJ 8640 GRUNDIG in PDF.
| Product type | Juice extractor |
| Brand | Grundig |
| Model | SJ 8640 |
| Power | 200 W |
| Supply voltage | 220-240 V ~, 50/60 Hz |
| Main function | Juice extraction from fruits and vegetables |
| Additional functions | Mixture extraction, extraction of frozen fruits/sorbets |
| Motor | Automatic shut-off in case of blockage |
| Safety | Child safety lock, automatic shut-off under stress |
| Pulp container capacity | Approximately 1.5 L |
| Juice container capacity | Approximately 1 L |
| Feed chute | Large, accepts whole pieces |
| Filter material | Stainless steel |
| Removable parts | Pusher, chute, rotary brush, mixing chamber, pressure screw, sieve, containers |
| Cleaning | By hand with soapy water; do not put in dishwasher |
| Maintenance | Provided brush for cleaning the sieve and chamber |
| Continuous use duration | Maximum 20 minutes |
| Protection | Automatic shut-off in case of overload |
| Included accessories | Pusher, chute, rotary brush, mixing chamber, pressure screw, sieve for fruits/vegetables, sieve for frozen fruits, juice container, pulp container, mixing and pressing button |
| Warranty | Spare parts available for at least 5 years |
| Weight | Approximately 3.5 kg |
| Color | White/Silver |
Frequently Asked Questions - SJ 8640 GRUNDIG
User questions about SJ 8640 GRUNDIG
0 question about this device. Answer the ones you know or ask your own.
Ask a new question about this device
Download the instructions for your Juicer in PDF format for free! Find your manual SJ 8640 - GRUNDIG and take your electronic device back in hand. On this page are published all the documents necessary for the use of your device. SJ 8640 by GRUNDIG.
USER MANUAL SJ 8640 GRUNDIG
natural_image
Black and white photo of a modern kitchen brush unit with clear glass interior (no visible text or symbols)DEENTR
ES FR
HR FL FIN
SVDA


natural_image
Abstract grayscale curved shape on white background (no text or symbols)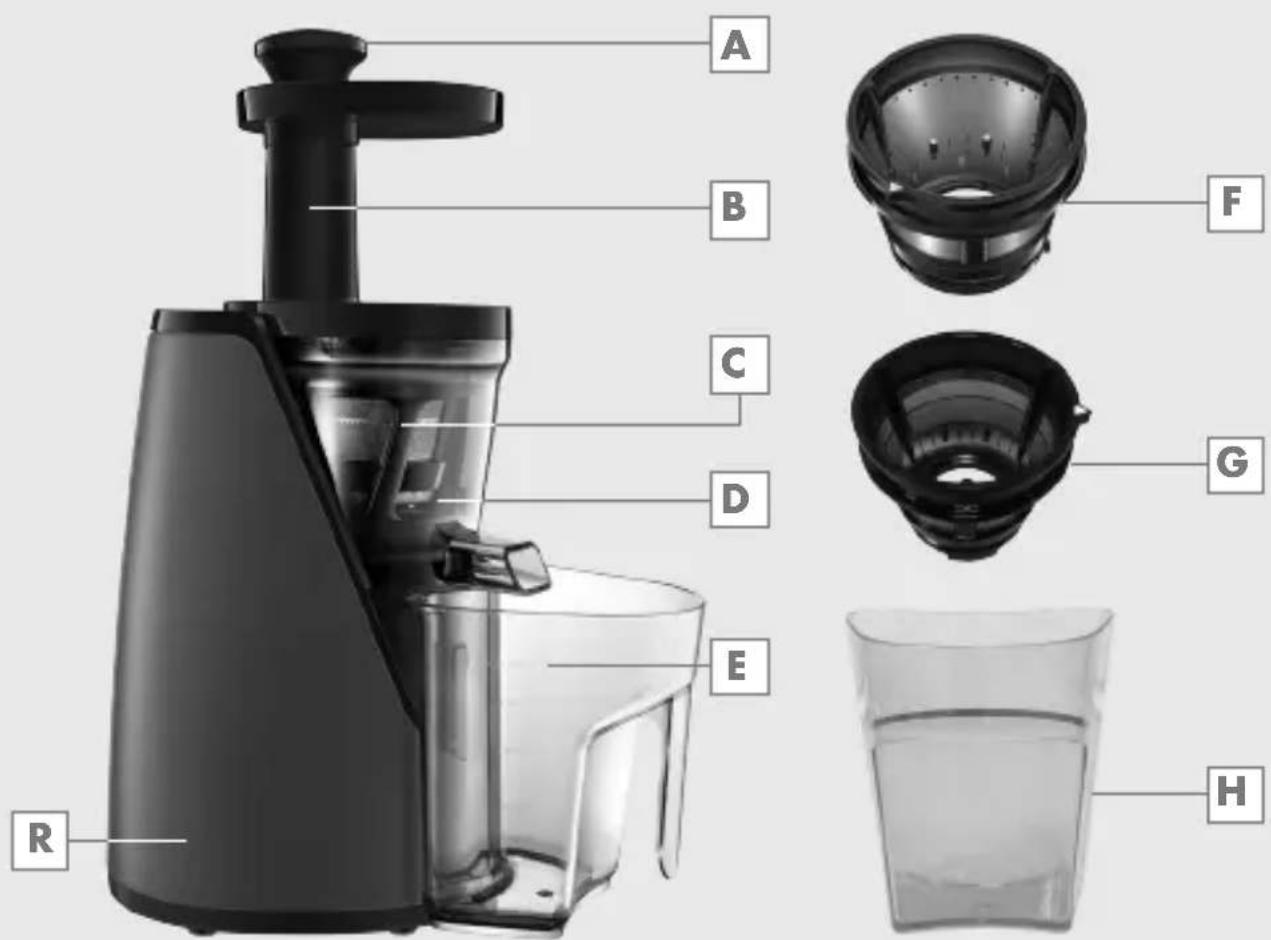
DEUTSCH 05-16
ENGLISH 17-27
TÜRKÇE 28-37
ESPAÑOL 38-49
FRANÇAIS 50-60
HRVATSKI 61-71
POLSKI 72-83
DANSK 84-93
SUOMI 94-104
NORSK 105-114
SVENSKA 115-125
natural_image
Stylized grayscale illustration of a tree with leaves and roots, enclosed in a circular frame (no text or symbols)natural_image
Exploded view diagram of a kitchen brush and blender, showing internal components like blade, filter, and cup (no text or labels)Achtung
Please read this instruction manual thoroughly before using this appliance! Follow all safety instructions in order to avoid damages due to improper use!
Keep the instruction manual for future reference. Should this appliance be given to a third party, then this instruction manual must also be handed over.
■ This appliance is intended for private domestic use only. It should not be used for commercial purposes.
This appliance can be used by children who are at the age of 8 and above and by people who have reduced physical, perceptual or mental abilities or by people who are deficient in terms of experience and knowledge as long as they are supervised and given the instructions regarding the safe use of the appliance and dangers encountered.
■ Children should not play with the appliance.
■ This appliance should not be used by children. Keep the appliance and cable out of the reach of children.
- Cleaning and user maintenance should not be performed by children.
- Do not use it if the power cable, appliance or the filter of the appliance is damaged. Contact an authorized service.
- Unplug the appliance when left unattended, while installing/removing accessories or before cleaning.
■ Use the original parts or parts recommended by the manufacturer only. - Do not attempt to dismantle the appliance.
- Your mains power supply should comply with the information supplied on the rating plate of the appliance.
■ Use the appliance with a grounded outlet. - Do not use the appliance with an extension cable.
- Do not pull the power cable when unplugging the appliance.
■ Unplug the appliance before cleaning, disassembly, accessory replacement and wait for it to stop completely.
■ After cleaning, dry the appliance and all parts before connecting it to mains supply and before attaching the parts.
- Do not touch the plug of the appliance with damp or wet hands.
- Do not immerse the appliance, power cable, or power plug in water or any other liquids.
- Do not operate or place any part of this appliance or its parts on or near hot surfaces.
- Do not operate the appliance continuously for more than 20 minutes.
- Do not remove the pulp container when the appliance is in operation.
- Do not operate the juicer without the pulp container fitted.
■ Use only the pusher to put food in the appliance. Do not use your fingers or an any other object.
- Cut fruits in such a way that they can fit into the feeding chute.
- Do not touch the small cutting blades on the base of the filter. Blades are sharp. There is a risk of injury.
■ Remove stones of stone fruits and peel off the rind of fruits that have a thick or inedible rind before putting them into the appliance. - Do not touch any of the rotating parts while the appliance is plugged. There is a risk of injury.
■ If you keep the packaging materials, store them out of the reach of children. - Do not push the pusher severely to extract more juice.
- Operate the appliance empty for 10 seconds and then start to extract the juice.
- When the appliance is excessively strained, it will automatically switch off for protection purposes. If this happen, switch off the appliance and remove the food that causes the strain. You can use the appliance for juice extraction again after waiting for 10 seconds.
Dear Customer,
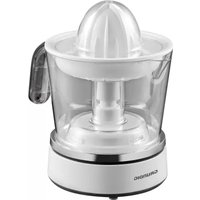
Congratulations on purchasing the SJ 8640 Juicer.
Please read the following user notes carefully to ensure you can enjoy your quality GRUNDIG product for many years to come.
A responsible approach!

natural_image
Stylized grayscale illustration of a tree with leaves and roots, enclosed in a circular frame (no text or symbols)GRUNDIG focusses on contractually agreed social working conditions with fair wages for both internal employees and suppliers. We also attach great importance to the efficient use of raw materials with continuous waste reduction of several tonnes of plastic every year. Furthermore, all our accessories are available for at least 5 years.
For a future worth living.
For a good reason. Grundig.
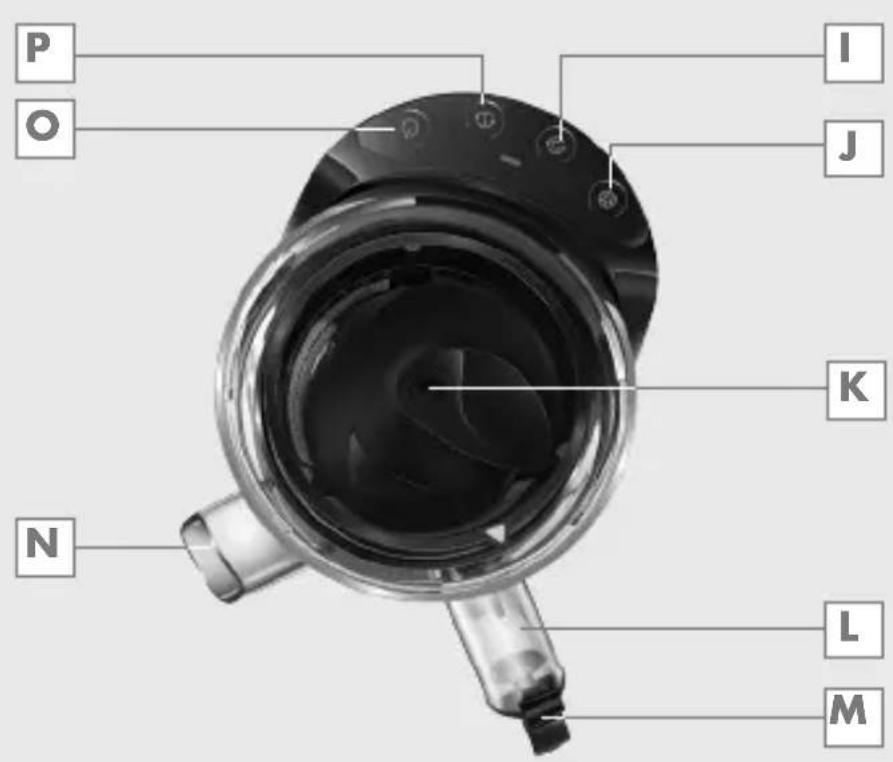
Controls and parts
See the figure on page 3.
A Pusher
B Hopper
C Spinning brush
D Cylinder chamber
E Pulp container
F Frozen fruit/sorbet strainer
G Fruit/vegetable strainer
H Juice container
I Mixing button
J Juicing button
K Press screw
L Juice outlet
M Drip stop
N Pulp outlet
Stop button
P Reverse button
R Body
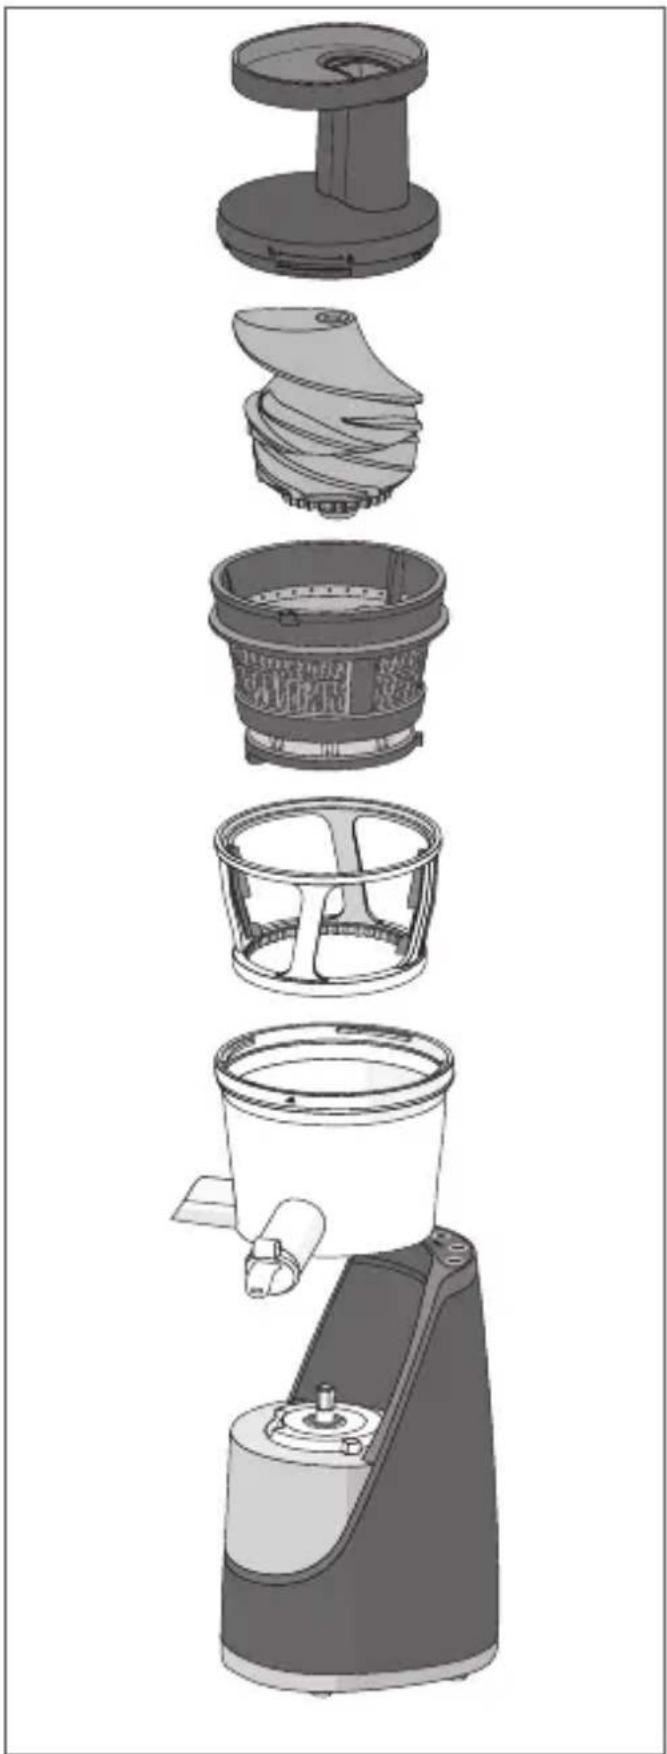
Installation
1 Place the cylinder chamber D on the body R so that the pulp and juice outlets are on the front.
Caution
■ Make sure that the silicone plug under the juice outlet L is closed before placing the cylinder chamber D. Otherwise, the extracted juice will flow over the body R.
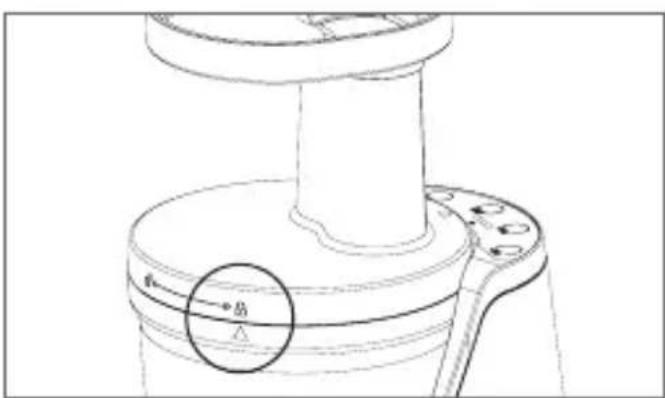
2 First, place the spinning brush C, then place the cylinder chamber D into the body R.
—The (▲) symbol on the cylinder chamber D corresponds to the (▼) symbol on the fruit/vegetable strainer G.
3 Place the press screw K into the filter.
-If the press screw K is not properly fitted, the hopper B cannot be assembled.
natural_image
Exploded view diagram of a kitchen brush and blender, showing internal components like handle, blade, and cup (no text or labels)4 Place the hopper B in a way that the ( symbol is aligned with the ( symbol on the cylinder chamber D.
5 Rotate the hopper Ⓑ clockwise until the 🔔 symbol is aligned with the (▲ symbol on the main body R.
-You will hear a "click" sound.
Caution
■ The appliance does not operate when the locking latch is not locked.
Operation
1 Plug in the appliance.
2 Place the pulp container E under the pulp outlet N, and place the juice container H under the juice outlet L.
3 Remove the stones and peel off the rind of the fruit or vegetable that you will process.
Caution
■ Hard stones may harm the filter.
■ Before starting the juice extraction, operate the appliance for 10 seconds while it is empty, then feed it.
Note
- Cut the food items that you want to put into the hopper B to appropriate sizes.
4 Push the fruits or vegetables into the appliance using the pusher A.
Juicing process
—Before starting the juice extraction, operate the appliance for 10 seconds while it is empty, then feed it.
2 Push the fruit into the spinning brush C through the hopper B with the help of the pusher A.
3 Push the ⏻ button ☐ once the process is over.
4 Unplug the appliance.
Note
- When the appliance is jammed and does not operate, push the (button P) for 5 seconds. Then push the (button J) again.
Caution
- When processing fibrous vegetables (such as celery stalk and wheatgrass), we recommend that you clean the cylinder chamber D and the fruit/ vegetable strainer G after extracting 200 grams of food. Otherwise, the squeezing performance of the product may decrease.
Mixed extraction process
■ You can use this function for your mixtures made of several different fruits or vegetables.
1 Close the drip stop M which is placed on the juice outlet L.
2 Push the ( ) button 1.
3 Push fruits or vegetables that you will process through the hopper using the pusher (see Operation section on page 10).
4 The squeezing process will be completed after the system turns left and right for about 1.5 minutes.
—The appliance will give an audible signal once the process is complete.
Caution
■ The Max. mark on the cylinder chamber D should not be exceeded. If you exceed the Max. mark, the extracted juice will overflow.
5 Remove the drip stop M which is placed on the juice outlet L.
—The mixed juice will pour into the juice container H.
6 Unplug the appliance.
Frozen fruit sorbet process
Before starting the process: cut the fruit you will use (kiwis, strawberries, bananas etc.) into small pieces and freeze them.
1 Place the freezing container instead of the spinning brush C when assembling the appliance.
2 Push the ( ) button J.
3 Pass and push the fruits you will use through the feeding chute using the pusher A.
USE
4 Push the (☐) button ☐ once the process is over.
5 Unplug the appliance.
Note
■ While preparing frozen fruit sorbet, the ingredients you have processed will pour out of the pulp outlet N.
Caution
■ Fruits that are taken out of the freezer should be kept at room temperature for 15-20 minutes.
Disassembling
■ Follow the installation steps in reverse order to disassemble the appliance.
Cleaning and care
Caution
■ Never use gasoline, solvent, abrasive cleaning agents, metal objects or hard brushes to clean the appliance.
1 Switch off and unplug the appliance.
2 Wait for the appliance to stop completely.
Note
It is easier to clean the appliance right after using it.
3 Disassemble the appliance.
4 Clean the body R with a damp cloth.
5 Clean the appliance using the brush that comes with the appliance.
6 Wash other parts with dishwashing liquid and sponge.
Caution
- Do not wash the parts in the dishwasher.
Storage
■ If you do not intend to use the appliance for a long time, store it carefully.
■ Unplug the appliance before lifting it.
■ Store the appliance in a cool and dry place.
- Keep the appliance out of the reach of children.
Handling and transportation
■ During handling and transportation, carry the appliance in its original packaging. The packaging of the appliance protects it against physical damages.
- Do not place heavy loads on the appliance or on the packaging. The appliance may get damaged.
■ Dropping the appliance may render it non-operational or cause permanent damage.
Environmental note
This product has been made from high-quality parts and materials which can be re-used and are suitable for recycling.
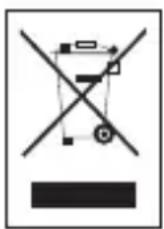
Therefore, do not dispose of the product with normal household waste at the end of its service life. Take it to a collection point for the recycling of electrical and electronic appliances. This is indicated by this symbol on the product, in the instruction manual and on the packaging.
Please consult your local authorities to find out where the nearest collection point is.
Help protect the environment by recycling used products.
Technical data

Power supply:
220-240 V \~, 50/60 Hz
Power: 200 W
Technical and design modifications reserved.
natural_image
Stylized grayscale illustration of a tree with leaves and roots, enclosed in a circular frame (no text or symbols)natural_image
Exploded view diagram of a kitchen brush and blender unit, showing internal components like blade, fan, and bucket (no text or labels)Dikkat
natural_image
Stylized grayscale illustration of a tree with leaves growing from soil, enclosed in a circular frame (no text or symbols)natural_image
Exploded view diagram of a kitchen brush and blender, showing internal components like handle, blade, and cup (no text or labels)natural_image
Technical line drawing of a mechanical component with a circular arrow and triangle annotation (no readable text or symbols)Precaución
natural_image
Stylized grayscale illustration of a tree with leaves and roots, enclosed in a circular frame (no text or symbols)natural_image
Exploded view diagram of a kitchen brush and blender, showing internal components like handle, blade, and cup (no text or labels)Mise en garde
natural_image
Stylized grayscale illustration of a tree with leaves and roots, enclosed in a circular frame (no text or symbols)natural_image
Exploded view diagram of a kitchen brush and blender unit (no text or labels)4 Lijevak za punjenje B stavite tako da je oznaka 📄 u ravnini s oznakom (▲ na cilindričnoj komori D.
natural_image
Stylized grayscale illustration of a tree with leaves growing from ground (no text or symbols)natural_image
Exploded view diagram of a kitchen brush and blender, showing internal components like handle, blade, and cup (no text or labels)Sposób użycia
Uwaga

natural_image
Stylized grayscale illustration of a tree with leaves growing from soil, enclosed in a circular frame (no text or symbols)natural_image
Stylized grayscale illustration of a tree with leaves and roots, enclosed in a circular frame (no text or symbols)natural_image
Exploded view diagram of a kitchen brush and blender, showing internal components like handle, blade, and cup (no text or labels)Varoitus
natural_image
Stylized grayscale illustration of a tree with leaves and roots, enclosed in a circular frame (no text or symbols)natural_image
Exploded view diagram of a kitchen brush and blender, showing internal components like blade, fan, and bucket (no text or labels)4 Plasser samlekaret B slik at (☐) - symbolet er på linje med (▲ symbolet på sylinderkammeret D.
Forsiktig
natural_image
Stylized grayscale illustration of a tree with leaves and roots, enclosed in a circular frame (no text or symbols)natural_image
Exploded view diagram of a kitchen brush and blender, showing internal components like handle, blade, and cup (no text or labels)Var försiktig


- Achtung
- A responsible approach!
- Controls and parts
- Installation
- Caution
- Operation
- Note
- Juicing process
- Mixed extraction process
- Frozen fruit sorbet process
- USE
- Disassembling
- Cleaning and care
- Storage
- Handling and transportation
- Environmental note
- Technical data
- Power supply:
- Dikkat
- Precaución
- Mise en garde
- Sposób użycia
- Uwaga
- Varoitus
- Forsiktig
- Var försiktig
Brand : GRUNDIG
Model : SJ 8640
Category : Juicer