
Basic 9066000 - Weather Station National Geographic - Free user manual and instructions
Find the device manual for free Basic 9066000 National Geographic in PDF.
| Product Type | Wireless Weather Station |
| Brand | National Geographic |
| Model | Basic 9066000 |
| Main Unit - Dimensions | 69 × 128 × 15 mm |
| Outdoor Sensor - Dimensions | 37.5 × 110 × 23 mm |
| Main Unit Power Supply | 2 AAA 1.5V batteries (included) |
| Sensor Power Supply | 2 AAA 1.5V batteries (included) |
| Recommended Battery Type | Alkaline (for outdoor use); lithium recommended for temperatures below 0°C |
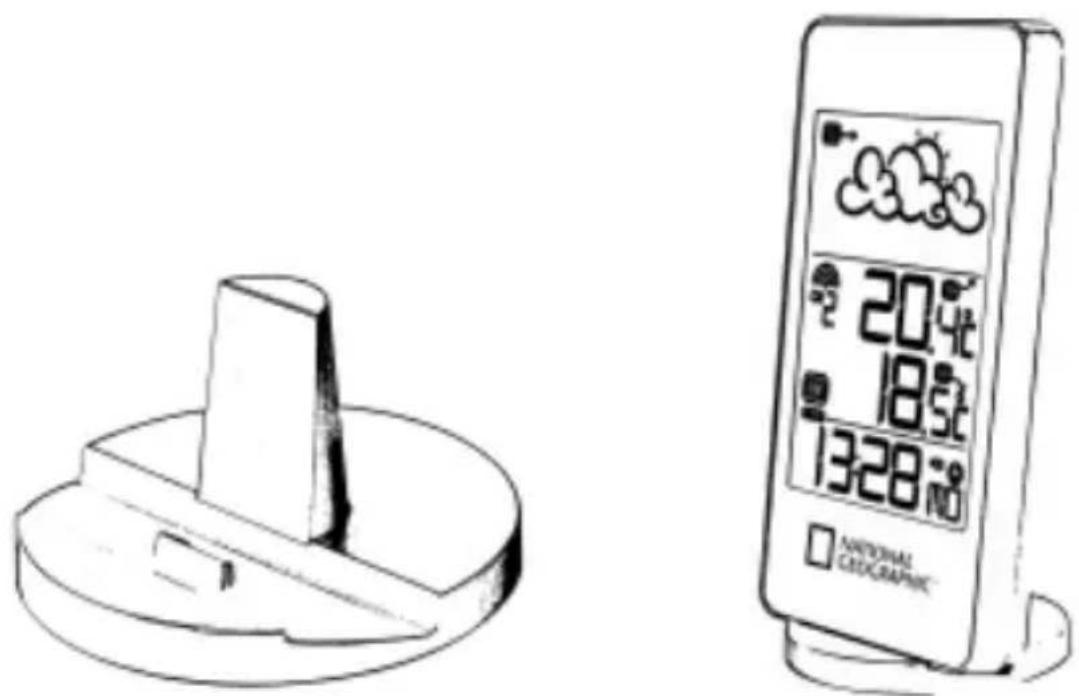
| Display | LCD screen with 3 windows: weather, temperature, clock |
| Weather Forecast | 7 icons (sunny to heavy snowfall) for 12 to 24 h |
| Indoor Temperature | Range: -5°C to +50°C; resolution 0.1°C |
| Outdoor Temperature (sensor included) | -10°C to +60°C; resolution 0.1°C; up to 3 sensors |
| Sensor Radio Frequency | 433 MHz |
| Wireless Range | Up to 30 m (100 ft) in open field |
| Clock | Radio-controlled (DCF 77); manual adjustment possible; 12/24 h format; 7-language calendar |
| Alarms | 2 time alarms (1 for Mon-Fri, 1 simple) + ice pre-alarm |
| Temperature Alarm | High and low programmable per channel |
| Min/Max Memory | Recorded minimum and maximum temperatures |
| Cleaning | Dry cloth only; remove batteries before cleaning |
| Safety | Do not disassemble; use only recommended batteries; keep out of reach of children |
| Disposal | Do not dispose of with household waste; comply with WEEE and used battery directives |
| Package Contents | Main unit, table stand, outdoor sensor, user manual |
Frequently Asked Questions - Basic 9066000 National Geographic
User questions about Basic 9066000 National Geographic
0 question about this device. Answer the ones you know or ask your own.
Ask a new question about this device
Download the instructions for your Weather Station in PDF format for free! Find your manual Basic 9066000 - National Geographic and take your electronic device back in hand. On this page are published all the documents necessary for the use of your device. Basic 9066000 by National Geographic.
USER MANUAL Basic 9066000 National Geographic
About this Instruction Manual
Please read the safety instructions in this manual carefully. To avoid damage to the unit and the risk of injury, only use this product as described in the manual.
Keep the instruction manual handy so that you can easily look up information on all the functions.

CAREFUL!
You will find this symbol before every section of text that deals with the risk of minor to severe injuries resulting from improper use.

NOTE!
You will find this symbol in front of every section of text which deals with the risk of damage to property or the environment.
Intended Use
This product is intended only for private use. It was developed as an electronic medium for the use of multimedia services.
General Warning

DANGER!
This device contains electronic components which operate via a power source (power supply and/or batteries). Do not let children use the device while unattended. Only use the device as described in the manual, otherwise you run the risk of an electric shock.
Children should only use the device under adult supervision. Keep packaging material, like plastic bags and rubber bands, out of the reach of children, as they pose a choking hazard.
Keep batteries out of the reach of children. Make sure you insert the batteries correctly. Empty or damaged batteries could cause burns if they come into contact with the skin. If necessary, wear adequate gloves for protection.

DANGER!
Do not expose the device to high temperatures. Use only the recommended batteries. Do not short-circuit the device or batteries, or throw them into a fire. Excessive heat or improper handling could trigger a short-circuit, a fire or an explosion!

NOTE!
Do not disassemble the device. In the event of a defect, please contact your dealer. The dealer will contact the Service Centre and can send the device in to be repaired, if necessary.
Use only the recommended batteries. Always replace weak or empty batteries with a new, complete set of batteries at full capacity. Do not use batteries from different brands or with different capacities. The batteries should be removed from the unit if it has not been used for a long time.
Notes on cleaning
Separate the device from the power supply or remove the batteries before cleaning.
! NOTE!
Only use a dry cloth to clean the exterior of the device. Do not use any cleaning fuid to avoid damaging the electronics.
Disposal
Dispose of the packaging materials properly, according to their type, such as paper or cardboard. Contact your local waste-disposal service or environmental authority for information on the proper disposal.

Do not dispose of electronic devices in the household garbage!
As per the Directive 2002/96/EC of the European Parliament on waste electrical and electronic equipment and its adaptation into German law, used electronic devices must be collected separately and recycled in an environmentally friendly manner.
In accordance with the regulations concerning batteries and rechargeable batteries, disposing of them in the normal household waste is explicitly forbidden. Please make sure to dispose of your used batteries as required by law - at a local collection point or in the retail market. Disposal in domestic waste violates the Battery Directive.
Batteries that contain toxins are marked with a sign and a chemical symbol.

Cd^1

Pb3

1 battery contains cadmium
^2 battery contains mercury
3 battery contains lead
EEC conformity explanation
Bresser GmbH has formed a Conformity Declaration in line with the applicable guidelines. This declaration is available for review.
Compliant in the following countries:
This device is approved for the EU and Switzerland. CH
Bresser GmbH
DE-46414 Rhede/Westf. · Germany

TABLE OF CONTENTS
- Introduction 28
- Operating elements 30
2.1 LCD (display) and keys/front view/rear view 30
2.2 Stand 32
2.3 Outdoor sensor 33 - Putting into operation 33
- Operation 35
4.1 Weather forecast window 36
4.2 Temperature window 36
4.3Clock window 39
4.3.1 Time function 39
4.3.2 Wake-up alarm function 41
5.Troubleshooting 44 - Technical data 45
1. INTRODUCTION
Thank you for selecting our weather station. This device provides precise time keeping and indicates trends, as well as displaying current temperature data from up to three outdoor sensors. (One single-channel outdoor sensor is included. Additional sensors are commercially available.)
In this package, you will find:
The base station (receiver)
- One separate table stand
- One single-channel outdoor sensor (transmitter)
This user manual
FEATURES OF THE BASE STATION
TIME
- Precise time and date are set via radio-controlled time signals (DCF77) from the time transmitter in Frankfurt, Germany.
12- or 24-hour time formats are selectable. - Manual adjustment of time and date (ideal if there is no DCF77 reception)
- Calendar date with month and day in one of seven languages: English, German, French, Italian, Spanish, Dutch or Swedish
- Separate weekday and single alarm with crescendo function
- Programmable with alert alarm in case of potential ice on the road
WEATHER
- Weather forecast for the next 12 to 24 hours in seven large icons: sunny, slightly cloudy, cloudy, rainy, heavy rain, snowy and heavy snow.
- User-defi ned high/low temperature alarm
- Indoor/outdoor temperature from up to three outdoor sensors
- One outdoor sensor is included, which connects to channel 1.
Additional sensors are required for channels 2 and 3.
FEATURES OF THE OUTDOOR SENSOR
- Remote data transmission to the base station via 433 MHz frequency
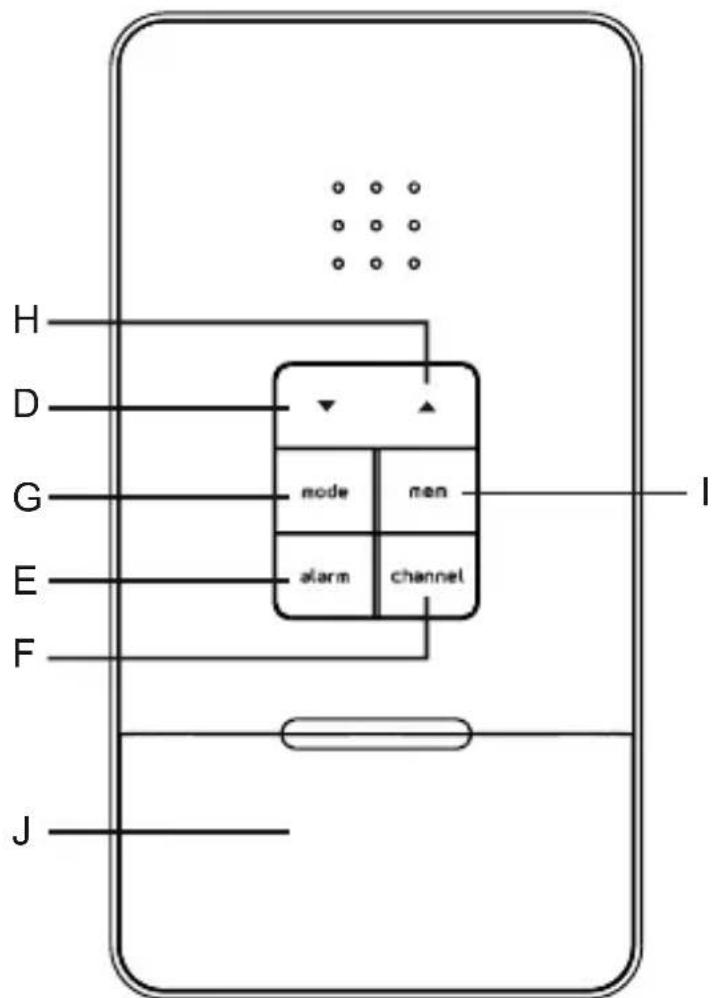
2. OPERATING ELEMENTS
2.1 LCD (DISPLAY) AND KEYS/FRONT VIEW/ REAR VIEW
All functions are depicted on the liquid crystal display (LCD) in three windows.
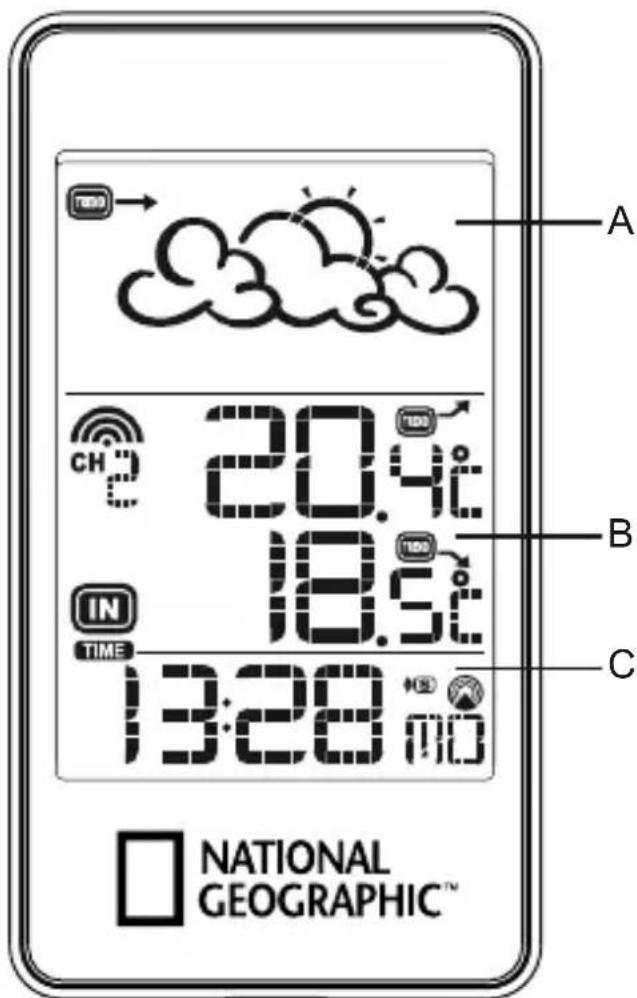
A. WEATHER window
B. TEMPERATURE window
C. CLOCK window
D. (▼) (DOWN) button
- Select the other window (CLOCK or TEMPERATURE)
- Press and hold for 2 seconds to search for wireless signal from the outdoor sensor.
- Decrease parameters in the setting mode.
E. ALARM button
- When clock window has been selected, press ALARM once to display the alarm time of weekday alarm [W], single alarm [S] and pre-alarm [PRE-AL]. Hold ALARM for 2 seconds to set weekday, single or pre-alarm alarm time.
- When TEMPERATURE window has been selected, press ALARM once to display the highest or lowest temperature alarm value. Hold ALARM for 2 seconds to set the highest or lowest temperature alarm value.
- When alarm (time or temperature) is on, press ALARM once to stop the alarm.
F. CHANNEL button
- Press CHANNEL to display the outdoor temperature readings of channel 1, 2 and 3 (additional outdoor sensors are required to use channel 2 and 3).
- Hold CHANNEL for 2 seconds to enter into circulation mode, and outdoor temperature readings of channels 1, 2 and 3 will be displayed automatically in every 5 seconds.
G. MODE button
-
When clock window has been selected, press MODE once to toggle between time with seconds display or time with weekday display. Press and hold MODE for 2 seconds to set language of the day of the week, year digit, month digit, date digit, hour format (12/24 hours), calendar format, hour digit and minute digit.
-
When TEMPERATURE window has been selected, press and hold MODE for 2 seconds to toggle the temperature unit between Celsius and Fahrenheit.
H. (▲) (UP) button
- Select the other window (CLOCK or TEMPERATURE)
- Increase the parameters in setting mode.
- Press and hold for 2 seconds to activate/deactivate radio-controlled time signal search manually.
I. MEM (HISTORY) button
- When TEMPERATURE window has been selected, press MEM to recall the minimum or maximum temperature readings of the base station and outdoor sensors. Press and hold for 2 seconds to clear collected memories.
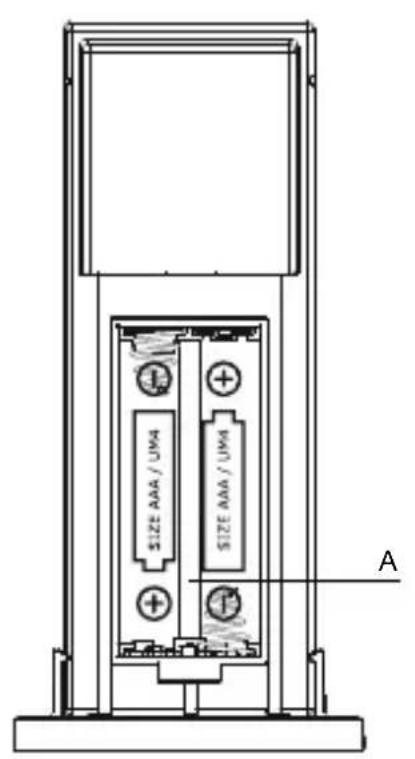
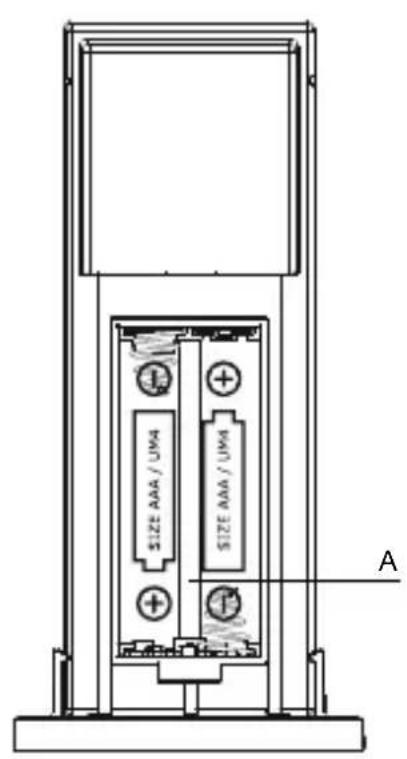
J. BATTERY COMPARTMENT
- Requires two AAA batteries.
2.2 STAND
The separate table stand gives the unit a special elegance when positioned on a shelf or on a table.
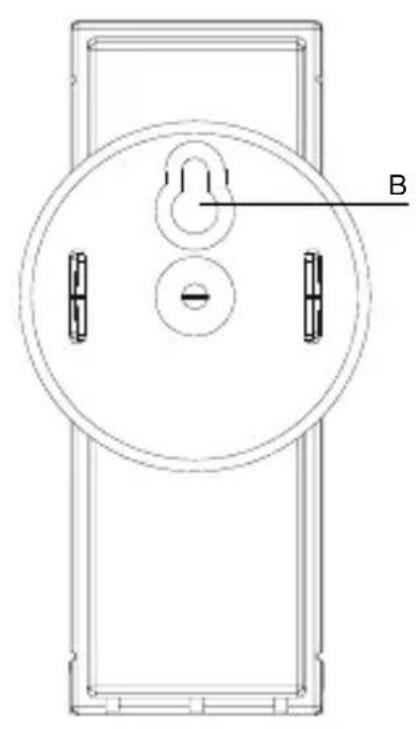
2.3 OUTDOOR SENSOR (TEMPERATURE)

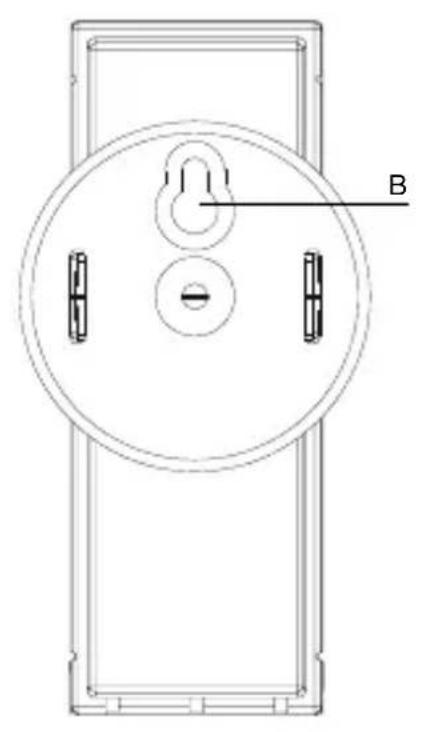
A. BATTERY COMPARTMENT:
Requires two AAA batteries.
B. WALL-MOUNT RECESSED HOLE:
Mount the sensor on the wall using the clip.
The communication between the base station (receiver) and the outdoor sensor (transmitter) is wireless, thus simplifying the installation. The outdoor sensor transmits data to the base station, with an operating range of up to 100 feet (30 metres) in an open area. The outdoor sensor can be placed indoors or outdoors, depending on the area where the temperature is intended to be measured. If you intend to measure outdoor conditions, place the sensor outdoors.
START UP THE COMMUNICATION:
- It is important to power up the base station before powering up the outdoor sensor. Immediately after batteries are installed, the outdoor sensor will start transmitting temperature data to the base station.
- It is strongly recommended to power up and test communication between the outdoor sensor and the base station before permanently mounting the sensor outside.
- During initial set up, place the outdoor sensor within one metre of the base station, in the same room, with both the receiver and transmitter far from any other electric product.
- After reception is established (remote readings will appear on the base station's display), position the outdoor sensor and the base station within the maximum transmission range of up to 30 metres (100 feet).
Note:
- Avoid pressing any button on the base station before the remote readings are displayed.
- Transmission or reception range may be affected by trees, metal structures, electronic appliances, surrounding building materials and how the base station and outdoor sensor are positioned.
PLACEMENT OF OUTDOOR SENSOR AND BASE STATION
- Place the outdoor sensor so that it faces the base station (receiver), minimizing obstructions such as doors, walls and furniture.
- Though the outdoor sensors are weather resistant, they should be placed away from direct sunlight, rain or snow. The optimal location for the outdoor sensor is under the eaves on the north side of a building with free air circulation.
- The outdoor sensor can be placed on a flat surface or mounted on a wall vertically by using the included stand. To affix the stand in place use a screw rather than a nail.
-
Ideally, place the outdoor sensor over soil, rather than asphalt, which may affect the correct temperature measurement.
-
Avoid placing the outdoor sensor near sources of heat, such as chimneys and heating elements.
- Avoid areas that collect heat from the sun and radiate heat, such as metal, brick or concrete structures, paving and patios.
- The international standard for accurate air temperature measurements is 1.25 metres (4 feet) above the ground.
- Make sure that the base station is located within the operating range of all outdoor sensors.
- Ideally, the base station should be placed within line of sight of the outdoor sensors. Avoid placing the base station near surfaces that emit or radiate heat (e.g. heating ducts or air conditioners) and areas with interference from wireless devices (e.g. cordless phones, radio headsets, baby monitoring devices and other electronics).
IMPORTANT NOTICE ABOUT BATTERIES
- The weather station comes with batteries to make start-up easy for you. These batteries may not last as long as new batteries may. When you have to replace the batteries on the outdoor sensor, we recommend you use alkaline batteries. One advantage of this type of battery is better performance when the outside temperature falls below 0^ (32^) . For optimal performance, we recommend lithium batteries.
- Avoid using rechargeable batteries. Rechargeable batteries do not maintain correct power requirements.
- First, insert the batteries into the base station and then insert the batteries into the outdoor sensor.
- Insert batteries before first use, matching the polarity indicated in the battery compartment.
4. OPERATION
Immediately after batteries are installed, the outdoor sensor will start transmitting temperature data to the base station at regular intervals.
Once the base station is powered up by inserting the batteries, the display will show all available LCD segments for a moment.
Important:
After this, the base station will scan the outdoor sensors (channel 1 to channel 3) in the TEMPERATURE window. There is no need to press any button during this process. After this, the base station will start to scan the DCF77 time transmitter in the CLOCK window. The default time the base station starts with is 12:00, which will be automatically reset during this process. There is no need to press any button during this process, either.
Recommendation:
Allow the base station to receive the outdoor sensor's data and the time without touching any button for about 6-8 minutes during the base station's initial set up. This will give the base station time to synchronize with the sensors, stabilize pressure readings and attain default settings.
4.1 WEATHER FORECAST
This unit is capable of detecting atmospheric pressure changes. Based on collected weather data, it forecasts the weather for the next 12 to 24 hours.
| When the display shows... | |||||||
| The forecast is... | Sunny | Partly cloudy | Cloudy | Rainy | Heavy rain | Snowy | Heavy snow |
Note:
The weather forecast accuracy is approximately 70% . The weather station shows the forecasted (predicted) conditions, not the current conditions. The 'Sunny' icon indicates clear weather, even when displayed at night.
4.2 TEMPERATURE WINDOW
The base station supports up to three outdoor sensors, each corresponding to a separate channel of the temperature display. The temperature can be displayed in Celsius (C) or Fahrenheit (F).
A temperature alert function is available for all channels. It can be programmed to sound when one of the remote sensors detects a temperature that exceeds or falls below the preset upper and lower limits.
For all operations described in Chapter 4.2, press UP ▲ or DOWN ▼ until the [IN] icon, to the left of the indoor temperature value, begins to flash.
FORCED SEARCH FOR REMOTE SENSORS
Select the TEMPERATURE window.
The base station can be manually activated to search for the signal from the selected outdoor sensor by pressing and holding DOWN for 3 seconds.
The wave icon above the current channel icon shows the connection status of the corresponding outdoor sensor:
| Icon Status | |
| Searching for the signals from the outdoor sensor | |
| Corresponding outdoor sensor signal received successfully | |
| No signals received for over 1 hour |
During this search procedure, the device searches the same outdoor sensor that was already previously logged in. If you replace the batteries in the outdoor sensor, the sensor gives itself a new code and will no longer be recognized by the base station. You can resolve this problem by:
- removing the batteries from the display unit and replacing them with new ones, or,
- if the batteries are still working, repeating the log in procedure as described above, by pressing and holding for 3 seconds, and while the wave icon is blinking, press and hold again for 3 seconds. The temperature indicator will start to blink, indicating that a new sensor is being searched for and will be logged in.
VIEWING REMOTE TEMPERATURE
Select the TEMPERATURE window.
Static Display: Press CHANNEL to select measurements from different remote sensors (channel 1, 2 or 3).
Channel Auto-Scan Display: To enable an automatic scan of all present channels, press and hold CHANNEL until the [ ] icon is displayed. The measurements from each remote channel will be displayed, alternating every 5 seconds.
Note: The channel auto-scan feature can be activated only if there is more than one remote sensor operating, and they are set to different channels.
PROGRAMMING TEMPERATURE IN CELSIUS OR FAHRENHEIT
Select the TEMPERATURE window.
Press and hold MODE for 3 seconds to toggle the temperature between Celsius (C) and Fahrenheit (F).
TEMPERATURE ALARM
Select the TEMPERATURE window.
Press ALARM to select the desired alarm: the upper temperature alert with [ ] icon (if disabled, display shows OFF), or the lower temperature alert with [ ] icon (if disabled, display shows OFF). Press and hold ALARM until the temperature digits flash. Adjust the temperature digits using or . Press and hold either button for faster setting. Press ALARM to confirm your selection and return to the temperature alarm selection screen.
ACTIVATING OR DEACTIVATING TEMPERATURE ALARMS:
Once the above alerts are displayed, press to enable, or to disable the alert.
VIEWING MAX/MIN READINGS
Select the TEMPERATURE window.
Press MEM to read the minimum temperature of all sensors (indoor and remote), indicated by the MIN icon. Press MEM again to read the maximum temperature of all sensors (indoor and remote), indicated by the MAX icon. Press MEM again to return to the current values.
RESETTING TEMPERATURE MEMORIES
Select the TEMPERATURE window.
Press and hold MEM for 3 seconds to clear all maximum and minimum temperatures stored in the unit's memory.
4.3 CLOCK WINDOW
For all operations described in Chapter 4.3, press or until the [TIME] icon, in the left corner of the time window, begins to flash.
4.3.1 TIME FUNCTION
The radio-controlled time signal (DCF 77) is transmitted from the central atomic clock in Frankfurt/Main, Germany It has a reception range of ap-
proximately 1,500 kilometres. If the [lower icon is not fully lit [ ], or if the time and date are not set automatically, please consider the following:
During nighttime hours, atmospheric disturbances are typically less severe and radio signal reception may improve. Reception once a day is suffi cients to keep the clock accurate within 1 second.
Make sure the unit is positioned at least 2 metres (8 feet) from any interference source, such as a TV, computer monitor or microwave. Within concrete- and metal-walled rooms, such as basements or off ice buildings, the signal may be weakened. In such cases, place the base station near the window for better reception. Sometimes it also helps to turn the unit by 90^ .
Note: In the setting situations described below, the unit will automatically exit the programming mode if it does not detect a button press for about 2 minutes. Any setting made before this will not be acknowledged by the unit. Therefore, after you have made changes to the settings, close the setting mode as described in the below chapters to save your changes.
HOW TO SET THE RADIO-CONTROLLED CLOCK
-
After the batteries are installed, the clock will search for the radio signal automatically (DCF77 from Germany). It takes about 3-10 minutes to finish this process, and the icon [ ] will flash constantly. The icon [ ] will be displayed during good reception and [ ] during poor reception.
-
If you wish to disable the auto-reception feature, hold for 3 seconds to disable it. Having done that, the tower icon will disappear.
-
To enable the auto-reception feature again, hold for 3 seconds again to start the reception and regular synchronization (daily at 0:00, 3:00, 6:00 and 12:00).
| ICON Time signal | reception strength |
| (Flashing) Undefined data | |
| ▲ | No reception for the past 24 hours |
| Weak signal, but can be decoded | |
| Strong signal | |
-
If the radio signal is received, the date and time will be set automatically and the radio control signal icon [ ] will turn on.
-
If the clock fails to receive the time signal, it will show the [ ]icon. If the time is not correct, you may set the time manually.
MANUAL SETTINGS
To set the clock manually, make sure the display shows the LOCAL time, not the [ZONE] time, and then press and hold MODE. It will now show the language. You may choose between English (EN), German (DE), French (FR), Italian (IT), Spanish (SP), Dutch (DU) and Swedish (SW). Press or to change it. Press MODE to confirm. You are now in the year setting. Repeat the same procedure to set the year, month, day, day-month format, 12/24 hour format, hour and minute. Each time you press MODE, you will enter a new setting:
Year Month Day Day-month format 12/24 hour format Hour Minute
While you are changing settings, pressing and holding or will change the value rapidly. If there is an item you do not wish to change, simply press MODE to bypass the item. After the last setting, pressing MODE will exit the setting mode and return to the clock mode.
HOW TO SET THE TIME ZONE
To set the time zone, make sure the display shows the time with the [ZONE] icon. Then press and hold MODE.
Press or to adjust the value in steps of 30 minutes. Press and hold either button to change the value rapidly. Press MODE to confirm your selection.
SELECT THE CLOCK/CALENDAR DISPLAY
Each time you press MODE, you will cycle through the following settings:
- Hour: Minute: Second
- Hour: Minute: Weekday
- Hour: Minute: Weekday of the time zone
- Hour: Minute: Second of the time zone
Day: Month
4.3.2 WAKE-UP ALARM FUNCTION
There are three time alarms available on the base station:
- Weekday Alarm [W]
The alarm sound will be activated and the icon will flash on weekdays (Monday-Friday) when it is armed and the alarm time is reached.
- Single Alarm [ s ]
The alarm sound will be activated and the icon will flash when it is armed and the alarm time is reached. Once it is finished, the single alarm will be disabled automatically.
- Pre-Alarm [PRE-AL]
The pre-alarm will be activated and the icon will flash if the temperature of channel 1 falls below 0^ C . It is programmable to sound 15, 30, 45, 60 or 90 minutes earlier than the weekday alarm or single alarm time.
ACTIVATING/DEACTIVATING THE TIME ALARMS
-
Press ALARM to rotate between:
-
Weekday Alarm Time (displays OFF if weekday alarm is deactivated)
- Single Alarm Time (displays OFF if single alarm is deactivated)
-
Pre-Alarm Time (displays OFF if pre-alarm is deactivated)
-
When the above alarms are displayed, pressing will activate and pressing will deactivate the corresponding alarm.
Note:
Press MODE anytime during the above alarm setting procedure to return to normal clock display.
SETTING THE TIME ALARMS
- Press ALARM to select the alarm which you wish to config gure.
- Press and hold ALARM until hour starts fl ashing in the display.
- Set Alarm Hour: Press or to adjust.
Press and hold either button to change the value rapidly.
- Set Alarm Minutes:
Press or to adjust. Press and hold either button to change the value rapidly.
Press ALARM to confirm your selection.
- Upon completion, the display will be returned to the alarm selection screen.
Note:
Pre-alarm cannot be activated if weekday alarm or single alarm is not enabled.
STOP THE ALARM SOUND
The alarm will sound for 2 minutes with increasing intensity.
To stop it, press ALARM while the alarm is sounding to disable the alarm.
Note:
For weekday alarm, pressing ALARM will only disable the alarm for the current day. The alarm will be activated again the next day (if it falls between Monday and Friday). If the alarm is not interrupted by pressing the ALARM key while the sound is active, it will repeat itself three times, every 8 minutes. If you want to stop the alarm during one of the 8 minute silent periods, you have to follow the steps described in the section titled 'Activating/Deactivating the Time Alarms'.
5. TROUBLESHOOTING
In case of a malfunction, always check the batteries and, if necessary, replace them in the base station and in the outdoor sensor(s).
Please also check the list below for solutions before contacting customer service.
| Issue Symptom Solution | ||
| Base station | Radio-controlled time signal is not received | Place unit by the window and keep it there overnight |
| Outdoor sensor | Cannot locate remote sensor | Check batteries |
| Check location | ||
| Press and hold ▼ on the base station to search for the signal from the outdoor sensor | ||
6. TECHNICAL DATA
BASE STATION
Indoor Temperature
Operating range: -5^ to 50^ (23°F to 122°F)
Temperature resolution: 0.1^ / 0.2^
Power
2 x AAA 1.5V batteries
Dimensions
69mmL× 128mmH× 15mmW
OUTDOORSensor
Temperature
Operating range with alkaline batteries: -10^ to +60^
(14°F to 140°F)
Temperature resolution: 0.1^ / 0.2^
Sampling Interval: 10 seconds
RF Transmission Frequency: 433 MHz
RF range: Maximum 100 feet (30 metres)
Temperature transmission cycle: approximately 45 seconds
Power
2 x AAA 1.5V batteries
Dimensions
37.5 mm L x 110 mm H x 23 mm W
Informations generales
G. Tasto MODE (MODALITA)
Con这对于 the apparecchio, I'm not sure how to find a way to get it. But I'm sure that it's possible to do so by using the formula
Frequenza transmissions RF: 433 MHz
2.3 SENSOR EXTERNO (TEMP)
- Исторы即时ities among the 19th century, including the 19th century and the 19th century.
- HaxMMteи уdeckЖиBaIte KhoIky B TeueHne DByx ceKyHd ДлЯ NO-нSCKa сngHaJa BHeShHero DaTUnKa;
- Историяе щдя умени паиметров в ржиме настория.
E. Khonka ALARM (CinHana):
Bokhe YACbl nocledoBaTeIbHo haxmMaTe KhoNky ALARM, yTo6byBvNDetb 3aDaHHOe BpeM eKeIHeBHOrO bDnIbHnKa [W], OndHO-KpaTHOrO bDnIbHnKa [S] n npedynpexKdEHHa [PRE-AL]. DJa3aHaHnBpeMeHn bDnIbHnKa HaKMITE n ydePxNBaTc KhoNky B TeueHne DByx CeKuHd;
BokHe TEMNEPATyPA nocJeIOBaTeIbHO haXImaIte KhoNky ALARM, yTo6bI yBnIeTb MInHMaJIbHOe I MaKcIMaJIbHOe 3NaueHne Tempeatypbl, npN KOtOpblx cpa6Otaet npedynpeJckDeHne.ДЯ 3a- daHnMnHMaJIbHOI mN MaKcIMaJIbHOI Tempeatypbl npedynpeJckDeHnHaKmTE HdepKHBaIte KhoNky B TeueHne DByx CeKyH;
Korda cpa6oTaET npedynpexKdEHe, naKMnte KhoNky ALARM, yTo6bI OTKJIIOHTb CnHaJ.
F. Khonka CHANNEL (daTvnK):
- Haxmnte KhoNky CHANNEL, yTo6bI y3HaTb TempepaTypy, cHTbI-BaemyIO ODNIM I3 BHeuHnx DaTuNKOB (Tpe6yOTcR DOONHITeJIbHbIe DaTuKn);
- Haxmte u ydepknaTe KhoNky CHANNEL B TeueHne DByx ceKynD, UTObI BKIOHTb peKIM aBTOMaTHueCKOTo nepexOda: B 3TOM peKInMe HHΦOpMaunKaJDoTo DaTuNKa 6yDet BbIBODnTBcH Na 3KpaH NO OuepeDi KaJDbIe PAn TcKynD.
G. Khoonka MODE (pexim):
Bokhe YACbl HaKMTe KhoNky MODE, TTo6bl nepeKJIouHTbcra MeJdy peKIMamn OTo6paXKeHnBpeMeHN (Yacbl N CeKHyDbl nIIn Yacbl I DeHb HeJeN).HaKMTe N ydePjKBaIte KhoNky B TeueHne
A B T O M A T N U E C K A C H X P O H N 3 a c u n y B P E M e H N I P O N 3 B O D N T C R 3 a C u e T I P N I E M A C H H A L A N e p e d a t u n k a D C F 7 7 n 3 Φ p a n K F y p r t a - H a - M a i N e. P a d n y C P h e M a C H H A L A - O K O N O 1 5 0 0 K N I O M e T P O B. E c n 3 h a u o K [ ] 6 a w H N T H e N O H O C T b I O [ ] n l n e c n a B T O M A T N U E C K A H a C T P O W K N B P E M e H N I D a T b I H E B O 3 M O X K H A, N O N P O B Y J T E B B I N O N H I T b O N I C A H H Y I O H N I K E I P O- U E D U P Y.
B HocHoe BpeMa aTMocΦepHbIe NOMEXM MHNMaJIbHbI, I npHeMa paNOCnHaJa MoKeT yLyUaTbCSr. OdHOro POnKJIuOeHnK CnHaJy B TeueHne DnA DoCTaTOUHO dJa TOrO, UTo6bl POnDePJKBaTb TOUHOCTb NOKa3aHn BpeMeHn Do OdHOJ CeKHyDbl.
- Y6eIntecb, yTO B paIHyce DByx MetpoB OT OCHOBHOrO 6Ioka Het noCTOpOHnIX npi6OpOB, KOTOpBle MOrYT Bbl3BaTb NOMExn npi npHeMe CnHaJa (TeJIeBn3Op, MoHITop KOMNbIOTepa, CBU-Neu b T.I.).
B OΦиСьIx NOMeUeHnIx IIN NOДВaIax CnIHaJI MOXe 6bITb OcIa-6JIeH. B ΘOM cIyuae NOMeCTIte OCHOBHOJ 6IOK PЯIOM C OKHOM. IOBOpOT OCHOBHorO 6Ioka Ha 90^ MoXe TaKHe yCnIHTb npHem.
IprimeaHne: Pn BbIOJIHeHHo OJHO n3 HIXeONHbIX Opeaun Ipn6op aBTOMaTHueCKN OTMeHNT JIObIe N3MeHEnr N BepHeTcB INC-XOJHOe COCTOHNHe, eCNI He NaKIMaTb KHOJKN B TeUeHne DByX MInHyT. CtapaiTeCb NOdTBeRJaTb N3MeHEnr Cpa3y NocLe INX BHeCeHnY.
HACTPOIKA ABTOMATNUECKO CHHXPOHN3AUHN BPEMEHN
- После установки батаразец лпибор начет пося сигнана пeredатука DCF77. 3тот поцess может заюгь 3-10 мнунт.
- EcII IN Bbl XOTIte OTKJIIOHTb aBTOMaTHUeCKyIO cINHXPOHn3aunHO, HAKMITE n ydePKNBaIte KHOJky (BBepx) B TeueHne Tpex CeKyHd. PocIe 3TOrO 3HaQOK 6aUnn NcYe3HeT C 3KpaHa.
-Чтобы BKЛЮЧИТь aВТOMaTиeCKуH CнHXpoHn3aUHIO, HαЖМITE n ydeprKnBaIte KhoIKy (BBePx) B TeueHne Tpex ceKyHd. CnHXpoHn3aUHЯ npOncXoJNT B NOJIHOuY, TpN YaCa HOuN, IeCTb YacOB yTpA N B ПОДeHb.
National Geographic's net proceeds support vital exploration, conservation, research, and education programs.
Visit our website: www.nationalgeographic.com
© 2012 National Geographic Society
NATIONAL GEOGRAPHIC and Yellow Border Design
are trademarks of the National Geographic Society, used under license. All rights reserved.

BRESSER
Bresser GmbH

- About this Instruction Manual
- CAREFUL!
- NOTE!
- Intended Use
- General Warning
- DANGER!
- Notes on cleaning
- Disposal
- EEC conformity explanation
- Compliant in the following countries:
- TABLE OF CONTENTS
- INTRODUCTION
- FEATURES OF THE BASE STATION
- TIME
- WEATHER
- FEATURES OF THE OUTDOOR SENSOR
- OPERATING ELEMENTS
- LCD (DISPLAY) AND KEYS/FRONT VIEW/ REAR VIEW
- ALARM button
- CHANNEL button
- MODE button
- (▲) (UP) button
- MEM (HISTORY) button
- BATTERY COMPARTMENT
- STAND
- OUTDOOR SENSOR (TEMPERATURE)
- START UP THE COMMUNICATION:
- Note:
- PLACEMENT OF OUTDOOR SENSOR AND BASE STATION
- IMPORTANT NOTICE ABOUT BATTERIES
- OPERATION
- Important:
- Recommendation:
- WEATHER FORECAST
- TEMPERATURE WINDOW
- FORCED SEARCH FOR REMOTE SENSORS
- VIEWING REMOTE TEMPERATURE
- PROGRAMMING TEMPERATURE IN CELSIUS OR FAHRENHEIT
- TEMPERATURE ALARM
- ACTIVATING OR DEACTIVATING TEMPERATURE ALARMS:
- VIEWING MAX/MIN READINGS
- RESETTING TEMPERATURE MEMORIES
- CLOCK WINDOW
- TIME FUNCTION
- HOW TO SET THE RADIO-CONTROLLED CLOCK
- MANUAL SETTINGS
- HOW TO SET THE TIME ZONE
- SELECT THE CLOCK/CALENDAR DISPLAY
- WAKE-UP ALARM FUNCTION
- ACTIVATING/DEACTIVATING THE TIME ALARMS
- SETTING THE TIME ALARMS
- STOP THE ALARM SOUND
- TROUBLESHOOTING
- TECHNICAL DATA
- BASE STATION
- OUTDOORSensor
- Informations generales
- Tasto MODE (MODALITA)
- SENSOR EXTERNO (TEMP)
- HACTPOIKA ABTOMATNUECKO CHHXPOHN3AUHN BPEMEHN
- BRESSER
Brand : National Geographic
Model : Basic 9066000
Category : Weather Station