kMix KMX59 - Blender KENWOOD - Free user manual and instructions
Find the device manual for free kMix KMX59 KENWOOD in PDF.
| Product type | Stand mixer |
| Brand | Kenwood |
| Model | kMix KMX59 |
| Bowl | Stainless steel |
| Included accessories | K-beater, whisk, dough hook, spatula, splash guard, tightening key |
| Number of speeds | Continuous electronic adjustment (from min to max) |
| Soft start function | Yes (gentle start) |
| Automatic stop | Yes, when the head is raised |
| Maximum capacity - Shortcrust pastry | 680 g of flour |
| Maximum capacity - Fruit cake | 2.72 kg of mixture |
| Maximum capacity - Firm bread dough | 1.35 kg of flour |
| Maximum capacity - Soft bread dough | 1.3 kg of flour |
| Maximum capacity - Egg whites | 12 whites |
| Recommended resting period | 20 minutes between preparations |
| Body material | Plastic (not specified, estimation) |
| Power supply | See label under the appliance |
| Body cleaning | Wipe with a damp cloth, do not immerse |
| Accessory cleaning | Hand washing recommended (bowl and splash guard dishwasher safe) |
| Safety | Do not use non-recommended accessory, do not leave unattended, keep out of reach of children |
| After-sales service | Contact the selling store or a Kenwood approved repairer |
Frequently Asked Questions - kMix KMX59 KENWOOD
User questions about kMix KMX59 KENWOOD
0 question about this device. Answer the ones you know or ask your own.
Ask a new question about this device
Download the instructions for your Blender in PDF format for free! Find your manual kMix KMX59 - KENWOOD and take your electronic device back in hand. On this page are published all the documents necessary for the use of your device. kMix KMX59 by KENWOOD.
USER MANUAL kMix KMX59 KENWOOD
KMX50 series, KMX60 series
KMX80 series, KMX90 series
instructions
istruzioni
instrucciones
know your Kenwood kitchen machine
safety
- Read these instructions carefully and retain for future reference.
- Remove all packaging and any labels.
- Switch off and unplug before fitting or removing tools/attachments, after use and before cleaning.
- Keep your fingers away from moving parts and fitted attachments.
- Never leave the machine on unattended.
- Never use a damaged machine. Get it checked or repaired: see 'service and customer care'.
- Never let the cord hang down where a child could grab it.
- Never let the power unit, cord or plug get wet.
- Never use an unauthorised attachment or both outlets at the same time
- Never exceed the maximum capacities.
- When using an attachment, read the safety instructions that come with it.
-
Take care when lifting this appliance as it is heavy. Ensure the head is locked and that the bowl, tools, outlet cover and cord are secure before lifting.
-
This appliance shall not be used by children. Keep the appliance and its cord out of reach of children.
Children should be supervised to ensure that they do not play with the appliance.
-
Misuse of your appliance can result in injury.
-
Appliances can be used by persons with reduced physical, sensory or mental capabilities or lack of experience and knowledge if they have been given supervision or instruction concerning use of the appliance in a safe way and if they understand the hazards involved.
-
Only use the appliance for its intended domestic use. Kenwood will not accept any liability if the appliance is subject to improper use, or failure to comply with these instructions.
know your Kenwood kitchen machine
before plugging in
- Make sure your electricity supply is the same as the one shown on the underside of your machine.
- This appliance conforms to EC directive 2004/108/EC on Electromagnetic Compatibility and EC regulation no. 1935/2004 of 27/10/2004 on materials intended for contact with food.
know your Kenwood kitchen machine
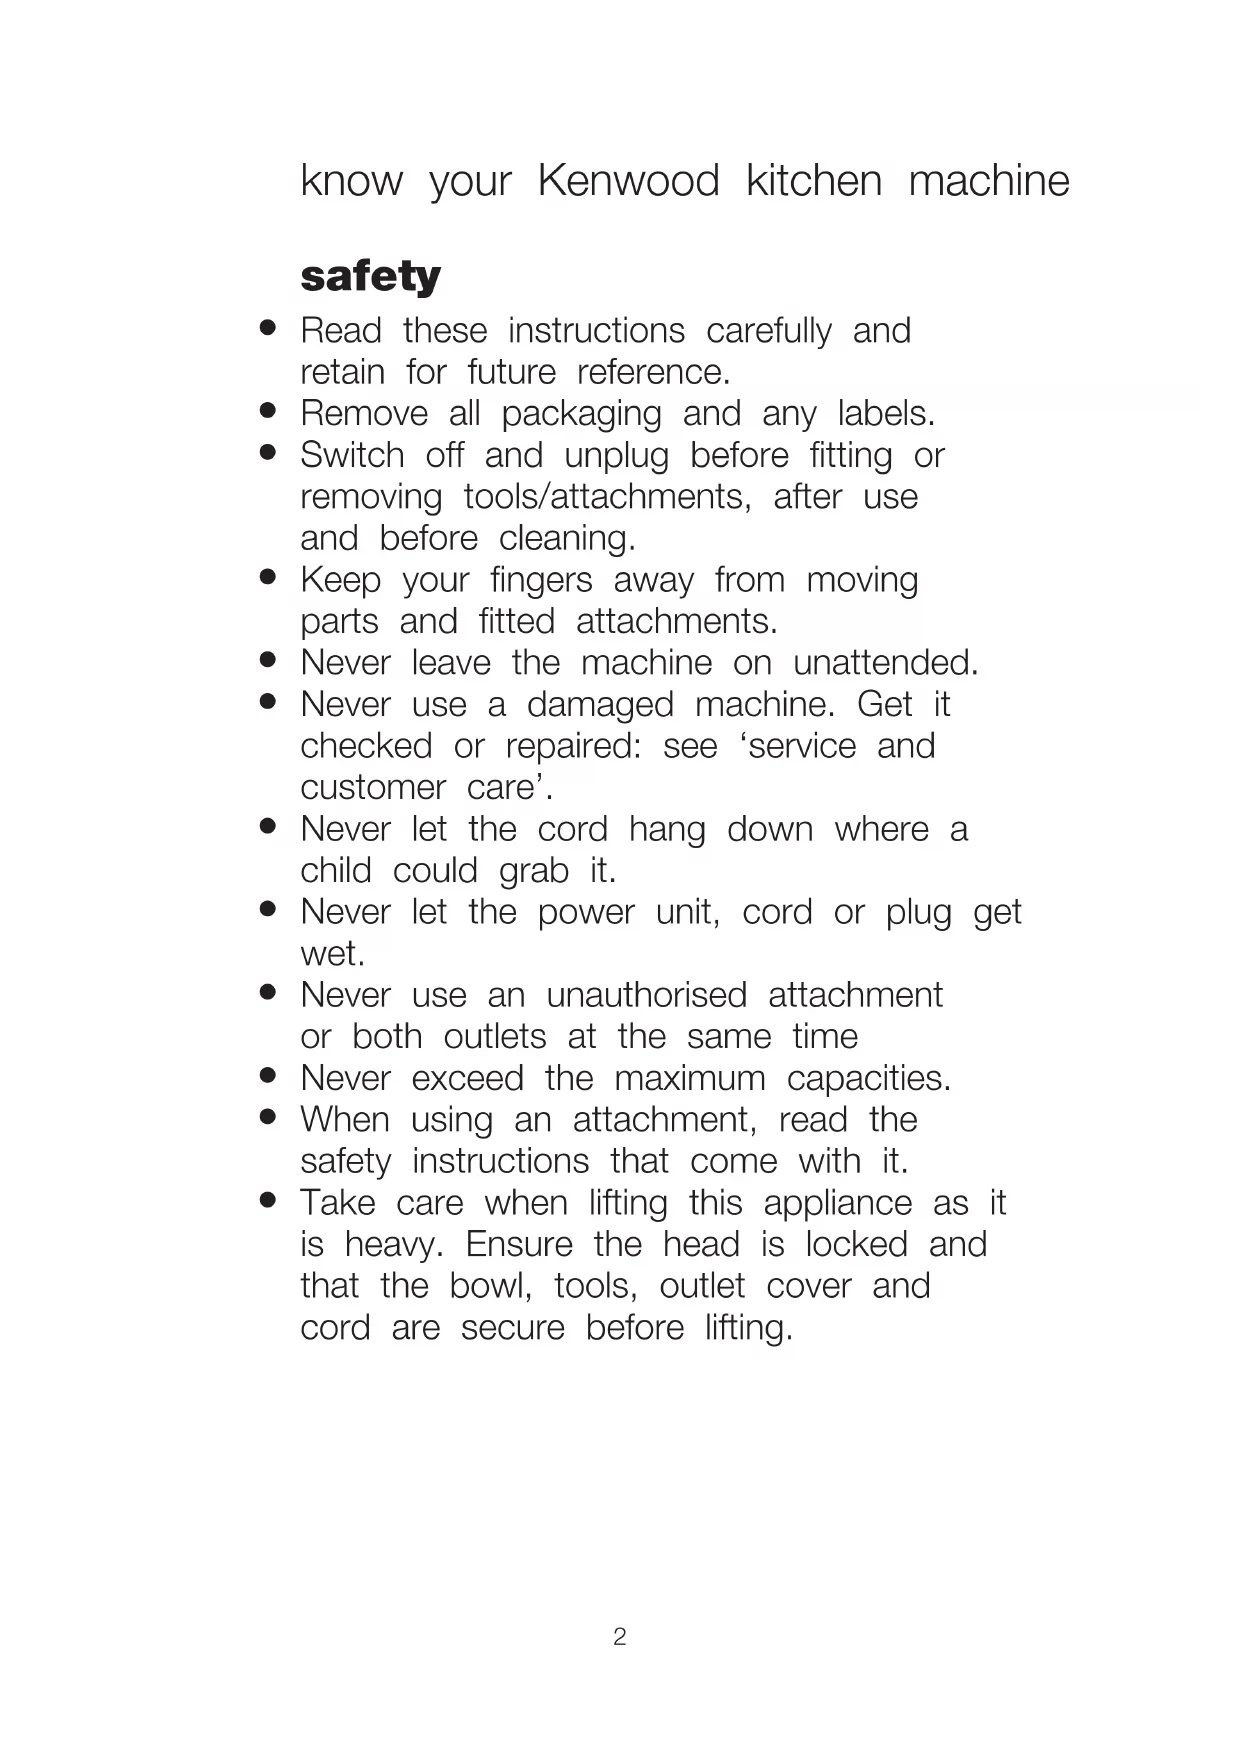
①mixer head
(2)attachment outlet
③ outlet cover
④ bowl
⑤tool socket
⑥ on/off and speed switch
⑦mixer ready indicator light
⑧mixer body
head release lever
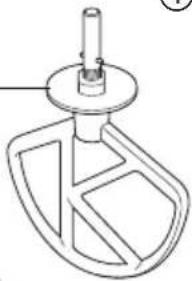
⑩ K-beater
whisk
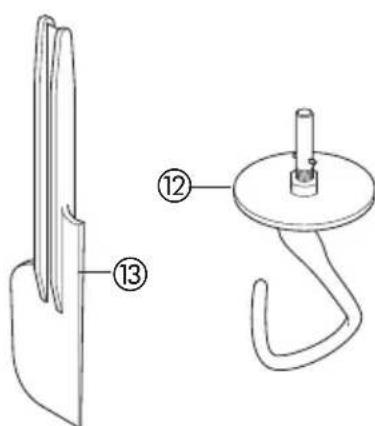
⑫ dough hook
③spatula
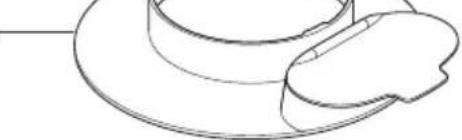
④plashguard
15spanner
the mixer
the mixing tools and some of their uses
K beater • For making cakes, biscuits, pastry, icing, fillings, éclairs and mashed potato.
whisk - For eggs, cream, batters, fatless sponges, meringues, cheeses, moussees, souffles. Don't use the whisk for heavy mixtures (eg creaming fat and sugar) - you could damage it.
dough hook For yeast mixtures.
to use your mixer
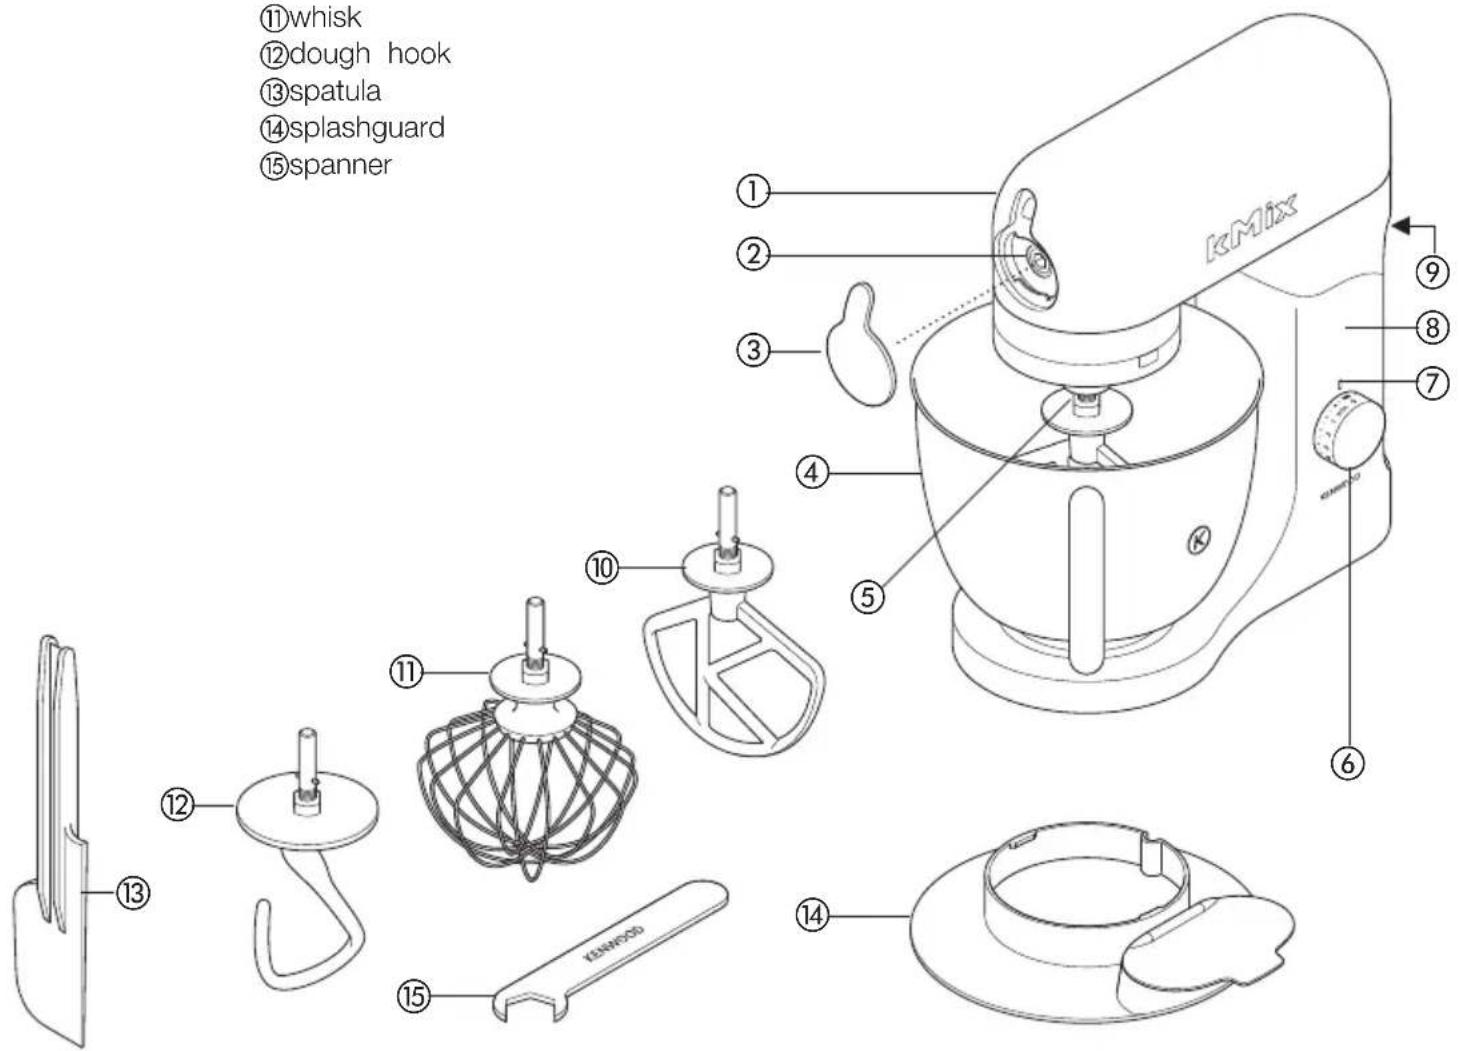
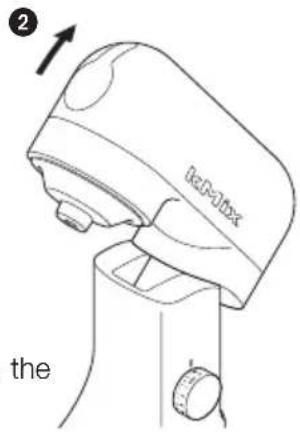
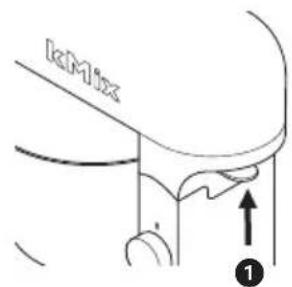
1 Lift the head release lever at the back of the appliance ① and at the same time lift the head until it locks in the raised position ②.
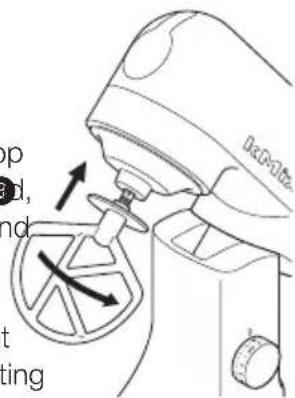
to insert a tool 2 Push up until it stops then turn 3.
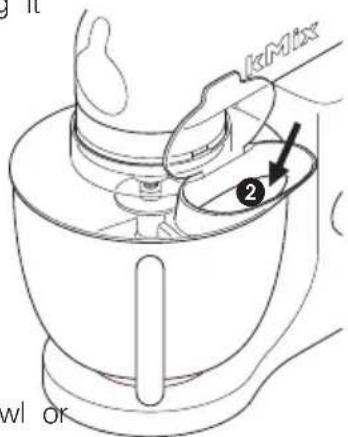
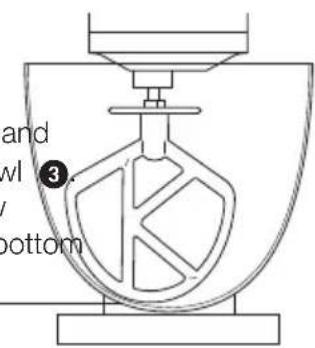
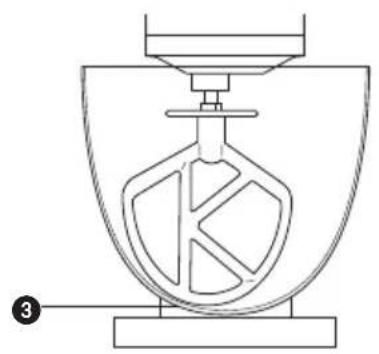
3 Fit the bowl onto the base. Place the handle directly over the unlock symbol ⑥ then gently turn the bowl clockwise until the handle is directly above the lock symbol . DO NOT USE excessive force and DO NOT overtighten ④.
4 Lift the head release lever at the back of the appliance and at the same time lower the mixer head .
5 Plug into the power supply and the mixer ready indicator light will glow.
6 Switch on by turning the speed switch to the desired setting. to remove a tool 7 Turn and remove.
important
-
If the mixer head is raised during operation, the machine will stop working straight away. To re-start the mixer, lower the mixer head, turn the speed switch to the off position, wait a few seconds and then re-select the speed. The mixer should resume operating straight away.
-
Whenever the mixer head is raised the mixer ready indicator light will go out. When the head is lowered, the light will glow indicating the mixer is ready to use.
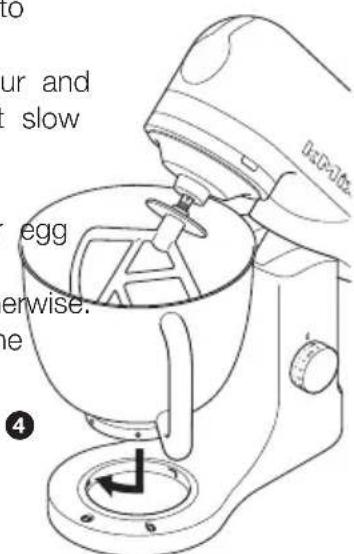
Hints - The fold function can be used for folding light ingredients into heavier mixtures for example meringues, moussees, fruit fools, Genoese sponges and souffles, and to slowly incorporate flour and fruit into cake mixtures. The mixer will operate at a constant slow speed.
- Eggs at room temperature are best for whisking.
Before whisking egg whites, make sure there's no grease or egg yolk on the whisk or bowl.
Use cold ingredients for pastry unless your recipe states otherwise.
- When creaming fat and sugar for cake mixes, always use the fat at room temperature or soften it first.
the mixer
- Your Kitchen Machine has been fitted with a 'soft start' feature to minimise spillage. However if the machine is switched on with a heavy mixture in the bowl such as bread dough, you may notice that the mixer takes a few seconds to reach the selected speed.
points for bread making
important - Never exceed the maximum capacities below - you will overload the machine.
- To protect the life of the machine always allow a rest of 20 minutes between loads.
- If you hear the machine labouring, switch off, remove half the dough and do each half separately.
- The ingredients mix best if you put the liquid in first.
- At intervals stop the machine and scrape the mixture off the dough hook.
- Different batches of flour vary considerably in the quantities of liquid required and the stickiness of the dough can have a marked effect on the load imposed on the machine. You are advised to keep the machine under observation whilst the dough is being mixed; the operation should take no longer than 5 minutes.
speed switch
These are a guide only and will vary depending upon the quantity of mix in the bowl and the ingredients being mixed.
K beater • creaming fat and sugar start on 'min', gradually increasing to a higher speed.
- beating eggs into creamed mixtures 4 - 'max'.
- folding in flour, fruit etc 'min' - 1 or fold.
- all in one cakes start on 'min', gradually increase to 'max'.
- rubbing fat into flour 'min' - 2.
whisk Gradually increase to 'max'. dough hook Start on min, gradually increasing to 1.
electronic speed sensor control
Your mixer is fitted with an electronic speed sensor control that is designed to maintain the speed under different load conditions, such as when kneading bread dough or when eggs are added to a cake mix. You may therefore hear some variation in speed during the operation as the mixer adjusts to the load and speed selected - this is normal.
maximum capacities
shortcrust pastry 680g flour
fruit cake mix 2.72 Kg total mix
stiff bread dough 1.35 Kg flour
soft bread dough 1.3 Kg flour
egg whites 12
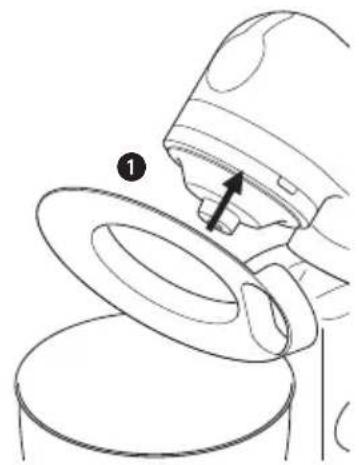
to fit and use your splashguard
1 Raise the mixer head until it locks.
2 Fit the bowl onto the base.
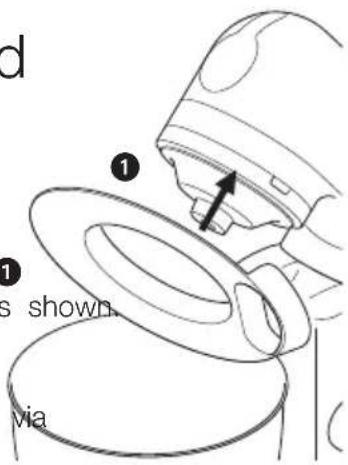
3 Push the splashguard onto the underside of the mixer head ① until fully located. The hinged section should be positioned as shown
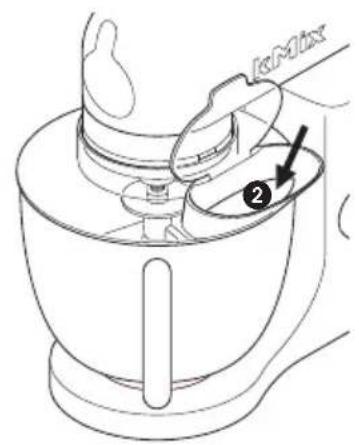
4 Insert required tool.
5 Lower the mixer head.
-
During mixing, ingredients can be added directly to the bowl via the hinged section of the splashguard ②.
-
You do not need to remove the splashguard to change tools.
6 Remove the splashguard by raising the mixer head and sliding it down.
troubleshooting
problem
- The whisk or K beater knocks against the bottom of the bowl isn't reaching the ingredients in the bottom of the bowl.
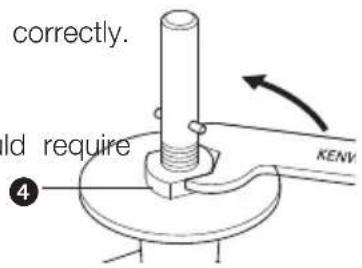
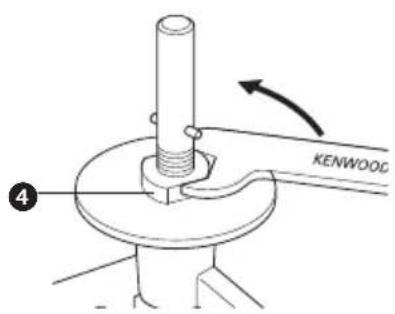
solution Adjust the height using the spanner provided. Here's how:
1 Unplug the appliance.
2 Raise the mixer head and insert the whisk or beater.
3 Lower the mixer head. If the clearance needs to be adjusted, raise the mixer head and remove the tool. Ideally the whisk and K beater should be almost touching the bottom of the bowl
4 Using the spanner provided loosen the nut sufficiently to allow adjustment of the shaft 4. To lower the tool closer to the b of the bowl, turn the shaft anti-clockwise. To raise the tool away from the bottom of the bowl turn the shaft clockwise.
5 Re-tighten the nut.
6 Fit the tool to the mixer and lower the mixer head. (Check its position see points above).
7 Repeat the above steps as necessary until the tool is set correctly. Once this is achieved tighten the nut securely.
dough hook - this tool is set at the factory and should require no adjustment.
problem
The mixer stops during operation.
solution - If for any reason power to the mixer is interrupted and the machine stops working, turn the speed switch to the off position, wait a few seconds and then re-select the speed. The mixer should resume operating straight away.
cleaning and service
care and cleaning
Always switch off and unplug before cleaning.
mixer body, Wipe with a damp cloth, then dry.
outlet cover ● Never use abrasives or immerse in water.
tools Wash by hand, then dry thoroughly. Do not wash in the dishwasher.
bowl, Wash by hand, then dry thoroughly or wash in the dishwasher.
splashguard - Never use a wire brush, steel wool or bleach to clean your stainless steel bowl. Use vinegar to remove limescale.
- Keep away from heat (cooker tops, ovens, microwaves).
service and customer care
- If the cord is damaged it must, for safety reasons, be replaced by KENWOOD or an authorised KENWOOD repairer.
If you need help with:
- using your machine
servicing or repairs
-
Contact the shop where you bought your appliance.
-
Designed and engineered by Kenwood in the UK.
Made in China.

IMPORTANT INFORMATION FOR CORRECT DISPOSAL OF THE PRODUCT IN ACCORDANCE WITH EC DIRECTIVE 2002/96/EC.
At the end of its working life, the product must not be disposed of as urban waste.
It must be taken to a special local authority differentiated waste collection centre or to a dealer providing this service.
Disposing of a household appliance separately avoids possible negative consequences for the environment and health deriving from inappropriate disposal and enables the constituent materials to be recovered to obtain significant savings in energy and resources. As a reminder of the need to dispose of household appliances separately, the product is marked with a crossed-out wheeled dustbin.
deeghaak - Voor gistmengsels.
de mixer gebruiken
Kpnska OTbopy Hikonn He BnkopncToByTe a6pa3NBHi MaTepiAn Ta He onyckaTepnilad y Body.
Hacadkn Mtnn nne BpyHy Ta peTeNbHO BnCyuBaTu. He Mtny nocydomnHi MaunHi.
ya, . PomnTe pykAmn, notim peTeIbHo npocuWitb afo nomnTe y npnctriin nocydomnHi MaunHi.
Дя 3axncty - Hikon He BnkopncTOByte npotryu, metaebn Bixotb BiD 6pn30K abo BiDbiIOBaIbHn 3ac6 dny uHHeHHaWl i3 HepXaBIOOoi cTani. JЯ BuaIeHHHaIbOTy BnkopncTOByte ouet.
He BCTaHOBIOHTe npuad nopraid i3 JxepenAMn tenla (KOHΦOpKaMn pIHTN, eJIeKTPoNEyAMN, MIKPOXBnIbOBUMn neyAMN).
06cnyrobyBaHHaTapeMOHT
- NowkoJxHn Hhup XnBHeHHa i3 MeTOIO 6e3neKn NiDnrae 3amHi Ha NiDnpnEMcTBax fipMn KENWOOD a6o B aBtOpn3ObaHomy cepBicHomy ceHTpi KENWOOD.
Kaio Bam Heo6xinda KOHCyNbTaui 3 npuBOy:
BnKOpncTaHH npuIaIy a6o
- 06cnyroByBaHHa, npuδaHHa 3anachnx deTanee afo peMOHTy,
3BepHItbcra Do Mara3nHy, B yKOMy BN npn6aann cei npna.
CnpoeKToBaHo Ta po3po6neHo kOmnaHieo Kenwood, O6'edHaHe KoponibCTBO.
3po6JIeHO B Kntai.
BAJKINBA IHΦOPMAUÇI A CTOCOBHO HAJEKHOI YTNII3AUÇI IPOODYKTY 3ΓIДH O I3 ΜIPEKTOBOHO EC 2002/96/EC.
Iicna 3akHHe TepmiHy ekcnnyatai He BnKaaTe ue npnaad 3 iHsMMn nobyTOBmN BiXoamn.
Bidnecitb npnaDIO MicueBOrO cneuaJIbHOro ABTOpN3OBaHOrO ceHTpy 36npaHH BIXxOIB a60 Do dIepe, kKMOKe Haadatni Taki nocnyri.
Biokpemna ytni3aig no6yTOBn x npnaIb Ido3BOJae
yHKHTM MoKINBnx HaraTnBnX HacJIkIB IJa HABKOJIuHbOro
cepeoBnTa Ta 3DopOB'Я IOdInH, kI BUNKaIOb y pa3i
He npabunbHOYtNi3aqi, a TAKOX Hadae MOKNIbICTb
nepeoBNTMaTePiaJN, 3 kNX 6yNo BnROTOBJeHO DaHni
npnad, 0, B cBOU Yepry, 36epirae eheprIO Ta iHsi BaKJIbI
pecypcn. Ppo Heo6xIDnicb BiOKpemneHOYtNi3aqi nO6yTOBnx
npnadIB HaraDye CneiaJIbHa No3NaUka Ha npOdyKTI y BnIJI
pekepcneHOrO cmITHNKU Ha KOlecax.
a
aaiii g aiai
aill a bbr lae aea 1
clally jaiil g hai kll jgal pdu wj
1 1
L 1
lll jginaall kgl lddii sic jaaill slgo g i daall igaiall ellll no slaipdaii
aall aal 1y Jll gaoiil .
()
ylll lccg ylll
KENWOOD 1
KENWOOD
:Jgoo
a^3b^3( a^2b^3 + ^32) = ^98 + ^62
12111111111
aio jalll al yaii aai jaiy
.kenwood


y
.2002/96/EC
aaii iiaii iaii iaii iaii iaii iaii iaii iaii iaii iaii iaii iaii iaii iaii iaii iaii iaii iaii iaii iaii iaii iaii iaii
e 1 1 1 1 1 1 1 1 1 1 1 1 1 1 1 1 1 1 1 1 1 1 1 1 1 1 1 1 1 1 1 1
yie 1j 1eolalw yghio yjgl jdy. Jiaio
j1j1j1o1j1j1j
1
S C = 12S C = 12 × 4t
p 1 bll l jn no glll jiljilgol
Lg
与 ab 共线 ( 12、13)
b1 = 23,b2 = - 43,b_3 = 0
jll qbjc gll l! jaiolgall
2 1
J 1
l_ x_ y_ = 0
a|c.
JgK
e^2g^2 + 1 = 0 此时最大 g^2 ≤ 1
aBbI L aI. 1234567890123456789012345678901234567890123456789012345678901234567890123456789012345678901234567890123456789
1
aal 1
yR 1
K jnnn nn nnnnnnnnnnnnnnnnnnnnnnnnnnnnnnnnnnnnnnnnnnnnnnnnnnnnnnnnnnnnnnnnnnnnnnnnnnnnnnnnnnnnnnnnnnnnnnnnnnnnnnnnnnnnn
- lg( 100 + 1) ≤ lg100
bawwclawll k wolall s a jall bwlly
20 20 20 20
acllll 1
all
aalalalalalalalalalalalalalalalalalalal
(aLalal)
J 1
alolall bry aaiiaaiiallll lll
huiy cai y g iannl s 1s hui pi -n
a1k.
Jz.
a a a a a a a a a a a a a a a a a a
e 1
p 1
( x,y - 1) x + y = - 1
zj
J 1
aagaae aegaae gaae gaae gaae gaae gaae gaae gaae
julal aolabai
sulj gdlu-olijgagall ggalllalglkali jj
jIg.11 Ie Juaill
J 1
oolalai jn jnnll 1jgljg jll g
1.15.2.3.4.5
Luljusuall uauuaiuuiuuiuuiuuiuuiuuiuuiuuiuuiuuiuuiuuiuuiuuiuuiuuiuuiuuiuuiuuiuuiuuiuuiuuiuuiuuiuuiuuiuuiuuiuuiuuiuuiuuiuuiuuiuuiuuiuuiuuiuuiuuiuuiuuiuuiuuiuuiuuiuuiuuiu
i j 1
a 20 20
Culjwll C
gall gaggall
1golz 1yoll cll
J (s) min sss
aall aeg
-2eacssie gaiy
()max
-()ming
(1) (2) (3) (4)
()min
(1) max 2
Xeall-()min
maxgaglllgeyll
Aeall lgyd aegell slyj gmin gagll ae yglc
gjx1y1 aysuill gpsuill juaa
100 100
aLz! iie g jiai juee juee Juaa aai bai aee
J 1
yub j1ag?Jauallgossssssbblllcysbsyessss
Sgulll
- 1.
15 15
15
15
17
zj
gololuljog
alglallgssll Sswll llallll alllll
a
J1K
pssll 111111111111111111111
jlll jll lal gall bll
b11 1
a a a a a a a a a a a a a a a a a
.
aill aag gll kdsylo ciayall sryc
aalaa aalaa aalaa aalaa aalaa aalaa
1.2g1
#
y
jlll jll lll lla aolal alalal alal alal alal
2004/108/EC aagg 1935/2004 aagg
Kenwood jolssiall sball jg elixi
法一. 它可以写
jallieo ②
jáolulb ③
( 4)
( 5)
bì xiè lǐ shāo wǒu lǐ gǔ gǔ ⑦
b1 = 12a,b2 = 14a
b1b2·s b_n 且 j z ,j k ⑨
10
1
2ab + 1 = 0
( 4) = 1m + 2n
111 ④
10 : 21 ⑤


(5)
Kenwood Jnnn 8. bgs jnlal piaa aagjllpiae
S_ OBC = S_ BOC + S_ CDF
#
i
1
i
1
1
j_4 = 8
a1 = 2,an + 1 = n1 - 2an
a_4 = 42
1
1
1
i
420 1501 1501 1501 1501 1501 1501 1501
i
1
111 111 111 111 111 111 111 1
Jb81 Jgll 1
jlll pse no sill lal 1
1
1 1
1
10000000000000000000000000000000
j4 = j1 + 1 = 5

HEAD OFFICE: Kenwood Limited, 1-3 Kenwood Business Park, New Lane, Havant, Hampshire PO9 2NH
kenwoodworld.com