3711 - Cooker NOVY - Free user manual and instructions
Find the device manual for free 3711 NOVY in PDF.
User questions about 3711 NOVY
0 question about this device. Answer the ones you know or ask your own.
Ask a new question about this device
Download the instructions for your Cooker in PDF format for free! Find your manual 3711 - NOVY and take your electronic device back in hand. On this page are published all the documents necessary for the use of your device. 3711 by NOVY.
USER MANUAL 3711 NOVY
1 SAFETY AND ASSEMBLY
REGULATIONS Further information on Novy products, accessories and services may be found on the internet: www.novy.co.uk These are the installation instructions for the appliance as shown on the front. The directions for use are in a separate booklet supplied with the appliance. These installation instructions make use of a number of symbols. The meanings of the symbols are shown below. Symbol Meaning Action
Indication Explanation of an indi- cation on the hood.
Warning This symbol indicates an important tip or a dangerous situation Observe this instruction in order to prevent injury and damage to property. Disposal of old electrical appliances The European Directive 2002/96/EC on Waste Electrical and Electronic Equipment (WEEE), requires that old household electrical appliances must not be disposed of in the normal unsorted municipal waste stream. Old appliances must be collected separately in order to op- timise the recovery and recycling of the materials they contain and reduce the impact on human health and the environment. The crossed out “wheeled bin” symbol on the product reminds you of your obligation, that when you dispose of the appliance it must be separately collected. Consumers should contact their local authority or retailer for information concerning the correct disposal of their old appliance.
This appliance is exclusively intended for domestic use. Any other use will nullify the guarantee.
Do not forget that the fryer reaches very high tempera- tures when operational.
Never leave the appliance in operation without su- pervision. − This appliance and the accessible parts will become hot during use. Do not touch hot parts. Keep children younger than 8 away from the appliance unless they are under continuous supervision. − This appliance can be used by children aged 8 years and over, as well as by people with reduced physical, sensory or mental capabilities or lack of experience and knowledge, provided they are supervised and instructed in the safe use of the appliance and understand the hazards involved.
The appliance is not intended to be operated by means of an external timer or separate remote-control system.
No guarantee will be given for damage caused by non-observance of this document.
This appliance complies with the EN 60335-2-13 stan- dard with regard to the heating of cabinets.
In the event of the oil or fat catching fire, place the lid on the appliance to extinguish the flame and turn it off with the switch or with the fuse on the electrical panel.
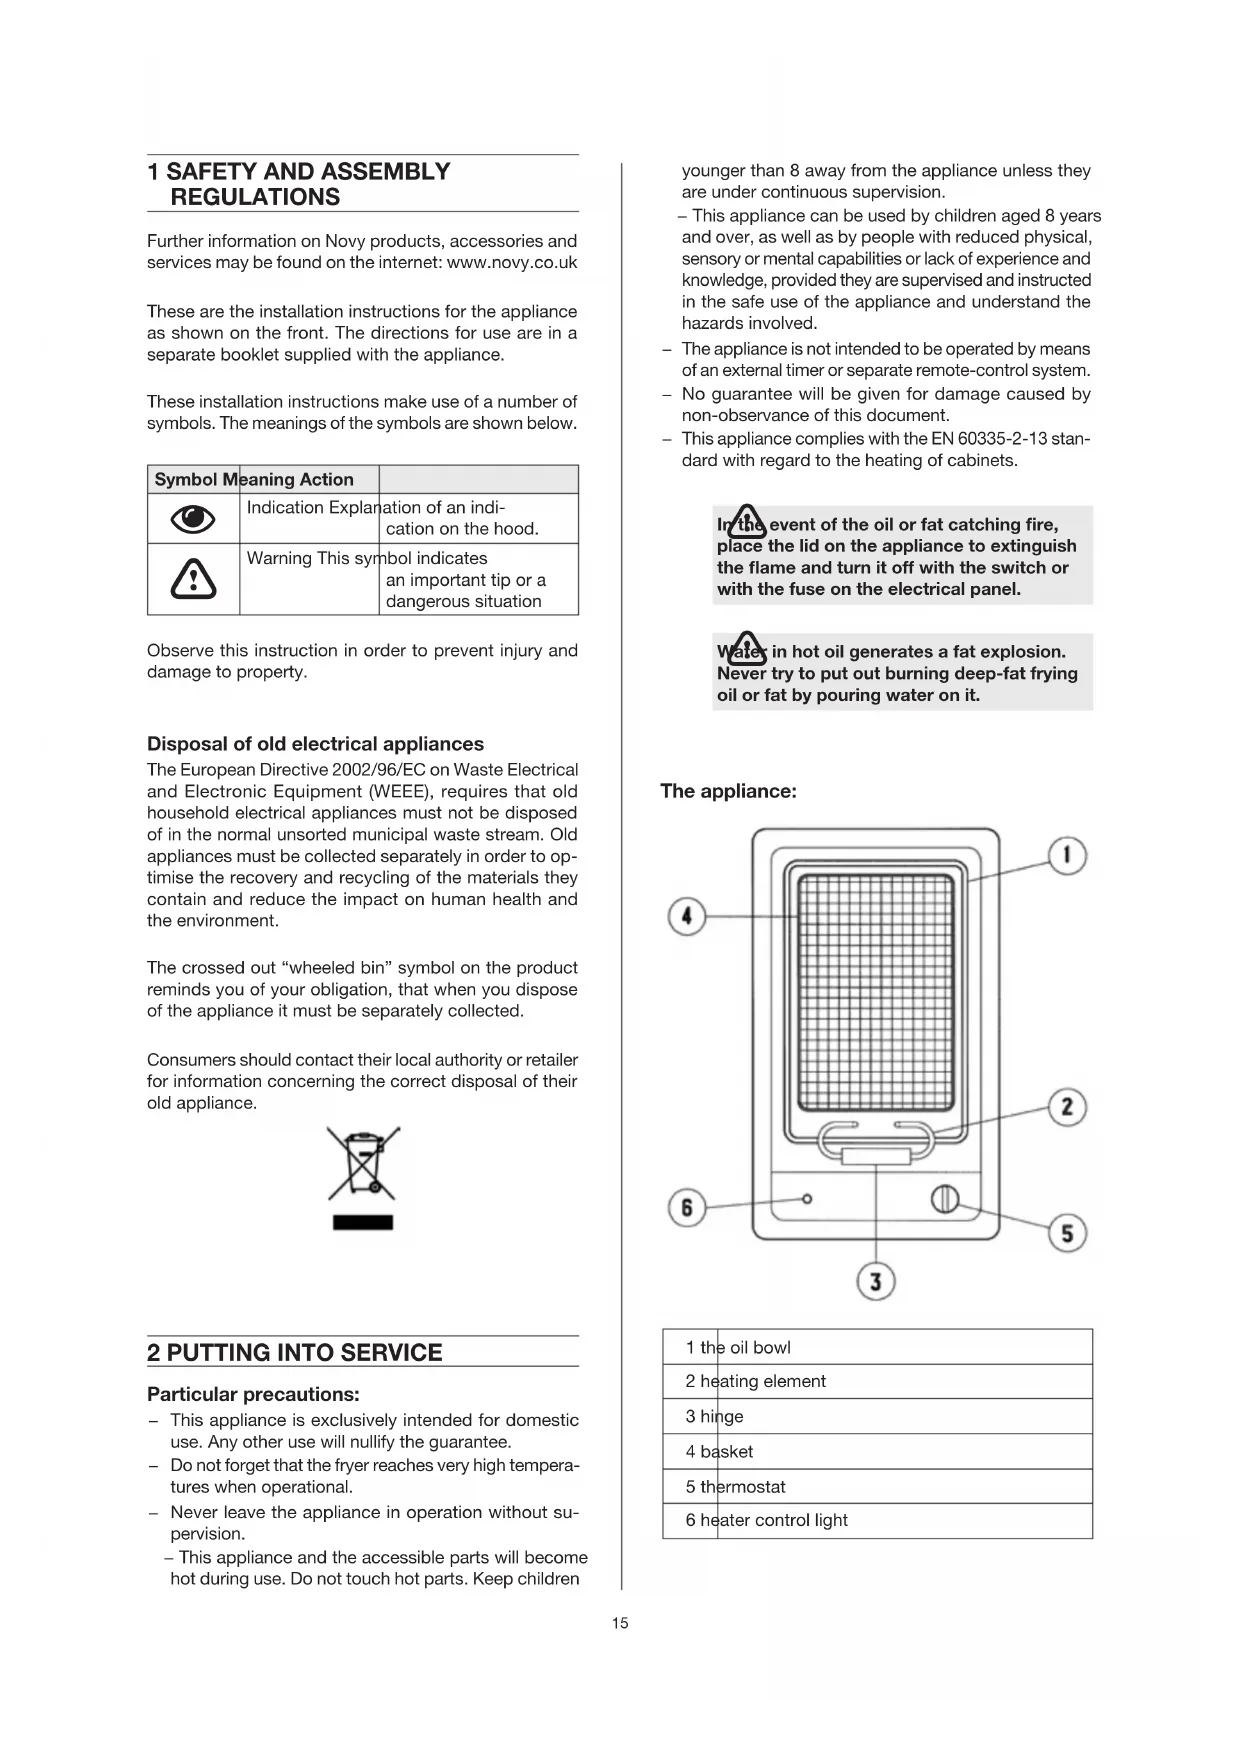
Water in hot oil generates a fat explosion. Never try to put out burning deep-fat frying oil or fat by pouring water on it. The appliance: 1 the oil bowl 2 heating element 3 hinge 4 basket 5 thermostat 6 heater control light16 Installation: The fitting plate is fixed into the work surface. It is then ready to accept, in order:
2. The element, which you pivot on its hinge towards the
bottom, in order to position it in the tank;
The basket; Cleaning before use: Start to clean the tank, the fryer basket and the heating element.
Fill the reservoir with three liters of water and add a drop of washing-up liquid.
Bring the water to the boil and keep it boiling for about 10 minutes. − Car efully take the reservoir out of the deep-frying pan and pour the water out. − Rinse the r eservoir with clean water. 3 IMPORTANT RECOMMENDATIONS
1. The level to which the bowl is filled must be between
the minimum and maximum marks engraved on the vertical side wall of the bowl for an optimal result. You can fill till the maximum mark.
The element of the cool zone fryer may not be oper- ated in the open air: it must ALWAYS be submerged in oil or fat. Consequently, blocks of fat may never by melted directly on the element.
animal fat, it is vital to melt it in advance before pouring it into the tank. You thus avoid burning out the element.
3. If you use fat and not oil in your fryer, it is recommend-
ed that (with the aid of a knife or a fork) you break up the fat before switching on the fryer. This will prevent splashes if an air bubble should become trapped. Proceed carefully in order not to strike the probes fitted to the heating element.
4. If you use deep-frozen foods or foods containing a
lot of humidity, keep a close eye on your fryer. When it comes into contact with water, oil boils heavily and sometimes risks spilling over.
5. Your fryer must be unplugged from the power supply
before any intervention. Overheat prevention The safety thermostat is a second temperature measure. In the event of a problem, it automatically cuts off the supply of electricity to the fryer. Reconnection is not au- tomatic. It must be carried out manually by an approved engineer. He must likewise make a complete change of the frying bath. 4 HINTS − The ideal temperature of the fryer is between 140ºC and 180ºC. Beyond these temperatures, the oil rapidly deteriorates.
If you use a temperature which is too low, food surfaces are not sealed, and fat penetrates.
It goes without saying that the thicker the pieces to be cooked the longer they must stay in the frying bath. It is necessary therefore to select a cooking temperature which allows the food to be cooked through without burning the outside.
The temperature which you have chosen is reached when the red light goes out. The position of the knob is indicative, according to the type of food to be cooked. It may vary in relation to the quantity used, and the personal taste of the consumer. Thermostat position Preparation 140°C Pommes frites (blanching) 160°C Chicken legs and wings 170°C Fritters, fish 180°C Croquettes 180°C Pommes frites (frying) To stop cooking, switch to position 0. 5 MAINTENANCE − Clean the fryer after each use. − Do not use a steam cleaner to clean the appliance.
Before any maintenance, disconnect the apparatus and leave it to cool. − It is necessary to r eplace the frying oil when it smells unpleasant or foam.
It is advisable to replace the frying oil every 8 to 12 uses.
The fryer can be completely dismantled (proceed in the reverse order to that for assembly). The fitted top: clean it with products intended for stainless steel. If you want it to stay beautiful, avoid abrasive pads and detergents. The cover: A stainless steel cover completely covers the tank. Clean it regularly with a damp cloth on which you can spray a little product intended for the maintenance of stainless steel. If you want to keep it looking good, avoid abrasive sponges and detergents. Do not spray cleaning products directly on the cover above the oil bath!17 It is disassembled by removing the two pins. It can be cleaned in the dishwasher. The bowl Is cleaned like regular dishes. Do not hesitate to put it in your dishwasher. The basket Is cleaned with a detergent like regular dishes.
Attention: in order to avoid problems with oxidation after washing the basket must be dried thoroughly, or dipped in oil. The heating element: Clean it with a damp cloth. 6 INSTALLATION INSTRUCTIONS − Read the guidelines in this manual and follow them.
It is necessary to provide a bipolar cut-off device in the power supply circuit, where the opening of the contacts is more than 3 mm. − The plug must be accessible after installation. − If the supply lead is damaged, it must be replaced by an equivalent lead (H05RNF 3x1mm²) available from the after-sales department. − A 16-ampere fuse is necessary. − Your fryer uses 2,200 watts. It is therefore necessary that your supply can provide this power without danger. IT IS VITAL that your fryer be connected to earth.
It is absolutely imperative to leave a space of at least 5 cm between the bottom of the fryer and the first shelf of the kitchen unit