— Radio — Mode d'emploi PDF")
LIFE P66007 (MD 43023) - Radio MEDION - Free user manual and instructions
Find the device manual for free LIFE P66007 (MD 43023) MEDION in PDF.
User questions about LIFE P66007 (MD 43023) MEDION
0 question about this device. Answer the ones you know or ask your own.
Ask a new question about this device
Download the instructions for your Radio in PDF format for free! Find your manual LIFE P66007 (MD 43023) - MEDION and take your electronic device back in hand. On this page are published all the documents necessary for the use of your device. LIFE P66007 (MD 43023) by MEDION.
USER MANUAL LIFE P66007 (MD 43023) MEDION
text_image
MEDION Welcome to Digital Radio MEDION Welcome to Digital RadioDAB+ /UKW Radio
DAB+ Radio
Radio DAB+
MEDION® LIFE® P66007 (MD 43023)
Inhalt
DE
natural_image
Simple icon of an open book with a lowercase 'i' inside, no text or symbols present.text_image
Warning symbol with a sine wave inside a triangle, indicating sound or sound pressureHörschädigung!
natural_image
Simple geometric diagram of two concentric squares (no text or symbols)Schutzklasse II
natural_image
Simple line drawing of a house with a chimney (no text or symbols)text_image
QR code image containing encoded data, no visible human-readable texttext_image
QR code image containing encoded data, no visible human-readable texttext_image
QR code image containing encoded data, no visible human-readable texttext_image
QR code image containing encoded data, no visible human-readable texttext_image
QR code image containing encoded data, no visible human-readable text1. Information about this user manual ...... 65
1.1. Explanation of symbols......65
2. Proper use 6
3. Safety information 70
3.1. Restricted group of people .....70
3.2. Operating safety ....NL 7
3.3. Safe handling of rechargeable batteries ....75
4. Declaration of conformity 76
5. Information on trademarks 76
6. Package contents 7
7. Device overview 78
7.1. Front view 78
7.2. Top view 79
7.3. View from right 80
8. Setting up the device 81
9. Connecting the USB charging cable ...... 81
10. Battery operation/charging the device ..... 82
- Switching the device on/off 82
- Setting the menu language...... 83
- Adjusting the aerial 83
- Setting the volume 84
14.1. Mute 84
15. Connecting the earphones/headphones ... 84
16. Radio mode......86
16.1. DAB mode 86
16.2. FM mode 88
16.3. Displaying station information .....90
17. Bluetooth® mode ......91
17.1. Pairing Bluetooth devices .....91
18. Alarm 92
18.1. Setting the alarm 93
18.2. Switching the alarm on/off .....94
18.3. Stopping the alarm/activating the snooze function .....95
19. Sleep timer....96
20. Settings 97
20.1. Overview of the menus in the FM and DAB operating modes .....98
- Cleaning 102
- Troubleshooting......102
- Repairs 104
- Disposal 105
- Technical specifications ....106
25.1. Explanation of symbols......108
-
Service information ....109
-
Legal Notice 111
1. Information about this user manual

natural_image
Simple icon of an open book with a lowercase 'i' inside, no text or symbols present.Thank you for choosing our product. We hope you enjoy using this device.
Please read the safety instructions and the user manual carefully before using the device for the first time. Note the warnings on the device and in the user manual.
Always keep the user manual close to hand. If you sell the device or give it away, please ensure that you also pass on this user manual. It is an essential component of the product.
1.1. Explanation of symbols
If a block of text is marked with one of the warning symbols listed below, the hazard described in that text must be avoided to prevent the potential consequences described there from occurring.

DANGER!
Warning: risk of fatal injury!
WARNING!

Warning: risk of possible fatal in- jury and/or serious irreversible in- juries!

CAUTION!
Warning: risk of minor and/or moderate injuries!

NOTICE!
Follow these instructions to prevent damage to the device!

More detailed information about using the device!

Follow the instructions in the user manual!
WARNING!
Warning: risk of electric shock!
WARNING!
Warning: danger due to loud volume!
Bullet point/information on steps during operation
▶ Instruction to be carried out
2.Properuse
Your device is intended for music and sound playback of DAB+/FM radio programmes and sound playback via Bluetooth.
It can be powered via the USB cable or the integrated battery.
The device is only intended for private use and not for industrial/commercial use.
Please note that we shall not be liable in cases of improper use:
- Do not modify the device without our consent and do not use any auxiliary equipment that we have not approved or supplied.
- Only use replacement parts or accessories that we have supplied or approved.
- Comply with all the information in this user manual, especially the safety information. Any other use is considered im-
proper and can cause personal injury or property damage.
- Do not use the device in potentially explosive atmospheres. This includes petrol stations, fuel storage areas and areas where solvents are processed. This device must also not be used in areas with particle-laden air (for example, flour or wood dust).
- Do not expose the device to extreme conditions. Avoid:
– high humidity or wet conditions
- extremely high or low temperatures
- direct sunlight
- open flames
3. Safety information
3.1. Restricted group of people
- This device can be used by children of eight years and older, and by people with limited physical, sensory or mental capacity, or with a lack of experience and knowledge, but only with proper supervision, or if they have been told how to use the device safely, and have understood the risks involved if they use it improperly.
• Children must not be allowed to play with the device.
- Cleaning and maintenance by the user must not be carried out by children unless they are supervised.
- Keep the device and its accessories out of the reach of children.
- The packaging material is not a toy for children to play with. Children must not be allowed to play with the plastic bags. There is a risk of choking and suffocation.
3.2. Operating safety
- Do not place containers filled with liquid, e.g. vases, on or near the product, and protect all the parts from drips or splashes. Such containers may tip over and the liquid may impair the electrical safety of the device.
- If the mains adapter, mains cable or device is damaged, immediately unplug the device from the socket.
- If the device has been moved from a cold to a warm space, condensation may form inside the device and mains adapter. Wait a few hours before using the device.
3.2.1. Power supply
- Only use the supplied USB cable to connect the radio.
- Connect the USB cable only to a compatible USB port.
• Always unplug the USB cable before cleaning. - When disconnecting from the power socket, always pull on the plug rather than on the cable.
- If the USB cable, mains cable or the device itself are damaged, or if liquids or foreign bodies get into the device, unplug the device from the USB port immediately.
3.2.2. Installation location/surroundings
- The device is equipped with non-slip plastic feet. Since furniture is coated with a variety of varnishes and plastics which are cleaned with different clean-
ing agents, it cannot be completely excluded that some of these cleaning agents contain ingredients which might damage the plastic feet, and cause them to become soft. If necessary, place a non-slip mat under the device.
- To prevent the device from falling, only install and operate it and its components on a sturdy, level and vibration-free surface.
- During the set-up process, maintain a minimum distance of 5 cm around the device for sufficient ventilation.
- Ventilation must not be impeded by covering the device with objects such as mag azines, table cloths, curtains, etc.
- Do not place the device near direct heat sources (e.g. heaters) that could affect it.
-
Never expose the device to excessive heat such as direct sunlight, fire, strong artificial light or similar.
-
Do not expose the device to extreme cold conditions.
- Do not place naked flames (e.g. lit candles) on or near the device.
- Do not place any objects on the cables as they may be damaged.
- Only use the device in living rooms or similar.
3.2.3. Electromagnetic compatibility
- To avoid malfunctions, keep the device at a distance of at least one metre from high-frequency or magnetic interference sources (televisions, other loudspeakers, mobile and cordless telephones, etc.).
3.3. Safe handling of rechargeable batteries

WARNING!
Risk of explosion!
Rechargeable batteries may contain combustible materials. If handled incorrectly, rechargeable batteries can leak, become very hot, ignite or even explode, which could damage your device and/or your health.
▶ Charge the battery only with the original accessory (mains adapter).
▶ Recharge flat batteries immediately to prevent damage.
▶ Do not expose the device to direct sun-light, heat or fire.
The rechargeable battery is an integral component of the device, which means users cannot replace it themselves.
4. Declaration of conformity
CE
Medion AG hereby declares that this device complies with the fundamental requirements and the other relevant provisions of:
• EMC Directive 2014/53/EU
• RoHS Directive 2011/65/EU
Complete declarations of conformity are available at www.medion.com/conformity.
5. Information on trademarks
The Bluetooth ^® word mark and logos are registered trademarks of Bluetooth SIG, Inc. and are used by MEDION under licence.
6. Package contents

DANGER!
Risk of choking and suffocation!
There is a risk of choking and suffocation due to swallowing or inhaling small parts or plastic wrap.
▶ Keep the plastic packaging out of the reach of children.
Remove the product from the packaging and remove all packaging material.
▶ Please check your purchase to ensure that all items are included. If anything is missing, please contact us within 14 days of purchase.
The following items are supplied with your product:
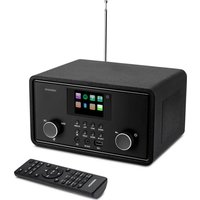
- DAB+/FM radio
- USB charging cable
- User manual and warranty card
7. Device overview
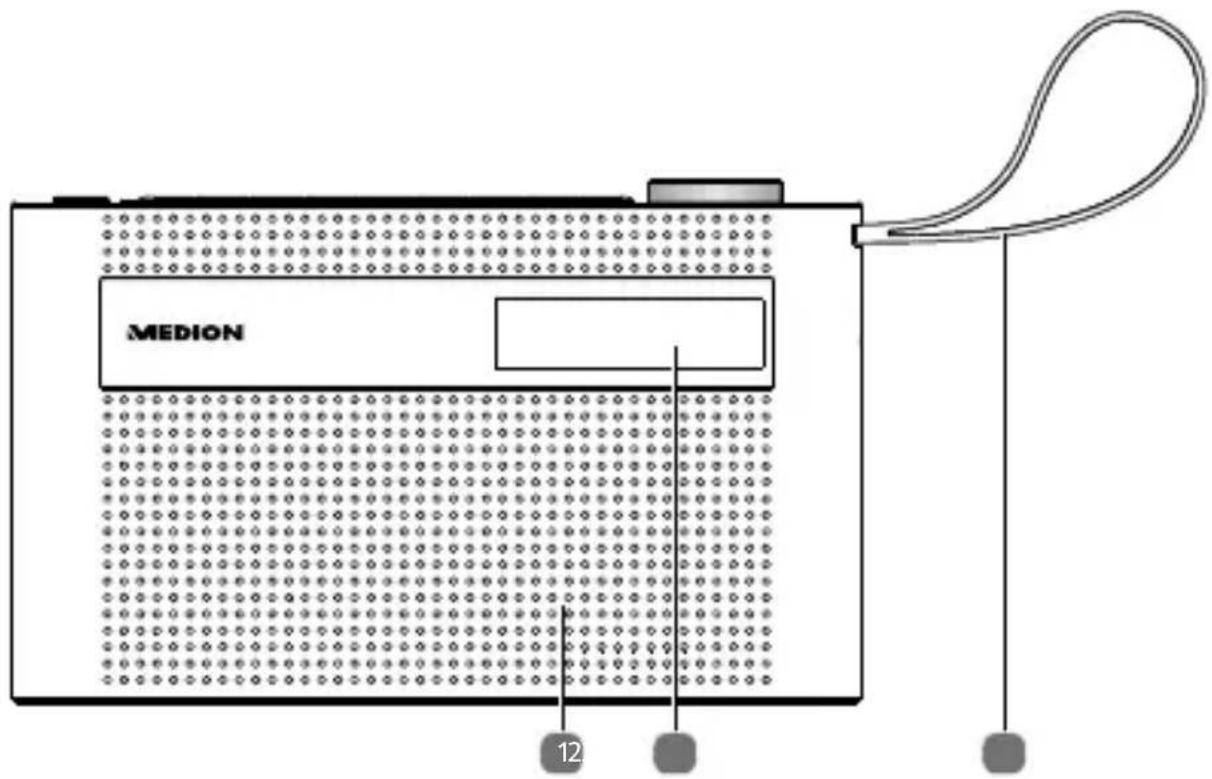
7.1. Front view
text_image
MEDION 121) Loudspeaker
2) Display
3) Carrying strap
7.2. Top view

text_image
MODE MENU/NFC PREV NEXT PRESET 1 2 3 4 5 45 789 10 124) /MODE – Switch device on; switch device to standby mode (press and hold); switch between DAB+, FM and Bluetooth; stop the alarm
5) Telescopic aerial
6) MENU – Open menu (press and hold); return to the previous menu
INFO – Display station information
7) PREV – DAB+: select previous station in the station list; FM: select previous radio frequency
8) NEXT – DAB+: select next station in the station list; FM: select next radio frequency
9) PRESET – Save station; call up stored station
10) 1, 2, 3, 4, 5 – Quick-access buttons for radio stations
11) – Adjust volume; in menu: navigate by turning
- Confirm by pressing the controller; Radio: start station search; activate snooze - Bluetooth: start/pause playback
12) Charge display
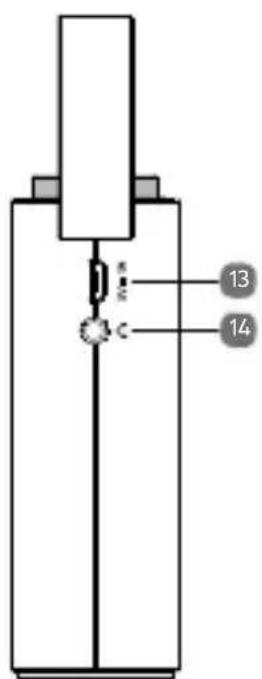
7.3. View from right
text_image
13 1413) 5V 1A=Connection for power supply
14) - Headphone jack
8. Setting up the device
Place the device on a sturdy, level surface. Take care to ensure that:
- the device and batteries are not exposed to intense sources of heat;
- the device and batteries are not left in direct sunlight;
- the device does not come into contact with liquids, not even water droplets or spray.
9. Connecting the USB charging cable
Connect the plug of the Micro USB charging cable to the 5V-1A connection of the device.
▶ Plug the USB connector into a suitable USB port.

If you do not need to use the device for a relatively long time, disconnect it from the power. To do so, unplug the USB cable.
10. Battery operation/charging the device
The device is fitted with an integrated rechargeable battery. The device is powered by the integrated battery if no charging cable is connected to the 5V---1A socket.
▶ To charge the battery, connect the mains adapter as described above.
The charging process is shown on the display and the charge display lights up.

The date/time display in standby mode is only visible when the device is charging.
11. Switching the device on/off
▶ Press the ⏻ button until the device switches on. When the device is switched on for the first time, an automatic search for DAB stations is performed.
▶ To switch the device to standby mode, press and hold the ⏻ button until
– the date and time appear in the display (if a charging cable is connected)
- or the display switches off (in battery mode).
12. Setting the menu language
▶ Press and hold the MENU button until the menu opens.
▶ Select the item SYSTEM by turning the controller and then press the controller to confirm the selection.
▶ Select the item LANGUAGE by turning the controller and then press the controller to confirm the selection.
Now turn the controller to select the desired language.
▶ Then press the controller to confirm the selection.
The menu language is now set.
13. Adjusting the aerial
▶ Pull out the telescopic aerial on the back of the device completely.

The aerial should be fully extended to ensure good signal reception and sound quality. When adjusting the telescopic aerial, the stations may have to be searched again (see "16. Radio mode" on page 86).
14. Setting the volume
When the device is in use, turn the controller anticlockwise to decrease the volume.
When the device is in use, turn the controller clockwise to increase the volume.
The selected volume is briefly shown on the display.
14.1. Mute
▶ Press the controller to mute the sound. The display shows VOLUME MUTED.
▶ Press the controller again to cancel mute.
15. Connecting the earphones/headphones
The headphone jack is located on the right-hand side of the device.
text_image
Warning symbol with a triangle containing a stylized 'e' and sound waves, indicating sound or audio hazard.Damage to hearing!
Excessive sound pressure when using earphones and head-phones can result in damage to and/or loss of hearing.
Before pressing play, set the volume to the lowest setting by turning the controller.
▶ Start playback and increase the volume to a comfortable level.
Using headphones to listen to a device playing at a high volume for an extended period can damage your hearing.
Use a 3.5 mm jack to plug the headphones into the connection on the right-hand side of the device. The loudspeaker then switches off automatically.
16. Radio mode
You can use this radio to receive FM and DAB+ stations.
Your radio has the Dynamic Label Segment (DLS) information service, which displays information such as artist, song titles or current traffic news on the display.
After switching on for the first time, the device automatically searches for DAB stations that can be received and stores them permanently. A search is required in FM mode.

Follow the instructions described in chapter "20. Settings" on page 97 to set basic settings such as preferred language and time.
16.1. DAB mode
▶ Press the MODE button repeatedly until DAB is highlighted in the display.
16.1.1. Selecting DAB stations from the station list
▶ Press the PREV or NEXT button repeatedly to select the desired DAB station from the station list.
▶ Wait a moment or press the controller to play the station.
16.1.2. Storing DAB stations
You can store up to 30 preset DAB stations.
▶ Set a station as described above.
▶ Press and hold the PRESET button until the station list with the stored stations appears in the display.
▶ Turn the controller to select the desired memory slot.
▶ Press the controller to save the station.
16.1.3. Calling up DAB stations
▶ Press the PRESET button. The list of stored stations appears on the display.
▶ Turn the controller to select the desired memory slot.
▶ Press SELECT using the controller to select the station.
16.1.4. Storing DAB stations to the quick-
access buttons
▶ Set a station as described above.
▶ Press and hold one of the quick-access buttons 1, 2, 3, 4 or 5 until the display shows a confirmation. The station is stored to the selected quick-access button.
16.1.5. Calling up DAB stations using the quick-access buttons
▶ Press one of the quick-access buttons 1, 2, 3, 4 or 5. The selected station is played.
16.2. FM mode
You can listen to FM radio in this mode.
▶ Press the MODE button repeatedly until FM is shown in the display.
16.2.1. Searching for FM stations
▶ Press the PREV/NEXT button briefly to set a particular frequency.
▶ Hold down one of the buttons to automatically search for the next station.
16.2.2. Storing FM stations
You can store up to 30 preset FM stations.
▶ Set a station as described above.
▶ Press and hold the PRESET button until the station list with the stored stations appears in the display.
▶ Turn the controller to select the desired memory slot.
▶ Press the controller to save the station.
16.2.3. Calling up FM stations
▶ Press the PRESET button. The list of stored stations appears on the display.
▶ Turn the controller to select the desired memory slot.
▶ Press the controller to select the station.
16.2.4. Storing FM stations to the quick-access buttons
▶ Set a station as described above.
▶ Press and hold one of the quick-access buttons 1, 2, 3, 4 or 5 until the display shows a confirmation. The station is stored to the selected quick-access button.
16.2.5. Calling up FM stations using the quick-access buttons
▶ Press one of the quick-access buttons 1, 2, 3, 4 or 5. The selected station is played.
16.3. Displaying station information
In DAB or FM mode, press the INFO button repeatedly to display station information.
DAB mode:
- Station information
• Signal strength/stability
• Programme section - Responsible radio station
• Channel number/frequency - Signal fault
- Bit rate/DAB variants
- Battery status in %
- Time
- Date
FM mode:
- Station information
• Programme section
• Channel number/frequency - Mono/stereo
- Battery status in %
- Time
- Date
17. Bluetooth® mode
You can use Bluetooth ^® to play tracks wirelessly from external devices (such as MP3 players or mobile phones with Bluetooth ^® ) on this device.
▶ Press the MODE button repeatedly until BT is highlighted in the display.
17.1. Pairing Bluetooth® devices
▶ Enable the Bluetooth function on your external device and pair the devices. Refer to the user manual for your audio playback device for more information. The name of the DAB radio is "MD 43023".
If you are prompted to enter a password on the external device, enter "0000" as the password.
During the pairing process, SCANNING... appears on the display.
▶ Pairing is complete once an acoustic signal sounds. The external device can now be used with the DAB radio.
If you would like to end Bluetooth transmission, change the source on the radio.
You can control how tracks are played, the volume and a range of special functions on your external device and on the DAB radio. What functions are available is dependent on your external device and the software that you use.
- Turn the controller to increase or decrease the volume.
- Press the controller to start or stop playback.
- Use the PREV/NEXT buttons or turn the controller to go back to the previous track or skip to the next track.
18. Alarm
It is possible to set two alarms at different times. The alarm will either trigger an alarm tone or switch on the radio. You can also set the alarm so that it is activated daily or only on certain days.
18.1. Setting the alarm
▶ Press and hold the MENU button until the menu opens.
▶ Select the item SYSTEM by turning the controller and then press the controller to confirm the selection.
▶ Select the item ALARM by turning the controller and then press the controller to confirm the selection.
▶ Select the desired ALARM 1 or ALARM 2 by turning the controller and then press the controller to confirm the selection.
▶ Press the controller again to set the alarm.
▶ Select the respective menu entries by turning the controller and confirm by pressing the controller:
- ON TIME: Time when the alarm should go off
- DURATION: Select the duration of the alarm in minutes
- SOURCE: Wake up by alarm tone, DAB or FM
- DAILY, ONCE, WEEKENDS, WEEKDAYS: Select alarm frequency
- Select the volume of the alarm
- ALARM OFF/ON: Switch alarm on/off
Once everything is set, finally press the controller. A confirmation message appears on the display.
The alarm function is only available during mains operation (when the radio is plugged into a power source).
18.2. Switching the alarm on/off
When the alarm is switched on, the display shows a bell symbol ▲ with the corresponding number of the alarm 1 or 2.
▶ Press and hold the MENU button until the menu opens.
▶ Select the item SYSTEM by turning the controller and then press the controller to confirm the selection.
▶ Select the item ALARM by turning the controller and then press the controller to confirm the selection.
▶ Select the desired ALARM 1 or ALARM 2 by turning the controller and then press the controller to confirm the selection.
▶ Select the desired ALARM ON or ALARM OFF by turning the controller and then press the controller to confirm the selection. A confirmation message appears on the display.
18.3. Stopping the alarm/activating the snooze function
When the alarm sounds, you can stop it immediately by pressing the MODE button
or start the snooze function by pressing the controller. The alarm will then sound again after approx. 15 minutes. Press the button repeatedly to extend the duration of the snooze function by up to 120 minutes. The duration is shown on the display.
When the snooze function is active, the display shows the elapsed time until the next alarm.
The snooze function can be cancelled by pressing the ⚙ button.
19. Sleep timer
The sleep timer allows you to switch off the device after a set period of time.
▶ Press and hold the MENU button until the menu opens.
▶ Select the item SYSTEM by turning the controller and then press the controller to confirm the selection.
▶ Select the item SLEEP by turning the controller and then press the controller to confirm the selection.
▶ Select the desired time after which the device should switch off by turning the controller.
20. Settings
System settings can only be adjusted when the device is switched on.

Any adjustments to the device settings are retained when the device is in standby mode.
Proceed as follows to navigate in the menu and change the settings:
▶ First select the DAB or FM operating mode as described above. Different settings can be configured depending on the selected operating mode.
▶ Press and hold the MENU button until the menu is shown on the display.
▶ Turn the controller to select a specific menu or item.
▶ Press the controller button to open a specific menu or to confirm a setting.
▶ You can return to the previous menu by briefly pressing the MENU button again.
▶ Press and hold MENU to exit the menu completely. The last radio station set appears in the display.
20.1. Overview of the menus in the FM and DAB operating modes
| Menu name Description | |
| FULL SCAN (DAB operating mode only) | |
| Automatic station search | |
| MANUAL TUNE (DAB operating mode only) | |
| Set frequency manually | |
| AMS (FM operating mode only) | |
| Automatic station search | |
| SCAN SETTING (FM operating mode only) | |
| STRONG STATIONS ONLY | Select whether to search for all stations (even those with weak reception) or only stations with strong reception. |
| ALL STATIONS | |
| DRC (DAB operating mode only) | |
| HIGH | Dynamic Range Control (DRC): compression selec-tion; default setting: off |
| LOW | |
| OFF | |
| Menu name Description | ||
| PRUNE (DAB operating mode only) | ||
| YES | Delete all DAB sta- tions that cannot be received in the current region. | |
| NO | ||
| AUDIO SETTING (FM operating mode only) | ||
| FORCED MONO | Select whether to play mono or stereo sound (only for sound playback through headphones). | |
| STEREO | ||
| PRESET RECALL | ||
| Display station list | ||
| PRESET STORE | ||
| Store stations in the sta- tion list | ||
| Menu name Description | ||
| SYSTEM | ||
| SLEEP | Set sleep timer (see “19. Sleep timer” on page 96) | |
| ALARM | Set alarm (see “18. Alarm” on page 92) | |
| TIME | SET TIME/ DATE | Manually set the time and date. |
| AUTO UP- DATE | Choose whether or not the date and time are set au- tomatically via the DAB or FM signal. | |
| SET 12/24 HOUR | Set the 12-hour or 24-hour time format. | |
| SET DATE FORMAT | Set the date format. | |
| BACK-LIGHT | TIMEOUT | Turn the automatic lighting on or off. When this function is enabled, the brightness of the display is dimmed if you do not perform any actions. |
| ON LEVEL | Specify the desired maximum display lighting intensity. | |
| DIM LEVEL | Specify the desired dimmed display lighting intensity. | |
| SPRACHE | Select the menu language | |
| FACTORY RESET | Reset to factory settings | |
| SOFTWARE UPGRADE | Display of software version | |
21. Cleaning
Before cleaning, please pull the mains adapter out of the socket. Use a soft, dry cloth to clean the device. Do not use chemical solutions or cleaning agents because these may damage the device's surface or the labels on it.
22. Troubleshooting
| Problem Possible cause | Remedy |
| The device cannot be switched on. | The batteries may be dead.The mains adapter is not connected properly.Operate the device using the batteries, check that they are correctly inserted and charged.Ensure that the mains cable is properly connected. |
| Incorrect display of time and date | The time/date is set incor-rectly.The time/date was not syn-chronised properly due to insufficient reception. |
| The device switches off when it is in use. | The batteries may be dead. |
| No or poor radio re-ception | The station signals are too weak. |
| No sound The volume is set too low. | • Increase the volume as required. |
23. Repairs
Please contact our Service Centre if you have technical problems with your device.

WARNING!
Risk of electric shock!
There is a risk of electric shock from live parts. Never, under any circumstances, attempt to open or repair the housing of the mains adapter or the device yourself.
If the housing of the mains adapter or the mains cable is damaged, the mains adapter must be disposed of and replaced with a new mains adapter of the same type.
If the mains cable of this device is damaged, it must be replaced by the manufacturer (or relevant customer service) or other suitably qualified person. This is to avoid hazards.
24. Disposal

PACKAGING
Your device has been packaged to protect it from damage in transit. The packaging is made of materials that can be recycled in an environmentally friendly manner.
DEVICE
The device is fitted with an integrated rechargeable battery. At the end of its service life, do not dispose of the device in the normal household rubbish. Instead, contact your local authority to find out how to dispose of it in an environmentally friendly manner at collection points for electrical and electronic scrap.
25. Technical specifications
| Radio | |
| Power supply DC 5 V 1A | --- |
| Battery operation | DC 3.7 V ---2000 mAh, 7.4 Wh |
| Battery charging time Approx. 3 to 4 hours | |
| Battery capacity | Approx. 8 hours (at 50% volume) |
| Output power 3 W RMS | |
| Headphone output 150 mV max. | |
| FM frequency band 87.5–108 MHz | |
| DAB+ frequency band 174.928–239.2 MHz | |
| Number of memo-ry slots | 30 (DAB), 30 (FM) |
| Environmental condi-tions | 10°C ~ +35°C10% ~ 90% humidity |
| Dimensions (W x H x D) | Approx. 155 x 90 x 32 mm |
| Weight (without mains adapter) | Approx. 280 g |
| Bluetooth | |
| Frequency 2402 to 2480 MHz | |
| Maximum transmission power | 3.2 dBm |
| Version 5.0 | |
| Profile A2DP, AVRCP | |
| Range | Up to 10 metres (with-out obstacles) |
25.1. Explanation of symbols

natural_image
Simple geometric diagram of two concentric squares (no text or symbols)Protection class II
Electrical devices in protection class II are devices that have double and/or reinforced insulation throughout and do not have the option of connecting a protective conductor. The housing of an electrical device in protection class II with surrounding insulating material might either form all of the additional or reinforced insulation, or part of it.

natural_image
Simple line drawing of a house with a chimney (no text or symbols)Indoor use
Devices with this symbol are intended solely for indoor use.

CE labelling
Products that feature this symbol meet the requirements of the EU directives (see section entitled “Declaration of conformity”).

Symbol for direct current (DC)

Symbol for alternating current (AC)
26. Service information
Please contact our Customer Service team if your device ever stops working the way you want or expect it to. There are several ways for you to contact us:
- In our Service Community, you can meet other users, as well as our staff, and you can exchange your experiences and pass on your knowledge there.
You will find our Service Community at community.medion.com.
- Alternatively, use our contact form at www.medion.com/contact.
- You can also contact our Service team via our hotline or by post.
| Opening times Hotline number UK | |
| Mon – Fri: 08.00 – 20.00Sat – Sun: 10.00 – 16.00 | 03333213106 |
| Service address | |
| MEDION Electronics Ltd.120 Faraday Park, Faraday Road, Dorcan Swindon SN3 5JF, Wiltshire United Kingdom | |

text_image
QR code image containing encoded data, no visible human-readable textYou can download this and many other sets of operating instructions from our service portal at www.medion.com/gb/service/. You will also find drivers and other software for a wide range of devices there.
You can also scan the QR code on the side of the screen, to download the operating instructions onto your mobile device from the service portal.
27. Legal Notice
Copyright © 2021
Date: 03.03.2021
All rights reserved.
These operating instructions are protected by copyright.
Mechanical, electronic and any other forms of reproduction are prohibited without the written permission of the manufacturer.
Copyright is owned by the company:
MEDION AG
Am Zehnthof 77
45307 Essen
Germany
Please note that you cannot use the address above for returns. Please always contact our Customer Service team first.
Sommaire
natural_image
Simple line icon of an open book with a lowercase 'i' inside, no text or symbols present.text_image
Warning symbol with a triangle containing an ear icon and sound waves, commonly used in safety or communication contexts.Risque de perte auditive !
natural_image
Simple geometric pattern of two concentric squares (no text or symbols)natural_image
Simple line drawing of a house with a chimney (no text or symbols)community.medion.com.
www.medion.com/contact.