— Radio — Mode d'emploi PDF")
LIFE E66050 (MD 43320) - Radio MEDION - Free user manual and instructions
Find the device manual for free LIFE E66050 (MD 43320) MEDION in PDF.
Pick your language and provide your email: we'll send you a specifically translated version.
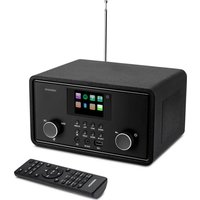
| Product type | DAB+ and FM digital radio |
| Brand | Medion |
| Model | LIFE E66050 (MD 43320) |
| Dimensions (approx.) | 25 x 15 x 10 cm |
| Weight (approx.) | 500 g |
| Power supply | 5 V DC power adapter (included) or 4 LR6 (AA) batteries |
| Power consumption | 3 W (max) |
| Speaker | Built-in stereo speaker, 3 W |
| Display | Backlit LCD display |
| Reception bands | DAB+ (band III) and FM (87.5 – 108 MHz) |
| Main functions | Alarm, timer, sleep, auto scan, 10 DAB+ and 10 FM presets |
| Connectivity | 3.5 mm headphone jack, USB port (charging) |
| Antenna | Built-in telescopic antenna |
| Care and cleaning | Clean with a soft, dry cloth. Do not use chemical or abrasive products. |
| Safety | Do not expose to moisture, rain, or extreme temperatures. Use only the provided adapter. |
| Spare parts and repairability | Power adapter, batteries (not included). Repair by an authorized professional. |
| General information | MEDION LIFE E66050 (MD 43320) portable radio – Manual available at notice-facile.com |
Frequently Asked Questions - LIFE E66050 (MD 43320) MEDION
How to turn on and off the Medion LIFE E66050 radio?
Press the ON/OFF button located on the top of the device to turn on. To turn off, press and hold the same button for 2 seconds.
How to set the time on the radio?
The time sets automatically via the DAB+ signal. If necessary, access the menu via the MENU button, select 'Settings' then 'Time/Date' and adjust manually.
How to start a DAB+ station scan?
Press the SCAN button to start an automatic scan. Found stations are stored and accessible with the PRESET buttons.
What to do if FM reception is poor?
Fully extend the telescopic antenna and reorient it. Move the radio away from interference sources (screens, microwaves). Test in DAB+ mode which is often more stable.
Can I use batteries to power the radio?
Yes, insert 4 LR6 (AA) batteries into the compartment at the back. The device automatically switches to battery if the power adapter is not plugged in.
How to reset the radio to factory settings?
Go to the SETTINGS menu, select 'Reset' and confirm. This erases all presets and custom settings.
The sound is too low, how to increase it?
Use the VOLUME knob on the side to increase volume. Also check that 'Night' mode (sound attenuation) is not activated in settings.
What do the error messages on the screen mean?
Messages like 'No signal' or 'Service unavailable' indicate a lack of reception. Check the antenna and DAB/FM coverage. See the full manual for the list of codes.
How to update the radio firmware?
This radio does not support user firmware updates. Contact Medion customer service for information.
Where to find the serial number and after-sales service?
The serial number is on the label on the back of the device. For after-sales service, visit the Medion website or contact technical support at 0 800 70 80 90 (toll-free).
User questions about LIFE E66050 (MD 43320) MEDION
0 question about this device. Answer the ones you know or ask your own.
Ask a new question about this device
No questions yet. Be the first to ask one.
Download the instructions for your Radio in PDF format for free! Find your manual LIFE E66050 (MD 43320) - MEDION and take your electronic device back in hand. On this page are published all the documents necessary for the use of your device. LIFE E66050 (MD 43320) by MEDION.