— Radio — Mode d'emploi PDF")
LIFE S64007 (MD 44007) - Radio MEDION - Free user manual and instructions
Find the device manual for free LIFE S64007 (MD 44007) MEDION in PDF.

| Product Type | Micro audio system with DAB+/FM radio, CD player, Bluetooth, Wi-Fi, Alexa voice control |
| Brand | MEDION |
| Model | LIFE S64007 (MD 44007) |
| Dimensions (W x H x D) | Approx. 210 x 150 x 225 mm |
| Weight | Approx. 2.5 kg |
| Power supply | Mains adaptor 15 V, 1.5 A; max. consumption 22.5 W in operation, approx. 4 W on standby |
| Main features | DAB+ and FM radio (60 presets), CD/CD-R/CD-RW player, USB port (up to 32 GB), Bluetooth 4.0, Wi-Fi (802.11 b/g/n), Amazon Alexa voice control, Spotify Connect, dual alarm, sleep timer, equalizer |
| Maintenance and cleaning | Unplug before cleaning; use a soft, dry cloth; avoid solvents and chemicals; do not allow liquid to enter |
| Safety | Class 1 laser; do not open the casing; use only the supplied adaptor; avoid moisture; keep out of reach of children; risk of electric shock if damaged |
| Spare parts and repairability | Remote control batteries: 2 x AAA 1.5 V; repair by an approved specialist; no user-serviceable parts |
| General information | French user manual available; MEDION after-sales service; EU conformity (RE, RoHS); warranty void if used improperly |
Frequently Asked Questions - LIFE S64007 (MD 44007) MEDION
User questions about LIFE S64007 (MD 44007) MEDION
0 question about this device. Answer the ones you know or ask your own.
Ask a new question about this device
Download the instructions for your Radio in PDF format for free! Find your manual LIFE S64007 (MD 44007) - MEDION and take your electronic device back in hand. On this page are published all the documents necessary for the use of your device. LIFE S64007 (MD 44007) by MEDION.
USER MANUAL LIFE S64007 (MD 44007) MEDION
natural_image
Black and silver portable electronic device with a stand and control panel, labeled 'MEDION' (no visible text on device body beyond branding)Mikro-Audio-System mit Amazon Alexa Micro Audio System with Amazon Alexa Micro chaîne audio avec Amazon Alexa Microsistema de sonido con Amazon Alexa Sistema micro audio con Amazon Alexa Micro-audiosysteem met Amazon Alexa MEDION® LIFE® P64007 (MD 44007)
Inhaltsverzeichnis
DE
natural_image
Diagram of an electronic device rear panel with connectors and a cable, no visible text or symbols1. Information about these operating instructions .... 47
1.1. Key to symbols....47
2. Proper use
3. EU – Declaration of Conformity 49
3.1. Trademark information ......ES.4
4. Safety information
4.1. Restricted group of people ....50
4.2. Operating safety 51
4.3. Power supply 52
4.4. Installation location/surroundings 5
4.5. Repairs....54
4.6. CD player....54
4.7. Drivers and connections ....54
4.8. Handling batteries 5
4.9. Cleaning the device ....56
5. Package contents
6. Device overview
6.1. Front....58
6.2. Top....59
6.3. Rear 60
6.4. Remote control....61
7. Inserting/replacing batteries in the remote control 62
8. Setting up the device 62
8.1. Mains connection 6
8.2. Aerial reception....63
8.3. Connecting external devices 63
9. Operating the device....64
9.1. Switch on/switch to standby mode 65
9.2. Selecting the operating mode 65
9.3. Selecting the menu language 65
9.4. Audio functions 66
9.5. Date and time....66
9.6. Alarm 67
9.7. Sleep timer....68
9.8. Dimmer....68
10. Radio mode 68
10.1. DAB mode....68
10.2. Menu settings....69
10.3. FM mode 70
10.4. Viewing information on the display....70
EN
10.5. Playing back CDs and USB storage media ....71
10.6. Inserting/removing a disc ....71
10.7. Connecting USB devices ....71
10.8. Start/pause/stop playback 71
10.9. Track selection, rewind/fast forward .....71
10.10. Repeat/random playback 72
10.11. Programming the track playing order 72
10.12. Track information (ID3) 72
10.13. Bluetooth mode....72
10.14. Connecting an external playback device ....73
10.15. Amazon Alexa ^® voice control ....74
10.16. Listening to music on Spotify ^® .....75
-
Setting the display brightness 75
-
Reset to factory settings 75
-
Displaying the software version....76
-
Cleaning 76
-
Troubleshooting 76
-
End of operation....77
-
Disposal 78
-
Technical specifications .... 79
18.1. Symbols on the type plate and power pack ....81
-
Service information 82
-
Legal Notice 83
1. Information about these operating instructions

Thank you for choosing our product. We hope you enjoy using this device.
Please read the safety instructions and all other instructions carefully before using the device for the first time. Note the warnings on the device and in the operating instructions.
Always keep the operating instructions close to hand. If you sell the device or give it away, please ensure that you also pass on these operating instructions. They are an essential component of the product.
1.1. Key to symbols
If a block of text is marked with one of the warning symbols listed below, the hazard described in that text must be avoided to prevent the potential consequences described there from occurring.

DANGER!
Warning: risk of fatal injury!

WARNING!
Warning: risk of possible fatal injury and/or serious irreversible injuries!

CAUTION!
Warning: risk of minor and/or moderate injuries!

NOTICE!
Follow these instructions to prevent damage to the device!

More detailed information about using the device!

Follow the instructions in the operating instructions!
WARNING!
Warning: risk of electric shock!
- Bullet point/information on steps during operation
▶ Instruction to be carried out
2. Proper use
Your device can be used in a range of ways:
The device is intended for playing sound media (CDs, MP3 data media, via USB, via Bluetooth) for analogue and digital radio reception and features voice control using Amazon Alexa®.
- The device is only intended for private use and not for industrial/commercial use.
Please note that we shall not be liable in cases of improper use:
- Do not modify the device without our consent and do not use any auxiliary equipment that we have not approved or supplied.
- Only use replacement parts or accessories that we have supplied or approved.
- Comply with all the information in these operating instructions, especially the safety information. Any other use is considered improper and can cause personal injury or property damage.
- Do not use the device outdoors.
- Do not expose the device to extreme conditions. Avoid:
– high humidity or wet conditions
- extremely high or low temperatures
- direct sunlight
- open flames.
3. EU – Declaration of Conformity
MEDION AG hereby declares that this device complies with the fundamental requirements and the other relevant provisions of:
• Radio Equipment Directive 2014/53/EU
• Ecodesign Directive 2009/125/EC
• RoHS Directive 2011/65/EU
You can download the complete EU Declaration of Conformity at www.medion.com/conformity.
All devices that can be connected to the relevant connections on the micro audio system must comply with the requirements of the Low Voltage Directive.
CE
3.1. Trademark information
Amazon, Alexa and all associated logos are registered trademarks of Amazon.com, Inc. or its subsidiaries.
The Bluetooth ^® word mark and logos are registered trademarks of Bluetooth SIG, Inc. and are used by MEDION ^® under licence.
Other trademarks and trade names are the property of their respective owners.
4. Safety information
4.1. Restricted group of people
- This device is not intended for use by people (including children) with reduced physical, sensory or mental abilities or by those without experience and/or knowledge, unless they are supervised by a person responsible for their safety or they have been instructed in its use by that person. Children must be supervised to ensure they do not play with this device.
- Keep the device and its accessories out of the reach of children.
- Cleaning and user maintenance on the device must not be carried out by children.

DANGER!
Risk of choking and suffocation!
The packaging material is not a toy! Packaging film can be swallowed or used improperly, creating a risk of choking and suffocation.
- Keep packaging material such as plastic film or plastic bags away from children.
4.2. Operating safety
Before using the device for the first time, check the device for damage. A defective or damaged device may not be used.

DANGER!
Risk of electric shock!
Risk of injury from electric shock due to live parts. They pose a risk of electric shock or fire if an unintentional short circuit occurs.
Do not place containers filled with liquid, e.g. vases, on or near the product, and protect all the parts from drips or splashes. Such containers may tip over and the liquid may impair the electrical safety of the device.
▶ Never open the product housing and do not push objects inside the product through the slots and openings.
If the device or connection cable is damaged, remove the plug from the mains socket immediately. This also applies if liquids or foreign objects have penetrated inside the device.
▶ Unplug the mains plug from the socket if you are away for a long period or there is a thunder storm.
4.3. Power supply

DANGER!
Risk of electric shock!
Risk of injury from electric shock due to live parts.
▶ Only connect the device to a properly installed earthed mains socket (230 V \~ 50 Hz) that is easy to reach and close to the place where you have set up the device. Always keep the socket free of obstructions so that the mains power adapter can be disconnected easily.
Even when the device is switched off, some components are live.
In order to disconnect the power to your device or to completely isolate the device from voltage sources remove the mains power adapter from the socket.
When disconnecting the mains power adapter from the mains supply, always pull on the plug rather than on the cable.
- In an emergency, for example, if you see smoke coming out of the device, or if it makes unusual noises, remove the mains power adapter from the socket.
- The device uses a small amount of electricity, even when it is switched off. To completely switch off the device, unplug the mains power adapter from the power socket.
- Only use the supplied mains power adapter, as specified in the technical data.
4.4. Installation location/surroundings

DANGER!
Risk of electric shock!
Major changes in temperature or fluctuations in humidity can cause moisture to build up within the device due to condensation – this can cause an electrical short circuit.
After transporting the device, wait until it has reached ambient temperature before switching it on.

NOTICE!
Risk of damage to the device!
Unsuitable environmental conditions could cause damage to the device.
▶ Use the device only in dry rooms.
▶ To prevent the device from falling, only install and operate it and its components on a sturdy, level and vibration-free surface.
When setting up the device:
- Leave a sufficient gap in relation to other objects, and that the ventilation slots are not covered in order to ensure that there is always sufficient ventilation
- Do not expose the device to direct sources of heat (e.g. heaters)
- Do not leave the device in direct sunlight
- Avoid contact with moisture, droplets or splashes, and no liquid-filled objects – for example, vases – are placed on or near the device
- Do not place the device close to magnetic fields (e.g. television sets or other loudspeakers)
- Do not place naked flames, such as lit candles, near the device
- Ensure that the connection cable is not taut or bent.
4.5. Repairs

DANGER!
Risk of electric shock!
There is a risk of electric shock due to live parts.
▶ Check the device and the connection cable for damage before using the device for the first time, and after each use.
▶ Do not use the device if the device shows visible signs of damage.
▶ If you discover any damage or experience any technical problems, have the device repaired exclusively by a qualified technician.
4.6. CD player
- The CD player is a Class 1 laser product. The device has a safety system that prevents dangerous laser beams from escaping during normal use. To avoid eye injuries, never tamper with or damage the device's safety system.

4.7. Drivers and connections
- Do not insert any foreign objects into the openings on the CD player. This can damage the device.
- Always place a CD in the disc tray with the labelled side facing to the front. Never use excessive force when inserting a CD or connecting an external device. If you feel resistance, try a different way or another medium.
4.8. Handling batteries
The remote control for this device is operated with two batteries. Please note the following:
- Keep new and used batteries out of the reach of children. Do not swallow batteries as they can cause chemical burns.

WARNING!
Risk of chemical burns!
The remote control supplied with the device contains two batteries. If batteries are swallowed, this can cause serious internal chemical burns within two hours which may prove fatal.
▶ Seek medical help immediately if you think that batteries may have been swallowed or secreted in any part of the body.
- Stop using the remote control if you cannot close the battery compartment securely, and keep it well away from children.
- Keep batteries and the remote control away from children to avoid any hazards/misuse.
- Before inserting the batteries, check that the contacts in the device and on the batteries are clean and, if necessary, clean them.
• Always use new batteries of the same type. Never use old and new batteries together. - Pay attention to the polarity (+/−) when inserting the batteries.
- There is a risk of explosion if batteries are replaced incorrectly! Only replace batteries with those of the same or an equivalent type.
- Never try to recharge non-rechargeable batteries. Risk of explosion!
-
Never expose the batteries to excessive heat (such as direct sunlight, fire or similar).
-
Store batteries in a cool, dry place. Strong direct heat can damage batteries. Do not expose the device to sources of intense heat.
- Never short circuit or dismantle batteries.
- Never throw batteries into a fire. Risk of explosion!
- Remove leaking batteries from the device immediately. Clean the contacts before inserting a new battery. Risk of chemical burns from battery acid! In the event of contact with battery acid, rinse the affected areas immediately with plenty of clean water and consult a doctor immediately.
• Always remove flat batteries from the device. - If the device is not going to be used for long periods, remove the batteries.
4.9. Cleaning the device

DANGER!
Risk of electric shock!
Risk of injury from electric shock due to live parts.
Before cleaning, pull the mains plug out of the socket.

NOTICE!
Possible material damage
Improper handling of sensitive surfaces can damage the device.
▶ Use a soft, dry cloth to clean the device.
- Avoid the use of chemical solutions and cleaning products because these may damage the device surface and/or the labels on it.
5. Package contents

DANGER!
Risk of choking and suffocation!
Risk of choking and suffocation due to swallowing or inhaling small parts or plastic wrap.
- Keep the plastic packaging out of the reach of children.
Remove the product from the packaging and remove all packaging material.
▶ Please check your purchase to ensure that all items are included. If anything is missing, please contact us within 14 days of purchase.
The following items are supplied with your product:
- Micro audio system
- Remote control incl. 2 x 1.5 V AAA batteries
- Mains power adapter
- Documentation
6. Device overview
6.1. Front

1) - VOL + - Volume controller
OK - Confirm selection in menu
NAV - Navigate in the menu
2) - Ejekt CD
3) CD compartment
4) - Deactivate microphone for Alexa
5) - Activate Alexa
6) ALARM - Set alarm 1/2
7) MENU – Open the menu
8) ▶/ > - Open station list (DAB); select frequency, search forwards (FM); next track (CD/Bluetooth/USB), fast forward (CD/USB);
9) ▶ II /INFO – Start/pause playback (CD/Bluetooth/USB); Retrieve station information (DAB/FM)
10) ◀◀ / < – Open station list (DAB); select frequency, search backwards (FM); previous track (CD/Bluetooth/USB), rewind (CD/USB);
11) ■ - End playback
12) FUNC. – Select operating mode; switch device to standby mode
13) Coloured Alexa status display
Off: ready for use
Red: microphone deactivated
Blue: wait for voice command
Flashing blue: processing a voice command
Pulsing blue: voice response active
Green-yellow-yellow: no connection to the WLAN router
14) Display
15) Infrared sensor for remote control
6.2. Top
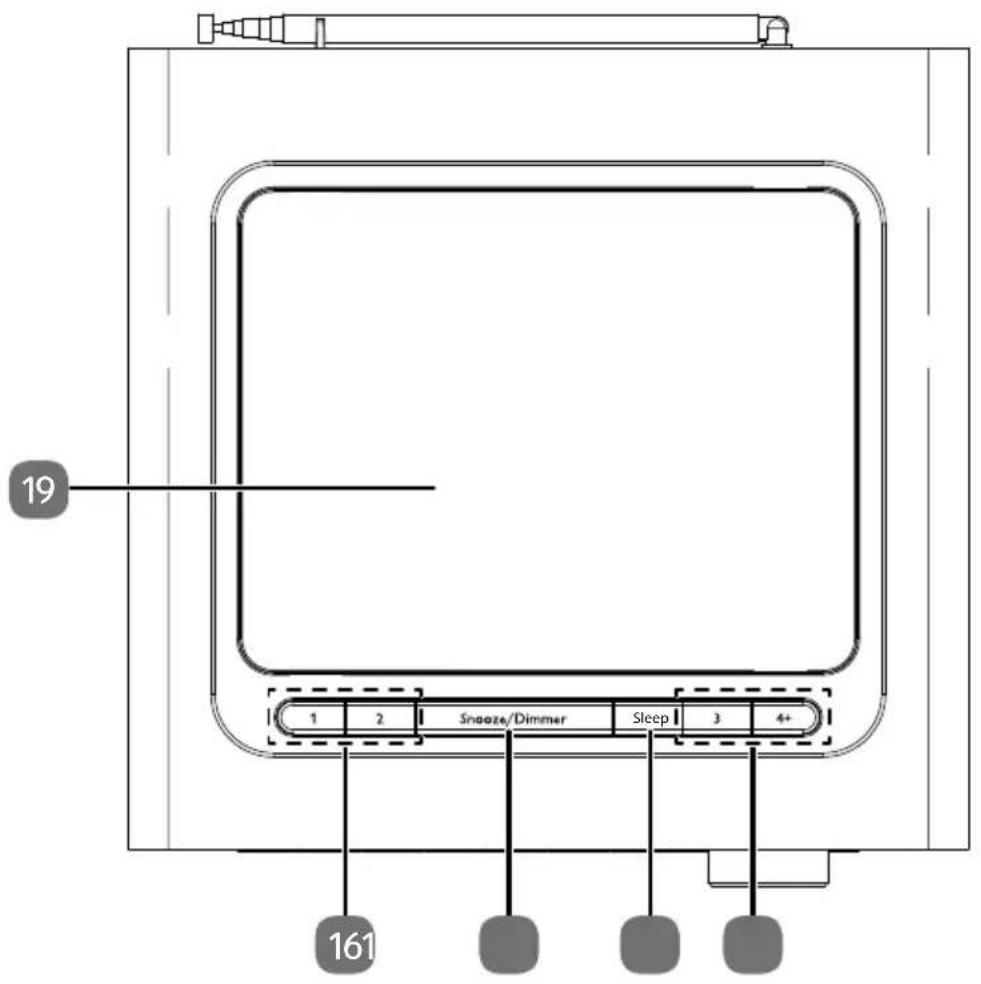
16) 1, 2, 3, 4+ – Memory spaces for radio stations
17) SLEEP – Set sleep mode
18) SNOOZE – Snooze function
DIMMER – Set the display brightness
19) Loudspeaker
6.3. Rear
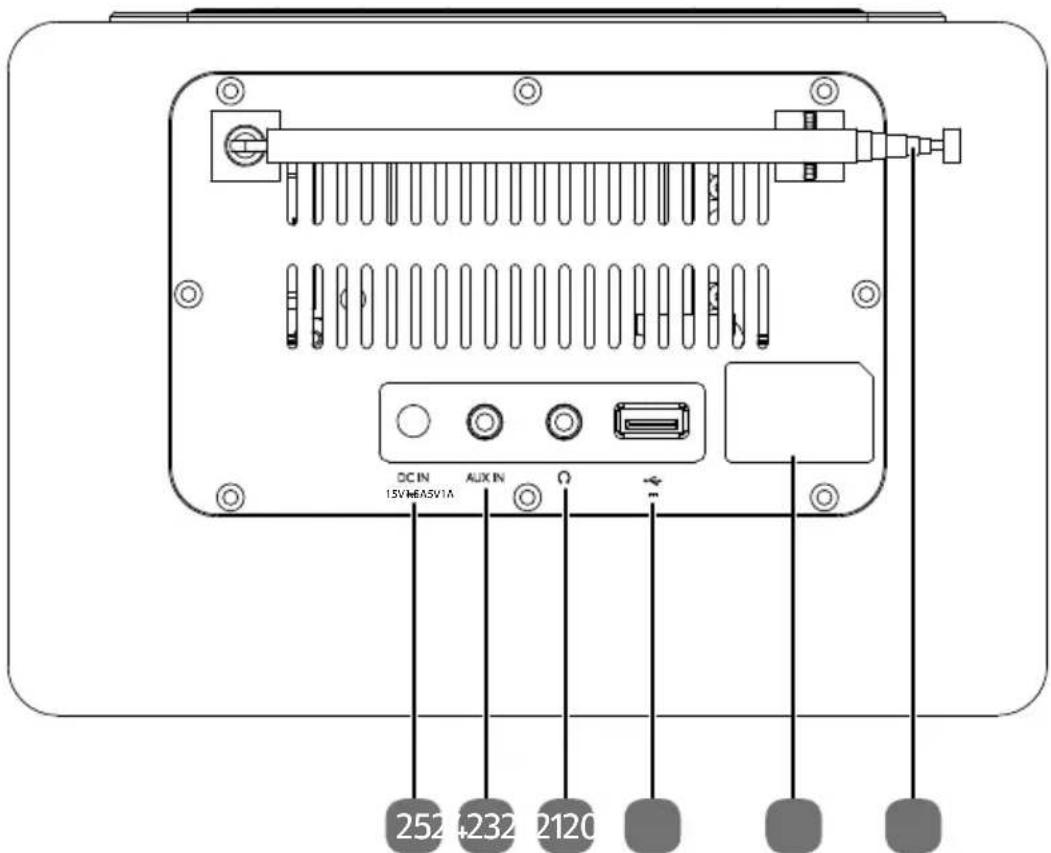
20) Telescopic aerial
21) Type plate
22) 5V-4A - Connection port for USB storage media
23) - Connection socket for headphones
24) AUX IN – Jack for external device
25) DC IN 15V --- 1.5A - Connection socket for mains power adapter
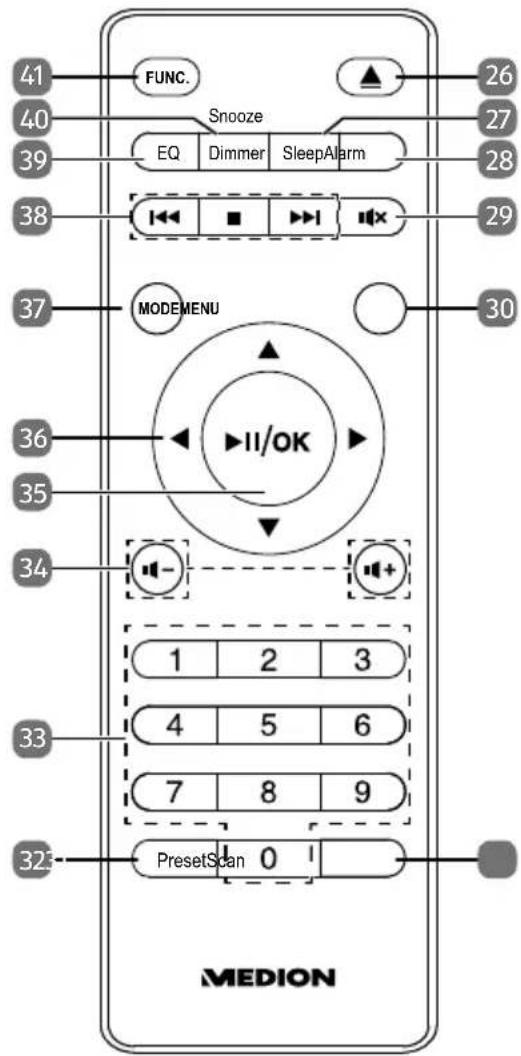
6.4. Remote control
26) - Eject CD
27) SLEEP – Set sleep mode
28) ALARM – Set alarm 1/2
29) - Mute
30) MENU – Open the menu
31) SCAN – Scan for radio stations
32) PRESET – Retrieve preset radio station
33) Number buttons
34) -/+ - Reduce/increase volume
35) ▶ II – Start/pause playback
OK – Confirm selection
36) ▶ – DAB: open station list; FM: select frequency, search forwards; CD: next track, fast forward; Bluetooth: next track; USB: next track, fast forward
▼ – Navigate down through the menu
- DAB: open station list; FM: select frequency, search backwards; CD: previous track, rewind; Bluetooth: previous track; USB: previous track, rewind
▲ - Navigate up through the menu
37) Select the operating mode
CD - CD mode
DAB – Digital radio mode
FM – Analogue radio mode
BT – Bluetooth mode
USB - USB mode
WIFI - WLAN mode
LINE IN - AUX mode
38) - Rewind/play previous track; open station list
▶▶ – fast forward/play next track; open station list
■ - Stop playback
39) EQ – Select equaliser mode
40) DIMMER – Set the display brightness
SNOOZE – Snooze function
41) Switch between the operating mode and standby mode
7. Inserting/replacing batteries in the remote control
Insert two 1.5 V R03/LR03/AAA/micro batteries in the remote control.

WARNING! Risk of explosion!
Risk of explosion if battery is replaced incorrectly.
▶ Replace batteries only with the same or equivalent type.
▶ Open the battery compartment cover.
Insert the battery so that the negative pole contacts the springs. Refer to the illustration in the battery compartment.
▶ Replace the battery compartment cover.
Replace the batteries if the device fails to react to commands from the remote control properly.
8. Setting up the device
Place the device and speaker on a sturdy, level surface. Some aggressive varnishes can corrode the rubber feet on the device. If necessary, place the device on a suitable underlay.

Before connecting an external device, unplug the mains plug from the device!
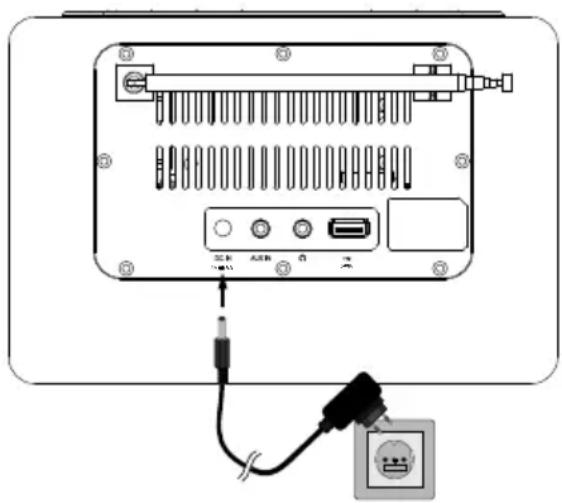
8.1. Mains connection
Connect the mains power adapter.
▶ To do so, insert the round end into the DC IN 15V=1.5A connection socket.
Then plug the mains power adapter into a properly installed 220–240 V \~ 50/60 Hz earthed power socket that is always easy to access.
8.2. Aerial reception
There is a telescopic aerial on the back of the device.
▶ Fully extend the aerial and adjust it for optimal reception.
8.3. Connecting external devices
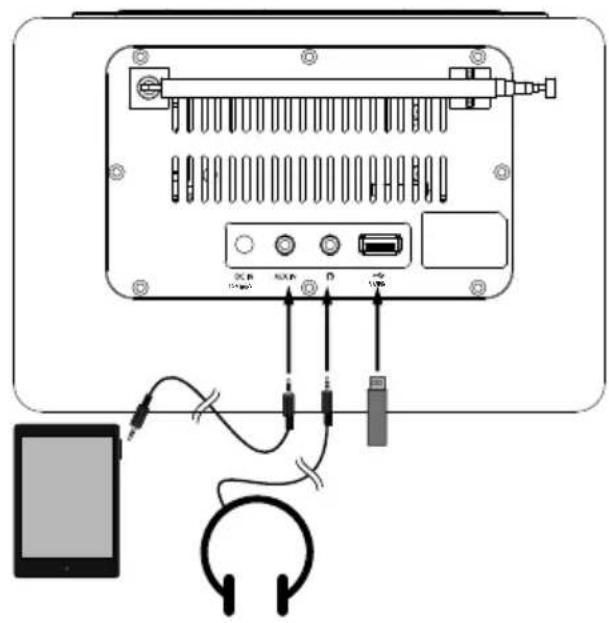
8.3.1. Connecting the headphones
You will find a 3.5 mm headphone socket on the back of the device.
Insert headphones with a 3.5mm jack plug into the headphone socket 🔒.
When headphones are connected the speakers are disabled. Volume adjustment is still possible to change the headphone volume.
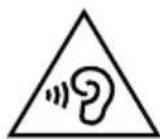
WARNING!
Risk of hearing damage!
Using headphones to listen to a device playing at a high volume for an extended period can damage your hearing.
Before pressing play, set the volume to the lowest setting.
▶ Start playback and increase the volume to a comfortable level.
8.3.2. Connecting USB devices
USB memory sticks can be connected to the USB port. This enables music tracks to be played from a USB memory stick. The USB port does not support video playback. Charging, for example of a smartphone, is also supported.
▶ Plug a USB device into the USB 5V——1A port.
8.3.3. Connecting a device to the AUX IN connection
There is a 3.5 mm jack labelled AUX IN on the back of the device.
▶ Plug the connection cable with a 3.5 mm jack plug into the jack connection.
9. Operating the device
Some functions can be accessed using the corresponding buttons on the remote control. In most cases, however, operation is also possible on the device itself. The next section provides an overview of navigation in the menu using the remote control in comparison to operation on the device itself.
| Function | Operation using the remote con-trol | Operation using the device |
| Open menu MENU | ||
| Navigate up/down through the menu | ▲/▼ | Turn the con-troller |
| Set the value | ▲/▼ or ◀/▶ | Turn the con-troller |
| Confirm selection OK Press controller | ||
| Return to previous menu MENU | ||
| Close menu | Press MENU several times until the menu is closed | |
However, these operating instructions predominantly focus on operation using the remote control so as to simplify the text.
9.1. Switch on/switch to standby mode
As soon as the device is connected to the power supply, the date and time are shown in the display. The device is in standby mode.
Alexa voice commands can also be used in standby mode.
▶ Press the FUNC. button on the device or remote control to switch on the device. The last operating mode selected is shown on the display.
▶ Press the
- FUNC. button on the remote control or
- press and hold the FUNC. button on the device
to switch the device back into standby mode.
The time and date are shown on the display.
9.2. Selecting the operating mode
▶ Press the
- MODE button on the remote control several times or
- press the FUNC. button on the device several times to run through the operating modes.
The selected operating mode appears in the display:
- CD - CD mode
- DAB - Digital radio mode
- FM - Analogue radio mode
- BT - Bluetooth mode
- USB - USB mode
- WIFI - WLAN mode
- LINE IN - AUX mode
9.3. Selecting the menu language
The menu can be displayed in different languages:
▶ Press the MENU button to open the menu.
▶ Use ▲/▼ to select MAIN MENU and press OK to confirm.
Depending on the operating mode, the MAIN MENU is opened directly after the MENU button is pressed.
▶ Use ▲/▼ to select LANGUAGE and press OK to confirm.
▶ Use ▲ /▼ to select the desired language and press OK to confirm.
9.4. Audio functions
9.4.1. Setting the volume
▶ To adjust the volume, use
- the - VOL + controller on the device or
- the -/+ buttons on the remote control.
▶ Press 📄 to mute the sound. The same symbol appears on the display. Press the button again to cancel the mute setting. The symbol disappears.

If an external device (e.g. a smartphone) is connected via Bluetooth or if an external device is connected to the AUX IN jack you can also adjust the volume using the external devices.
9.4.2. Equalizer
Using the equalizer, you can adjust the bass and low frequencies in the menu.
▶ Press the EQ button.
The value after BASS flashes.
▶ Use ▲/▼ to set the desired bass value and press OK to confirm.
The value after TREBLE flashes.
▶ Use ▲ /▼ to set the desired treble value and press OK to confirm.
9.5. Date and time
The time is set regularly using the radio reception signal. Manual setting is, however, possible.
9.5.1. Setting the date/time manually
▶ Press the MENU button to open the menu.
▶ If a track is to be played back, use ▲/▼ to select MAIN MENU and press OK to confirm.
▶ Use ▲/▼ to select TIME SETUP and press OK to confirm.
▶ Use ▲/▼ to select SET TIME and press OK to confirm.
▶ Use ▲/▼ to set the date in day, month, year format and press OK to confirm each setting.
▶ Then use ▲/▼ to set the time and press OK to confirm each setting.
The time and date have been set.
9.5.2. Time format
The time can be displayed in 12-hour or 24-hour format.
▶ Press the MENU button to open the menu.
▶ If a track is to be played back, use ▲/▼ to select MAIN MENU and press OK to confirm.
▶ Use ▲/▼ to select TIME SETUP and press OK to confirm.
▶ Use ▲/▼ to select TIME FORMAT and press OK to confirm.
▶ Use ▲/▼ to set 12-hour or 24-hour format and press OK to confirm.
9.5.3. Automatic synchronisation
The date and time can be set automatically, eliminating the need to set the time and date manually. Data from the radio signal is used for this.
▶ Press the MENU button to open the menu.
▶ If a track is to be played back, use ▲/▼ to select MAIN MENU and press OK to confirm.
▶ Use ▲/▼ to select TIME SETUP and press OK to confirm.
▶ Use ▲/▼ to select AUTO UPDATE and press OK to confirm.
▶ Use ▲ /▼ to set:
- NO UPDATE: no automatic synchronisation
- FROM RADIO: automatic synchronisation enabled.
- Press OK to confirm.
9.6. Alarm
9.6.1. Setting the alarm
The device must be switched on for the alarm to be set. There are two alarm times that can each be set independently of the other.
▶ Press the MENU button to open the menu.
If a track is to be played back, use ▲/▼ to select MAIN MENU and press OK to confirm.
▶ Use ▲/▼ to select ALARMS and press OK to confirm.
▶ Use ▲/▼ to select the desired ALARM 1 or ALARM 2 and press OK to confirm.
▶ Use ▲/▼ in succession to select the desired entries and press OK to confirm each. Use ▲/▼ to make the respective settings in the menus.
The menu includes the following entries:
- ENABLE – Deactivate the alarm (OFF), and set a daily (DAILY) or one-off alarm (ONCE). It is also possible to set regular alarms on weekdays (WEEK-DAYS) and weekends (WEEKENDS)
- TIME - Set the time of the alarm
- MODE – Select the operating mode in which you want to start the alarm (DAB, FM, BUZZER = alarm tone)
- PRESET – Select a radio station from a station list that is to be used to start the alarm or LAST PRESET for the last station set
- VOLUME – Select the alarm volume
- SAVE - Save settings
▶ Once all settings are completed, select SAVE and press OK to confirm.
The alarm has been set. When an alarm is switched on, a bell symbol with the corresponding time set appears on the display.
9.6.2. Stopping the alarm
When the alarm sounds, you can stop it immediately by pressing the FUNC. button
9.6.3. Snooze function
▶ You can sound the alarm again after approx. 9 minutes by pressing SNOOZE. The remaining time is shown on the display.
▶ You can cancel the snooze function by pressing the FUNC. button.
9.7. Sleep timer
If you select the sleep timer function, the device switches off automatically after a defined period of up to 180 minutes.
When the device is switched on, press the SLEEP button once or several times to select the duration of the sleep timer in intervals of OFF 5, 15, 30, 45, 60, 90, 120, 180 minutes.
After the selected duration, the device switches itself off automatically.
If a sleep timer is activated, you can see the remaining time on the display:
▶ You can cancel the sleep timer by pressing SLEEP once.
The remaining time is shown.
▶ Press and hold the SLEEP button until SLEEP OFF is shown on the display.
9.8. Dimmer
The display features four dimming phases.
▶ Press the DIMMER button once or several times to run through the dimming phases.
10. Radio mode
You can use this radio to receive FM and DAB stations.
Your radio has the Dynamic Label Segment (DLS) information service, which displays information such as artist, song titles or current traffic news on the display.
10.1. DAB mode
When DAB mode is used for the first time, the device automatically searches for all DAB stations that can be received and stores them permanently. This means that the station search only needs to be carried out once.
▶ Press the FUNC. button several times until DAB appears on the display.
When DAB mode is used for the first time, a status bar with the message SCAN-NING and the number of stations found is shown on the display.
Once the station search is complete, the stations are listed in alphabetical order and the first station in the list is displayed.

You can restart the scan at any time by pressing the SCAN button.
10.1.1. Playing DAB stations
All stations that can be received are automatically stored in a general station list.
▶ Press the ◀ / ▶ to retrieve the station list.
▶ Use ▲/▼ to select the desired radio station.
▶ Press OK to play the radio station.
10.1.2. Storing DAB stations
You can store up to 30 preset DAB stations in a separate station list.
▶ First select the station to be stored.
▶ Press and hold the PRESET button to retrieve the list of stored stations.
▶ Use ▲/▼ to select the desired memory slot.
▶ Press and hold the OK button to store the radio station.
A confirmation is shown on the display.
Radio stations that are in the list of stored stations are shown on the display with a star and the memory slot number.
10.1.3. Retrieving stored DAB stations
▶ Press the PRESET button. The list of stored stations appears on the display.
▶ Use ▲/▼ to select the desired memory slot.
▶ Press the OK button to retrieve the radio station.
10.2. Menu settings
Operation in the menu takes place as described in section "9. Operating the device" on page 64.
▶ Press the MENU button to navigate to the menu.
| STATION LIST Display the list of stations | ||
| FULL SCAN Full station search and storage of all stations found | ||
| MANUAL TUNE Manual selection of the frequency | ||
| STATION ORDER MULTIPLEX Sort stations by blocks of stations | ||
| ACTIVE Hide stations that cannot be displayed | ||
| DRC OFF | Dynamic Range Control | (DRC): Select the compression |
| LOW | ||
| HIGH | ||
| PRUNE STATION | Delete all DAB stations that cannot be received in the current region. | |
10.3.FM mode
10.3.1. Storing stations automatically
▶ Press and hold the SCAN button until the station search starts. All stations found are stored by frequency.
10.3.2. Searching for FM stations manually
You can search stations in several ways:
▶ Press the SCAN button. An automatic station search starts until the next station is found. The station search stops when the next strongest station signal is reached.
▶ Press the button again to continue to search for the next station.
Alternatively:
▶ Press the ◀ / ▶ button several times to run through the frequencies in succession.
10.3.3. Storing FM stations
You can store up to 30 preset DAB stations in a separate station list.
▶ First select the station to be stored.
▶ Press and hold the PRESET button to retrieve the list of stored stations.
▶ Use ▲/▼ to select the desired memory slot.
▶ Press and hold the OK button to store the radio station.
A confirmation is shown on the display.
Radio stations that are in the list of stored stations are shown on the display with a star and the memory slot number.
10.3.4. Retrieving stored FM stations
▶ Press the PRESET button. The list of stored stations appears on the display.
▶ Use ▲/▼ to select the desired memory slot.
▶ Press the OK button to retrieve the radio station.
10.3.5. Switching between mono/stereo
During playback, press and hold the OK button until a confirmation is shown on the display.
▶ MONO: the radio station is played back in mono.
▶ AUTO STEREO: the radio station is played back in stereo.
10.4. Viewing information on the display
In DAB or FM mode, press the OK button on the remote control or the INFO button on the device to view the following information in sequence on the display:
Signal error (DAB), signal strength, station name/information, programme section, channel number/frequency, date, bit rate/codec/channel.
10.5. Playing back CDs and USB storage media
Note the following:
- Due to the numerous different file systems and file formats, connected USB memory sticks cannot be guaranteed to function.
- Depending on the size of the data medium, it may take some time for the system to be detected.
- Depending on the medium, certain functions may not be supported.
- External hard disks are not supported.
10.6. Inserting/removing a disc
Ensure there is approximately 15 cm space in front of the device, so that the CD is not hindered during insertion or ejection.
▶ Carefully insert a CD with the labelled side facing upwards into the CD slot. The CD is automatically pulled in and READING appears on the display. The first track then starts playing automatically.
If no disc is inserted, or if the disc cannot be read, the display reads NO DISC.
▶ Press the button to eject the inserted CD.
10.7. Connecting USB devices
USB memory sticks can be connected to the USB port. This enables music tracks to be played from a USB memory stick.
▶ Plug a USB device into the USB port.
10.8. Start/pause/stop playback
▶ Press the ▶ II button to start playing tracks. To pause playback, press the button again. Press the button again to resume playback.
▶ Press ■ to stop playback completely.
10.9. Track selection, rewind/fast forward
▶ Press the ◀ button to go back to the start of the track that is currently being played (CD only). Press the button again to skip to the previous track. Use the ▶ button to switch to the next track.
▶ Press and hold the ◀/▶ button to rewind/fast forward within a track.
10.10. Repeat/random playback
▶ Press the MENU button to open the menu.
▶ Use ▲ /▼ to select CD REPEAT or USB REPEAT and press OK to confirm.
▶ Use ▲ /▼ to select the desired entry.
- Repeat switched off (REPEAT OFF appears on the display; only in CD mode).
- Repeat all tracks (REPEAT ALL appears on the display).
– Repeat individual track (REPEAT ONE appears on the display).
- Random playback active (RANDOM is shown on the display).
▶ Press OK to confirm your selection.
10.11. Programming the track playing order
Use the programme function to create your own music playlist by selecting which specific tracks you want to play. You can specify the order in which the list is played yourself. Proceed as follows:
▶ Press ■ to stop playback.
▶ Press and hold the PRESET button to navigate to programme mode. Programme position P01 appears on the display. A star with the desired programme number appears on the display.
▶ Now press ◀ / ▶ to select a track.
▶ Press and hold the PRESET button to store the track.
▶ A star with the next programme number appears on the display.
▶ Store additional tracks in the same way.
▶ Once you have added all tracks, press OK to confirm.
▶ To delete a programmed playback, press the ■ button twice.
10.12. Track information (ID3)
If the CD or USB memory stick contains tracks with ID3 information, information about the track, artist and album name will be shown on the display.
10.13. Bluetooth mode
You can use Bluetooth to play tracks wirelessly from external devices such as MP3 players or mobile phones with Bluetooth on this micro audio system.
10.13.1. Connecting Bluetooth devices for the first time
▶ Switch to Bluetooth mode. CONNECTING... will appear on the display.
▶ Enable the Bluetooth function on your external device as well.
The micro audio system is automatically in pairing mode.
▶ Perform pairing on the external device. Refer to the instructions for your external device for more information. The name of the radio is "MEDION MD 44007".
CONNECTED appears on the display permanently and the pairing process is now complete; the external device can now be used with the micro audio system.
If you want to stop data transfer via Bluetooth, switch off the Bluetooth function on the external device or long press on OK to disconnect the connection.
Known external devices, which have already been paired once, will be connected again automatically in the future. It is not necessary to pair the devices again. To reconnect, simply activate Bluetooth mode on both devices.
10.13.2. Control
You can control how tracks are played, the volume and a range of special functions on your external device and on the micro audio system. What functions are available is dependent on your external device and the software that you use. In principle, these buttons on the device are intended for control via Bluetooth:
| -/+ | Reduce/increase volume |
| II | Start/pause playback |
| or | Previous track/next track |
10.14. Connecting an external playback device
You can use the AUX IN jack to connect an external playback device (for example a CD player or MP3 player).
▶ Switch the micro audio system to standby mode.
▶ Switch off your external device.
Plug the end of a 3.5 mm jack cable into the AUX IN jack on the back of the micro audio system.
Connect the other end of the cable to your external device.
▶ Switch on your external device and, if necessary, the micro audio system.
▶ Press the FUNC. button on the device or the MODE button on the remote control several times until LINE IN appears on the display. The audio signal from your external device will now be played back.
10.15. Amazon Alexa® voice control
10.15.1. Initial setup of the voice control
The initial setup of the device takes place via an app that must be installed on your smartphone. This enables you to configure the settings to activate the voice control.
▶ First, install the Medion Speaker app on your smartphone. This is available free of charge from the App Store (Apple) or Google Play Store (Android). Use a QR code scanner on your smartphone to easily access the app in the Play or App Store. Alternatively, search for "Medion Speaker".

Once the app has been installed on your smartphone, proceed as follows to continue the voice control setup process:
▶ Start the Medion Speaker app on your smartphone.
▶ Press FUNC. on the micro audio system or MODE on the remote control several times until WIFI appears on the display.
▶ Press and hold the ○ button on the micro audio system until an announcement sounds. The device is now in configuration mode.
▶ Add a device to the app and select the model MEDION MD44007 from the list in the following steps.
▶ Follow the instructions in the app and search for network-enabled devices in the WLAN settings of your smartphone. The micro audio system MD 44007_XXXX appears in the list.
▶ Select the device MD 44007_XXXX and connect it to your smartphone.
▶ After establishing the connection, switch back to the app and follow the instructions.
You will hear an indication that the devices have been connected successfully and you should continue to follow the app instructions.
The instructions go on to process the setup of the Amazon Alexa account. Follow the instructions on the screen here as well.
To activate Amazon Alexa ^® , register the micro audio system in your Amazon account. You need to be registered on Amazon for this:
▶ Once the settings are completed, you can close the Medion Speaker app.
10.15.2. Control
The voice control reacts to your voice. As soon as you talk to the device with "Alexa" it will respond to your requests.
▶ You can also activate the Amazon Alexa ^® feature by pressing the O button.
10.15.3. Muting the microphone
Press the microphone mute button if you wish to mute the microphone of your device. Amazon Alexa® no longer receives signals in this case and is deactivated. The LED indicator below the display then lights up red. Press the button again to reactivate the microphone and to reactivate Amazon Alexa.
10.16. Listening to music on Spotify®
You can play back audio data from the music streaming service Spotify® via the internet radio. The prerequisite is that you have the premium version of the Spotify app in-

stalled on your smartphone or tablet PC and the internet radio and the device with the Spotify app are registered on the same network.
Installing Spotify
Open Google Play™ or the Apple® App Store and search for the term Spotify.
Install the Spotify® app on your smartphone or tablet PC. Follow the installation instructions on the screen.
- Subscribe to a premium account from Spotify®.

In order to be able to install the Spotify application, there must be an Internet connection.
The premium version of the Spotify ^® app is subject to a fee.
You can find information about Spotify® software licences at www.spotify.com/connect/third-party-licenses.
11. Setting the display brightness
The menu can be displayed in different languages:
▶ Press the MENU button to open the menu.
▶ Use ▲/▼ to select MAIN MENU and press OK to confirm.
Depending on the operating mode, the MAIN MENU is opened directly after the MENU button is pressed.
▶ Use ▲/▼ to select BACKLIGHT and press OK to confirm.
▶ Use ◀ / ▶ to select the desired brightness and press OK to confirm.
12. Reset to factory settings
If the device malfunctions, you can reset the device. In doing so, all settings such as stored radio stations and the WLAN configuration are deleted.
▶ Press the MENU button to open the menu.
▶ Use ▲/▼ to select MAIN MENU and press OK to confirm.
Depending on the operating mode, the MAIN MENU is opened directly after the MENU button is pressed.
▶ Use ▲/▼ to select FACTORY RESET and press OK to confirm.
▶ Use ◀ / ▶ to select YES and press OK to confirm.
13. Displaying the software version
▶ Press the MENU button to open the menu.
▶ Use ▲/▼ to select MAIN MENU and press OK to confirm.
Depending on the operating mode, the MAIN MENU is opened directly after the MENU button is pressed.
▶ Use ▲/▼ to select SW VERSION and press OK to confirm.
The software version installed on the micro audio system is displayed.
14. Cleaning
- Before cleaning, pull the plug out of the mains socket. Clean the external surfaces of the device with a soft, dry cloth. Do not use chemical solutions or cleaning agents because these may damage the device's surface or the labels on it.
- Never allow liquids to get inside the device.
15. Troubleshooting
If a fault occurs, first see whether you can resolve the problem yourself. You might find this overview useful.
| Fault Possible cause Corrective action | ||
| No function | The device is disrupted by a thunderstorm, static charge or another external factor. | ▸ Pull the mains power adapter out of the socket and then plug it in again. |
| The mains power adapter is not inserted correctly. | ▸ Check the power connection at the mains power adapter connection and the socket. | |
| No sound | The current volume is set too low. | ▸ Increase the volume. |
| Mute setting is activated. | ▸ Switch off the mute setting. | |
| When the device is connected via AUX IN or Bluetooth: The volume of the external device is too low. | ▸ Increase the volume on the external device. | |
| Fault Possible cause Corrective action | ||
| CD is not played. | Condensation has formed. | ▸ Pull the mains power adapter out of the socket and wait until the device and the CD has adapted to the environmental conditions. |
| Incorrect CD format. | ▸ The device only supports the CD formats specified in the technical data. | |
| The CD is dirty or incorrectly inserted. | ▸ Clean the CD and insert it into the CD compartment with the label facing upwards. | |
| Alarm does not switch on | The alarm is not set correctly. | ▸ Check whether the correct alarm time has been set.▸ Check whether the alarm has been activated. |

DANGER! Risk of electric shock!
Risk of injury from electric shock due to live parts.
▶ Never attempt to repair the device yourself. If a repair is necessary, please contact our Service Center or a suitable authorised repair workshop.
16. End of operation
If you do not need to use the device for a relatively long time, please take it out of operation.
▶ To do this, unplug the mains cable and take out the batteries.
The device also switches off after 15 minutes of inactivity.
The device continues using electricity, even when it is switched off. Unplug the device from the power socket to switch if off completely.
17. Disposal

PACKAGING
Your device has been packaged to protect it from damage in transit. The packaging is made of materials that can be recycled in an environmentally friendly manner.

DEVICE
Do not dispose of old devices in normal household waste.
In accordance with Directive 2012/19/EU, these devices must be disposed of correctly at the end of their service life.
This involves separating the materials in the devices for the purpose of recycling and minimising the environmental impact.
Take old devices to a collection point for electrical scrap or a recycling centre. Before doing so, remove the batteries from the remote control and take them to a separate collection point for used batteries.
Contact your local waste disposal company or your local authority for more information on this subject.
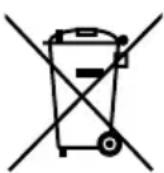
BATTERIES
Do not dispose of used batteries with normal household rubbish. Batteries must be disposed of correctly. For this purpose, retailers that sell batteries and local collection points provide containers in which you can dispose of them. Contact your local waste disposal company or your local authority for more information.
- Technical specifications
| Device | |
| Input voltage 15 V 1.5 A | —— ⊖-⊕ |
| Power consumption during operation | Max. 22.5 W |
| Power consumption when switched off | Approx. 4 W |
| Output power 1 x 15 watt RMS | |
| Laser output Class 1 laser product | |
| Supported formats CD-R, CD-RW, audio CD | |
| Number of memory slots of the programmable playback | 99 tracks (CD) |
| Radio | |
| FM radio frequency range 87.5–108 MHz | |
| DAB+ frequency band 174.928–239.20 MHz | |
| Station memory 60 (30 DAB, 30 FM) | |
| Connections | |
| Aux In 3.5 mm jack | |
| USB | DC 5 V—— max. 1A, standard USB host, version 2.0, up to 32 GB (FAT32/ex-FAT), with charging function |
| Bluetooth® | |
| Frequency range | 2402 to 2480 MHz |
| Maximum transmission power | 0.4 dBm |
| Version | 4.0 |
| Profile A2DP, AVRCP 1.4 | |
| Range Up to 10 metres (without obstacles) | |
| Operating frequency 2.4 GHz | |
| WLAN | |
| Frequency range 2412–2472 MHz | |
| Maximum transmission power 18.9 dBm | |
| Channel 1–13 | |
| WLAN standard: 802.11 b/g/n | |
| Encryption: WEP/WPA/WPA2 | |
| Environmental conditions | |
| Temperatures | In operation: 10°C to +45°CNot in operation (in packaging):-20°C to +60°C |
| Humidity(non-condensing) | In operation: < 0 ~ 80%Not in operation (in packaging): < 90% |
| Dimensions / weight | |
| Dimensions (W x H x D) Approx. 210 x 150 x 225 mm | |
| Weight Approx. 2.5 kg | |
| Mains power adapter | |
| Manufacturer | DongGuan Yingna Electronic Technology Co., Ltd. |
| Model YN-24WA150150EU | |
| Input voltage AC 100–240 V ~ 50/60 Hz 0.75 A | |
| Output voltage 15 V DC 1.5 A | —— ⭕●⊕ |
| Protection class | Protection class II |
 | |
Remote control
Battery 2 x 1.5 V R03/LR03/AAA/micro batteries
18.1. Symbols on the type plate and power pack
Protection class II

Electrical devices in protection class II are devices that have double and/or reinforced insulation throughout, and do not have an option for connecting a protective earth. The housing of an electrical device in protection class II, with surrounding insulating material, might either form all of the additional or reinforced insulation, or part of it.

Indoor use
Devices with this symbol are intended solely for indoor use.

CE labelling
Products that feature this symbol meet the requirements of the EU directives (see chapter entitled "Declaration of conformity").

Symbol for alternating current (AC)
19. Service information
Please contact our Customer Service team if your device ever stops working the way you want or expect it to. There are several ways for you to contact us:
- In our Service Community, you can meet other users, as well as our staff, and you can exchange your experiences and pass on your knowledge there.
You will find our Service Community at http://community.medion.com.
• Alternatively, use our contact form at www.medion.com/contact.
- You can also contact our Service team via our hotline or by post.
| Opening times Hotline number UK | |
| Mon – Fri: 08.00 – 20.00Sat – Sun: 10.00 – 16.00 | 0333 3213106 |
| Hotline number Ireland | |
| 1 800 992508 | |
| Service address | |
| MEDION Electronics Ltd.120 Faraday Park, Faraday Road, DorcanSwindon SN3 5JF, WiltshireUnited Kingdom | |

You can download this and many other sets of operating instructions from our service portal at www.medion.com/gb/service/start/.
You will also find drivers and other software for a wide range of devices there.
You can also scan the QR code on the side of the screen, to download the operating instructions onto your mobile device from the service portal.
20. Legal Notice
Copyright © 2019
Date: 11. December 2019
All rights reserved.
These operating instructions are protected by copyright.
Mechanical, electronic and any other forms of reproduction are prohibited without the written permission of the manufacturer.
Copyright is owned by the company:
MEDION AG
Am Zehnthof 77
45307 Essen
Germany
Please note that you cannot use the address above for returns. Please always contact our Customer Service team first.