 — Radio — Mode d'emploi PDF")
LIFE P85027 (MD 88069) - Radio MEDION - Free user manual and instructions
Find the device manual for free LIFE P85027 (MD 88069) MEDION in PDF.

| Product type | Internet Radio, DAB+, FM, Bluetooth, USB, AUX |
| Brand | MEDION |
| Model | LIFE P85027 (MD 88069) |
| Dimensions (L × H × D) | approx. 25.5 × 19.0 × 14.4 cm |
| Weight | 2.25 kg |
| Power supply | Power adapter 15.0 V — 2.0 A, 100–240 V~, 50/60 Hz |
| Power consumption (operating) | 30 W |
| Power consumption in standby (Wi-Fi on) | 0.91 W |
| Main functions | Internet Radio, DAB, FM, Bluetooth 4.2, USB (MP3), AUX IN, Spotify Connect, Sleep timer, Dual alarm, Equalizer, App control |
| Output power | 2 × 10 W RMS |
| Radio bands | FM 87.5–108 MHz, DAB III 174.928–239.200 MHz |
| Station memory | 40 (DAB), 40 (FM), 40 (Internet) |
| Wi-Fi | 802.11 a/b/g/n, 2.4/5 GHz, WEP/WPA/WPA2 |
| Bluetooth | Version 4.2, profiles A2DP/AVRCP, range up to 10 m |
| Ports | USB (front), AUX IN (3.5 mm jack), headphone (3.5 mm jack) |
| Remote control batteries | 2 × LR03/AAA 1.5 V |
| Operating temperature | 0 °C ~ +35 °C |
| Operating humidity | < 85 % |
| Maintenance and cleaning | Soft dry cloth, avoid solvents and chemical products |
| After-sales service | MEDION France, tel. 02 55 66 12 45, Mon-Fri 9am-7pm |
Frequently Asked Questions - LIFE P85027 (MD 88069) MEDION
User questions about LIFE P85027 (MD 88069) MEDION
0 question about this device. Answer the ones you know or ask your own.
Ask a new question about this device
Download the instructions for your Radio in PDF format for free! Find your manual LIFE P85027 (MD 88069) - MEDION and take your electronic device back in hand. On this page are published all the documents necessary for the use of your device. LIFE P85027 (MD 88069) by MEDION.
USER MANUAL LIFE P85027 (MD 88069) MEDION
natural_image
Two medical device cases: one with a white remote control panel and another with a black digital display showing function buttons (no readable text or symbols)Stereo Internetradio Radio internet stéréo Stereo internetradio Radio por internet estéreo Radio internet stereo Stereo internet radio
Inhaltsverzeichnis
DE
The Spotify Software is subject to third party licenses found here: https://www.spotify.com/connect/third-party-licenses

Directive RoHS 2011/65/UE
https://www.spotify.com/connect/third-party-licenses
www.medion.com/conformity.
- Information about this user manual ....5
1.1. Explanation of symbols.... 5 FR
-
Proper use ....5
-
General safety instructions ....6 NL
-
EU - Declaration of Conformity ....8
-
Trademark information ......E8
-
Package contents 8
-
Setting up the appliance 12 IT
7.1. Inserting/replacing the battery in the remote control 12
7.2. Mains connection....12
7.3. Adjusting the aerial....12
- Getting started ....13
8.1. Switching on the appliance/standby 13
8.2. Operation in the menus....13
8.3. Initial set-up ...... 13
8.4. Selecting the operating mode ....16
8.5. Sound....16
-
Internet radio & podcasts....17
-
DAB and FM radio ....17
10.1. Tuning the stations....18
10.2. Radio menu 18
- Favourites lists 18
11.1. Storing favourites .... 18
11.2. Calling up favourites....19
-
Spotify Connect.... 19
-
Play USB flash drive.... 19
13.1. Playback menu....19
13.2. Starting/pausing/stopping playback....20
13.3. Track selection, fast rewind/fast forward .....20
13.4. Playlist 20
13.5. Repeat, random playback....21
-
Additional information, cover 21
-
Playback via the AUX IN connection.... 21
-
Bluetooth® mode 21
16.1. Connecting Bluetooth devices 22
16.2. Controlling the tracks.... 22
16.3. Bluetooth menu 22
- Sleep timer and alarm 22
17.1. Sleep timer 22
17.2. Alarm.... 23
-
Display brightness....23
-
System settings ......24
-
Using the app as the control ....26
20.1. Installation via direct link.... 26
20.2. Using the app ...... 26
- Cleaning 27
- End of operation.... 27
- Troubleshooting 28
- Disposal 29
- Technical specifications ....30
- Service information ....33
- Legal Notice ....34
1. Information about this user manual

Thank you for choosing our product. We hope you enjoy using this appli-ance.
Please read the safety instructions and the user manual carefully before using the appliance for the first time. Note the warnings on the appliance and in the user manual.
Always keep the user manual close to hand. If you sell the appliance or give it away, please ensure that you also pass on this user manual. It is an essential component of the product.
1.1. Explanation of symbols
If a block of text is marked with one of the warning symbols listed below, the hazard described in that text must be avoided to prevent the potential consequences described there from occurring.

DANGER!
Warning: risk of fatal injury!

WARNING!
Warning: risk of possible fatal injury and/or serious irreversible injuries!

CAUTION!
Warning: risk of minor and/or moderate injuries!

More detailed information about using the appliance
WARNING!
Warning: danger due to loud volume!

Protection class II

Indoor use

Symbol for direct current (DC)

Symbol for alternating current (AC)

Energy efficiency level VI

The ‘Triman’ symbol tells the consumer that the product can be recycled, is covered by an extended system of manufacturer’s responsibility and must be sorted by material type in France.
2. Proper use
Your appliance can be used in a range of ways:
The appliance is used to play sound media (Bluetooth ^® , USB devices) and for radio reception (DAB, FM and internet).
The specified reception frequency range represents the technical possibilities of the appliance. Information received outside this range may not be used or further distributed. The respective national laws must be observed.
Please note that we shall not be liable in cases of improper use.
Any other use is considered improper and can cause personal injury or property damage.
3. General safety instructions
■ This appliance is not intended for use by people (including children) with reduced physical, sensory or mental abilities or by those without experience and/or knowledge, unless they are supervised by a person responsible for their safety or they have been instructed in its use by that person.
■ Children must be supervised to ensure they do not play with this appliance. Keep the appliance and its accessories out of the reach of children.
■ Cleaning and user maintenance on the appliance must not be carried out by children.
■ Before using the appliance for the first time, check the appliance and mains adapter for damage. A defective or damaged radio or mains adapter must not be used.
■ Do not place containers filled with liquid, e.g. vases, on or near the appliance, and protect all the parts from dripping or sprayed
water. Such containers may tip over and the liquid may impair the electrical safety of the appliance.
■ Never open the housing of the appliance or the mains adapter and do not push objects into the appliance through the slots and openings.
If the mains adapter or appliance is damaged, unplug the mains adapter from the socket immediately. This also applies if liquids or foreign objects have penetrated inside the appliance.
■ Unplug the mains adapter from the power socket if you are away for a long period or if there is a thunderstorm.
■ Do not use the appliance outdoors.
■ Do not expose the appliance to extreme conditions. Avo- id:
– high humidity or wet conditions
- extremely high or low temperatures
- direct sunlight
- naked flames
■ Do not use the appliance in potentially explosive atmospheres. This includes petrol stations, fuel storage areas and areas where solvents are processed. This appliance must also not be used in areas with particle-laden air (for example, flour or wood dust).
■ Do not modify the appli without our consent and do not use any auxiliary equipment that we have not approved or supplied.
Observe the following battery instructions:
- Keep new and used batteries out of the reach of children. Do not swallow batteries as they can cause chemical burns. Batteries are not a toy!
■ Avoid contact with battery acid. If battery acid comes into contact with skin, eyes or mucous membranes, rinse the affected areas with plenty of clean water and consult a doctor as soon as possible.
■ Stop using the appliance if the battery compartment does not close properly, and
keep the appliance out of reach of children.
■ Always use new batteries of the same type. Never use old and new batteries together.
■ There is a risk of explosion if batteries are replaced incorrectly! Only replace batteries with those of the same or an equivalent type.
■ Never try to recharge non-rechargeable batteries. Risk of explosion!
■ Never expose the batteries to excessive heat (such as direct sunlight, fire or similar).
■ Store batteries in a cool, dry place. Strong direct heat can damage batteries. Do not expose the appliance to sources of intense heat.
- Never short-circuit batteries. - Remove leaking batteries from the appliance immediately. Clean the contacts before inserting new batteries. Battery acid can cause chemical burns!
■ Also remove flat batteries. Flat batteries tend to leak easily.
4. EU – Declaration of Conformity
CE MEDION AG hereby declares that this appliance complies with the fundamental requirements and the other relevant provisions of:
• Radio Equipment Directive 2014/53/EU
• Ecodesign Directive 2009/125/EC
• RoHS Directive 2011/65/EU
All multimedia equipment that can be connected to the corresponding connections of the appliance must comply with the requirements of the Low Voltage Directive.
You can download the complete EU Declaration of Conformity at www.medion.com/conformity.
Due to the 5 GHz frequency range of the integrated wireless LAN solution, the appliance may only be used inside buildings in the EU (see table).
 | ||||
| AT BE BG CZ DK | ||||
| EE FR DE IS IE | ||||
| IT EL ES CY LV | ||||
| LI LT LU HU MT | ||||
| NL | NO PL PT RO | |||
| SI | SK TR FI | SE | ||
| CH | UK (NI) | HR | ||
AT = Austria, BE = Belgium, BG = Bulgaria, CZ = Czech Republic, DK = Denmark, EE = Estonia, FR = France, DE = Germany, IS = Iceland, IE = Ireland, IT = Italy, EL = Greece, ES = Spain, CY = Cyprus, LI = Liechtenstein,
LV = Latvia, LT = Lithuania, LU = Luxembourg, HU = Hungary, MT = Malta, NL = Netherlands, NO = Norway, PL = Poland, PT = Portugal, RO = Romania, SI = Slovenia, SK = Slovakia, TR = Turkey, FI = Finland, SE = Sweden, CH = Switzerland, UK(NI) = Northern Ireland, HR = Croatia
5. Trademark information
The Bluetooth ^® word mark and logos are registered trademarks of Bluetooth SIG, Inc. and are used by MEDION under licence.
Other trademarks are the property of their respective owners.
6. Package contents

DANGER!
Risk of choking and suffocation!
The packaging material is not a toy! Packaging film can be swallowed or used improperly, creating a risk of choking and suffocation.
- Keep packaging material such as plastic film or plastic bags away from children.
Remove the product from the packaging and remove all packaging material.
▶ Please check the package contents to ensure that all items are included. If anything is missing, please contact us within 14 days of purchase.
The following items are supplied with your product:
- Internet radio
- Remote control and 2× LR03/AAA/1.5 V batteries
- Mains adapter
- Documentation
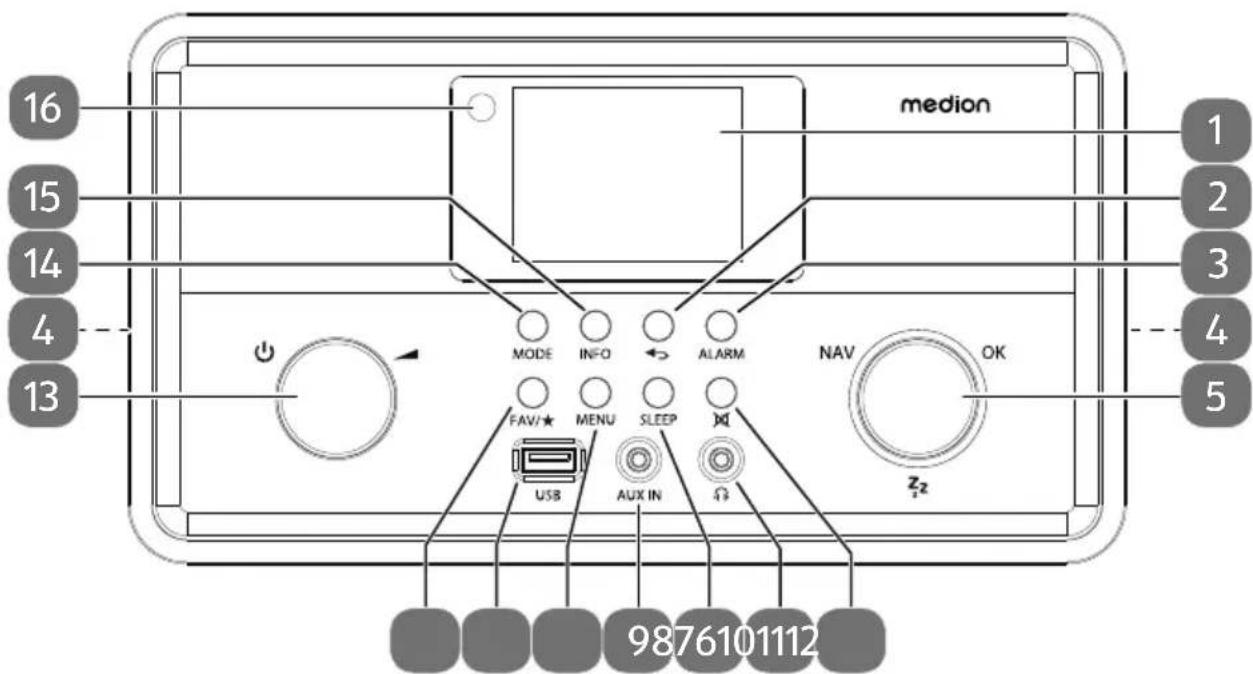
Fig. 1 - Front view
- Display
-
- Back a menu level
- ALARM – Set alarm time
- Speakers (on the sides of the appliance)
- NAV – Navigate through the menu by turning
OK – Confirm menu selection by pressing
z – Snooze function
- -Mute
- 📋 – Headphone connection, 3.5 mm stereo jack
- SLEEP – Set switch-off time
- AUX IN – Audio input, 3.5 mm stereo socket
- MENU – Call up settings menu
- USB - USB port
- FAV/ ★ – Call up/save favourites list
- ⏻ - Switch the appliance on/to standby mode
- Volume control
- MODE – Select operating mode
- INFO - Switch display view, WPS button
- Infrared sensor for the remote control
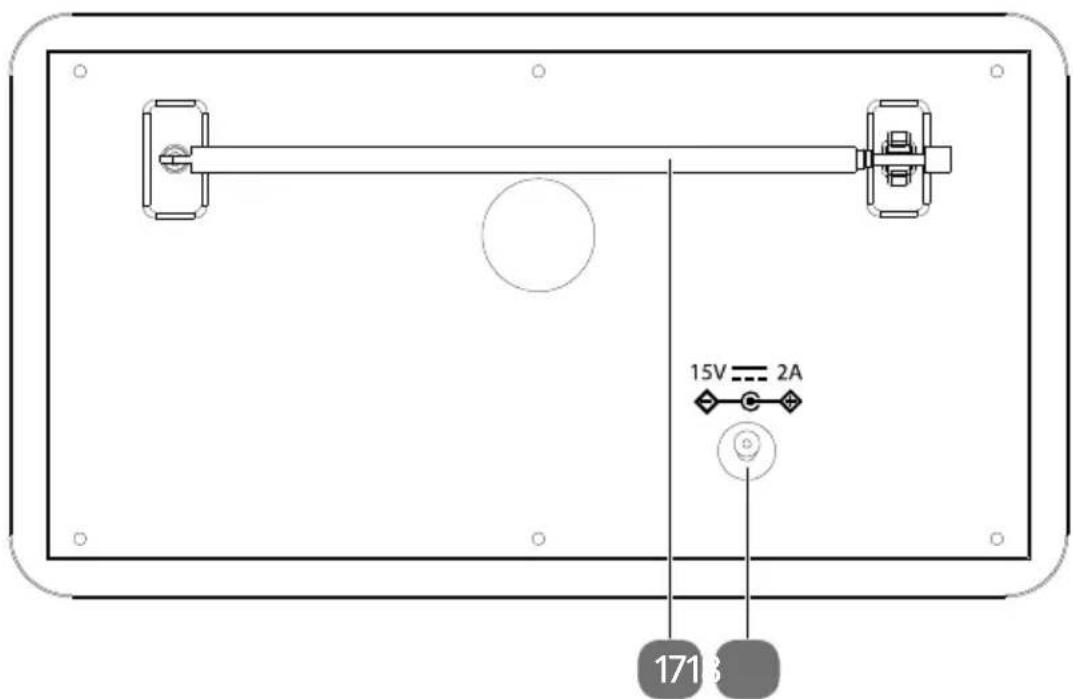
Fig. 2 - Rückseite
- DAB/FM antenna
- Socket for mains power adapter

- Mute
- ← - Select operating mode
P-MODE - Random playback/repeat function
PAIR – Start Bluetooth pairing mode
- Set display brightness
- ZOOM- Display information in full screen mode / exit full screen mode
- INFO - Switch display view/WPS function
- ← - Back a menu level
- Navigation buttons ▲ ▼;
◀ – Play back previous track, FM: Station search backwards, DAB: call up the previous station in list;
▶▶ – Play back next track, FM: Station search forwards, DAB: call up next station in list
;▶ II – Start/pause playback;
OK – Confirm entries; press and hold to add tracks to the playlist
- Decrease volume, increase volume
-
0-9 - To enter numbers
-
Set the alarm time
- SLEEP/ Z_z – Set the switch-off time/snooze function
- MENU – Call up main menu
- EQ - Set equaliser
- ★ – Store station/call up stored stations
- ⏻ - Switch device on/switch to standby mode
7. Sett ing up the appliance
Place the appliance on a sturdy, level surface. Some aggressive varnishes can corrode the rubber feet on the appliance. If necessary, place the appliance on a suitable underlay.

Before connecting an external device, unplug the mains plug from the appliance!
7.1. Inserting/replacing the battery in the remote control
Insert two 1.5 V R03/LR03/AAA/micro batteries in the remote control.
▶ Open the battery compartment cover.
Insert the batteries so that the negative pole contacts the springs.
▶ Replace the battery compartment cover.

WARNING!
Risk of explosion if batteries are replaced incorrectly.
■ Replace batteries only with the same or equivalent type.
7.2. Mains connection
Connect the appliance plug of the supplied mains adapter to the mains connection and plug the mains adapter into a properly installed 100–240 V \~ 50/60 Hz earthed shockproof socket that can always be accessed.
7.3. Adjusting the aerial
A telescopic aerial for DAB and FM radio reception is located on the back of the appliance.
▶ Pull out the antenna completely and align it for the best reception.
8. Getting started
You can use the main play functions on your audio system using the buttons on the appliance. In addition to the basic controls, the remote control also provides additional options for using all functions of your appliance.
In this user manual, we refer to the remote control buttons. If we do refer to the controls on the appliance itself, we will clearly indicate this.
8.1. Switching on the appliance/standby
▶ Press the button to switch on the appliance.
▶ Press the button again to return the appliance to standby mode. The time will be displayed.
After switching on for the first time, the appliance performs the initial set-up as described below.

The appliance uses a small amount of electricity even when it is switched off. To completely switch off the appliance, unplug it from the power socket.
8.2. Operation in the menus
The appliance menus are controlled in the same way in all operating modes. In general,
- use the arrow buttons ▲ ▼ ◀ ▶ to select an option or a menu
- press the OK button to confirm a selection
- press ➕ to return to the previous step/menu
- select characters on the display keypad using ▲▼◀▶ or by repeatedly pressing the 0-9 (ABC...WXYZ) buttons. To delete a character, select BKSP and if you want to cancel the entry, select CANCEL.
- Any activated menu items are marked with an *.
- If there is another submenu for a menu, this is indicated with a >.
8.3. Initial set-up
When the appliance is started for the first time, it runs through the initial set-up to configure the settings for the language, date/time and network.
▶ First select the desired language.
▶ Follow the instructions to agree to the data protection provisions.
▶ At the prompt SETUP WIZARD START NOW?, select YES and start the set-up wizard.
If you select NO, in the next window you can select whether the wizard will start the next time the appliance is switched on.
8.3.1. Setting the date and time
▶ Select the desired hour format (12/24) and confirm your selection.
▶ Select the medium that you want to use to update the time (UPDATE FROM DAB, UPDATE FROM FM, UPDATE FROM NETWORK, NO UPDATE) and confirm your selection.
If you have selected UPDATE FROM NETWORK option, configure your time zone in the next dialogue window.
▶ Set daylight saving time to ON or OFF and confirm your selection.
If you have selected the last option (NO UPDATE), proceed as follows to set the time manually:
The digit position for the day flashes.
▶ Select the day and confirm your selection.
The digit position for the month flashes.
▶ Select the month and confirm your selection.
The digit position for the year flashes.
▶ Select the year and confirm your selection.
The digit position for the hour flashes.
▶ Select the hour and confirm your selection.
The digit position for the minutes flashes.
▶ Select the minutes and confirm your selection.
8.3.2. Establishing a connection to a network

Please also refer to the user manual of your router for the following steps to connect to a network.
▶ Select whether the network should always remain connected to the appliance (even in standby mode) and confirm your selection.
The appliance searches for available networks. The networks found are then displayed with their name (SSID) in a list. WLAN access points that provide a connection via WPS are indicated with [WPS]. Beneath this, you will see the following entries:
- RESCAN: Start a new search
- MANUAL CONFIG: Enter connection data manually
Now select the WLAN access point to which you want to connect the appliance. Confirm your selection.
To connect to an encrypted network, observe the following sections.
With an unencrypted (open) WLAN access point, the internet radio establishes a direct connection and the set-up wizard ends here.
WLAN connection via WPS
After you have selected a WLAN network that has the option to connect via WPS, the WPS menu appears.
If you do not want to establish a connection via WPS, select the entry SKIP WPS (continue with „Entering a network key“ on page 183).
WPS button
Select the PUSH BUTTON option to enable the WPS function to be used via the router's WPS button.
Then press the WPS button on the router and press OK to confirm the connection with the audio system.

You can also access the WPS function at any time by pressing and holding the INFO button.
The appliance will now establish a connection with the network. After successfully establishing a connection, a corresponding notice is then displayed.
The appliance can now play back media via the network and receive internet radio stations as long as there is an active internet connection via the network.
The appliance stores the connection data so that it does not need to be re-entered to re-establish the connection.
Entering a network key
If you have previously selected SKIP WPS, you must enter the network key manually.
▶ Enter the network key.
▶ Once you have entered the network key, select OK and then press OK to confirm.
The appliance stores this key so that it does not need to be re-entered to re-establish the connection.
The appliance will now establish a connection with the network. Once the connection is successful, a corresponding notice is then displayed.
▶ Press OK to confirm.
The appliance can now play back media via the network and receive internet radio stations as long as there is an active internet connection via the network.
8.4. Selecting the operating mode
▶ Press the ⬇ button (MODE on the appliance). Use ▲▼ (turn NAV/OK on the appliance) to select the desired operating mode and confirm with OK. The selected operating mode appears in the display:
- INTERNET RADIO - Internet radio
- PODCASTS - Podcast mode
- SPOTIFY - Spotify mode
- MUSIC PLAYER - USB mode
- DAB + RADIO - DAB radio
- FM RADIO - FM radio
- BLUETOOTH - Bluetooth mode
- AUX IN - AUX mode
8.5. Sound
8.5.1. Volume/mute
▶ Control the volume using the ▶- / ▶+ buttons (▲ controller on the appliance).
▶ Press to mute the sound. Press the button again to cancel the mute setting.

If a device is connected via Bluetooth or if a device is connected to the AUX IN jack you can also adjust the volume on the devices directly.
8.5.2. Equalizer
▶ Press the EQ button to call up a list of the different sound options: NORMAL, FLAT, JAZZ, ROCK, MOVIE, CLASSIC, POP, NEWS, MY EQ or MY EQ.
▶ Press the ▼ buttons to select the sound option and confirm the selection with OK.

You can define your own equaliser using MY EQ PROFILE SETUP. For this, you can find the setting on „19. System settings“ on page 192.
8.5.3. Connecting headphones
You will find a 3.5 mm headphone socket on the front of the appliance.
Insert headphones with a 3.5mm jack plug into the headphone socket 🔒.
When headphones are connected, the speakers are disabled. The volume can still be controlled to change the headphone volume.

WARNING!
Risk of hearing damage!
Using headphones/earphones to listen to an appliance at high volumes for an extended period can damage your hearing
■ Before pressing play, set the volume to the lowest setting.
■ Start playback and increase the volume to a comfortable level.
9. Internet radio & podcasts
You can listen to internet radio programmes and podcasts with the appliance. Select the desired operating mode
▶ Press the button (MODE on the appliance). Use ▲▼ (turn NAV/OK on the appliance) to select the operating mode INTERNET RADIO or PODCASTS and confirm with OK.
▶ Press MENU to select the services:
- LAST LISTENED – The most recently selected services are listed here.
- STATION LIST (internet radio) / PODCAST LIST (podcasts) – Search for services according to certain criteria or search for services.
- SYSTEM SETTINGS – see „19. System settings“ on page 192
- MAIN MENU – see „8.4. Selecting the operating mode“ on page 184
10. DAB and FM radio
This appliance can receive both DAB and FM radio stations. Select the required radio mode:
▶ Press the button (MODE on the appliance). Use ▲▼ (turn NAV/OK on the appliance) to select the operating mode DAB+ RADIO or FM RADIO and confirm with OK.

The first time the radio is used, an automatic station search is carried out and a station list is created with the stations found.
10.1. Tuning the stations
DAB radio
▶ Press ▼ to select the desired channel from the channel list.
▶ Press OK to play the channel.
The radio station name is shown on the display.
FM radio
▶ Press the◀ or ▶l button to set a station manually.
▶ Alternatively, hold down the or ▶I button to start the station search. The search stops at the next station found.
The radio station name is shown on the display.
10.2. Radio menu
Press MENU to make further settings:
DAB radio
- STATION LIST - Displays the list of stations.
- SEARCH – Starts a complete station search and creates a new station list.
- MANUAL TUNE - Manual setting of radio frequencies.
- PRUNE INVALID – Deletes all DAB stations that cannot be received in the current region.
- DRC – Dynamic Range Control (DRC), selection of the compression
- STATION ORDER – Alphanumeric station list or sorts according to frequency ranges.
- SYSTEM SETTINGS – see „19. System settings“ on page 192
- MAIN MENU – see „8.4. Selecting the operating mode“ on page 184
FM radio
- SCAN SETTING – Select whether to search for all (even weak) or only strong stations.
- AUDIO SETTING - Choose whether mono or stereo sound is to be played.
– AUTO. STORE – Automatic search and storage of all stations found. - SYSTEM SETTINGS – see „19. System settings“ on page 192
- MAIN MENU – see „8.4. Selecting the operating mode“ on page 184
11. Favourites lists
You can store internet, DAB or FM stations as well as podcast favourites lists. Each mode has its own list with 40 memory slots each.
11.1. Storing favourites
▶ Select the radio station or the podcast show to be stored.
▶ Press and hold the button to open the stored list.
▶ Select the memory space using ▼.
▶ Then press the OK controller to store.
Once a station or a programme has been stored in a memory space, the memory space number appears during playback in the display.
11.2. Calling up favourites
▶ Press the ★ button to open the stored list.
▶ Select the memory space using ▼.
▶ Press OK on the controller to play the station or the programme.
12. Spotify Connect
Use your smartphone, tablet or computer as a remote control for Spotify. Learn more at spotify.com/connect.
The Spotify software is subject to third party licences found here: https://www.spotify.com/connect/third-party-licenses

▶ Press the button (MODE on the appliance). Use ▲▼ (turn NAV/OK on the appliance) to select the operating mode SPOTIFY and confirm with OK.
The following playback functions are available: PLAY, STOP, previous/next track and automatic playback (shuffle).

You must already be registered to use Spotify Connect. A paid subscription may be required for use.
Different streaming services are available depending on the region. The number and type of streaming services may change when firmware updates are carried out. The user shall not be entitled to any legal claims to the use of any specific service on their appliance.
13. Play USB flash drive
You can use the appliance to play USB flash drives. Select the desired operating mode:
▶ Press the button (MODE on the appliance). Use ▲▼ (turn NAV/OK on the appliance) to select the operating mode MUSIC PLAYER and confirm with OK.
▶ Plug a USB device into the USB port.
13.1. Playback menu
Press MENU to open the menu:
- USB PLAYBACK – To display the USB device content, select the track or folder here.
- PLAYLIST - Displays the playlist you have defined.
- REPEAT - Switch repeat track on/off with OK
- SHUFFLE - Switch random playback on/off with OK
- CLEAR MY PLAYLIST - Delete the playlist you have defined
- SYSTEM SETTINGS – see „19. System settings“ on page 192
- MAIN MENU - see „8.4. Selecting the operating mode“ on page 184
13.2. Starting/pausing/stopping playback
▶ Press the ▶ II button to start playing tracks. To pause playback, press the button again. Press the button once again to resume playback.
13.3. Track selection, fast rewind/fast forward
▶ Press the ◀ button to go back to the start of the track that is currently being played. Press the button again to skip to the previous track. Use the ▶ button to switch to the next track.
▶ Hold down the button to fast rewind within a track or hold down the ▶l button to fast forward.
13.4. Playlist
You can select specific tracks for playback using a playlist. You can specify the order in which the list is played yourself.
13.4.1. Adding tracks
▶ First select a track you want to add to the playlist. To do so, either open the USB PLAYBACK menu with the MENU button or select a current track during playback.
▶ Press and hold the OK button until it is confirmed in the display that the track has been added to the playlist.
13.4.2. Playing back tracks
▶ Press MENU to open the playback menu.
▶ Select the PLAYLIST menu with ▲▼ and open it with OK.
The playlist created above is shown.
▶ Use ▼ to select the desired track in the list and start playback with OK.
13.4.3. Removing tracks
▶ Press MENU to open the playback menu.
▶ Select the PLAYLIST menu with ▲▼ and open it with OK.
The playlist created above is shown.
▶ Use ▼ to select the desired track in the list.
▶ Press and hold the OK button until it is confirmed in the display that the track has been removed from the playlist.
13.5. Repeat, random playback
▶ Press the P-MODE button repeatedly to switch through the repeat modes. The following modes are supported:
- Repeat individual track - 1 is shown on the display
- Repeat all tracks - ⊙ is shown on the display
- Play all tracks in the current folder in a random order - → appears on the display.
- Play all tracks in the current folder in a random order and repeatedly - Ⓞ → ≡ appears on the display.
▶ Press the P-MODE button again to switch off the repeat function.
14. Additional information, cover
It is possible to display additional information, such as the station name, track information or the current type of programme for a radio station or podcast.
▶ Press the INFO button repeatedly to call up the additional information in succession.
The logo of a station/programme can be shown large on the display.
▶ Press the ZOOM button on the remote control to show the logo. Press the button again to return to the previous screen.
15. Playback via the AUX IN connection
The AUX IN connection is intended for connection to an external playback appliance (e.g. CD player or MP3 player).
▶ Switch the audio system to standby mode.
▶ Switch off your external device.
▶ Plug the end of a 3.5 mm jack cable (not included in the package contents) into the AUX IN socket on the front of the audio system.
Connect the other end of the cable to your external device.
▶ Switch on your external device and audio system.
▶ Press the button (MODE on the appliance). Use ▲▼ (turn NAV/OK on the appliance) to select the operating mode AUX IN and confirm with OK.
The audio signal from your external device can now be played back. Playback is controlled using the external device.
16. Bluetooth® mode
You can use Bluetooth to play tracks wirelessly from external devices such as MP3 players or mobile phones with Bluetooth on this appliance.
▶ Press the button (MODE on the appliance). Use ▲▼ (turn NAV/OK on the appliance) to select the operating mode BLUETOOTH and confirm with OK.
16.1. Connecting Bluetooth devices
▶ Enable the Bluetooth function on your external device and then connect to it. Refer to the user manual for your appliance for more information. The name of the audio system is "MD 88069".
If you are prompted to enter a password on the external device, enter '0000' as the password.
The pairing is complete when CONNECTED appears on the display. The external device can be used on the audio system.
16.2. Controlling the tracks
You can control how tracks are played, the volume and a range of special functions on your external device and on the audio system.
You have the following options for controlling the tracks with the audio system:
▶ Adjust the volume using the VOL -/+ controller.
▶ Pres▶ II to start or pause playback.
▶ Press or ▶ to go back to the previous track or skip to the next track.
Please note: not every function is available for every external device. Some functions may only be displayed on the external device's display.
16.3. Bluetooth menu
Press MENU to open the menu:
- BLUETOOTH SETUP – Set the appliance to pairing mode. If a device is already connected, it is disconnected.
- SHOW DETAILS – Displays information about Bluetooth, the paired device and displays the list of paired devices.
- SYSTEM SETTINGS – see „19. System settings“ on page 192
- MAIN MENU – see „8.4. Selecting the operating mode“ on page 184
17. Sleep timer and alarm
17.1. Sleep timer
If you select the sleep timer (snooze) function, the appliance switches off automatically after a defined period of time.
▶ Repeatedly press the SLEEP button to set the desired time to appliance switch-off. The appliance switches off after the preset time.
▶ To switch off the sleep timer prematurely, press the SLEEP button repeatedly until SLEEP OFF appears.
17.2. Alarm
Open the main menu in any operating mode.
▶ To do this, press the MENU button, select the MAIN MENU and open it.
▶ Open the ALARM menu.
▶ Use ▼ to select the desired alarm 1 or 2 and press OK on the controller to confirm the selection.
▶ Set the alarm in the following submenu.
- ALARM - Switch alarm on/off and select snooze
- TIME - Set the alarm time
- MODE - Set the type of alarm
- PRESET – Select the last track listened to or select a station/programme from the stored list
- VOLUME - Set volume of the alarm
Once you have made all settings, select SAVE and press the MENU button repeatedly to exit the menu.
An alarm symbol with the selected alarm time appears on the display.
17.2.1. Ending alarm tone
When the alarm sounds, press
the button to start the snooze function. If necessary, press the button repeatedly to set a longer duration. The remaining time is shown on the display.
▶ the button to deactivate the alarm for at least 24 hours.
18. Display brightness
Press the 🎨 button to gradually change the brightness of the display.
19. System sett ings
The system menu contains general settings that affect the appliance. You can access the menu in all operating modes.
▶ Press the MENU button in any operating mode.
▶ Use ▼ to select the SYSTEM SETTINGS and confirm with OK.
The following settings are available:
| Menu name Description | ||
| EQUALISER | Select sound profile, see also „8.5.2. Equalizer“ on page 184.You can set your preferences for bass and treble for MY EQ under MY EQ PROFILE SETUP. | |
| QUALITY AUDIO STREAM | Selection of the transmission quality of the audio stream for the internet radio or podcasts. | |
| NETWORK NETWORK WIZARD | Start search for networks. | |
| PBC WLAN SET-UP | ||
| DISPLAY SETTINGS | ||
| MANUAL SETTINGS | ||
| NETREMOTE PIN SET-UP | ||
| NETWORK PROFILE | ||
| DELETE NET-WORK SET-TINGS | ||
| MAINTAIN NETWORK CONNECTION | ||
| TIME/DATE SET | SETTIME/DATE | Manually set the time and date |
| AUTOM. UP-DATE | Choose whether or not the date and time are set automatically via the DAB or FM signal or via the network. Automatic adjustment takes place daily between 4 and 5 AM. | |
| SET TIMEFORMAT | Set the 12-hour or 24-hour time format. | |
| SET TIMEZONE | Set the time zone. (only if automatic update via the network is set) | |
| DAYLIGHTSAVING TIME | Switch daylight saving time on/off (only if automatic update via the network is set) | |
| LANGUAGE | Select the menu language | |
| FACTORY SETTINGS | Restore factory settings | |
| SOFTWARE UPDATE | Update the software of the appliance | |
| SET-UP WIZARD | Restart the set-up wizard | |
| INFO | Display software version | |
| DATA PROTECTIONINFORMATION | Display of the internet address where the data protection provisions can be accessed. | |
| DISPLAY LIGHTING | POWER-ONTIMEOUT | Duration of inactivity after which the display is to be dimmed during operation. |
| POWER-ONLEVEL | Selection of display brightness during operation. | |
| STANDBY LEVEL | Selection of display brightness in standby mode. | |
20. Using the app as the control
You can control your internet radio using the app on your smartphone or tablet PC.
In addition to the established setting options such as start, stop, repeat or the creation of favourites lists and station searches, the app makes it possible to individually customise the sound output.
20.1. Installation via direct link
Use this QR code to download the app directly from the Google Play Store ^® or Apple ^® App Store:

You need an internet connection to install this app.

20.2. Using the app
▶ Start the app.
▶ Make sure that the smartphone/tablet PC and internet radio are logged in to the same WLAN network.
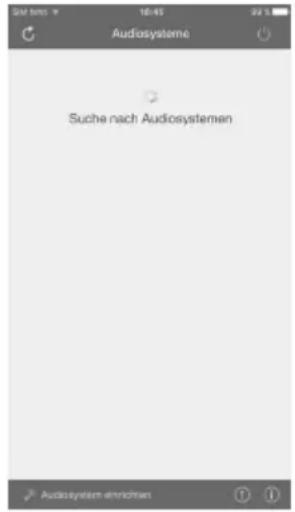
When started for the very first time, the app will list all compatible internet radios detected in the WLAN network by their friendly name.
▶ Select the correct internet radio.
You can use all of the internet radio functions via the app.
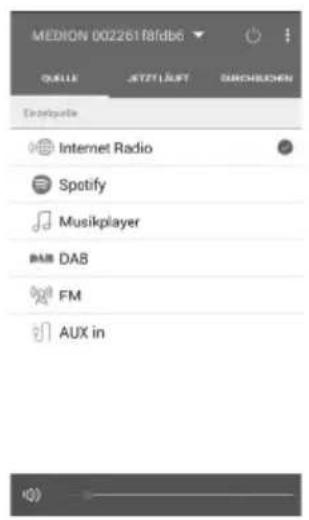
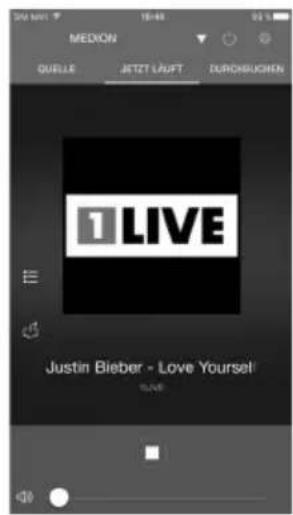
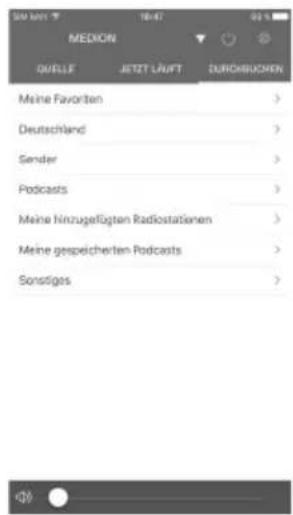
- You can select the operating mode via QUELLE.
– The current playback is shown under JETZT LÄUFT. - You can search for internet radio stations/podcasts under DURCHSUCHEN.
When WLAN function is switched off for operating modes that do not use WLAN such as AUX-IN, FM radio and DAB radio, it is not possible to control the appliance using the app.
21. Cleaning
Always disconnect the appliance from the mains before cleaning it.
Only use a dry, soft cloth to clean the appliance. Do not use chemical solutions or cleaning products because these may damage the appliance's surface and/or markings.
22. End of operation
The appliance switches off after 15 minutes of inactivity. You can switch it back on again by pressing the button.
The appliance continues using electricity, even when it is switched off. Unplug the appliance from the power socket to switch if off completely.
If you do not intend to use the appliance over a longer period of time, store it in a cool, dry place and make sure that it is protected from dust and extreme temperature fluctuations.
23. Troubleshooting
If a fault occurs, first see whether you can resolve the problem yourself. You might find this overview useful.
| Fault Possible cause Corrective action | ||
| No sound The current volume is set too low. Increase the volume. | ||
| Headphones are connected. Audio playback is interrupted when headphones are connected. | Unplug the headphone jack plug from the headphone socket. | |
| No or poor radio reception | The station signals are too weak. Adjust the frequency of the stations. Move the radio to a different location or change the direction of the aerial to improve the reception, if necessary. | |
| No function The mains adapter is not plugged in correctly. | Check that the mains adapter is correctly connected to the appliance and plugged into the socket. | |
| Pull the mains adapter out of the socket and then plug it in again. | ||
24. Disposal

PACKAGING
The product has been packaged to protect it from damage in transit. The packaging is made of materials that can be recycled in an environmentally friendly manner.

DEVICE
All old appliances marked with the symbol illustrated must not be disposed of in normal household rubbish.
In accordance with Directive 2012/19/EU, the device must be properly disposed of at the end of its service life.
This involves separating the materials in the appliance for the purpose of recycling as well as minimising the environmental impact and negative effects on human health.
Take old devices to a collection point for electrical scrap or a recycling centre. Before doing so, remove the batteries from the device and take them to a separate collection point for used batteries.
Contact your local waste disposal company or your local authority for more information on this subject.

BATTERIES
Do not dispose of used batteries with household rubbish. Batteries must be disposed of correctly. Retailers that sell batteries and local collection points provide containers in which you can dispose of them. Contact your local waste disposal company or your local authority for more information.
In connection with the sale of batteries or the supply of equipment containing batteries, we are obliged to draw your attention to the following:
As the end user, you are legally required to return used batteries.
The crossed-out wheelie bin symbol means that the battery must not be disposed of with household rubbish.
RECHARGEABLE BATTERIES
Do not dispose of used rechargeable batteries with household rubbish. Rechargeable batteries must be disposed of correctly. Retailers that sell batteries and local collection points provide containers in which you can dispose of them. Contact your local waste disposal company or your local authority for more information.
In connection with the sale of rechargeable batteries or the supply of equipment containing batteries, we are obliged to draw your attention to the following:
As the end user, you are legally required to return used rechargeable batteries.
The crossed-out wheelie bin symbol means that the rechargeable batteries must not be disposed of with household rubbish.
- Technical specifications
| Mains adapter | |
| Manufacturer GME Technology (Shenzhen) Co., Ltd | Importer:MEDION AGAm Zehnthof 7745307 EssenGermanyHR number: HRB 13274 |
| Model name OBL-1502000E | |
| Input voltage/current/input AC frequency 100–240 V~, 50/60 Hz, 1.5 A max. | |
| Output voltage/current 15.0 V | ——2.0 A |
| Output power 30.0 W | |
| Average efficiency during operation 87.19% | |
| Efficiency with low load (10%) 88.67% | |
| Power consumption with zero load 0.091 W | |
| Relevant load conditions: | |
| Percentage of output current according to type plate | |
| Load condition 1 100% ± 2% | |
| Load condition 2 75% ± 2% | |
| Load condition 3 50% ± 2% | |
| Load condition 4 | 25% ± 2% |
| Load condition 5 10% ± 1% | |
| Load condition 6 | 0% (zero load) |
| Radio | |
| FM band 87.5–108 MHz | |
| DAB band III 174.928–239.200 MHz | |
| RDS Yes | |
| Station memory 40 (DAB), 40 (FM), 40 (internet radio) | |
| Output power 2 x 10 W RMS | |
| Power supply | 15.0 V— — — 2.0 A ◇●◇ |
| Power consumption during operation 30 W | |
| Power consumption in standby mode | WLAN enabled: 0.91 WWLAN disabled: 0.71 W |
| USB | |
| USB input Standard USB host (version 2.0) with up to128 GB and MP3 decoding ^2 | |
| USB output voltage / current 5 V max. 100 mA | —— |
| Supported file systems FAT16, FAT32 | no external hard drives |
| Supported formats MP3 | |
| Bluetooth | |
| Version 4.2 | |
| Profile A2DP, AVRCP | |
| Range | Up to 10 metres (without obstacles) |
| Frequency range | 2402–2480 MHz |
| Maximum transmission power | -6.35 dBm |
| WLAN | |
| Frequency range | 2.4 GHz/5 GHz |
| WLAN standard | 802.11 a/b/g/n |
| Encryption | WEP/WPA/WPA2 |
| Range Indoors approx. 35–100 m / | outdoors approx. 100–300 m |
| Frequency ranges MHz: 2412–2472 | Channels: 11–13Maximum transmission power/dBm: 12.2 |
| MHz: 5150–5825Channels: 36–65Maximum transmission power/dBm: 17.1 | |
| Connections for external functions | |
| FM antenna Telescopic antenna | |
| AUX IN 3.5 mm jack | |
| Headphone socket 3.5 mm jack | |
| Remote control | |
| Remote control batteries 2×1.5 V R03/LR03/AAA |
| Environmental conditions | |
| Temperatures | In operation: 0°C to +35°C |
| Not in operation: 0°C to +35°C | |
| Humidity | In operation: <85% |
| Not in operation: <85% | |
| Dimensions/weight | |
| Appliance (W × H × D) Approx. 25.5 × 19.0 × 14.4 cm | |
| Weight 2.25 kg | |
26. Service information
Please contact our Customer Service team if your device ever stops working the way you want or expect it to. There are several ways for you to contact us:
- In our Service-Community, you can meet other users, as well as our staff, and you can exchange your experiences and pass on your knowledge there.
You will find our Service-Community at community.medion.com.
• Alternatively, use our contact form at www.medion.com/contact. - You can also contact our Service team via our hotline or by post.
| Opening times Hotline number UK | |
| Mon – Fri: 08.00 – 20.00Sat – Sun: 10.00 – 16.00 | 0333 3213106 |
| Service address | |
| MEDION Electronics Ltd.120 Faraday Park, Faraday Road, DorcanSwindon SN3 5JF, WiltshireUnited Kingdom | |

You can download this and many other sets of operating instructions from our service portal at www.medionservice.com.
We have stopped providing printed copies of our warranty terms and conditions as part of our commitment to sustainability, but you can access the warranty terms and conditions on our service portal.
You can also scan the QR code on the side of the screen, to download the operating instructions onto your mobile device from the service portal.
27. LegalNotice
Copyright 2024
Date: 27. März 2024
All rights reserved.
These operating instructions are protected by copyright.
Mechanical, electronic and any other forms of reproduction are prohibited without the written permission of the manufacturer.
Copyright is owned by the company:
MEDION AG
Am Zehnthof 77
45307 Essen
Germany
Please note that you cannot use the address above for returns. Please always contact our Customer Service team first.

- Inhaltsverzeichnis
- Information about this user manual
- Explanation of symbols
- DANGER!
- WARNING!
- CAUTION!
- Proper use
- General safety instructions
- EU – Declaration of Conformity
- Trademark information
- Package contents
- Risk of choking and suffocation!
- Sett ing up the appliance
- Inserting/replacing the battery in the remote control
- Mains connection
- Adjusting the aerial
- Getting started
- Switching on the appliance/standby
- Operation in the menus
- Initial set-up
- Setting the date and time
- Establishing a connection to a network
- WLAN connection via WPS
- WPS button
- Entering a network key
- Selecting the operating mode
- Sound
- Volume/mute
- Equalizer
- Connecting headphones
- Risk of hearing damage!
- Internet radio & podcasts
- DAB and FM radio
- Tuning the stations
- DAB radio
- FM radio
- Radio menu
- Favourites lists
- Storing favourites
- Calling up favourites
- Spotify Connect
- Play USB flash drive
- Playback menu
- Starting/pausing/stopping playback
- Track selection, fast rewind/fast forward
- Playlist
- Adding tracks
- Playing back tracks
- Removing tracks
- Repeat, random playback
- Additional information, cover
- Playback via the AUX IN connection
- Bluetooth® mode
- Connecting Bluetooth devices
- Controlling the tracks
- Bluetooth menu
- Sleep timer and alarm
- Sleep timer
- Alarm
- Ending alarm tone
- Display brightness
- System sett ings
- Using the app as the control
- Installation via direct link
- Using the app
- Cleaning
- End of operation
- Troubleshooting
- Disposal
- PACKAGING
- DEVICE
- BATTERIES
- RECHARGEABLE BATTERIES
- Service information
- LegalNotice
- MEDION AG
- Am Zehnthof 77
- Essen
- Germany
Brand : MEDION
Model : LIFE P85027 (MD 88069)
Category : Radio