Mimzy Spin 3In1 - High chair Joie - Free user manual and instructions
Find the device manual for free Mimzy Spin 3In1 Joie in PDF.
User questions about Mimzy Spin 3In1 Joie
0 question about this device. Answer the ones you know or ask your own.
Ask a new question about this device
Download the instructions for your High chair in PDF format for free! Find your manual Mimzy Spin 3In1 - Joie and take your electronic device back in hand. On this page are published all the documents necessary for the use of your device. Mimzy Spin 3In1 by Joie.
USER MANUAL Mimzy Spin 3In1 Joie
mimzy™ spin 3in1 highchair
GB Instruction Manual
IMPORTANT!READ CAREFULLY AND KEEP FOR FUTURE REFERENCE
Highchair Assembly

text_image
1 1 CLICK CLICK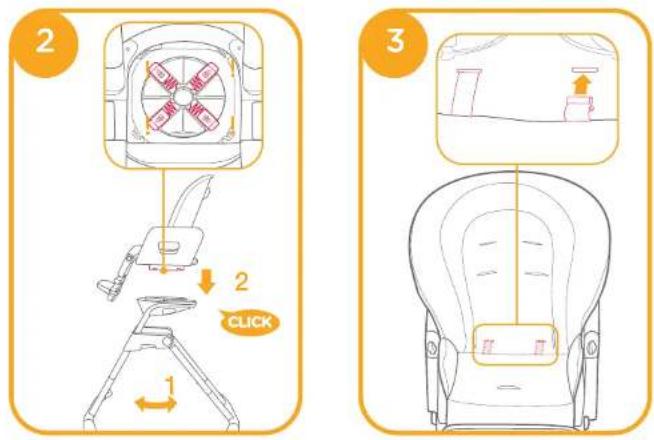
text_image
2 2 CLICK 3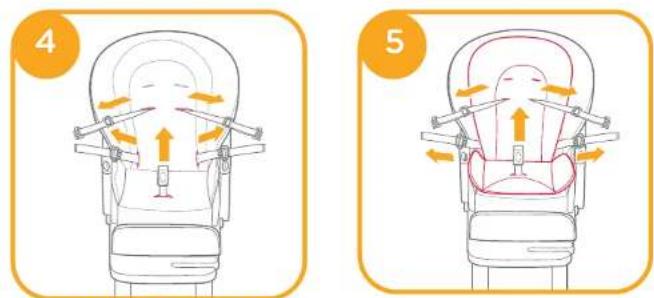
text_image
4 5Highchair Operation
text_image
6 CLICK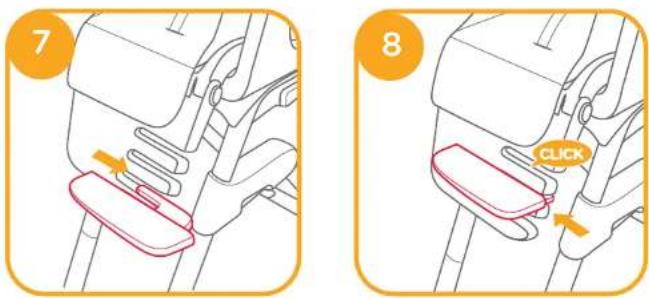
text_image
7 8 CLICK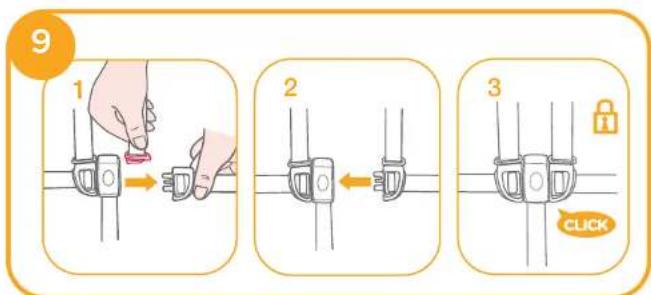
text_image
9 1 2 3 CLICK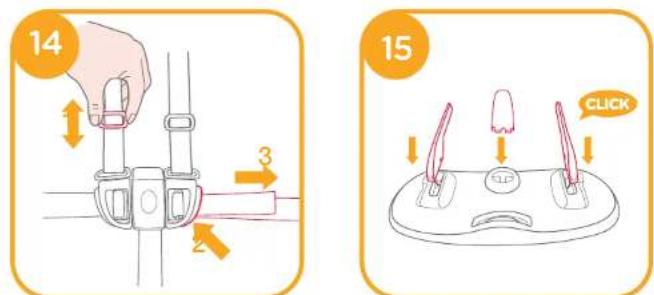
text_image
14 3 2 15 CLICK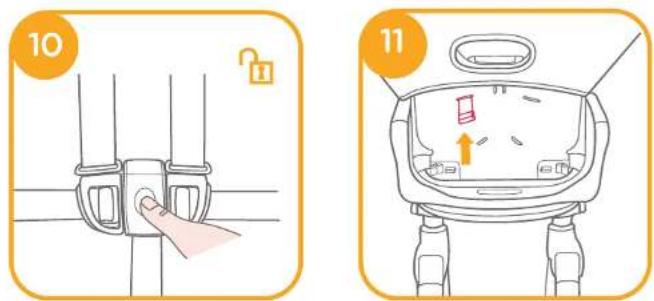
text_image
10 11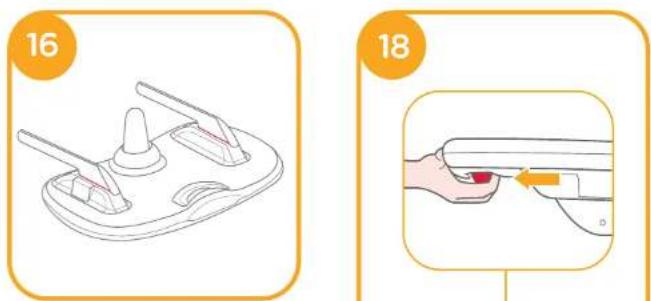
text_image
16 18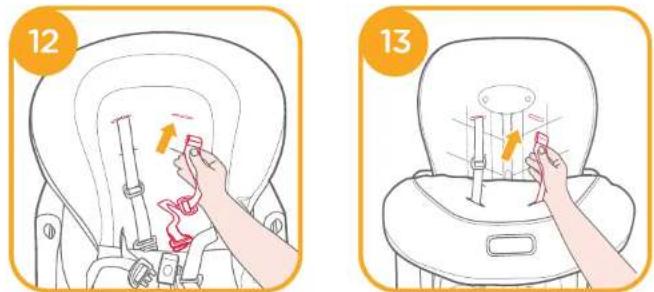
text_image
12 13
text_image
17 CLICK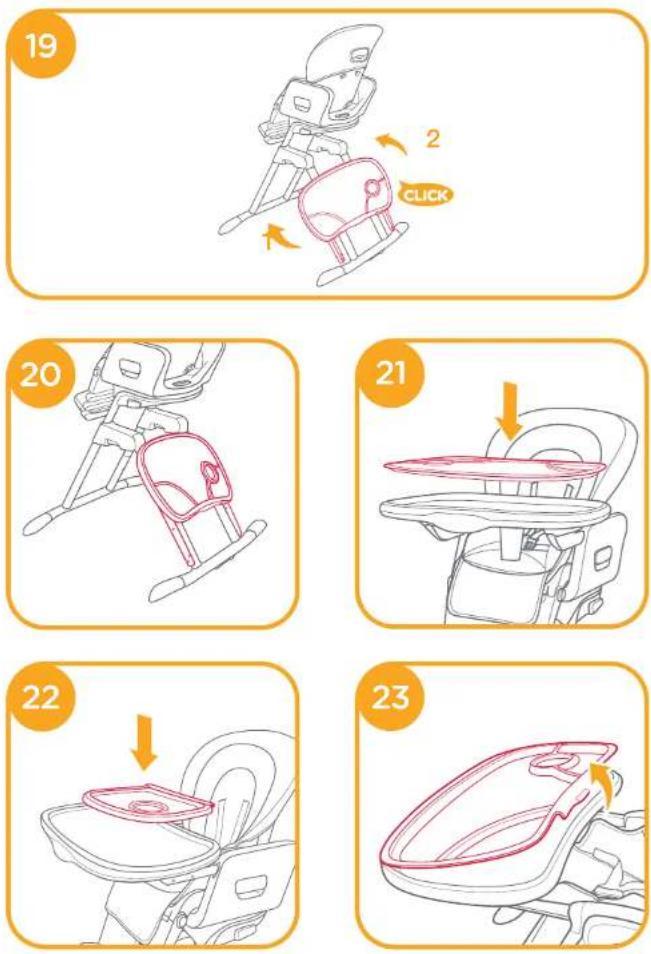
text_image
24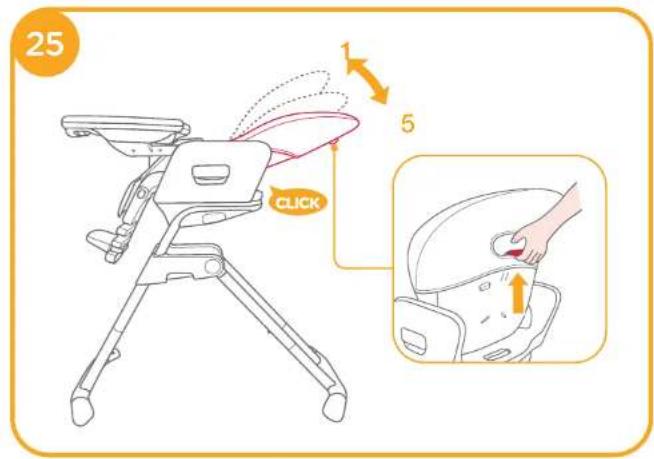
text_image
25 CLICK 5
text_image
26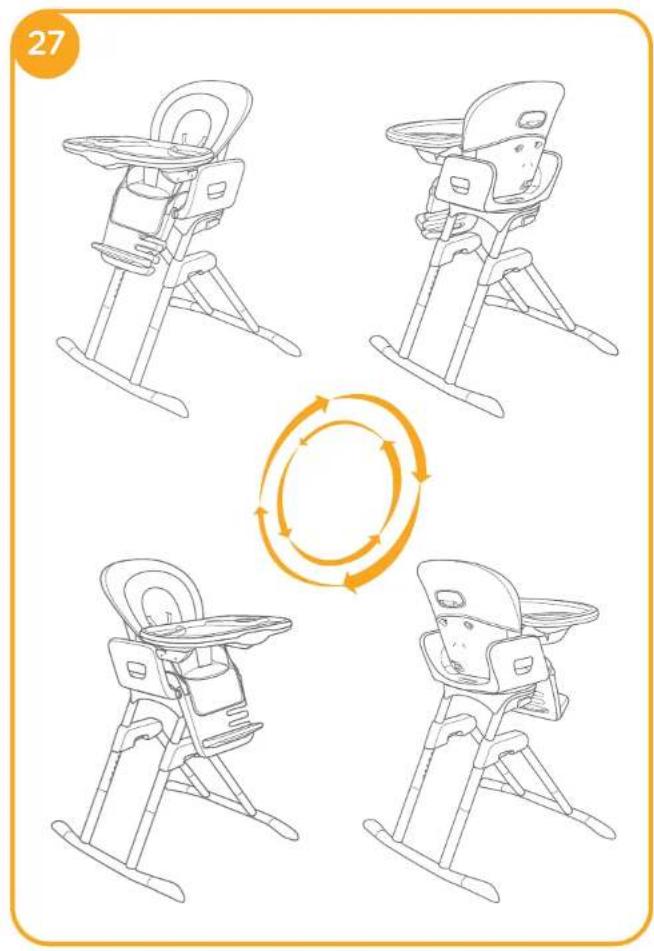
text_image
27Fold Highchair
natural_image
Line drawing of a baby boom chair with seat, legs, and straps (no text or symbols)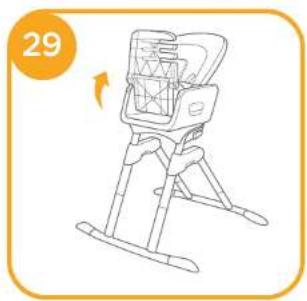
natural_image
Line drawing of a robotic device with a mounted sensor or camera, shown in profile view (no text or symbols)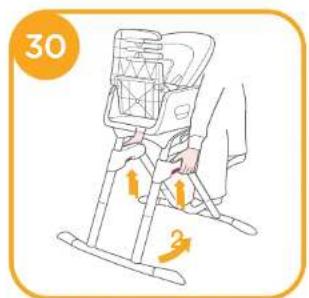
text_image
30 3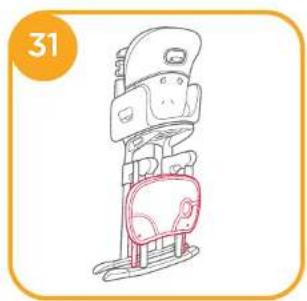
natural_image
Illustration of a baby seat with a chair and seatbelt, no text or symbols presentDetach Seat Pad
text_image
32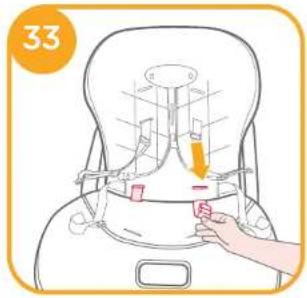
text_image
33Notes

Welcome to Joie™
Congratulations on becoming part of the Joie family! We are so excited to be part of your life with your little one. While using with the Joie mimzy™ spin 3in1, you are using a high quality, fully certified high chair, approved to European safety standards EN 14968:2017+A1:2020 and EN 12790:2009. When using as reclined cradic, the maximum weight is 9kg (6 months approximately). When using as highchair, the suitable age is 5-36 months. Please carefully read this manual and follow each step to ensure a pleasant experience and best protection for your child.
IMPORTANT! READ CAREFULLY AND KEEP FOR FUTURE REFERENCE!
Visit us at joiebaby.com to download manuals and see more exciting Joie products!
Contents
Figures 1-9
WARNINGS 13
Highchair Assembly 15
Assemble Frame 15
Assemble Seat 15
Assemble Seat Pad 15
Highchair Operation 15
Adjust Calf Support 15
Adjust Footrest 15
Use Buckle 15
Adjust Height for Shoulder Hamesses 16
Adjust Length for Hamesses 16
Use Tray 16
Use Tray Cover and Tray Insert 16
Adjust Height for Seat 16
Adjust Recline 17
Rotate the seat 17
Fold Highchair 17
Detach Seat Pad 17
Care and Maintenance 17
Emergency
In case of emergency or accident, it is most important to have your child taken care of with first aid and medical treatment immediately.
Product Information
Read all the instructions in this manual before using this product. If you have any further questions, please contact your local distributor.
Product Mimzy spin 3in1 Highchair
Suitable for Child weighing under 15kg (0 - 36 months)
Materials Plastics, metal,
Made in China
Brand Name Joie
Website www.jolebaby.com
Manufacturer Allison GmbH
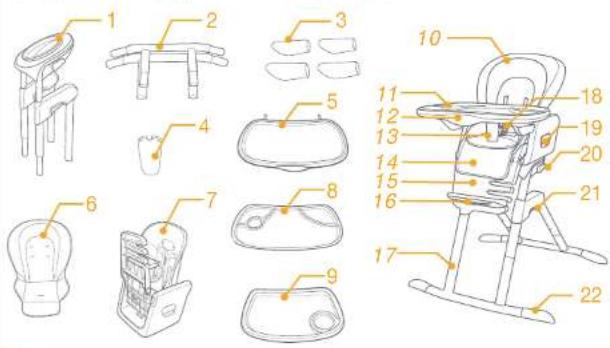
Parts List
Make sure all parts are available before assembly. If any part is missing please contact your local distributor. No tools are required for assembly.
1 Frame 7 Seat 13 Tray Horn
3 Foot 9 Tray Insert 15 Calf Support
4 Tray Hom 10 Backrest 16 Footrest
5 Tray 11 Tray Cover 17 Support Tube
6. Post Pad 18. Tray 19. Front Flexi
6 Seat Pad 12 Tray
2 Support Tube 8 Tray Cover 14 Seat Pad 20 Height Adjustment Button
text_image
Technical diagram of a baby seat with numbered parts for identificationAccessories
(May not be included)
Small insert (on certain models)
Accessories may be sold separately or may not be available depending on region.
WARNINGS
! Read all the instructions in this manual before using this product.
! Adult assembly required.
! Please keep instruction manual for future use.
! When using as reclined cradle, the maximum weight is 9kg (6 months approximately)
! The product is intended for children able to sit up unaided and up to 3 years or a maximum weight of 15kg.
! Failure to follow these warnings and the assembly instructions could result in danger.
! DO NOT make any modification to this highchair or use it along with component parts from other manufacturers.
! DO NOT use the product if any parts are broken, torn or missing.
! To prevent serious injury or death from falling or sliding out, always use the restraint system.
! Secure your child at all times with the restraint system provided, either in the reclining or upright position. The tray is not designed to hold your child in the product.
Do not use the reclined cradle once your child can sit unaided.
This reclined cradle is not intended for prolonged periods of sleeping.
This reclined cradle does not replace a cot or a bed. Should your child need to sleep, then it should be placed in a suitable cot or bed.
It is recommended that the product be used in the upright position only by children capable of sitting upright unassisted.
! DO NOT allow your child to stand in or on the highchair.
! DO NOT lift and carry highchair while occupied.
! DO NOT allow children to play with or around highchair while occupied.
! DO NOT allow children to lean over sides of highchair. It may become unbalanced and tip over.
! DO NOT place any heavy bags, packages, or other items on the highchair tray. They may cause the chair to tip over.
! Always use on a flat and level floor.
! Be aware of the risk of open fire and other sources of strong heat in the vicinity of the product.
! Do not use accessories or replacement parts other than those approved by the manufacturer.
! It is dangerous to use this reclined cradle on an elevated surface, e.g. a table.
! To avoid strangulation hazard, DO NOT place product in any location where there are cords, such as window blind cords, drapes, phone cords, etc.
! All assembly fittings should be unfolded completely and tightened properly before using the product.
! Regularly check the locks and fittings for security.
! Regularly inspect the product for damaged hardware, loose joints, missing parts or sharp edges.
Remove your child from product before folding or adjusting the highchair.
! Make sure the product has been folded or unfolded completely before letting your child approach the highchair.
Consult the distributor for issues concerning maintenance, repair and part replacement.
! DO NOT place food that is hot enough to burn child's skin on the tray.
! Make sure that any harness is correctly fitted.
! Do not use the product unless all components are correctly fitted and adjusted.
! It is recommended the use of the most reclined position for new born baby.
! Do not use the highchair until the child can sit up unaided.
! To avoid suffocation, remove plastic bag and packaging materials before using this product. The plastic bag and packaging materials should then be kept away from babies and children.
! WARNING Make sure the safety harness is correctly fitted.
! WARNING Never leave the child unattended.
! To prevent serious injury or death from falling or sliding out, always use the restraint system and ensure it is correctly fitted.
! Falling hazard: Prevent your child from climbing on the high chair.
! Keep children away when unfolding and folding the product to avoid injury.
! Be aware of the risk of tilting when your child can push its feet against a table or any other structure.
! Always use the restraint system.
Highchair Assembly
Please read all the instructions in this manual before assembling and using this product.
Assemble Frame
see images
Please check the direction when assembling the foot.
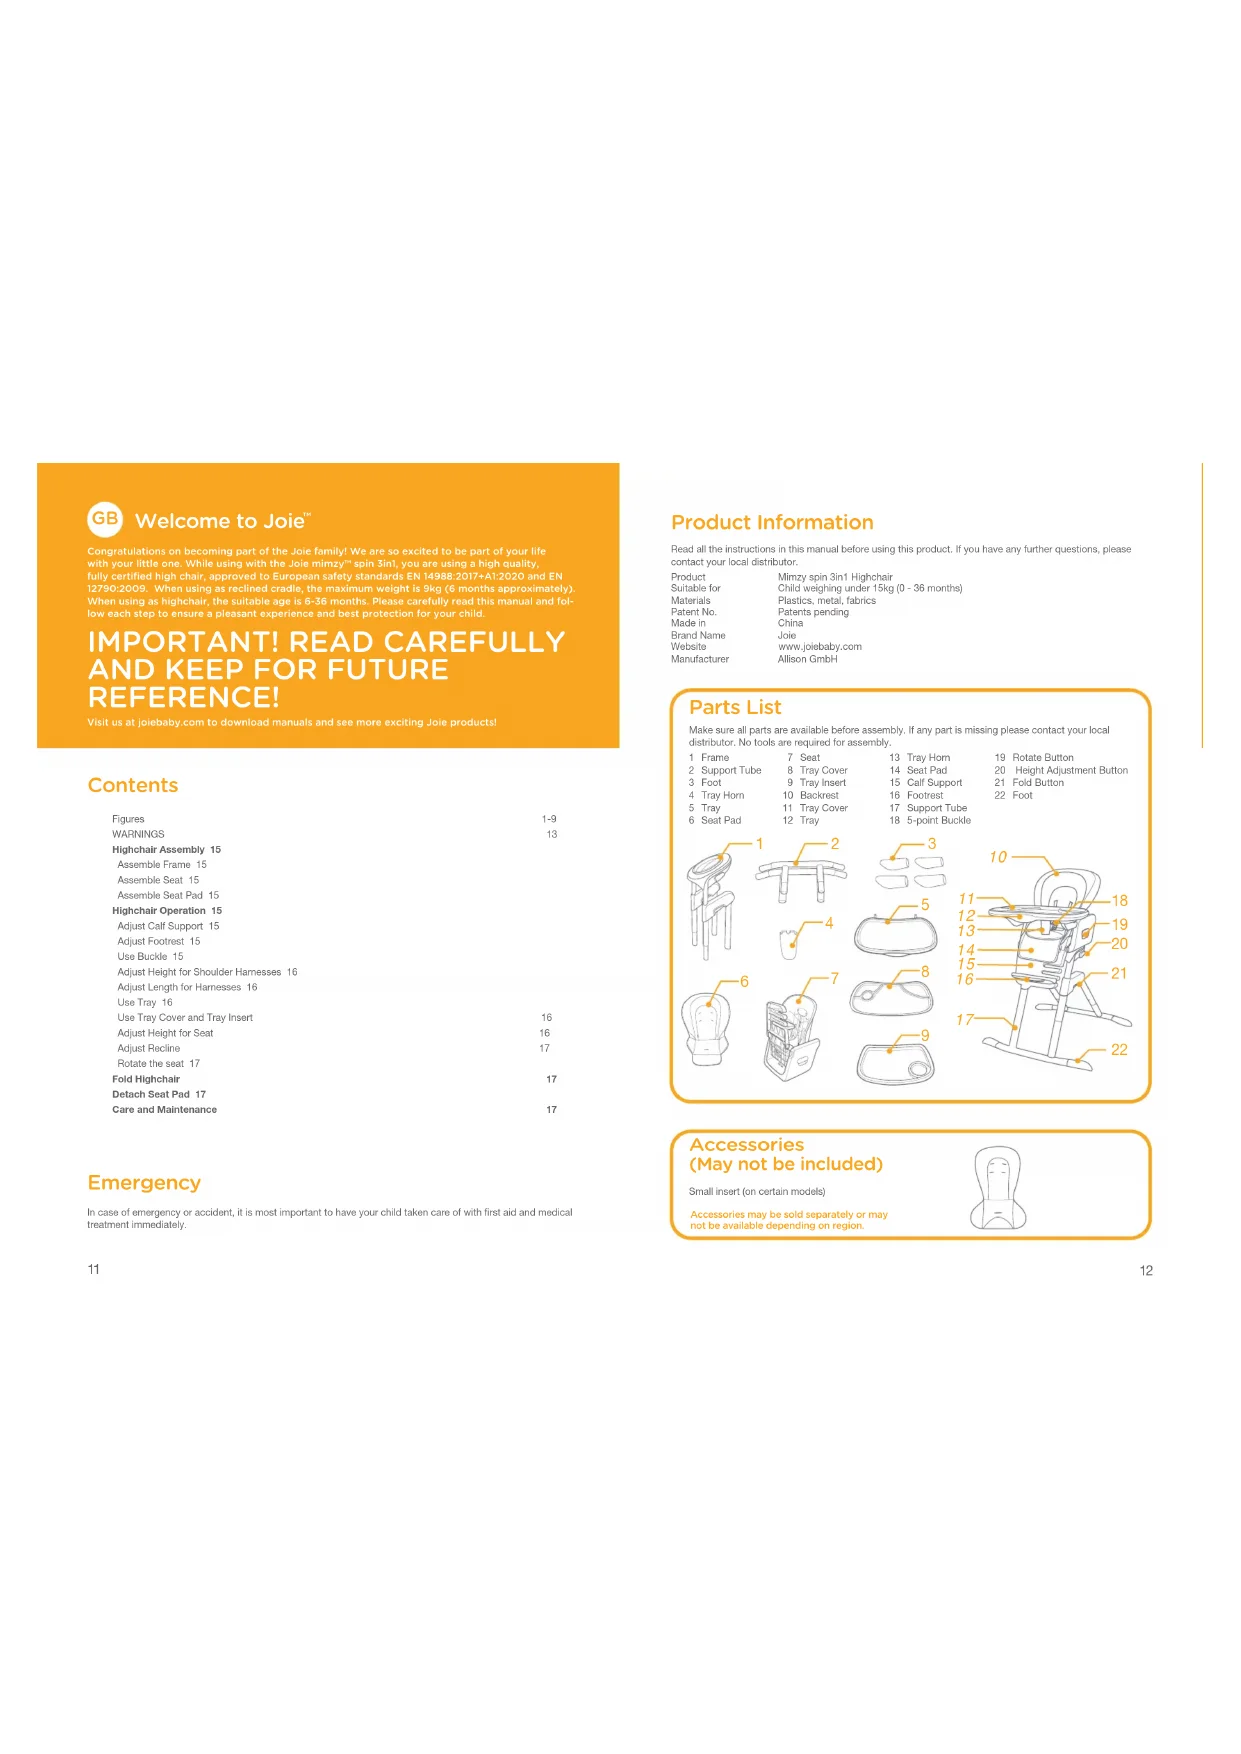
Assemble Seat
see images 2
Fit the seat onto the frame. An audible "click" means the seat is secured to the frame.
! Lift the seat up to be sure it is locked into place.
1. The seat or the frame can not be used separately.
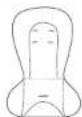
Assemble small insert Pad
see images ③ - ⑥
Assemble the seat pad by following these steps:
- Open the seat.
- Wrap the seat pad over the top of seat back.
- Insert the two straps through openings in seat back.
Please make sure the straps are secured to the seat back to prevent the seat pad from slipping. - Pull all the harnesses through the slots in seat pad.
Small seat pad is for child's protection. A child 0-6 months must use small seat pad.
Highchair Operation
Adjust Calf Support
see images
The calf support has 2 position settings.
Adjust Footrest
see images ⑦ - ⑧
The footrest can be adjusted to 3 positions.
Use Buckle
see images ② - ⑪
Note
- To avoid serious injury from falling or sliding out, always secure your child with harness.
- Make sure your child is snugly secured, and that the space between the child and the shoulder harness is about the thickness of one hand.
- DO NOT cross the shoulder belts. This will cause pressure on child's neck.
Adjust Height for Shoulder Harnesses
see images ⓘ - ⓣ
Note
- The shoulder harness must go into the slot that is even with or slightly above the shoulders.
- In order to protect your child from falling out, after your child is placed into the seat, check whether the shoulder harnesses are at proper height.
- For larger child, use the upper shoulder slots. For smaller child, use the lower shoulder slots.
When changing shoulder harness slots, make sure shoulder harnesses are going through same slots in seat pad and seat back.
Adjust Length for Harnesses
see images
Use slide adjuster to change the harness length, 14-1 Press the button 30 -2, while pulling the waist harness to proper length, 14-3
Use Tray
see images 1 - 2
Always fit the tray horn to the tray. Once the tray horn has been fitted, it must never be removed.
The tray can be entirely pulled out. Be careful when pulling the tray to the end of the seat.
! Ensure both sides of tray are in matching positions.
! Pull tray backward to ensure both guides are secure.
Use Tray Cover and Tray Insert
see images ① - ②
Note
- The tray can be used together with the tray cover or the tray insert.
- When placed on the dinner table, the tray cover and tray insert can be used as tray pads.
- The tray cover and the tray insert have the same operation.
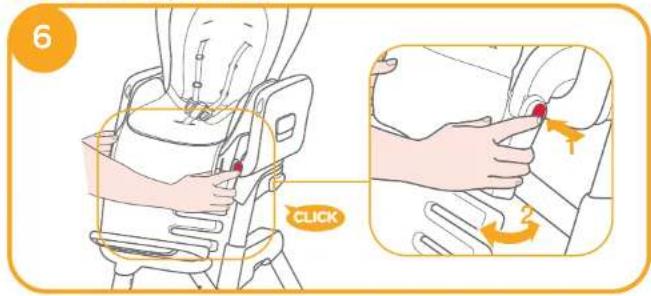
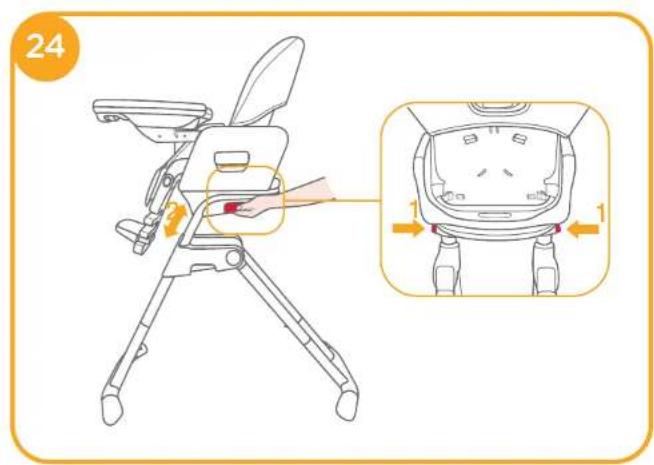
Adjust Height for Seat
see images
There are 5 height positions. The seat can be adjusted to the proper height according to the height of your dinner table, which makes it more convenient for your child to have meals together with family.
! DO NOT adjust the height of the seat with child in it.
Adjust Recline
see images 25
There are 5 recline positions. The seat can be used as a reclined cradle when the recline is on the fifth position.
! DO NOT adjust the seat recline with child in it.
Rotate the seat
see images 26 - 27
! Release any one of rotating buttons, the seat can be rotated.
! The rotating seat design makes the mother more convenient.
Please remove your child from product before folding or adjusting the highchair except rotating the seat.
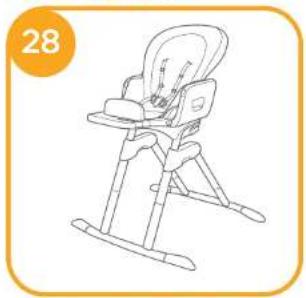
Fold Highchair
see images 26 - 31
! DO NOT fold the highchair with child in it.
! Remove tray before folding the highchair.
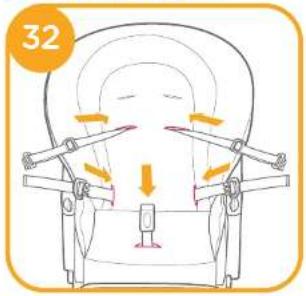
Detach Seat Pad
see images 32 - 33
Care and Maintenance
The tray cover and tray insert are dishwasher safe.
! Your seat pad can be spot cleaned with a sponge and soapy water. DO NOT use bleach.
! Drip dry the washed seat pad. DO NOT put in dryer.
To clean the frame, wipe with a damp cloth and mild detergent then wipe out any traces of moisture on the frame with a dry cloth.
! DO NOT use undiluted neutral detergent, gasoline or other organic solvent to wash the highchair. It may cause damage to the highchair.
From time to time, check your highchair for worn parts, torn material or stitching. Replace the parts as needed.
If the highchair is not in use for a long period of time, please put it somewhere your child cannot access it.
Notes

Bem-vindo a Joie™
text_image
Labeled diagram of a baby care chair with numbered parts for identificationtext_image
Labeled diagram of a baby care chair with numbered parts for identificationtext_image
Technical diagram of a baby seat with numbered parts for identificationAccessoires (non compris)
- The shoulder harness must go into the slot that is even with or slightly above the shoulders.
- In order to protect your child from falling out, after your child is placed into the seat, check whether the shoulder harnesses are at proper height.
- For larger child, use the upper shoulder slots. For smaller child, use the lower shoulder slots.
text_image
Diagram showing nine labeled parts of a tableware or appliance assembly, including chairs, bowls, and lighting fixtures.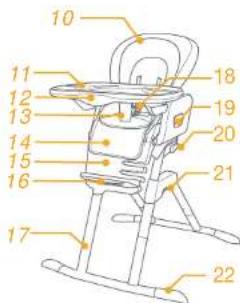
text_image
10 11 12 13 14 15 16 17 18 19 20 21 22text_image
Technical diagram of a baby care seat with numbered parts for identificationtext_image
Technical diagram of a baby seat with numbered parts for identificationtext_image
Diagram showing labeled parts of a table or stool with numbered annotations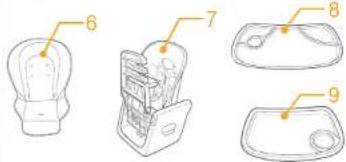
text_image
Diagram showing labeled parts of a light bulb and folder, including numbered annotations 6 through 9.
text_image
10 11 12 13 14 15 16 17 18 19 20 21 22text_image
Labeled diagram of a baby care chair with numbered parts for identificationΑξεσουάρ
text_image
Labeled diagram of a baby seat and minach seat assembly with numbered partstext_image
Technical diagram of a baby seat with numbered parts for identificationAkcesoria
أ Improving your interest in the world.
إِمْضُ المَأَكْسِ مِ إِمْكَانِ كَتَّ أَسْرَةٍ بِلِيْتَقِدِ لَمَبْ تَرَالِاقِ بِلِيْتَةِ الْغَدْ.
٥ إ Pres Cuba-Japan-Ajahres, ٢٠٠-٣٠ مزحالا.