RTAX68U - Wireless Router ASUS - Free user manual and instructions
Find the device manual for free RTAX68U ASUS in PDF.
| Product Type | Dual-band Wi-Fi 6 (AX) Wireless Router |
| Brand | ASUS |
| Model | RT-AX68U |
| Network Standards | IEEE 802.11a/b/g/n/ac/ax |
| Frequency Bands | 2.4 GHz and 5 GHz |
| Maximum Speed | Up to 574 Mbps (2.4 GHz) + 1201 Mbps (5 GHz) |
| Ports | 1 Gigabit WAN port, 4 Gigabit LAN ports, 1 USB 2.0 port, 1 USB 3.0 port |
| Antennas | 4 adjustable external antennas |
| Power | DC power adapter: 19 V, 1.75 A max |
| Operating Temperature | 0°C to 40°C |
| Storage Temperature | 0°C to 70°C |
| Operating Humidity | 50% to 90% RH |
| Storage Humidity | 20% to 90% RH |
| Wireless Security | WPA2-PSK, WPA3-PSK, WPA/WPA2-Enterprise |
| Advanced Functions | MU-MIMO, OFDMA, QoS, VPN (PPTP, OpenVPN), firewall, parental controls |
| Package Contents | Router, power adapter, RJ-45 Ethernet cable, quick start guide |
| Weight (estimated) | Approximately 500 g |
| Dimensions (estimated) | 220 x 120 x 40 mm |
Frequently Asked Questions - RTAX68U ASUS
User questions about RTAX68U ASUS
0 question about this device. Answer the ones you know or ask your own.
Ask a new question about this device
Download the instructions for your Wireless Router in PDF format for free! Find your manual RTAX68U - ASUS and take your electronic device back in hand. On this page are published all the documents necessary for the use of your device. RTAX68U by ASUS.
USER MANUAL RTAX68U ASUS
natural_image
Line drawing of a device with two vertical supports and a mesh cover, labeled 'ASUS-TAXES1' at the bottom (no other text or symbols)U16675 / First Edition / June 2020
Table of contents Table of contents
English....3
Български....9
Hrvatski....15
Čeština....21
Dansk 27
Nederlands 33
Eesti 39
Français 45
Suomi....51
Deutsch....57
Ελληνικά....63
Magyar 69
Italiano 75
Lietuvių 81
Latviešu....87
Norsk....93
Português....99
Polski....105
Русский....111
Română 117
Español....123
Srpski 129
Slovenský 135
Slovenščina....141
Svenska 147
Türkçe 153
Українська....159
165
Package contents Package contents
√ RT-AX68U Wireless Router AC adapter
√ Network cable (RJ-45) Quick Start Guide
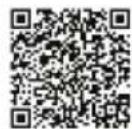
A quick look at RT-AX68UA quick look at RT-AX68U
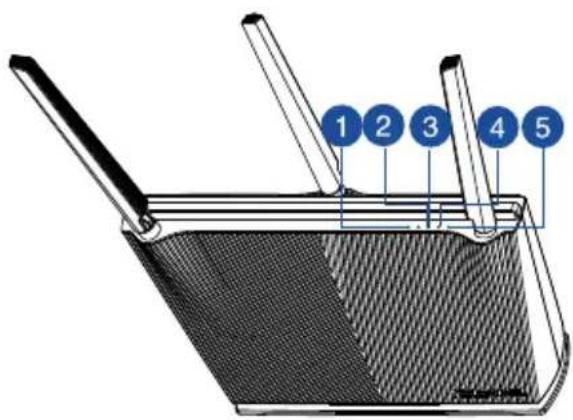
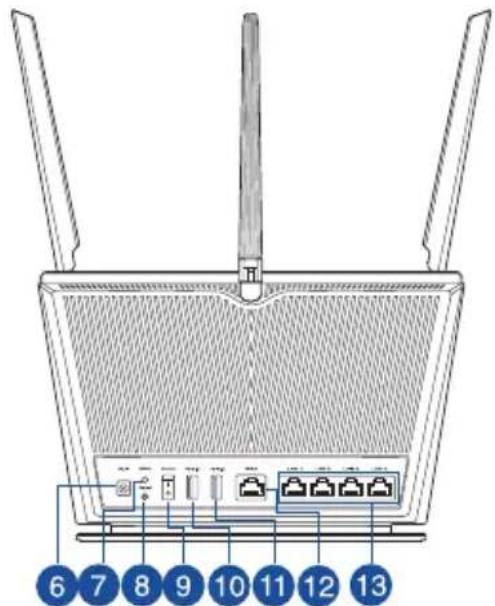
| 1 LAN LED Reset button | 8 |
| 2 WAN (Internet) LED Power switch | 9 |
| 3 5GHz LED USB 2.0 port | 10 |
| 4 2.4GHz LED USB 3.0 port | 11 |
| 5 Power LED WAN (Internet) port | 12 |
| 6 Power (DCIN) port LAN 1 ~ 4 ports | 13 |
| 7 WPS button |
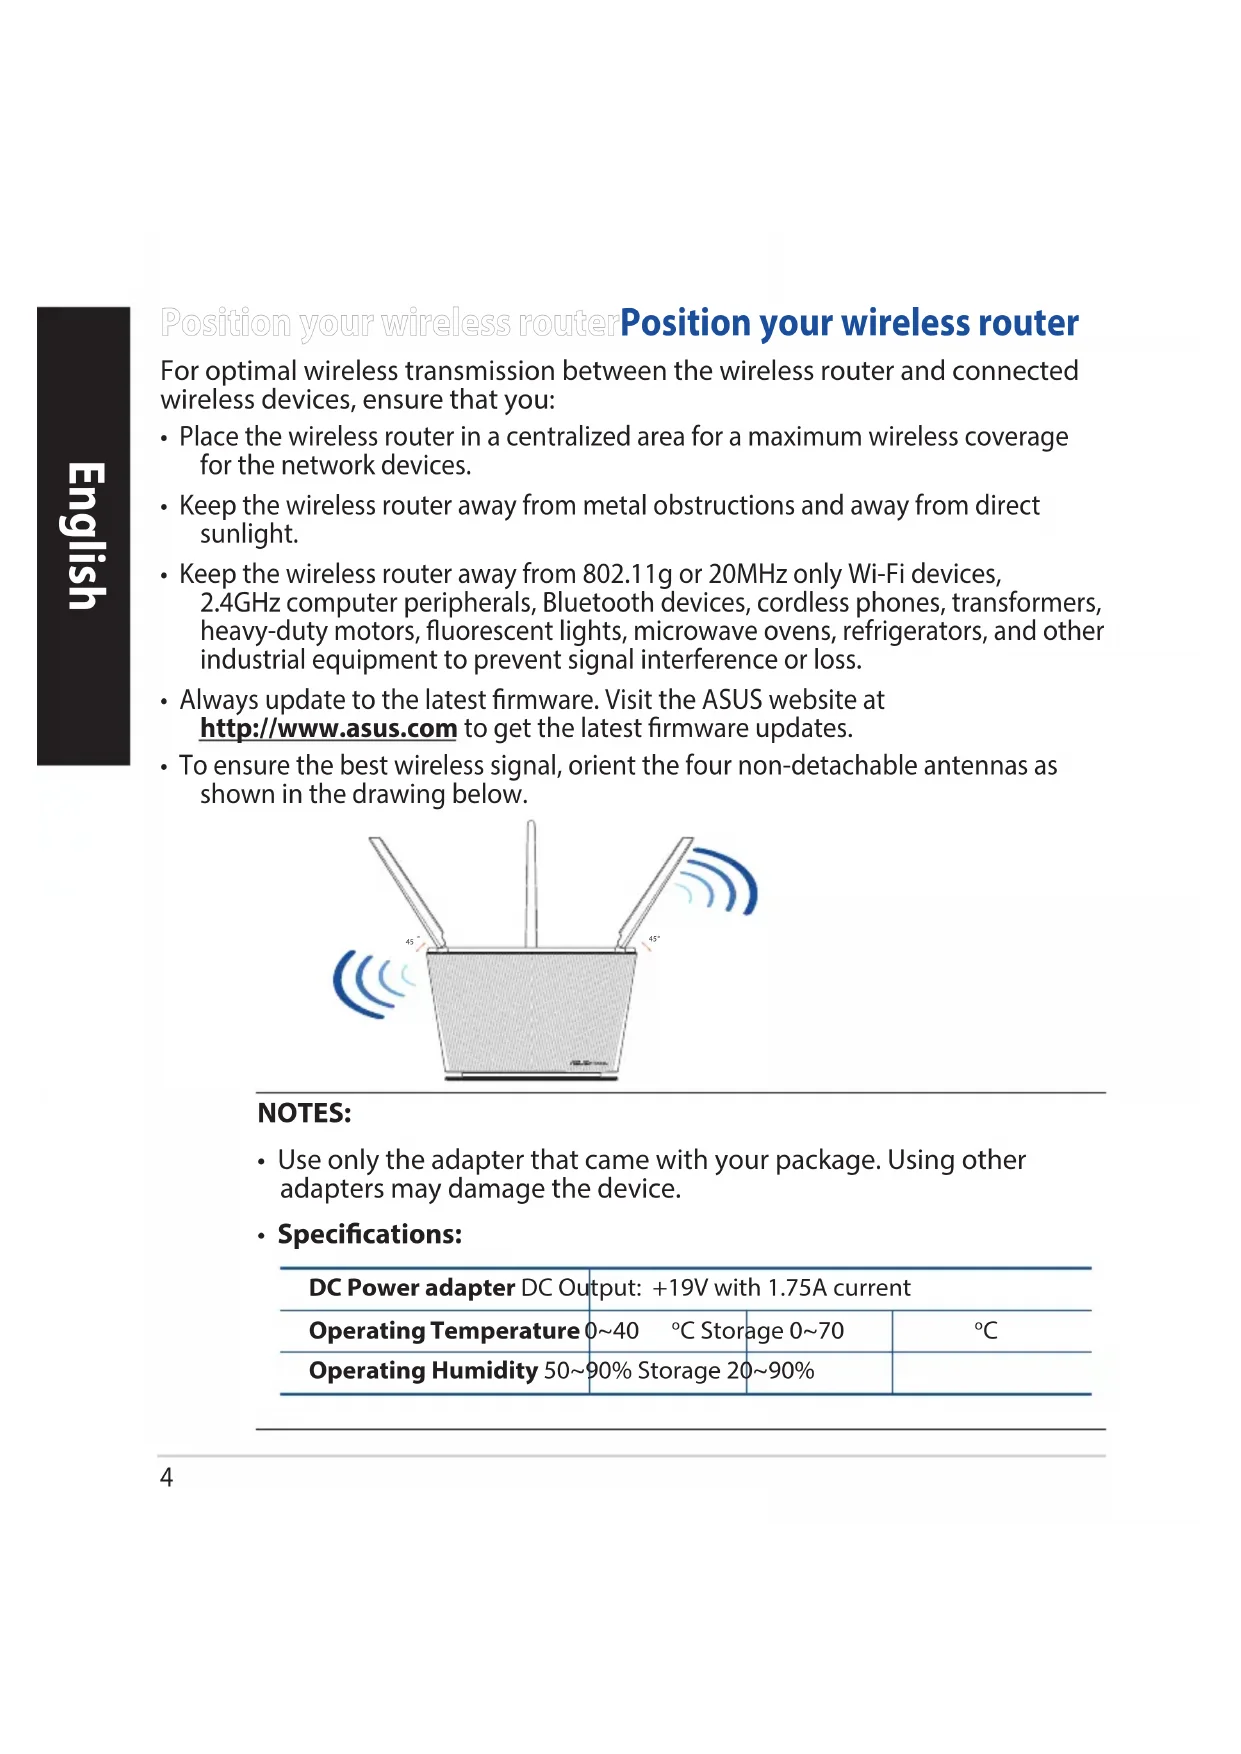
Position your wireless router Position your wireless router
For optimal wireless transmission between the wireless router and connected wireless devices, ensure that you:
- Place the wireless router in a centralized area for a maximum wireless coverage for the network devices.
- Keep the wireless router away from metal obstructions and away from direct sunlight.
- Keep the wireless router away from 802.11g or 20MHz only Wi-Fi devices, 2.4GHz computer peripherals, Bluetooth devices, cordless phones, transformers, heavy-duty motors, fluorescent lights, microwave ovens, refrigerators, and other industrial equipment to prevent signal interference or loss.
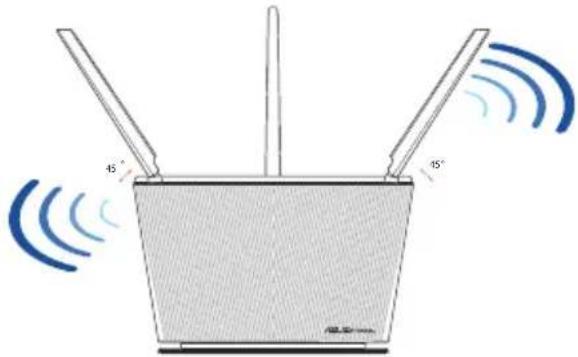
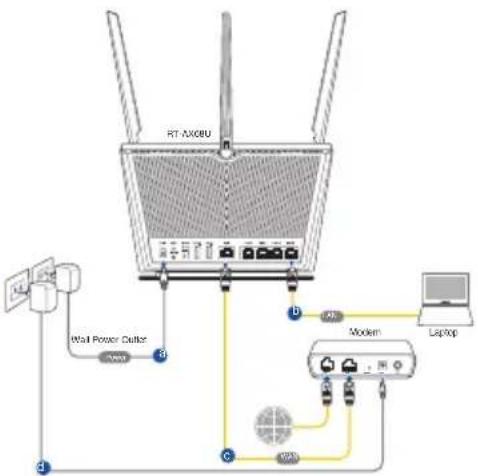
• Always update to the latest firmware. Visit the ASUS website at http://www.asus.com to get the latest firmware updates. - To ensure the best wireless signal, orient the four non-detachable antennas as shown in the drawing below.
natural_image
Diagram of a microwave oven with two blades emitting signal waves, no text or symbols presentNOTES:
- Use only the adapter that came with your package. Using other adapters may damage the device.
- Specifications:
| DC Power adapter DC Output: +19V with 1.75A current | |||
| Operating Temperature | 0~40 °C Storage | 0~70 | °C |
| Operating Humidity | 50~90% Storage | 20~90% | |
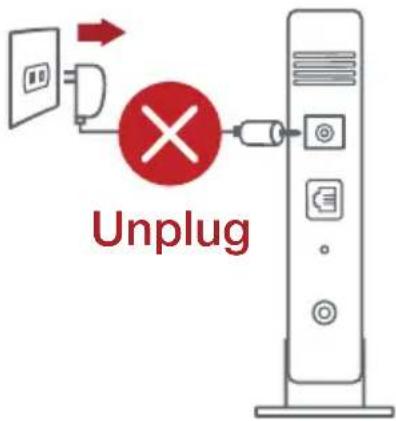
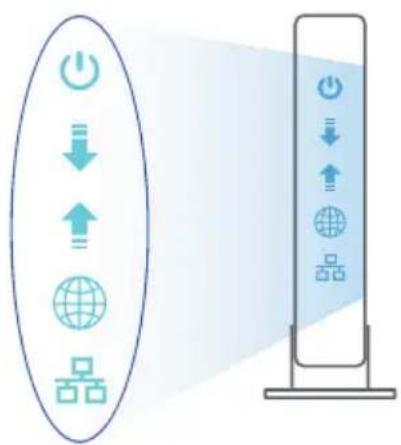
Preparing your modem Preparing your modem
- Unplug the power cable/DSL modem. If it has a battery backup, remove the battery.
NOTE: If you are using DSL for Internet, you will need your username/password from your Internet Service Provider (ISP) to properly configure the router.
- Connect your modem to the router with the bundled network cable.
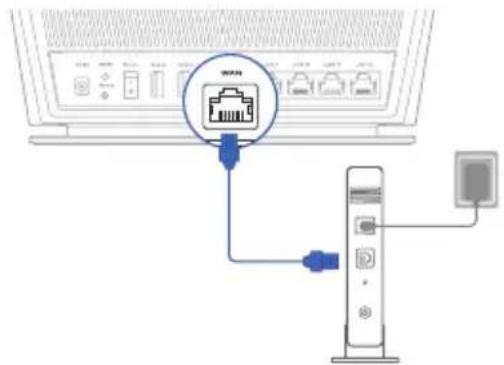
- Power on your cable/DSL modem.
- Check your cable/DSL modem LED lights to ensure the connection is active.
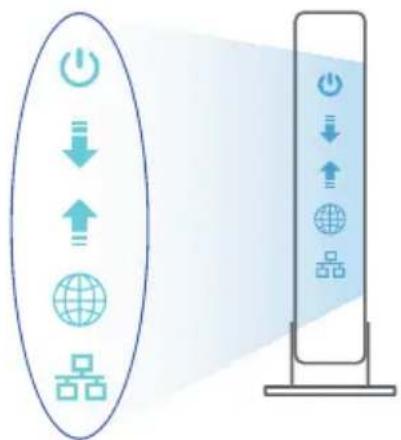
flowchart
graph TD
    A["Power Icon"] --> B["Down Arrow"]
    B --> C["Up Arrow"]
    C --> D["Global Circle"]
    C --> E["Blocks"]
    F["Vertical Stack"] --> G["Power Icon"]
    G --> H["Down Arrow"]
    H --> I["Up Arrow"]
    I --> J["Global Circle"]
    I --> K["Blocks"]
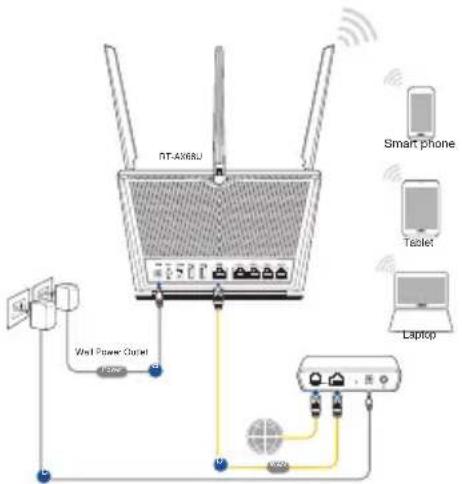
Setting up your RT-AX68U Setting up your RT-AX68U
You can set up your router via wired or wireless connection.
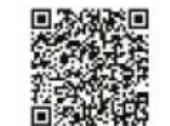
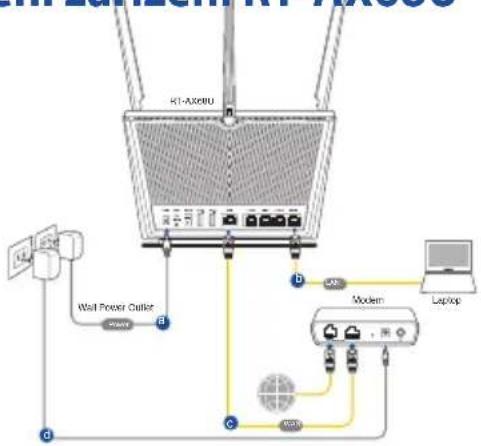
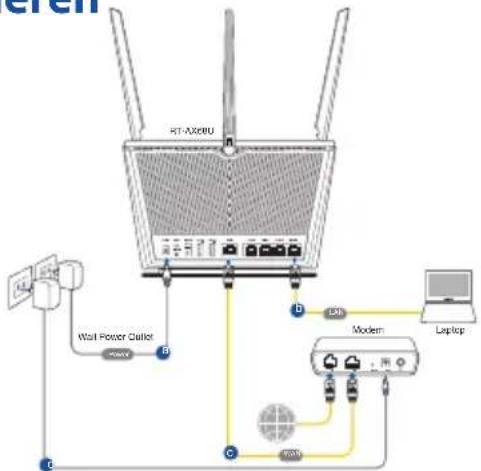
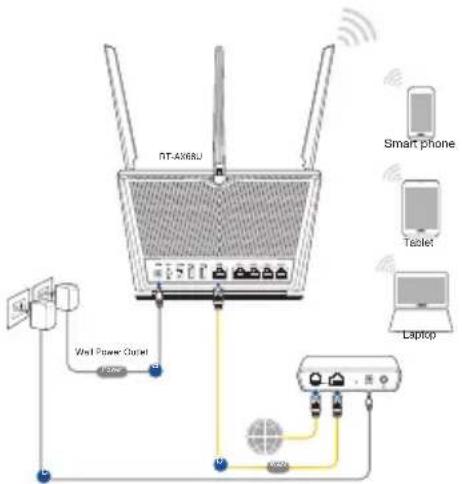
A. Wired connection
- Plug your router into a power outlet and power it on. Connect the network cable from your computer to a LAN port on your router.

flowchart
graph TD
    A["RT AX6BU"] --> B["Wall Power cutter"]
    B --> C["New"]
    C --> D["Modem"]
    D --> E["Laptop"]
    D --> F["PC"]
    D --> G["USB"]
    G --> H["Network"]
    style A fill:#f9f,stroke:#333
    style B fill:#ccf,stroke:#333
    style C fill:#cfc,stroke:#333
    style D fill:#fcc,stroke:#333
    style E fill:#cff,stroke:#333
    style F fill:#ffc,stroke:#333
    style G fill:#fcc,stroke:#333
    style H fill:#ffc,stroke:#333
- The web GUI launches automatically when you open a web browser. If it does not auto-launch, enter http://router.asus.com.
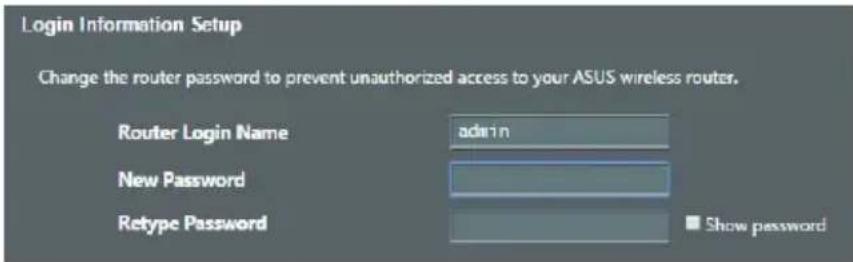
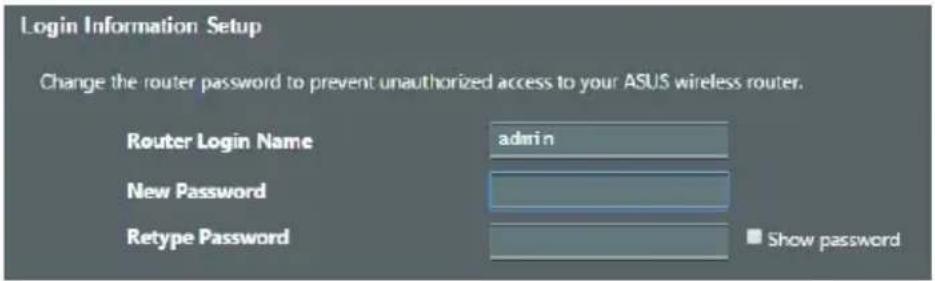
- Set up a password for your router to prevent unauthorized access.
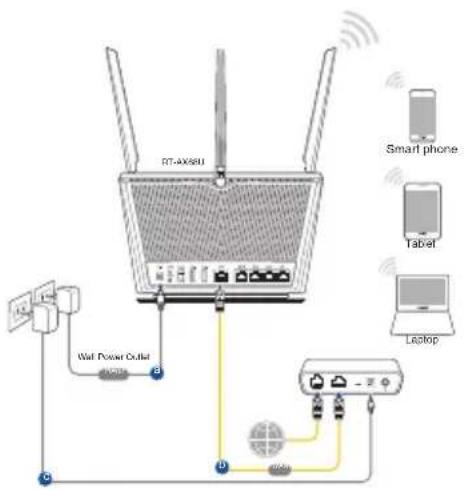
B. Wireless connection
- Plug your router into a power outlet and power it on.

flowchart
graph TD
    A["RT-AX68U"] --> B["Smart phone"]
    A --> C["Tablet"]
    A --> D["Laptop"]
    A --> E["USB Port"]
    A --> F["Wire Power Outlet"]
    F --> G["USB Port"]
    style A fill:#f9f,stroke:#333
    style B fill:#ccf,stroke:#333
    style C fill:#cfc,stroke:#333
    style D fill:#fcc,stroke:#333
    style E fill:#cff,stroke:#333
    style F fill:#ffc,stroke:#333
    style G fill:#fcf,stroke:#333
    style_H["Radio Station"] --> I["Switch"]
    style I --> J["USB Port"]
    style_K["Internet"] --> L["Switch"]
    style L --> M["USB Port"]
- Connect to the network with SSID shown on the product label on the back side of the router. For better network security, change to a unique SSID and assign a password.
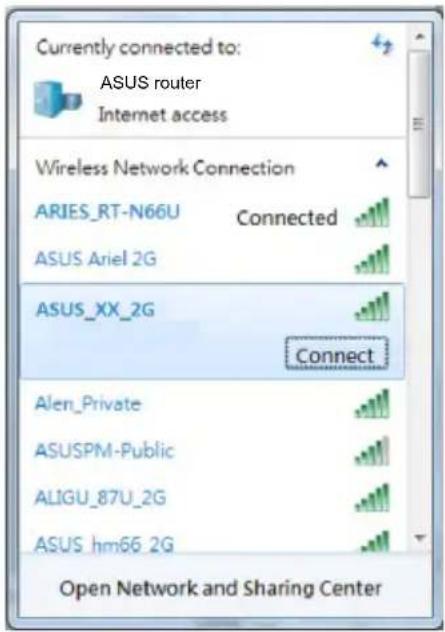
2.4G Wi-Fi Name (SSID): ASUS_XX_2G
5G Wi-Fi Name (SSID): ASUS_XX_5G
* XX refers to the last two digits of 2.4GHz MAC address. You can find it on the label on the back of your router.
- You can choose either the web GUI or ASUS Router app to set up your router. a. Web GUI Setup
- Once connected, the web GUI launches automatically when you open a web browser. If it does not auto-launch, enter http://router.asus.com.
- Set up a password for your router to prevent unauthorized access.
b. App Setup
Download ASUS Router App to set up your router via your mobile devices.
- Turn on Wi-Fi on your mobile devices and connect to your router's network.
- Follow ASUS Router App setup instructions to complete the setup.
ASUS
Router


ASUS Router
Remembering your wireless router settings
- Remember your wireless settings as you complete the router setup.
| Router Name: Password: | |
| 2.4 GHz network SSID: Password: | |
| 5GHz network SSID: Password: |
FAQFAQ
- Where can I find more information about the wireless router?
• Online FAQ site: https://www.asus.com/support/faq
• Technical support site: https://www.asus.com/support
- Customer hotline: refer to the Support Hotline section in this Quick Start Guide
- You can get the user manual online at https://www.asus.com/support
natural_image
Diagram of a microwave oven with two blades emitting signal waves (no text or symbols)ЗАБЕЛЕЖКА:
| 2,4G Wi-Fi име (SSID): ASUS_XX_2G |
| 5G Wi-Fi име (SSID): ASUS_XX_5G |
Downloaded on the App Store
natural_image
Diagram of a microwave oven with two blades and a central fan, emitting sound waves (no text or symbols)NAPOMENE:
- Koristite samo onaj adapter koji ste dobili u pakiranju. Korištenjem drugih adaptera možete oštetiti uređaj.
- Tehnički podaci:
| Adapter DC napajanja | DC izlaz: +19 V s maksimalnom strujom od 1,75 A | ||
| Radna temperatura 0 ~ | 40 °C Pohrana 0 ~ 70 | °C | |
| Radna vlažnost 50~90% | Pohrana 20~90% | ||
Pripremanje modema Pripremanje modema
- Iskopčajte kabel za napajanje/DSL modem. Ako postoji baterijsko napajanje, uklonite bateriju.
-
Uključite kabelski/DSL modem.
-
Pogledajte LED indikatore kabelskog/DSL modema za provjeru aktivnosti veze.

flowchart
graph TD
    A["Power"] --> B["Download"]
    B --> C["Upload"]
    C --> D["Global"]
    D --> E["Server"]
    style A fill:#f9f,stroke:#333
    style B fill:#ccf,stroke:#333
    style C fill:#cfc,stroke:#333
    style D fill:#fcc,stroke:#333
    style E fill:#cff,stroke:#333
Postavljanje uređaja RT-AX68UPostavljanje uređaja RT-AX68U
Možete podesiti RT-AX68U putem žične ili bežične veze.
A. Žična veza
B. Bežična veza
Naziv za 2,4G Wi-Fi (SSID): ASUS_XX_2G
Naziv za 5G Wi-Fi (SSID): ASUS_XX_5G
b. Podešavanje aplikacije
natural_image
Diagram of a radio receiver with two blades emitting sound waves (no text or symbols)POZNÁMKA:

flowchart
graph TD
    A["Power"] --> B["Download"]
    B --> C["Upload"]
    C --> D["Global"]
    D --> E["Server"]
    style A fill:#f9f,stroke:#333
    style B fill:#ccf,stroke:#333
    style C fill:#cfc,stroke:#333
    style D fill:#fcc,stroke:#333
    style E fill:#cff,stroke:#333
flowchart
graph TD
    A["RT-AX000"] --> B["Wall Power Outlet"]
    B --> C["Power"]
    C --> D["Server"]
    D --> E["Model"]
    E --> F["Laptop"]
    E --> G["Wireless"]
    G --> H["Data Bus"]
    style A fill:#f9f,stroke:#333
    style B fill:#ccf,stroke:#333
    style C fill:#cfc,stroke:#333
    style D fill:#fcc,stroke:#333
    style E fill:#cff,stroke:#333
    style F fill:#ffc,stroke:#333
    style G fill:#fcc,stroke:#333
    style H fill:#ffc,stroke:#333
natural_image
Diagram of a microwave oven with two blades emitting signal waves (no text or symbols)BEMÆRKNINGE:

flowchart
graph TD
    A["RT AX6BU"] --> B["Wall Power cutter"]
    B --> C["New"]
    C --> D["Modem"]
    D --> E["Laptop"]
    D --> F["PC"]
    D --> G["Wi-Fi"]
    D --> H["USB"]
natural_image
Diagram of a microwave oven with two blades emitting 45° waves (no text or symbols)OPMERKING:
flowchart
graph TD
    A["RT-AX80U"] --> B["Wall Power Outlet"]
    B --> C["Node C"]
    A --> D["Laptop"]
    A --> E["Modem"]
    E --> F["Network Port C"]
    A --> G["Node B"]
    A --> H["Node D"]
    style A fill:#f9f,stroke:#333
    style B fill:#ccf,stroke:#333
    style C fill:#cfc,stroke:#333
    style D fill:#fcc,stroke:#333
    style E fill:#cff,stroke:#333
    style F fill:#ffc,stroke:#333
    style G fill:#fcc,stroke:#333
    style H fill:#ffc,stroke:#333
2.4 G wifi-naam (SSID): ASUS_XX_2G
5 G wifi-naam (SSID): ASUS_XX_5G
b. App-instelling

Downloaded on the App Store

ASUS Router
natural_image
Diagram of a microwave oven with two blades emitting signal waves (no text or symbols)MÄRKUSED:
2,4 G Wi-Fi nimi (SSID): ASUS_XX_2G
5 G Wi-Fi nimi (SSID): ASUS_XX_5G
b. Rakenduse seadistamine
natural_image
Diagram of a microwave oven with two blades and a central dish, emitting blue waves (no text or symbols)REMARQUES :
B. Connexion Wi-Fi
b. Configuration via l'application
natural_image
Diagram of a microwave oven with two blades and 45-degree angle labels (no text or symbols beyond measurement indicators)HUOMAA:
B. Langaton yhteys
2,4 G Wi-Fi-nimi (SSID): ASUS_XX_2G
5 G Wi-Fi-nimi (SSID): ASUS_XX_5G
natural_image
Diagram of a microwave oven with two blades and 45-degree angle labels (no text or symbols beyond measurement indicators)HINWEISE:
2,4G WLAN-Name (SSID): ASUS_XX_2G
5G WLAN-Name (SSID): ASUS_XX_5G
natural_image
Diagram of a microwave oven with two blades emitting signal waves (no text or symbols)ΣΗΜΕΙΩΣΕΙΣ:
B. Ασύρματη σύνδεση
2,4G Wi-Fi'Ovoμα (SSID): ASUS_XX_2G
5G Wi-Fi'Ovoμα (SSID): ASUS_XX_5G
natural_image
Diagram of a microwave oven with two blades emitting signal waves (no text or symbols)MEGJEGYZÉSEK:
2,4G Wi-Fi neve (SSID): ASUS_XX_2G
5G Wi-Fi neve (SSID): ASUS_XX_5G
natural_image
Diagram of a portable router with two side blades emitting 45° waves (no text or symbols)NOTE:
Nome Wi-Fi 2.4G (SSID): ASUS_XX_2G
Nome Wi-Fi 5G (SSID): ASUS_XX_5G
natural_image
Diagram of a microwave oven with two blades and a central fan, emitting sound waves (no text or symbols)PASTABOS:
B. Belaidis ryšys
1. Prijunkite kelvedj prie maitinimo lizdo ir ijunkite ji.
natural_image
Diagram of a microwave oven with two blades emitting signal waves (no text or symbols)PIEZIMES:
2,4 G Wi-Fi nosaukums (SSID): ASUS_XX_2G
5G Wi-Fi nosaukums (SSID): ASUS_XX_5G
natural_image
Diagram of a microwave oven with two side blades and 45-degree angle labels (no text or symbols beyond measurement markers)MERKNADER:
- Slå på kabel-/DSL-modemet.
- Se LED-lampen på kabel-/DSL-modemet for å kontrollere at forbindelsen er aktiv.

flowchart
graph TD
    A["Power"] --> B["Download"]
    B --> C["Upload"]
    C --> D["Global"]
    D --> E["Group"]
Sette opp RT-AX68U Sette opp RT-AX68U
2,4 GHz Wi-Fi-navn (SSID): ASUS_XX_2G
5GHz Wi-Fi-navn (SSID): ASUS_XX_5G
* XX refererer til de to siste sifrene i MAC-adressen. Du finner det på etiketten på baksiden av RT-AX68U.
- Du kan velge enten web-brukergrensesnittet eller ASUS Router-appen til å konfigurere ruteren.
b. Oppsett med app
Last ned ASUS Router-appen for å konfigurere ruteren via en mobilenhet.
Download on the App Store
Q ASUS Router
natural_image
Diagram of a microwave oven with two blades emitting 45° waves (no text or symbols)NOTAS:
B. Ligação sem fios
natural_image
Diagram of a microwave oven with two blades and a central dish, emitting blue waves (no text or symbols)UWAGI:
natural_image
Diagram of a microwave oven with two blades emitting 45° waves (no text or symbols)ПРИМЕЧАНИЯ:
natural_image
Diagram of a microwave oven with two blades emitting 45° waves (no text or symbols)NOTE:
| Nume rețea Wi-Fi 2,4 GHz (SSID): | ASUS_XX_2G |
| Nume rețea Wi-Fi 5 GHz (SSID): | ASUS_XX_5G |
b. Configurare prin aplicatie
natural_image
Diagram of a microwave oven with two blades and a central dish, emitting blue waves (no text or symbols)NOTAS:
flowchart
graph TD
    A["NT-AX68U"] -->|Wireless Power Outlet| B["Smart phone"]
    A -->|Wireless Power Outlet| C["Laptop"]
    A -->|Wireless Power Outlet| D["Teilet"]
    A -->|Wireless Power Outlet| E["Ground"]
Nombre Wi-Fi 2,4 GHz (SSID): ASUS_XX_2G
Nombre Wi-Fi 5GHz (SSID): ASUS_XX_5G
natural_image
Diagram of a microwave oven with two blades and a central fan, emitting blue waves (no text or symbols)NAPOMENE:
- Koristite isključivo adapter koji ste dobili u pakovanju. Korišćenje drugih adaptera može da ošteti uređaj.
- Specifikacija:
| Adapter za jednosmernu struju | Izlaz jednosmerne struje: +19 V sa maks. strujom od 1,75 A | ||
| Radna temperatura 0°C–40°C Skladištenje 0°C–70°C | |||
| Radna vlažnost 50%–90% Skladištenje 20%–90% | |||
Priprema vašeg modema Priprema vašeg modema
- Uključite svoj kabl/DSL modem.
- Proverite LED lampice svog kabla/DSL modema da proverite da je veza aktivna.

flowchart
graph TD
    A["Power"] --> B["Download"]
    B --> C["Upload"]
    C --> D["Global"]
    D --> E["Server"]
    style A fill:#f9f,stroke:#333
    style B fill:#ccf,stroke:#333
    style C fill:#cfc,stroke:#333
    style D fill:#fcc,stroke:#333
    style E fill:#cff,stroke:#333
Podešavanje vašeg RT-AX68UPodešavanje vašeg RT-AX68U
B. Bežično povezivanje
1. Priključite svoj ruter u utičnicu za struju i uključite ga.

2,4G Wi-Fi ime (SSID): ASUS_XX_2G
5G Wi-Fi ime (SSID): ASUS_XX_5G
b. Podešavanje aplikacije
natural_image
Diagram of a microwave oven with two blades and a central dish, emitting sound waves (no text or symbols)POZNÁMKY:
- Zapnite káblový/DSL modem.
- Skontrolujte kontrolky LED na modeme DSL/ napájací kábel a uistite sa, že pripojenie je aktívne.
flowchart
graph TD
    A["Power Input"] --> B["Download"]
    B --> C["Upload"]
    C --> D["Global Network"]
    D --> E["Group Units"]
    style A fill:#f9f,stroke:#333
    style E fill:#bbf,stroke:#333
flowchart
graph TD
    A["RT-AX0BU"] -->|A port| B["Wall Power Converter"]
    A -->|B port| C["Modem"]
    A -->|C port| D["Laptop"]
    B -->|D port| C
    C -->|D port| D
    style A fill:#f9f,stroke:#333
    style B fill:#ccf,stroke:#333
    style C fill:#cfc,stroke:#333
    style D fill:#fcc,stroke:#333
B. Bezdrôtové pripojenie
1. Smerovač zapojte do elektrickej zásuvky a zapnite ho.
b. App Setup
natural_image
Diagram of a microwave oven with two blades and a central fan, emitting sound waves (no text or symbols)OPOMBE:
Ime 2,4 GHz omrežja Wi-Fi (SSID): ASUS_XX_2G
Ime 5 GHz omrežja Wi-Fi (SSID): ASUS_XX_5G
natural_image
Diagram of a microwave oven with two blades and a central dish, emitting blue waves (no text or symbols)ANMÄRKNINGAR:
| 2,4 G Wi-Fi-namn (SSID): ASUS_XX_2G |
| 5 G Wi-Fi-namn (SSID): ASUS_XX_5G |
b. App-inställning
- Teknisk support: https://www.asus.com/support
- Kundhotline: Se support hotlineskärmbilderna i Supplementguiden
natural_image
Diagram of a microwave oven with two blades and a central speaker, emitting sound waves (no text or symbols)NOTLAR:
2.4 G Wi-Fi Adi (SSID): ASUS_XX_2G
5 G Wi-Fi Adı (SSID): ASUS_XX_5G
Назва Wi-Fi 2,4 Г (SSID): ASUS_XX_2G
Назва Wi-Fi 5 Г (SSID): ASUS_XX_5G

Download on the App Store

ASUS Router
20MHz 802.11g Wi-Fi, 2.4GHz, 2.4GHz, Bluetooth,
natural_image
Diagram of a microwave oven with two blades and a central dish, emitting sound waves (no text or symbols):תָרִי
•
:תְרַעָה
| 1.75A ☐☐☐☐☐☐☐☐☐☐☐☐☐☐☐☐☐☐☐☐☐☐☐☐☐☐☐☐☐☐☐☐☐☐☐☐☐☐☐☐☐☐☐☐☐☐☐☐☐☐☐☐☐☐☐☐☐☐☐☐☐☐☐☐☐☐☐☐☐☐☐☐☐☐☐☐☐☐☐☐☐☐☐☐☐☐☐☐☐☐☐☐☐☐☐☐☐☐☐☐☐ ☐☐☐☐☐☐☐☐☐☐☐☐☐☐☐☐☐☐☐☐☐☐☐☐☐☐☐☐☐☐☐☐☐☐☐☐☐☐☐☐☐☐☐☐☐☐☐☐☐☐☐☐☐☐☐☐☐☐☐☐☐☐☐☐☐☐☐☐☐☐☐☐☐☐☐☐☐☐☐☐☐☐☐☐☐☐☐☐☐☐☐☐☐☐☐☐☐☐ ☐ ☐ ☐ ☐ ☐ ☐ ☐ ☐ ☐ ☐ ☐ ☐ ☐ ☐ ☐ ☐ ☐ ☐ ☐ ☐ ☐ ☐ ☐ ☐ ☐ ☐ ☐ ☐ ☐ ☐ ☐ ☐ ☐ ☐ ☐ ☐ ☐ ☐ ☐ ☐ ☐ ☐ ☐ ☐ ☐ ☐ ☐ ☐ ☐ ☐ ☑ ☐ ☐ ☐ ☐ ☐ ☐ ☐ ☐ ☐ ☐ ☐ ☐ ☐ ☐ ☐ ☐ ☐ ☐ ☐ ☐ ☐ ☐ ☐ ☐ ☐ ☐ ☐ ☐ ☐ ☐ ☐ ☐ ☐ ☐ ☐ ☐ ☐ ☐ ☐ ☐ ☐ ☐ ☐ ☐ ☐ ☐ ☐ ☐ ☐ ☒ ☐ ☐ ☐ ☐ ☐ ☐ ☐ ☐ ☐ ☐ ☐ ☐ ☐ ☐ ☐ ☐ ☐ ☐ ☐ ☐ ☐ ☐ ☐ ☐ ☐ ☐ ☐ ☐ ☐ ☐ ☐ ☐ ☐ ☐ ☐ ☐ ☐ ☐ ☐ ☐ ☐ ☐ ☐ ☐ ☐ ☐ ☐ ☐ ☐ ☓ ☐ ☐ ☐ ☐ ☐ ☐ ☐ ☐ ☐ ☐ ☐ ☐ ☐ ☐ ☐ ☐ ☐ ☐ ☐ ☐ ☐ ☐ ☐ ☐ ☐ ☐ ☐ ☐ ☐ ☐ ☐ ☐ ☐ ☐ ☐ ☐ ☐ ☐ ☐ ☐ ☐ ☐ ☐ ☐ ☐ ☐ ☐ ☐ ☐ ★ ☐ ☐ ☐ ☐ ☐ ☐ ☐ ☐ ☐ ☐ ☐ ☐ ☐ ☐ ☐ ☐ ☐ ☐ ☐ ☐ ☐ ☐ ☐ ☐ ☐ ☐ ☐ ☐ ☐ ☐ ☐ ☐ ☐ ☐ ☐ ☐ ☐ ☐ ☐ ☐ ☐ ☐ ☐ ☐ ☐ ☐ ☐ ☐ ☐ ☎ ☐ ☐ ☐ ☐ ☐ ☐ ☐ ☐ ☐ ☐ ☐ ☐ ☐ ☐ ☐ ☐ ☐ ☐ ☐ ☐ ☐ ☐ ☐ ☐ ☐ ☐ ☐ ☐ ☐ ☐ ☐ ☐ ☐ ☐ ☐ ☐ ☐ ☐ ☐ ☐ ☐ ☐ ☐ ☐ ☐ ☐ ☐ ☐ ☐ ☋ ☐ ☐ ☐ ☐ ☐ ☐ ☐ ☐ ☐ ☐ ☐ ☐ ☐ ☐ ☐ ☐ ☐ ☐ ☐ ☐ ☐ ☐ ☐ ☐ ☐ ☐ ☐ ☐ ☐ ☐ ☐ ☐ ☐ ☐ ☐ ☐ ☐ ☐ ☐ ☐ ☐ ☐ ☐ ☐ ☐ ☐ ☐ ☐ ☐ ☞ | |||
| °C | °C | ☐☐☐☐☐☐☐☐☐☐☐☐☐☐☐☐☐☐☐☐☐☐☐☐☐☐☐☐☐☐☐☐☐☐☐☐☐☐☐☐☐☐☐☐☐☐☐☐☐☐☐☐☐☐☐☐☐☐☐☐☐☐☐☐☐☐☐☐☐☐☐☐☐☐☐☐☐☐☐☐☐☐☐☐☐☐☐☐☐☐☐☐☐☐☐☐☐☐☐ | |
| 20%~90% | ☐☐☐☐ | 50%~90% | ☐☐☐☐☐☐☐☐☐☐☐☐☐☐☐☐☐☐☐☐☐☐☐☐☐☐☐☐☐☐☐☐☐☐☐☐☐☐☐☐☐☐☐☐☐☐☐☐☐☐☐☐☐☐☐☐☐☐☐☐☐☐☐☐☐☐☐☐☐☐☐☐☐☐☐☐☐☐☐☐☐☐☐☐☐☐☐☐☐☐☐☐☐☐☐☐☐☐ |

. Android Studio Software - ASUS Router - iOS GUI-ה Activity Management Software - 3 GUI - Software Activity Management Software - N
ASUS
Router


ASUS Router
https://www.asus.com/support:
•