
DN474A - AV receiver DENON - Free user manual and instructions
Find the device manual for free DN474A DENON in PDF.
| Product type | Audio-video receiver |
| Brand | Denon |
| Model | DN474A |
| Rack mount | Yes (brackets included) |
| Audio inputs | Euroblock connectors 6-pin (2x) and 4-pin (4x) included |
| Audio outputs | Euroblock connectors for speakers |
| LED indicators | Signal (green), clipping (red), protection (red) |
| Controls | Level knobs per channel |
| Operating mode | Selector 70 V / 100 V (DIP switches) |
| Protection | Overheat protection (protection mode) |
| Power supply | Mains (cable included) |
| Fuse | Replaceable (appropriate rating required) |
| Maintenance | Clear air intake and exhaust grilles |
| Safety | Grounding via ground connectors |
| Included accessories | Euroblock connectors, power cable, rack brackets, user guide |
| Documentation | User manual (24 pages, French) |
Frequently Asked Questions - DN474A DENON
User questions about DN474A DENON
0 question about this device. Answer the ones you know or ask your own.
Ask a new question about this device
Download the instructions for your AV receiver in PDF format for free! Find your manual DN474A - DENON and take your electronic device back in hand. On this page are published all the documents necessary for the use of your device. DN474A by DENON.
USER MANUAL DN474A DENON
User Guide (English)
Introduction
Thank you for purchasing the DN-474A. At Denon Professional, performance and reliability mean as much to us as they do to you. That's why we design our equipment with o thing in mind—to make your performance the best it can be.
Box Contents
DN-474A
(2) 6-Pin Euroblock Connectors
(4) 4-Pin Euroblock Connectors
Power Cable
Rack Ears with Screws
User Guide
Safety & Warranty Manual
Support
For the latest information about this product (documentation, technical specifications, system requirements, compatibility information, etc.) and product registration, visit denonpro.com.
For additional product support, visit denonpro.com/support.
Features
Front Panel

- Power Switch: Press this switch to power DN-474A on or off.
- Level Knobs: Turn these knobs to set the output level for each channel.
-
Signal/Clip/Protection LEDs: These lights will illuminate different colors to show the signal status of each channel input:
-
Signal LED: The input's Signal LED will be lit green when it is receiving a signal at an optimal level.
- Clip LED: The input's Clip LED is "peaking" when the LED is lit red (higher than 0 dB). Turn its Level knob counter-clockwise or reduce the volume of the source to prevent "clipping" (distortion).
-
Protection LED: If the Protection LED turns red, the unit is in heat protection mode and will not output sound. To restore sound output, reduce the temperature by making sure there is good ventilation and by decreasing the signal level.
-
Air Intake Vents: Keep the vents clear from obstructions to allow air to flow through the front grill for proper performance.
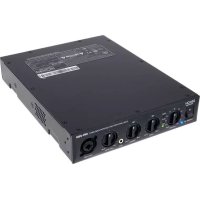
Rear Panel

- Power Inlet: Use the included power cable to connect this input to a power outlet.
- Fuse: If the unit's fuse is broken, lift this tab to replace the fuse. Replace it with a fuse with an appropriate rating. Using a fuse with an incorrect rating can damage the unit and/or fuse.
- Inputs: Use Euroblock connectors to connect these channel inputs to your audio sources. Each channel has a ground (G), cold/negative (-), and hot/positive (+) connector. Make sure the wiring of each device matches each connection.
- Outputs: Use Euroblock connectors to connect these channel outputs to your loudspeakers. Make sure the wiring of each loudspeaker is done properly for each output.
- Operation Mode Switch: Select the operation mode to 70V or 100V for Outputs 3 and 4 by moving the dip-switches to the desired position.
- Exhaust Vents: Air from the front intake flows through the unit and exits here. For proper performance, do not block the air vent.
Setup
Items not listed under Introduction > Box Contents are sold separately.
- Use the included Euroblock connectors to connect the inputs on the rear panel to your audio sources. • Each channel input has a ground (G), cold/negative (-), and hot/positive (+) connector.
- Use the included Euroblock connectors to connect the outputs on the rear panel to your loudspeakers.
- Use the included power cable to connect the power inlet to a power outlet.
- Power on all of your audio sources (Blu-ray ^® players, stereos, microphones, amplifiers, etc.).
- Press the power switch to power on DN-474A.
- Adjust the level knobs for each channel input as necessary.
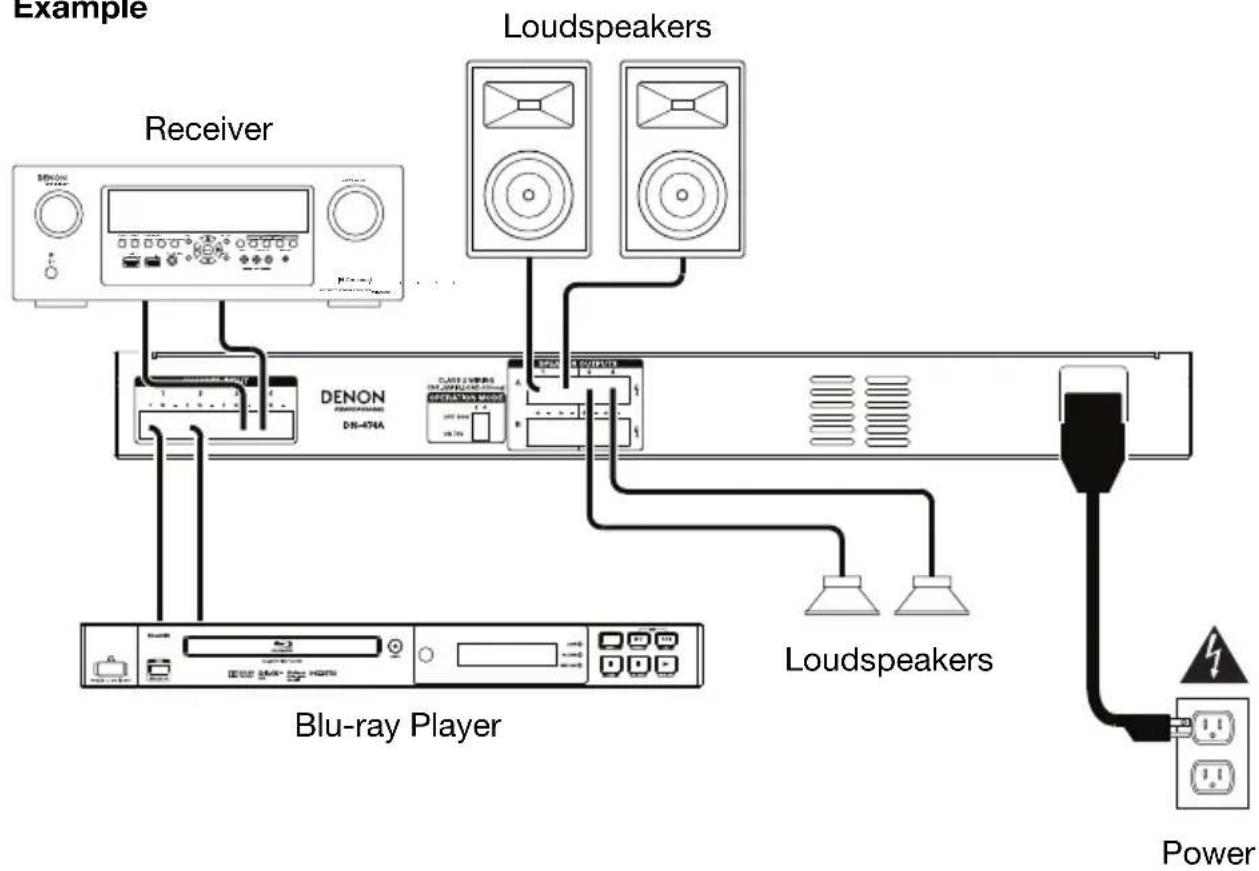
Example
flowchart
graph TD
    A["Example"] --> B["Receiver"]
    B --> C["DENON DENON 476A"]
    C --> D["Loudspeakers"]
    D --> E["Loudspeakers"]
    E --> F["Blu-ray Player"]
    F --> G["Power"]
    style A fill:#f9f,stroke:#333
    style B fill:#ccf,stroke:#333
    style C fill:#cfc,stroke:#333
    style D fill:#fcc,stroke:#333
    style E fill:#cff,stroke:#333
    style F fill:#ffc,stroke:#333
    style G fill:#fcc,stroke:#333
Using a Euroblock Connector
- Twist the speaker wire to form a tight strand and insert this into the appropriate port, pushing the wire until it is secured inside.
- Attach the Euroblock connector to the terminal on DN-474A.
- To disconnect a wire, use a small screwdriver to press in the spring above the insert port while pulling out the wire.

Troubleshooting
If you encounter a problem, try doing these things first:
• Make sure all cables and other connected devices are properly and securely connected.
• Make sure you are using DN-474A as described in this user guide.
• Make sure your other devices or media are working properly.
- If you believe DN-474A is not working properly, check the following table for your problem and solution.
| Problem: | Solution: | Please | see: |
| Power does not turn on. | Make sure DN-474A's power inlet is properly connected to a power outlet using the included power cable. | Setup | |
| DN-474A does not produce any sound, or the sound is distorted. | Make sure all cable and device connections are secure and correct.Make sure none of the cables are damaged.Make sure the settings on your loudspeaker, mixer, etc. are correct. | Setup | |
| The sound has a hum or noise. | Check the polarity of the input connections.If an unbalanced connection is used, ensure terminal (-) is linked to GND.If the clip LED is lit, reduce the output volume.Check the polarity of the speaker connections. | Setup | |
Guide de dépannage
(2) 6-Pin Euroblock-Anschlüsse
(4) 4-Pin Euroblock-Anschlüsse
Netzkabel
Technical Specifications
| Total Harmonic Distortion | < 0.1% |
| Frequency Response | 100 Hz – 15 kHz (0+/-1 dBv) |
| Signal-to-Noise Ratio | >95 dB |
| Channel Separation | >70 dB |
| Output Power(each channel) | 120 W |
| Input Sensitivity | 0.9-1.1V (0+/-1dBv) |
| Input Impedance | 20kΩ balanced or 10kΩ unbalanced |
| Connectors | (4) Euroblock channel outputs (70V, 100V, 4Ω, 8Ω)(8) Euroblock channel inputs (ground, -, +)(1) IEC power inlet |
| Power | Connection: IECInput Voltage:Japan: 100 V~, 50/60 Hz, 1000 WUS/CA: 110–120 V~, 50/60 Hz, 1000 WEU/UK: 220–240 V~, 50/50 Hz, 1000 W |
| Dimensions(width x depth x height) | 19.0" x 11.1" x 1.7"483 x 281 x 44 mm |
| Weight | 10.4 lbs.4.7 kg |
Specifications are subject to change without notice.
Trademarks & Licenses
Denon is a trademark of D&M Holdings Inc., registered in the U.S. and other countries. Denon Professional products are produced by inMusic Brands, Inc., Cumberland, RI 02864, USA. All other product names, company names, trademarks, or trade names are those of their respective owners.
denonpro.com

Brand : DENON
Model : DN474A
Category : AV receiver