
DN280 - AV receiver DENON - Free user manual and instructions
Find the device manual for free DN280 DENON in PDF.
| Product Type | Audio-video receiver (zone amplifier) |
| Brand | Denon |
| Model | DN280 |
| Dimensions (W x D x H) | 48,3 x 20,3 x 4,4 cm |
| Weight | 5 kg |
| Power Supply | 100-240 V AC, 50/60 Hz |
| Output Power | Less than 60 W (distortion-free) |
| Inputs | 1 RCA line input (stereo summed to mono), 1 3.5 mm aux input, 1 XLR/TRS mic/line input |
| Output | 1 Euroblock speaker output (70 V/100 V or low impedance) |
| Functions | Master volume control, Bass/Treble tone control, SIG/CLIP/PROT indicators |
| Ducking function | Yes, automatically reduces the gain of other inputs when using the microphone |
| Rack mountable | Yes (brackets included) |
| Indicators | Signal (green), clip (red), protect (red) |
| Fuse | Yes, replaceable (rating indicated on rear panel) |
| Included Accessories | Power cord, rack mount brackets, rubber feet, Euroblock connector, user guide |
| Maintenance | Clean with a dry cloth |
| Safety | Do not block ventilation openings, use a fuse of appropriate rating |
Frequently Asked Questions - DN280 DENON
User questions about DN280 DENON
0 question about this device. Answer the ones you know or ask your own.
Ask a new question about this device
Download the instructions for your AV receiver in PDF format for free! Find your manual DN280 - DENON and take your electronic device back in hand. On this page are published all the documents necessary for the use of your device. DN280 by DENON.
USER MANUAL DN280 DENON
User Guide (English)
Introduction
Thank you for purchasing the DN-280. At Denon Professional, performance and reliability mean as much to us as they do to you. That's why we design our equipment with only one thing in mind—to make your performance the best it can be.
Box Contents
DN-280
IEC Power Cable
Rack Mount Ears & Screws
Rubber Feet
Euroblock Connector
User Guide
Safety & Warranty Manual
Support
For the latest information about this product (documentation, technical specifications, system requirements, compatibility information, etc.) and product registration, visit denonpro.com.
For additional product support, visit denonpro.com/support.
Features
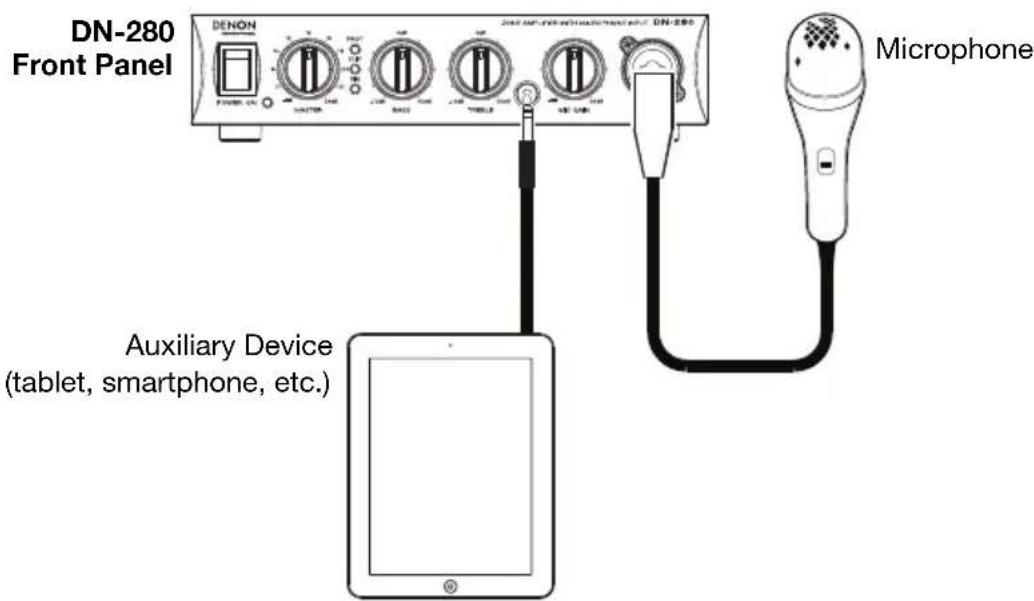
Front Panel
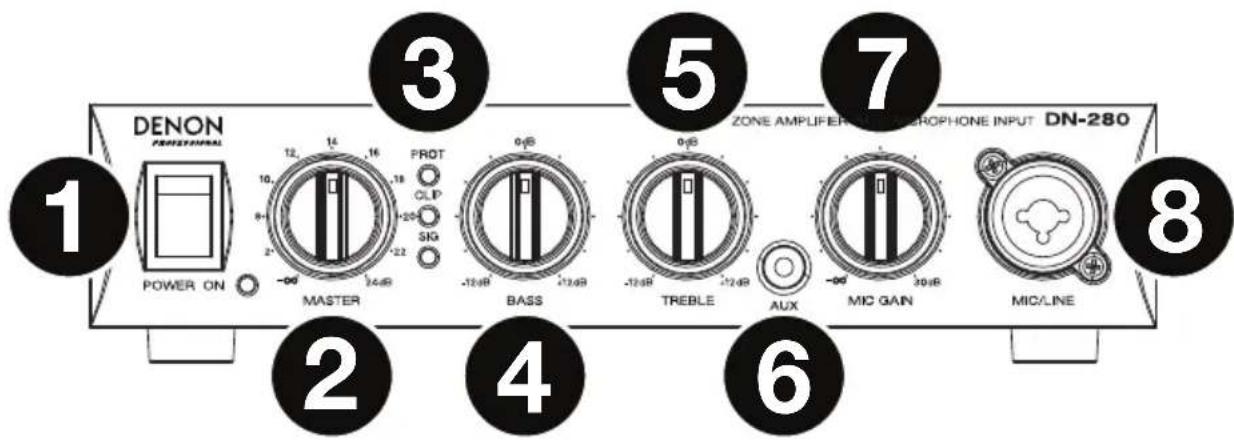
- Power Switch: Press this switch to power DN-280 on or off. Make sure the Master knob is all the way down before powering on. The power LED will turn on when DN-280 is powered on.
- Master: Turn this knob to control the volume level of the audio signal sent to DN-280's Speaker Output.
-
Signal/Clip/Protection LEDs: These lights show the signal status of the Channel Input:
-
Signal LED (SIG): The Signal LED will be lit green when the signal coming from the Channel Input is at an optimal volume level.
- Clip LED (CLIP): When the Clip LED is lit red, the Channel Input's signal is "peaking" (higher than 0 dB). To prevent the "clipping" (distortion) that can result from a loud input signal, turn the Master knob counter-clockwise or reduce the volume on the device plugged into the Channel Input.
-
Protection LED (PROT): If the Protection LED turns red, DN-280 is in heat protection mode and will not output sound. To restore sound output, reduce DN-280's temperature by making sure there is good ventilation and/or decreasing the volume.
-
Speaker Bass: Turn this knob to control the level of the low (bass) frequencies sent from DN-280's Speaker Output.
- Speaker Treble: Turn this knob to control the level of the high (treble) frequencies sent from DN-280's Speaker Output.
- Aux Input: Connect an audio device to this input using a standard 1/8" (3.5 mm) stereo/TRS cable.
Note: The Aux Input and rear panel Channel Input cannot be used at the same time. The Channel Input will be disabled when a device is plugged into the Aux Input.
- Mic Gain: Turn this knob to control the volume level of the Mic/Line Input.
- Mic/Line Input: Connect a microphone or line-level device to this input using a standard XLR or 1/4" (6.35 mm) TRS cable. Turn the Mic Gain knob to control the volume level of this input.
Note: This input includes a ducking feature, which automatically reduces the gain of the Aux Input and Channel Input by 20 dB when the microphone is in use at the same time (such as when paging). After 2.5 seconds without input from the microphone, the Aux Input and Channel Input gain will return to their set levels.
Rear Panel
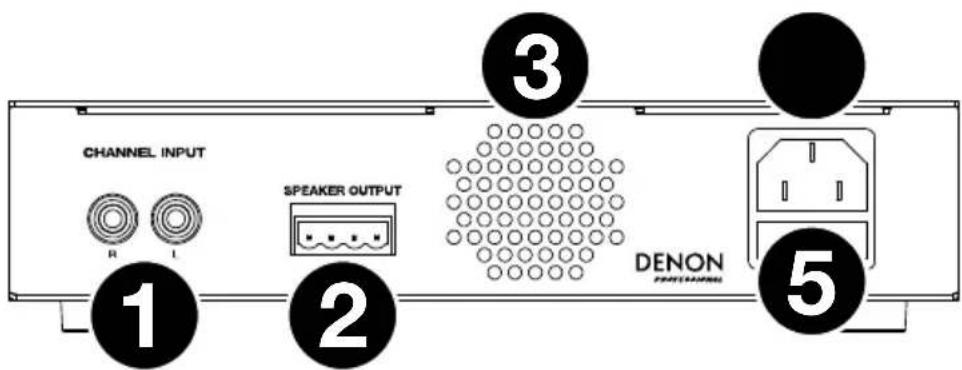
- Channel Input (unbalanced RCA): Use an RCA cable to connect an external audio source to this input. The left and right input signals will be summed to mono.
- Speaker Output: This output sends the main/master signal from DN-280 to your external speaker. Connect this output to your speaker using the included Euroblock connector and speaker wire (not included). The power of the output is less than 60 W (without distortion). See Setup for more information.
Important: Connect only one speaker type to the speaker output. Use only 70V/100V speakers designed with step-down transformers with the 70V/100V outputs. Do not connect a low-impedance speaker (4Ω) to the 70V/100V output terminals, as this may result in damage to your amplifier and/or speaker.
- Vents: For proper performance, keep the vents clear from obstructions to allow air to flow.
- Power Input: Use the included power cable to connect this input to a power outlet. Make sure DN-280's Power Switch is set to off when connecting or disconnecting the cable.
- Fuse: If the unit's fuse is broken, lift this tab to replace the fuse. Replace it with a fuse that has an appropriate rating (following the specifications located on the rear panel of DN-280). Using a fuse with an incorrect rating can damage the unit and/or fuse.
Setup
Getting Started:
- Connect an audio source to the Channel Input, Aux Input, or Mic/Line Input.
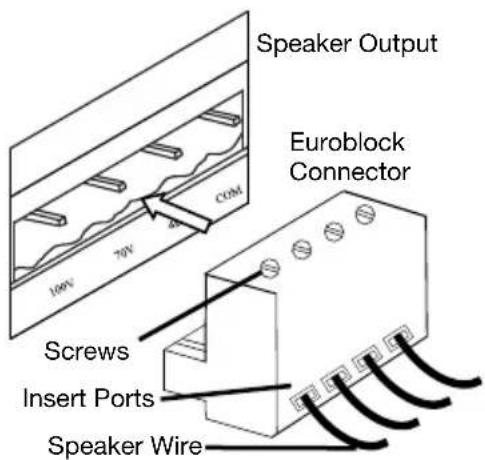
- Connect your speaker to the Speaker Output using the included Euroblock connector and speaker wire (not included). See Using the Euroblock Connector below for more details.
- Make sure that the Master knob is all the way down.
- Connect the power cable from the Power Input to a power outlet. Then power on DN-280.
- Adjust the Master knob to get a strong signal without distortion.
- Adjust the Treble and Bass knobs to further control the frequencies of the sound.
Using the Euroblock Connector:
- Use a small screwdriver to loosen the screws corresponding to the insert ports on the Euroblock connector.
- Twist the speaker wire to form a tight strand and insert this into the appropriate insert port (as indicated below the Speaker Output on DN-280). Push the wire until it is secured inside. Repeat this step for each port.
- Tighten the screws corresponding to the insert ports on the Euroblock connector.
- Insert the Euroblock connector into the Speaker Output on DN-280.
If you would like to disconnect a wire, first make sure you loosen the corresponding screw on the Euroblock connector before you pull out the wire.
Rear Panel Connection Diagram
Items not listed under Introduction > Box Contents are sold separately.

Front Panel Connection Diagram
Items not listed under Introduction > Box Contents are sold separately.
Troubleshooting
If you encounter a problem, first try one or more of the following:
• Make sure all cables and other connected devices are properly and securely connected.
• Make sure you are using DN-280 as described in this user guide.
• Make sure your other devices are working properly.
- If you believe DN-280 is not working properly, check the following table for your problem and solution.
| Problem: | Solution: |
| Power does not turn on. | Make sure DN-280's Power Input is properly connected to a power outlet using the included power cable. |
| DN-280 does not produce any sound, or the sound is distorted. | Make sure all cable and device connections are secure and correct.Make sure none of the cables are damaged.Make sure the volume settings on your loudspeaker, mixer, etc. are correct.If you are trying to produce sound through the Channel Input, make sure that no device is plugged into the Aux Input.If the Protection (PROT) LED is on, reduce DN-280's temperature by making sure there is good ventilation, and/or decreasing the volume. |
| The sound has a hum or noise. Check | the polarity of the input connections.If an unbalanced connection is used, ensure the terminal (-) is linked to GND.If the clip LED is lit, reduce the volume.Check the polarity of the speaker connections. |
Euroblock-Anschlüsse
Benutzerhandbuch
Technical Specifications
| Total Harmonic Distortion | < 0.1% (A-weighted) |
| Frequency Response | 100 Hz – 15 kHz (+0/-3 dBv) |
| Signal-to-Noise Ratio | >95 dB (A-weighted) |
| Damping Factor | >200 (1k 8 Ω) |
| Output Power | 60 W |
| Connectors | (1) Euroblock channel output(1) Dual RCA input(1) XLR / TRS 1/4” (6.35 mm) combination input(1) TRS 1/8” (3.5 mm) auxiliary input |
| Input Impedance | 20k Ω balanced or 10k Ω unbalanced |
| Input Sensitivity Dual RCA input: 0+/-1 dBvAuxiliary input: -10+/-1 dBvCombination input: -30+/-1 dBv | |
| Voltage Gain | 40+0/-1 dB (100 V) |
| Power | 100 V ~, 50/60 Hz, 100 W110–120 V ~, 50/60 Hz, 100 W220–240 V ~, 50/60 Hz, 100 W |
| Dimensions(width x depth x height) | 7.9” x 10.7” x 1.7”200 x 273 x 43 mm |
| Weight | 5.3 lbs.2.4 kg |
Specifications are subject to change without notice.
Trademarks & Licenses
Denon is a trademark of D&M Holdings Inc., registered in the U.S. and other countries. Denon Professional products are produced by inMusic Brands, Inc., Cumberland, RI 02864, USA. All other product names, company names, trademarks, or trade names are those of their respective owners.
denonpro.com

Brand : DENON
Model : DN280
Category : AV receiver