— AV receiver — Mode d'emploi PDF")
AVPA1HDCI(A) - AV receiver DENON - Free user manual and instructions
Find the device manual for free AVPA1HDCI(A) DENON in PDF.

User questions about AVPA1HDCI(A) DENON
0 question about this device. Answer the ones you know or ask your own.
Ask a new question about this device
Download the instructions for your AV receiver in PDF format for free! Find your manual AVPA1HDCI(A) - DENON and take your electronic device back in hand. On this page are published all the documents necessary for the use of your device. AVPA1HDCI(A) by DENON.
USER MANUAL AVPA1HDCI(A) DENON
The lightning flash with arrowhead symbol, within an equilateral triangle, is intended to alert the user to the presence of uninsulated "dangerous voltage" within the product's enclosure that may be of sufficient magnitude to constitute a risk of electric shock to persons.

The exclamation point within an equilateral triangle is intended to alert the user to the presence of important operating and maintenance (servicing) instructions in the literature accompanying the appliance.
WARNING:
TO REDUCE THE RISK OF FIRE OR ELECTRIC SHOCK, DO NOT EXPOSE THIS APPLIANCE TO RAIN OR MOISTURE.
SAFETY INSTRUCTIONS
- Read Instructions – All the safety and operating instructions should be read before the product is operated.
- Retain Instructions - The safety and operating instructions should be retained for future reference.
- Heed Warnings – All warnings on the product and in the operating instructions should be adhered to.
- Follow Instructions - All operating and use instructions should be followed.
- Cleaning – Unplug this product from the wall outlet before cleaning. Do not use liquid cleaners or aerosol cleaners.
- Attachments – Do not use attachments not recommended by the product manufacturer as they may cause hazards.
- Water and Moisture – Do not use this product near water – for example, near a bath tub, wash bowl, kitchen sink, or laundry tub; in a wet basement, or near a swimming pool, and the like.
- Accessories – Do not place this product on an unstable cart, stand, tripod, bracket, or table. The product may fall, causing serious injury to a child or adult, and serious damage to the product. Use only with a cart, stand, tripod, bracket, or table recommended by the manufacturer, or sold with
the product. Any mounting of the product should follow the manufacturer's instructions, and should use a mounting accessory recommended by the manufacturer.
- A product and cart combination should be moved with care. Quick stops, excessive force, and uneven surfaces may cause the product and cart combination to overturn.
- Ventilation - Stots and openings in the cabinet are provided for ventilation and to ensure reliable operation of the product and to protect it from overheating, and these openings must not be blocked or covered. The openings should never be blocked by placing the product on a bed, sofa, rug, or other similar surface. This product should not be placed in a built-in installation such as a bookcase or rack unless proper ventilation is provided or the manufacturer's instructions have been adhered to.
- Power Sources - This product should be operated only from the type of power source indicated on the marking label. If you are not sure of the type of power supply to your home, consult your product dealer or local power company. For products intended to operate from battery power, or other sources, refer to the operating instructions.
- Grounding or Polarization - This product may be equipped with a polarized alternating-current line plug for plug having one blade wider than the other. This plug will fit into the power outlet only one way. This is a safety feature. If you are unable to insert the plug fully into the outlet, try reversing the plug. If the plug should still fail to fit, contact your electrician to replace your absolute outlet. Do not defeat the safety purpose of the polarized plug.
text_image
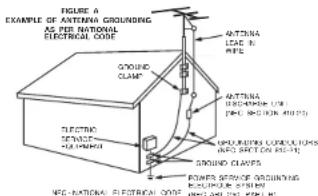
FIGURE A EXAMPLE OF ANTIFFO GEOGRAPHIC AS PER NATIONAL ELECTRICAL CODE ANTenna LINE IN PIPE GROUND CLAMPS ANTenna ELECTRIC LINE (PEL SECTION 4012) POWER SERVICE GROUNDING ELECTRIC SYSTEM FWD-NATIONAL ELECTRICAL CODE GROUND CLAMPS FWD-UNIONAL ELECTRICAL CODE
- Power-Cord Protection - Power-supply cords should be routed so that they are not likely to be walked on or pinched by items placed upon or against them, paying particular attention to cords at plugs, convenience receptacles, and the point where they exit from the product.
- Cudoor Antenna Grounding - If an outside antenna or cable system is connected to the product, be sure the antenna or cable system is grounded so as to provide some protection against voltage surges and built-up static charges. Article 810 of the National Electrical Code, ANSI/NFPA 70, provides information with regard to proper grounding of the mast and supporting structure, grounding of the lead-in wire to an antenna discharge unit, size of grounding conductors, location of antenna-discharge unit, connection to grounding electrodes, and requirements for the grounding electrode. See Figure A.
- Lightning - For added protection for this product during a lightning storm, or when it is left unattended and unused for long periods of time, unplug it from the wall outlet and disconnect the antenna or cable system. This will prevent damage to the product due to lightning and power line surges.
- Power Lines - An outside antenna system should not be located in the vicinity of overhead power lines or other electric light or power circuits, or where it can fall into such power lines or circuits. When installing an outside antenna system, extreme care should be taken to keep from touching such power lines or circuits as contact with them might be fatal.
- Overloading - Do not overload wall outlets, extension cords, or integral convenience receptacles as this can result in a risk of fire or electric shock.
- Object and Liquid Entry – Never push objects of any kind into this product through openings as they may touch dangerous voltage points or short-out parts that could result in a fire or electric shock. Never spill liquid of any kind on the product.
- Servicing – Do not attempt to service this product yourself as opening or removing covers may expose you to dangerous voltage or other hazards. Refer all servicing to qualified service personnel.
- Damage Requiring Service – Unplug this product from the wall outlet and refer servicing to qualified service personnel under the following conditions:
a) When the power-supply cord or plug is damaged,
b) If liquid has been spilled, or objects have fallen into the product, c) If the product has been exposed to rain or water.
d) If the product does not operate normally by following the operating instructions. Adjust only those controls that are covered by the operating instructions as an improper adjustment of other controls may result in damage and will often require extensive work by a qualified technician to restore the product to its normal operation,
e) If the product has been dropped or damaged in any way, and
1) When the product exhibits a distinct change in performance – this indicates a need for service.
- Replacement Parts - When replacement parts are required, be sure the service technician has used replacement parts specified by the manufacturer or have the same characteristics as the original part. Unauthorized substitutions may result in fire, electric shock, or other hazards.
- Safety Check – Upon completion of any service or repairs to this product, ask the service technician to perform safety checks to determine that the product is in proper operating condition.
- Wall or Ceiling Mounting - The product should be mounted to a wall or ceiling only as recommended by the manufacturer.
- Heat - The product should be situated away from heat sources such as radiators, heat registers, stoves, or other products (including amplifiers) that produce heat.
FCC Information (For US customers)
1. COMPLIANCE INFORMATION
Product Name: AV Surround Pre-Amplifier
Model Number: AVP-A1HDCI
This product contains FCC ID: BV2-MPGBR052.
This product complies with Part 15 of the FCC Rules. Operation is subject to the following two conditions: (1) this product may not cause harmful interference, and (2) this product must accept any interference received, including interference that may cause undesired operation.
Denon Electronics (USA), LLC
100 Corporate Drive, Mahwah, NJ 07430-2041
Tel. 201-762-8500 (Main)
2. IMPORTANT NOTICE: DO NOT MODIFY THIS PRODUCT
This product, when installed as indicated in the instructions contained in this manual, meets FCC requirements. Modification not expressly approved by DENON may void your authority, granted by the FCC, to use the product.
3. CAUTION
- To comply with FCC RF exposure compliance requirement, separation distance of at least 20 cm must be maintained between the antenna of this product and all persons.
- This product and its antenna must not be co-located or operating in conjunction with any other antenna or transmitter.
4. NOTE
This product has been tested and found to comply with the limits for a Class B digital device, pursuant to Part 15 of the FCC Rules. These limits are designed to provide reasonable protection against harmful interference in a residential installation.
This product generates, uses and can radiate radio frequency energy and, if not installed and used in accordance with the instructions, may cause harmful interference to radio communications. However, there is no guarantee that interference will not occur in a particular installation. If this product does cause harmful interference to radio or television reception, which can be determined by turning the product OFF and CN, the user is encouraged to try to correct the interference by one or more of the following measures:
- Recipient or relocate the receiving antenna.
- Increase the separation between the equipment and receiver.
- Connect the product into an outlet on a circuit different from that to which the receiver is connected.
- Consult the local retailer authorized to distribute this type of product or an experienced radio/TV technician for help.
IC Information (For Canadian customers)
1. PRODUCT
This product contains IC 6963A-MPGBR052.
This product complies with RSS-210 of Industry Canada. Operation is subject to the following two conditions: (1) this product may not cause harmful interference, and (2) this product must accept any interference received, including interference that may cause undesired operation.
This Class B digital apparatus complies with Canadian ICES-003.
APPAREIL
To reduce potential radio interference to other users, the antenna type and its gain should be so chosen that the equivalent isotropically radiated power (e.i.r.p.) is not more than that permitted for successful communication.
ATTENTION
3 Option Hix bus 34 1 Mode surround automotive 24
- Mode surroond auto-natique : 100000000000000000000000000000000000000000000000000000000000000
- ÉQ manuel : 24
text_image
Labeled diagram of a device rear panel with numbered ports and component labels such as capacitors, relays, and switches.① Touche DIRECT/STEREO....(51)
② Prise de casque audio (PHONES)....(58, 73)
③ Touche CINEMA (50)
④ Touche RESTORER....(55)
⑤ Touche MUSIC....(50)
⑥ Touche NIGHT .....(55)
⑦ Touche MENU ……(24)
⑧ Touche CH SEL / ENTER......(24, 75)
⑨ Touche RETURN....(24)
⑩ Bornes V.AUX INPUT....(18)
⑪ Touche ROOM EQ....(55)
⑫ Prise SETUP MIC (26)
⑬ Touche DYNAMIC EQ ……(55)
14 Touche STATUS....(57)
⑮ Touche DIMMER....(43)
⑯ Touche SCALE....(47)
⑰ Port USB ......(19)
⑱ Touche ZONE4 ON/OFF....(87)
⑲ Touche ZONE3 ON/OFF....(87)
⑳ Touche ZONE2 ON/OFF....(87)
②1 Touche AUDIO DELAY....(56)
② Touches curseurs (△▽◀▷) ……(24)
②3 Touche GAME....(50)
⑳ Touche INPUT MODE....(4.7)
25 Touche 7CH STEREO .....(51)
26 Touche DSP SIMULATION .....(51)
⑳ Touche HOME THX CINEMA....(50)
28 Touche STANDARD .....(51)
29 Touche PURE DIRECT .....(52)
Affichage
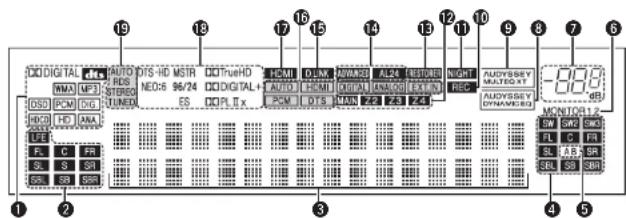
text_image
DC DIGITAL MAX MP3 DTS HD MSTR NE0:5 96/24 DC DIGITAL+ DC DTS DC TrueHD DC DTS HD DC DTS HD DC DTS HD DC DTS HD DC DTS HD DC DTS HD DC DTS HD DC DTS HD DC DTS HD DC DTS HD DC DTS HD DC DTS HD DC DTS HD DC DTS HD DC DTS HD DC DTS HD DC DTS HD DC DTS HD DC DTS HD DC DTS HD DC DTS H DC DTS H DC DTS H DC DTS H DC DTS H DC DTS H DC DTS H DC DTS H DC DTS H DC DTS H DC DTS H DC DTS H DC DTS H DC DTS H DC DTS H DC DTS H DC DTS H DC DTS H DC DTS H DC DTS H DC DTS I X DC DTS I X DC DTS I X DC DTS I X DC DTS I X DC DTS I X DC DTS I X DC DTS I X DC DTS I X DC DTS I X DC DTS I X DC DTS I X DC DTS I X DC DTS I X DC DTS I X DC DTS I X DC DTS I X DC DTCI 1.2 FL 2 FL 3 FL 4 FL 5 FL 6 FL 7 FL 8 FL 9 FL 10 11 12 13 14 15 16 17 18 19 20 21 22 23 24 25 26 27 28 29 30 31 32 33 34 35 36 37 38 39 40 41 42 43 44 45 46 47 48 49 50 51 52 53 54 55 56 57 58 59 60 61 62 63 64 65 66 67 68 69 70 71 72 73 74 75 76 77 78 79 80 81 82 83 84 85 86 87 88 89 90 91 92 93 94 95 96 97 98 99 100 -0.0000000000000000000000000000000000000000000000000000000000000000000000000000000000000000000000000000text_image
Labeled diagram of an electronic device rack with numbered components and ports① Borne CONTROL LINK ......[1]
② Borne RS-232C....(23)
③ Bornes audio analogiques (AUDIO) ……(14)
4 Bornes RCA PRE OUT (11, 22)
⑤ Bornes EXT. IN ……(18)
⑥ Prise CA (AC IN)....(23)
⑦ Sorties CA (AC OUTLETS) ……(23)
⑧ Bornes XLR PRE OUT....(11)
⑨ Bornes d'antenne HD Radio
(DTU ANTENNA) (20)
10 Bornes COMPONENT VIDEO ......(13, 22)
⑪ Bornes audio numériques
(OPTICAL / COAXIAL / BNC)....13, 22
⑫ Bornes HDMI....(12)
⑬ Borne ETHERNET (21)
14 Port USB (19)
⑮ Borne XM (SATTU) ......(19)
16 Borne WLAN ANTENNA ......(21)
⑰ Bornes d'antennes FM/AM
(TUNER ANTENNA) ......(20)
18 Borne DENON LINK....(18)
19 Prises TRIGGER OUT ......(23)
20 Prises REMOTE CONTROL .....(22)
21 Bornes XLR audio (CD) ......(14)
22 Prise DOCK CONTROL (14)
23 Borne SIGNAL GND ......(14)
24 Bornes VIDEO / S-VIDEO....(13)
Télécommande
text_image
1 2 3 4 5 6 7 8 9 10 DENON NC. 1079 M D B C D E F G H I J K L M N O P Q R S T U V W X Y Z A B C D E F G H I J K L M N O P Q R S T U V W X Y Z A B C D E F G H I J K L M N O P Q R S T U V W X I J K L M N O P Q R S T U V W X I J K① Témoins ZONE .....(85)
② Touche de configuration avancée .....[85]
③ Touches de sélection de la source d'entrée .....(15)
4 Touches CHANNEL ......(65, 84)
⑤ Touche SHIFT .....(59)
⑥ Touche MENU ……(24)
⑦ Touches curseurs (△▽◀ ▷)……(24)
⑧ Touche SEARCH ……(60, 62, 65)
⑨ Touche REPEAT (65)
⑩ Touche RANDOM 165
⑪ Emetteur infrarouge de télécommande .....(4)
⑫ Touche ZONE SELECT (85)
13 Touches de mise en marche/extinction de zone (ZONE ON / ZONE OFF)....(87)
14 Touches de contrôle du volume principal (VOLUME) ..... (58)
⑮ Touche de mise en sourdine (MUTE) ……(58, 87)
16 Touche ENTER (24)
⑰ Touche RETURN (24)
18 Touches système ..... (59, 83, 84)
⑲ Touche ALL MUSIC/FAVORITES (DIRECT PLAY) ...... (83)
20 Touche USB (DIRECT PLAY)....(83)
REMARQUE
- Deep Color 30 at 36 bits
• xvYCC - Correction Auto Lipsync
| Format audio compatible | Détails | Disques (exemples) |
| PCM linéaire 2 canaux | 7canaux 32-192 kHz16/20/24 bits | CD, DVD-Video,DVD-Audio |
| PCM linéaire multi canaux | 9canaux 32-192 kHz16/20/24 bits | DVD-Audio |
| Dolby Digital, DTS Flux | DVD-Video | |
| DSD | 2/5.1 canaux2,8224 MHz1 bit | SACD |
| Dolby Digital Plus,Dolby TrueHD,DTS-HD | Flux | HD DVD,Blu-ray Disc |
TV IN → Cable video : DVR-1 OUT → Cable video
text_image
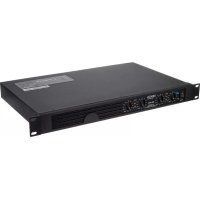
Diagram of an electronic device rear panel with labeled ports and connectors, showing internal components and connections.
text_image
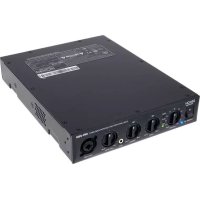
Technical diagram of an industrial control panel with labeled buttons, dials, and portsBorne RS-232C
text_image
Scanned image of an electronic device control panel with labeled buttons, ports, and connectorstext_image
Diagram showing directional arrows and symbols with a label 'Lorsq' at the bottom
[Non-Text]
The Ground Truth image displays a single, solid horizontal line. According to Rule 2 (UNDERSCORE & LINE RULES), this is a stylistic or background line, not a placeholder underscore. Therefore, the OCR result must ignore it and output nothing or only meaningful text. The provided OCR content is "____", which consists of four underscores. This is an incorrect interpretation of the line as a placeholder, violating the rule that stylistic lines must be ignored. The OCR has hallucinated placeholder underscores where none should exist in the GT. Hence, the OCR result is inconsistent with the Ground Truth.
[EMPTY]
广力云智慧零售收银系统
[Non-Text]
Options
[Non-Text]
[Non-Text]
广力云智慧零售收银系统
[EMPTY]
natural_image
Simple diagram with a central icon and surrounding stars and sound waves (no text or symbols)CLASS A: 10.0.0.0 - 10.255.255.255
CLASS B: 172.16.0.0 - 172.31.255.255
CLASS C: 192.168.0.0 \~ 192.168.255.255
Masq. sous-rés.
| Attribution pré-sortie\Pré-sortie | FL | FR | C | SL (A) | SR (A) | SL (B) | SR (B) | SBL | SBR | SW1 | SW2 | SW3 |
| Normal | FL | FR | C | SL (A) | SR (A) | SL (B) | SR (B) | SBL | SBR | SW1 | SW2 | SW3 |
| Attribution libre | FL | FL | FL | FL | FL | FL | FL | FL | FL | FL | FL | FL |
| FR | FR | FR | FR | FR | FR | FR | FR | FR | FR | FR | FR | |
| C | C | C | C | C | C | C | C | C | C | C | C | |
| SL (A) | SL (A) | SL (A) | SL (A) | SL (A) | SL (A) | SL (A) | SL (A) | SL (A) | SL (A) | SL (A) | SL (A) | |
| SR (A) | SR (A) | SR (A) | SR (A) | SR (A) | SR (A) | SR (A) | SR (A) | SR (A) | SR (A) | SR (A) | SR (A) | |
| SL (B) | SL (B) | SL (B) | SL (B) | SL (B) | SL (B) | SL (B) | SL (B) | SL (B) | SL (B) | SL (B) | SL (B) | |
| SR (B) | SR (B) | SR (B) | SR (B) | SR (B) | SR (B) | SR (B) | SR (B) | SR (B) | SR (B) | SR (B) | SR (B) | |
| SBL | SBL | SBL | SBL | SBL | SBL | SBL | SBL | SBL | SBL | SBL | SBL | |
| SBR | SBR | SBR | SBR | SBR | SBR | SBR | SBR | SBR | SBR | SBR | SBR | |
| SW1 | SW1 | SW1 | SW1 | SW1 | SW1 | SW1 | SW1 | SW1 | SW1 | SW1 | SW1 | |
| SW2 | SW2 | SW2 | SW2 | SW2 | SW2 | SW2 | SW2 | SW2 | SW2 | SW2 | SW2 | |
| SW3 | SW3 | SW3 | SW3 | SW3 | SW3 | SW3 | SW3 | SW3 | SW3 | SW3 | SW3 |

m = 311

①MASSE
XLR (INV)

①MASSE
②CHAUD
③FROID
[Non-Text]
②FROID
③CHAUD
CD | DVD | HDP | TV/CBL | SAT | VCR | DVR-1 | DVR-2 | V.AUX
PLIIx CINEMA PLII CINEMA Pro Logic NEO:6 CINEMA
Lecture de sources multi-canaux (Dolby Digital, DTS, etc.)
Ce mode convient aux sources audio.

Game
PLIIx CINEMA PLII CINEMA Pro Logic NEO:6 CINEMA
En mode DOLBY HEADPHONE
- Sources Dolby Digital: "0 dB"
• Films DTS: "0 dB"
- Sources audio DTS: “-10 dB”
Centrer image
text_image
SOURCE SELECT MASTER/BLUME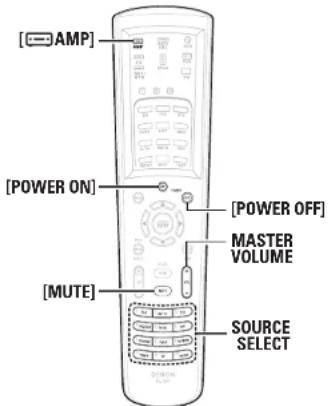
text_image
[AMP] [POWER ON] [MUTE] [POWER OFF] MASTER VOLUME SOURCE SELECTtext_image
[TU] (Mode DEV1) [BAND] [A ~ G] [▲▼] [MEMO] (MODE) [SEARCH] [CHANNEL] [1 ~ 8] [TUNER], (Mode AMP) [SHIFT]text_image
[TU] (Mode DEV1) [SEARCH] [CHANNEL] [TUNER] [▲▼] ENTER △▼◀◀ [SEARCH] [SAT TU] (Mode AMP) [NUMBER]text_image
[NET/DTU] [Mode DEV2] [▲▼] [MODE] [BAND] △▼ [SEARCH] [DTU] [Mode AMP] [iPod] [POWER OFF] [iPod] [Mode AMP]text_image
[AMP] INPUT MODE Mode surround SOURCE SELECTtext_image
[AMP] [Témoin de transmission de signal] [MODE SELECTOR] [HOME] [NUMBER] [RC SETUP]
text_image
Affichage [MODE SELECTOR] [▶], [◀◀▶▶▶-1], [◀◀▶▶▶-1], [■■], [SOURCE ON], [SOURCE OFF] [MENU] [ENTER] [△▽◀▶] [SETUP] [DISPLAY] [CH +/-] [TV/VCR] [0 ~ 9, +10] Touches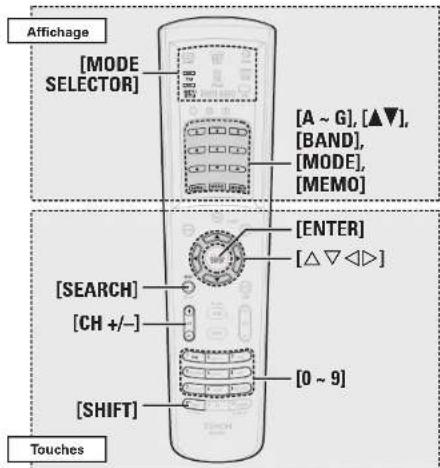
text_image
Affichage [MODE SELECTOR] [A ~ G], [▲▼], [BAND], [MODE], [MEMO] [SEARCH] [CH +/-] [SHIFT] [ENTER] [△▽ ◀◀] [0 ~ 9] Touchesnatural_image
Line drawing of a CD-ROM device with front and back buttons (no text or symbols)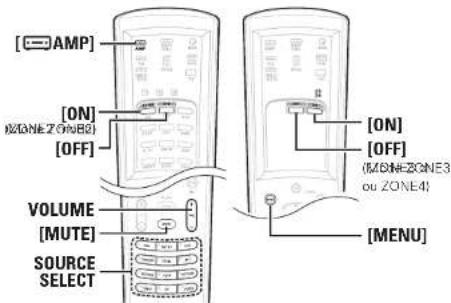
text_image
[AMP] [ON] (ONE Z (ONB2)) [OFF] VOLUME [MUTE] SOURCE SELECT [ON] [OFF] (MONE-ZONE3 ou ZONE4) [MENU]DTS Digital Surround
Home THX Cinema Surround
Re-EQ™ (Re-Equalization)
Adaptive Decorrelation™
ASA (Advanced Speaker Array)
AUDYSSEY MULTEQ XT DYNAMIC EQ
Advanced AL24 Processing Multi channel
(High-Definition Multimedia Interface)
Communications Ad hoc
WPA (Wi-Fi Protected Access)
WPA2 (Wi-Fi Protected Access 2)
WPA-PSK/WPA2-PSK (Pre-Shared Key)
AES (Advanced Encryption Standard)
Section HD Radio [FM] [AM]
(remarque: V is 75 ohms, 0dB^2 = 1× 10