Druckluft Mobilo - Compressor Prebena - Free user manual and instructions
Find the device manual for free Druckluft Mobilo Prebena in PDF.
User questions about Druckluft Mobilo Prebena
0 question about this device. Answer the ones you know or ask your own.
Ask a new question about this device
Download the instructions for your Compressor in PDF format for free! Find your manual Druckluft Mobilo - Prebena and take your electronic device back in hand. On this page are published all the documents necessary for the use of your device. Druckluft Mobilo by Prebena.
USER MANUAL Druckluft Mobilo Prebena
These operating instructions will help you with the
proper use as intended,
- safe and
- beneficial
use of the portable PNEUMATIC mobilo pressure equipment, referred to in brief as the pressure equipment.
We assume that every person using this pressure equipment has knowledge of how to handle pneumatic equipment and the applied materials. People who do not have this knowledge must be instructed by an experienced user about how to use the pressure equipment.
Every person
using,
- cleaning or
- disposing of his pressure equipment
must read and understand these operating instructions.
These operating instructions are considered a part of the product. Always keep them with the pressure equipment. Pass on the operating instructions if you sell the pressure equipment or hand it on in any other manner.
Table of contents
Layout characteristics. 5
General layout characteristics 5
Safety instruction attributes 6
Basic safety instructions 7
Proper, intended use 7
Avoid the risk of fatal injuries 8
Avoid explosion hazards 8
Avoid risk of injury 8
Avoid damage to the pressure equipment 8
Description 9
Equipment overview and scope of supply 9
Function 11
Product features 11
Side and direction specifications 11
Accessories 12
Information on the rating plate 12
Preparing the pressure equipment 13
Unpacking the pressure equipment 13
Check condition 14
Connecting pressure equipment to the compressed air supply . 15
Using the pressure equipment 19
After use 23
Disconnect the compressed air supply 23
Transporting and storing the pressure equipment 25
Packing 25
Storage 26
Servicing the pressure equipment 27
Oiling the pressure equipment 28
Filling the compressed air cartridge 29
Testing the compressed air cartridge 29
Repairing faults 30
Ordering accessories 32
Reordering compressed air cartridges 32
Ordering other accessories 32
Disposing the pressure equipment 33
Technical data 34
PNEUMATIC mobilo pressure equipment 34
Compressed air cartridge KT-3500 34
Manufacturer's address 35
Guarantee 36
Index 37
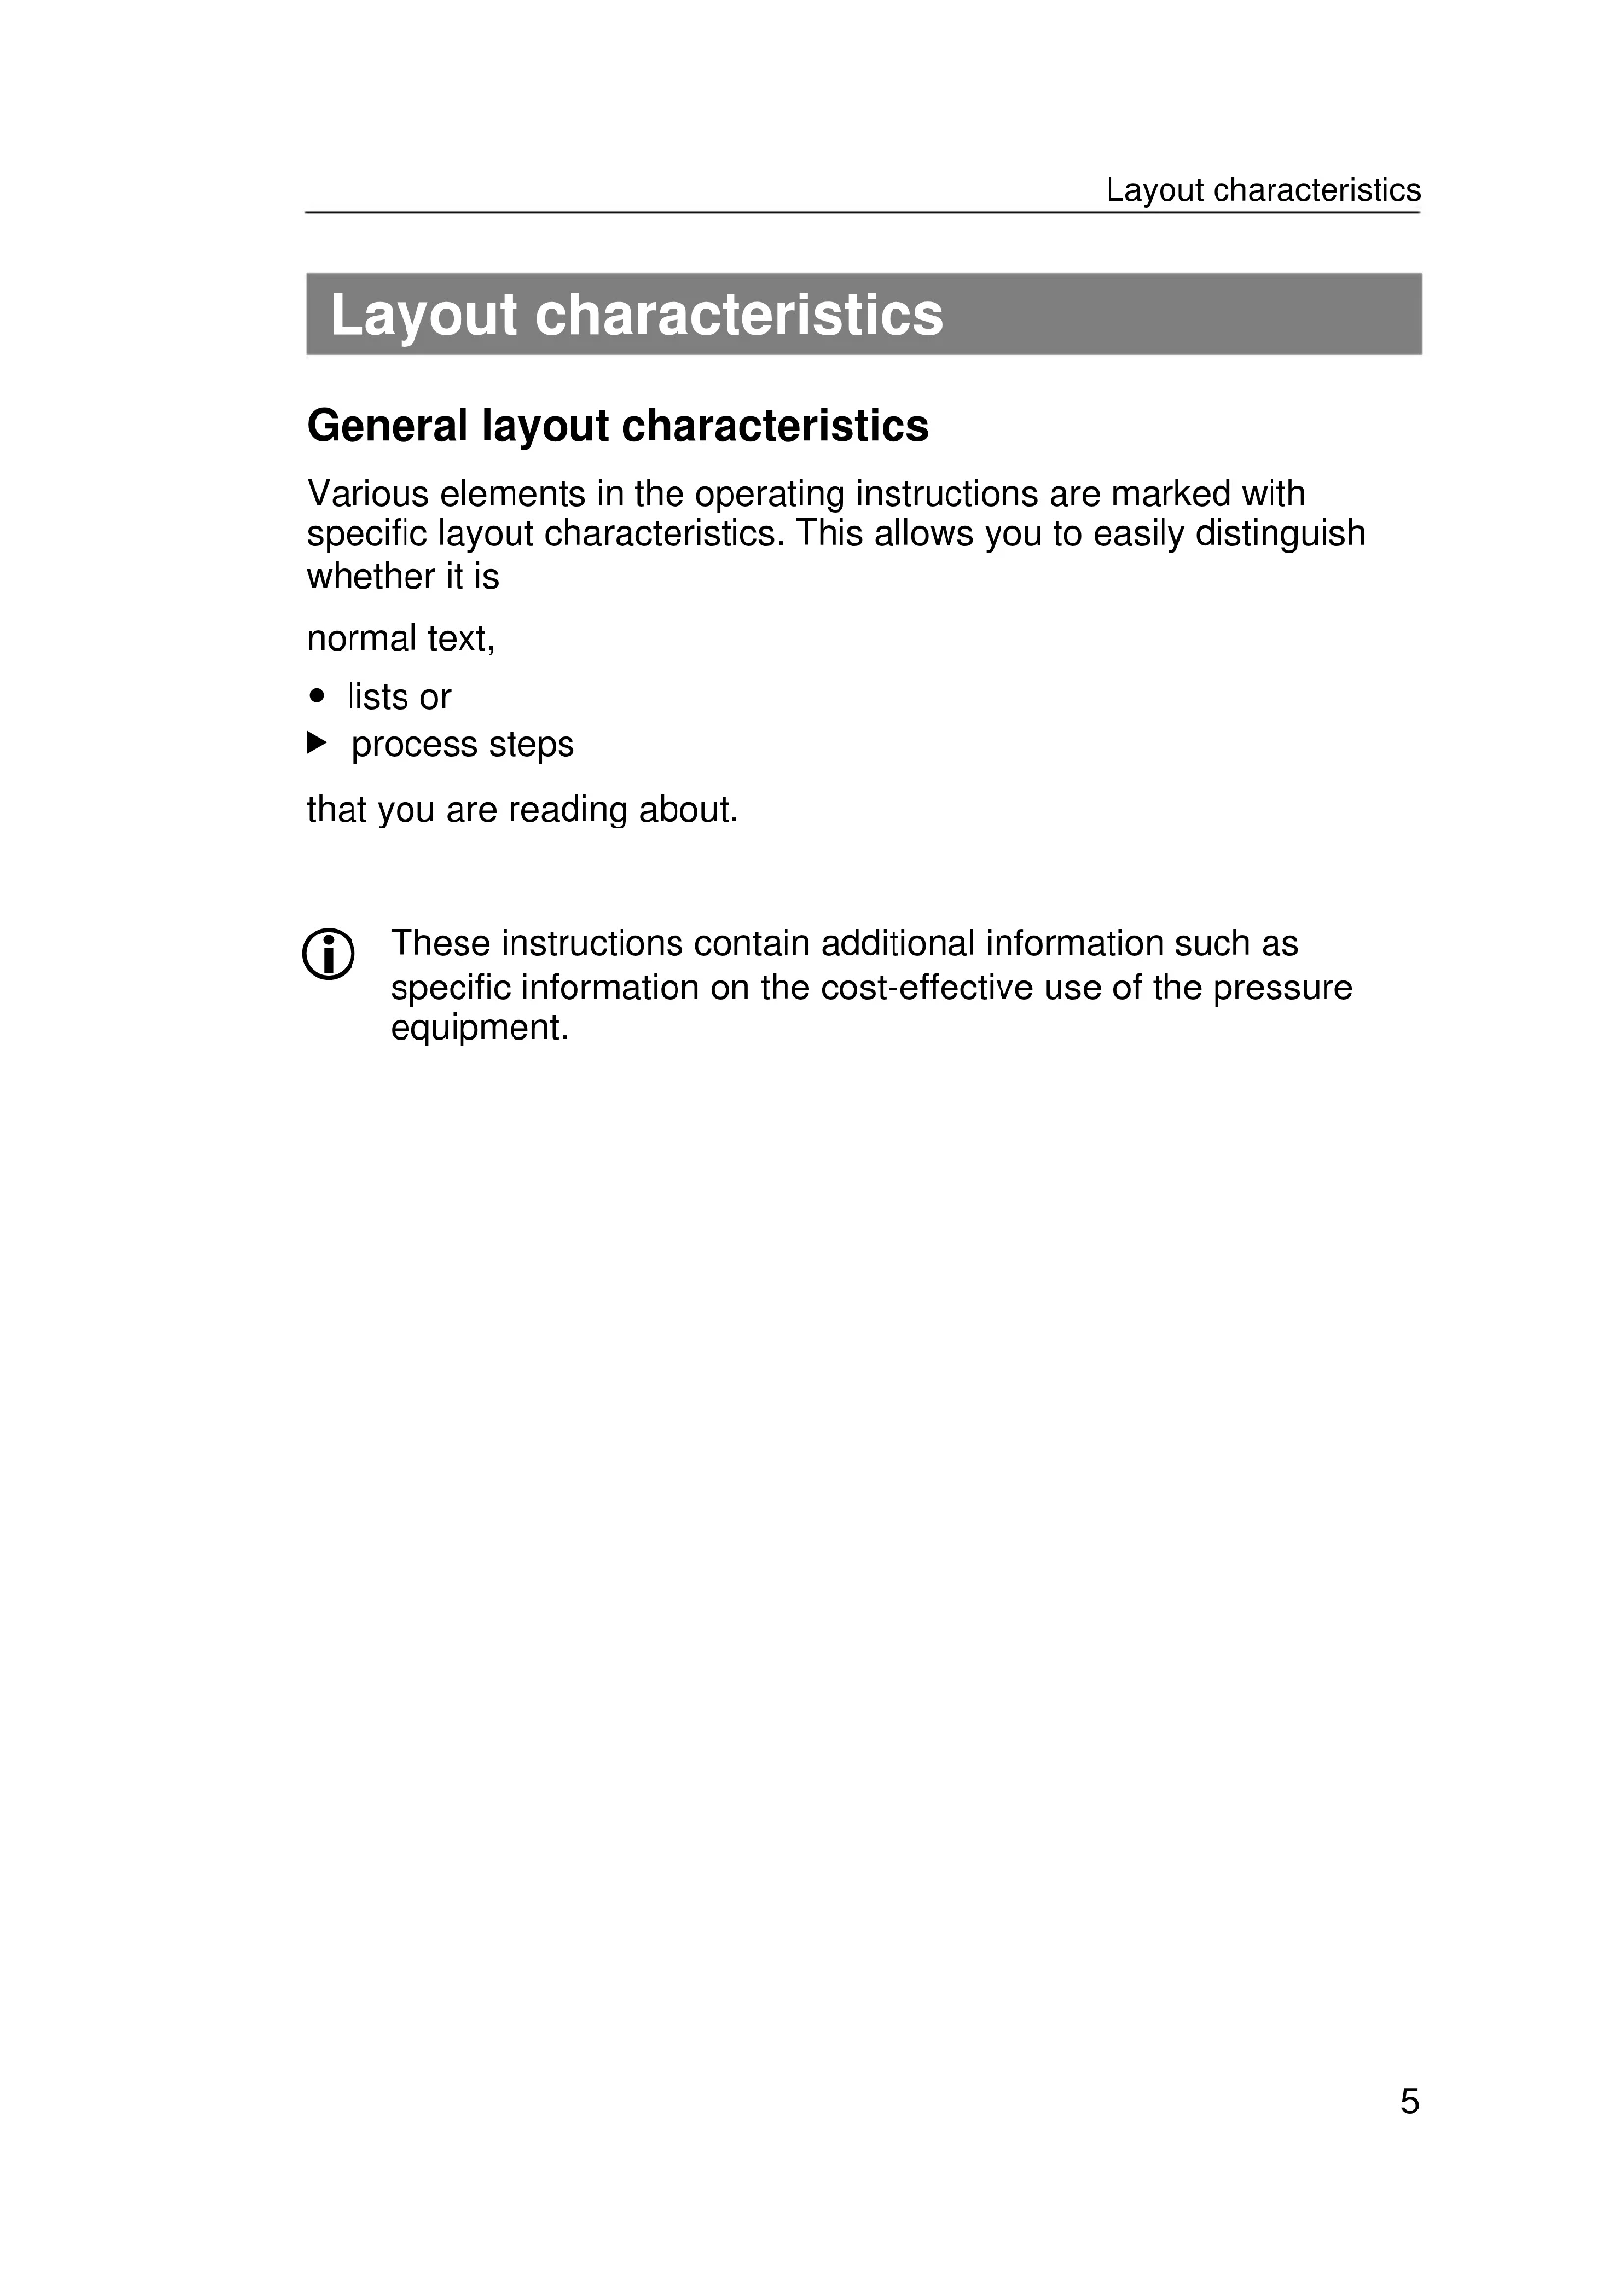
Layout characteristics
General layout characteristics
Various elements in the operating instructions are marked with specific layout characteristics. This allows you to easily distinguish whether it is
normal text,
- lists or
process steps
that you are reading about.
These instructions contain additional information such as specific information on the cost-effective use of the pressure equipment.
Safety instruction attributes
All safety instructions in these operating instructions are based on the same pattern. On the left you will find a symbol indicating the type of danger. To the right of that you will see a signal word which identifies the severity of the danger. Under that you will find a description of the source of danger and instructions on how to avoid this danger.


DANGER
Warnings with the word DANGER indicate hazards with an immediate impending risk of serious or even fatal injuries.


WARNING
Warnings with the word WARNING warn of hazards that can lead to potentially serious or even fatal injuries.


CAUTION
Warnings with the word CAUTION warn of hazards that can lead to potentially slight to moderate injuries, property or environmental damage.
Basic safety instructions
Observe and follow all the warnings and instructions in these operating instructions and those on the pressure equipment when using the pressure equipment. The spare parts list supplied with the tool forms an integral part of this operating manual.
Proper, intended use
The pressure equipment is used for portable accumulation and reduction of the stored pressure at a low operating pressure for supplying the tapping points. The pressure equipment is intended for do-it-yourselfers and craftsmen who need compressed air for various purposes. Proper intended use also includes compliance with the accident prevent regulations and the statutory regulations and standards in force at the place of use. Use in any other way is not considered proper intended use and can result in material damage or even personal injury.
Unauthorised use constitutes in particular operation
- by persons without the necessary knowledge in the use of pressure equipment and the materials used,
- of pressure equipment modified without the authorisation of the manufacturer.
- with accessories other than those stipulated in these operating instructions.
- connected to compressed air sources not listed in these operating instructions,
PREBENA WILFRIED BORNEMANN GMBH & CO. KG accepts no liability for any damage or injuries resulting from any such improper or unintended use.
Avoid the risk of fatal injuries
- Do not allow children to play with packaging films - risk of suffocation.
Avoid explosion hazards
- Do not use the pressure equipment in areas with an explosion hazard.
- Never operate the pressure equipment with oxygen or other explosive gases or gas mixtures.
- Do not expose the compressed air cartridge to temperatures over 100^ .
Avoid risk of injury
- Store the pressure equipment out of the reach of children and other unauthorised persons.
- Always disconnect the pressure equipment from the compressed air cartridge before transporting.
Avoid damage to the pressure equipment
- Never open the pressure equipment. Always leave repairs to qualified specialists.
- Do not use the pressure equipment if it has been dropped or is damaged. Have it inspected by qualified specialists before putting it into use again.
Description
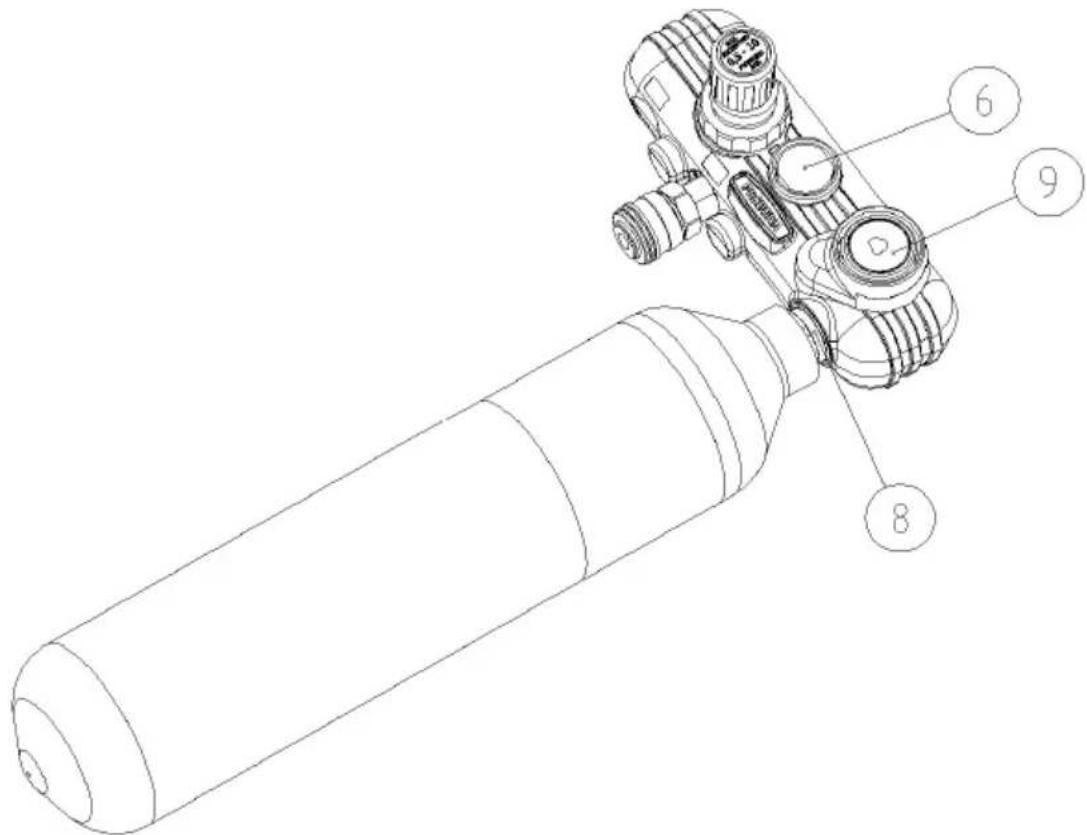
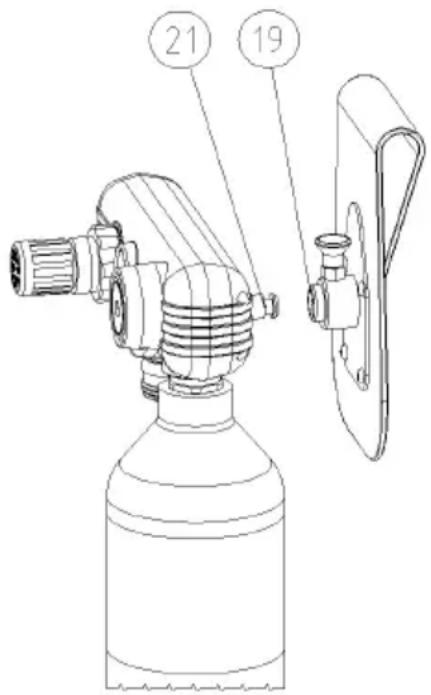
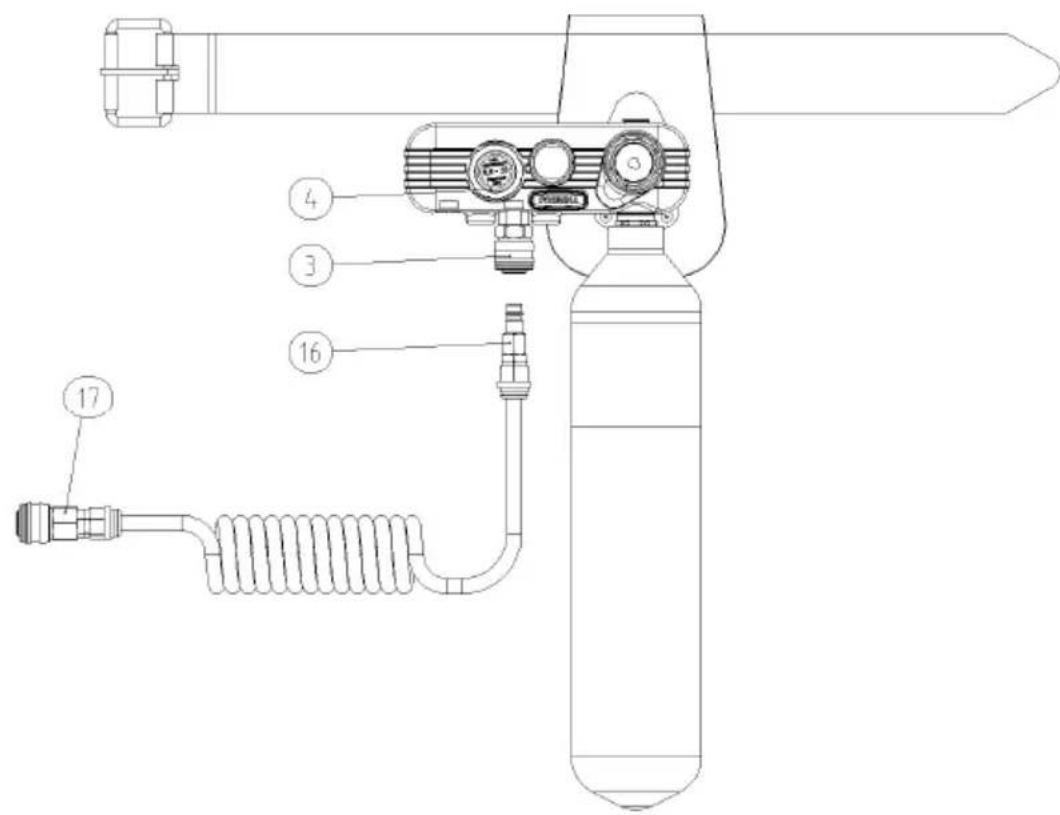
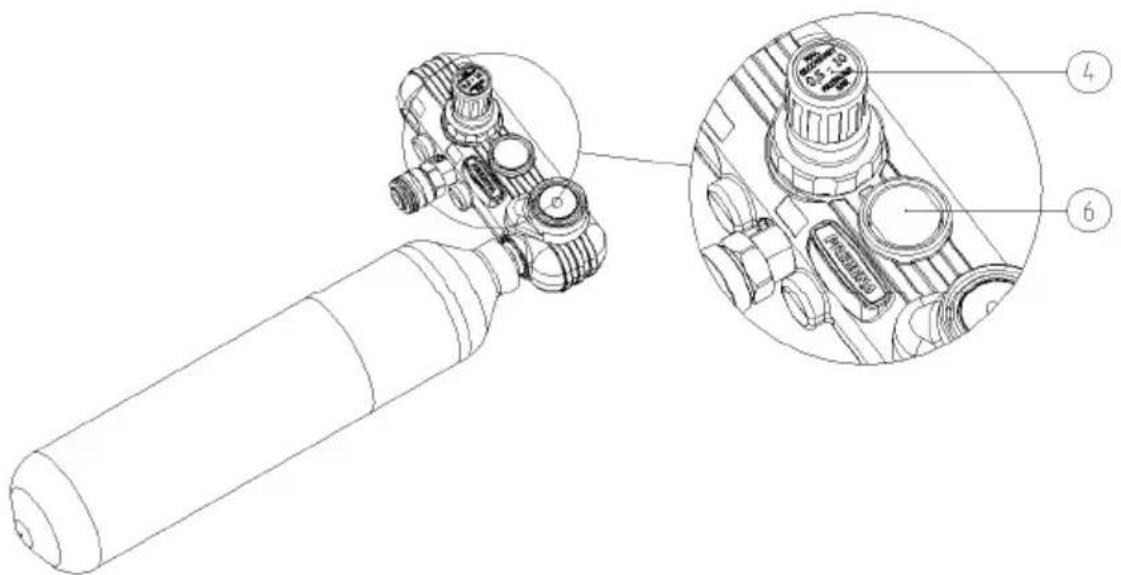
Equipment overview and scope of supply
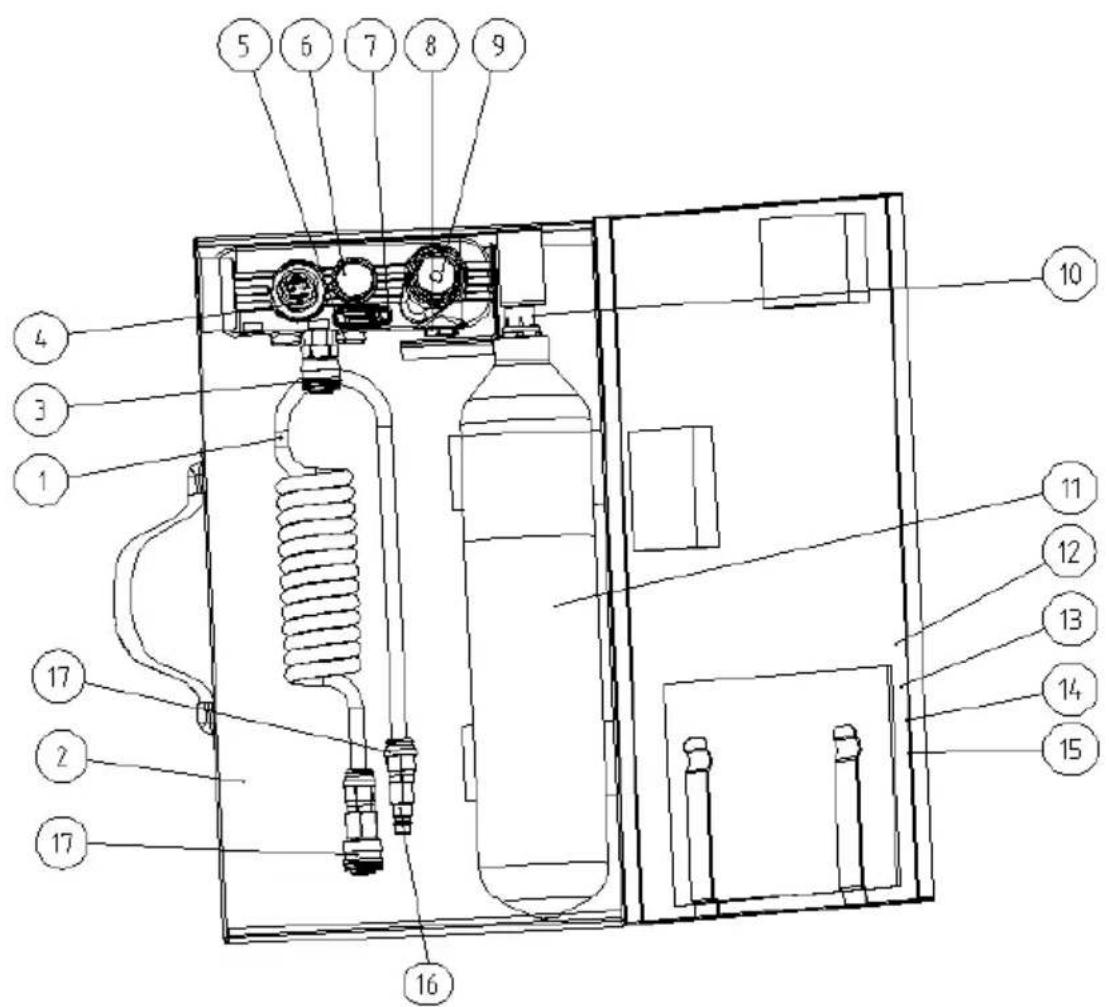
| No. | Explanation |
| 1 | Compressed air cartridge for port to the tapping points (NW 7,2) |
| 2 | Metal transport case |
| 3 | Tapping point (NW 7,2) |
| 4 | Control for the operating pressure |
| 5 | Safety valve for the operating pressure with firing at 11 bar |
| 6 | Manometer (pressure gauge) for the operating pressure |
| 7 | Safety valve compressed air cartridge with firing at 21 bar |
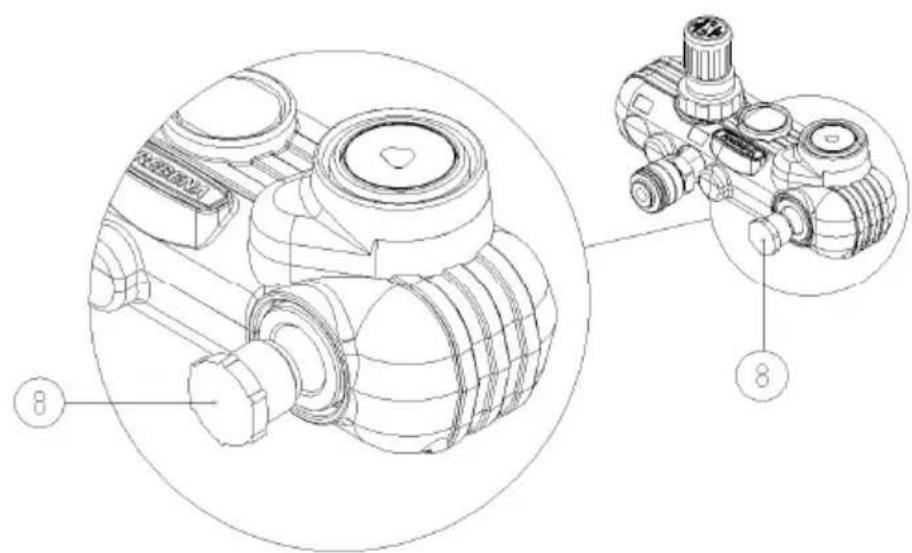
| 8 | Port for the compressed air cartridge with stoppers |
| 9 | Pressure gauge for the pressure of the compressed air cartridge (filling level indicator) |
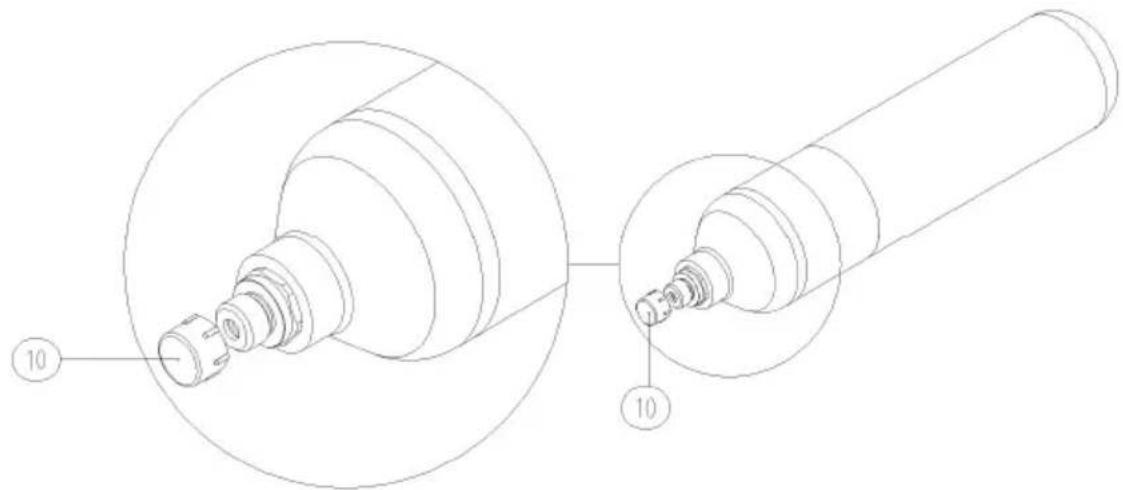
| 10 | Compressed air cartridge valve with seal cap |
| 11 | Compressed air cartridge KT-3500 |
| 12 | Operating instructions for the PNEUMATIC mobilo |
| 13 | Operating instructions for the KT-3500 cartridge |
| 14 | Declaration of conformity, PNEUMATIC mobilo |
| 15 | Declaration of conformity, KT-3500 |
| 16 | Connecting the compressed air hose |
| 17 | Quick coupler of the compressed air hose |
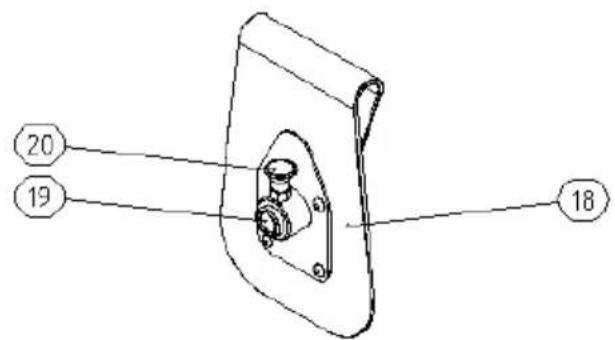
| 18 | Controller mount |
| 19 | Quick coupler of the controller mount |
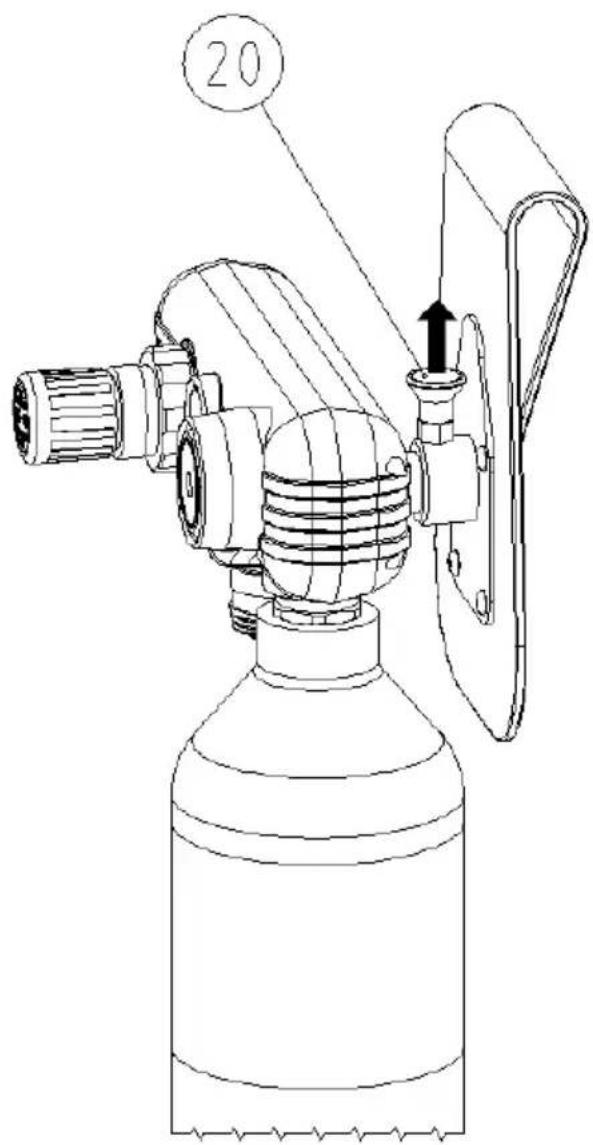
| 20 | Stop bolt |
| - | Controller connection bolt (no picture) |
| - | Belly-band (no picture) |
Function
The pressure equipment reduces the stored pressure to a low operating pressure for supplying the tapping point. The KT-3500 compressed air cartridge is used as the pressure source. Excess pressure is bled off through the pressure relief valve.
You can set the operating pressure by controlling the discharge pressure.
Product features
The pressure equipment has the following features:
Operation carrier bag (on body),
Side and direction specifications
The direction specification for the operating pressure controller refers to looking at the top of the pressure gauge for the discharge pressure.
Accessories
The following accessories are available for the pressure equipment:
- Compressed air cartridge KT-3500
- Compressor for compressed air cartridge PKT-FILLMASTER 350 (not included in scope of supply),
- Compressed-air hose with 9mm interior diameter and 4m working length (not included in scope of supply),
- Compressed air hose set (not included in scope of supply)
- Hose reel (not included in scope of supply)
Information on the rating plate
The rating plate is glued to the rear of the pressure controller. It contains the following information:
- Company name and country of origin
- Type designation of the pressure equipment
- The maximum admissible working pressure
- The CE symbol (the product conforms to the standards listed in the included Declaration of Conformity)
- Serial number
- Discharge output
Preparing the pressure equipment
Unpacking the pressure equipment
Remove the pressure equipment from the packaging.
- Remove all packaging materials, such as plastic films, filler material and the cardboard box.


WARNING
Do not allow children to play with plastic packaging films. Risk of suffocation!
Do not allow children to play with plastic packaging films.
- Keep packing materials out of the reach of children.
- Save the packaging material for later use.
Check condition


WARNING
There is a risk of injury when using damaged pressure equipment and if the accessories are not correctly fastened.
- Check the condition of the pressure equipment before each use.
Use pressure equipment in perfect condition only.
Check the following points in particular:
- The hoses lines must be undamaged.
- The fitting and the connecting thread for the compressed air cartridge for foreign matter and soiling.
- All parts of the pressure equipment and all accessories must be securely attached.
- The safety devices must not be blocked or otherwise impaired in their function.
- No parts of the pressure equipment or the accessories may show visible signs of damage, such as scratches or dents.
iScratches on the housing shells are not damage.
- Do not connect damaged pressure equipment to a compressed air supply.
- Have damaged pressure equipment repaired by qualified specialists before putting it into operation.
Connecting pressure equipment to the compressed air supply
The pressure equipment is connected to a compressed air cartridge (included in the scope of delivery).
The admissible working pressure of the pressure equipment is 10 bar. If the admissible operating pressure is exceeded, the dial on the pressure gauge (6.) for the operating pressure moves into the red range.
This can occur under the following conditions:
If both safety valves are defective and
- you have connected the pressure equipment to an unsuitable compressed air cartridge.

WARNING
Risk of explosion if the maximum operating pressure is exceeded.
If this happens, immediately disconnect the compressed air supply from the pressure equipment.
Attach compressed air cartridge
- Screw the stoppers (8.) out of the connecting threads for the compressed-air cartridge.
Screw the seal cap (10.) off the compressed-air cartridge.
- Check the fitting and the connecting thread for the compressed air cartridge for foreign matter and soiling.
Clean the fitting and connecting thread, if necessary.
Check the condition of the pressure equipment (see page 14).

WARNING
Operating with unsuitable compressed air cartridges can cause damage on the pressure equipment.
Operate the pressure equipment only with type KT-3500 compressed air cartridges.
Screw the compressed air cartridge hand-tight into the thread of fitting (8).
The pressure gauge (9.) on the fitting for the compressed air cartridge now shows the pressure currently prevailing in the cartridge. The pressure equipment is ready for operation when the pointer of the pressure gauge (9.) is in the green part of the scale.
The pressure gauge (6.) for the operating pressure displays the current operating pressure.
If you use an unsuitable compressed air cartridge and if both safety valves are defective, the pressure in this cartridge can exceed the maximum admissible operating pressure of the pressure equipment. In this case the pointer of the pressure gauge (6.) indicates an operating pressure of more than 10 bar.

WARNING Risk of explosion if the maximum operating pressure is exceeded.
- Immediately disconnect the compressed air cartridge from the pressure equipment.
When the pointer of the pressure gauge (9.) on the fitting for the compressed air cartridge is in the red zone of the scale, the pressure in the compressed air cartridge is no longer sufficient to operate the pressure equipment.
In this case replace the compressed air cartridge with a full compressed air cartridge.
You can refill the compressed air cartridge using the PKT-FILLMASTER 350 compressor, which is available as an accessory. You can also purchase a full compressed air cartridge in exchange for an empty cartridge from your dealer.
Using the pressure equipment
You can operate the pressure equipment in the carrier bag directly on your body. That facilitates efficient and effective operation of pressure equipment independent of a stationary source of compressed air.
Operation with the controller mount
To transport the pressure equipment over long distances, proceed as follows:
- Place the transport case in a horizontal position with the lid facing upwards. Open the transport case and the latch for the lid.
- Take out the belly band with the controller mount and adjust the belly band so that it fits well.
- Remove the pressure equipment and the compressed air cartridge.
- Connect the compressed air supply to the pressure equipment as described on page 16.
- Push the controller's connection bolt (21) onto the quick coupler of the controller mount (19) until it engages audibly.
- Push the fitting of the compressed air hose (16.) onto the quick coupler of the pressure equipment tapping point (3.) until it engages audibly.
- Set the desired operating pressure for the operating pressure (4.) on the controller (see page 21).
You can now run various compressed air tools on the compressed air hose (17.) quick coupler.

Please carefully read the manual of the involved accessory for technical attributes and the instructions for correct use.
Controlling operating pressure
You can control the operating pressure on the operating pressure controller (4.).
i Set the operating pressure such that the operating pressure desired for the application is just obtained. This offers the following advantages:
- You save energy (compressed air),
- You reduce the noise level, and
- You reduce the wear on the accessory unit.
To adjust the operating pressure, proceed as follows:
- Hold the pressure equipment so that you can easily read the pressure gauge (6.) for the operating pressure.
- Pull the operating pressure controller (4) up and away from the pressure gauge.
- Turn the operating pressure controller until the pressure gauge dial (6.) stands at about 5 bar:
The average operating pressure is now set.
Adjust the desired operating pressure as below:
To increase the operating pressure, turn the operating pressure controller (4.) clockwise.
To decrease the operating pressure, turn the operating pressure controller (4.) anticlockwise.
A quarter turn of the operating pressure controller changes the operating pressure by roughly 0.5 bar.
- While doing so, observe the indicator on the pressure gauge for the operating pressure (6).
- Push the operating pressure controller (4.) towards the pressure gauge.
- Check the operating pressure controller in the corresponding accessory manual.
Repeat these steps until the desired operating pressure is set.
After use
After use or prior to prolonged shut-downs, perform the steps described below.
Disconnect the compressed air supply
Remove compressed air cartridge
Unscrew the compressed air cartridge from the thread of the fitting (8.).
The compressed air contained in the pressure equipment escapes audibly.
Screw the stoppers into the fitting thread.
Screw the seal cap onto the compressed-air cartridge.
- Store the compressed air cartridge protected against impacts and dropping in the supplied transport case.

You can refill the compressed air cartridge using the PKT-FILLMASTER 350 compressor, which is available as an accessory. You can also purchase a full compressed air cartridge in exchange for an empty cartridge from your dealer.
Disconnect compressed air hose
Press the quick coupler of the tapping point (3.) towards the pressure equipment.
The quick coupler is now released.
- Pull the compressed air hose off the tapping point (3.) on the pressure equipment.
Remove the controller from the controller mount
- Pull the stop bolt (20) of the controller mount and keep the bolt pulled.
The quick coupler is now released.
Pull the controller off the quick coupler of the controller mount.
Transporting and storing the pressure equipment
Packing
Pack up the pressure equipment before storage and after use.
Carry out the following preparatory steps:
- Disconnect the pressure equipment from the compressed air supply (see page 23).
- Allow the pressure to be completely relieved from the pressure equipment.
If necessary, clean the compressed air connections to remove any foreign matter and soiling. - Close the compressed air fittings with suitable plugs.
Put the pressure equipment, the compressed air hose and the carrying bag in the transport case as illustrated.
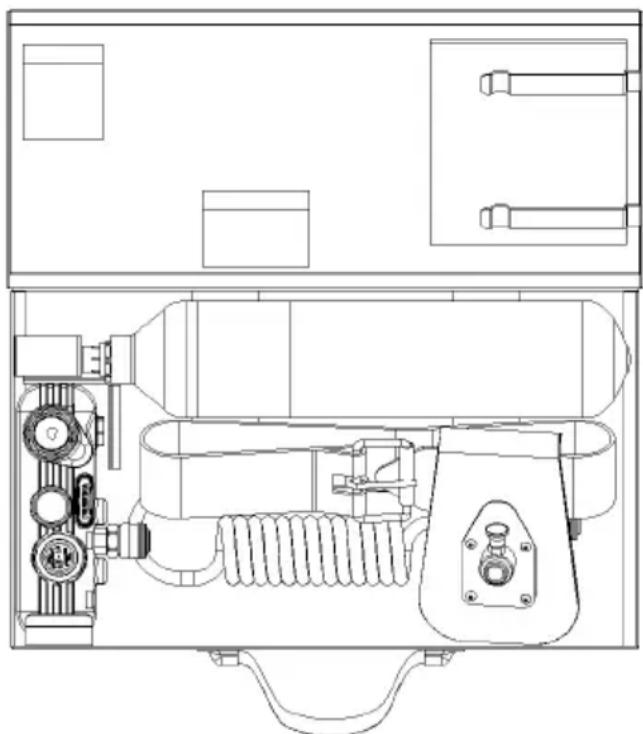
- Close the transport case and the latch for the lid.
Storage
- Oil all metal parts of the pressure equipment thinly with PREBENA special nailer oil.
Pack the pressure equipment in the transport case. - Store the pressure equipment at room temperature in a dry place protected from dust.
Servicing the pressure equipment
The pressure equipment may only be serviced by persons with the required knowledge, skills and experience. All work not described here must be carried out by the manufacturer's aftersales service or at the manufacturer.
Cleaning housing and external surfaces

CAUTION
Unsuitable cleaning agents can cause damage to the pressure equipment or the accessories.
Clean only with a dry or slightly damp cloth or a cloth dampened with a mild soap solution.
Slight soiling
Wipe off the pressure equipment housing with a dry cloth.
- Oil all metal parts of the pressure equipment thinly with PREBENA special nailer oil.
Severe soiling
- Wipe off the pressure equipment housing with a cloth dampened slightly with a mild soap solution.
- Then wipe off the housing with a cloth dampened slightly with tap water.
Finally wipe the housing dry with a soft, dry cloth. - Oil all metal parts of the pressure equipment thinly with PREBENA special nailer oil.
Oiling the pressure equipment


CAUTION
Insufficient lubrication or the use of the wrong lubricants can cause damage to the pressure equipment.
Use only PREBENA Special Nailer Oil
- Fill the lubricating oil into the compressed air cartridge port.
- Pour two to five drops of PREBENA special nailer oil directly into the port for the compressed air cartridge every day before starting work.


CAUTION
Danger of environmental pollution if the lubricating oil is spilled.
Absorb spilled oil with a binding agent.
Wipe up absorbed oil with a cloth.
- Dispose of the cloths in accordance with the statutory regulations in force at the place of use.
Filling the compressed air cartridge
Empty KT-3500 compressed air cartridges may only be filled with the PKT-FILLMASTER 350 compressor, which is available as an accessory.
Comply the operating manual of the compressor during this.
Testing the compressed air cartridge

WARNING
Danger of explosion through untested compressed air cartridges.
- Use solely tested compressed air cartridges.
The KT-3500 compressed air cartridges must pass a pressure test at PREBENA every five years. This test must be documented in the intended box on the compressed air cartridge label. If you charge the compressed air cartridge with the PKT-FILLMASTER compressor yourself, you must send the cartridge to PREBENA for pressure testing. Otherwise, this test is performed while the compressed air cartridges are filled at PREBENA.
- Check the date of the last periodical test on the rating plate.
Comply the cartridge operating manual while doing so.
If the date five years ago or older, proceed as below:
Pack the cartridge in a robust shipping carton.
- Send the cartridge to PREBENA for testing.
Use solely properly tested compressed air cartridges.
Repairing faults


WARNING
Operation of damaged or malfunctioning pressure equipment can result in serious or even fatal injuries.
In case of a fault, immediately disconnect pressure equipment from the compressed air supply.
Use the pressure equipment again only after the fault has been repaired.


CAUTION
The pressure equipment may be damaged if repaired by unauthorised persons.
Let the manufacturer perform all repairs to the pressure equipment.
The following chart shows possible malfunctions and the necessary measures.
| Symptom | Possible cause | Corrective measure |
| Pressure equipment loses air. | The fastening screws are loose. | ▶ Tighten fastening screws. |
| A seal is defective. | ▶ Contact Service (see page 35). | |
| Operating pressure too high. | Pressure reduction valve or safety valve defective. | ▶ Immediately disconnect the pressure equipment from the compressed air supply (see page 23).▶ Contact Service (see page 35). |
| Operating pressure too high (air escaping audibly at the safety valve (7.) for operation with compressed air cartridge). | Pressure equipment is damaged or pressure in the compressed air cartridge is too high. | ► Immediately disconnect the cartridge from the pressure equipment (see page 23).► Apply the correct operating pressure to the cartridge (see page 15).If the problem continues to exist:► Disconnect cartridge from pressure equipment.► Contact Service (see page 35). |
| Operating pressure too high (air escaping audibly at safety valve (5.) for the operating pressure). | Operating pressure set too high or pressure equipment damaged. | ► Reduce operating pressure (see page 21).If the problem continues to exist:► Immediately disconnect the cartridge from the pressure equipment (see page 23).► Contact Service (see page 35). |
If the malfunction continues to persist, contact your dealer or the manufacturer (see page 35).
Ordering accessories
You can reorder accessories from the manufacturer (see page 35).
Reordering compressed air cartridges
You can purchase full KT-3500 compressed air cartridges in exchange for empty cartridges from your dealer.
You can order the compressed air cartridges individually (KT-3500) or in the special transport container with two compressed air cartridges (KT-1000).
Ordering other accessories
| Name | Order number |
| PREBENA Special Nailer Oil | Z200.10 |
| PKT-FILLMASTER 350 Compressor | PKT-FILLMASTER 350 |
| Spiral hose with 9 mm inner diameter, 12 mm outer diameter, working length 4 m, extended length 7.5 m | Z160.12 |
| Compressed air hose set with 9 mm inner diameter, 15 mm outer diameter, extended length 10.0 m | Z200.20 |
| Compressed air hose drum with inner diameter 8 cm, outer diameter 12 cm, for a hose length of 30 m | Z180.00 |
Disposing the pressure equipment

CAUTION
Environmental damage if incorrectly disposed.
Clean the pressure equipment before disposal.
Comply with applicable regulations for oil disposal.

Never throw the pressure equipment or parts of it into normal domestic refuse. Ask your city or municipal authorities about facilities for recycling or for environmentally safe and proper disposal of the pressure equipment.
You can obtain information about the materials used in the pressure equipment from the manufacturer.
Technical data
PNEUMATIC mobilo pressure equipment
| Dimensions with case (L × W × H): | 476 x 122 x 295 mm |
| Dimensions, with carrying bag (L × W × H): | 465 x 200 x 115 mm |
| Weight, with transport case: | 6,6 kg |
| Weight, with carrying bag: | 3,05 kg |
| Operating pressure: | 0,5–10 bar |
| Maximum operating pressure: | 10 bar |
| Max. discharge output: | 220 l/min |
| Safety-valve set pressure: (Operating pressure) | 11 bar |
| Safety-valve set pressure: (Compressed air cartridge) | 21 bar |
| Operating temperatures: | -5 bis +45 °C |
| Storage/transport temperature: | Room temperature |
Compressed air cartridge KT-3500
| Length: | 410 mm |
| Diameter: | 87 mm |
| Weight, empty cartridge: | 1.3 kg |
| Weight, filled cartridge: | 1.7 kg |
| Contents: | 1.5 l compressed air |
| Maximum container air pressure: | 300 bar |
| Operating temperature: | -5 to +45°C |
| Storage/transport temperature: | Room temperature, maximum 60°C |
| Maximum service life: | 15 years from manufacture |
Manufacturer's address
PREBENA
PREBENA provides a 1 year guarantee on the stated product starting from the date of sale under the following guarantee terms. PREBENA guarantees free of charge repair of faults attributable to material or manufacturing faults. Malfunctions or damage caused by improper use are not covered by the free of charge guarantee.
The guarantee does not cover wearing parts such as O-rings, etc. It shall be at the discretion of PREBENA to fulfil the guarantee by replacement of the faulty part or by the supply of a new product. No further claims will be accepted.
In order to claim under the guarantee, the completed guarantee form with dealer's stamp and date of sale or an invoice containing the dates and information required on the guarantee form must be enclosed with the product.
Shipment: The product to which the claim relates must be packed carefully in order to avoid damage during transport and sent postage paid to PREBENA.

Guarantee form
Model name: Date of purchase:
Dealer: (Stamp)
Index
A
Accessories
Compressed air cartridges 32
Description 12
Nailer oil 32
Order numbers 32
Ordering 32
PKT-FILLMASTER
Compressor 32
After operation
Disconnect from the compressed air supply 23
C
Care
Cleaning external surfaces 27
Oiling 28
Check
Condition 14
Pressure gauge for compressed air cartridge 17
Pressure gauge for operating pressure 15
Check condition
hose line 14
Safety devices 14
Visible damage 14
Cleaning
Housing and external surfaces 27
Severe soiling 27
Slight soiling 27
Cleaning the external surfaces 27
Cleaning the housing 27
Compressed air cartridge attachment 16
Compressor 32
Connection 17
Fill 29
Pressure gauge 17
Remove 23
Reorder 32
Technical data 34
Testing 29
Compressed air hose
Connection 20
Disconnect 23
Compressed air supply
Connect 15
Disconnect 23
Connection
Compressed air cartridge 17
Compressed air hose 20
Control
Operating pressure 21
D
Description
Accessories 12
Features 11
Function 11
Rating plate 12
Scope of supply 10
Side and direction specifications 1
Disposal 33
F
Features 11
Fill
Compressed air cartridge 29
Function 11
G
General layout characteristics
General text 5
Guarantee 36
L
Layout characteristics
Safety instructions 6
M
Malfunctions
Aftersales Service 31
Repair 30
Manufacturer's address 35
Maximum operating
pressure 34
0
Oiling 28
Operating pressure
Economic setting 21
Maximum 15, 34
Pressure gauge 15
Reading 21, 22
Set 21
Operation
After use 23
Preparation 13
Repairing faults 30
Set operating pressure 21
Use 19
P
Packing 25
Prebena 35
Preparation
Attaching compressed air cartridge 15
Check condition 14
Connect to compressed air supply 15
Unpacking 13
Pressure equipment
Disposal 33
Oiling 28
Operation 19
Pack in transport case 25
Packing 25
Preparation 13
Service 27
Storage 26
Technical data 34
Unpacking 13
Pressure gauge
Compressed air cartridge 17
Operating pressure 15
Reading the operating pressure 21, 22
Proper, intended use 7
Putting into storage 26
R
Rating plate 12
Remove severe soiling 27
Remove slight soiling 27
s
Safety devices
Check condition 14
Safety instructions
Basic instructions 7
Layout attributes 6
Proper, intended use 7
Service 27, 35
Fill compressed air cartridge 29
Test compressed air cartridge 29
Set
Operating pressure 21
Side and direction specifications 1
Storage 26
T
Technical data
Compressed air cartridge 34
Pressure equipment 34
Testing
Compressed air cartridge 29
Transport case 25
Troubleshooting 30
U
Unpacking 13
W
Working posture 8
Introduccion
Emballage 25
Stockage 26
Commercant: (cachet)
Indice
A
Accessoires
Forts encrasements 27
Légers encraisements 27