Bella - Travel cot Chipolino - Free user manual and instructions
Find the device manual for free Bella Chipolino in PDF.
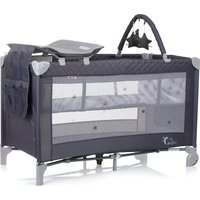
| Product type | Foldable umbrella bed with integrated bassinet and changing table |
| Brand | Chipolino |
| Model | Bella |
| Mattress dimensions (minimum) | 60 × 120 cm |
| Minimum internal height (low position) | 500 mm (from mattress to top edge) |
| Minimum internal height (high position) | 200 mm (from mattress to top edge) |
| Maximum supported weight (bassinet) | 15 kg |
| Maximum supported weight (changing table) | 11 kg (up to 12 months) |
| Main materials | Fabric, plastic, metal |
| Number of wheels | 2 wheels with parking brake |
| Folding mechanism | Central folding with safety locks |
| Bassinet usage levels | 2 levels (low position for baby who can sit up, high position for newborn) |
| Included accessories | Base mattress, second level mattress, removable changing table, pocket support, carry bag |
| Assembly | Tool-free, partial assembly by manufacturer |
| Care and cleaning | Clean with a soft damp cloth (water or mild detergent); avoid abrasive products, ammonia, bleach, alcohol; dry completely before storage |
| Safety instructions | Always activate the brake; check locks before use; do not leave unattended; do not use more than one mattress; do not place near flames or heat sources |
| Spare parts and repairability | Use only manufacturer-approved parts; contact an authorized service center for any repairs |
| Storage | Store in a clean, dry place away from sunlight, rain, and temperature variations |
Frequently Asked Questions - Bella Chipolino
User questions about Bella Chipolino
0 question about this device. Answer the ones you know or ask your own.
Ask a new question about this device
Download the instructions for your Travel cot in PDF format for free! Find your manual Bella - Chipolino and take your electronic device back in hand. On this page are published all the documents necessary for the use of your device. Bella by Chipolino.
USER MANUAL Bella Chipolino
5. NOCTABKA C JXKOBOBE
5-1-MontpaTe cko6nte B OTBOpTe OT NoCTaBkata.
5-2 - MoHTnUpIe Upe3 cKo6Nte NocTaBkata KbM Ko7apata.
5-3-MoHTnpaHa noCTabKa cJko6OBe.
6. KOJIeJA C IPIPNCIOCOJIINHn3A IAPKIPAAHE
KoWapata mMa DBe KOJena. Hatnchete JocHTeTata Ha DBete KOJena HADony, 3a Da octaHe KoWapata HeNodBnKHa (ФИr.6-2). NOBnHete loCTyeTa Harope, 3a Da OCBO6OIndTe DBXKeHNeTO Ha KOJenata (ФИr.6-1).
TO ASSURE SAFE USAGE OF THIS PRODUCT
FOLLOW ALL WARNING, INSTRUCTIONS AND
RECOMMENDATIONS GIVEN IN THIS USER MANUAL!
WARNING!
WARNING! NEVER LEAVE THE CHILD UNATTENDED!
WARNING! ENSURE THE PRODUCT IS NOT PLACED NEAR AN OPEN FLAME OR HEAT SOURCE, SUCH AS ELECTRIC OR GAS HEATERS!
WARNING! DO NOT USE THE PRODUCT IF IT HAS DAMAGED, TORN, OR MISSING PARTS! ONLY USE REPLACEMENT PARTS APPROVED BY THE MANUFACTURER! THE MANUFACTURER IS NOT LIABLE FOR SAFETY IF NON-ORIGINAL OR UNRECOMMENDED PARTS ARE USED.
WARNING! DO NOT PLACE OBJECTS IN OR NEAR THE CRIB THAT COULD BE USED AS SUPPORT FOR THE CHILD OR CREATE A SUFFOCATION HAZARD, SUCH AS CORDS, CURTAIN STRINGS, AND SIMILAR ITEMS!
WARNING! DO NOT USE MORE THAN ONE MATTRESS IN THE CRIB!
CAUTION! OBSERVE THE MARKINGS FOR THE PERMISSIBLE MATTRESS LEVEL!
CAUTION! THE MATTRESS THICKNESS MUST BE SUCH THAT THE INTERNAL HEIGHT (FROM THE TOP SURFACE OF THE MATTRESS TO THE UPPER EDGES OF THE CRIB SIDES AND ENDS) IS AT LEAST 500 MM IN THE LOWEST BASE POSITION AND AT LEAST 200 MM IN THE HIGHEST BASE POSITION (SEE PRODUCT MARKINGS).
CAUTION! THE MINIMUM DIMENSIONS FOR THE LENGTH AND WIDTH OF THE MATTRESS USED IN THE CRIB MUST BE SUCH THAT THE INTERNAL SPACE BETWEEN THE MATTRESS AND THE SIDES OR ENDS OF THE BED DOES NOT EXCEED 30 MM!
CAUTION! USE THE CHANGING PAD FOR CHILDREN UP TO 12 MONTHS OLD AND UP TO 11 KG IN WEIGHT!
Use a mattress with minimum dimensions of 60 × 120 cm.
DO NOT use the crib and/or changing pad for more than one child at a time!
DO NOT use the crib for a child who can climb or hang on it, as it may tip over, causing falls and injuries!
ALWAYS check that all locking mechanisms are fully engaged before use. Only then is the crib ready for use.
Use the crib's second level only for children who CANNOT sit up unaided, roll over, or push themselves up on their hands and knees!
The lowest level of the crib is the safest for your child! Use the lowest level as soon as your child is able to sit up unaided!
All assembly parts must always be tightened. These parts should be checked regularly and tightened as necessary.
Use the crib only for children weighing no more than 15kg
Use the changing pad only for children up to 12 months old and up to 11kg in weight.
The assembly, unfolding, and folding of the product should be done by an adult only!
Place the crib only on a flat and horizontal surface!
Always engage the parking brake on the crib's wheels. USE THE WHEELS ONLY TO MOVE THE CRIB!
Do not allow children under 3 years old near the product until assembly is complete, to avoid access to small and detached parts!
- Keep plastic packaging away from children to prevent the risk of suffocation!
ASSEMBLY AND FUNCTIONS
The crib is intended for newborn babies and small children weighing no more than 15kg
The changing pad is intended for a child up to 12 months of age and weighing up to 11kg
The product is delivered partially assembled by the manufacturer. No tools are required to complete the assembly.
CAUTION! Follow exactly the assembly and usage instructions provided in the manual text and illustrations.
CAUTION! CHECK THE SECURITY OF EACH FIXING AFTER COMPLETING EVERY OPERATION!
CAUTION! Fixing a specific position is usually accompanied by a clicking sound.
CAUTION! Keep your hands clear of pinch points during each operation!
MAIN PARTS
1 - Carrying and storage bag
2-Folding crib
3 - Clips for accessory pocket
4 - Pocket stand
5 - Tubes for installing the second level (4 pcs.)
6 - Changing pad for the child
7 - Short tubes with clips for changing pad (2 pcs.)
8 - Long tubes for changing pad (2 pcs.)
9 - Second level base
10 - Crib base pad
1.UNFOLDING THE CRIB
1-1, 1-2, 1-3, 1-4 - Remove the crib from the carry bag, peel back the velcro straps, and remove the crib base pad.
1-5 - Spread the legs of the crib as shown in the figure.
1-6 - Lift the short sides in the middle until they lock (click).
1-7 - Lift the long sides in the middle until they lock (click).
1-8 and 1-9 - Press down the center of the crib.
1-10 - The crib is fully unfolded.
IMPORTANT! Ensure that the crib is secured in the unfolded position!
2. FIRST (LOW) LEVEL OF THE CRIB
2-1 - Place the base pad.
2-2 - Pass the velcro straps through the openings.
2-3 and 2-4 - Secure the velcro straps on the underside of the crib.
3. SECOND LEVEL OF THE CRIB
3-1 - Attach the second level with a zipper to the inner side of the crib.
3-2 -Zip up the second level around the sides of the crib.
3-3 - Insert the tubes for the second level and connect them in pairs.
3-5 and 3-6 - Place the pad on the second level.
4. CHANGING PAD
4-1, 4-2, 4-3 - Insert the long (a) and short (b) tubes through the corresponding openings in the fabric (c).
4-4 and 4-5 - Press the pins (d) and insert the tubes into each other until the pin (d) appears through the hole.
4-6 - Fully assembled changing pad.
4-7 and 4-8 - Place the changing pad on the crib and press firmly until it is secured.
4-9 - Installed changing pad.
5. POCKET STAND
5-1 - Insert the clips into the openings on the stand.
5-2 - Attach the stand to the crib with the clips.
5-3 - Pocket stand installed.
6. WHEELS WITH PARKING MECHANISM
The crib has two wheels. Push down the levers on both wheels to keep the crib stationary (fig. 6-2). Lift the levers to release wheel movement (fig. 6-1).
7. FOLDING AND PACKING
IMPORTANT! Before folding the crib, remove the pocket stand, changing pad, crib base pad, second level, and any additional accessories.
7-1, 7-2, 7-3 - Pull up the center of the crib.
7-4 and 7-5 - Release the buttons on each side (under the fabric) and pull the four legs of the crib toward the center.
IMPORTANT! Do not apply excessive force if the sides do not fold on the first attempt to avoid damaging them. Repeat the steps as described.
7-6 - Wrap the crib base pad around the folded crib.
7-7 and 7-8 - Fasten the velcro straps.
7-9, 7-10, and 7-11 - Place the crib in the carry bag and zip it closed.
MAINTENANCE AND CARE
Do not apply strong pressure to the adjustment and folding mechanisms to avoid damaging or breaking them.
Clean the fabric, plastic, or metal parts of the product with a soft cotton cloth or sponge moistened with water or mild detergent.
Do not use aggressive cleaning agents containing abrasive particles, ammonia, bleach, or alcohol.
After cleaning, always dry the crib and its components thoroughly before storage. Mold may develop if stored while damp.
Store the product in a clean and dry place.
Do not expose to environmental elements such as sun, rain, moisture, or sudden temperature changes!
For issues related to normal use, consult or request repairs from authorized service centers.
A TERMÉK BIZTONSÁGOS HASZNÁLATÁNAK BIZTOSÍTÁSA
ERDEKÉBEN KÖVESSE A FELHASNZALÖI KÉZIKÖNYVBEN TALÁLHATO
ÖSSZES FIGYELMEZTETEST, UTASITÁST ES AJANLÁST!
FIGYELMEZTETÉSEKI!
FIGYELEM! SOHANE HAGYJAA GYERMEKET FELUGYELET NELKUL!
FIGYELEM! GONDOSKODJON ROLA, HOGY A TERMÉK NE LEGYEN NYICT LÁNG VAGY HÖFORRÁS, MINT ELEKTROMOS VAGY GAZFUTÉS KOZELÉBEN!
FIGYELEM! NE HASNZÁLJAATTERMÉKET, HASERÜLT, SZAKADT VAGYHIÁNYOS! HASNZÁLJON KIZÁRÓLAG A GYARTO ÁLTAL JÖVÁHAGYOTT PÖTALKATRESZEKET! A GYARTO NEM VÄLLAL FELELOSSÉGET A BIZTONSAGERT, HA NEM EREDETI VAGY NEM AJANLOTT ALKATRESZEKET HASNZÁLNAK.
FIGYELEM! NE HELYEZZEN TARGYAKAT A KISAGYBAN VAGY A KOZELÉBE, AMELYEKET A GYERMEK TÁMASZKÉNT HASNZALHAT VAGY AMELYEK FULLADÁSVESZÉLYT OKOZHATNAK, MINT PÉLDÁUL ZSINOROK, FÜGGÖNYKÖTEL ES HASONLÖ TARGYAK!
FIGYELEM! NE HASZNÁLJON TÖBB MINT EGY MATRACOTA KISÁGYBAN!
VIGYAZAT! KÖVESSE A MEGENGEDETT MATRACSZINTRE VONATKOZO JELÖLÉSEKET!
VIGYAZAT! A MATRAC VASTAGSÁGA OLYAN LEGYEN, HOGY A KISÁGY OLDALAINAK ÉS VÉGEINEK FELSO SZÉLE ÉS A MATRAC FELSO FELÜLETE KÖZÖTTI MAGASSÁG A LEGALSO POZÍCIÓBAN LEGALÁBB 500 MM, A LEGMAGASABB POZÍCIÓBAN LEGALÁBB 200 MM LEGYEN (LÁSD A TERMEK JELÖLÉSEIT).
VIGYAZAT! A KISAGYBAN HASNZALT MATRAC HOSSZÁNAK ÉS SZELESSEGENEK MINIMÁLIS MÉRETEI OLYANOK LEGYENEK, HOGY A MATRAC ÉS A KISAGY OLDALAI VAGY VEGEI KÖZÖTTI BELSO TAVOLSAG NE HALADJA MEG A 30 MM-T!
VIGYAZAT! A PELENKAZOALATETET CSAK 12 HONAPOS KORIG ES LEGFEJLEBB 11 KG-OS GYERMEKEKNEL HASZNALJA!
GE: aodmy6bdoa5b8m0s
a3600000000000000000
56mmn 36mnnns 60d mnnn 26 60 d n 60 60 60 60 60 60 60 60 60 60 60 60 60 60 60 60 60 60 60 60 60 60 60 60 60 60 60 60 60 60 60 60 60 60