Alfredo 68806 - Pizza oven UNOLD - Free user manual and instructions
Find the device manual for free Alfredo 68806 UNOLD in PDF.

User questions about Alfredo 68806 UNOLD
0 question about this device. Answer the ones you know or ask your own.
Ask a new question about this device
Download the instructions for your Pizza oven in PDF format for free! Find your manual Alfredo 68806 - UNOLD and take your electronic device back in hand. On this page are published all the documents necessary for the use of your device. Alfredo 68806 by UNOLD.
USER MANUAL Alfredo 68806 UNOLD
natural_image
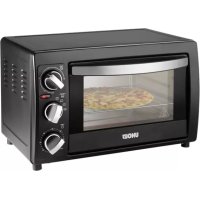
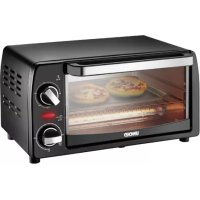
Exterior view of a modern flat-screen toaster with three control knobs (no visible text or symbols)Bedienungsanleitung
Instructions for use | Notice d'utilisation Gebruiksaanwijzing | Istruzioni per l'uso Instrucciones de uso | Instrukcja obsługi
Modell 68805 / 68806
Impressum:
Instructions for use Model 68805/68806
Foreword....30
Technical data....30
Explanation of symbols....31
For your safety....31
Description of control panel 36
Accessories included ....37
Programmes....37
Before first use....38
Preheating 40
Operation....40
Cleaning and care....43
Error indications on the display....44
Neapolitan Pizza....45
Guarantee Conditions....48
Waste Disposal/Environmental Protection ...48
Service 29
1 Vent
2 Glass door with handle
3 Control panel
4 Housing
5 Baking chamber
6 Pizza stone
7 Pizza paddle
FR Page 49
natural_image
Person holding a large white dough ball over a wooden table, with bowls of flour and ingredients in the background (no visible text or symbols)Thank you for having chosen a quality product from the Unold range. Please read the user manual carefully. This will allow you to familiarise yourself quickly with all the functions of your new pizza oven (hereinafter referred to as the “appliance”).
Please ensure that the user manual is read and observed by anyone who uses, cleans or maintains the appliance. When handing over the appliance to a new owner, always include the user manual.
If you have any queries that are not answered in this document, or if you encounter technical problems, please contact our Customer Service department or your specialist dealer.
TECHNICAL DATA
| Power: 1,700 W, | 220–240 V~, 50/60 Hz |
| Dimensions: approx. | 43.3 x 47.2 x 28.6 cm (W/D/H) |
| Weight: 68805 ca. | 11.8 kg / 68806 ca. 11.3 kg |
| Cable length: approx. | 90 cm |
| Housing: 68805 | Sheet steel sprayed black68806 Stainless steel |
| Pizza stone: removable, made of cordierite, approx. | 32 x 32 x 1.25 cm |
| Baking chamber: approx. | 32 x 34 x 9 cm, with interior lighting |
| Features: Safe handling thanks to double-glazed door with cool touch handle and heat-insulated stainless steel housing, removable pizza stone, automatic programmes and a Manual programme, suitable for pizzas up to 30 cm in diameter | |
| Accessories: Instruction manual, recipe booklet, pizza stone, pizza paddle | |
| Features, technology, colours and design are subject to change without notice;errors excepted | |
EXPLANATION OF SYMBOLS

This symbol denotes a possible hazard which could cause injury or damage to the appliance.
This symbol indicates a potential burning hazard. Please be especially careful at all times here.
FOR YOUR SAFETY
Please read this user manual carefully and keep it for future reference.
General safety instructions
- This appliance can be used by children aged 8 years and over and persons with reduced physical, sensory or mental capabilities or a lack of experience and knowledge, provided they are supervised or have been instructed in the safe use of the appliance and understand the hazards involved.
- Children must not play with the appliance.
- Children aged 8 or above may clean or maintain the appliance, provided they are supervised.
- Keep the appliance and its power cable out of the reach of children under the age of 8.
- The packaging material is not a toy – choking hazard! Keep packaging materials out of the reach of children.
- The appliance is designed for household and similar use, e.g.
■kitchenettes in offices, shops or other workplaces,
■farms,
■for use by guests in hotels, motels, hostels or other accommodation facilities as well as in bed and breakfast accommodation and holiday homes.
Safe handling of electricity
-
Connect the appliance only to an AC power source as specified on the rating plate.
-
We recommend that you operate the appliance on its own circuit. If in doubt, ask a specialist for advice if you are unsure.
- Do not connect the appliance to an external timer or remotely controlled power system.
- We do not recommend using an extension cable. However, if you use an extension cable, it must comply with the applicable safety standards and you must never exceed the specified maximum current capacity of the cable. Always unwind the extension cable used completely!
- Do not place metal foil in the appliance - risk of electric shock!
- For reasons of electrical safety, never immerse the appliance or the power cable in water or other liquids.
- For reasons of electrical safety, do not clean the appliance in the dishwasher.
- The switch and power cable must not come into contact with water or other liquids. If this happens nevertheless, all parts must be completely dry before the appliance is used again.
- To prevent damage to the power cable, never wrap it around the appliance and avoid kinks in the power cable.
- Unplug the appliance from the power socket after use and before cleaning. Never leave the appliance unattended while it is connected to the power socket.
- When disconnecting the power cable from the power socket, always pull on the plug and not the cable itself.
- Never touch the appliance or the cable with wet hands.
- The appliance is not switched off completely until it has been disconnected from the power supply by pulling the plug.
Handling the pizza stone
- Never immerse the pizza stone in water; this can damage the stone.
- Never clean the pizza stone with washing-up liquid. Washing-up liquid can penetrate the pores of the stone and pass onto the food.
- Do clean the pizza stone with pointed objects or a high-pressure cleaner. Otherwise, scratches may occur and the food residues can penetrate into them.
- Never treat the pizza stone with disinfectants. Due to the high temperatures in the oven, disinfection of the stone is not necessary.
Safe set-up and operation of the appliance
- For safety reasons, never place the appliance on hot surfaces, metal trays or a wet surface.
- The appliance must not be installed in cupboards or operated in furniture niches – risk of fire!
- Make sure that the appliance and the power plug are freely accessible at all times so that the appliance can be quickly disconnected from the power supply if necessary.
- Set up the appliance in such a way that there is at least 10 cm of clearance to other objects at the sides and at least 15 cm overhead clearance.
- Do not place the appliance or the power cable close to naked flames or receptacles containing water.
- Do not set up the appliance in rooms where the temperature may drop below freezing.
- Likewise, never place cardboard, plastics, paper or other flammable materials in the baking chamber.
-
Do not use baking paper or baking foil due to the high temperatures in the appliance. Always remove all films and papers from e.g. frozen foods, even if they can be left on during baking according to the manufacturer.
-
Always use the appliance on a clear, level and heat-resistant surface.
- The appliance should only be used to prepare pizza and similar flat baked items.
- Never put oversized food in the baking chamber, as there is a risk of fire.
- Do not allow the power cable to hang over the edge of the work surface, as this could result in accidents, for example if pulled on by small children.
- Route the power cord safely so that it cannot be pulled on or tripped over.
- Use the pizza oven indoors only.
- The appliance is not intended for use in any type of vehicle.
- Never cover the appliance or place any objects on it during operation, to prevent the appliance from overheating.
- Never put aluminium foil in the baking chamber of the appliance.
- Never place kitchen appliances, cooking spoons etc. on the open door of the appliance.
- Never leave the door of the appliance open for a long time during operation to keep the heat inside the appliance, thus saving energy.
- Before cleaning the appliance, switch it off, disconnect the plug from the power socket and allow the appliance to cool off completely.
- Hot steam may escape when the appliance is opened. Therefore, proceed with caution.
- To avoid injury, do not move the appliance whilst it is in operation.
- Make sure that all users, especially children, are aware of the risk of escaping steam – risk of scalding!
-
The housing, and especially the baking surface, become very hot – risk of burns! Do not touch these surfaces during or after operation.
-
To avoid burns when opening the appliance, use an oven cloth or oven gloves and only touch the door handle with them.
- For safety reasons, the appliance switches off after some time if no settings are entered.
- To prevent damage, do not operate the appliance with accessories from another manufacturer or brand.
- Never leave the pizza paddle in the pizza oven when the oven is in operation – fire hazard.
- Regularly check the appliance, the power cable and the plug for wear and damage. If the power cable or other parts are damaged, return the appliance or the cable to our Customer Service department for inspection and repair.
- An improper repair may result in serious hazards to the user and will render the warranty void.

Never open the appliance housing. Risk of injury from electric shock!
The appliance and the pizza stone are very hot during and after operation! Avoid contact with hot surfaces of the appliance; there is a risk of burns!
Do not leave the appliance unattended when baking at high temperatures – risk of fire!
Keep children away from the appliance!
The manufacturer will not be liable in the event of incorrect assembly, improper or incorrect use or if repairs are carried out by unauthorized third parties.
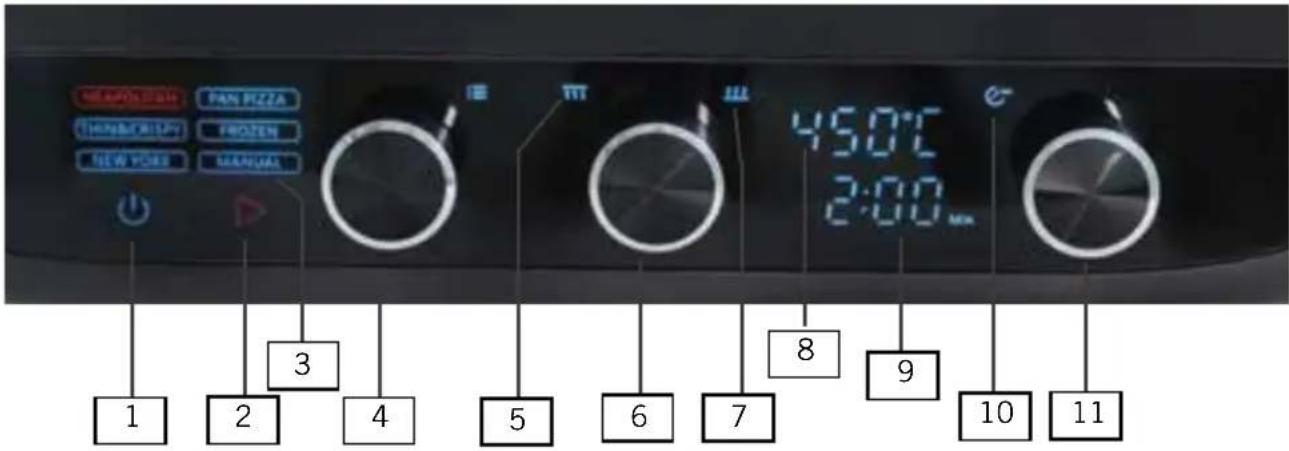
DESCRIPTION OF CONTROL PANEL
text_image
PAN PIZZA THOMORARY FROZEN NEW YORK MANUAL 1 2 3 4 5 6 7 8 9 10 11 45.0°C 2:001 "Power" button
Switches the appliance on or off
2 "Start" button
Starts the desired processes
3 Programs
Indicator lights of the programmes. Each selected programme lights up
4 "Programs" control knob
Starts the desired programme
5 Top heat symbol
6 "Temperature" control knob To set the desired temperature
7 Bottom heat symbol
8 Temperature indicator
9 Time indicator
Indicates the remaining time
10 "Timer" symbol
"Timer" control knob To select the desired cooking time. After this time has elapsed, a beep sounds, but the appliance does not switch off. You can also carry out the baking process without the timer.
ACCESSORIES INCLUDED

Pizza paddle
Caution: Always use a pizza paddle to place the pizza in the appliance, because the appliance is very hot! When using a pizza paddle other than the one included, make sure that the size of the pizza paddle fits the oven. If the pizza paddle is too large, you cannot put the pizza in the oven. Always sprinkle the pizza paddle with some flour first. Do not use too much flour, because the flour can ignite at very high temperatures. Place the rolled-out pizza dough on the floured pizza paddle. Top the pizza and then push it into the oven. By shaking the pizza paddle slightly, the pizza will slide off more easily.
The pizza paddle must not remain in the oven during the baking process!
PROGRAMMES
Use of the programmes
| Programme Use | |
| Neapolitan(wood-fired style pizza) | Classic preparation, airy crust, high heat (without the use of wood or wood-like additives) |
| Thin & Crispy(thin & crispy) | For very thinly rolled doughs, baking powder pizza |
| New York(New York style pizza) | Similar to the pan pizza, typically tough feeling in the mouth, thin base |
| Pan Pizza(pan pizza) | Only with a baking tray (which you can find in a specialist shop), fluffy dough, plenty of topping, sauce right to the edge, crispy base |
| Frozen(frozen) | For frozen pizza or frozen tarte flambée |
| Manual(own programme) | Set the programme according to your individual wishes |
Temperatures and programme times
| Preset Preset | |||||
| Programme | Top heat °C | Bottom heat °C | Adjustable between | Time | Time adjustable |
| Neapolitan (wood-fired style pizza) | 450 °C | 450 °C 20 | 0–450 °C 2 min. | 1–10 min. | |
| Thin & Crispy (thin & crispy) | 270 °C | 330 °C 15 | 0–450 °C 6 min. | 1–10 min. | |
| New York (New York style pizza) | 245 °C | 270 °C 15 | 0–450 °C 8 min. | 1–20 min. | |
| Pan Pizza (pan pizza) | 220 °C | 340 °C 15 | 0–450 °C 12 min. | 1–30 min. | |
| Frozen 245 °C 2 | 05 °C | 150–450 °C | 16 min. | 1–20 min. | |
| Manual (own programme) | 400 °C | 400 °C 15 | 0–450 °C 2 min. | 1–30 min. | |
BEFORE FIRST USE

Some smoke may escape when used for the first time. This is normal and not a cause for complaint.
The appliance and the pizza stone are very hot during and after operation! Avoid contact with hot surfaces of the appliance – there is a risk of burns!
The pizza stone must not be oiled. Oiling can lead to undesirable smoke and odours as well as damage to the pizza stone.
Do not leave the appliance unattended when using high temperatures – risk of fire!
Keep children away from the appliance!
- Remove all packaging materials and any transport protection (but not the rating plate) from the appliance and pizza stone. Keep packaging materials
away from children – risk of suffocation! Dispose of the packaging materials according to the relevant local waste disposal regulations.
- The plug may be protected by a cover. Remove the cover. Make sure that the cover is disposed of immediately. If swallowed, there is a risk of suffocation, especially for children and animals.
- Inspect the appliance for damage. If there is visible damage, do not operate the appliance; instead, contact our Customer Service department.
- Check whether all accessories listed in this manual are present.
- Gently wipe the pizza stone with a damp cloth without detergent to remove any manufacturing residues. Then let the stone dry completely. Caution: Washing-up liquid may damage the stone. Observe all the information in the chapter “Cleaning and care”. Push the pizza stone into the oven.
- Wipe the housing down with a damp cloth and dry carefully.
- Before first use, the empty appliance must be heated for 20 minutes to remove any production residues. Make sure that the room is well ventilated during this time.
- Insert the plug into a power socket.
- A short beep sounds, all indicator lights come on and then go off again. The "Power" button is lit red.
- Press the "Power" button.
- The lettering of the “Neapolitan” programme is lit red. The display shows the temperature “450 °C” and the time “2:00”; the baking chamber light comes on.
- Press the "Start" button.
- The “Start” button and the temperature indicator flash. The appliance heats up and the baking process starts. The appliance fan starts up. This process takes approx. 23 minutes.
- When the process is complete, a beep sounds three times. The “Start” button and the temperature indicator stop flashing and the “Start” button lights up white.
- Now switch off the appliance with the "POWER" button and let it cool down.
- The fans will continue to run for some time.
- The appliance is now ready for use.
PREHEATING

The appliance and the pizza stone are very hot during and after operation! Avoid contact with hot surfaces of the appliance – there is a risk of burns!
Do not leave the appliance unattended when using high temperatures – risk of fire!
Keep children away from the appliance!
- The programmes have a preheating phase.
- This is especially important when baking at very high temperatures in order to obtain a perfect baking result.
- During the preheating phase, the pizza stone must be in the appliance.
- If the appliance is still very hot from the previous baking process, it will skip the preheating phase.
OPERATION


The appliance and the pizza stone are very hot during and after operation! Avoid contact with hot surfaces of the appliance – there is a risk of burns!
Do not leave the appliance unattended when baking at high temperatures – risk of fire!
Keep children away from the appliance!
Do not use baking paper or baking foil due to the high temperatures in the appliance. Always remove all films and papers from e.g. frozen foods, even if they can be left on during baking according to the manufacturer.
Preparing the appliance
- Note: If you have switched on the appliance but have not entered any settings for a long time, the standby mode is activated after some time. You must then switch the appliance on again to enter settings.
- Prepare the desired pizza dough.
- The pizza stone must not be brushed with oil. Brushing with oil may lead to an undesirable formation of smoke and odour and result in damage to the pizza stone.
-
Insert the plug of the pizza oven into a wall socket.
-
A short beep sounds, all indicator lights come on and then go off again. The "Power" button is lit red.
- Press the "Power" button.
- The lettering of the “Neapolitan” programme is lit red. The display shows the temperature “450 °C” and the time “2:00”; the baking chamber light comes on.
- Use the left knob to select the programme and turn it until the desired programme lights up red. The display indicates the pre-set temperature and baking time of the programme you selected.
- You can change the temperature of the top and bottom heat and the run time of the timer in the programmes. If you wish to customise these settings, you should do the following:
Press the temperature control knob until the desired symbol of top or bottom heat flashes. Once the symbol of the top heat flashes, you can select the desired temperature by turning the temperature control knob. Press the temperature control knob again until the symbol of the bottom heat flashes and set this temperature as well by turning the temperature control knob. - Note: If you do not press any buttons within 5 seconds, this setting will return to its starting position. The currently set temperature will be stored.
- If you wish to change the pre-set time, turn the control knob for the time setting to the desired programme run time.
- Caution: Depending on the programme, the temperature and run time can only be adjusted in certain ranges, as described in the table on page 38. Tip: With your own programme, you are free to set both as you wish.
- Press the “Start” button. The selected programme lights up white and the temperature control flashes; the “Start” button flashes red.
- The appliance will now preheat. The appliance requires approx. 23 minutes to reach the highest possible temperature of 450 °C . The timer is not active while the appliance is heating up!
- While this is taking place, add your chosen pizza toppings.
- When the preheating phase is completed, a beep sounds multiple times. The "Start" button and the temperature light up white.
- Important: Due to the compact design of the appliance, smoke may escape at the door of the appliance.
Baking the pizza
- Open the door of the appliance and use a pizza paddle to slide the pizza with its toppings onto the pizza stone. Caution: The appliance and pizza stone are very hot!
- Close the door of the appliance.
- Next, press the knob controlling the time to turn the timer on.
- The time in the display counts down.
- Note: Once the run time of the timer has started, this time cannot be changed until it has elapsed. Similarly, a programme cannot be changed once it has started. In this case, you must cancel the programme using the "Power" button. Preset values such as the temperature are then no longer stored.
- During baking, check the pizza occasionally to ensure that the pizza is baked evenly and reaches the degree of doneness you require. Depending on the temperature, the pizza may be ready very quickly. The exact baking time varies with the type of the dough and with the quantity and thickness of the toppings on your pizza. While a pizza with a thin layer of toppings may be done in as little as two minutes, a pizza with thicker toppings may require a slightly longer time.
- After the baking time has elapsed, a beep will sound multiple times and the time indicator will return to its starting position.
- Caution: After the set time has elapsed, a beep sounds, but the baking process will continue.
- When your pizza is ready, open the appliance door.
- Carefully remove the pizza with a pizza paddle. Note that both the appliance and the pizza are very hot.
- Close the appliance door again.
- Let the pizza cool down briefly before serving and enjoying it.
- If required, you can now bake more pizzas.
- Note: After approximately two hours of heating, the appliance switches to standby mode for safety reasons. You must then press the „Power“ button and select the desired programme again if you want to continue baking pizza.
-
Please note that infra-red thermometers are often unable to accurately measure the high temperatures in the pizza oven. If you are unsure, please contact our customer service department for more information on temperature monitoring.
-
Wait 3-4 minutes between the individual baking processes if you are preparing several pizzas in a row. This is the best way to achieve the necessary heat in each case.
- Once you have finished baking, switch off the appliance by pressing the "Power" button.
- The fan continues to run for some time to cool the appliance down. You may open the door of the oven to speed up this process.
- The fans of the appliance will continue to run for approx. 15 minutes, even if the appliance is turned off.
- Remove the plug from the wall socket. Only then is the appliance completely switched off.
- Before cleaning and, if applicable, storing the appliance, allow it to cool down.
CLEANING AND CARE
After use and before cleaning, switch off the appliance and unplug it. Let the appliance and the pizza stone cool down completely. Never use scouring pads with metal components to clean the housing. There is a risk of electric shock.
The appliance must not be immersed in water or other liquids.
- Allow the pizza stone to cool completely in the pizza oven before cleaning. This avoids temperature fluctuations that can damage the stone.
- Remove burned food residues with a wooden spatula or a glass ceramic scraper. Be careful and do not scratch the stone. Scratches in the stone can cause food residues to be burnt deep into the stone when you are next baking.
-
Then gently wipe the pizza stone down with a damp cloth under running water. Use lukewarm water in order to avoid temperature fluctuations. Never use washing-up liquid or other detergents and never clean the pizza stone in the dishwasher or with a high-pressure cleaner.
-
The pizza stone is made of a natural material that can discolour despite regular cleaning. This does not affect the function of the appliance and is not a cause for complaint.
- Please note that, after a short time, a patina (i.e. a coating) may cover the baking chamber. This patina does not affect the way the appliance operates and is therefore not a cause for complaint.
- Wipe the inside and outside of the appliance down with a damp cloth with a little washing-up liquid and wipe again with a cloth dampened with clear water. Do not allow water to enter the appliance. Then dry the appliance thoroughly.
- Note: Some condensation may occasionally form behind the glass of the door. This is due to technical reasons and not a cause for complaint. As a rule, this water evaporates after further baking processes at a high temperature.
- Regular cleaning prolongs the service life of your appliance.
- When not in use, store the appliance in a dry, dustproof place. If you are not going to use the appliance for a long period of time, we recommend that you store it in the original box.
Clean all accessories after each use to keep food residues from accumulating and prolong the life of the accessories.
Pizza paddle
- The pizza paddle is not dishwasher-safe! Clean the pizza paddle in dishwater after each use. Do not use harsh or abrasive cleaners / implements. Dry thoroughly and store in a dry and clean place.
ERROR INDICATIONS ON THE DISPLAY
| Error display and error codes | Cause of error |
| No display or code on the control panel | The appliance is not connected to the power supply.Circuit board damaged - contact customer service.Overheating protection fuse switched off - let the appliance cool down. |
| The display is active, but the unit does not heat up. | Upper or lower heating element damaged.Damaged relay components on the circuit board.Contact the customer service. |
| E1 | Upper temperature sensor interrupted.Contact the customer service. |
| E2 | Lower temperature sensor interruptedContact the customer service. |
| E3 | Indoor temperature not detected.Contact the customer service. |
| E4 | Indoor temperature not detected.Contact the customer service. |
| E5 | A communication line in the electronics is defective.Contact the customer service. |
NEAPOLITAN PIZZA
A perfect pizza starts with the ideal dough. Therefore, follow the instructions below and try different variations until you have found the perfect pizza recipe for you.
Tip: Of course, your previous recipes can also be prepared in the pizza oven; you just have to check which temperature and time setting is necessary.
Pizza Napoletana - which now has World Heritage status - is considered the original pizza dough, and this protected form consists of only 4 or 5 ingredients: flour, water, salt, yeast and .... time. Many articles have been written about the perfect pizza dough, and to this day, opinions are divided as to which recipe is actually the best. In the following, we would like to present a classic and simple basic recipe which is guaranteed to succeed and, at the same time, comes very close to the “perfect” pizza. Let’s discuss a few important things to begin with: Hydration is the ratio of water to flour. If we use e.g 1 kg of flour and add 600 ml of water, the dough has a hydration of 60%. The higher the proportion of water in the dough, the softer and more airy the dough becomes. However, if the dough is too moist, it is more difficult to work with. In order to keep it simple, we’ll therefore work first with this basic recipe with a hydration of 60% (i.e. 300 ml of water to 500 g of flour). With a little practice, you can also try it with a hydration of 65%.
In order to be able to absorb a high proportion of water in the dough, we still need the right flour. Common flour type 405 has the right grinding degree, but the flour lacks minerals, especially the protein content. For this recipe, we need a protein content of 12–13 g per 100 g flour, which is contained in most type
00 pizza flours (Tipo 00). Type 00 pizza flours are available in most well-stocked supermarkets, and more rarely by discounters.
In contrast to some fast pizza dough recipes, the proportion of yeast in this recipe is deliberately kept very low. Fast dough pizzas are ready in a very short time, but they taste very strongly of yeast. In addition, pizza doughs with a lot of yeast are much harder to digest.
Ingredients for 3 pizzas:
500 g Tipo 00 flour, 300 g ice-cold water (preferably weighed instead of measured), 0.5–1 g fresh yeast (equivalent to a small 8–10 mm diameter scoop), 15 g sea salt
First, dissolve the salt in the water. Add yeast and flour and knead everything. If you wish to knead the dough manually, you should knead for at least 25–30 minutes. This is important because the gluten structure is formed by kneading, which ensures that the dough becomes elastic. If you do not knead for long enough, the pizza dough may tear later.
As an alternative to kneading by hand, the dough can also be kneaded with a food processor for about 10 minutes on a low setting. However, the temperature of the dough should be taken into account and, if necessary, measured with a probe thermometer. The temperature should be a maximum of 25^ C to prevent the yeast from working too early. You can also recognise the right consistency First, dissolve the salt in the water. Add yeast and flour and knead everything. If you wish to knead the dough manually, you should knead for at least 25–30 minutes. This is important because the gluten structure is formed by kneading, which ensures that the dough becomes elastic. If you do not knead for long enough, the pizza dough may tear later.
As an alternative to kneading by hand, the dough can also be kneaded with a food processor for about 10 minutes on a low setting. However, the temperature of the dough should be taken into account and, if necessary, measured with a probe thermometer. The temperature should be a maximum of 25^ C to prevent the yeast from working too early. You can also recognise the right consistency of the dough by using the so-called “window test”, in which you slowly pull a portion of the dough apart so that you can almost see through it, but the dough does not tear.
Once the dough has been kneaded, it is formed into a tight ball, put into a bowl and covered with a lid or cling film. Some Neapolitan dough recipes allow the dough to rest in the refrigerator for about 24 hours before the so-called “bulk fermentation” starts at room temperature and the yeast only then begins to work. However, in our basic recipe for beginners, we’ll start directly with the “bulk fermentation” and allow the dough to rise for 12–14 hours at room temperature. After the “bulk fermentation”, the dough is divided into 3 equal-sized pieces, rolled until round and placed in a slightly wider, covered container for the so-called “proving”. Here, the base should be sprinkled with some flour (or semola) and the dough pieces should not be placed too close together, as they will rise slightly. After about 10–12 hours, our Neapolitan pizza dough is ready for further processing.
The dough pieces can now be removed individually and shaped. IMPORTANT: Please do not use a rolling pin, otherwise all the air which has formed over the course of 24 hours will be squeezed out of the dough again. Instead, place the dough piece on a lightly floured work surface and slowly flatten it with your fingertips from the inside outwards, but leave the edge unprocessed so that it stays particularly fluffy and has the typical shape. In the next step, take the pizza in your hands and slowly pull it apart with the back of your hands. By combining the two steps, you will gradually get an even shape with a fairly thin base and wide edge. Now, place the shaped pizza on a lightly floured pizza paddle and add your chosen toppings. The traditional Neapolitan pizza is always topped with a thin layer of tomato sauce, then drained and chopped mozzarella (or buffalo mozzarella), and then topped with other chosen ingredients. Then bake the finished pizza in the preheated pizza oven at 450^ C for only about 2 minutes. Buon Appetito!
natural_image
Person holding a large, white dough-like substance in a kitchen setting with bowls of food nearby (no visible text or symbols)While carefully considered and tested by their authors and UNOLD AG, the recipes included in this instruction manual are provided without guarantee. The authors / UNOLD AG or their agents cannot be held liable for any personal injury or damage to property or material.
GUARANTEE CONDITIONS
We grant a warranty of 24 months for this UNOLD brand appliance - 12 months for commercial use - from the date of purchase, covering damage that is demonstrably due to factory defects when used as intended. Within the warranty period, we will remedy material and manufacturing defects at our discretion by repair or exchange. Our warranty services apply exclusively to appliances sold in Germany and Austria. For other countries, please contact the responsible importer. Please send appliances for which you seek removal of defects, together with a copy of the machine-generated proof of purchase that shows the date of purchase along with a description of the fault, to our customer service department using suitable packaging. On our website https://unold.de/pages/rucksendungen, you can print out a return slip (only for return shipments from Germany and Austria). All types of damage attributable to wear and tear, improper handling and non-compliance with the maintenance and care instructions are excluded from the warranty. The warranty claim is void if repairs or interventions on the appliance are carried out by a third party. This manufacturer's warranty does not limit your statutory rights or your claims against the seller or dealer under the purchase contract in accordance with the provisions of the German Civil Code (BGB). Your statutory rights as a consumer, in particular your rights to warranty and the statutory claims for defects in accordance with Sections 437 et seqq. BGB, remain unaffected.
UNOLD AG, Mannheimer Straße 4, D-68766 Hockenheim
WASTE DISPOSAL / ENVIRONMENTAL PROTECTION
Our appliances are produced on a highquality level for a long lifetime. Regular maintenance and expert repairs by our after-sales service can extend the useful life of the appliance. If an appliance is defective and repair is not possible, we ask you to follow the following instructions for disposal. Do not dispose this appliance together with your standard household waste. There is a legal requirement to dispose of waste electrical and electronic equipment (WEEE) as well as batteries and accumulators separately from household waste. You can recognise this waste equipment by the crossed-out wheeled bin symbol (WEEE symbol). Please bring this product to an approved collection point for recycling of electric and electronic products. By separate collection and disposal of waste products you help to protect natural resources and ensure, that the product is disposed in an adequate way to protect health and environment.
The instruction booklet is also available for download: www.unold.de