
FW55EZ20L - Monitor SONY - Free user manual and instructions
Find the device manual for free FW55EZ20L SONY in PDF.
| Product Type | Professional LCD Monitor |
| Brand | Sony |
| Model | FW55EZ20L |
| Display Type | LCD with LED Backlight |
| Display Resolution | 3840 x 2160 (4K) |
| Screen Size (Diagonal) | 138.8 cm (55 inches) |
| Dimensions (W x H x D) | 124.3 x 72.1 x 7.1 cm |
| Weight | 15.3 kg |
| Power Supply | 220-240 V AC, 50 Hz |
| Standby Consumption | 0.5 W |
| Audio Output (RMS) | 10 W + 10 W |
| HDMI Connectivity | 4 HDMI inputs (HDCP 2.3), HDMI IN 3 with eARC/ARC |
| USB Connectivity | 2 USB 2.0 ports (500 mA max) |
| Other Connectors | VIDEO IN (mini jack), optical audio output, headphone, LAN, RS-232C |
| Wireless Network | Wi-Fi 802.11a/b/g/n/ac, Bluetooth 5.0 |
| Professional Features | BRAVIA Signage Free, power scheduling, periodic restart, IP/RS-232C control |
| Wall Mount | Compatible with SU-WL850 (except 50/43) and SU-WL450 mounts |
| Operating Temperature | 0°C to 40°C |
| Operating Humidity | 10% to 80% RH (without condensation) |
| Included Accessories | Remote control, batteries, table stand, installation guide |
Frequently Asked Questions - FW55EZ20L SONY
User questions about FW55EZ20L SONY
0 question about this device. Answer the ones you know or ask your own.
Ask a new question about this device
Download the instructions for your Monitor in PDF format for free! Find your manual FW55EZ20L - SONY and take your electronic device back in hand. On this page are published all the documents necessary for the use of your device. FW55EZ20L by SONY.
USER MANUAL FW55EZ20L SONY
Connection Diagram ....4
Remote Control and LCD Monitor....6
Pro settings....7
BRAVIA Signage Free .....8
Control functions .....10
RS-232C....10
IP control 11
Installing the LCD Monitor to the Wall....12
Troubleshooting....13
Specifications....14
About Manuals
This LCD Monitor comes with the following manuals. Please retain the manuals for future reference.
Setup Guide
• LCD Monitor installation and setup.
Reference Guide (this manual) / Safety Information
- Safety information, remote control, troubleshooting, wall-mount installation, specification, etc.
Help
Find more troubleshooting and other useful information directly from your LCD Monitor. Press HELP on the remote control to display a list of topics.

Setting menus are subject to change without notice.
IMPORTANT - Read the End User Software Licence Agreement before using your Sony product. Using your product indicates your acceptance of the End User Software Licence Agreement. The software licence agreement between you and Sony is available online at Sony website (https://www.sony.net/tv-software-licenses/) or on your product screen. Go to [Settings] → [System] → [About] → [Legal information] → [Notices and licences].
Note
- Before operating the LCD Monitor, please read the "Safety Information".
- Read the supplied safety documentation for additional safety information.
- Images and illustrations used in the Setup Guide and this manual are for reference only and may differ from the actual product.
Location of the identification label
Labels for the LCD Monitor Model No., Production Date (year/month) and Power Supply rating are located on the rear of the LCD Monitor or package.
IMPORTANT NOTICE
Notice for Radio Equipment
Hereby, Sony Corporation declares that the radio equipment types FW-75EZ20L, FW-65EZ20L, FW-55EZ20L, FW-50EZ20L, FW-43EZ20L are in compliance with Directive 2014/53/EU. The full text of the EU declaration of conformity is available at the following internet address: https://compliance.sony.eu
Hereby, Sony Corporation declares that the radio equipment types FW-75EZ20L, FW-65EZ20L, FW-55EZ20L, FW-50EZ20L, FW-43EZ20L are in compliance with the UK relevant statutory requirements. The full text of the declaration of conformity is available at the following internet address: https://compliance.sony.co.uk
For this radio equipment, the following restrictions on putting into service or of requirements for authorization of use apply in AT, BE, HR, CY, CZ, DK, EE, FI, FR, DE, EL, HU, IE, IT, LV, LT, LU, MT, NL, PL, PT, SK, SI, ES, SE, UK, UK (NI), IS, LI, NO, CH, BG, RO, TR, AL, BA, MK, MD, RS, ME, Kosovo :
5150 - 5350 MHz band is restricted to indoor operations only.
Safety Information
Installation/Set-up
Install and use the LCD Monitor in accordance with the instructions below in order to avoid any risk of fire, electric shock or damage and/or injuries.
Installation
- The LCD Monitor should be installed near an easily accessible mains socket.
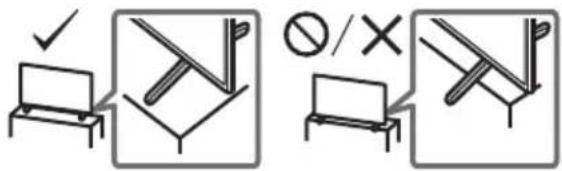
- Place the LCD Monitor on a stable, level surface to prevent it from falling over and causing personal injury or property damage.
• Install the LCD Monitor where it cannot be pulled, pushed, or knocked over.
- Install the LCD Monitor so that the LCD Monitor's Table-Top Stand does not protrude out from the LCD Monitor stand (not supplied). If the Table-Top Stand protrudes out from the LCD Monitor stand, it may cause LCD Monitor set to topple over, fall down, and cause personal injury or damage to the LCD Monitor. (Models with Table-Top Stand only)
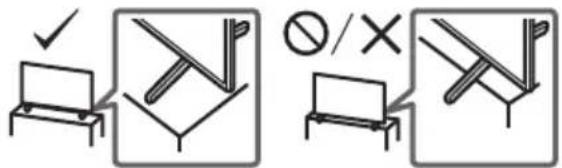
Transporting
- Before transporting the LCD Monitor, disconnect all cables.
- Two or more persons are needed to transport a large LCD Monitor.
- When transporting the LCD Monitor by hand, hold it as shown below. Do not put stress on the LCD panel and the frame around the screen.
- When lifting or moving the LCD Monitor, hold it firmly from the bottom.
- When handling or mounting the LCD Monitor set, do not lay down the LCD Monitor (for applicable LCD Monitor model only).

natural_image
Line drawing of two human figures holding a rectangular device (no text or symbols)- When transporting the LCD Monitor, do not subject it to jolts or excessive vibration.
- When transporting the LCD Monitor for repairs or when moving, pack it using the original carton and packing material.
Topple prevention (models with Table-Top Stand only)
FW-65EZ20L / 55EZ20L / 50EZ20L / 43EZ20L
Connection Diagram
Note
- Terminals and labels may vary depending on region/country/LCD Monitor model.

flowchart
graph TD
    A["Home Device"] --> B["Remote RS-232C"]
    B --> C["LAN"]
    C --> D["HDMI Device/ARC"]
    D --> E["Audio System with eARC/ARC/HDMI Device"]
    E --> F["HDMI Device/PC"]
    F --> G["Headphone"]
    G --> H["Video IN / -"]
    H --> I["HDMI IN"]
    I --> J["Digital Audio OUT (OPTICAL)"]
    J --> K["USB storage media etc."]
    style A fill:#f9f,stroke:#333
    style B fill:#ccf,stroke:#333
    style C fill:#cfc,stroke:#333
    style D fill:#fcc,stroke:#333
    style E fill:#cff,stroke:#333
    style F fill:#ffc,stroke:#333
    style G fill:#cfc,stroke:#333
    style H fill:#fcc,stroke:#333
    style I fill:#cfc,stroke:#333
    style J fill:#fcc,stroke:#333
    style K fill:#cfc,stroke:#333
    style_L["Router"] --> M["Home Controller"]
    N["Audio System with eARC/ARC/HDMI Device"] --> O["HDMI Device/PC"]
    P["Video/Video game equipment/DVD player/Camcorder"] --> Q["HDMI Device/PC"]
1 USB

USB
2
- Connecting a large USB device may interfere with other connected devices beside it.
2 Ⓞ (Headphone)
• Supports 3-pole stereo mini jack only.
- You cannot output sound from both the headphone and the LCD Monitor speakers at the same time.
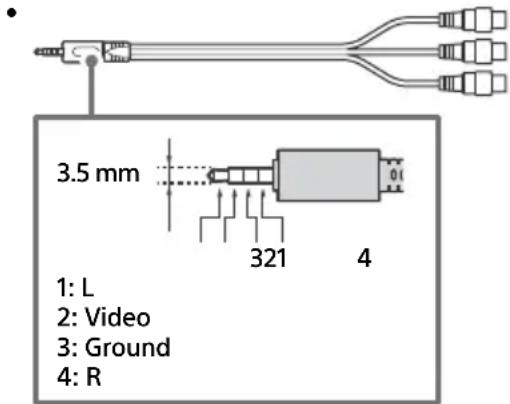
3 -∅ V I D E O I N
- For a composite connection, use an Analogue Extension Cable (not supplied).
4 HDMI IN 1/2/3
- HDMI interface can transfer the digital video and audio on a single cable.
• HDMI IN 3 eARC/ARC (Enhanced Audio Return Channel/Audio Return Channel)
Connect your audio system to the HDMI IN 3 to route LCD Monitor audio to your audio system. An audio system that supports HDMI eARC/ARC can send video to the LCD Monitor, and receive audio from the LCD Monitor via the same HDMI cable. If your audio system does not support HDMI eARC/ARC, an additional connection with DIGITAL AUDIO OUT (OPTICAL) is necessary.
- Use the HDMI cable with Ethernet to connect audio system with eARC.
5 REMOTE RS-232C
- Terminal for serial communication. For details, see "Control functions".
Remote Control and LCD Monitor
The remote control shape, layout, availability and function of remote control buttons may vary depending on your region/country/LCD Monitor model/LCD Monitor settings.
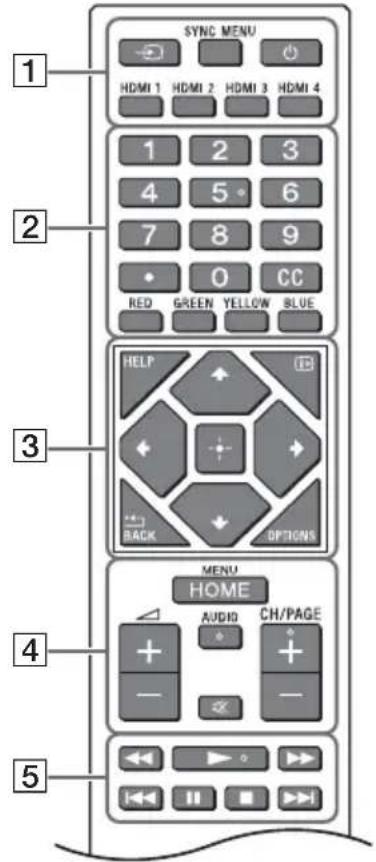
1 (Input select): Display and select the input source, etc.
SYNC MENU: Display the BRAVIA Sync Menu.
(Power)
HDMI 1/2/3/4
2 Number buttons
(dot)
CC
Colour buttons
3 HELP: Display the Help menu.
i+ (Screen display): Display information.
/BACK
OPTIONS: Displays a list of functions that can be used at that time.
//// (Navigation D-Pad): On screen menu navigation and selection.
4 HOME/MENU
△ +/- (Volume)
AUDIO*: Select the sound of multilingual source or dual sound (depend on programme source).
※ (Mute)
CH/PAGE +/-
5
flowchart
graph TD
    A["6"] --> B(( ))
    B --> C[" "]
    C --> D["7"]
6 ⏻ (Power)
7 Remote Control sensor / LED
* Accessibility shortcut is available by pressing and holding AUDIO.
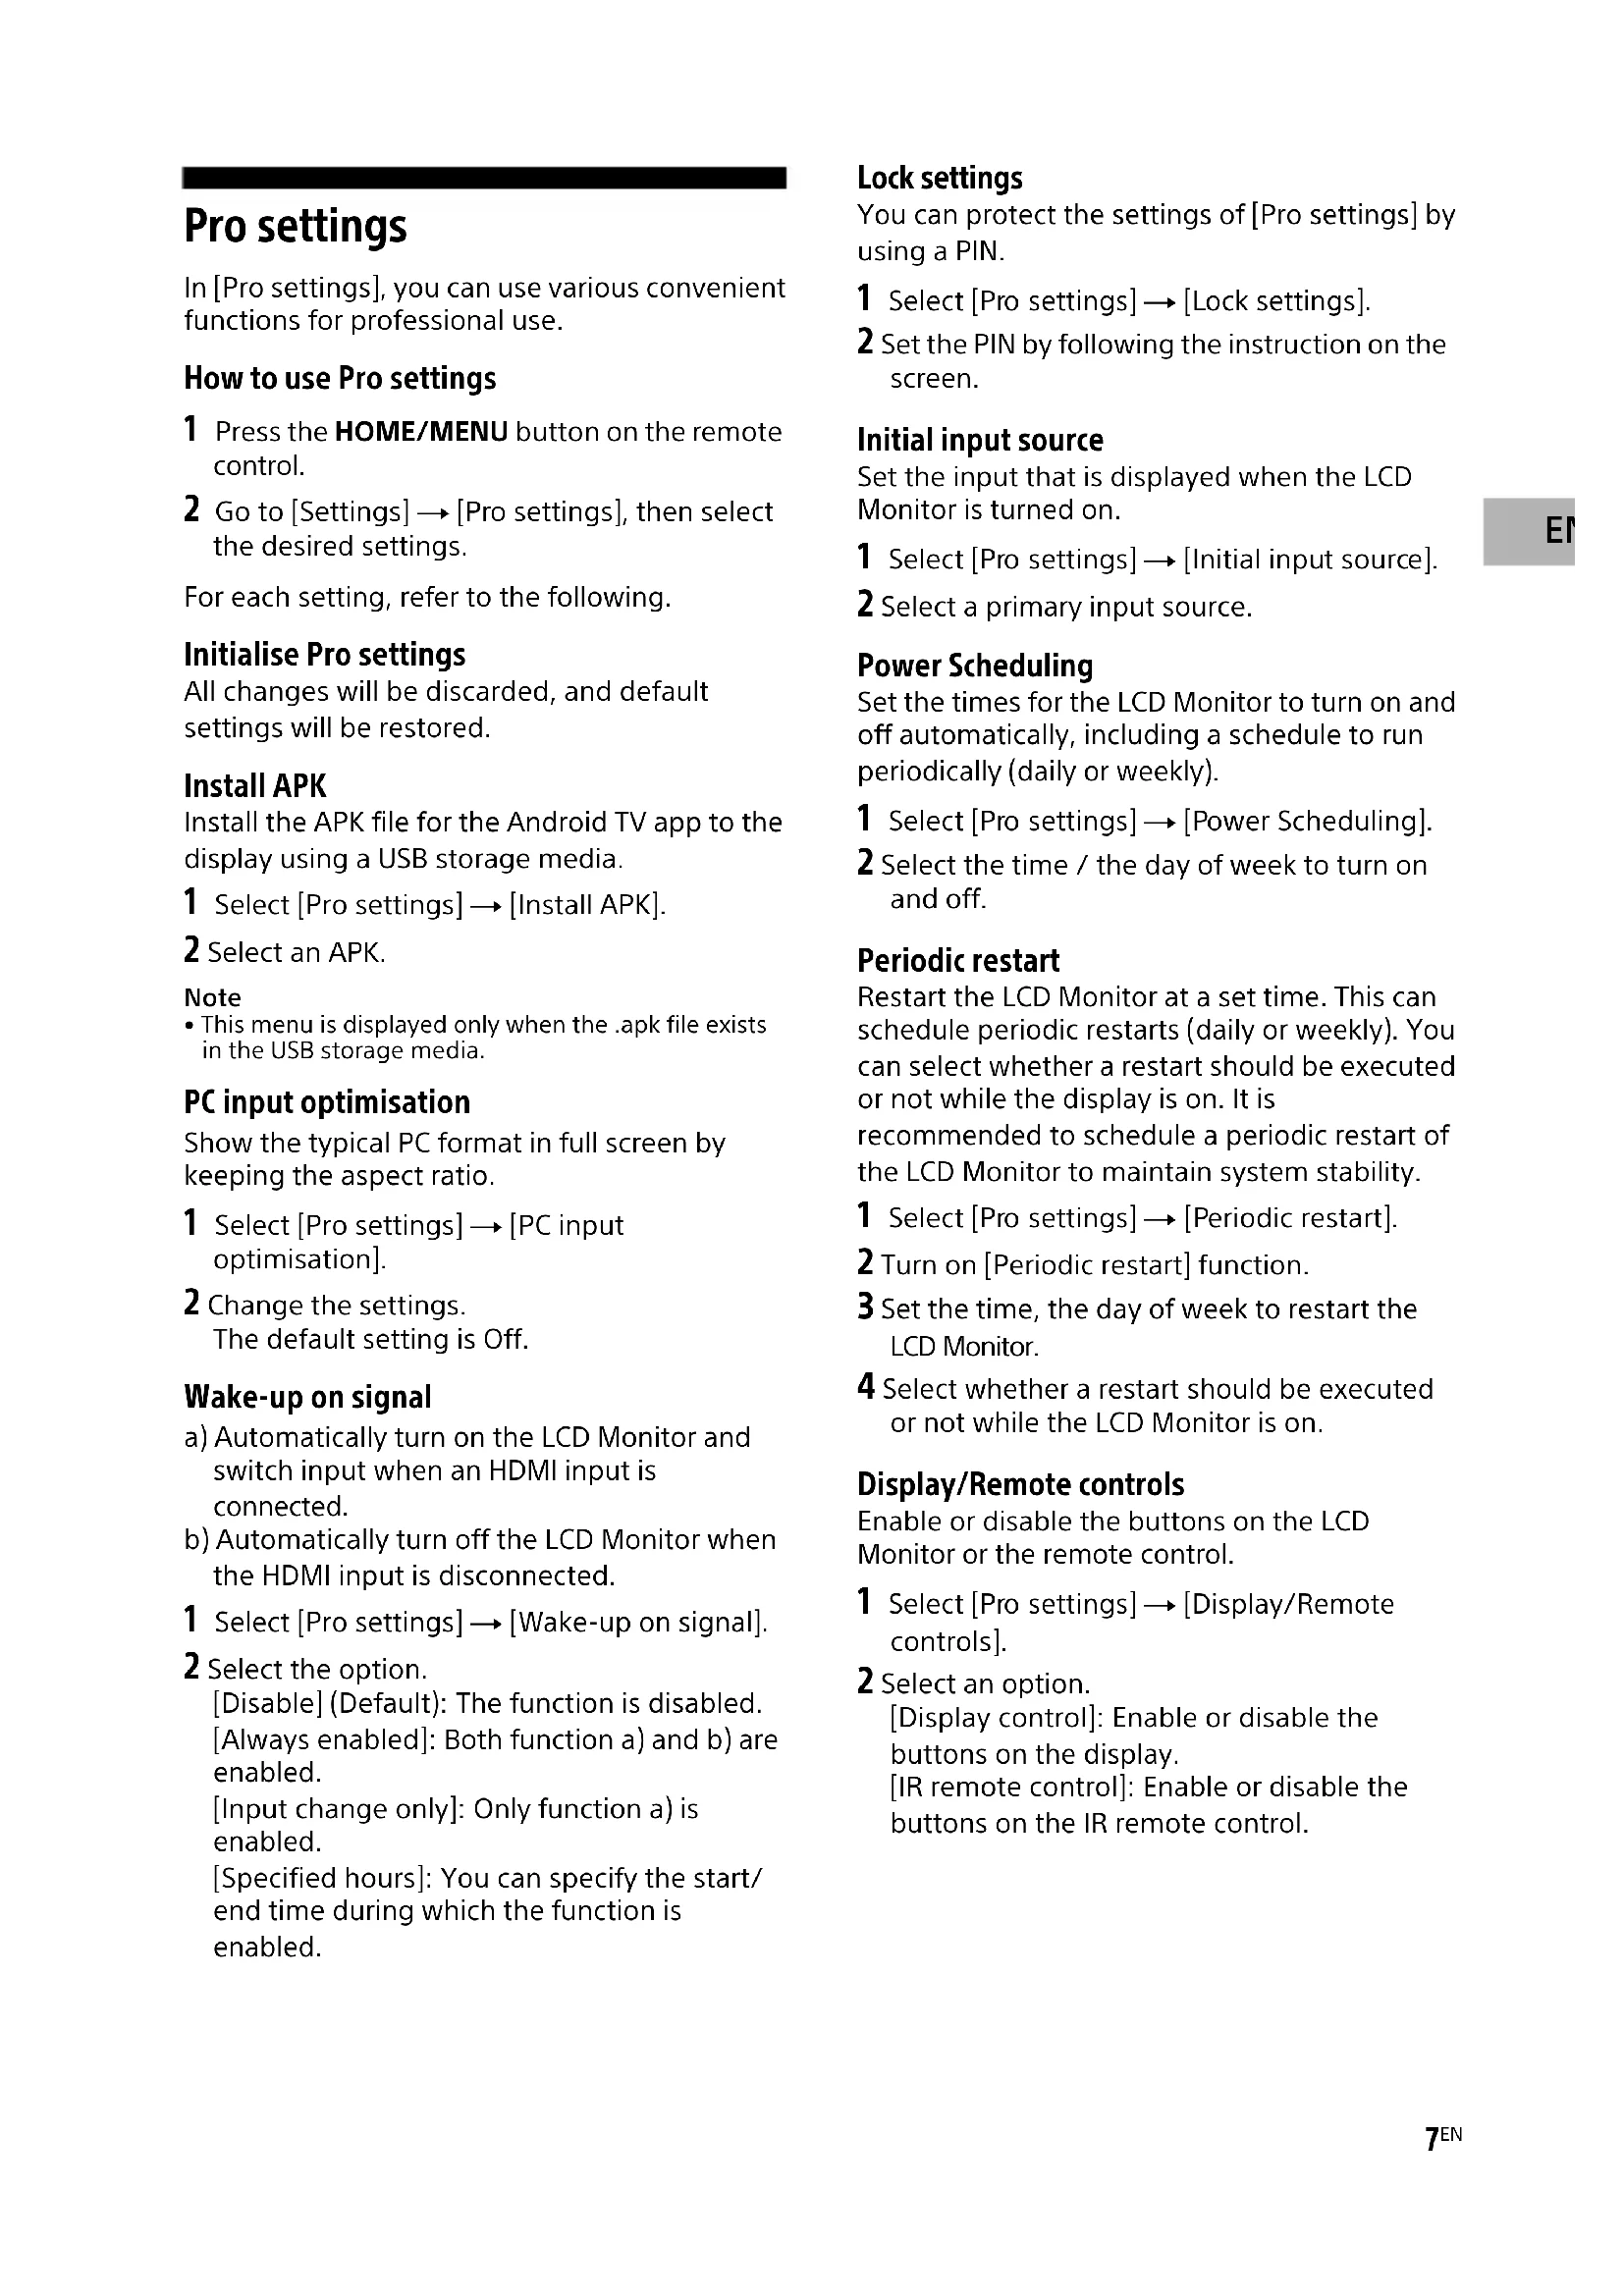
Pro settings
In [Pro settings], you can use various convenient functions for professional use.
How to use Pro settings
1 Press the HOME/MENU button on the remote control.
2 Go to [Settings] → [Pro settings], then select the desired settings.
For each setting, refer to the following.
Initialise Pro settings
All changes will be discarded, and default settings will be restored.
Install APK
Install the APK file for the Android TV app to the display using a USB storage media.
1 Select [Pro settings] → [Install APK].
2 Select an APK.
Note
- This menu is displayed only when the .apk file exists in the USB storage media.
PC input optimisation
Show the typical PC format in full screen by keeping the aspect ratio.
1 Select [Pro settings] → [PC input optimisation].
2 Change the settings. The default setting is Off.
Wake-up on signal
a) Automatically turn on the LCD Monitor and switch input when an HDMI input is connected.
b) Automatically turn off the LCD Monitor when the HDMI input is disconnected.
1 Select [Pro settings] → [Wake-up on signal].
2 Select the option.
[Disable] (Default): The function is disabled.
[Always enabled]: Both function a) and b) are enabled.
[Input change only]: Only function a) is enabled.
[Specified hours]: You can specify the start/end time during which the function is enabled.
Lock settings
You can protect the settings of [Pro settings] by using a PIN.
1 Select [Pro settings] → [Lock settings].
2 Set the PIN by following the instruction on the screen.
Initial input source
Set the input that is displayed when the LCD Monitor is turned on.
1 Select [Pro settings] → [Initial input source].
2 Select a primary input source.
Power Scheduling
Set the times for the LCD Monitor to turn on and off automatically, including a schedule to run periodically (daily or weekly).
1 Select [Pro settings] → [Power Scheduling].
2 Select the time / the day of week to turn on and off.
Periodic restart
Restart the LCD Monitor at a set time. This can schedule periodic restarts (daily or weekly). You can select whether a restart should be executed or not while the display is on. It is recommended to schedule a periodic restart of the LCD Monitor to maintain system stability.
1 Select [Pro settings] → [Periodic restart].
2 Turn on [Periodic restart] function.
3 Set the time, the day of week to restart the LCD Monitor.
4 Select whether a restart should be executed or not while the LCD Monitor is on.
Display/Remote controls
Enable or disable the buttons on the LCD Monitor or the remote control.
1 Select [Pro settings] → [Display/Remote controls].
2 Select an option. [Display control]: Enable or disable the buttons on the display. [IR remote control]: Enable or disable the buttons on the IR remote control.
External inputs
Define which input sources are available.
1 Select [Pro settings] → [External inputs].
2 Select an input.
3 Select an option.
[Use with labels]: The input info label appears on the screen.
[Use without labels]: The input info label does not appear on the screen.
[Not use]: The input is disabled in Pro mode.
BRAVIA Signage Free
Allows you to playback movies and still images that are stored on a USB storage media, insert the USB device into a USB port on the LCD Monitor.
Supported files and formats
Video format ^12
MP4 AVC, MP4 AVC/HEVC (.mp4)
MPEG TS AVC/MPEG2 (.m2ts)
*1 Maximum supported resolution is 3840 × 2160 for a 4K model and 1920 × 1080 for a 2K model.
*2 Frame rate is 30 fps.
Photo format
JPEG ^*1 (.jpg, .jpeg)
BMP^*2(.bmp)
PNG ^*2 (.png)
GIF ^*2 (.gif)
*1 Maximum supported resolution is 3840 × 2160 for a 4K model.
*2 Maximum supported resolution is 1920 × 1080 for a 2K model.
Audio format
MP3 (.mp3) (44.1 kHz, 48 kHz) (2 channels)
AAC (.m4a) (44.1 kHz, 48 kHz) (2 channels)
What to prepare
Format the USB storage media file system using NTFS or FAT32 option.
Start BRAVIA Signage Free
Select [BRAVIA Signage Free] on the [Home] screen of the LCD Monitor.
The first time you open [BRAVIA Signage Free], the [Basic settings] screen is displayed.
Next time, the registered contents are displayed.
You can display the [Basic settings] screen when you press and hold the 1 button on the remote control for more than 3 seconds.
If you enable [Lock settings], to view [BRAVIA Signage Free], enter the PIN code.
Basic settings screen settings
[Landscape/Portrait], [Transition effect], and [Text].
If you enable the [Presentation mode], you can manually select the previous or next content with the left/right button on the remote control.
Slideshow playback
Slideshow playback will playback content alphabetically that is stored on the USB storage media.
1 Create a "media" folder in the root folder of the USB storage media and copy the contents.
2 Insert the USB storage media to a USB port on the LCD Monitor.
3 Go to [Home] → [BRAVIA Signage Free], to display the [Basic settings] screen. To show the [Basic settings] screen, press and hold the 1 button on the remote control for more than 3 seconds.
4 Set the [Play mode] to [Slideshow].
5 Select [Start].
Create playlist and play
A playlist can be created that specifies the order of playback for the contents stored on the USB storage media.
1 Create a "media" folder in the root folder of the USB storage media and copy the contents.
2 Insert the USB storage media to a USB port on the LCD Monitor.
3 Go to [Home] → [BRAVIA Signage Free], to display the [Basic settings] screen.
To show the [Basic settings] screen, press and hold the 1 button on the remote control for more than 3 seconds.
4 Press the RED button on the remote control to create the playlist and display the [Playlist settings] screen. You can check the colour button function at the bottom of the screen.
5 Enter the playlist name via on-screen keyboard.
6 Select the content. You can add the content by choosing [+].
7 Select [OK]. The Playlist is saved, and the [Basic settings] screen is displayed.
8 On [Basic settings] screen, set the [Play mode] to [Playlist] and select the playlist name to playback, then select [Start].
Playlist schedule playback
You can set the playback schedule for the playlist.
1 Go to [Home] → [BRAVIA Signage Free], to display the [Basic settings] screen. To show the [Basic settings] screen, press and hold the 1 button on the remote control for more than 3 seconds.
2 On the [Basic settings] screen, press the GREEN button on the remote control. The [Schedule settings] screen is displayed.
3 On the [Schedule settings], press the RED button on the remote control, and create the new schedule.
4 Select [OK]. The Schedule is saved, and the [Basic settings] screen is displayed.
5 On the [Basic settings] screen, set the [Play mode] to [Scheduled], then select [Start].
Note
- The time/date settings of the LCD Monitor must be correct.
Copy the contents to the LCD Monitor's internal storage
You can copy the contents from the USB storage media to the LCD Monitor's internal storage. You can playback the contents from the LCD Monitor's internal storage by changing the [Storage] setting to [Internal storage] on the [Basic settings] screen.
1 On the [Basic settings] screen, press the YELLOW button on the remote control. The [Content management] screen is displayed.
2 Press the GREEN button on the remote control to import content.
Press the RED button on the remote control to delete content.
Press the YELLOW button on the remote control for multiple selections.
Bulk import / Bulk export
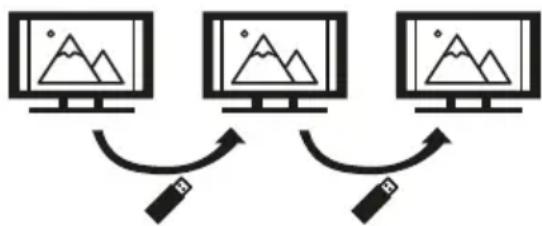
You can copy the settings and content from one LCD Monitor to another using the [BRAVIA Signage Free] software.
flowchart
graph TD
    A["Monitor 1"] -->|Bidirectional Arrow| B["Monitor 2"]
    B -->|Bidirectional Arrow| C["Monitor 3"]
1 Connect the USB storage media to the LCD Monitor.
2 Go to the [Basic settings] screen, select [Bulk import] or [Bulk export].
[Bulk import]: Import the settings and content from the USB storage media
[Bulk export]: Export the settings and content to the USB storage media
3 Select [OK] to perform Bulk import / Bulk export.
Auto start playback
1 Copy "autorun.txt" file to "sony" folder and contents to "media" folder of the USB storage media.
2 Connect the USB storage media to the LCD Monitor after turned on.
3 Signage playback starts when mains lead is plugged in again.
Control functions
RS-232C
You can control the LCD Monitor from an external service via RS-232C. The RS-232C connection is briefly explained in this page.
Interface
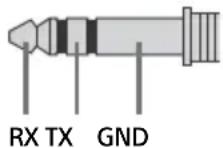
Establish the RS-232C connection to the LCD Monitor by using a 3.5 mm stereo mini plug.
TIP: LCD Monitor→Controller
RING: Controller → LCD Monitor
Connection settings
When establishing the RS-232C connection, make connection settings as below.
| Baud rate 9600 bps |
| Data 8 bit |
| Parity None |
| Start bit 1 bit |
| Stop bit 1 bit |
| Flow control None |
Data format
We introduce the data format for the RS-232C communication below.
(a) Requests from the controller to the LCD Monitor
| No. Item Value | ||||||||
| 1 | H | e | a | d | e | r | 0 | x |
| 2 | Category | 0x00 | (fixed) | |||||
| 3 | Function | 0xXX | ||||||
| 4 | Length | 0xXX | (=Data X+1 byte) | |||||
| 5 | Data 1 | 0xXX | ||||||
| : | : | 0 | x | XX | ||||
| : | : | 0x | X | X | ||||
| X+4 | Data X | 0xXX | ||||||
| X+5 Check Sum | 0xXX | |||||||
(b) Responses from the LCD Monitor to the controller
| No. Item Value | ||||||||
| 1 | H | e | a | d | e | r | 0 | |
| 2 Answer 0x00 Completed (Normal End) | ||||||||
| 0x01 : Limit Over(Abnormal End-Exceed maximum value) | ||||||||
| 0x02 : Limit Over(Abnormal End-Exceed minimum value) | ||||||||
| 0x03 : Command Canceled (Abnormal end) | ||||||||
| 0x04 : Parse Error (Data Format Error) | ||||||||
| 3 | C | h | e | c | k | S | u | m |
Command example
Examples of RS-232C communication command are explained below.
| Control | Head | Category | Function | Length | Data 1 | Data X | Checksum |
| Power on/off | 0x8C | 0x00 | 0x00 | 0x02 | 0x00 (off) | - | 0x8E |
| 0x01 (on) | - | 0x8F | |||||
| HDMI input selection | 0x8C | 0x00 | 0x02 | 0x03 | 0x04 (HDMI) | 0x01 (#1) | 0x96 |
| 0x02 (#2) | 0x97 | ||||||
| 0x03 (#3) | 0x98 | ||||||
| 0x04 (#4) | 0x99 |
For more details on RS-232C, please contact your sales representative.
IP control
You can control the LCD Monitor via IP from an HTML5/Android application on the external device. You can manage and monitor information of input/power, control the LCD Monitor such as input source and volume.
Supported IP protocol
| Protocol name | Layer | Format | Authentication | Explanation |
| Simple IP control | TCP | Byte stream | N/A | Only typical functions are supported. |
LCD Monitor settings
When using [IP control], set the LCD Monitor as follows first.
Go to [Settings] → [Network and Internet] → [IP control].
For Simple IP control,
- Enable [Simple IP control].
For more details on [IP control], please contact your sales representative.
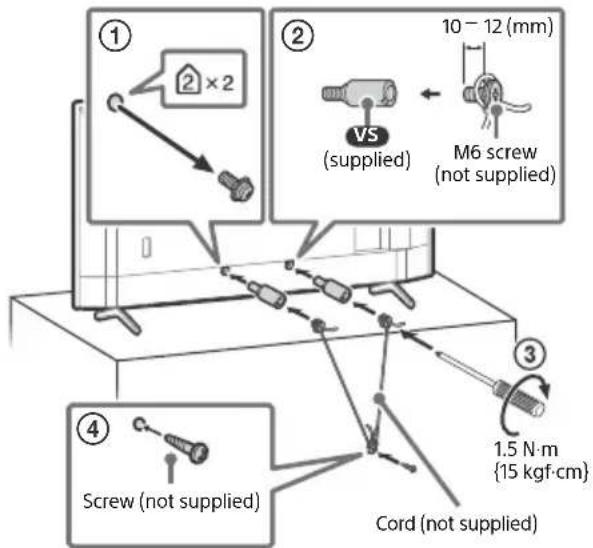
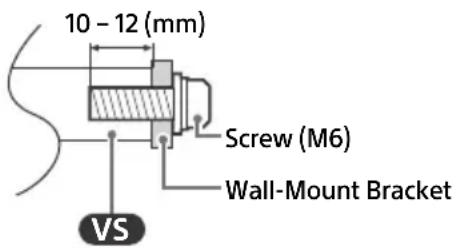
Installing the LCD Monitor to the Wall
Using the optional Wall-Mount Bracket (SU-WL850 or SU-WL450)* (not supplied)
To Customers:
For product protection and safety reasons, Sony strongly recommends that installation of your LCD Monitor be performed by Sony dealers or licensed contractors. Do not attempt to install it yourself.
To Sony Dealers and Contractors:
Provide full attention to safety during the installation, periodic maintenance and examination of this product.
Wall-Mount Bracket Installation Information
For instructions on Wall-Mount Bracket installation, see the Installation Information (Wall-Mount Bracket) on the product page for your LCD Monitor model.
https://www.sony.eu/support
- Follow the instruction guide provided with the Wall-Mount Bracket for your model. Sufficient expertise is required in installing this LCD Monitor, especially to determine the strength of the wall for withstanding the LCD Monitor's weight.
- Sony is not liable for any damage or injury caused by mishandling or improper installation.
- Only qualified service personnel should carry out wall-mount installations.
- For safety reasons, it is strongly recommended that you use Sony accessories, including:
- Wall-Mount Bracket SU-WL850
- Wall-Mount Bracket SU-WL450
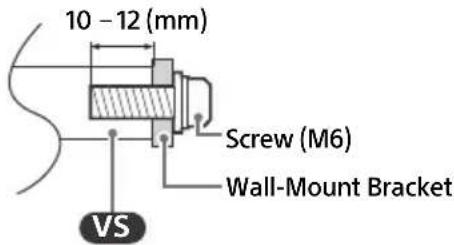
- Be sure to use the screws supplied with the Wall-Mount Bracket when attaching the Wall-Mount Bracket to the LCD Monitor. The supplied screws are designed as indicated by illustration when measured from the attaching surface of the Wall-Mount Bracket.
The diameter and length of the screws differ depending on the Wall-Mount Bracket model. Use of screws other than those supplied may result in internal damage to the LCD Monitor or cause it to fall, etc.
- Be sure to store the unused screws and Table-Top Stand in a safe place until you are ready to attach the Table-Top Stand (models with Table-Top Stand only). Keep the screws away from small children.
* Only for limited region/country/model.
Using the optional Wall-Mount Bracket (except SU-WL850 or SU-WL450) (not supplied)
This LCD Monitor's instruction manual only provides the steps to prepare the LCD Monitor for Wall-Mount installation before it is installed on the wall.
Your LCD Monitor can be mounted to a wall using a suitable Wall-Mount Bracket (not supplied). If the Table-Top Stand is attached to the LCD Monitor, the LCD Monitor may require detaching the Table-Top Stand (models with Table-Top Stand only).
Prepare the LCD Monitor for the Wall-Mount Bracket before making cable connections.
For product protection and safety reasons, Sony strongly recommends that installation of your LCD Monitor on the wall be performed by qualified professionals. Do not attempt to install it yourself.
- Follow the instruction guide provided with the Wall-Mount Bracket for your model. Sufficient expertise is required in installing this LCD Monitor, especially to determine the strength of the wall for withstanding the LCD Monitor's weight.
- The screws for installing the Wall-Mount Bracket to the LCD Monitor are not supplied.
- The length of the screw for Wall-Mount Bracket differs depending on the Wall-Mount Bracket thickness. Please refer to below illustration.
Troubleshooting
General troubleshooting for issues like: black screen, no sound, frozen picture, LCD Monitor does not respond, or network is lost, do the following steps.
1 Restart your LCD Monitor by pressing the power button on the remote control for about five seconds and select [Restart]. The LCD Monitor will restart. If the LCD Monitor does not recover, try unplugging the mains lead then press the power button on the LCD Monitor and release it. Wait for two minutes, and plug in the mains lead.
Or, press the power button on the LCD Monitor for about 40 seconds until the LCD Monitor turns off.
2 Refer to the Help menu by pressing HELP on the remote control.
3 Connect your LCD Monitor to the Internet and perform a software update. Sony recommends you to keep your LCD Monitor software updated. Software updates provide new features and performance improvements.
When you plug in the LCD Monitor, the LCD Monitor may not be able to turn on for a while even if you press the power button on the remote control or the LCD Monitor.
It takes time to initialize the system. Wait for about one minute, then operate it again.
The remote control does not function.
- Replace the batteries.
Specifications
System
Panel system
LCD (Liquid Crystal Display) Panel, LED
Backlight
Sound output (W)
10 + 10
Wireless technology
Protocol IEEE 802.11a/b/g/n/ac
Bluetooth® Version 5.0
Frequency range (MHz) (Output power (dBm))
Wireless LAN (LCD Monitor)
2400-2483.5 (<20.0), 5150-5250 (<23.0),
5250-5350 (<20.0), 5470-5725 (<20.0),
5725-5850 (<13.9)
Bluetooth ^® (LCD Monitor)
2400-2483.5 (<10.0)
Input/Output jacks
→/→ VIDEO IN
Video/Audio input (mini jack)
HDMI IN 1/2/3 (HDCP 2.3-compatible)
Video:
4096 × 2160p (50, 60 Hz)^*1 , 4096 × 2160p
(24 Hz), 3840 × 2160p (50, 60 Hz) ^*1 , 3840 ×
2160p (24, 25, 30 Hz), 1080p (30, 50, 60 Hz),
1080/24p, 1080i (50, 60 Hz), 720p (30, 50,
60 Hz), 720/24p, 576p, 576i 480p, 480i, PC
Formats
Audio:
In eARC (Enhanced Audio Return Channel) mode
7.1 channel linear PCM: 32/44.1/48 kHz
16 bits, Dolby Digital, Dolby Digital Plus,
Dolby TrueHD, Dolby Atmos
Except eARC mode
Two channel linear PCM: 32/44.1/48 kHz
16/20/24 bits, Dolby Audio
eARC/ARC (Enhanced Audio Return Channel/
Audio Return Channel) (HDMI IN 3 only)*2
In eARC mode
7.1 channel linear PCM: 32/44.1/48 kHz
16 bits, Dolby Digital, Dolby Digital Plus,
Dolby TrueHD, Dolby Atmos
In ARC mode
Two channel linear PCM: 48 kHz 16 bits,
Dolby Audio, Dolby Atmos
→ DIGITAL AUDIO OUT (OPTICAL)
Digital optical jack (Two channel linear PCM:
48 kHz 16 bits, Dolby Audio)
USB port 1 and 2 support High Speed USB (USB 2.0)
LAN
10BASE-T/100BASE-TX connector (Depending on the operating environment of the network, connection speed may differ. The communication rate and quality are not guaranteed.)
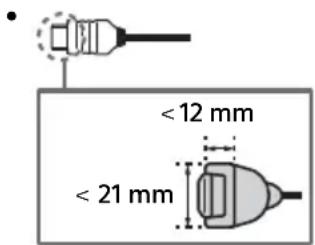
REMOTE
RS-232C, mini jack
This jack is for receiving the external control signal.
Power, Product Fiche and others
Power requirements
220 V - 240 V AC, 50 Hz
Screen size (measured diagonally) (Approx.)
(cm/inches)
FW-75EZ20L: 189.3 / 75
FW-65EZ20L: 163.9 / 65
FW-55EZ20L: 138.8 / 55
FW-50EZ20L: 125.7 / 50
FW-43EZ20L: 108.0 / 43
Standby power consumption*3*4 (W)
0.50
Display resolution (horizontal × vertical) (pixels)
3840 × 2160
Output Rating
500 mA (for USB 1/2)
Dimensions (Approx.) (w × h × d) (cm)
FW-75EZ20L: 168.6 × 96.9 × 7.2
FW-65EZ20L: 146.2 × 84.2 × 7.1
FW-55EZ20L: 124.3 × 72.1 × 7.1
FW-50EZ20L: 112.6 × 65.3 × 7.0
FW-43EZ20L: 97.2 × 56.7 × 7.0
Mass (Approx.) (kg)
FW-75EZ20L: 30.4
FW-65EZ20L: 20.4
FW-55EZ20L: 15.3
FW-50EZ20L: 12.1
FW-43EZ20L: 9.3
Others
Optional accessories
Wall-Mount Bracket: SU-WL850 (except
FW-50EZ20L / 43EZ20L), SU-WL450
Table-Top Stand: FWA-ST1L (FW-43EZ20L only),
FWA-ST2L (FW-50EZ20L only), FWA-ST3L
(FW-65EZ20L / 55EZ20L only)
Operating temperature: 0 °C – 40 °C
Operating humidity: 10 % – 80 % RH (non-condensing)
*1 Refer to the on screen menu to set [HDMI signal format].
*2 Connect your audio system to the HDMI IN 3 to route LCD Monitor audio to your audio system.
*3 Specified standby power is reached after the LCD Monitor finishes necessary internal processes.
*4 Standby power consumption will increase when your LCD Monitor is connected to the network.
Note
- Optional accessories availability depends on countries/region/LCD Monitor model/stock.
- Design and specifications are subject to change without notice.
- Some of the on-screen instructions may not apply to your LCD Monitor model.
- Product fiche in this manual is for COMMISSION DELEGATED REGULATION (EU) 1062/2010. Refer to its website for (EU) 2019/2013 information.
Trademark Information
- The terms HDMI, HDMI High-Definition Multimedia Interface, HDMI Trade dress and the HDMI Logos are trademarks or registered trademarks of HDMI Licensing Administrator, Inc.
- Manufactured under license from Dolby Laboratories. Dolby, Dolby Audio, and the double-D symbol are trademarks of Dolby Laboratories Licensing Corporation.
- Vewd® Core. Copyright 1995-2023 Vewd Software AS. All rights reserved.
- Google, YouTube and Android TV are trademarks of Google LLC.
- Wi-Fi®, Wi-Fi Alliance® and Wi-Fi Direct® are registered trademarks of Wi-Fi Alliance.
- Wi-Fi CERTIFIED™ and Wi-Fi CERTIFIED 6™ logos are certification marks of Wi-Fi Alliance.
- The Bluetooth® word mark and logos are registered trademarks owned by Bluetooth SIG, Inc. and any use of such marks by Sony Group Corporation and its subsidiaries is under license.
- Apple, Apple Home, AirPlay and HomeKit are trademarks of Apple Inc., registered in the U.S. and other countries and regions. To use AirPlay and Apple HomeKit with this TV, the latest version of iOS, iPadOS, or macOS is recommended.
- Covered by one or more claims of the HEVC patents listed at patentlist.accessadvance.com.
- All other trademarks are the property of their respective owners.
Product registration number (COMMISSION DELEGATED REGULATION (EU) 2019/2013)
FW-75EZ20L (1589637), FW-65EZ20L (1589636), FW-55EZ20L (1589635), FW-50EZ20L (1589634), FW-43EZ20L (1589633).
Table des matières
AVIS IMPORTANT....2
Transport
natural_image
Line drawing of two human figures holding a rectangular device (no text or symbols)• HDMI IN 3 eARC/ARC (Enhanced Audio Return Channel/Audio Return Channel)
flowchart
graph TD
    A["Monitor 1"] -->|USB cable| B["Monitor 2"]
    B -->|USB cable| C["Monitor 3"]
https://www.sony.eu/support
—Support de fixation murale SU-WL850
—Support de fixation murale SU-WL450
2160p (24, 25, 30 Hz), 1080p (30, 50, 60 Hz),
1080/24p, 1080i (50, 60 Hz), 720p (30, 50,
60 Hz), 720/24p, 576p, 576i 480p, 480i,
Formats PC
Audio :
En mode eARC (Enhanced Audio Return
Channel)
16/20/24 bits, Dolby Audio
eARC/ARC (Enhanced Audio Return Channel/
Audio Return Channel) (HDMI IN 3
uniquement)*2
En mode eARC
→ DIGITAL AUDIO OUT (OPTICAL)
FW-43EZ20L:97,2×56,7×7,0
Poids (Environ) (kg)
FW-75EZ20L:30,4
FW-65EZ20L:20,4
FW-55EZ20L:15,3
FW-50EZ20L : 12,1
FW-43EZ20L:9,3
Autres
Accessoires en option
Support de fixation murale : SU-WL850 (sauf FW-50EZ20L / 43EZ20L), SU-WL450
Support de table : FWA-ST1L (FW-43EZ20L uniquement), FWA-ST2L (FW-50EZ20L uniquement), FWA-ST3L (FW-65EZ20L / 55EZ20L uniquement)
Transporte
natural_image
Line drawing of two human figures holding a rectangular device (no text or symbols)• HDMI IN 3 eARC/ARC (Enhanced Audio Return Channel/Audio Return Channel)
flowchart
graph TD
    A["Monitor 1"] -->|USB cable| B["Monitor 2"]
    B -->|USB cable| C["Monitor 3"]
https://www.sony.eu/support
2160p (24, 25, 30 Hz), 1080p (30, 50, 60 Hz),
1080/24p, 1080i (50, 60 Hz), 720p (30, 50,
60 Hz), 720/24p, 576p, 576i 480p, 480i,
Formatos de PC
Audio:
En el modo eARC (Enhanced Audio Return
Channel)
PCM lineal de 7,1 canales: 32/44,1/48 kHz
16 bits, Dolby Digital, Dolby Digital Plus,
Dolby TrueHD, Dolby Atmos
16/20/24 bits, Dolby Audio
eARC/ARC (Enhanced Audio Return Channel/
Audio Return Channel) (solo HDMI IN 3)*2
En el modo eARC
PCM lineal de 7,1 canales: 32/44,1/48 kHz
16 bits, Dolby Digital, Dolby Digital Plus,
Dolby TrueHD, Dolby Atmos
En el modo ARC
PCM lineal de dos canales: 48 kHz 16 bits,
Dolby Audio, Dolby Atmos
→ DIGITAL AUDIO OUT (OPTICAL)
Toma digital óptica (PCM lineal de dos
canales: 48 kHz 16 bits, Dolby Audio)
FW-43EZ20L: 108,0 / 43
Soporte de sobremesa: FWA-ST1L (solo FW-43EZ20L), FWA-ST2L (solo FW-50EZ20L), FWA-ST3L (solo FW-65EZ20L / 55EZ20L)
Specifications....15
Over handleidingen
Transport
natural_image
Line drawing of two silhouetted figures holding a rectangular device (no text or symbols)1 Selecteer [Pro-instellingen] → [APK installeren].
*2 De framerate is 30 fps.
Fotoformaat
JPEG*1(.jpg, .jpeg)
BMP^*2(.bmp)
PNG ^*2 (.png)
GIF*2 (.gif)
5 Selecteer [Start].
Importeren in bulk / Exporteren in bulk
flowchart
graph TD
    A["Monitor 1"] -->|Bidirectional Arrow| B["Monitor 2"]
    B -->|Bidirectional Arrow| C["Monitor 3"]
PUNT: LCD-monitor→ controller
RING: Controller → LCD-monitor
Verbindingsinstellingen
https://www.sony.eu/support
2160p (24, 25, 30 Hz), 1080p (30, 50, 60 Hz),
1080/24p, 1080i (50, 60 Hz), 720p (30, 50,
60 Hz), 720/24p, 576p, 576i 480p, 480i,
Pc-formaten
Audio:
In eARC (Enhanced Audio Return
Channel)-modus
7,1-kanaals lineaire PCM: 32/44,1/48 kHz
16 bits, Dolby Digital, Dolby Digital Plus,
Dolby TrueHD, Dolby Atmos
Behalve eARC-modus
Tweekanaals lineaire PCM: 32/44,1/48 kHz
16/20/24 bits, Dolby Audio
eARC/ARC (Enhanced Audio Return Channel/
Audio Return Channel) (alleen HDMI IN 3)*2
In eARC-modus
7,1-kanaals lineaire PCM: 32/44,1/48 kHz
16 bits, Dolby Digital, Dolby Digital Plus,
Dolby TrueHD, Dolby Atmos
In ARC-modus
Tweekanaals lineaire PCM: 48 kHz 16 bits,
Dolby Audio, Dolby Atmos
→ DIGITAL AUDIO OUT (OPTICAL)
FW-43EZ20L: 108,0 / 43
Stand-by vermogensgebruik ^34 (W) 0,50
Afmetingen (ong.) (b × h × d) (cm)
FWA-ST3L (alleen FW-65EZ20L / 55EZ20L)
Transport
natural_image
Line drawing of two human figures holding a rectangular device (no text or symbols)flowchart
graph TD
    A["Monitor 1"] -->|USB| B["Monitor 2"]
    B -->|USB| C["Monitor 3"]
https://www.sony.eu/support
Bluetooth ^® (LCD-Monitor)
2400-2483,5 (<10,0)
2160p (24, 25, 30 Hz), 1080p (30, 50, 60 Hz),
1080/24p, 1080i (50, 60 Hz), 720p (30, 50,
60 Hz), 720/24p, 576p, 576i 480p, 480i,
Computerformate
Audio:
Im eARC (Enhanced Audio Return
Channel)-Modus
7,1-Kanal linear PCM: 32/44,1/48 kHz 16 Bit,
Dolby Digital, Dolby Digital Plus, Dolby
TrueHD, Dolby Atmos
Außer eARC-Modus
Zwei Kanäle, lineares PCM: 32/44,1/48 kHz
16/20/24 Bit, Dolby Audio
eARC/ARC (Enhanced Audio Return Channel/
Audio Return Channel) (nur HDMI IN 3)*2
Im eARC-Modus
7,1-Kanal linear PCM: 32/44,1/48 kHz 16 Bit,
Dolby Digital, Dolby Digital Plus, Dolby
TrueHD, Dolby Atmos
Im ARC-Modus
→ DIGITAL AUDIO OUT (OPTICAL)
High-Speed-USB (USB 2.0)
LAN
FW-43EZ20L: 108,0 / 43
Transporte
natural_image
Line drawing of two silhouetted figures holding a rectangular device (no text or symbols)flowchart
graph TD
    A["Monitor 1"] -->|USB cable| B["Monitor 2"]
    B -->|USB cable| C["Monitor 3"]
2160p (24, 25, 30 Hz), 1080p (30, 50, 60 Hz),
1080/24p, 1080i (50, 60 Hz), 720p (30, 50,
60 Hz), 720/24p, 576p, 576i 480p, 480i,
Formatos PC
Áudio:
No modo eARC (Enhanced Audio Return
Channel)
PCM linear do canal 7,1: 32/44,1/48 kHz
16 bits, Dolby Digital, Dolby Digital Plus,
Dolby TrueHD, Dolby Atmos
Exceto no modo eARC
PCM linear de dois canais: 32/44,1/48 kHz
16/20/24 bits, Dolby Audio
eARC/ARC (Enhanced Audio Return Channel/
Audio Return Channel) (Apenas HDMI IN 3)*2
No modo eARC
PCM linear do canal 7,1: 32/44,1/48 kHz
16 bits, Dolby Digital, Dolby Digital Plus,
Dolby TrueHD, Dolby Atmos
No modo ARC
PCM linear de dois canais: 48 kHz 16 bits,
Dolby Audio, Dolby Atmos
→ DIGITAL AUDIO OUT (OPTICAL)
FW-43EZ20L: 108,0 / 43
Trasporto
natural_image
Line drawing of two human figures holding a rectangular device (no text or symbols)• HDMI IN 3 eARC/ARC (Enhanced Audio Return Channel/Audio Return Channel)
flowchart
graph TD
    A["Monitor 1"] -->|USB| B["Monitor 2"]
    B -->|USB| C["Monitor 3"]
https://www.sony.eu/support
LAN wireless (Monitor LCD)
2400-2483,5 (<20,0), 5150-5250 (<23,0),
5250-5350 (<20,0), 5470-5725 (<20,0),
5725-5850 (<13,9)
Bluetooth ^® (Monitor LCD)
2400-2483,5 (<10,0)
2160p (24, 25, 30 Hz), 1080p (30, 50, 60 Hz),
1080/24p, 1080i (50, 60 Hz), 720p (30, 50,
60 Hz), 720/24p, 576p, 576i 480p, 480i,
Formati PC
Audio:
eARC/ARC (Enhanced Audio Return Channel/
Audio Return Channel) (solo HDMI IN 3)*2
In modalità eARC
PCM lineare 7,1 canali: 32/44,1/48 kHz 16 bit,
Dolby Digital, Dolby Digital Plus, Dolby
TrueHD, Dolby Atmos
In modalità ARC
→ DIGITAL AUDIO OUT (OPTICAL)
FW-43EZ20L: 108,0 / 43
500 mA (per USB 1/2)
Dimensioni (circa) (I × a × p) (cm)
Supporto da tavolo: FWA-ST1L (solo FW-43EZ20L), FWA-ST2L (solo FW-50EZ20L), FWA-ST3L (solo FW-65EZ20L / 55EZ20L)
- Vewd® Core. Copyright 1995-2023 Vewd Software AS. All rights reserved.
Transport
natural_image
Line drawing of two human silhouettes holding a rectangular device (no text or symbols)• HDMI IN 3 eARC/ARC (Enhanced Audio Return Channel/Audio Return Channel)
flowchart
graph TD
    A["Monitor 1"] -->|USB cable| B["Monitor 2"]
    B -->|USB cable| C["Monitor 3"]
2160p (24, 25, 30 Hz), 1080p (30, 50, 60 Hz),
1080/24p, 1080i (50, 60 Hz), 720p (30, 50,
60 Hz), 720/24p, 576p, 576i 480p, 480i,
PC-format
Ljud:
I eARC (Enhanced Audio Return
Channel)-läge
eARC/ARC (Enhanced Audio Return Channel/
Audio Return Channel) (endast HDMI IN 3)*2
I eARC-läge
→ DIGITAL AUDIO OUT (OPTICAL)
FW-43EZ20L: 108,0 / 43
Transport
natural_image
Line drawing of two silhouetted figures holding a rectangular device (no text or symbols)flowchart
graph TD
    A["Monitor 1"] -->|USB cable| B["Monitor 2"]
    B -->|USB cable| C["Monitor 3"]
https://www.sony.eu/support
2160p (24, 25, 30 Hz), 1080p (30, 50, 60 Hz),
1080/24p, 1080i (50, 60 Hz), 720p (30, 50,
60 Hz), 720/24p, 576p, 576i 480p, 480i,
Pc-formater
Lyd:
I eARC (Enhanced Audio Return
Channel)-tilstand
7,1-kanals lineær PCM: 32/44,1/48 kHz
16 bit, Dolby Digital, Dolby Digital Plus,
Dolby TrueHD, Dolby Atmos
eARC/ARC (Enhanced Audio Return Channel/
Audio Return Channel) (kun HDMI IN 3)*2
I eARC-tilstand
7,1-kanals lineær PCM: 32/44,1/48 kHz 16 bit,
Dolby Digital, Dolby Digital Plus, Dolby
TrueHD, Dolby Atmos
I ARC-tilstand
To-kanals lineær PCM: 48 kHz 16 bit, Dolby
Audio, Dolby Atmos
→ DIGITAL AUDIO OUT (OPTICAL)
Digitalt optisk stik (to-kanals lineær PCM:
48 kHz 16 bit, Dolby Audio)
(Stereo-minijack)
Hovedtelefoner
1, 2
FW-43EZ20L: 108,0 / 43
500 mA (for USB 1/2)
Mål (Ca.) (b × h × d) (cm)
https://compliance.sony.eu
natural_image
Line drawing of two human figures holding a rectangular device (no text or symbols)2160p (24, 25, 30 Hz), 1080p (30, 50, 60 Hz),
1080/24p, 1080i (50, 60 Hz), 720p (30, 50,
60 Hz), 720/24p, 576p, 576i 480p, 480i,
PC-muodot
Audio:
eARC (Enhanced Audio Return
Channel)-tilassa
eARC/ARC (Enhanced Audio Return Channel/
Audio Return Channel) (vain HDMI IN 3)*2
eARC-tilassa
→ DIGITAL AUDIO OUT (OPTICAL)
FW-43EZ20L: 108,0 / 43
Virrankulutus valmiustilassa ^3*4 (W)
0,50
FWA-ST2L (vain FW-50EZ20L), FWA-ST3L (vain
FW-65EZ20L / 55EZ20L)
Pro-innstillinger....7
BRAVIA Signage Free .....8
Bæring
natural_image
Line drawing of two human figures holding a rectangular device (no text or symbols)• HDMI IN 3 eARC/ARC (Enhanced Audio Return Channel/Audio Return Channel)
Initialiser Pro-innstillinger
1 Velg [Pro-innstillinger] → [Installer APK].
2 Velg en APK.
Merknader
- Denne menyen vises bare når .apk-filen eksisterer på USB-lagringsminnet.
flowchart
graph TD
    A["Monitor 1"] -->|USB cable| B["Monitor 2"]
    B -->|USB cable| C["Monitor 3"]
https://www.sony.eu/support
2160p (24, 25, 30 Hz), 1080p (30, 50, 60 Hz),
1080/24p, 1080i (50, 60 Hz), 720p (30, 50,
60 Hz), 720/24p, 576p, 576i 480p, 480i,
PC-formater
Lyd:
I eARC (Enhanced Audio Return
Channel)-modus
eARC/ARC (Enhanced Audio Return Channel/
Audio Return Channel) (kun HDMI IN 3)*2
I eARC-modus
7,1 kanal lineær PCM: 32/44,1/48 kHz 16 biter,
Dolby Digital, Dolby Digital Plus, Dolby
TrueHD, Dolby Atmos
I ARC-modus
Tokanals lineær PCM: 48 kHz 16 biter, Dolby
Audio, Dolby Atmos
→ DIGITAL AUDIO OUT (OPTICAL)
Digital optisk kontakt (tokanals lineær PCM:
48 kHz 16 biter, Dolby Audio)
(minijack, stereo)
Hodetelefon

FW-43EZ20L: 108,0 / 43
Strømforbruk i hvilemodus ^34 (W) 0,50
Skjermoppløsning (horisontal × vertikal) (piksler) 3840 × 2160
Nominell effekt
500 mA (for USB 1/2)
Mål (ca.) (b × h × d) (cm)
Pilot i Monitor LCD ....6
Transport
natural_image
Line drawing of two silhouetted figures holding a rectangular device (no text or symbols)• HDMI IN 3 eARC/ARC (Enhanced Audio Return Channel/Audio Return Channel)
flowchart
graph TD
    A["Monitor 1"] -->|Bidirectional Arrow| B["Monitor 2"]
    B -->|Bidirectional Arrow| C["Monitor 3"]
2160p (24, 25, 30 Hz), 1080p (30, 50, 60 Hz),
1080/24p, 1080i (50, 60 Hz), 720p (30, 50,
60 Hz), 720/24p, 576p, 576i 480p, 480i,
formaty komputerowe
Audio:
W trybie eARC (Enhanced Audio Return
Channel)
eARC/ARC (Enhanced Audio Return Channel/
Audio Return Channel) (tylko HDMI IN 3)*2
W trybie eARC
→ DIGITAL AUDIO OUT (OPTICAL)
FW-43EZ20L: 108,0 / 43
FW-43EZ20L), FWA-ST2L (tylko model
FW-50EZ20L), FWA-ST3L (tylko model
FW-65EZ20L / 55EZ20L)
Temperatura robocza: 0 °C – 40 °C
Μεταφορά
natural_image
Line drawing of two human silhouettes holding a rectangular device (no text or symbols)• HDMI IN 3 eARC/ARC (Enhanced Audio Return Channel/Audio Return Channel)
flowchart
graph TD
    A["6"] --> B["Process Block"]
    B --> C["7"]
6 ⏻ (Ισχύς)
flowchart
graph TD
    A["Monitor 1"] -->|USB cable| B["Monitor 2"]
    B -->|USB cable| C["Monitor 3"]
https://www.sony.eu/support
2160p (24, 25, 30 Hz), 1080p (30, 50, 60 Hz),
1080/24p, 1080i (50, 60 Hz), 720p (30, 50,
60 Hz), 720/24p, 576p, 576i 480p, 480i, PC
Μορφές υπολογιστή
'Ηχος:
eARC/ARC (Enhanced Audio Return Channel/
→ DIGITAL AUDIO OUT (OPTICAL)
FW-43EZ20L: 108,0 / 43
- Vewd® Core. Copyright 1995-2023 Vewd Software AS. All rights reserved.
Nakliye
natural_image
Line drawing of two human silhouettes holding a rectangular device (no text or symbols)• HDMI IN 3 eARC/ARC (Enhanced Audio Return Channel/Audio Return Channel)
flowchart
graph TD
    A["Monitor 1"] -->|USB cable| B["Monitor 2"]
    B -->|USB cable| C["Monitor 3"]
2160p (24, 25, 30 Hz), 1080p (30, 50, 60 Hz),
1080/24p, 1080i (50, 60 Hz), 720p (30, 50,
60 Hz), 720/24p, 576p, 576i 480p, 480i, PC
Formatları
Ses:
eARC (Enhanced Audio Return Channel)
modunda
eARC/ARC (Enhanced Audio Return Channel/
Audio Return Channel) (sadece HDMI IN 3)*2
eARC modunda
→ DIGITAL AUDIO OUT (OPTICAL)
FW-43EZ20L: 108,0 / 43
.Administrator, Inc.
•
☐ double-D-☐ Dolby Audio, Dolby
Dolby Licensing
.Corporation
VewdCore. Copyright 1995-2023 Vewd •
Software AS. All rights reserved.
eARC コウ クロナ
kHz 48/44.1/32: Programming PCM
Dolby Audio, 24/20/16
eARC/ARC (Enhanced Audio Return Channel/
^2* (הכלה HDMI IN 3) (Audio Return Channel
eARC
DIGITAL AUDIO OUT (OPTICAL)
eARC (Enhanced Audio Return Channel)
40-7 LCD-הַרְבָרִיֹתָהַעֲלְרִיֹתָהַעֲלְרִיֹתָהַעֲלְרִיֹתָהַעֲלְרִיֹתָהַעֲלְרִיֹתָהַעֲלְרִי
- LCD-USB RED LED LED LED LED LED LED LED LED LED LED LED LED LED LED LED LED LED LED LED LED LED LED LED LED LED LED LED LED LED LED LED LED LED LED LED LED LED LED LED LED LED LED LED LED LED LED LED LED LED LED LED LED LED LED LED LED LED LED LED LED LED LED LED LED LED LED LED LED LED LED LED LED LED LED LED LED LED LED LED LED LED LED LED LED LED LED LED LED LED LED LED LED LED LED LED LED LED LED LED LED
[הכלההוּרָהוּרָה] ← [Proהוּרָהוּרָה] 1
.הכלה is LCD-הכלה is prochette is prochette is prochette is prochette is prochette is prochette is prochette is prochette is prochette is prochette is prochette is prochette is prochette is prochette is prochette is prochette is prochette is prochette is prochette is prochette is prochette is prochette is prochette is prochette is prochette is prochnette
natural_image
Pure electrical circuit lines without any symbols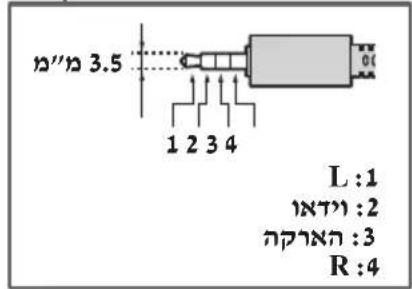
HDMI IN 1/2/3 4
.DIGITAL AUDIO OUT (OPTICAL)
natural_image
Line drawing of two silhouetted figures holding a rectangular device (no text or symbols)• וְאַלָהוֹתָהִי
← [הכלה] ← [הכלה] ← [הכלה]
.[הכלהה] ← [הכלהה]
תְרָה
https://compliance.sony.eu
IE, IT, LV, LT, LU, MT, NL, PL, PT, SK, SI, ES, SE, UK,
UK (NI), IS, LI, NO, CH, BG, RO, TR, AL, BA, MK, MD, RS,
: כְּוֹר, ME
(הכלההוּרָהוּרָהוּרָהוּרָהוּרָהוּרָהוּרָהוּרָהוּרָהוּרָהוּרָהוּרָהוּרָהוּרָהוּרָה) LCD -הכלההוּרָהוּרָהוּרָהוּרָהוּרָהוּרָהוּרָהוּרָהוּרָהוּרָהוּרָהוּרָהוּרָהוּר'
תְקַרָה בְּשָׁב
2.
2.
4
-
LCD
-
Pro
8 BRAVIA Signage Free
10.
10....RS-232C
11 IP
12.
13.
13.