Powerduction 10R PRO - Cooker GYS - Free user manual and instructions
Find the device manual for free Powerduction 10R PRO GYS in PDF.
User questions about Powerduction 10R PRO GYS
0 question about this device. Answer the ones you know or ask your own.
Ask a new question about this device
Download the instructions for your Cooker in PDF format for free! Find your manual Powerduction 10R PRO - GYS and take your electronic device back in hand. On this page are published all the documents necessary for the use of your device. Powerduction 10R PRO by GYS.
USER MANUAL Powerduction 10R PRO GYS
ACCESSIONS EN OPTION
This manual contains safety and operating instructions, to be followed for your safety. Please read it carefully before using the device for the first time and keep it in a safe place for future reference. Read and understand the following safety recommendations before using or servicing the unit. Any change or servicing that is not specified in the instruction manual must not be undertaken. The manufacturer is not liable for any injury or damage caused due to non-compliance with the instructions featured in this manual. If there is any issue or uncertainty, please consult a qualified individual to operate the equipment correctly. This machine should only be used for operations comprised within the limits indicated on the machine and in the instruction manual. The operator must observe the safety precautions. In case of inadequate or unsafe use, the manufacturer cannot be held liable for damage or injury. Any other uses not specified in this manual is forbidden, and possibly dangerous. The product is semi automatic and requires the presence of an operator.
This unit can be used by children aged 8 or over and by people with reduced physical, sensory or mental capabilities or lack of experience or knowledge, if they are properly monitored or if instructions for using the equipment safely have been read and risks made aware of. Children must not play with the product. Cleaning and maintenance should not be performed by an unsupervised child.
Ne pas utiliser l'appareil, si le cordon d'alimentation ou la fiche de secteur sont endommages.
Do not obstruct the cooling vents. Refer to the installation section before operating the machine.
Fire and explosion risks!
- Do not use the device in an explosive atmosphere.
- Keep airbags, gas cannisters or other pressurised gas containers away from the induction heating machine.


Warning, heat and flame risk.
- Do not overheat parts and adhesives.
- Be wary of fire, keep a fire extinguisher is in the vicinity.
- Do not position the machine on, or near flammable surfaces.
- Do not position the machine near flammable materials.
Warning! Very hot surface. Risk of burns.
- The parts and pieces that have just been heated are hot and may cause burns when manipulated.
- Do not touch any hot parts with your hands.
- Wait for the parts and pieces to cool down before handling them.
- Check that jewellery (such as wedding rings) or other metal pieces do not get close to the induction heating machine or the inductor when switched on.
- Remove any jewellery or any metal object from yourself before using this machine
- People with metal implants should not use this machine.
- In case of burns, rinse with water abundantly and see a medical doctor as soon as possible.
Dangerosity of the gas fumes
- Keep the head away from the fumes, do not inhale.
- If working inside, ventilate the area or use a fume extractor to evacuate the gases and fumes.
- Induction heating of certain materials such as adhesives and flux can generate fumes and gases. Breathing these fumes and gases can be dangerous for your health. For example, heating urethane generates a gas: hydrogen cyanide, potentially mortal for humans.
- If the ventilation is insufficient, use an approved respiratory unit.
- Read the safety data sheets (MSDS) and the manufacturer's instructions for adhesives, flux, metals, consumables, coatings, cleaning agents, corrosives, and paint strippers.
- Do not use the heater on parts being degreased or sprayed. The heat might react with fumes and generate highly toxic gases.
- Work in a confined area only if it's well ventilated, or use an ap-proved respiratory/filtration unit. Make sure that a qualified person is around to watch over you. The fumes and gases released while heating can replace oxygen or air, causing accidents or death. Check the quality of the air you're breathing
- Do not overheat metals, such as galvanised steel, covered with lead or cadmium, unless the coating is removed from the surface before it's heated, that the area is well ventilated, and if needed, use an approved filtration/respiratory unit. Foundry pieces and all metals containing such elements may generate toxic fumes if overheated.
- Check the MSDS for temperature related details.
Warning, electrical danger
Caution: Danger of optical radiation when the heated metal elements reach fusion.
Warning! Major magnetic field. People wearing active or passive implants must be informed.
No further protective steps are required when the machine is used on its own.
Further restrictions and/or protective measures may be necessary in other cases.
After maintenance, the magnetic field levels must be checked before the machine is used again.
When switched on, never put the inductor near the head or vital organs.
People wearing pacemakers are advised to not come close to the machine. Risk of disruption of pacemaker operations when close to the machine. Consult a doctor before getting close to induction heaters.
Risk of metal or adhesive projections
- Wear approved protective goggles with lateral protections, or protect the whole face with a screen.
- Wear protective clothes.
Weargloves.
Do not obstruct the machine's air intake, which facilitates air circulation. Check the installation chapter before using the device.
Connection:
- This machine must be connected to an earthed socket.


- These Class A devices are not intended to be used on a residential site where the electric current is supplied by the public network, with a low voltage power supply. There may be potential difficulties in ensuring electromagnetic compatibility on these sites, because of the interferences, as well as radio frequencies.
Maintenance:
- If the power cable is damaged, it must be replaced by the manufacturer, its after sales service or an equally qualified person to prevent danger.
- Service should be performed by a qualified person.
- Warning! Always disconnect from the mains before performing maintenance on the device. High Voltage and Currents inside the machine.
- Remove the casing on a regular basis, to remove any excess dust. Take this opportunity to have the electrical connections checked by a qualified person, with an insulated tool.
- Do not use solvents or any agressive cleaning products.
- Clean the device's surfaces with a dry cloth.


Regulations:
Device complies with Europeans directives.
The certificate of compliance is available on our website.
EAC Conformity marking (Eurasian Economic Community).
- Equipment in compliance with British requirements. The British Declaration of Conformity is available on our website (see home page).
- Equipment in conformity with Moroccan standards.
- The declaration C_ (CMIM) of conformity is available on our website (see cover page).
Waste management:
- This product should be disposed of at an appropriate recycling facility. Do not throw away in a domestic bin.
DESCRIPTION
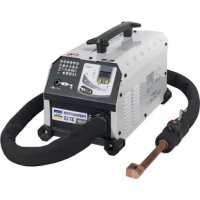
The Powerduction 10R has been designed to heat ferrous metallic elements by induction heating. Its main purpose is the unjamming of parts such as bolts or exhaust pipes.
Carry cas econtents:
Le Powerduction 10R is supplied in a carry case that contains t(see fig.1) :
- the generator and its inductor cable, ①
- 10 coiled wired, diameter 18 mm/21 mm/24 mm/27 mm/30 mm SIDE & FRONT (2)
- a flexible braided wire ③
- a straight rigid wire 4
Fig.1
| Powerduction 10R Powerduction 10R PRO | |
| ① | |
| ② | spiral wire Ø18 mm Side 054806 spiral wire Ø24 mm Side 054790 spiral wire Ø30 mm Side 055469 |
| ③ | flexible braided wire 054813 |
| ④ | Rigid straight wire 054868 |
| ② | spiral wire Ø21 Side 079953 |
| spiral wire Ø27 Side 079960 | |
| spiral wire Ø18 Front 079977 | |
| spiral wire Ø21 Front 079984 | |
| spiral wire Ø24 Front 079991 | |
| spiral wire Ø27 Front 080003 | |
| spiral wire Ø30 Front 080010 | |
The elements contained in this carry case are fragile. They're to be handled with care.
MAINS POWER SUPPLY
This equipment is supplied with a 16 A CEE7/7 type plug and should only be used on an electrical installation single-phase 230V (50 - 60 Hz) three-wire with a neutral connected to earth.
STARTING
Assembly
Choose the required tool (one of the coiled wires, the braided wire or the straight wire) and fit it on the inductor. To do so, insert the two rods of the selected tool and insert them into the holes intended for this purpose, then screw the tightening wheels (fig.2). To unscrew a tightening wheel, it is possible to use a spanner/wrench size 12. Warning: never use a spanner/wrench to screw the tightening wheel as it may get damaged.
Heating activation
| Start the product by pressing the ON/OFF button. The green LED lights up. | |
| Press the inductor button to activate the heating. Keep pressing the button to keep the heating active. | The green LED flashes green as long as the heating is active. |
Protections
The product is equipped with protections :
| Thermal protection The orange LED is lit when the product is in thermal protection. The product trigger is inactive during this time. Wait for the orange LED to go out before restarting the heating process. |
| Overcurrent protection In case of overcurrent, the orange LED flashes. The product trigger becomes inactive. Restart the product to clear the fault and restart heating. |
| Trigger defect On power-up, if the Powerduction detects a fault on the trigger, the orange LED lights up. Disconnect the faulty trigger and replace it. Then restart the heater. |
RECOMMENDATIONS
The coiled inductor is designed for unjamming. it heats metal pieces or parts via induction to unblock and remove them easily. Circle the piece using the appropriate accessory (coiled, braided, straight), then heat the inductor, that will be used to heat the metal piece. Once the piece starts to be coloured in red, stop the heating and remove it using the right tool (clamp, spatter/wrench...) then remove it.
ACCESSIONS

The accessories provided are consumables. These must be replaced when they are damaged. Damaged consumables (burnt sleeves, etc.) can cause serious damage to the product. Spirals must be made up of at least 3 turns in order not to damage the product.
In order to be able to work on parts with multiple shapes, 5 or 12 types of accessories accompany the inductor (According to the version).
It works in the same way as coils and braided wire. Its shape must be adjusted to fit the metal piece's shape and if possible, circle around the piece several time for maximum efficiency.
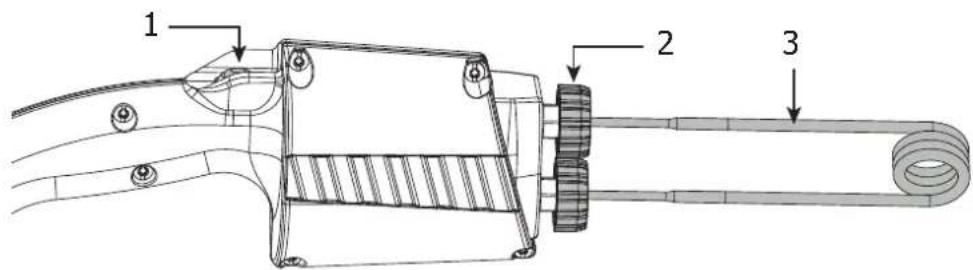
fig.2
1-Button
2-Tightening wheels
3-Spirale
OPTIONAL ACCESSORIES
| Powerduction 10R Powerduction | 10R PRO |
| 3 coiled wire (Ø 18, 24, 30 mm) Standard tool, already shaped for a fast and effective operation. The coil shape enable optimises the concentration of the magnetic fields in its centre, which guarantees a powerful and effective induction heating. The glass fiber circle can electrically insulate the coils as well as the element to heat. The coil is used in the following way : position it at the centre then press the inductor's button to start the heating. | 10 coiled wire (Ø 18, 21, 24, 27, 30 mm SIDE) and (Ø 18, 21, 24, 27, 30 mm FRONT) Standard tool, already shaped for a fast and effective operation. The coil shape enable optimises the concentration of the magnetic fields in its centre, which guarantees a powerful and effective induction heating. The glass fiber circle can electrically insulate the coils as well as the element to heat. The coil is used in the following way : position it at the centre then press the inductor's button to start the heating. |
| Heating efficiency : To achieve maximum heating power efficiency, the coil must be adapted to the workpiece. | |
| Flexible braided wire The braid is designed for pieces that cannot be heated with the coil (parts with a bigger diameter): Ex. an exhaust pipe or a wheel hub The braid can be enrolled around the metal piece. To obtain a better result, circle 3 times around the metal piece and make sure that the coils are bonded together. Press the inductor's button to start the charge. | |
| Straight rigid wire The straight rigid wire is designed to suit any of the user's needs. It can be : - adjusted to the shape of a specific part/piece. - adjusted to a piece that is too big for the coils. - copy the shape of an existing coil if the latter is damaged. | |
| 066601 Adhesive-removal inductor | |
| 079472 Ferrite inductor for all types of ferrous metals. | |
| 079489 Replacement ferrite |
RECOMMENDATIONS
- When heating the coils for the first time, some smoke will be released.
- Avoid heating for more than 30s, the coils will heat excessively and suffer premature damages.
- It is not necessary to come in contact with the bolt to heat it.
- The coil's protective fabric is fragile, it is glass fabric : make sure to store the coils in such a way that they do not get damaged.

The coils heat very fast. After use, is is recommended to let them cool down before storing them. Manipulate with gloves to prevent burns or itches caused by the glass fabric.
Do not place a finger or any limb inside or close to the coil when the machine is switched on. Magnetic fields should be considered.
WARRANTY
The warranty covers faulty workmanship for 2 years from the date of purchase (parts and labour).
The warranty does not cover:
- Transit damage.
Normal wear of parts (eg.: cables, clamps, etc.). - Damages due to misuse (power supply error, dropping of equipment, disassembling).
- Environment related failures (pollution, rust, dust).
- Removable inductors and ferrites that are consumables.
In case of failure, return the unit to your distributor together with:
- The proof of purchase (receipt etc ...)
- A description of the fault reported
SICHERHEITSHINWEISE

He nCnoB3yIe annapaT ecn CeTeBOH np Hnp Nn BnKa NOBpeKDeHbl.
He NaKpbBaIte annapaT.
He nepekpbIbAte BeHTnlaUHhBle OTBepCTn. Ipeed nCpOJIb3OBaHnem O3HaKOMbTeCb C pa3dEJOM «yCTaHOBka» INHCTpyKuIN.
Pnck noxkapa n B3pbBa!
Pn 3apJe 6aTape MoKeT BbInyCTnTb B3pbBOONacBbI ra3.
He nCnoB3yIe annapaT BO B3pbIBOONaCHO cpeJe.
- DépçnTE nodyskn 6e30nacHoctn, a3pO30nbHbIe 6aJIIOhbl I npOcHTn Poi DaBJIeHNEM BdaIIN OT O6OpyIDOBAHN IJRA INHyKUHOHHOro HaRpeBa.
Onachoctb BbICOKoTempeaTypbl N PlaMeHn.
He neperpeBaTe deTaIIN MoIINHn.
- BydTe 6DnTeNbHbI, Bcerda depKnte no6n3OCTn ORHeTuWnteJIb.
He ctabte annapaT ha nnB6n3n BocnpameHouxCnoBepxHOCTe.
He yctaHaBnBaIte annapat B6n3n BocnnaMeHyouxcBeueCTB.
BhImaHne! Topaay noBepxHOCTb. OnaCHOctb OXKOrOB.
- Topnye DeTaNn ngopyuee o6OpdyoBaHne Moryr Bbl3BaTb OXKOrn.
He DToTpaRnBaITeCb rOlbIMn pyKaMn Do HarpeTbIX DeTaJIeN.
-ДождnteCb,чTo DeTaNи OobopydOBaHne OCTbHyT npexde Yem Do HnxdoTpaRnBaTbcra.


Cleinte 3a Tem, yTo6blIOBeIINpHbIe yKpaWeHnB (B cactHOCTn, o6pyaJIbHbIE KOJIbca) nII MeTALInueCKne DeTaN He HaxOOnNcB B6n3n
- INДуКцИОнHосиСTeMbI IN HДуКТopa BO BpeM pa6OТbl.
- Chnmtte c ce6B BCE IOBeHnpbIe yKpaSeHnI n DpyrHe MeTaJIuYeCKne npedMeTbI NpeEd TEM, KaK IcNoIb3OBAtB 3TO O6OpyIOBaHnE.
- Лица, Имени MeТаJIиЧeCKne IMПlaHTaTbI, He DoJXHbI IcNoJIb3OBAt b 3TO obopydOBaHnE.
Bcnyae oXora,obnIbHo npOMoTe BODOn n npOKOHcyIbTnpuYTe Bpaua 6e3 npOMEJIeHn.
Onachbile ncnapeHn I ra3
-ДерхиTe roJIOBy BdaJI N OT dbIMa, He BdbIxAJIte nCnapeHnra.
- Пи пабоTe в помени проветпавайе пабочую 30ну n/nлп ИспальштЕ
экгayстордя Вытжки Испарени n ra3OB.
- Инданов Ньгаров Некоторьх матерпалов, Клесших Beшость и Флюсов может Вьзвьт История И образовные ra3ов. Вьхаь.Tи История И ra3ы может 6ыт.bОпсныМдя Baшero 3dopobь. Hanpimep, HarpeВуета на Вьзвьет Мбг Дэл ВьнICTORO BODOPOA, KOTOPь Mokket 6bIbСмрTeьнБИМ.
- EcII BENTINIaHn HeIOCTaTOUHO, To NJIb3yIeTcB peCInpaTOPOM, OTBeuaIOuIzIM PpHrTaIM CTaHdApTaM.
-Чтайта линсты 6езonaсноctи Beшесь (MSDS) и руководства поньдпелл по Клесцим Beшесьтам, Флюсам, металлam, paхховим MaTeрпалam, пokрытnam, чираль Срдстам и растовпелам.
He harpeBaIte DeTaln, KOtOpbIe OunuAOT OT Xnpa Hn Ha KOTOpbIe YTO-JN60 paCnblraT. TEnlmo MoKeT BCTyInrB peakcHcnpaehmN npNBecTN K 06pa3OBAHIO CnIbHO TOKCNHOrn pa3dpaxKaIOUe r3a.
Pa6oTaIe B 3aMKHyTOM IpOcTpaHCTBe TOLbKO B TOM Clyuae, eCNI OHO XopoIo npOBETpNBaETcRA IIN NcNoJIb3yra peCnnpaTOp, OTBeuaIOUIm npInrAByIM CTAndapTam. Pa6oTaIe B nPncytCTBm KOMnTeHTHO rO CneUmaNCTa, KOtOpB MoR 6bl npInrHa NOMoUb. Ncnapenra I ra3bl, o6pa3yIOUmeCBA Pe3yJbTAte HArpeBa MOrYT BblTECHNTb KNCLOPOd I pINBeCTN K HeCACTHOMy ClyuAO IIN Bbl3BaTb CMeptb. Y6eINTECb B Ka-ueCTBe BO3dyxa, KOtOpbIM Bbl DblWITE.
He neperpeBaTe TaKne MeTaJIbI, KaK OcunHKOBaHHa RCTaJIb, CTAJIb CO CBINTOBbIM NII KAdMnEBbIM NOKpbITnEM 3a NCKLIQUeHNEm ClyuAeB, KOrDa NOKpbITNe YdaJIeHO C HArpeBaemOn NobepXHocTn, pa6Oua 30Ha XopoIo NPOBeTpNBAETcN IIN Pn HADo6HocTn INCNoJIb3yra peCnnpaTOp, OTBeUaOUsn IpnHrTaBMCTaHdApTAM. IInTbe 3arOTobKn N BCE MeTaJIbI, CoJepXaUne 3TN 3JeMeHTbl, CNOCo6HbI BbIDeJIaR JAOBtBie NCnapeHnE, eCNI OHn neperpeTbI.
- CMOTPnTe INΦOpMaζIOn O TeMηρaTypax B ΜινCTe 6e3ΩaCHOCTN BeIεCTBa (MSDS).
Onachoctb nopaxeHnnaJIeKtpnuecknM TOKOM.
BHHMaHHe: onaCHOCTb n3nyeHnra CBeta KOrda HarpeTbe MeTaJIInueckne 3JIeMeHTbI DOCTnraIOT PnaBHeHn.
BhImaHne! CnIbHoe MaHHTHOe NOJe. LNuca, HMeIOUne aKTHBHe IIN NaCCNBHe IIMIIaHTaTbI DOJXHbI 6bITb IHOpMnPOBaHbI.
Korda annapat nCnoB3yeTcOdH, To He Tpe6yeTcHnKaKoH dpYroDOnONHHTeHbHO 3aunTHoMepbl. B dpyrnx cnyaX moryt noTp6obatbcra DOnONHHTeHbIe OrganuHueHnN/nn 3aunTHbIe Mepbl.
Bo Bpemr Texo6cnyKuBaHnry ypoBeHb n3JyueHnMaHHTHO rOJrdoJIKeH 6bITb npOBepen Do CneDuOeRo NcNoB3OBaHnry o6OpyDoBaHnry.
B pa6ooyem pexime hikorda He np6nkaTe uNdyKTop K rOIOBe nn K xH3-HeHHo BaXhIM opraHam.
HocnteIe 3JIeKtpokapDIOCTMMyJrTOPOB He DoJXhbl npn6JnxKaTbcra K annapaTy. Pnck c6oar pa60tbi 3JIeKtpokapDIOCTMMyJrTOPOB B6Jn3n annapaTa.
IpokohcylbTnpuyTecb y Bpaa nepea TeM, KaK npnbJxKaTbcra K INdyKcuHOMy HarpeBaTeIIO.
Pnck 6pbizr MetaIIa nll KJIeIeero BeIeCTBa
- 3aunntte c68 oukamn 6e30nacnoctn C 60KOBbIMN 3aunTAMN, OTBeuaOuMN npHrTbIM CTaHdapTaM, INI NCNOB3yIte 3KpaH nepeJ nIcOm.
Hocnte pa6ouyIO oJekdy
Hocnte nepuATkn.
He nepekepbaiTe BeHTnIaHIOHbIe OTBepCTn. Ipeed nCpOJIb30BaHHeM 03- HaKoMbTecb C pa3dENoM «yCTaHOBka» HNCTpyKcHn.
IopKJIIOUeHne
- 3To yCTpoIcTBO DoJIxHOb 6bITb NODKIIIOyeHO K po3eTKe C 3a3EmJIeHNeM.
- ΘTOT annapat Klacca A, npedHa3NaeHHbI dIy npomblIeHHbIX NOMeHn, He NOxOHT dIy IcNoIb3OBaHnB B XINbIX KBapTaIax, rIe 3JIeKTPnueckn TOK nOdaetcra OoIeCTBeHHoC nCTeMoN pITAHn Hn3KOrO HAnpJKeHn. B TaKnx KBapTaIax MOrT BO3HnKHyTb TpydHOCTn ObecneueHn 3JIeKTPomarHnTHyIO COBMeCTUMOCTb I3-3a KOHdyKTNBbIX INHdyKTNBbIX NOMex Ha paDInOaCTOTE.
06cnyxnbHne:
- Ecni shHyp nHTaHnIOBpeXdeH, OH doJxHe 6bITb 3aMeHeH npOn3BOdnteM, erO cepBnCHo CnyK60n nn KBaIINΦuNpOBaHHbIM CneuaJIInCTOM BO n36exKaHne onaCHOCTn.
- TexHnueckoe 06cIyXnBaHne DoJxHO IpOu3BODITbCra TOLbKO KBaJIHΦnUPOBaHHbIM CpeUaJINCTOM.
BHHMaHHe! OTKJIIOUHTe annapaT OT pO3eTKn Do hauana peMOHTbIX pa6oT. BHyTpN annapaTa BbICOKHe n onaChbIe HAnpJKeHne N TOK. - Perylaepno OtkpbBaIte annapat n npodyBaIte ero, UTO6bI OunchTb OT nbI. Heo6xOIMo TaKke npOBepaTb BCE 3JIeKtpueeCKne COeINHeHnC NOMOsbIO n30InpobAHnHO INCTpyMeHTa. IpoBepka DOJXHa OcyueeCTBIArTBcR KBaJIHΦnIpOBaHHbIM CpeunAInCTom.
- HN B KOem Cnyuae He nCnOJb30BaTb paCTBOpNTeJI NJI dpyrNe Koppo3HbIe MOUuNE CpeDCTBa.
OuHCTnTe NOBepXHOCTb aannapaTa c NOMoUc yxOy TpAKN.
Hopmbi npabnla :
- AnnapaT COOTBETCTByeT DnpeKtNBam Ebpocoi03a.
-ДeКларачи COOTBETCTBЯ ectb Ha HauWe m caiTe.
3HaK COOTBeTCTBnA EAC (EBpa3nCKoe 3KOHOmNueeCKoe COo6IeCTBO).


MaTePnAa COOTBeTCTByeT Tpe6oBaHnA M BeIiKO6pTuHaHn. 3aABJeHne O COOTBeTCTBn Ia BeIiKO6pTuHaHn DoCTynHo Ha Hauem Be6-caYte (cM. rnaBHyIO CTpaHnUy).
- 06opydobahne B COOTBETCTBnN C MapOKKaHCKmN CTaHdpTaMn.
- ToBap coOTBeTCTByeT HopMaM Mapokko. DeKlapaunca C (CMIM) Doctynha Дя сkaUnBaHnHa Ha Hauem caIte (cHa TITyIbHOI CTpaHnIe).
YTNIN3aunr:
- 3TO obopydobAHne noJnxnT nepepa6oTke. He BbI6paCbIBaTb B o6uMycopoc6OpHnK.
ONHCAHNE
Powerduction 10R npedha3nueH nIy HarpeBaHnMaTeaJIuYeCKnx 3JeMeHTOB INdYkUeE. Ero ochOBHOe npimeHeHne - yCTpaHHeHne 3aeHaHn TaKx DeTaIe, KaK rAkn NII BbIXIOHbIe Tpy6bl.
CopeKmOe YemOdaHa
Powerduction 10R noCTabIaTeC B cHMeOaHe, KOToPbIO coepeXnT (CM. fNr.1) :
- rHepeatop n ero HndyKuHnHb KabeIb 1
- 10 cnnpaJIbHbIX npOBoDA nIaMeTpOM 18 MM / 21 MM / 24 MM / 27 MM / 30 MM SIDE & FRONT (2),
-1n6kniPiTeHbInHnyKTop ③ - 1 npraMoT TBepdbI INHdyKTop 4
Fig.1
| Powerduction 10R Powerduction 10R PRO | |
| ① | |
| ② | cπirpáльnéx προBOa dniAMetPOM 018 mm Side 054806 cπirpáльnéx προBOa dniAMetPOM 024 mm Side 054790 cπirpáльnéx προBOa dniAMetPOM 030mm Side 055469 |
| ③ | rhiokn piIeTeHbI INdUkTOp 054813 |
| ④ | πρamO TBePbI INdUkTOp 054868 |
| ② | cπirpáльnéx προBOa dniAMetPOM 021 Side 079953 |
| cπirpáльnéx προBOa dniAMetPOM 027 Side 079960 | |
| cπirpáльnéx προBOa dniAMetPOM 018 Front 079977 | |
| cπirpáльnéx προBOa dniAMetPOM 021 Front 079984 | |
| cπirpáльnéx προBOa dniAMetPOM 024 Front 079991 | |
| cπirpáльnéx προBOa dniAMetPOM 027 Front 080003 | |
| cπirpáльnéx προBOa dniAMetPOM 030 Front 080010 | |

3IeMeHTbI, coepkaauecB 3TOM ueMoDAHe, xpynKne. C HmH HyxHo o6paaaTbcra AkkypaTHo.
3NEKTPONITAHNE
AnHoe o6OpyObaHne noCTabnIeTcBnKo Tnna CEE7/7 16 A n doJxHO nCNOJb3OBAbCBaTOJbKO B3NeKTpoYCTaHOBkax.
Ondo3HbTpxnpoBDOHn230B(50-60Γc)cnHeTpalbo,coeHNHeHHbC3mJe.
PINHUNPABOTbI
C6opka
3TO DeIcTBnE npocTo COCTOHT B BbIbope HxHOro IHCTpyMeTHa (OINH IN 3 CNIPAbHbIX pIOBOOD, PJIeTeHbI npOBOD nII npraMo npOBOD) n B MOHTnpOBaHN erO Ha INdYkTOp. IInr 3TOrO BCTaBbTe o6a CTePjXHr Bbl6paHHoro IHCTpyMeTHa B INpeHa3HaueHHbIe dIg NTO rOBepCTnR n 3aTAHnte KOJecNKn (ΦmR.2). 4TO6bl OTBnHTnTb KOJecNKo MOKHO NcIPOlb30BaTb raeHbI KIIOU HA 12. BHIMaHHe: HN B KOem cIyuae He NcIPOlb30BaTb KIIIOU dIra 3aBnHvHBaHnKoJcNka, YTO6bl He NOBpeDnTb erO.
Haapano Harpeba