16257 - Dashcam Eufab - Free user manual and instructions
Find the device manual for free 16257 Eufab in PDF.
User questions about 16257 Eufab
0 question about this device. Answer the ones you know or ask your own.
Ask a new question about this device
Download the instructions for your Dashcam in PDF format for free! Find your manual 16257 - Eufab and take your electronic device back in hand. On this page are published all the documents necessary for the use of your device. 16257 by Eufab.
USER MANUAL 16257 Eufab
text_image
EUFAB GERMANY CAR & BICYCLE ACCESSORIES FULL HD CAR DVR 100 MHz/2.000 DIGITAL CANCE 2000 CE 100 MHz/2.000 DIGITAL CANCE 2000 100 MHz/2.000 DIGITAL CANCE 2000 100 MHz/2.000 DIGITAL CANCE 2000 100 MHz/2.000 DIGITAL CANCE 2000 100 MHz/2.000 DIGITAL CANCE 2000 100 MHz/2.000 DIGITAL CENCE 100 MHz/2.000 DIGITAL CENCE 100 MHz/2.000 DIGITAL CENCE 100 MHz/2.000 DIGITAL CENCE 100 MHz/2.000 DIGITAL CENCE 100 MHz/2.000 DIGITAL CENCE 100 MHz/2.000 DIGITAL CENCE 10 1 1 1 1 1 1 1 1 1 1 1 1 1 1 1 1 1 1 1 1 1 1 1 1 1 1 1 1 1 1 1 1 1 1 1 1 1 1 1 1 1 1 1 1 1 1 1 1 1 1 GEOFAB
Art.-Nr.: 16257
Kfz Dashboard Kamera
Operating instructions....9

Cod. art. 16257
Videocamera Per Auto
text_image
Warning symbol with exclamation mark inside a triangleWARNUNG
text_image
elenk ⑮ ⑯ ⑰ ⑱natural_image
Coiled black cable with a car plugged into, labeled with numbers 19 and 20 (no text or symbols on the cable itself)Bild 3: Ladekabel
6.2 SPEICHERKARTE
Please read the operating instructions carefully prior to use and observe all safety instructions!
Not observing such may lead to personal injury, damage to the device or to your property!
Store the original packaging, the receipt and these instructions so that they may be consulted at a later date! When passing on the product, please include these operating instructions as well.
Please check the contents of package for integrity and completeness prior to use!
1. PROPER USE OF THE PRODUCT
The vehicle dashboard camera is a video camera designed to record moving images from the interior of the vehicle (protected area) during the journey.
The vehicle dashboard camera may only be operated using the supplied connecting cable.
This device is not designed to be used by children or persons with limited mental abilities or without experience and/or lack of required specialist knowledge. Keep children away from the device.
The device is not designated for commercial use.
Use according to the intended purpose also includes the observance of all information in these operating instructions, particularly the observance of the safety notes. Any other utilisation is considered to be contrary to the intended purpose and may lead to material damage or personal injuries. EAL GmbH assumes no liability for damage resulting from improper use.
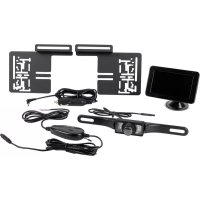
2. SCOPE OF DELIVERY
1 x Vehicle dashboard camera
1 x Connecting cable
1 x Suction cup mount for the windscreen
1 x Operating instructions
3. SPECIFICATIONS
Dimensions: 35 x 65 x 70 [mm]
Power supply: 12 - 24 V DC
Monitor: LCD, 5.6 cm (2.2 inches)
Lens: Wide angle, 120 degrees
Video format: AVI
Video resolution: 1080P FHD, HD, 720P, WVGA, VGA
Photo resolution: Maximum 12 M
Memory: micro-SD card with up to a maximum of 32 GB, class 10 (Not included in delivery)
Weight: 0.170 kg
Battery: Lithium polymer, 180 mAh, 0.67 Wh
Photo format: JPEG
4. SAFETY PRECAUTIONS

- The warning triangle indicates all instructions which are important for safety. Always follow these otherwise you could injure yourself or damage the device.
• Children may not play with the device. - Cleaning and user maintenance may not be carried out by children without supervision.
- Do not treat packaging material carelessly. This may become a dangerous plaything for a child!
- Only use this product for its designated purpose!
- Do not manipulate or disassemble the device!
- For your own safety, only use accessories and spare parts that are stated in these instructions or that are recommended by the manufacturer!
- Do not misuse the cable. Do not use a cable or accessories other than those supplied.
- To disconnect the power supply, always pull on the plug itself, never on the cable.
- Do not expose the camera to mechanical loads, extreme temperatures, damp, solvents or gases.
- Secure the camera in your vehicle in such a way that your driving is not impeded.
- The camera may not be mounted in the vicinity of air bags.
- The battery of the camera cannot be removed and may only be charged when in the camera. Only use the supplied charging cable to charge the battery, never use another external charger.
- Observe the additional safety precautions in the individual sections of the operating instructions
- The use as vehicle monitoring camera may be restricted or banned in some countries. Find out about the legal regulations before using the camera.
5. EXPLANATION OF SYMBOLS


Complies with EC directives

Labelled electrical products may not be disposed of in the household waste

Read the operating instructions
6. OPERATING INSTRUCTIONS
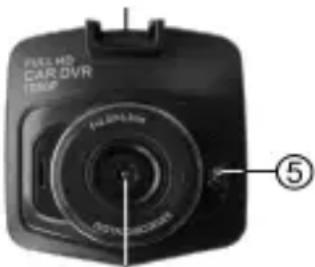
6.1 OVERVIEW
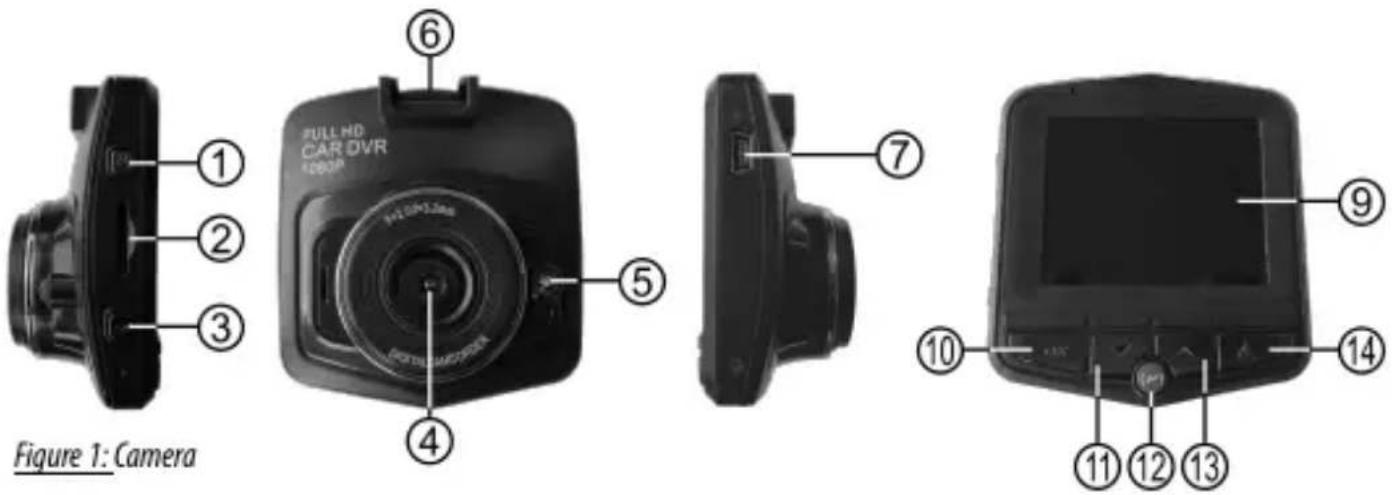
1 ON/OFF switch
2 Slot for memory card
3 Menu button
4 Lens
5 Power-LED
6 Mounting point
7 USB socket
9 Display
10 OK-button
11 Cursor button, down
12 Parking mode button
13 Cursor button, up
14 Mode button
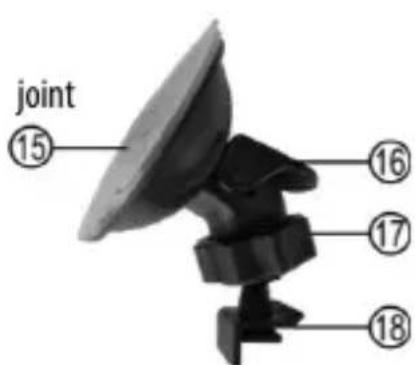
15 Suction base
16 Lever
17 Coupling nut / ball
18 Camera mount
19 USB connector
20 Vehicle connector
text_image
joint 15 16 17 18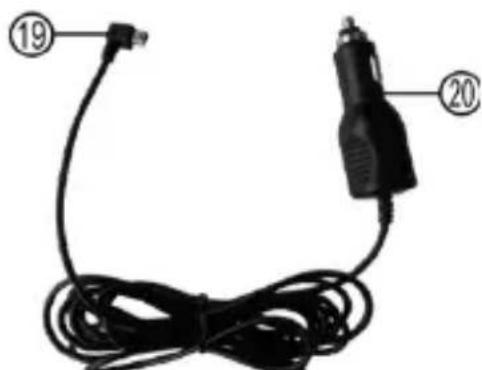
natural_image
Coiled black cable with two labeled connectors (19 and 20), no text or symbols on the cable itselfFigure 2: Suction base mount Figure 3: Charging cable
6.2 MEMORY CARD
Inserting the memory card
Make sure that the dashboard camera has been switched off. Insert the micro-SD into the slot (Position 2 in the overview). Pay attention to ensure that the memory card is correctly positioned. The contacts of the memory card must face in the direction of the lens. Carefully push the memory card into the slot until it engages with a soft click.
Removing the memory card
Switch the camera off. To remove the memory card, press down and release. The card will pop up and you can remove it.

Removing the memory card with the camera switched on may result in a loss of data or damage to the device.
6.3 INSTALLATION
Clean the section of the windscreen where the camera is to be mounted. Put the camera mount (Position 18 in the overview) into the mounting point (Position 6 in the overview) of the camera. Press the suction base (Position 15 in the overview) against the windscreen. Flip the lever (Position 16 in the overview). Undo the coupling nut (Position 17 in the overview) on the ball joint. Align the camera. Tighten the coupling nut up again.
6.4 CONNECTING THE CAMERA
Plug the USB connector (Position 19 in the overview) of the charging cable into the USB socket (Position 7 in the overview) of the camera. Lay out the charging cable in such a way that it does not impede visibility and does not hinder you during the journey. Plug the vehicle connector (Position 20 in the overview) of the charging cable into the 12 V socket of your vehicle.
6.5 FUNCTIONS
ON/OFF switch (Position 1 in the overview)
Long press: Switches the camera on/off.
Video recording is started directly after the camera is switched on.
Brief press: Switches the Power-LED (Position 5 in the overview) on/off.
OK button (Position 10 in the overview)
In Standby mode: A brief press starts video recording (red dot flashes on the display)
A second brief press stops video recording.
In Photo mode: A brief press takes a photograph.
In Play mode: A brief press plays the recorded video.
Menu button (Position 3 in the overview)
In Standby mode: A brief press opens the menu for the video settings. With the cursor buttons (Positions 11 and 13 in the overview), you can select the various menu items. Press the OK button to open the selected menu item. Use the cursor buttons to select the setting in the menu item, and confirm by pressing the OK button.
Settings in the video menu (symbol shows a video camera in the top left of the display):
Resolution: FHD - HD - 720P 1280x720 - WVGA 848x480 - VGA 640x480
Loop recording: Here, the camera records short video passages. When the memory is full, the oldest recording will always be deleted.
Switch off -1 minute -2 minutes -3 minutes
Exposure: Here you can set the brightness of the video recording.
$$ + 2. 0 \dots + 0. 0 \dots - 2. 0 $$
Motion detection: When the motion detector is activated, the camera automatically starts recording when motion is detected.
Switch off – switch on
Record audio: Switches the audio on/off
Switch off – switch on
Date stamp: The date is shown on the video.
Switch off – switch on
Gsensor: When the gravity sensor is switched on, a camera in Parking mode will automatically record a 20 second video in the event of an impact (this recording is not automatically deleted). Three levels may be set for the severity of the impact.
Switch off - 2G (light impact) - 4G - 8G (serious impact)
Exit the menu using the mode button.
Settings in the photo menu (symbol shows a photo camera in the top left of the display):
Resolution: Select the resolution for your photos:
12M - 10M - 8M - 5M - 3M - 2M HD - 1,3M - VGA
Image quality: Select the image quality for your photos:
High quality – Standard – Low quality
Sharpness: Select the sharpness setting for your photos:
Strong – Standard – Soft
White balance: Set the white contrast for your photos in order to get images that are true to colour.
Automatic – Sunlight – Cloudy day – Light bulb – Wolfram (light bulb)
– fluorescent (fluorescent tube)
ISO: Set the sensitivity of the camera.
Automatic - 100 - 200
Exposure compensation: Here you can set the brightness of the photos.
+2.0 ... +0.0 ... -2.0
Stabiliser: Switch the image stabiliser on/off.
Switch off – switch on
Exit the menu using the mode button.
In Standby mode: Briefly press twice opens the menu for the camera settings. With the cursor buttons (Positions 11 and 13 in the overview), you can select the various menu items. Press the OK button to open the selected menu item. Use the cursor buttons to select the setting in the menu item, and confirm by pressing the OK button.
Camera settings (spanner symbol at the top left of the screen):
Park mode: If the stop mode is activated, the video recording is saved automatically in the event of an impact (this recording is not deleted automatically). Three levels may be set for the severity of the impact.
Switch off - 2G (light impact) - 4G - 8G (serious impact)
Volume: 0 to 3
Date/Time: Set the date and time using the cursor buttons and confirm each entry by pressing the OK button. Press the menu button to exit this menu item.
Language settings: Set the menu language and confirm the selected language using the OK button.
Screensaver: Set whether and when the screensaver is to be activated.
Light frequency: Adjust the frequency to the power supply in your country.
50 Hz – 60 Hz
Format: The memory card is formatted, all data is lost.
Cancel – Confirm
Default setting: The factory settings of the camera are restored.
Cancel – Confirm
Version: Shows the version of the software on the camera.
Mode button (Position 14 in the overview)
Pressing the Mode button multiple times allows you to switch the function modes in the following sequence: Video mode – Photo mode – Play mode.
Parking mode button (Position 12 in the overview)
Press the Parking mode button before switching the camera off. The „P symbol“ will be shown in the top right of the display. After the camera is switched off, it is in Parking mode, see also the „Gravity sensor“ in section 6.5 Functions.
In order to view the recorded videos and photos, press the Mode button to switch to Play mode. Use the cursor buttons to select the desired video or photo. Press the OK button to view the video or photo.
In order to view the recordings on your computer, insert the memory card into an appropriate card reader and connect to your computer.
6.8 TROUBLESHOOTING
Turn the tip of the 12 V connector of the charging cable anti-clockwise until it is released from the connector and it can be removed. The fuse is exposed and can be removed from the connector. Replace the fuse with another of the same strength and screw the tip back into the connector.
Fuse: 6 x 30, 2 A, fast-blowing, 250 V
6.7 REPLACING THE FUSE
| Error/Fault Possible cause Assistance/solution | ||
| No function | The connector of the monitor cable has not been inserted into the 12 V vehicle socket. | Plug the connector of the charging cable into the 12 V vehicle socket. |
| The fuse of the monitor cable connector has been triggered and must be replaced. | Replace the fuse in the monitor cable connector | |
| The fuse of the 12 V vehicle socket has been triggered and must be replaced. | Replace the fuse in the fuse box of the vehicle | |
| The battery is empty (only when used without charging cable) | Use the charging cable to connect the camera to the 12 V vehicle socket. | |
| No saving possible | The memory card has not been inserted correctly | Insert the memory card properly |
| Write protection of the memory card has been activated | Deactivate the write protection of the memory card | |
| The memory card is not formatted Format at the memory card (Format in section 6.5 Functions) | ||
| There is not sufficient memory space Delete some files in order to free up memory space | ||
| The memory card is defective Try using a different card | ||
| The monitor does not show a clean image | The lens of the camera is dirty Carefully clean the lens | |
| Strong light is acting directly on the lens of the camera | As soon as the strong light dissipates, the image quality will be OK | |
| Incorrect light frequency set Set the appropriate light frequency for artificial light (Light frequency in section 6.5 Functions) | ||
7. MAINTENANCE AND CARE
Before cleaning, disconnect the connecting cable from the camera. Clean the housing with a soft, dry cloth. Do not use any aggressive cleaning agents or solvent-based cleaners. Never allow liquids to ingress into the housing.
When not in use, store the dashboard camera in a dry place. Do not expose the camera to large temperature fluctuations. The condensation that occurs as a result may, under certain circumstances, damage the device.
8. NOTES REGARDING ENVIRONMENTAL PROTECTION
Do not dispose of electrical devices with the household waste! Electrical and electronic scrap must be collected separately and disposed of in an environmentally responsible manner for recycling. Please contact your community or city administration regarding disposal options for electrical and electronic scrap.
9. CONTACT INFORMATION
EAL GmbH
42115 Wuppertal, Germany
+49 (0)202 42 92 83 0
text_image
Warning symbol with exclamation mark inside a triangleAVERTISSEMENT
Dimensions: 35 x 65 x 70 [mm]
text_image
Diagram of a mechanical component with three labeled parts: ①, ②, and ③.Figure 1: Caméra
text_image
FULLHAD CAR DVR ISSUP FULLHAD ISSIP ⑤④

natural_image
Close-up of a black mechanical component with a numbered label (7) pointing to a section, no visible text or symbols beyond the number.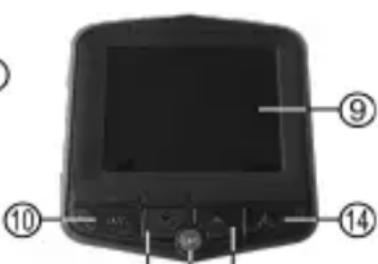
text_image
Labeled diagram of a device with numbered components, likely an electronic device or control panel.⑪ ⑫ ⑬
+2,0 ... +0,0 ... -2,0
text_image
Warning symbol with exclamation mark inside a triangleWAARSCHUWING
text_image
Diagram showing labeled parts of a satellite dish and cable, including numbered componentstext_image
Diagram showing labeled parts of a satellite dish and cable, including numbered components 15 to 20.+2,0 ... +0,0 ... -2,0
$$ 1 2 M - 1 0 M - 8 M - 5 M - 3 M - 2 M H D - 1, 3 M - V G A $$
natural_image
Product display of a car dashboard and rearview camera with attached cable, shown in three circular views (front, side, and top) without any visible text or symbols.EUFAB
GERMANY CAR & BICYCLE ACCESSORIES