L 160 D - Speaker DB Technologies - Free user manual and instructions
Find the device manual for free L 160 D DB Technologies in PDF.

User questions about L 160 D DB Technologies
0 question about this device. Answer the ones you know or ask your own.
Ask a new question about this device
Download the instructions for your Speaker in PDF format for free! Find your manual L 160 D - DB Technologies and take your electronic device back in hand. On this page are published all the documents necessary for the use of your device. L 160 D by DB Technologies.
USER MANUAL L 160 D DB Technologies
USER MANUAL - Section 1
natural_image
Line drawing of two electronic devices with visible branding (no text or symbols on the devices themselves)CE

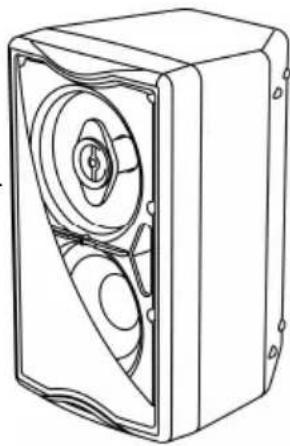
DESCRIZIONE
natural_image
Technical line drawing of a rectangular electronic device with internal components (no text or symbols)
natural_image
Technical line drawing of a mechanical device with internal components (no text or symbols)L160D
6) INDICATORE LUMINOSO "ON/SIGNAL"
The speakers in this series use a latest generation digital amplifier.
This highly efficient amplifier provides high power with limited weight and dimension. Thanks to the low power dissipated, the cooling of the amplifier module does not require a fan.
The digital preamplifier with DSP (Digital Signal Processing) controls the audio crossover of the acoustic components, the frequency response, the limiter, and the phase alignment.
The correct switch on of the amplifier is guaranteed by an initialization procedure; during this test stage the LEDs (“LIMITER” and “ON/SIGNAL”), located on the amplifier module, stay on together for approx. 2 sec.
At the end of the switch on procedure, on the amplifier module, the "ON/SIGNAL" green LED flashes slowly, when there is signal absence.
During normal operation the “ON/SIGNAL” green LED serves as Vu-meter monitoring the audio level reproduced.
The "LIMITER" red LED lights up to indicate that the internal limiter circuit has tripped to prevent amplifier distortion and protects the speakers against overloads.
Thermal control is provided by the internal DSP, by means of one sensor, controls the temperature of the amplifier, avoiding overheating by limiting the overall volume.
In case of overheating (> 90°C) the volume decreases proportionally to the temperature increase, making the change unnoticeable.
The correct volume and all the functions are automatically restored when standard operating temperatures are reached.
L80D
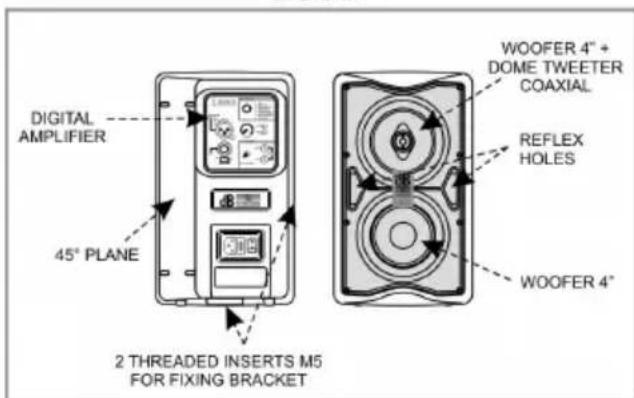
The active speaker L80D is equipped with an amplifier capable of delivering a power of 80W.
The speaker is equipped with a 4" woofer with dome tweeter (coaxial - voice coil 1") and 4" woofer (voice coil 1")
The speaker case is made of plastic material
The M5 threaded holes on the side and the bottom allow the possibility to use the speaker attached to a bracket.
It is also designed for use in rest position as a monitor (with an angle of 45^ )
natural_image
Line drawing of a rectangular electronic device with internal components (no text or symbols)
natural_image
Line drawing of a mechanical device with internal components (no text or symbols)L160D
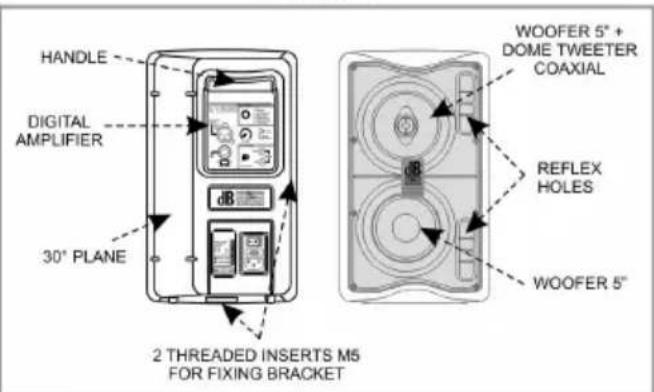
The active speaker L160D is equipped with an amplifier capable of delivering a power of 160W.
The speaker is equipped with a 5" woofer with dome tweeter (coaxial - voice coil 1") and 5" woofer (voice coil 1")
The speaker case is made of plastic materials and is equipped with a recessed handle in the back that makes it easy to transport.
The M5 threaded holes on the side and the bottom allow the possibility to use the speaker attached to a bracket.
It is also designed for use in rest position as a monitor (with an angle of 60°)
COMMANDS AND FUNCTIONS (FIG. 1)
INPUT/OUTPUT and CONTROLS section
1) "BALANCED INPUT" (XLR) and "LINK" (JACK 6,3mm) CONNECTORS
These balanced inputs can be used to connect balanced or unbalanced microphones or audio sources at line level (0dB) (eg. preamplifier, mixer, recorder, CD player, musical instrument, ...).
The balanced connector is connected in parallel and can be used to send the audio signal to other amplified speakers, recorders or supplementary amplifiers.
2) "INPUT SENS" SWITCH
Position the switch in LINE to use a line level source (0 dB) or MIC to use a microphone.
3) EQUALIZATION "DSP SETUP" SELECTOR
This control enables to select the suitable equalization for loudspeaker use.
4) "VOLUME" CONTROL
The knob regulates the speaker's volume.
This control does not affect the output "LINK" levels.
5) "LIMITER" INDICATOR LIGHT
This indicator shows red to indicate that the internal limiter circuit has tripped.
This prevents amplifier distortion and protects the speakers against overloads.
6) "ON/SIGNAL"INDICATOR LIGHT
This indicator light comes on green to indicate that the amplifier is switched on and it is working properly. The “ON/SIGNAL” green LED flashes slowly, when there is signal absence.
During normal operation the LED serves as Vu-meter monitoring the audio level reproduced.
"AUX CHANEL" section
7) "AUX CHANEL - INPUT" INPUT CONNECTORS
Through the RCA phono connectors, this input permits easy connection of CD, DAT, cassette players, etc....
8) "AUX CHANNEL - VOLUME" CONTROL
This control adjusts the output volume from the speaker of just the AUX CHANNEL signal.
This control does not affect the overall volume of the speaker.
Power supply section
9) POWER SWITCH "POWER"
This switch can be used to switch the speaker on and off.
10) FUSE CARRIER "FUSE"
Mains fuse housing. Replace only with identical value!
11) POWER CABLE SOCKET "MAINS"
Used for connecting the power cable supplied.
DSP SETUP
The DSP allows the selection of 8 different equalizations:
DSP SETUP

1 - LIVE
2 - PLAYBACK
3 - STAGE MONITOR
4 - MALE VOICE
5 - FEMALE VOICE
6 - STUDIO MONITOR
7 - AUTO LOUDNESS
8 - TALKBACK
L80D
L160D
DSP SETUP

1 - LIVE
2 - PLAYBACK
3 - STAGE MONITOR
4 - MALE VOICE
5 - FEMALE VOICE
6 - STUDIO MONITOR
7 - AUTO LOUDNESS
8 - L160 (Analog)
1 - LIVE
For use during live performances with the speaker placed on a stand. Recommended for musicians and singers.
2 - PLAYBACK
To listen and use music from MP3 players, CDs, etc., even in a live situation with the speaker positioned on a stand. Low and high frequencies are emphasized.
3 - STAGE MONITOR
To be positioned on the floor as stage monitor. Low frequencies, emphasized by the floor, are limited, thus preventing related feedbacks.
4 - MALE SINGER
Designed for male voices since middle and low frequencies are emphasized minimizing the feedback due to the proximity effect of the cardioid or hypercardioid microphones.
5 - FEMALE SINGER
Designed for female voices. This preset emphasizes middle and high frequencies, making voices sharper. The feedback is extremely limited for both cardioid and hypercardioid microphones.
6 - STUDIO MONITOR
Designed specifically for use in the studio, or where a flat response curve of the input signal is required. In this case the output signal turns out to be as faithful as possible to the original signal.
7 - AUTO LOUDNESS
For all those situations where the music is played in the background. In this case the low frequencies are extended and enhanced, so as to create a more enveloping sound even at low sound level.
8 - TALKBACK only with speaker L80D
Specifically designed to improve speech intelligibility. The frequency response curve in this preset proves to be appropriate for broadcasting announcements, notices and voice messages.
8 - L160 (Analog) only with speaker L160D
When the speaker is positioned on a stand, specifically designed for music playback (MP3, CD etc..). The response curve of the speaker in this preset turns out to be identical to that of the analogue model L160.
DIAGNOSTICS TABLE
| STATE OR CONDITION OF THE MODULE | LED “SIGNAL/ON” | LED “LIMITER” | FUNCTIONS OR DESCRIPTION OF THE MODULE |
| Normal operation | |||
| Power ON | ON for 2/3 sec. | ON for 2/3 sec. | Audio MUTED Initialization of the amplifier module |
| Normal use (without any audio signal input) | Slow flashing | OFF | Audio ACTIVE Module initialization complete and correct No signal audio. |
| Normal use | Flashing according to track | OFF | Audio ACTIVE The module has detected a partial anomaly and remains active with limited functions |
| Amplifier temperature management | |||
| Amplifier temperature (thermal threshold) | Normal operation | Normal operation | Audio ACTIVE The amplifier module reduces the volume, up to a maximum of 6dBm, as the temperature rises above the safety threshold. |
| Generic errors | |||
| No power supply (Vac) detected | OFF | OFF | A momentary lack of supply voltage is detected during normal operation |
| Current overload | Normal operation | Normal operation | During normal operation, a current overload is detected and automatically managed by the amplifier. |
TECHNICAL SPECIFICATION
| L80D | L160D | |
| System | Active Bi-Amp | Active Bi-Amp |
| Type of amplifier | Digital – Class D | Digital – Class D |
| Power PRG | 80W | 160W |
| Musical power | 160W | 320W |
| Frequency response (-6dB) | 104Hz-20KHz | 88Hz-20KHz |
| (-10dB) | 90Hz-20KHz | 70Hz-20KHz |
| Sound pressure (SPL) | 112dB | 116dB |
| Component parts | 1 woofer 4”+ dome tweeter(coaxial)1 woofer 4” | 1 woofer 5” + dome tweeter(coaxial)1 woofer 5” |
| Input sensitivity nominal | -32dBu / 0dBu (switch) | -32dBu / 0dBu (switch) |
| Input impedance | LINE/MIC | LINE/MIC |
| Balanced | 30Kohm/600ohm | 30Kohm/600ohm |
| Unbalanced | 15Kohm/300ohm | 15Kohm/300ohm |
| RCA Input sensitivity | -12dBu | -12dBu |
| RCA impendence | 4,7Kohm | 4,7Kohm |
| Power supply | 110-120Vac 50-60Hz220-240Vac 50-60Hz | 110-120Vac 50-60Hz220-240Vac 50-60Hz |
| Inrush current | 600mA | 900mA |
| Current consumption | ||
| 100-120Vac 50-60Hz | 500mA | 800mA |
| 220-240Vac 50-60Hz | 250mA | 400mA |
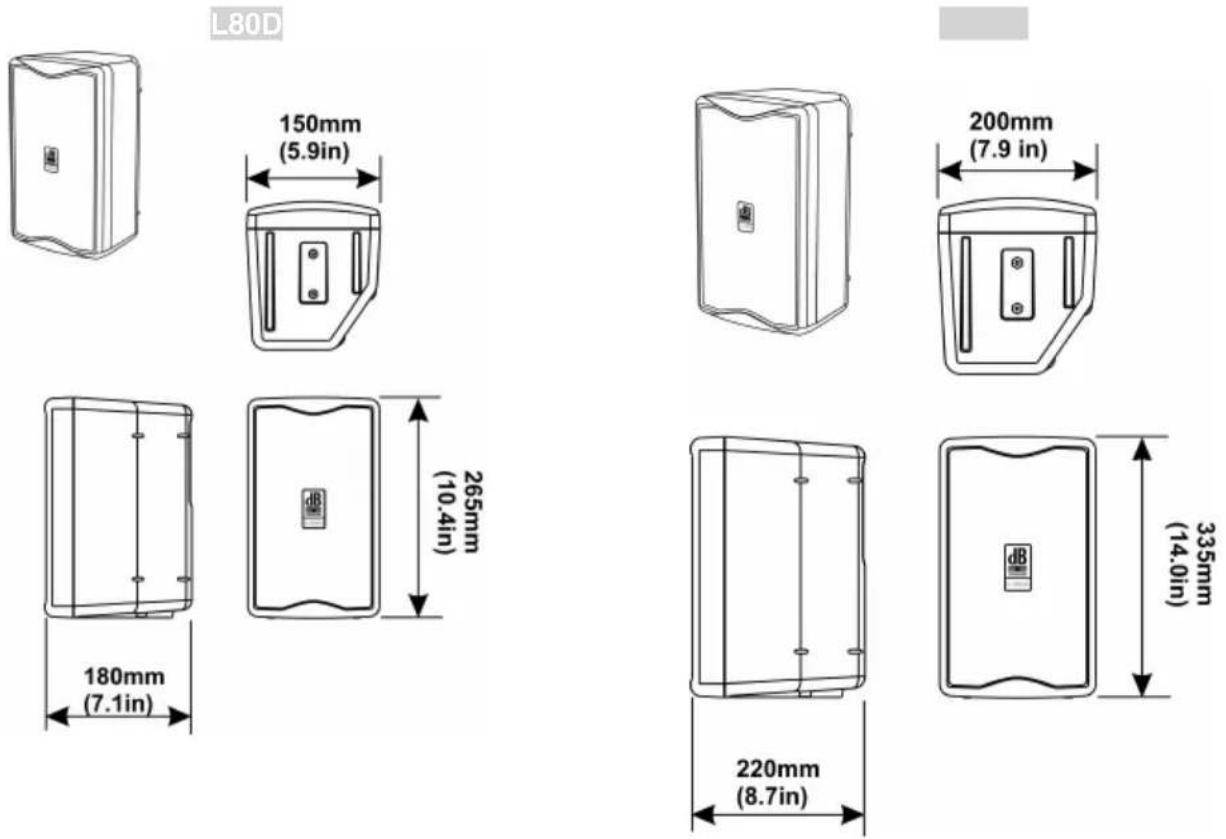
| Dimensions (LxHxP) | 155X265X180 mm6.1X10.4X9.1inch. | 200x335x220mm7.9X13.2X8.7inch. |
| Weight | 3.75Kg8.27lbs | 5,2Kg11.46lbs |
| DSP processor | ||
| DSP | 56bit | 56bit |
| Audio conversion AD/DA | 24bit/48KHz | 24bit/48KHz |
| Volume control | Digital | Digital |
| Equalization | 8 preset EQ | 8 preset EQ |
EMI CLASSIFICATION
According to the standards EN 55103 this equipment is designed and suitable to operate in E3 (or lower E2, E1) Electromagnetic environments.
L80D
L160D
BESCHREIBUNG
natural_image
Line drawing of a mechanical device with internal components and mounting holes (no text or symbols)
natural_image
Technical line drawing of a mechanical device with internal components (no text or symbols)L160D
natural_image
Technical line drawing of a rectangular device with internal circular components (no text or symbols)
natural_image
Technical line drawing of a mechanical device with internal components (no text or symbols)L160D
DIMENSIONI - DIMENSIONS
ABMESSUNGEN - DIMENSIONS
SCHEMA A BLOCCHI - BLOCK DIAGRAM
natural_image
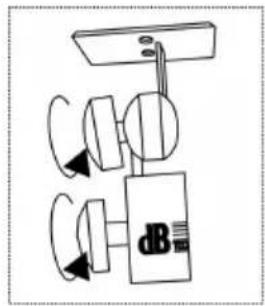
Technical line drawing of a door and a cylindrical device on a brick base (no text or symbols)Utilizzo con supporto piantana - Use with pedestal stand Anwendung mit Pedestaluntergestell - Utilisation sur pied
natural_image
Simple line drawing of a mechanical device with rotating components (no text or symbols)The bracket fastening kit is optional (code SN130)
natural_image
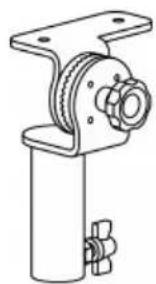
Four identical line drawings of a tripod-mounted TV stand with a small screen on top, shown from different angles (no text or symbols)Utilizzo con supporto piantana 25mm - Use with 25mm stand Anwendung mit 25 mm ständer - Utilisation avec le stand de 25mm
natural_image
Technical line drawing of a mechanical assembly with a cylindrical base and flanged component (no text or symbols)The bracket fastening kit is optional (code SA25)
natural_image
Four technical line drawings of electronic device modules with no visible text or symbolsnatural_image
Technical line drawing of two wall-mounted equipment components mounted on a brick wall (no text or symbols)The bracket fastening kit is optional (code WB13)
natural_image
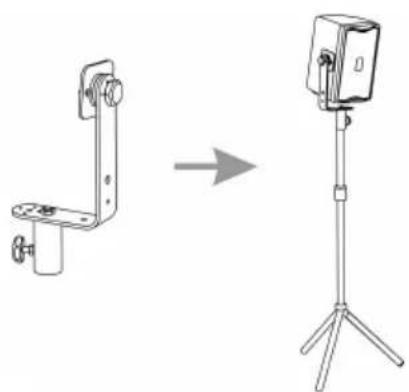
Technical line drawings of two mechanical bracket components (no text or symbols)Utilizzo con supporto piantana Use with pedestal stand Anwendung mit Pedestaluntergestell Utilisation sur pied
natural_image
Technical line drawing showing a mechanical clamp device transforming into a mounted camera on a tripod stand (no text or symbols present)natural_image
Diagram showing a mechanical bracket transforming into a housing (no text or symbols)
natural_image
Technical line drawing showing a bracket and a door lock assembly (no text or symbols)SAFETY INSTRUCTIONS FOR ACCESSORIES
Contact dB Technologies for accessories to be used with speakers.
dB Technologies will not accept any responsibility when inappropriate accessories or not suitable additional devices are used.
Before hanging the loudspeaker check all the components for damages, deformations, missing or damaged parts that may compromise safety during installation.
The installation of the speaker on speaker stand must be carried out exclusively by professionally qualified staff, being careful to place a speaker stand foot in the direction of the output side of the sound (front side of the speaker) so as to maximize stability in relation to the centre of gravity of the speaker