
TMH6000iii - Printer EPSON - Free user manual and instructions
Find the device manual for free TMH6000iii EPSON in PDF.
| Product Type | Multifunction printer for receipt, slip, and endorsement |
| Print Technology | Thermal (receipt); 9-pin dot matrix impact (slip); 8-pin shuttle impact (endorsement) |
| Print Font | Receipt: 9x17 / 12x24; Slip: 5x9 / 7x9; Endorsement: 5x7 |
| Dimensions (H x W x D) | 185 x 186 x 298 mm |
| Weight | Approx. 5.3 kg |
| Power Supply | +24 V DC ± 10% |
| Power Consumption | Slip: 1.7 A (avg.); Receipt: 1.8 A (avg.) |
| Operating Temperature | 5 to 45 °C |
| Operating Humidity | 10 to 90% without condensation |
| Interface | RS-232C, bidirectional parallel, RS-485 (optional) |
| Data Buffer | 45 bytes or 4 KB (selectable by DIP) |
| Number of copies (slip) | 1 original + 3 copies |
| Ink Ribbon (slip) | ERC-32(P) - life 6 million characters |
| Ink Ribbon (endorsement) | ERC-41(P) - life 1 million characters |
| Receipt paper (roll) | Thermal paper 79.5 ±0.5 x 83 mm |
| Paper size slip/endorsement | Width 70-148 mm, length 150-210 mm |
| Paper thickness slip/endorsement | 0.09 to 0.2 mm |
| Reliability (MTBF) | Receipt: 360,000 hours; Slip: 180,000 hours |
| Special Features | Magnetic character reading (MICR), endorsement printing, cash drawer (D.K.D) |
| Recommended Cleaning | Thermal head: every 3 months; MICR reader: every 12 months |
| Safety Instructions | Do not disassemble, use on a stable surface, unplug if smoke or odor |
Frequently Asked Questions - TMH6000iii EPSON
User questions about TMH6000iii EPSON
0 question about this device. Answer the ones you know or ask your own.
Ask a new question about this device
Download the instructions for your Printer in PDF format for free! Find your manual TMH6000iii - EPSON and take your electronic device back in hand. On this page are published all the documents necessary for the use of your device. TMH6000iii by EPSON.
USER MANUAL TMH6000iii EPSON
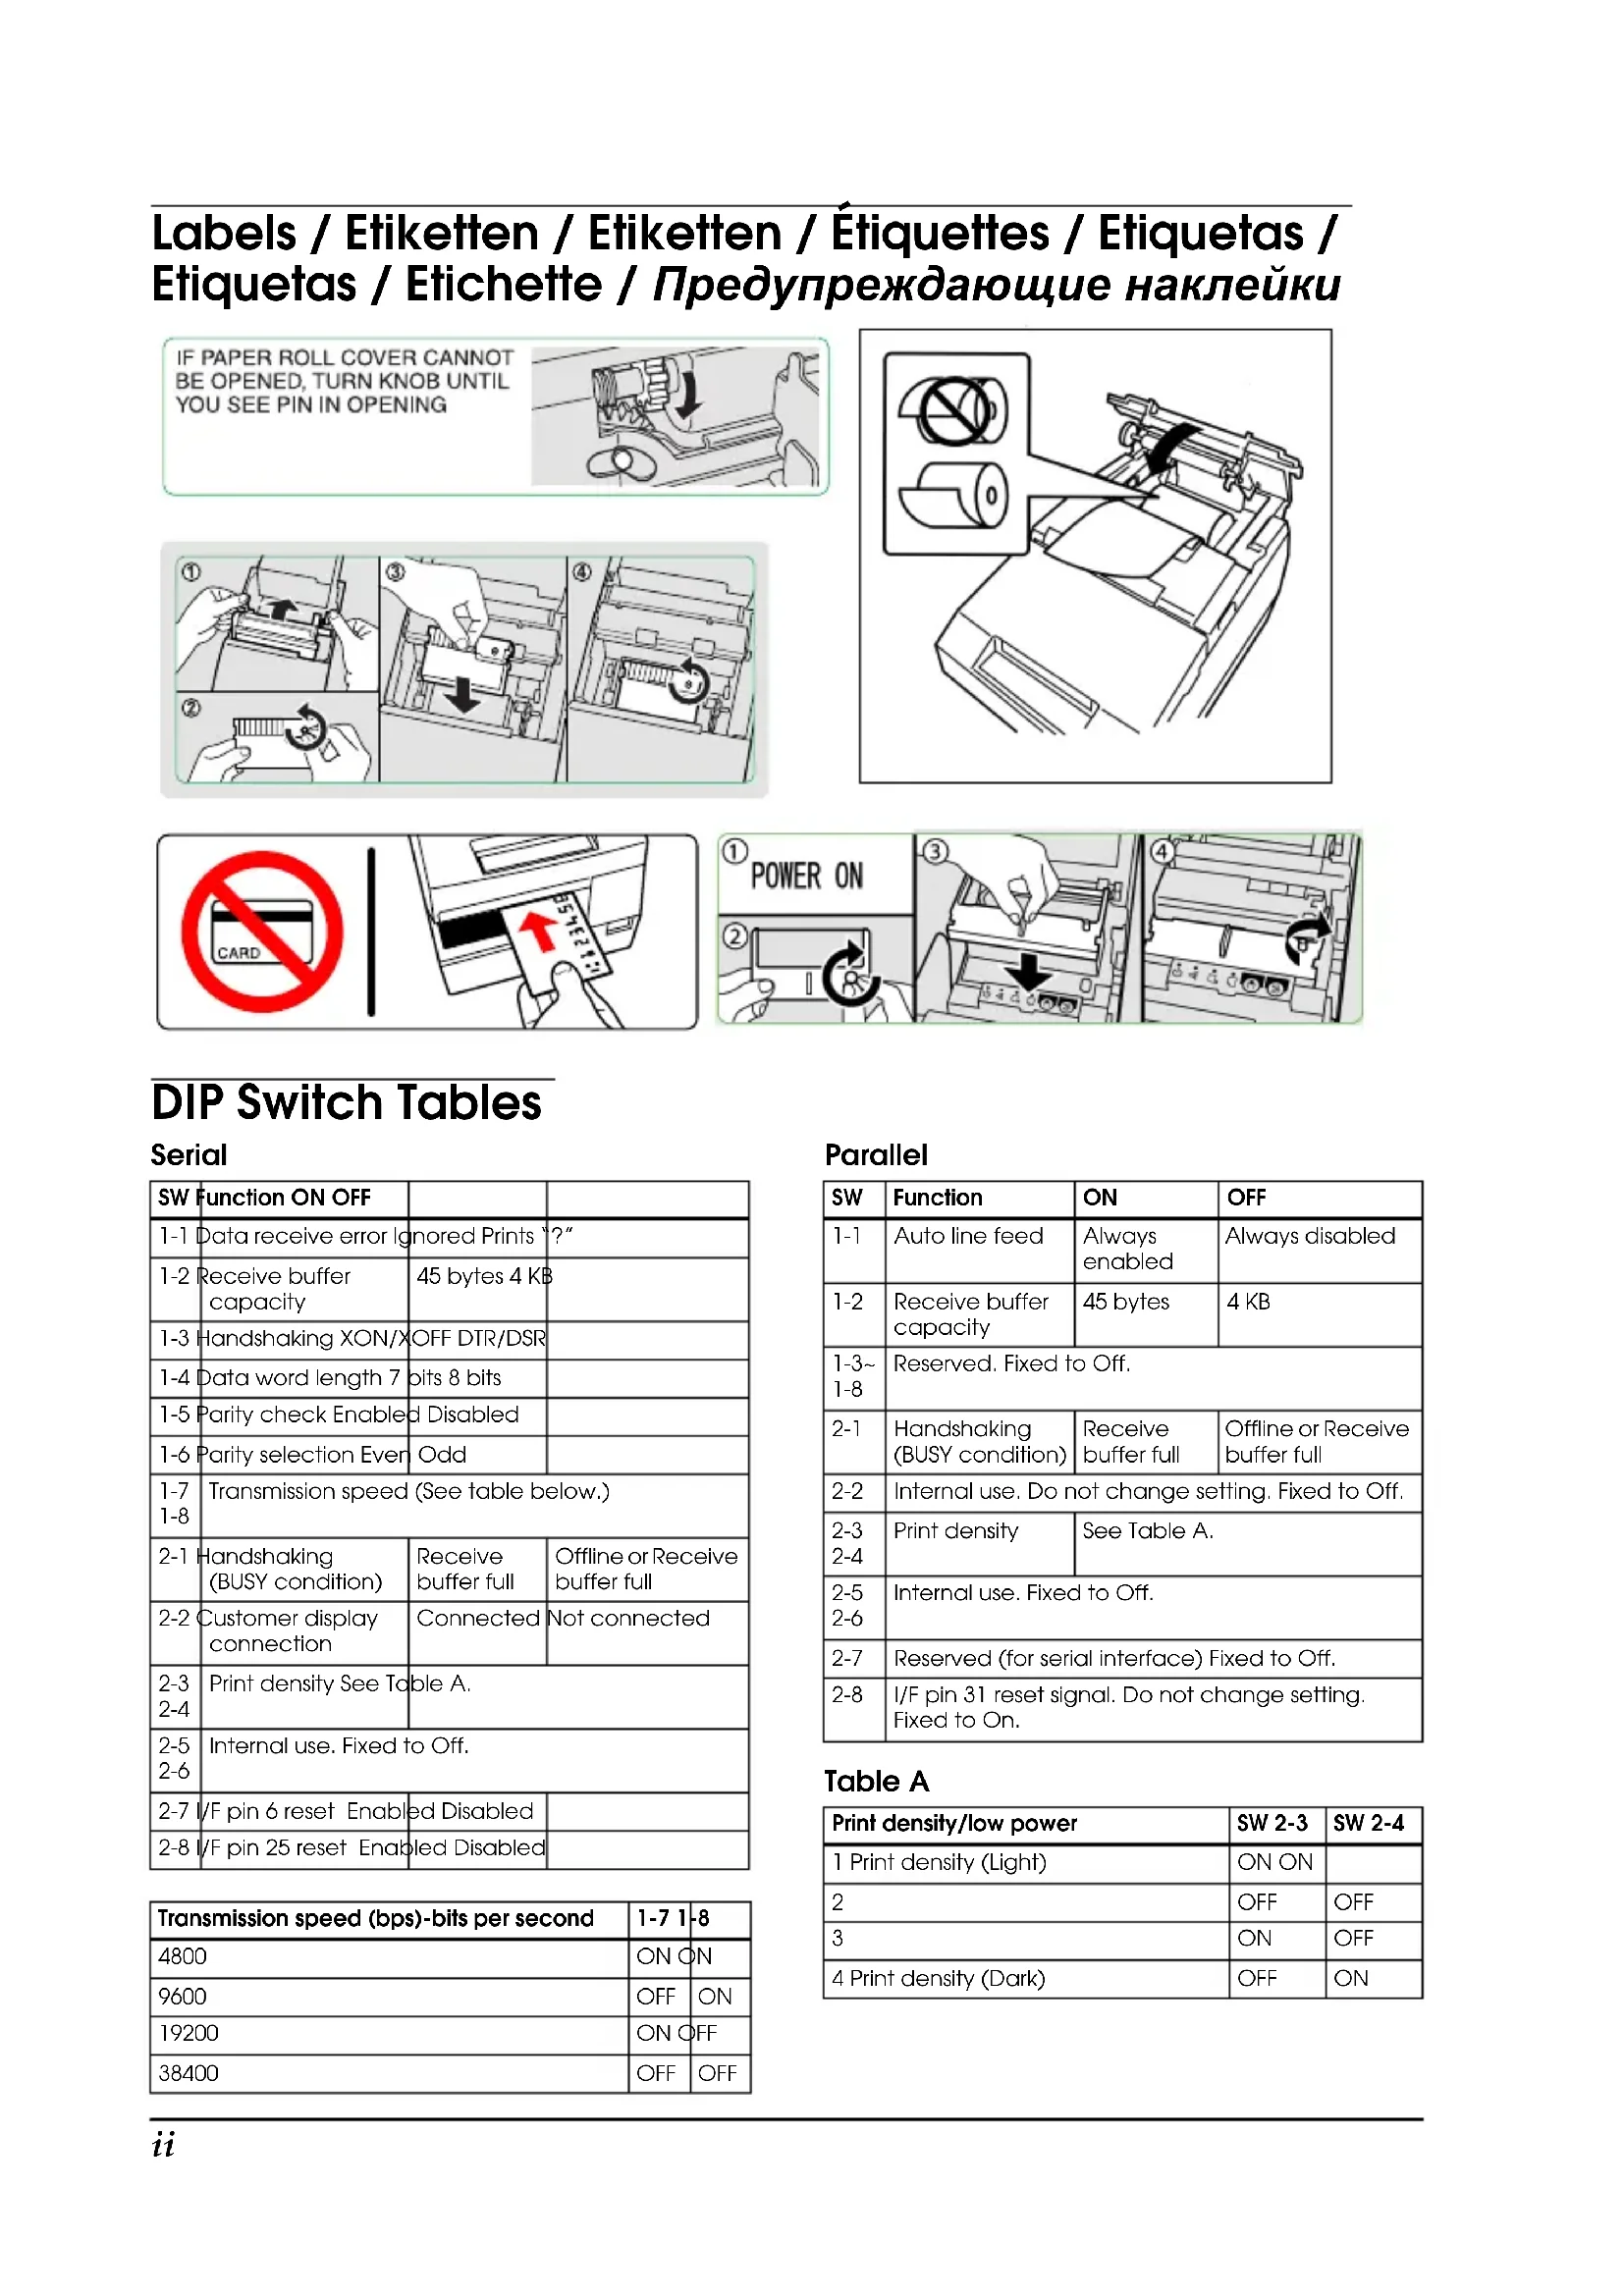
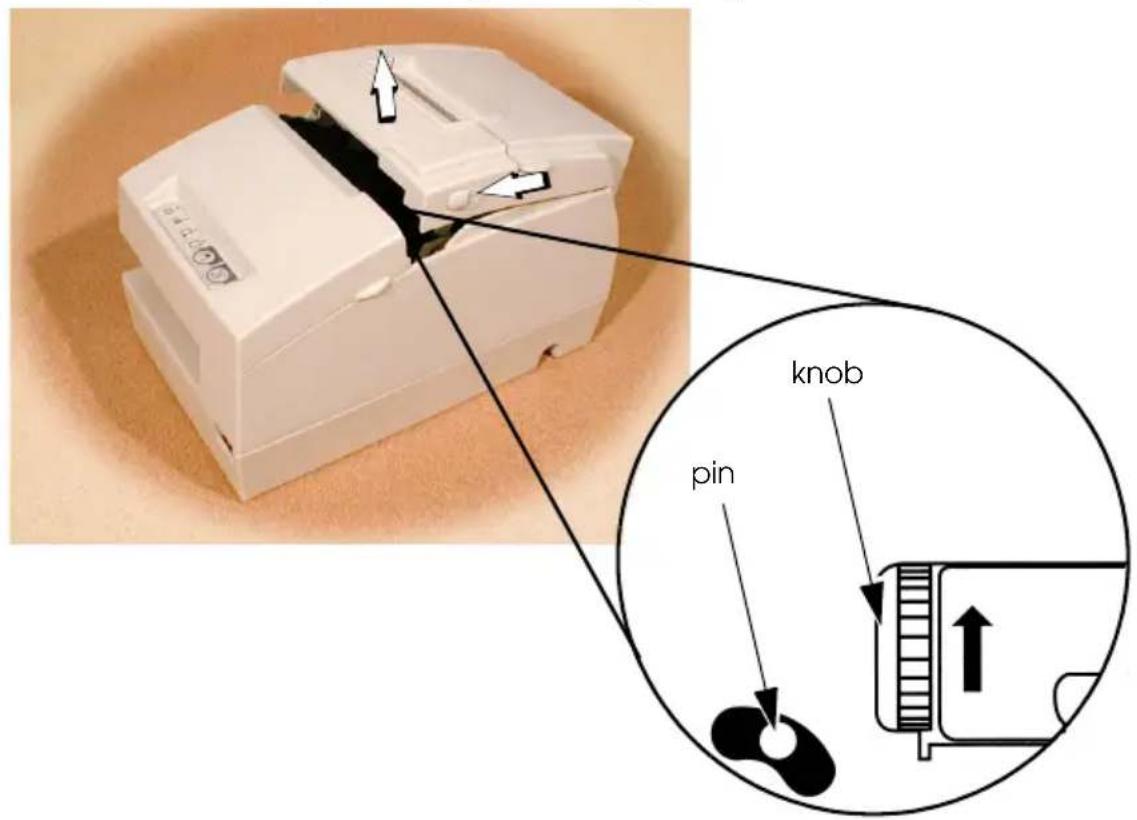
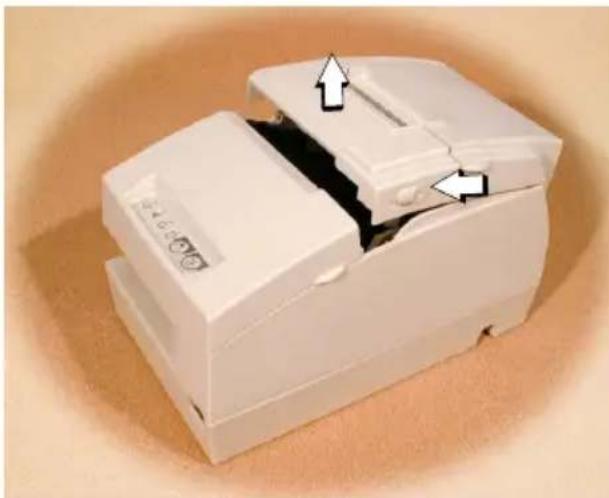
IF PAPER ROLL COVER CANNOT BE OPENED, TURN KNOB UNTIL YOU SEE PIN IN OPENING
DIP Switch Tables
Serial
| SW Function ON OFF | |||
| 1-1 Data receive error Ignored Printed ?" | |||
| 1-2 Receive buffer capacity | 45 bytes 4 KB | ||
| 1-3 Handshaking XON/X OFF DTR/DSR | |||
| 1-4 Data word length 7 bits 8 bits | |||
| 1-5 Parity check Enabled Disabled | |||
| 1-6 Parity selection Ever Odd | |||
| 1-7 Transmission speed (See table below.) | |||
| 1-8 | |||
| 2-1 Handshaking (BUSY condition) | Receive buffer full | Offline or Receive buffer full | |
| 2-2 Customer display connection | Connected | Not connected | |
| 2-3 Print density See Table A. | |||
| 2-5 Internal use. Fixed to Off. | |||
| 2-7 /F pin 6 reset Enabled Disabled | |||
| 2-8 /F pin 25 reset Enabled Disabled | |||
| Transmission speed (bps)-bits per second | 1-7 1-8 |
| 4800 | ON ON |
| 9600 | OFF ON |
| 19200 | ON OFF |
| 38400 | OFF OFF |
Parallel
| SW | Function | ON | OFF |
| 1-1 | Auto line feed | Always enabled | Always disabled |
| 1-2 | Receive buffer capacity | 45 bytes | 4 KB |
| 1-3~1-8 | Reserved. Fixed to Off. | ||
| 2-1 | Handshaking (BUSY condition) | Receive buffer full | Offline or Receive buffer full |
| 2-2 | Internal use. Do not change setting. Fixed to Off. | ||
| 2-32-4 | Print density | See Table A. | |
| 2-52-6 | Internal use. Fixed to Off. | ||
| 2-7 | Reserved (for serial interface) Fixed to Off. | ||
| 2-8 | I/F pin 31 reset signal. Do not change setting. Fixed to On. | ||
Table A
| Print density/low power | SW 2-3 | SW 2-4 |
| 1 Print density (Light) | ON ON | |
| 2 | OFF | OFF |
| 3 | ON | OFF |
| 4 Print density (Dark) | OFF | ON |
TM-H6000III
User's Manual
All rights reserved. No part of this publication may be reproduced, stored in a retrieval system, or transmitted in any form or by any means, electronic, mechanical, photocopying, recording, or otherwise, without the prior written permission of Seiko Epson Corporation. No patent liability is assumed with respect to the use of the information contained herein. While every precaution has been taken in the preparation of this book, Seiko Epson Corporation assumes no responsibility for errors or omissions. Neither is any liability assumed for damages resulting from the use of the information contained herein.
Neither Seiko Epson Corporation nor its affiliates shall be liable to the purchaser of this product or third parties for damages, losses, costs, or expenses incurred by purchaser or third parties as a result of: accident, misuse, or abuse of this product or unauthorized modifications, repairs, or alterations to this product, or (excluding the U.S.) failure to strictly comply with Seiko Epson Corporation's operating and maintenance instructions.
Seiko Epson Corporation shall not be liable against any damages or problems arising from the use of any options or any consumable products other than those designated as Original Epson Products or Epson Approved Products by Seiko Epson Corporation.
Epson and ESC/POS are registered trademarks of Seiko Epson Corporation.
NOTICE: The contents of this manual are subject to change without notice.
Copyright © 2005 by Seiko Epson Corporation, Nagano, Japan.
EMC and Safety Standards Applied
Product Name: TM-H6000III
Model Name: M147G
The following standards are applied only to the printers that are so labeled. (EMC is tested using the Epson power supply.)
Europe: CE marking
Safety: EN 60950
North America: EMI: FCC/ICES-003 Class A
Safety: UL 1950/CSA C22.2 No. 950
Japan: EMI: VCCI Class A
Oceania: EMC: AS/NZS CISPR22 Class B
WARNING
The connection of a non-shielded printer interface cable to this printer will invalidate the EMC standards of this device.
You are cautioned that changes or modifications not expressly approved by Seiko Epson Corporation could void your authority to operate the equipment.
CE Marking
The printer conforms to the following Directives and Norms:
Directive 89/336/EEC EN 55022
Class B
EN 55024
IEC 61000-4-2
IEC 61000-4-3
IEC 61000-4-4
IEC 61000-4-5
IEC 61000-4-6
IEC 61000-4-8
IEC 61000-4-11
FCC Compliance Statement For American Users
This equipment has been tested and found to comply with the limits for a Class A digital device, pursuant to Part 15 of the FCC Rules. These limits are designed to provide reasonable protection against harmful interference when the equipment is operated in a commercial environment.
This equipment generates, uses, and can radiate radio frequency energy and, if not installed and used in accordance with the instruction manual, may cause harmful interference to radio communications.
Operation of this equipment in a residential area is likely to cause harmful interference, in which case the user will be required to correct the interference at his own expense.
FOR CANADIAN USERS
This Class A digital apparatus complies with Canadian ICES-003.
Safety Precautions
This section presents important information intended to ensure safe and effective use of this product. Please read this section carefully and store it in an accessible location.
WARNING:
Shut down your equipment immediately if it produces smoke, a strange odor, or unusual noise. Continued use may lead to fire. Immediately unplug the equipment and contact your dealer or a Seiko Epson service center for advice.
Never attempt to repair this product yourself. Improper repair work can be dangerous.
Never disassemble or modify this product. Tampering with this product may result in injury or fire.
Be sure to use the specified power source. Connection to an improper power source may cause fire.
Do not allow foreign matter to fall into the equipment. Penetration by foreign objects may lead to fire.
If water or other liquid spills into this equipment, unplug the power cord immediately, and then contact your dealer or a Seiko Epson service center for advice. Continued usage may lead to fire.
CAUTION:
Do not connect cables in ways other than those mentioned in this manual. Different connections may cause equipment damage and burning.
Be sure to set this equipment on a firm, stable, horizontal surface. Product may break or cause injury if it falls.
Do not use in locations subject to high humidity or dust levels. Excessive humidity and dust may cause equipment damage or fire.
Do not place heavy objects on top of this product. Never stand or lean on this product. Equipment may fall or collapse, causing breakage and possible injury. To ensure safety, unplug this product before leaving it unused for an extended period.
Do not touch the thermal head or paper feed motor. Wait for the head and the motor to be cool. The head and the motor can be very hot after printing for a long time. Touching them may cause burns.
Labels
WARNING:
Do not connect a telephone line to the drawer kick-out connector or the display module connector; otherwise the printer and the telephone line may be damaged.
CAUTION:
Thermal head and paper feed motor for the thermal section are hot
CAUTION:
Caution label for autocutter blade.
Unpacking
The following items are included with the standard specification printer. If any item is damaged, contact your dealer.
□Printer
Thermal roll paper
Dedicated ribbon cassette [ERC-32 (P)]
Power switch cover
User's manual (This manual)
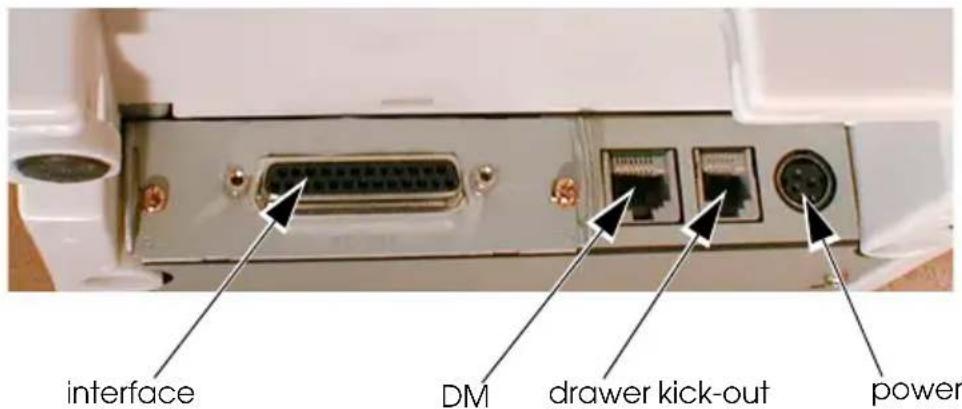
Connectors
Important Installation Notes
For a serial interface, use a null modem cable.
For a parallel interface, use an IEEE 1284 cable.
For a USB interface, install the driver before connecting the printer.
Downloading Drivers, Utilities, and Manuals
Drivers, utilities, and manuals can be downloaded from one of the following URLs.
For customers in North America, go to the following web site:
http://www.epsonexpert.com/ and follow the on-screen instructions.
For customers in other countries, go to the following web site:
http://www.epson-pos.com/
Select the product name from the "Select any product" pulldown menu.
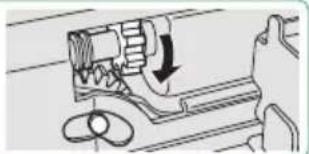
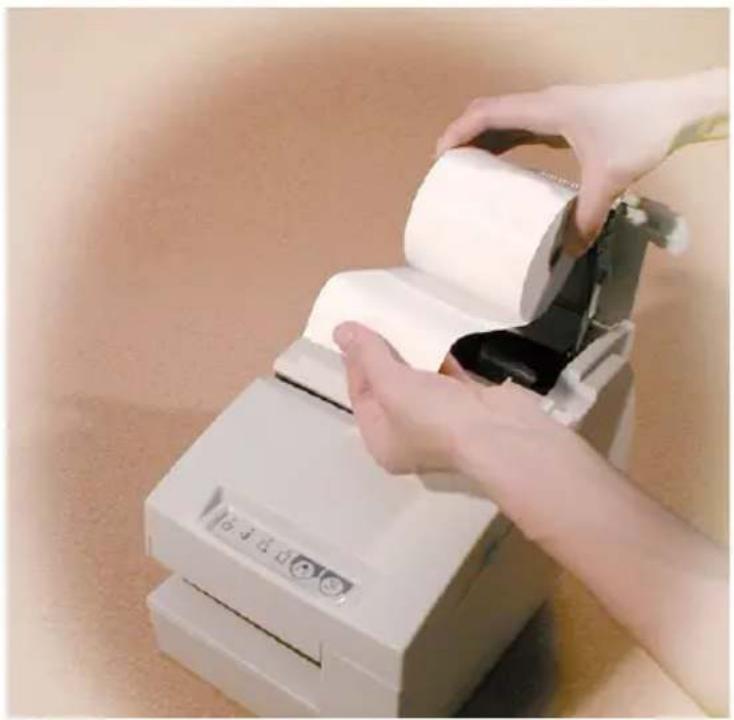
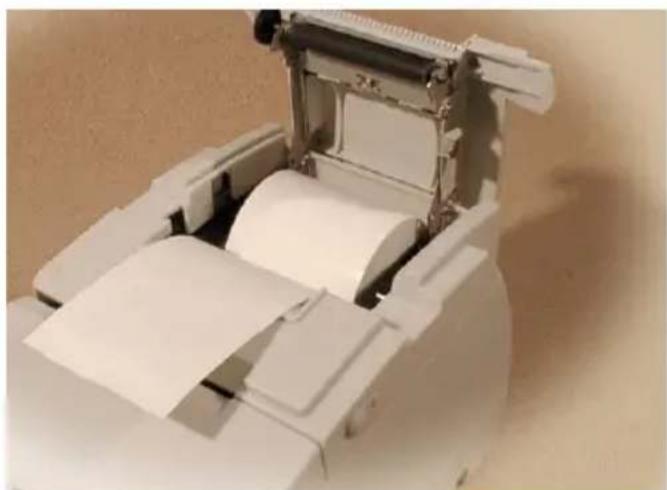
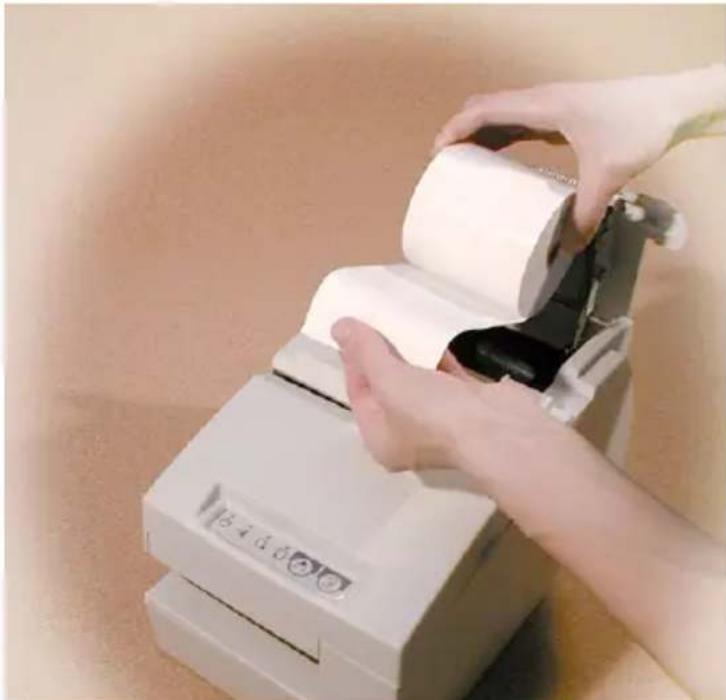
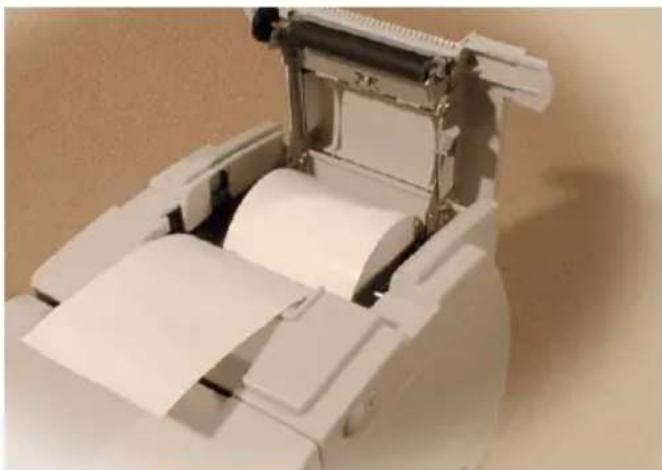
Installing the Paper Roll
Note:
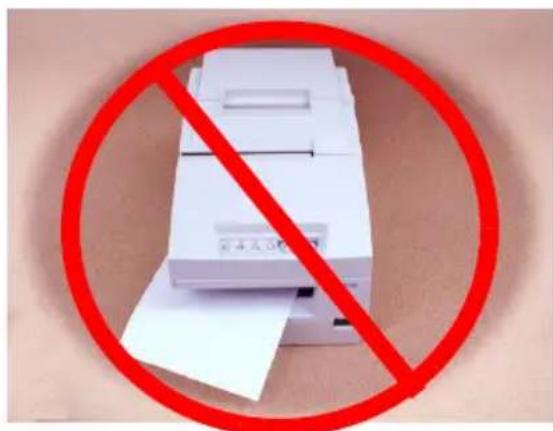
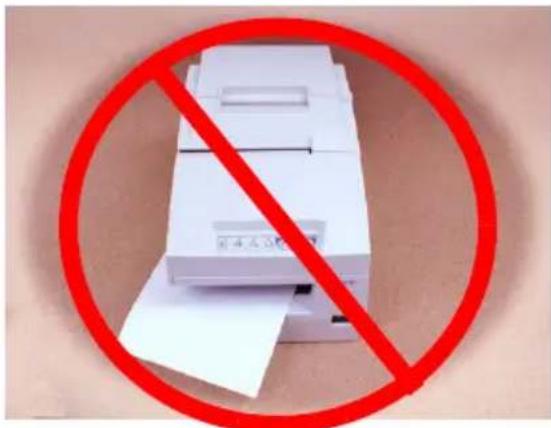
Do not use paper rolls that have the paper glued or taped to the core because they might cause a paper jam.
To prevent paper jams, make sure that nothing obstructs paper coming out of the paper exit, and do not pull the paper out of the printer.

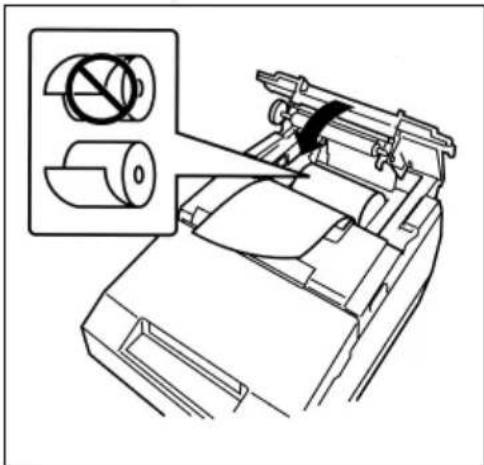
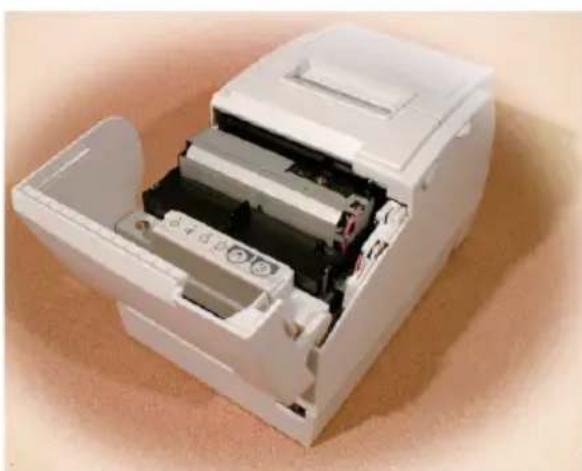
Installing the Ribbon
Epson recommends the use of genuine Epson ribbon cassettes.
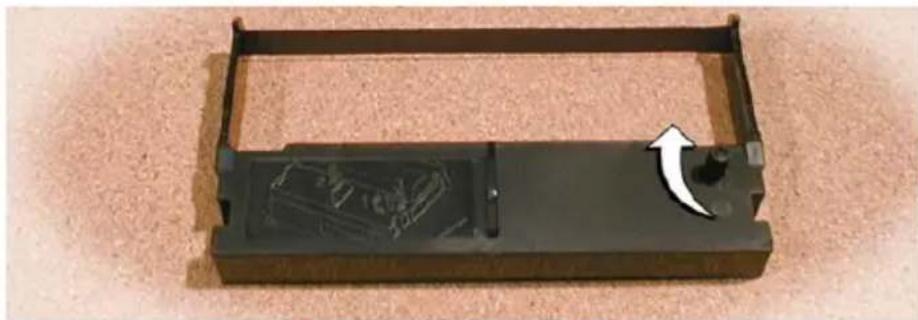
- Turn on the printer. Turn the knob on the ribbon cartridge. Open the front cover of the printer, and insert the new ribbon.
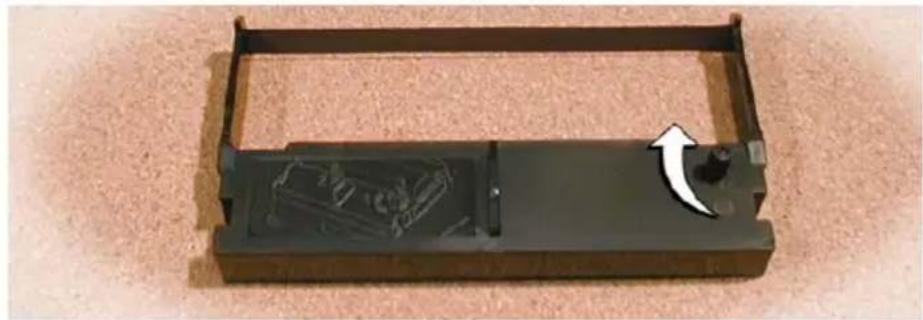
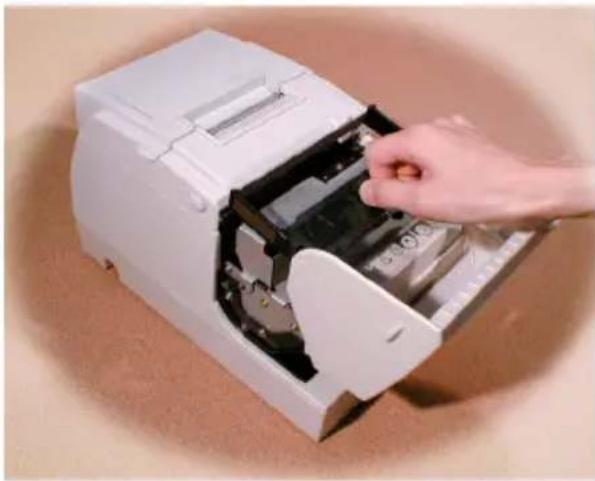
- Turn the knob 2 or 3 times and check the ribbon position.
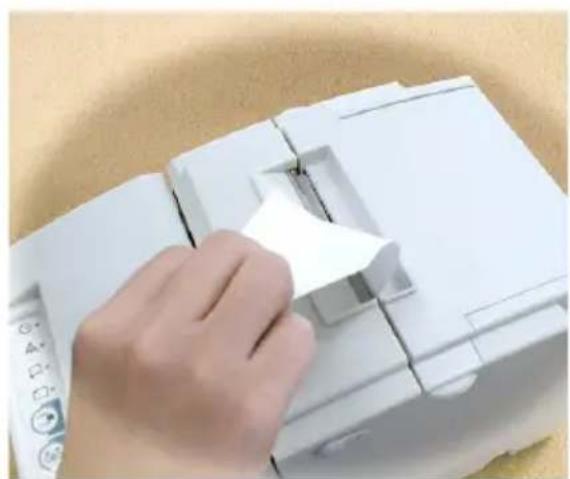
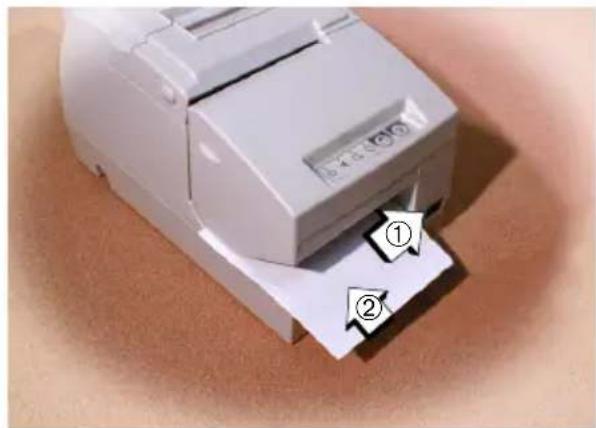
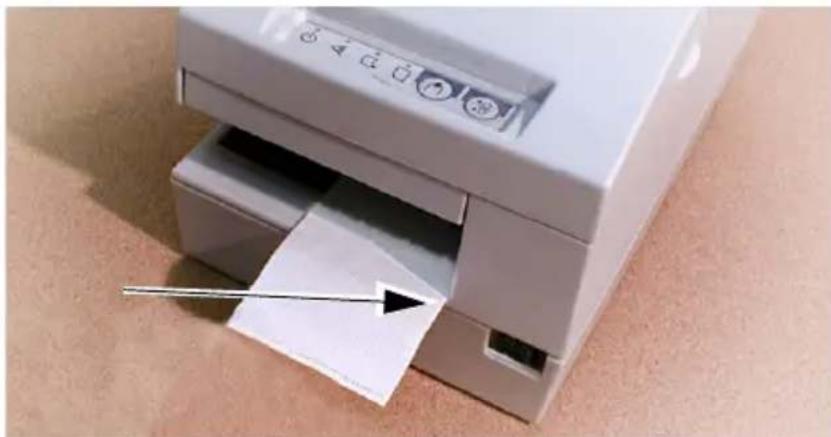
Inserting Slip Paper
Troubleshooting
Error light on or blinking.
Make sure that the printer cover is properly closed.
Turn off the printer and check for a paper jam.
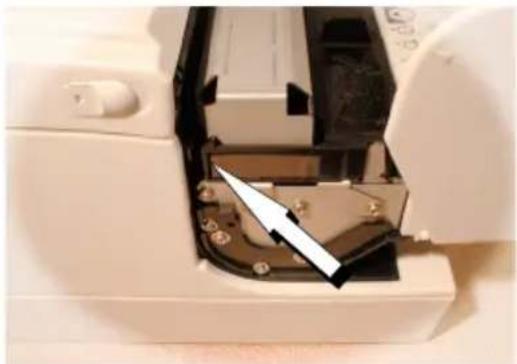
The autocutter is jammed or the paper roll cover will not open.
- Turn off the printer and open the unit cover.
- Then turn the knob until you see a pin in the opening.
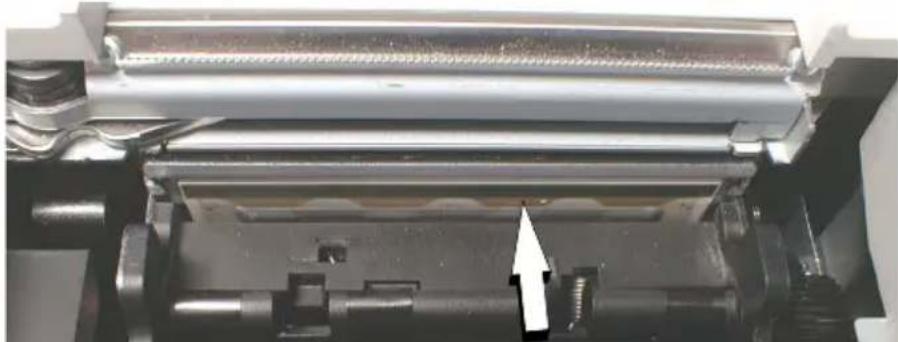
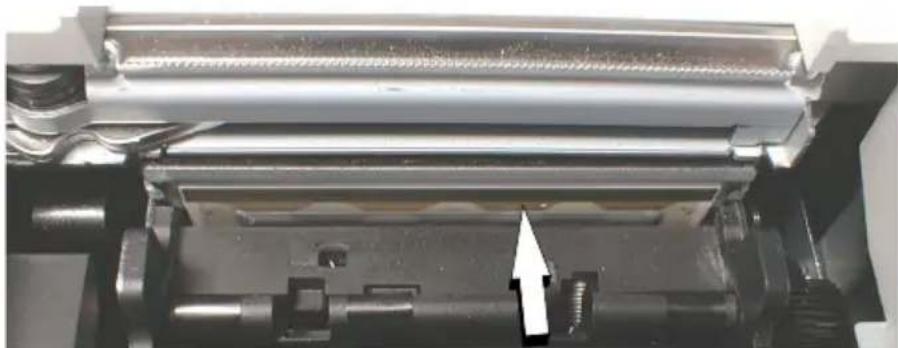
Cleaning the Print Head


CAUTION:
After printing, the print head can be very hot. Be careful not to touch it. Also let it cool before you clean it. Do not damage the print head by touching it with your fingers or any hard object.
Open the paper roll cover, and clean the thermal element (the green part) of the print head with a cotton swab moistened with an alcohol solvent (ethanol, methanol, or IPA).
Clean the thermal head periodically (generally every 3 months) to maintain receipt print quality.
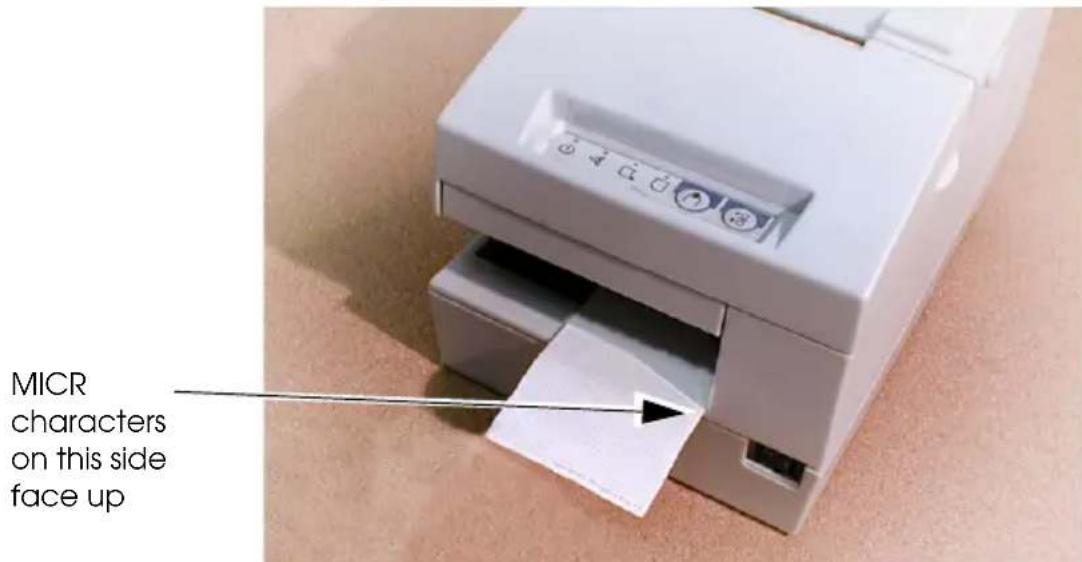
MICR and Endorsement Printing (Factory installed options) Reading MICR Characters On Personal Checks

CAUTION:
Do not insert checks with staples in them. This may cause paper jams, MICR reading errors, and damage to the MICR head.
Be sure the checks are flat, without curls, folds, or wrinkles.
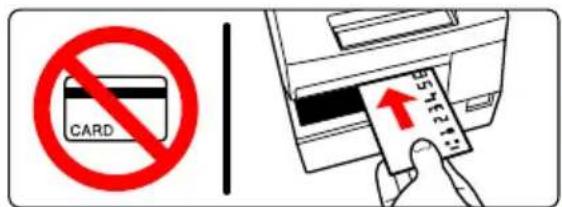
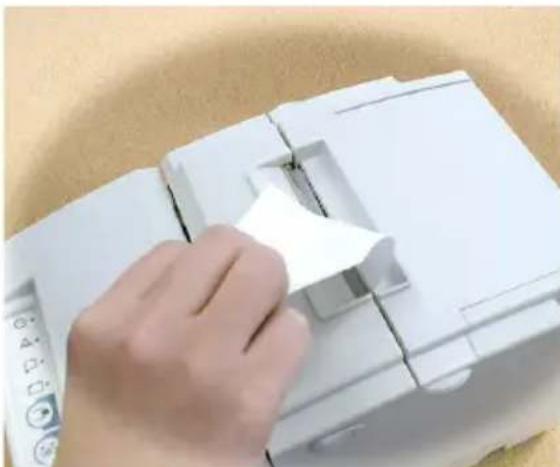
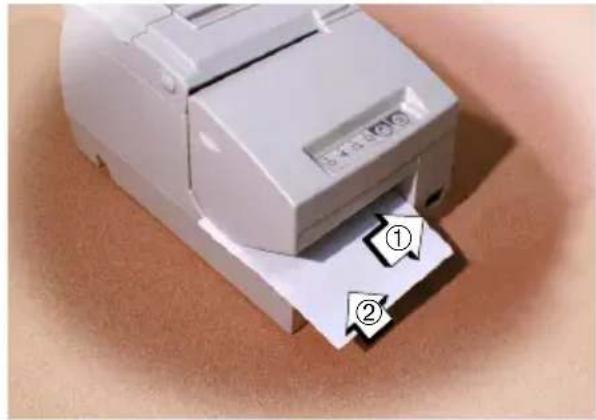
- Wait until the SLIP light blinks. Then insert the check face up with the right side of the check against the right side of the paper guide as far as it will go. Be sure that the MICR characters are on the right.
- The printer will detect the check and start drawing it in. When the printer starts drawing it in, let go of the check immediately. When the printer ejects the check and the SLIP light starts blinking again; remove the check by pulling it straight up; do not pull it at an angle.
Cleaning the MICR Mechanism
Approximately every 12 months clean the MICR head with a moistened cleaning sheet.
Use the following or an equivalent commercially available cleaning sheet:
PRESAT brand (KIC) "CHECK READER CLEANING CARD."
Note:
Be sure not to use an adhesive cleaning sheet.
Follow the steps below:
- Load a paper roll in the printer; turn off the power; then open the paper roll cover and turn the power back on while holding down the RELEASE button.
- Press the RELEASE button 7 times; then close the paper roll cover. The printer prints the following message on receipt paper and the SLIP light flashes.
* RECOGNITION MODE *
Please set check.
- Insert the cleaning sheet like a standard check.
CAUTION:
Be sure that the sheet is inserted with the correct side up and that it is inserted in the correct direction.
Use a cleaning sheet only one time; then discard it.
- When the sheet is ejected, press the RELEASE button, and remove the sheet from the printer.
Notes on using the MICR reader
Do not install the printer near any magnetic fields. Be especially careful where you install your display device and be sure to check the recognition rate of the MICR reader with the display device in place.
Make sure that the printer is not subjected to any impact or vibration when it is performing a MICR reading.
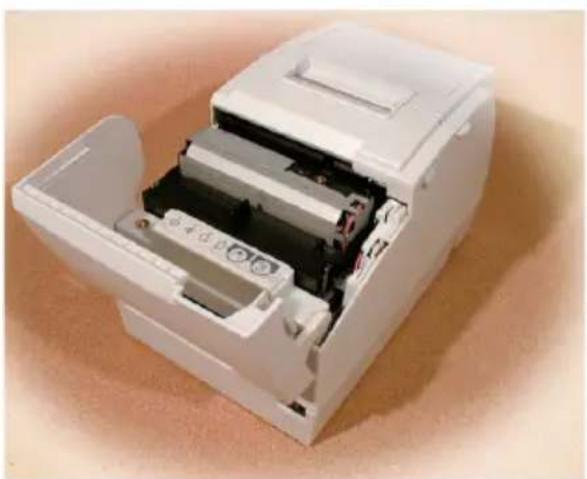
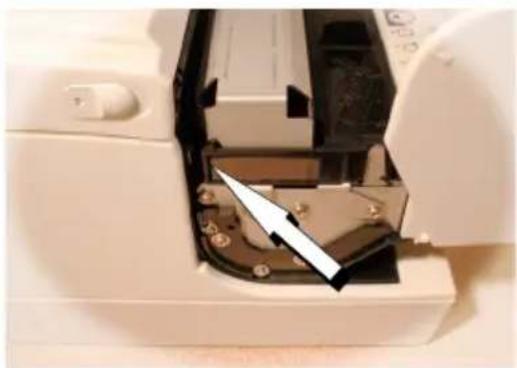
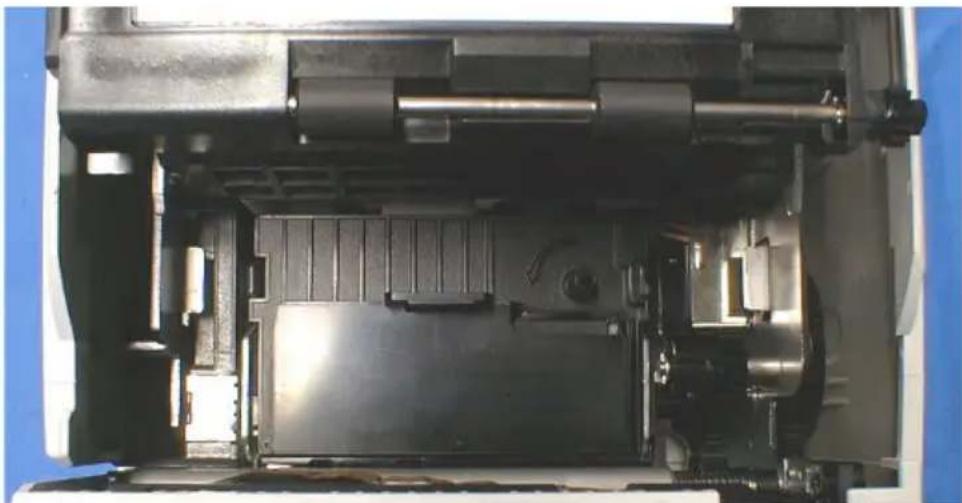
Endorsement Printing
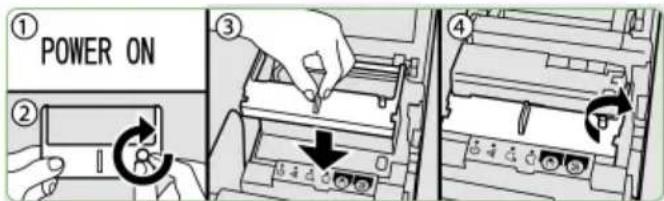
If your printer has the optional endorsement printing mechanism, install the endorsement ribbon following the steps below:
Note:
Be sure to turn on the power before installing a ribbon cassette.
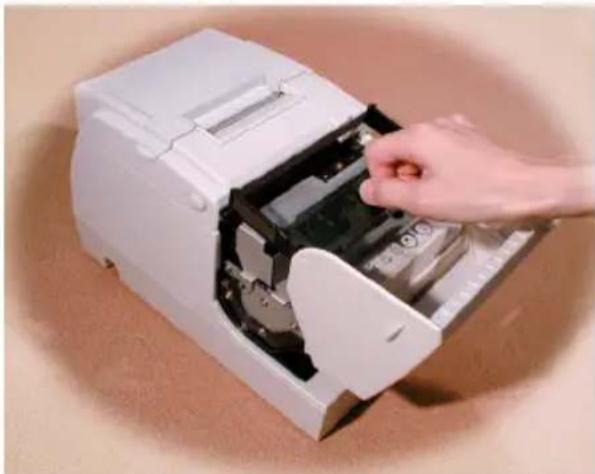
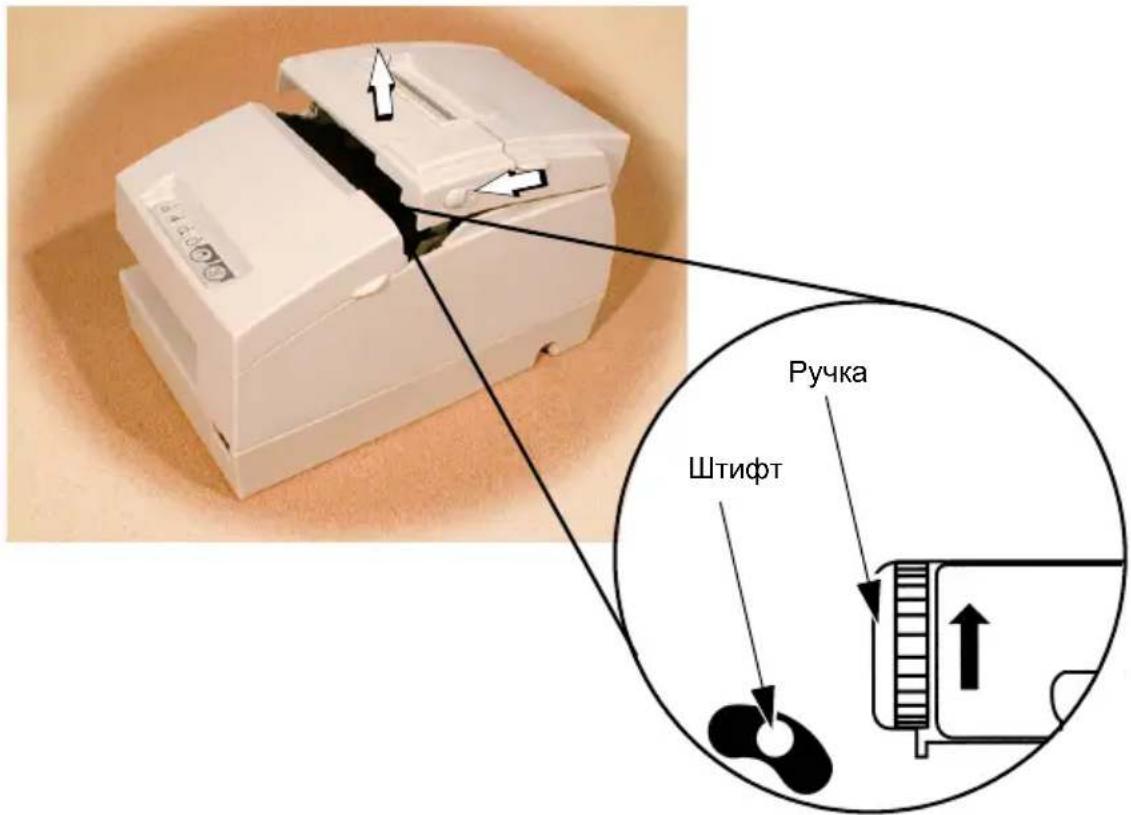
- Turn the ribbon cassette knob. Then open the unit cover. Inside the printer, push the levers backward to open the unit.

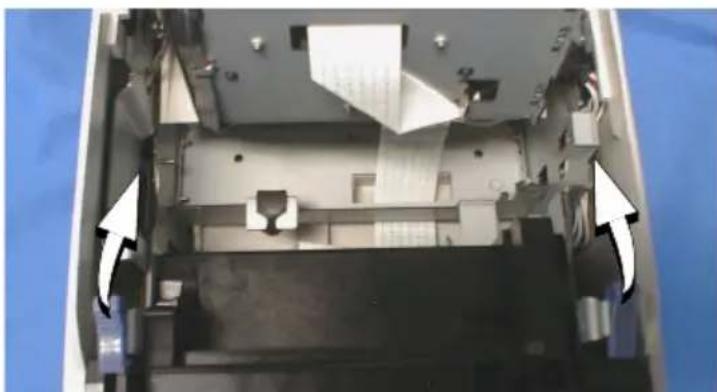
Note:
Do not open the unit during printing.
- Insert the ribbon into the printer in the position shown and turn the knob again to seat the ribbon. Then close the printer.
Epson Ecology Label
This product is in compliance with the Epson ecology label requirements. Please see the following link for detailed information on label criteria: http://www.epson.co.jp/e/

TM-H6000III Specifications
| Print method Receipt: Thermal line Slip: 9-pin serial impact dot matrix Endorsement: 8-pin shuttle impact dot matrix | |
| Print font Receipt: 9 × 17 | 12 × 24 Slip: 5 × 9 / 7 × 9 Endorsement: 5 × 7 |
| Columns Receipt: 56/42 | Slip: 60/45 Endorsement: 40 |
| Character size (W × H) | Receipt: 0.99 × 2.40 mm {0.04 × 0.09"} 1.41 × 3.39 mm {0.06 × 0.13"} Slip: 1.56 × 3.1 mm {0.06 × 0.12"} 1.24 × 3.1 mm {0.05 × 0.12"} Endorsement: 1.1 × 2.42 mm {0.04 × 0.10"} |
| Character sets 95 alphanumeric, 37 international characters 128 × 11 (slip: 12) pages extended graphic characters | |
| Print speed Receipt: 63, Slip: 5.14, Endorsement: 1.9 (lines per second) | |
| Paper dimensions | Receipt: Thermal roll paper 79.5 ± 0.5 × 83 mm {3.1 ± 0.02 × 3.3"} Slip/endorsement: 70 ~ 148 × 150 ~ 210 mm {2.8 ~ 5.8 × 5.9 ~ 8.3" (W × L) |
| Paper thickness Slip (single-ply): 0.09 ~ 0.2 mm {0.0035 ~ 0.0079"} Endorsement: 0.09 ~ 0.2 mm {0.0035 ~ 0.0079" | |
| Copy capability Receipt/Endorsement: Single-ply Slip: 1 original + 3 copies | |
| Inked ribbon Slip: ERC-32(P) Endorsement: ERC-41(P) | |
| Ribbon life Slip: 6 million characters Endorsement: 1 million characters | |
| Interface (compatible) | RS-232C/Bi-directional parallel/RS-485 (dealer option) |
| Data buffer Selectable for 45 bytes or 4 KB using DIP switch | |
| D.K.D. function | 2 drives |
| Power supply | +24 VDC ± 10% |
| Current consumption Slip: | Approximately 1.7 A (mean) Receipt: Approximately 1.8 A (mean) |
| Temperature Operating: | 5 to 45°C {41 to 113°F} Storage: -10 to 50°C {14 to 122°F} |
| Humidity 10 to 90% without condensation | |
| Reliability Receipt: MTBF: | 360,000 hours, MCBF: 72 million lines Slip: MTBF: 180,000 hours, MCBF: 18 million lines |
| Overall dimensions 185 × | 186 × 298 mm {7.28 × 7.32 × 11.73" (H × W × D) |
| Mass Approximately 5.3 kg {11.7 lb} | |
TM-H6000III
Bedienungsanleitung
Copyright © 2005 Seiko Epson Corporation, Nagano, Japan.
Directive 89/336/EEC EN 55022
Klasse B
EN 55024
IEC 61000-4-2
IEC 61000-4-3
IEC 61000-4-4
IEC 61000-4-5
IEC 61000-4-6
IEC 61000-4-8
IEC 61000-4-11
GERÄUSCHPEGEL
PRESAT brand (KIC) "CHECK READER CLEANING CARD"
Copyright 2005, Seiko Epson Corporation, Nagano, Japan.
Copyright © 2005 Seiko Epson Corporation, Nagano, Japan.
Directive 89/336/EEC EN 55022
Classe B
EN 55024
IEC 61000-4-2
IEC 61000-4-3
IEC 61000-4-4
IEC 61000-4-5
IEC 61000-4-6
IEC 61000-4-8
IEC 61000-4-11
POUR LES UTILISATEURS CANADIENS
Veja as ilustracoes na网页 5.
Instalacao da fita
Veja as ilustracoes na网页 7.
Copyright © 2005 Seiko Epson Corporation, Nagano, Giappone.
Copyright © 2005, Seiko Epson Corporation, HaraHO, IIOHNA.
Coombeemcmeue cmahdapmam 3JIeKmpoma2Humho (3M) coBMEcmumocmu u 6e3oNaChocmu
HaHMeHOBaHHe IpoDyKuHn: TM-H6000III
HaHMeHOBaIIHe MoJeJIH: M147G
CJIeIyIOHcNE CTAHdApTbI IINPMCHHMbI TOJIbKO B OTHOICHHN IIpHHTepOB, 06O3HauchHHbx COOTBcTCTBYIOHMn HAKJIeIKaMH. (HcIIbTaHHHa 3M COBMeCTHMocTb IIPOBOJrTCa HCIOJIb3OBaHHem HcTOHHKa 3JIeKTPoIHHTaHHA EPSON).
B Ebpoe: MapKnpoBka CE
Be30nacHocTb EN 60950
B CeBepHoi AmePHKe: 3M IomexH
FCC/ICES-003, KIaacc A
Bc30nacHocTb UL 1950/ CSA C22.2 No. 950
B JIOHIN: 3M Iomexn
VCCI, KJIacc A
BTHXOOKeaHcKOM perHOHe: 3M coBMeCTHMocTb AS/NZS CISPR22, KJIacc B
PPEyPExKdEHNE
IIOKJIIOUeHHe K OTOMy yCTPOHCTBy HeOkaHnPOBaHHORo HHTeppeCHORo Ka6eJc I npHHTepOM IpHBedT K HecobJIIODeHHIO pHMcEHMBIX B OTHouHEHHN 3TOrO yCTPOHCTBA cTAHdAPTOB 0JIeKTPOMaHHTHO COBMECTMHOCTH.
YHTbBAHte, YTO BHeceHHe KaKHX-JIN60 H3MeHeHH B KOHCTpyKuHIO 6OpyIOBaHHa 6e3 CneHaJIbHOrO pa3peHHeHH KOpIopauHH SEIKO EPSON MoKeT IPrHBecTH K IIOTepe IIOJB3OBaTeJIem IpaB Ha rapaHTnHoe 06cIyJKBaHHe.
Mapkuopoeka «CE»
YcTpoHcTBO COOTBeTcBye Tpe6oBaHHM, IIpeIyCMOTpeHHbIM CJIeIyIOIIHHM INIpeKTHBaMH H cTaHJapTaMH: IInpeKTHBa 89/336/EEC: EN 55022
KJacc B
EN 55024
IEC 61000-4-2
IEC 61000-4-3
IEC 61000-4-4
IEC 61000-4-5
IEC 61000-4-6
IEC 61000-4-8
IEC 61000-4-11
TOCT P 51318.22-99 (KJIaacc B)
FOCT P 51318.24-99
TOCT PM3K 60950-2002
http://www.cpson-pos.com/
http://support.epson.ru
YcmaHObKa pyJIoHa 6yMa2U
Ipumeanue
He ucnobyime pyo hbi byma zu, 6 komopbix byma znpkleeha u npukpenla ha junkou nenmo K baniky pnoHa, maK KaK omo MoXem npu6odumb K 3acmpebaHIO byma zu. Ira mozo umobbl npedombpammb zacmpbaHue byma zu, ybeDumec6 omcymcbu npenamcmBu, cnocobhix nomeuamb nodaue byma zu, ne bbimraBaime bymazy u3 npunmepa.

YcmaHObKa JneHmbI
KOMIIAHN EPSON peKOMeHnyeT HcIOJIb3OBaTB KAcCEtBi C JeHTaMn IPOH3BOJCTBA KOMIIAHN EPSON.
- Bклочипринтep. Повернite ручky натужени ЛeHTы Ha kaccete c ЛeHTOn. OTKpoIte NepeДИIOIO КрБИКУ пriHTEpa И BCaTbTe HOByIO JeHTy.
- IIOBepHTe pyuKy HaTaeKeHHaJIbI IBa HJIn TpN pa3a N IpoBepbTe IIpaBHJbHOCTb IIOJOKeHH JIEHTbl.
3a2py3ka 6yma2u对阵neyu amu do6ae0hbx Keumahuu
YcmpaHeHue npuun HeucnpaBHoCmeU
CBeTOBoH HnHkArOp oHH6Kn HeIpepbIBHo rOpHT HJH MmraeT.
Y6eHTecbBTOM, TTO KpbIka IIpHHTepaHaJIeKaIHM O6pa3OM 3aKpbIta.
BbIKIOHHTe npHHTep H npOBepbTe, He 3acTpJa Jn 6ymara.
3aeIIO aBToMaTHnueckoe oTpe3Hoe yctpoiCTBO HIn He otKpbIbAeTc KpbIIka pyJIOHa 6yMaHn.
- BbIKJIIOHTe IIpHHTep I OTKPOIte KpbIIK Ky IIpHNTepa.
- IocJIe 3rTOIIOBOpaUNBaIte pyuKy, Ioka BbI He yBnIte B OTBepCTHn ITnΦT
Ouucmka neyamaioue 2oJIOBku

BHIMAHHE!
B npouecce neamu 20noBa k Moxem Haapebambcdo Oeyh Bbcokou memnepamypbl. Bybme ocmopoxhbl, He npukacumecb K zoayeu 20oBe! Daume 20oBe ocmbimb, npexde yem bHaHne me ee oucmy. PpukocOeHue K 20oBe moxem ee nopeedumb.
OrkpoTe KpbIuKy pyloHa 6yMaHn H OChTHe TepMOJIeMeHT (3eJeHOTo IBeTa) IIeHaTAlIOUeI ROIOBKn XJIOIIaTO6yMaKHBIM TAMIOHOM, yBJIAxKHeHHbIM pactBOpHTeJIeM Ha OCHOBE 3THIOBOrO HIN H3OIIPOIIHIOBOrO CInnpta.
IepnoHueeckn (KaK IIpaBnIO, pa3 B 3 MeecHa) OCHIIaHTe TepMOHeaTaHOu IToIOBky, TTO6bI He cHJkaIOcb KaHeCTBO NeHaTH.
CyumbiHaue 3HaKOB, HaHeceHHbIX Ma2HumHbIMU YeHulAmu, u neYamb uHdoccamEhmoB (NoDmBepXdeHu oPJIaMbI nepCoHaJIbHbIX YeKOe, BeKceJeU) (BapuaHmbI 3aOodcKoU KOMNKeMaauu npUnmepa)
CyumbieaHue Ma2HumHbIX 3HaKo8 Ha nepcoHaJIbHbIX YeKaX

BHIMAHHE!
He ecmaenme yeku c npobonohbIMU ckokamu dna cwhueahua byma2 - 3mo moxem npueecmu K 3acmpeehaHIO byma2u, ouwkam npu cumbibaHuM Ma2Humhix 3HaKoE u noepexdehuO 20no8ku dna cumpbeaHua Ma2Humhix 3HaKoE.
Bcmaaune moIbko poHbIe, He Mmblte ueku 6e3 nepeau6oe u cknaadoK.
- IIOJOKHITe, HOKa He HauHET MHRATb CBeTOBOH HINHKaTOp SLIP》,IocJIe Yero BCTABbTe Yek JUyeBOu cmOpOHou 66epx TaK, YTObI IIpaBbIK KpaYKeA 6blI O6paIeH K IIpaBOI CTOPOHe HAIIpaBIAIOUIE JII 6yMaHn H BILOTHyIO IIpHIJIeRAJI K Hei. Y6eINTecb B TOM, YTO HaHECEHHbIE MaHHTHBIMN UePHNJAMM 3HaKN HAXOITcR c IIpaBOI CTOPHObl.
- IIpnHTep 3apeHCTpnpyeT BcTaBJIeMbI YeK H NaHHe T BTrHbA Tb erO. KaK ToJIbKO IIpnHTep HaHHe T BTrHbA Tb yeK, OTnyctHte yeK. KOrJa IIpnHTep BbIToJIkHeT yeK H CBeTOBOH HINKaTOP «SLIP» cHOBa HaHHe T MHRa Tb, H3BJIeKHTe yeK, IOTraHyB erO IIpyMo BBepx; He TAnHTe yeK K ce6e IIOI yIJOM.
Ouucmka MexaHu3Ma ycmpoUcmea dJa cYumbIaHua Ma2HumHbIX 3HaKo8
IIpHmepHO pa3 B rOJ OUnIaIe TRe IIOBky JJIa CHTbIBaHHaMaHHTbIX 3HaKOB cIIeIHaJIbHOJ KApTOc HAnHeceHHbIM YnCTraHm COCTaBOM JJIa OUnCTKN yCTpoINCTB CHTbIBaHHaYeKOB.
Пиьз龟Tecь KapToI PRESAT (KIC) ПЯ OЧNTКИ yCtpoIcTB cHTbIBaHnRA YeKOB (CHECK READER CLEANING CARD) ИIN 3KBHBAJIeHTHOI HMeIOIIeIcR B IpoJdaKe YIcTЯшЕI KapToI.
IpuMeuahue
He noIb3yIumecb yucmauMu KapmAmc KJIeuKUm nu noBepxHocMa!
BbIOJIHNTe cJeIyIOUyIO nocJeIOBaTeJbHocTb Oepaun.
- BcTaBbTe B npHTep pyIOH 6yMaH N BbIKJIOHHTe 3JIeKTPoNTaHHe npHTepa, nocJe yero oTKpOHTe KpbIuKy pyIOHa 6yMaH N cHOBa BKJIOHTe 3JIeKTPoNTaHHe, yIepKHBa B HaxkATOM IOIOKeHHN KHOKNY «RELEASE»
- Cemb pa3 haXMMTe Ha KHOIIky «RELEASE», IocJIe Yero 3aKpoIte KpbIHKy pyJIOHa 6ymaH. IIpHHTeP pacIeYaTaEcoO6UeHHe Ha 6yMaRe IJIa KBHTaHUn, H NaHHeT MHRatb CBeTOBOH HINKaTop «SLIP».
* RECOGNITION MODE *
Please set check.
- BcTaBbTe YHCTaIyU KApTy TaK JKe, KaK BcTaBJIeTcraHapThbI YeK.

BHIMAHHE!
He 3a6b1eaume, ymo yucmnyu kapmy cneyem ecmaenmb, co6nloda npabunbhyo opuehmauio, ymo6bl eepxna cmopoha kapmbi bila obpauneHa bepx. Yucmua Kapma uCnoB3yemc monbko oduh pa3; uCnoB3OeaHnyo kapmy cneyem bIbpaacbIeamb.
- Пocлte toro kaK npHTep BbIToJIKNHeT YnCTaIyIO KapTy, HaxMHTe Ha KHOIIky «RELEASE» n H3BJIeKHTe KapTy n3 npHTepa.
3aMeaHua, omHocuuec K uCnOJIb3OeAHUo ycmpoucmea dJa cUmbieHaHua Ma2HumHbIX 3HaKo8
He yctaHaJIbIbai Te npHtep pAOM c HCTOuHHKaAMN JIO6bIX 3JIeKTpOMaHTHBIX IOJIeB. ByIbTe oc06eHHo octopoxhbl, ycTaHaJIbBaJINcPIeN, INpOBepBe, IPOdoJIkaet JIN cHTbIAIOIIce ycTpoiCTBO IIpaBHJIbHO paCIO3HaBaTB MaHTHTbIe 3HaKN IocJIe yCTaHOBKn JINcIIeJ.
CJIeIHTe 3a TeM, YTO6bI B IpoIeCCc CHTbIBaHnMa rHHTHBIX 3HaKOB IIpHHTep He IIOBepraJic KAKHM-JIN6O yIapHbIM HaIpy3KaM HJIN Bn6paunn.
Ieamb uHdoocameHmoB
EcJINB pnpHTepe npedymOTpeh yCTaHaBJIbAembl NO JKeJIaHHIO 3aKa3HKA MExAHN3M IJIyIeATn HIOCCAMeHTOB, yCTaHOBHTe JIeHTy IJIy IeATn HIOCCaMeHTOB, BbIIOJIHHC CJeIyIOUyIO IOcJIeIOBaTeJIbHOCTb OIIepaun.
Ipumeuanue
He 3abybme bblknoumb 9ekmponumaue npunmepa neped nauaiom ycmanobku kaccembl cJehmou!
3koIoouecku yapbIK kOmnaHuE PSON
ОпсьиBaemoeВ 3TOMpyKOBODCTBeO6OpyIOBAHHe COOTBETCTByeT Tpe6OBaHnM K IpoIyKuHH C 3KOJIOrHueCKHMApJIbKOM KOMIIaHHN EPSON.IoIpo6Hoe H3IIOJKeHne 3THX Tpe6OBaHHcM.Ha caHTe IIO aIpecy http://www.epson.co.jp/e/.

TexHuYeCKue xapaKmepucmuku npuHmepa TM-H6000III
Printed on Recycled Paper
Printed in China
2005.06

- DIP Switch Tables
- TM-H6000III
- User's Manual
- EMC and Safety Standards Applied
- WARNING
- CE Marking
- FCC Compliance Statement For American Users
- FOR CANADIAN USERS
- Safety Precautions
- WARNING:
- CAUTION:
- Labels
- Unpacking
- Connectors
- Important Installation Notes
- Downloading Drivers, Utilities, and Manuals
- Installing the Paper Roll
- Installing the Ribbon
- Inserting Slip Paper
- Troubleshooting
- Error light on or blinking.
- The autocutter is jammed or the paper roll cover will not open.
- Cleaning the Print Head
- MICR and Endorsement Printing (Factory installed options) Reading MICR Characters On Personal Checks
- Cleaning the MICR Mechanism
- Note:
- Notes on using the MICR reader
- Endorsement Printing
- Epson Ecology Label
- Bedienungsanleitung
- GERÄUSCHPEGEL
- POUR LES UTILISATEURS CANADIENS
- Instalacao da fita
- Coombeemcmeue cmahdapmam 3JIeKmpoma2Humho (3M) coBMEcmumocmu u 6e3oNaChocmu
- PPEyPExKdEHNE
- Mapkuopoeka «CE»
- YcmaHObKa pyJIoHa 6yMa2U
- Ipumeanue
- YcmaHObKa JneHmbI
- 3a2py3ka 6yma2u对阵neyu amu do6ae0hbx Keumahuu
- YcmpaHeHue npuun HeucnpaBHoCmeU
- Ouucmka neyamaioue 2oJIOBku
- BHIMAHHE!
- CyumbiHaue 3HaKOB, HaHeceHHbIX Ma2HumHbIMU YeHulAmu, u neYamb uHdoccamEhmoB (NoDmBepXdeHu oPJIaMbI nepCoHaJIbHbIX YeKOe, BeKceJeU) (BapuaHmbI 3aOodcKoU KOMNKeMaauu npUnmepa)
- CyumbieaHue Ma2HumHbIX 3HaKo8 Ha nepcoHaJIbHbIX YeKaX
- Ouucmka MexaHu3Ma ycmpoUcmea dJa cYumbIaHua Ma2HumHbIX 3HaKo8
- IpuMeuahue
- 3aMeaHua, omHocuuec K uCnOJIb3OeAHUo ycmpoucmea dJa cUmbieHaHua Ma2HumHbIX 3HaKo8
- Ieamb uHdoocameHmoB
- Ipumeuanue
- 3koIoouecku yapbIK kOmnaHuE PSON
Brand : EPSON
Model : TMH6000iii
Category : Printer