USER MANUAL Collector 48 S STIGA
natural_image
Line drawing of a lawn mower with labeled parts E and C (no text or symbols beyond labels)
WBE170LS
WBE200LS
WBE120LS
WBE140LS

4.5 DLOUHODOBÁ NEČINNOST
4.2 EKKINHΣH TOY KINHTHPA
- GENERAL INFORMATION......1
- SAFETY REGULATIONS....1
- ABOUT THE MACHINE....4
3.1 Machine description and intended use.. 4
3.2 Safety signs 4
3.3 Identification label 4
3.4 Engine components 4
3.5 Environmental conditions....4
3.6 Fuel 4
3.7 Oil 5
3.8 Air filter....5
3.9 Spark plug....5
- REGULATIONS FOR USE....5
4.1 Before each use....5
4.2 Starting the engine....6
4.3 Stopping the engine at the end of operation....6
4.4 Cleaning and storage 6
4.5 Prolonged downtime 6
- MAINTENANCE 6
5.1 General 6
5.2 Maintenance table....7
5.3 BATTERY (if applicable)....7
5.4 Oil change....8
5.5 Cleaning the silencer and the engine .... 8
5.6 Air filter maintenance 8
5.7 Spark plug checks and maintenance .... 9
- TROUBLESHOOTING....9
1.1 HOW TO READ THIS MANUAL
Some of the paragraphs in this manual contain particularly important information in terms of safety and operation, and are highlighted differently, according to the following criteria:
NOTE or IMPORTANT this paragraph provides details or further information on what has already been said, with the aim of preventing damage to the machine or other damage.
The symbol represents a danger. Failure to observe the warning can lead to possible personal and/or third party injury and/or damage.
1.2 REFERENCES
The figures in these instructions for use are numbered 1, 2, 3, and so forth.
The components identified in the figures are marked with letters A, B C and so forth.
A reference to component C in figure 2 is represented by: "See fig. 2.C" or simply "(Fig. 2.C)". The figures are provided by way of example. The effective prices can vary in comparison to the ones provided here.
1.2.2 Titles
The manual is arranged in chapters and paragraphs. The title of paragraph “2.1 Training” is a sub-title of “2. Safety regulations”. The references to titles or paragraphs are marked with the abbreviation chap. or par. and the relative number. Example: “chap. 2” or “par. 2.1”.
2. SAFETY REGULATIONS
2.1 TRAINING
Read these instructions carefully before using the machine.
⚠️ Familiarise with the controls and with appropriate use of the machine.
Learn how to stop the engine quickly. Failure to observe warnings and instructions can cause fires and/or serious injury. Keep all warnings and instructions safe for future reference.
- Never allow the machine to be used by children or individuals who are not familiar with the instructions. Local laws may establish a minimum age for users.
- Never use the machine if the user is tired or unwell, or has taken medication, drugs, alcohol or substances that impair reflexes and concentration.
- Remember that the operator or user is responsible for accidents and unexpected events that can occur to other people or property.
2.2 PRELIMINARY OPERATIONS
Personal Protective Equipment (PPE)
- Never use the machine without wearing suitable clothing.
- Never wear loose clothing, laces, jewellery of other objects that can get caught; tie back long hair and maintain the safety distance at.
- Wear noise cancelling headphones.
Work / Machine Area
- Before starting the engine ensure that all of the controls operating the moving parts of the machine are disconnected.
Internal combustion engine: fuel
- Warning: the fuel is highly flammable. Handle with care!
– Always store the fuel in suitable containers.
– Fill up or top up using a funnel, only outdoors and never smoke during these operations.
– Fill up before turning the engine on. Never open the tank cap or fill up when the engine is running or still warm.
– If any fuel spills out do not start the engine, rather, move the machine away from the spillage and immediately clean up every trace of fuel that has spilled on to the machine or ground
- Firmly screw the fuel container tank cap back on.
- Avoid getting any fuel or your clothing and, if this should happen, change your clothes before starting the engine.
2.3 DURING USE
Work Area
- Do not use the machine in environments that pose the risk of explosion, in the
presence of flammable liquids, gases or powders. Electrical contact or mechanical rubbing can generate sparks that can ignite powder or vapour.
- Do not operate the engine in confined spaces where dangerous carbon monoxide fumes can collect. The start-up operations must be carried out outdoors or in a well-ventilated area. Always remember that the exhaust gases are toxic.
- Keep people, children and animals away from the work area. Children must be supervised by another adult.
Conduct
- Before making repairs, cleaning, performing inspections, adjustments, turn the engine off and disconnect the spark plug cable (unless explained otherwise in the instructions).
- Do not touch the parts of the engine that heat up during operation. Risk of burns.
Restrictions of use
- Do not use the machine if there are not enough protections or if the safety devices are not set up correctly.
- Do not disconnect or tamper with the installed safety systems.
- Do not change the engine adjustments, or exceed the maximum rpm. If the engine is forced to run at an excessive speed, the risk of personal injury increases.
- Do not use starter fluids or other similar products.
- Do not tilt the machine onto its side to the point where fuel leaks from the fuel tank cap.
- Do not crank the engine without spark plug.
2.4 MAINTENANCE, STORAGE AND TRANSPORT
Servicing the machine on a regular basis and correct storage maintain machine safety.
Broken or worn parts must be replaced and never repaired. Only use original parts: using parts that are not original or installed incorrectly affects machine safety, and can therefore cause accidents or personal injury and relieve the Manufacturer of all obligations and liability.
Maintenance
- If the tank can be emptied, perform this operation outdoors and when the motor is cold.
- To reduce the risk of fire, check for oil and/or fuel leaks on a regular basis.
Storage
- Never leave fuel in the tank if the machine is stored in a building where the fuel vapours can come into contact with open flames, sparks or sources of heat.
- Let the machine cool down before storing it indoors.
Transport
- Transport the machine with an empty tank.
2.5 BATTERY, BATTERY CHARGER (IF APPLICABLE)
IMPORTANT The following safety instructions are in addition to the safety requirements provided in the specific battery and battery charger manual delivered with this machine.
- Only use battery chargers recommended by the manufacturer to recharge batteries. An inadequate battery charger may cause electric shock, overheating or corrosive liquid to leak from the battery.
- Use only batteries specifically designed for your power tool. The use of other batteries may cause injuries and fire risks.
- Keep all unused batteries at a distance from paper clips, coins, keys, nails, screws or other small metal objects as contact with the same can cause short circuits. Short circuits between battery contacts can lead to explosion or fires.
- Never use the battery charger in environments in the presence of vapours, flammable substances or on easily flammable surfaces such as paper, fabric, etc. The battery charger heats up during recharging and may cause a fire.
- When transporting accumulators, make sure the contacts never come into contact with each other and never use metal containers to transport them.
2.6 ENVIRONMENTAL PROTECTION
Protecting the environment must be a significant and top priority for machine use, to the benefit of civil co-habitation and of the environment that we live in. Avoid being an element of disturbance to the surrounding area. Use this machine at reasonable times of the day only (not early morning or late evening when the noise could cause disturbance). Comply with local regulations for the disposal of packaging, deteriorated parts or any elements
with a strong environmental impact; this waste must not be disposed of with regular waste, but must be separated and taken to collection centres, who will recycle the materials.
Comply with local regulations for the disposal of waste materials
At the time of decommissioning, do not leave the machine in the environment, rather, contact a collection centre, in accordance with local regulations in force.

Do not throw electrical equipment away with domestic waste. According to the European Directive 2012/19/EU on electrical and electronic equipment waste and its implementation in compliance with national standards, old electrical equipment must be collected separately, for eco-compatible recycling. If electrical equipment is disposed of in dumps or in landfills, hazardous substances can leak into the groundwater and contaminate the food chain, damaging your health and well-being. For further information on the disposal of this product, contact your dealer or a domestic waste collection service.

At the end of their working life, dispose of batteries paying due attention to the environment. Batteries contain material classified as hazardous for you and the environment. They must be removed and disposed of separately at a facility that accepts lithium-ion batteries.

Separate waste collection of the products and packaging used allows the materials to be recycled and reused. Reuse of recycled materials help to prevent environmental pollution and reduces the l for raw materials.
2.7 EMISSIONS
The combustion process generates toxic substances such as carbon monoxide, nitrogen oxides and hydrocarbons. It is important to control these substances because they can react with photochemical smog as well as with direct exposure to sunlight. Carbon monoxide does not react in the same way to exposure to sunlight but it must still be considered toxic.
Our machines are equipped with emission reduction systems for the substances mentioned above.
3. ABOUT THE MACHINE
3.1 MACHINE DESCRIPTION AND INTENDED USE
This machine is a spark-ignition engine.
Engine performance, reliability and life are influenced by many factors, some external and some strictly associated with the quality of the employed products and with the scheduled maintenance. Additional information is provided below for greater awareness of your machine. Any other use that does not comply with the above, can be dangerous and cause damage to people and/or property.
IMPORTANT Improper use of the machine causes the warranty to lapse and relieves the Manufacturer of any liability, placing all responsibility for damage or injury, to him/herself or third parties, on the user.
3.1.1 Type of users
This machine is intended for use by consumers, i.e. non-professional operators. It is intended for "hobby-related activities".
3.2 SAFETY SIGNS
There are various symbols on the machine. Their function is to remind the operator of the correct conduct for use, with due care and caution.
Meanings of the symbols:

Warning! - Petrol is flammable. Allow engine to cool at least 2 minutes before refuelling.

Warning: Read the instructions before use.
Warning! - Engines emit carbon monoxide. DO NOT run in enclosed area.

Danger! Keep away from hot surfaces.
3.3 IDENTIFICATION LABEL
Write the serial number (S/n) of your machine on the space provided on the label at the back of the cover.
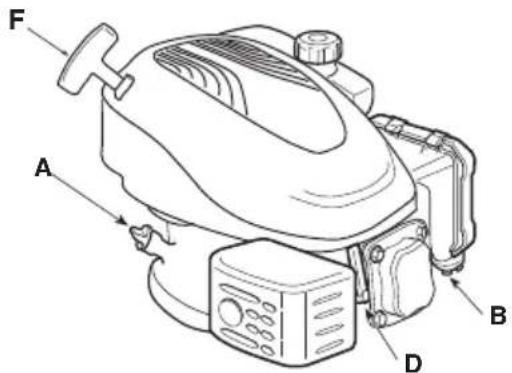
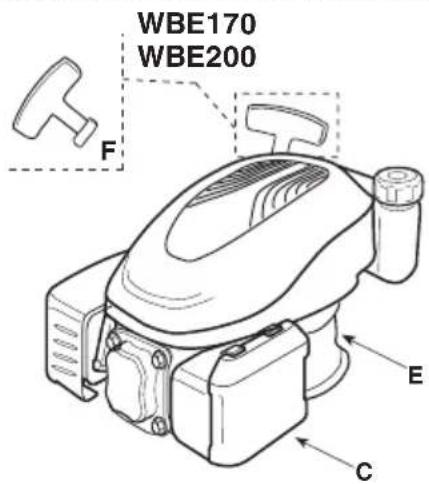
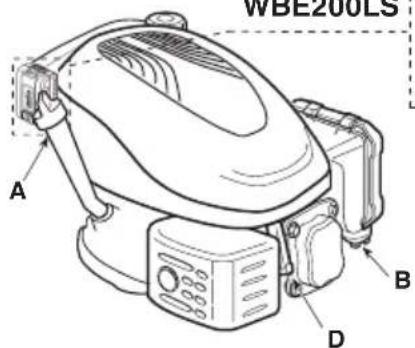
3.4 ENGINE COMPONENTS
The machine is comprised of the following main parts (fig. 1).
A. Oil filler cap with dipstick
B. Carburettor
C. Air filter cover
D. Spark plug cap
E. Engine code
F. Knob of the starter rope (if applicable)
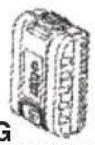
G. Battery (if applicable)
3.5 ENVIRONMENTAL CONDITIONS
The operation of a four-stroke endothermic engine is affected by:
a) Temperature:
- When operating at low temperatures cold starts may be difficult.
- When operating at very high temperatures warm starts may be difficult due to evaporation of the fuel in the float chamber of the carburettor or in the pump.
– In any case the right kind of oil must be used, according to the operating temperatures.
b) Altitude:
- The higher the altitude above sea level, the lower the max power developed by an endothermic engine.
- When there is a considerable increase in altitude, the load on the machine should be reduced and particularly heavy work avoided.
3.6 FUEL
A good quality fuel is the major issue for the engine reliability of operation.
Fuel must meet these requirements:
a) Use clean, fresh unleaded gasoline, with a minimum of 90 octane
b) Do not use fuel formulated with ethanol greater than 10%;
c) Do not add oil
d) To protect the fuel system from gum formation, mix a fuel stabilizer into the fuel.
Use of unapproved fuels will cause damage to engine components, which will not be covered under warranty.
NOTE Only use the fuel named in the technical data table. Do not use other types of fuel. It is possible to use ecological fuels, such as alkylate petrol. The composition of this petrol has less of an impact on people and animals. No negative effects have been reported in connection to their use. Nonetheless, there are types of alkylate petrol on the market for which it is not possible to provide specific indications on their use.
3.7 OIL
Use always high quality oils, choosing their viscosity grade according to the operating temperature.
- Only use detergent oil with a quality of no less than SF-SG.
- Choose the SAE viscosity based on the technical data table.
- The use of multigrade oil can lead to greater consumption in hot weather, accordingly it is necessary to check the level more frequently.
- Do not mix oils of different brands and characteristics.
- SAE 30 oil, if used below +5°C, could result in possible engine damage due to inadequate lubrication.
3.8 AIR FILTER
The air filter must always be in perfect working order, to prevent debris and dust from getting sucked into the engine, reducing the efficiency and life of the machine.
- Always keep the filtering element free of debris and in perfect working order (par. 5.6).
- If necessary, replace the filtering element with an original spare part Incompatible filtering elements can impair the efficiency and life of the engine.
- Never start the engine without mounting the filtering element properly.
3.9 SPARK PLUG
Not all the spark plugs for endothermic engines are the same.
- Use only spark plugs of the recommended type, with the right heat range.
- Check the length of the thread, because - if too long - it will damage the engine beyond repair.
- Make sure that the electrodes are clean and that their gap is correct (par. 5.7)
4. REGULATIONS FOR USE
4.1 BEFORE EACH USE
Before every use, perform the following checking procedures in order to assure a regular operation.
4.1.1 Oil level check
- Place the machine on a flat surface.
- Clean around the oil fill cap.
- Unscrew the cap(fig. 2.A), clean the end of the dipstick (fig. 2.B) and slide it back in until the cap is touching the hole, as shown :
- if the dipstick is short, place the cap without fastening it,
- if the dipstick is long, fasten it again with a click and then unscrew it,
- Remove the cap with the dipstick and check the oil level that must be between the «MIN» and «MAX» marks.
- If oil is required, add oil of the same kind up to the «MAX» mark, being careful not to spill any outside the oil fill
- Fully tighten the filler cap (fig. 2.A) and wipe off any spilled oil.
NOTE Top up gradually, adding small amounts of oil, checking the level each time.
Do not top up beyond the «MAX» level;
an excessive level can cause:
• smoking from the exhaust;
- soiling of the spark plug or air filter with subsequent difficulty for ignition.
NOTE For the required type of oil, observe the indications provided in the technical data table.
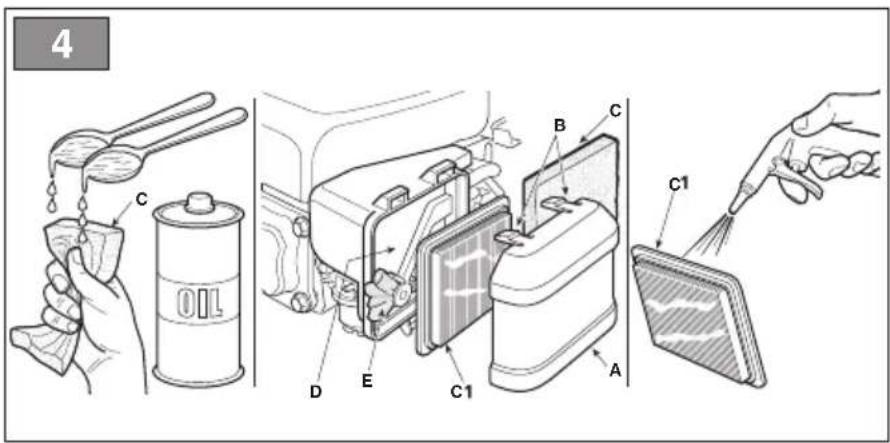
4.1.2 Air filter control
The efficiency of the air filter is essential to correct engine operation; never start the engine if the filter element is missing, broken or insufficiently saturated with oil.
- Clean around the filter cover (fig.4.A).
- Remove the cover (fig. 4.A) by releasing the tabs (fig. 4.B);
- Check the state of the filtering element (fig. 4.C or 4.C.1), which must be intact, clean and in perfect working order; if not, either carry out maintenance or replace it (see 5.6).
- Put the cover back in place (fig. 4.A).
4.1.3 Refuelling
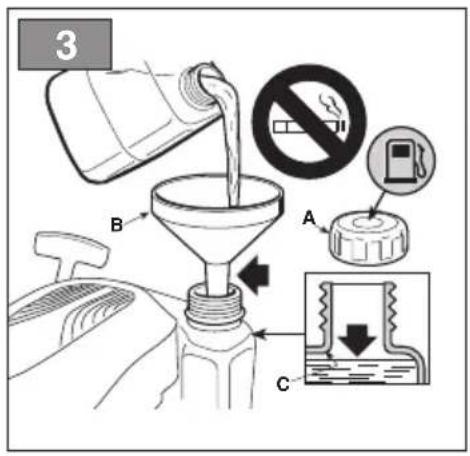
The refuelling operations are described in the machine manual and are mentioned here. To refuel:
- Unscrew the fuel tank filler cap (fig.3.A) and remove it.
- Set a funnel on the hole. (fig.3.B)
- Refuel and take the funnel off (fig.3.B)
- At the end of refuelling, screw the cap back on (fig.3.A) and clean any spillage.
IMPORTANT Avoid getting fuel on the plastic parts of the engine or machine to avoid damaging them, and immediately clean off every trace of spilled fuel. The warranty does not cover damage to plastic parts caused by fuel.
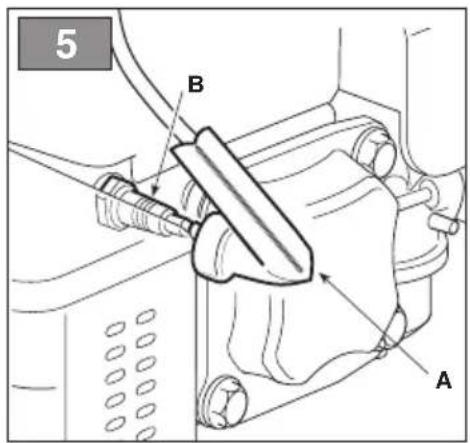
4.1.4 Spark plug cap
Firmly connect the cap (fig. 5.A) of the spark plug cable (fig. 5.B), ensuring that there are no traces of dirt inside the cap or on the spark plug terminal.
4.1.5 Check the battery charge status
See paragraph 5.3.2
4.2 STARTING THE ENGINE
The engine must be started up as described in the machine's Instructions Manual, always being careful to uncouple any device (if applicable) that is capable of making the machine travel forwards or stop the engine.
IMPORTANT Do not work on slopes exceeding 20° to avoid jeopardising correct engine operation
IMPORTANT Make sure the battery is properly inserted inside its housing when dealing with battery start-up models (par. 5.3.3)
4.3 STOPPING THE ENGINE AT THE END OF OPERATION
- Stop the engine following the instructions contained in the machine's Instructions Manual.
-
With a cold engine, take the cap off the spark plug (fig. 5.A) and take out the starter key (if applicable).
-
Remove any debris from the engine and especially around the exhaust silencer to reduce the risk of fire.
4.4 CLEANING AND STORAGE
- Do not spray with water or use pressure washer wands to clean the exterior of the engine.
- Preferably use a compressed air gun (max. 6 bars), thus preventing debris and dust from penetrating inside.
- Store the lawnmower (and the engine) in a dry place, sheltered from the elements and sufficiently ventilated.
4.5 PROLONGED DOWNTIME
If the engine is not going to be used for more than 30 days (for example, at the end of the season), it will be necessary to take a few precautions so that it will start back up again accordingly.
- Start the engine and run it until it comes to a halt, so that it uses up all the fuel that is left in the tank and in the carburettor, to prevent deposits forming inside.
- Remove the spark plug and pour about 3 cl of clean engine oil into the spark plug hole, then, having blocked the hole with a rag, run the starter motor briefly to turn the engine for a few revs and distribute the oil over the inner surface of the cylinder. Finally, replace the spark plug without connecting the cable cap.
5. MAINTENANCE
⚠️ Any attempt to tamper with the emission control system may increase emission levels above legal limits. This definition includes the removal or alteration of parts such as the intake system, the fuel system and the exhaust system.
5.1 GENERAL
The safety regulations that must be followed during maintenance are described in par. 2.4.
All controls and maintenance operations must be carried out with the machine off and the engine off. Disconnect the spark plug and read the relative instructions before starting any cleaning or maintenance procedure. Wear suitable clothing, gloves and glasses before performing any maintenance.
- The frequency and type of procedures are outlined in the "Maintenance table".
- The use of non-original parts and accessories could have negative effects on machine operation and safety. The manufacturer declines any responsibility for damage or injury caused by said products.
- Original parts are supplied by assistance shops and authorised dealers.
IMPORTANT All maintenance and adjustment operations that are not described in this manual must be carried out by your Dealer or by a Specialised Centre.
IMPORTANT It is the responsibility of the owner to perform the machine maintenance operations described in the table below.
IMPORTANT Clean more frequently when operating in particularly demanding conditions or when there is debris in the air.
NOTE Filters should be cleaned / replaced more often if the machine is used on very dusty ground.
| Operation | After the first 5 hours | Every 5 hours or after every use | Every 50 hours or at the end of the season | Every 100 hours |
| Oil level check (par. 4.1.1) - √ - | | | | |
| Oil change ^1 (par. 5.4) √ - √ - | | | | |
| Cleaning the silencer and the engine (par. 5.5) | - √ | -- | | |
| Checking and cleaning the air filter ^2 (par. 5.6) | - √ | -- | | |
| Changing the air filter (par. 5.6) ^3 | -- | √ | | |
| Spark plug check (par. 5.7) | -- | √ - | | |
| Changing spark plugs (par. 5.7) | -- | √ | | |
^1 Change the oil every 25 hours if the engine is operating under heavy load or in hot weather.
^2 Clean the air filter more frequently if the machine is operating in dusty areas.
^3 Only for the filtering element provided in the form of a cartridge.
5.3 BATTERY (IF APPLICABLE)
To ensure long life to the battery it is essential to keep it carefully maintained. The machine battery must always be charged:
- before using the machine for the first time after purchase;
- before leaving the machine disused for a long period (over 30 days) (par. 4.5);
- before starting up the machine after a prolonged period of inactivity.
IMPORTANT If unused for any length of time, recharge the battery every two months to prolong its working life.
Failure in following the procedure or in charging the battery could permanently damage the battery elements. A flat battery must be recharged as soon as possible.
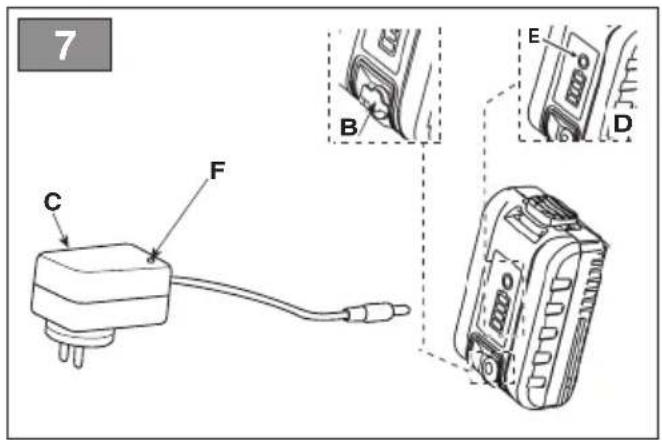
IMPORTANT The battery must be charged exclusively using the battery charger (fig. 7.C). Other recharging systems can irreversibly damage the battery.
5.3.1 Battery removal and recharging
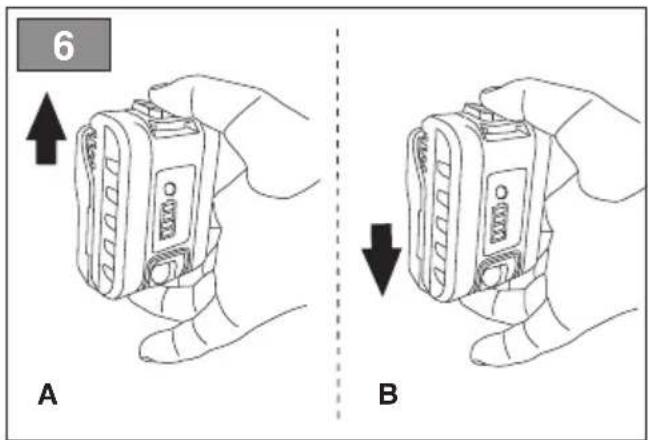
To remove the battery:
- Push the button placed above the battery by making it slide upwards (fig. 6.A).
To recharge the battery:
- Remove the rubber cap placed on the battery's lower side (fig 7.B)
- connect the battery charger (fig. 7.C) to a power socket with the voltage indicated on the rating plate.
- Once the battery is connected the battery charger's light will light up (fig 7.F): a red light means that the battery is recharging, whereas a green light means that the recharging is complete.
NOTE The battery is equipped with a guard that inhibits recharging if the environmental temperature is not between 0 and +45 °C.
IMPORTANT The battery can be charged at any time, even partially, with no risk of damaging it.
5.3.2 Check the battery charge status
The battery is equipped with a device allowing the user to check its charge status (fig. 7.D).
By pushing the button (fig. 7.E) the lights showing the battery's residual charge will light up:
- three green lights and one red mean that the charge ranges from 100% to 78%
- two green lights and one red mean that the charge ranges from 77% to 55%
• one green light and one red mean that the charge ranges from 54% to 33%
- a red light means that the charge is lower than 32% and that the battery should be recharged as soon as possible.
5.3.3 Refitting the battery on the machine
When recharging is completed:
- disconnect the battery from the battery charger
- Disconnect the battery charger (fig. 7.C) from the mains power supply;
- insert the battery (fig. 1.G) in its housing by pushing it downwards (fig. 6.B) until you hear a "click": this sound means that the battery is locked in its position and that the connection is ensured;
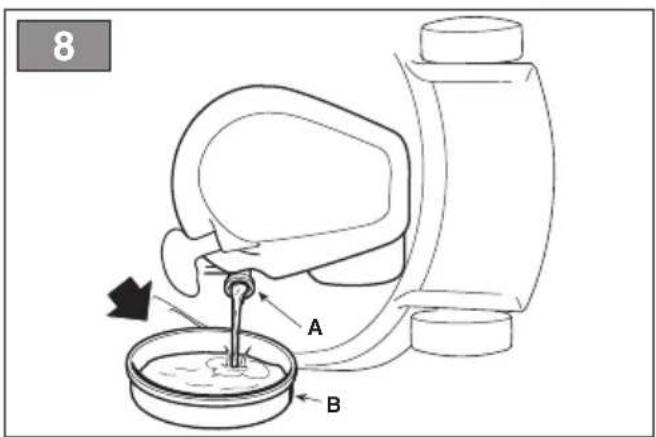
5.4 OIL CHANGE
For the required type of oil, observe the indications provided in the technical data table.
IMPORTANT Drain the oil out while the engine is warm, being careful not to touch the hot engine nor the drained oil.
See the specific chapter for the oil to be used.
IMPORTANT Drain the oil out while the engine is warm, being careful not to touch the hot engine nor the drained oil.
a) Place engine level.
b) Make sure that the fuel tank is not full and that the cap is properly closed.
c) Clean around oil fill (fig. 2.A.).
d) Remove the filler cap (fig. 2.A).
e) Have a container ready (fig. 8.B) to collect the oil.
f) Tip the lawnmower on its right side so that the oil will drain from the oil fill (fig. 8).
g) Place the lawnmower level and top up with new oil (see 4.1.1).
h) Check that the oil level has reached the «MAX» notch on the dipstick (fig. 2.B).
j) Close the filler cap and wipe off any spilled oil.
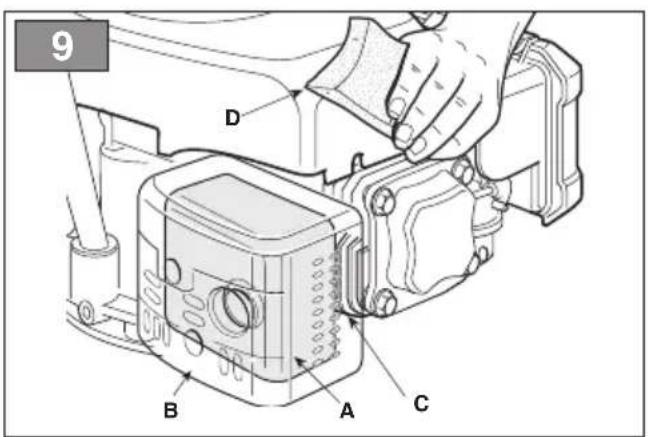
5.5 CLEANING THE SILENCER AND THE ENGINE
The silencer must be cleaned when the engine is cold.
a) Use a jet of compressed air or a brush to remove any debris and dirt that could cause a fire from the silencer (fig. 9.A) and its protective cover (fig. 9.B).
b) Clean the cylinder and cylinder head fins (fig. 9.C) to ease engine cooling and prevent overheating.
c) Clean the plastic components with a sponge (fig. 9.D) soaked in water and detergent.
5.6 AIR FILTER MAINTENANCE
The filtering element must be kept perfectly clean and must be replaced if it is broken or damaged.
a) Clean around the filter cover (fig. 4.A).
b) Remove the cover (fig. 4.A) by releasing the tabs (fig. 4.B).
c) Remove the filtering element (fig. 4.C or 4.C.1).
d) Block the inlet duct (fig. 4.E) with a rag to prevent any dirt from entering.
e) Carry out maintenance on the filtering element as described below for each type.
f) Clean inside the filter housing (fig. 4.D) to get rid of any dust, debris or dirt, taking care not to push anything into the induction pipe (fig. 4.E).
g) Place the filtering element (fig. 4.C or 4.C.1) into its housing and close the cover (fig. 4.B).
- Sponge filtering element (fig. 4.C)
Keep the filtering element clean and soaked in oil. Replace it if it is disintegrating, cut or broken.
IMPORTANT
Do not use compressed air to clean the filtering element.
- Clean the sponge filtering element with water and detergent and dry it with a clean cloth.
- Soak the filtering element in 2 tablespoonfuls of clean engine oil and wring it well to distribute the oil evenly.
- Remove any excess oil with a clean cloth.
If you need to replace the filtering element, oil the new filter as described above.
• Cartridge filtering element (fig. 4.C.1)
- Blow compressed air from the inside to remove dust and debris.
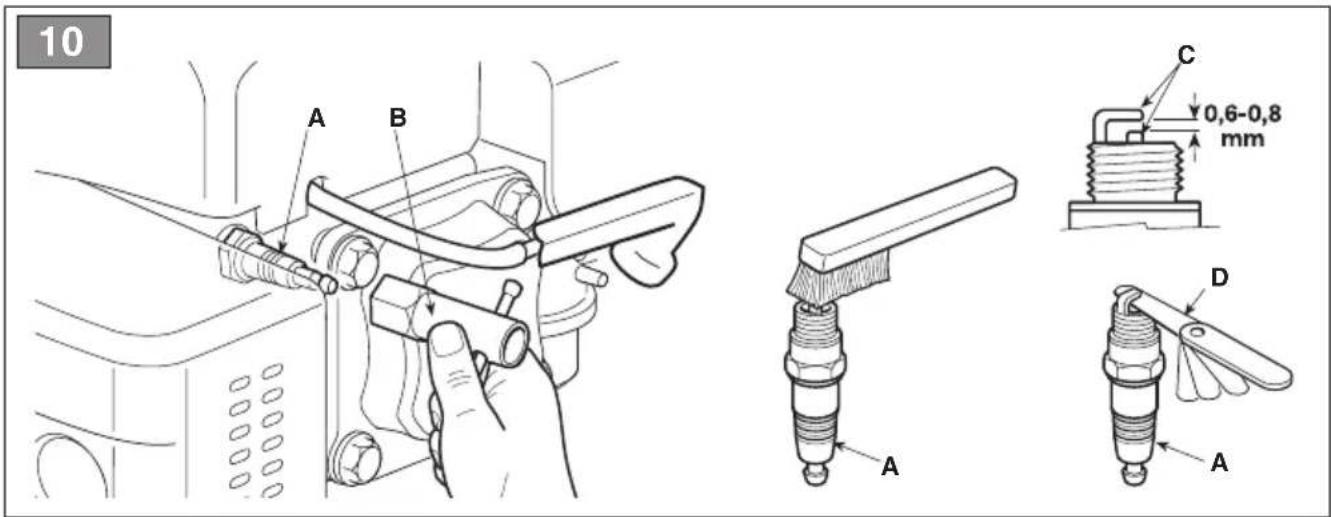
5.7 SPARK PLUG CHECKS AND MAINTENANCE
- Take the spark plug down (fig. 10.A) using a socket wrench (fig. 10.B).
- Clean the electrodes (fig. 10.C) with a metal brush, removing any carbonaceous build-up.
-
Using a thickness gauge (fig. 10.D) ensure the gap between electrodes is correct (0.6 - 0.8 mm).
-
Put the spark plug back in (fig. 10.A) and tighten firmly using a socket wrench (fig. 10.B).
Replace the spark plug if the electrodes are burnt or if the porcelain is broken or damaged.
⚠️ Fire hazard! Do not check the ignition system when the spark plug is not in place.
IMPORTANT Only use the required type of spark plugs (see Technical data table).
- TROUBLESHOOTING
| PROBLEM PROBABLE CAUSE SOLUTION | |
| 1. Difficulty staring the engine | No fuel Check and top up (chap. 5.1.3) | |
| Old fuel or deposits in the fuel tank Empty the fuel tank and add fresh fuel |
| Incorrect starting procedure | Perform start-up correctly (par. 5.2 and par. 5.3) |
| Disconnected spark plug | Ensure that the cap is fitted onto the spark plug (par. 5.1.4) |
| The spark plug is wet or the spark plug electrodes are dirty or placed inadequately | Check (par. 6.6) |
| Clogged air filter Check and clean (par. 6.5) |
| Incorrect oil for the season Replace with suitable oil (par. 6.3) |
| Fuel evaporation in the carburettor (vapour lock) due to elevated temperatures | Wait a few minutes then try starting it up again (par. 5.3) |
| Carburetion fault Contact an Authorised Assistance Centre |
| Low battery Recharge the battery (par 5.3.1) |
| Battery is not inserted correctly | Insert the battery correctly (par. 5.3.3) |
| 2. Irregular operation. | Dirty spark plug electrodes or incorrect gap | Check (par. 6.6) |
| The spark plug cap inserted incorrectly | Ensure that the cap is firmly fitted on (par. 5.1.4) |
| Clogged air filter Check and clean (par. 6.5) |
| Carburetion fault Contact an Authorised Assistance Centre |
| 3. Loss of power during operation | Clogged air filter Check and clean (par. 6.5) |
| Carburetion fault Contact an Authorised Assistance Centre |
If problems persist after implementing the solution, contact your Dealer.
INDICE
1.1 KUIDAS JUHENDIT LUGEDA
3.3 IDENTIFITSEERIMISPLAAT
3.5 CONDITIONS AMBIANTES
- UTVRĐIVANJE PROBLEMA 9
1.1 KAKO ČITATI PRIRUČNIK
6. UTVRĐIVANJE PROBLEMA
5.2 APKOPES DARBU TABULA
3.5 OMGEVINGSCONDITIES
5.3 ACCU (INDIEN VOORZIEN)
2.4 VEDLIKEHOLD, LAGRING OG TRANSPORT
3. BLI KJENT MED MASKINEN
3.1 BESKRIVELSE AV MASKINEN OG TILTENKT BRUK
Denne maskinen er en forbrenningsmotor.
5.2 VEDLIKEHOLDSTABELL
5.6 VEDLIKEHOLD AV LUFTFILTERET
5.7 KONTROLL OG VEDLIKEHOLD AV TENNPLUGGEN
- Demonter tennpluggen (fig. 10.A) med en pipenøkkel (fig. 10.B).
-
Rengjør elektrodene (fig. 10.C) med en metallbørste, og fjern eventuelle kullavsetninger.
-
Kontroller med en sensor (fig. 10.D) den korrekte avstanden mellom elektrodene (0,6 - 0,8 mm).
- Sett tennpluggen på igjen (fig. 10.A) og skru den helt fast med en pipenøkkel (fig. 10.B). Skift tennpluggen hvis elektrodene er brent eller porselenet er skadet eller ødelagt.
3. ZNAJOMOŚĆ MASZYNY
3.1 OPIS MASZYNY I UŻYCIE PRZEWIDZIANE
4.5 DLHODOBÁ NEČINNOST
2.2 POSTOPKI PRED UPORABO
Osebna varovalna oprema (OVO)
4.5 DALJŠE OBDOBJE NEUPORABE
3.5 PROSTORNI USLOVI
Na rad četverotaktnog endotermičkog motora utiče sledeće:
a) Temperatura:
– Kada su temperature niske može da dođe do poteškoća kod pokretanja na hladno.
– Kada se radi na veoma visokim temperaturama može da dođe do poteškoća kod pokretanja na toplo zbog isparavanja goriva u posudu karburatora ili u pumpu.
– U svakom slučaju tip ulja treba da se prilagodi temperaturi na kojoj se mašina koristi.
b) Nadmorska visina:
– Maksimalna snaga endotermičkog motora postepeno se umanjuje sa porastom nadmorske visine.
– Zbog toga je potrebno da se kod značajnog povećanja nadmorske visine umanji opterećenje mašine na način da se izbegavaju posebno teški radovi.
3.6 GORIVO
Dobar kvalitet goriva od bitnog je značaja za pravilan rad motora.
4.4 RENGÖRING OCH FÖRVARING
EN • The content and images in this User Manual were produced expressly for ST. S.p.A. and are protected by copyright – any unauthorised reproduction or modification to the document, either partially or in full, is prohibited.
Type:
Art.N....-s/n.....CE

