ES 7700 - Screwdriver METABO - Free user manual and instructions
Find the device manual for free ES 7700 METABO in PDF.
User questions about ES 7700 METABO
0 question about this device. Answer the ones you know or ask your own.
Ask a new question about this device
Download the instructions for your Screwdriver in PDF format for free! Find your manual ES 7700 - METABO and take your electronic device back in hand. On this page are published all the documents necessary for the use of your device. ES 7700 by METABO.
USER MANUAL ES 7700 METABO
KONFORMITÄTSERKLÄRUNGVEDECLARATION OF CONFORMITY
We herewith declare in our sole responsibility that this product complies with the following standards in accordance with the regulations of the undermentioned Directives*
Director Innovation, Research and Development
Dokumentationsbevollmachtigter/ responsible person for documentation/ Chargé de la documentation
Metabowerke GmbH
Metabo-Allee
D-72622Nurtingen

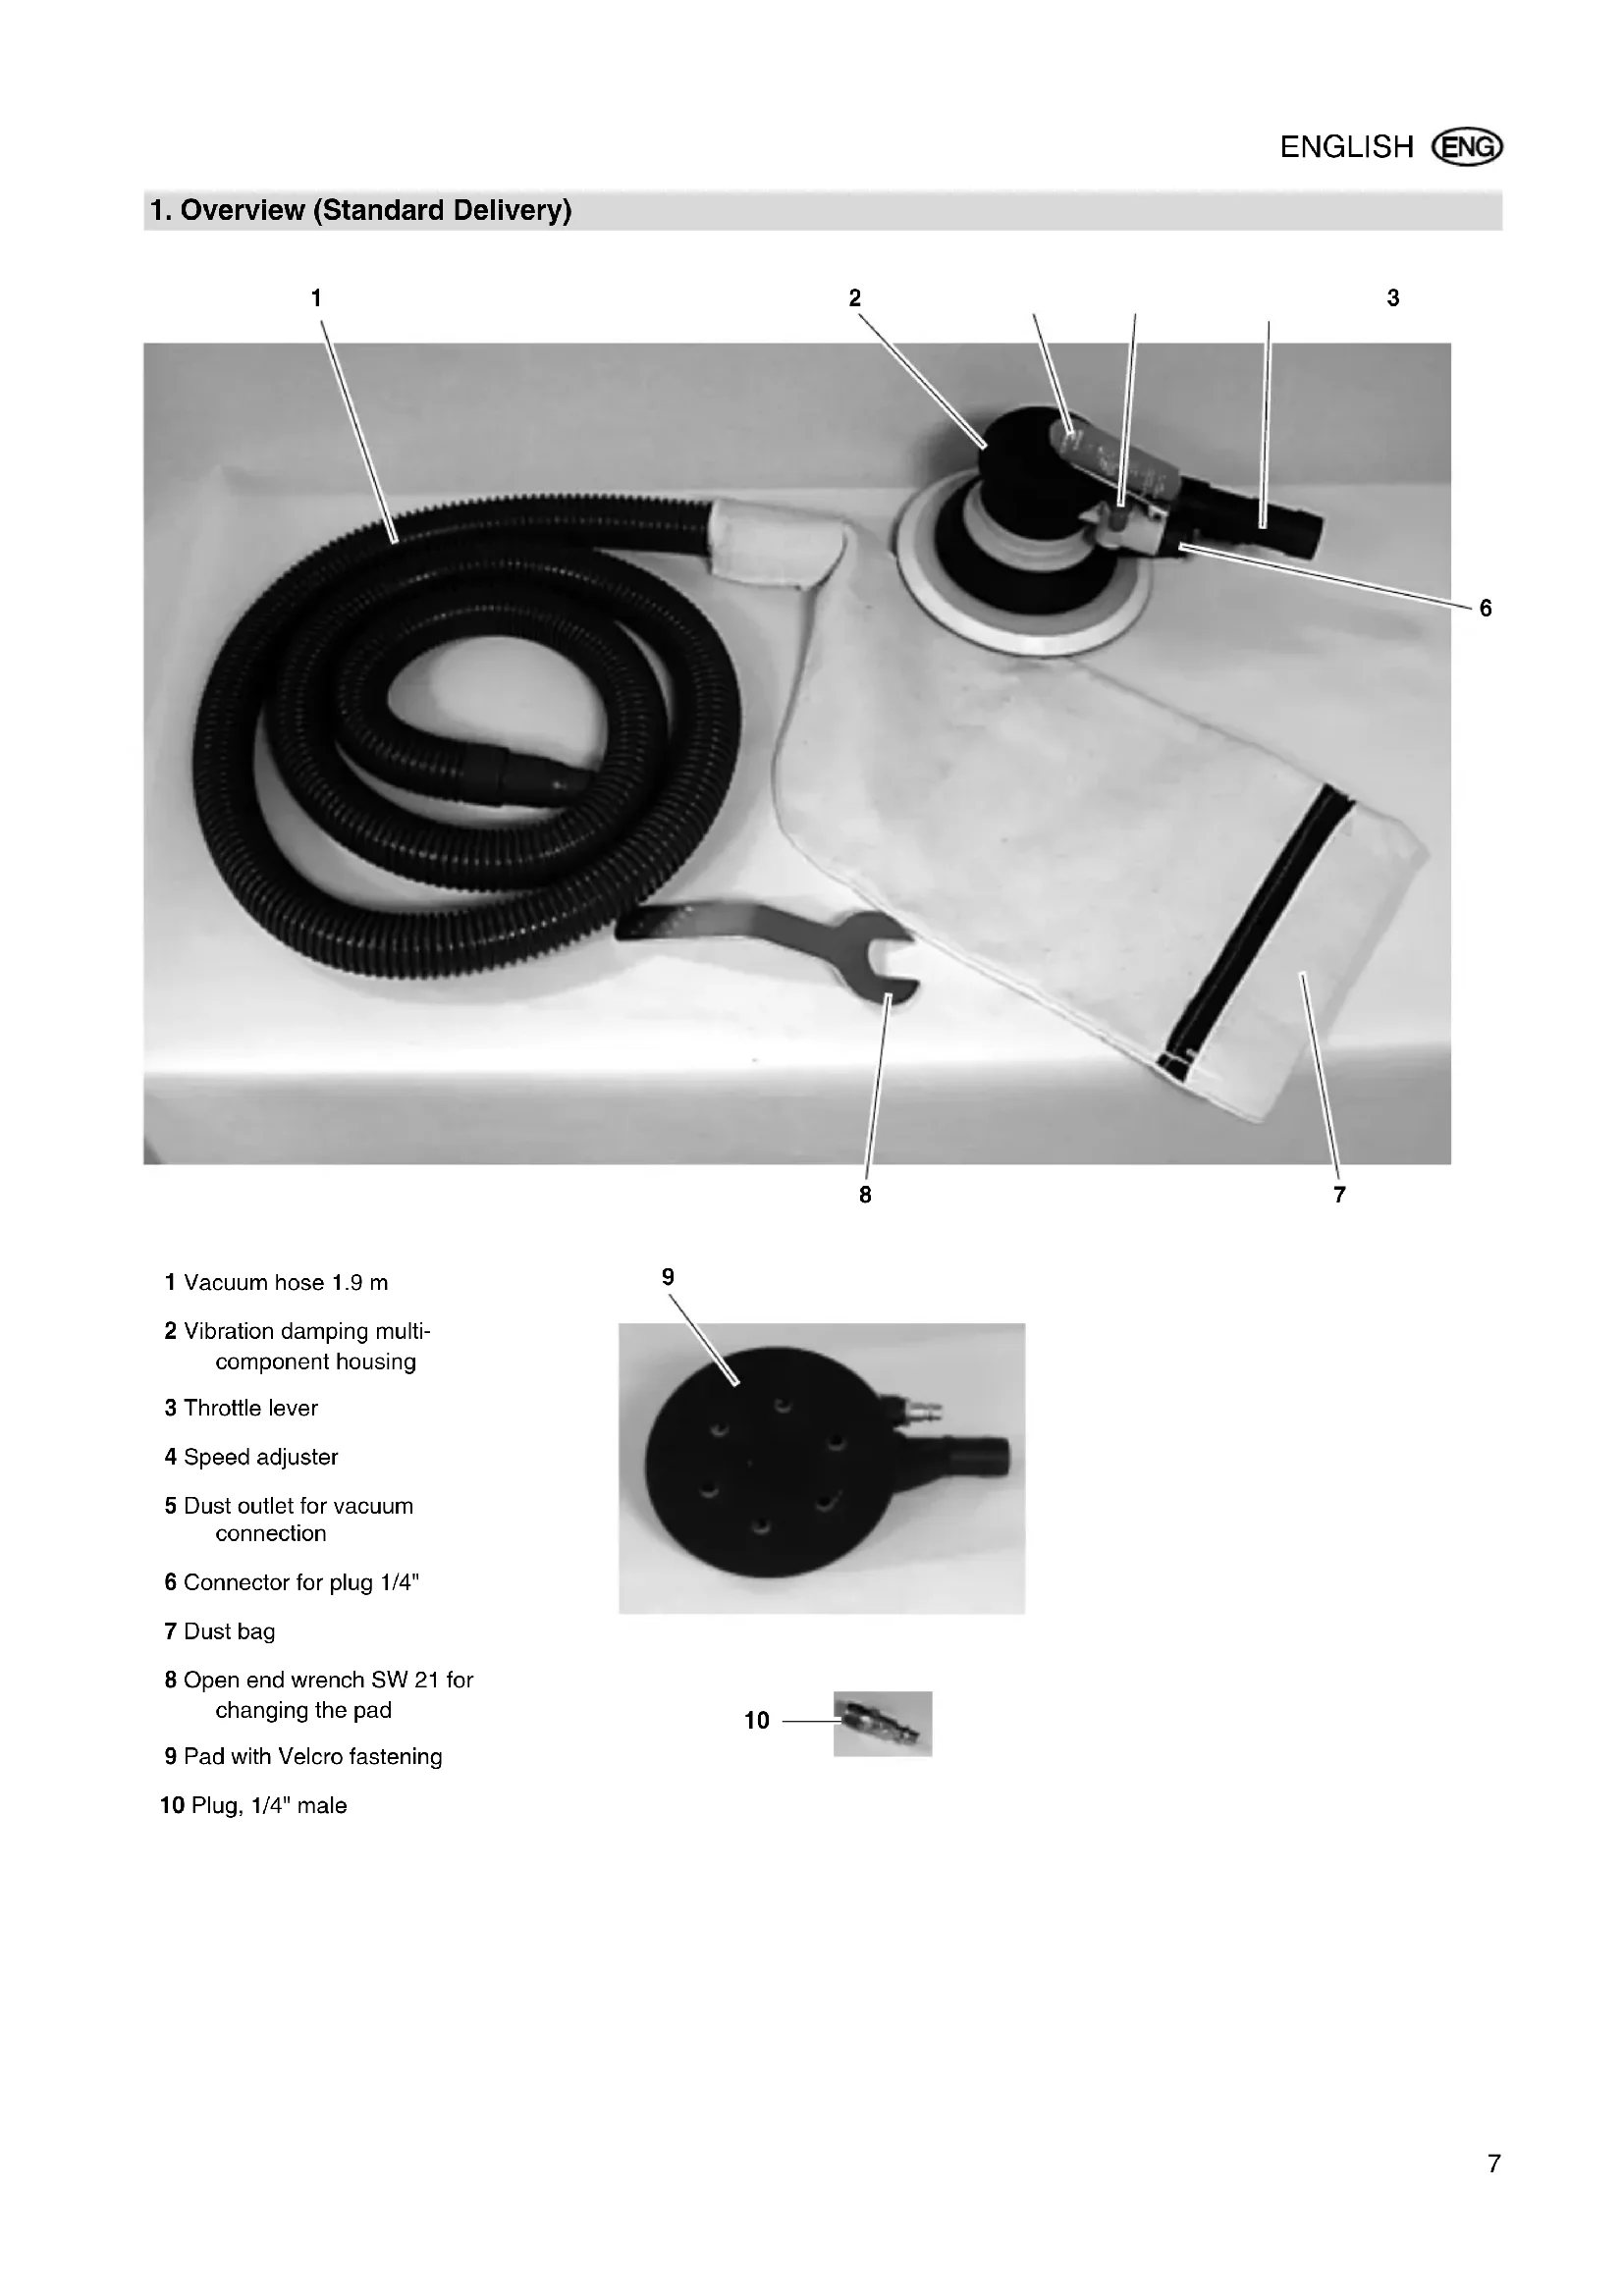
1 Vacuum hose 1.9 m
2 Vibration damping multi-component housing
3 Throttle lever
4 Speed adjuster
5 Dust outlet for vacuum connection
6 Connector for plug 1 / 4^
7 Dust bag
8 Open end wrench SW 21 for changing the pad
9 Pad with Velcro fastening
10 Plug, 1/4" male
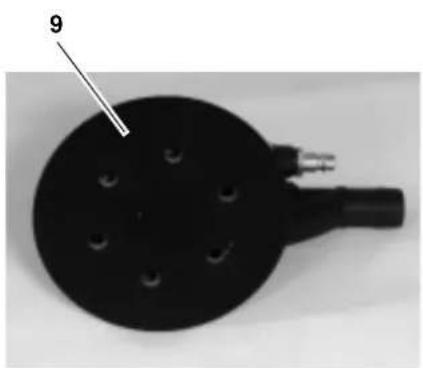

Table of Contents
- Overview (Standard Delivery) ....7
- Please Read First! 8
- Safety 8
3.1 Specified conditions of use .8
3.2 General safety instructions..8 - Operation 8
4.1 Before initial operation 8
4.2 Using the tool 9
4.3 Changing the sanding disc....9
4.4 Changing the sanding pad 9 - Care and Maintenance. 9
- Available Accessories 9
- Repairs. 9
- Environmental Protection .9
- Technical Specifications 9
2. Please Read First!
These instructions are written in a way to let you work with the tool quickly and safely. Here is how to use the instructions:
- Read these instructions fully before operating the tool. Pay special attention to the safety information.
If you notice transport damage while unpacking, notify your supplier immediately. Do not operate the tool!
These instructions are intended for individuals having a basic technical knowledge in the handling of tools like the one described herein. If you have no experience whatsoever with such tool, we strongly recommend to seek the advise of experienced individuals. - Keep all documents supplied with this tool for future reference. Also, retain proof of purchase in case of a warranty claim.
- Should you rent or sell the tool, pass on all documents supplied with the tool.
The manufacturer is not liable for any damage arising from neglect of these operating instructions.
Information in these instructions is denoted as under:

Caution!
Danger!
Risk of personal injury or environmental damage.
Risk of material damage.
Numbers in illustrations (1, 2, 3, ...)
- denote component parts;
are consecutively numbered;
- Instructions to be carried out in a certain sequence are numbered.
- Instructions which can be carried out in any sequence are indicated by a bullet.
- Listings are indicated by an En Dash.
3. Safety
3.1 Specified conditions of use
This random orbit finishing sander is an air tool for use by craftsmen. It can be used for sanding, polishing and for surface preparation.
This tool shall only be powered by an air compressor. The max. permissible working pressure stated in the Technical Specifications must not be exceeded. This tool must not be operated with gases that are explosive, combustible or detrimental to health.
Any other use is not as specified. Use not as specified, modification of the tool or use of parts not approved by the equipment manufacturer can cause unforeseeable damage!
3.2 General safety instructions
- When using this air tool follow the safety instructions given below, to exclude the risk of personal injury or material damage.
- Please also observe the special safety instructions in the respective chapters.
- Observe the statutory accident insurance institution regulations and regulations for the prevention of accidents pertaining to the operation of air compressors and air tools, where applicable.

General hazards!
- Keep your work area tidy - a messy work area invites accidents.
- Be alert. Do not operate this tool while under the influence of drugs, alcohol or medication.
- Keep children and bystanders away from the work area.
- Store air tools out of the reach of children.
Always use a quick coupler to connect this air tool to a compressor. - Do not work materials detrimental to health.
- Working with this tool may generate sparks. Do not use the tool near
flammable materials, liquids or gases.
- Sanding dust is flammable. Keep the amount of flammable material to a minimum by periodically emptying the dust bag.
- Avoid whirling up dust when emptying the dust bag. Do not inhale the sanding dust.
- Do not touch any rotating parts.
- Disconnect from air supply before
- changing sanding discs or sanding pad,
- servicing or
-
when tool is left unattended.
-
Use only sanding discs and pads intended by the manufacturer for this tool.

Hazard generated by insufficient personal protection gear!
- Wear hearing protection.
- Wear safety glasses.
- Wear dust mask.
- Wear safety gloves.

Hazard generated by tool defects!
- Do not attempt to repair the tool yourself! Only trained specialists are permitted to service or repair compressors, pressure vessels and air tools.

Danger by vibration!
- Vibrations are transmitted to the entire body, particularly to arms and hands. Very heavy vibrations may cause nerve and vascular disorder.

Caution!
- Protect the tool, air inlet and operating elements in particular, from dust and dirt.
- Make sure that the max. permissible working pressure stated in the Technical Specifications is not exceeded. The working pressure must be adjusted by a pressure regulator.
- Do not overload tool - use it only within the performance range it was designed for (see Technical Specifications).
- Let tool run idle for a short time only.
4. Operation
4.1 Before initial operation
Install plug.
- Press sanding disc on the pad, observing position of vac holes.
4.2 Using the tool

Caution!
To ensure a long service life of
this tool, it needs to be supplied with sufficient quantities of pneumatic oil. This can be achieved by:
- a service unit with oiler at the compressor.
- a lubricator, installed in the air line or directly on the air tool.
-
adding approx. 3-5 drops of pneumatic oil by hand every 15 minutes of use (constant operation) to the air inlet.
-
Connect dust bag.
- Adjust working pressure at the compressor (see Technical Specifications for max. permissible working pressure).
-
Connect tool with quick coupler to air supply.
-
To start:
-
Press throttle fully down.
-
Adjust speed with the speed adjuster.
-
Hold sanding disc with light and even pressure on the surface to be worked.
4.3 Changing the sanding disc

Danger!
-
Use only sanding discs approved by the manufacturer for this tool.
Always disconnect from air supply before servicing. -
Peel used disc from the pad.
-
Press new sanding disc on the pad, observing position of vac holes.
4.4 Changing the sanding pad
Danger!
Always disconnect from air supply before servicing.
- Slide open end wrench between rubber collar and pad on retaining nut.
- Remove old pad by turning counterclockwise, counter with open end wrench.
- Install new pad by turning clockwise, counter with open end wrench.
5. Care and Maintenance
Danger!
Always disconnect from air supply before servicing.
Repair and maintenance work other than described in this section must be carried out by qualified specialists only.
- Check all screwed connections for tightness, tighten if necessary.
- If the tool is not lubricated by a service unit or line lubricator, add 3-5 drops of pneumatic oil to air inlet every 15 minutes of use (constant operation).
- Do not store tool unprotected outdoors or in damp environment.
6. Available Accessories
- Pneumatic oil 0.5 litre
Special lubricant for air tools, service units and line oilers.
Stock-no. 090 100 8540
Line oiler R3/8" female
For fitting directly to air tools. Oil level can always be checked through sight glass.
Stock-no. 090 105 4592
- Swivel-type air inlet DKG 1/4"
For fitting directly to air tools. Improves tool manoeuvrability.
Stock-no. 090 106 0991
Complete selection of sanding discs, 150mm corundum, grit P 40 to P 400 available.
7. Repairs
Danger!
Repairs to air tools must be carried out by qualified specialists ONLY!
Air tools in need of repair can be send to the service centre in your country. See Spare Parts List for address.
Please attach a description of the fault to the power tool.
8. Environmental Protection
The tool's packaging can be 100% recycled.
Worn out machines and accessories contain considerable amounts of valuable raw and plastic materials, which can be recycled.
These instructions are printed on paper produced with elemental chlorine free bleaching process.
9. Technical Specifications
| Model ES 7700 | ||
| Air consumption l/min 550 | ||
| Max. permissible working pressure bar 6.3 | ||
| Speed | min-1 | 12000 |
| Orbital stroke | mm | 5 |
| Sanding pad diameter | mm | 150 |
| Vibration (effective value of weighted acceleration) | m/s2 | 3.57 |
| Uncertainty K | m/s2 | 1.79 |
| EN ISO 15744 | ||
| Sound power level LWA | dB (A) | 97.7 |
| Sound pressure level LPA | dB (A) | 86.7 |
| Uncertainty K | dB (A) | 4.0 |
| Dimensions: | ||
| length x width x height | mm | 230 x 108 x 148 |
| Weight | kg | 0.96 |
Ipeed BbInOpHeHem IIO6bIX
pa60t Ha HnHCTpyMeHTe OTOeUNHHTb NOaCy CxAtoro BO3dyxa.
- 3aDbHyTb KINCHOTbIM 3EBOM MEXy pe3HOBoM MaHexeToI TapeKoHa CTOnOpHyrKaKy.
- OTKpyTntb CTapyTO TapeNkny npOTnB YacBOB CTpeNk, npN 3Tom NOdEprKuBaTB KJIIOYOM C o6paTHoI CTopoHbI.
- PnKpyTb HOByo TapEnKy no YacBOB CTpeJIke, npn 3tOM NOdEpxNBA Tb KIOHcO M C o6paTHoCtOpHObl.
5. Texo6cIyJxuBaHne uXoI

Onachoctb!
Ipeed BbINOJIHeHnEM IIO6bIX
pa60T Ha HnHCTpymente OTCOeMHHTb NOaCy CxAtOro Bo3dyxa.Pa60tI NO TexO6CnyKuBaHNIO NIN peMOHTy, He ONncaHHbE B daHHo rnaBe, DOJXHbI BblNOJHATbcrTOJbKO CneuaJIncTAMN.
- PpOBePnTb pe3b6oBbIe COeINHeHnHa npOuHOCtB, pNn Heo6xOaMIOCTn IOdTaHyTb.
EcnnnHCTpymEn He Cma3bIbaeTcB 6NOKom Texo6cnykBaHnna nn npncTabHOi MaCneHko, CneDyet KaKdBiE 15 MInHyT pa6Otbl (INNTeNbHoe INCNOJb3OBAHHe) HAnocntb BpyHyIO 3-5 Kanelb NHeBMaTnueCKoro Macna B nPncoeDnHeHne CxKaTOrO BO3dyxa.
He xpaHHTb INCTpyMeNT 6e3 3aunTbHa OTKpbITOM BO3dyXe NIN BO BnaJxHcpeJe.
6. BO3MOXHbIe
PnHaIeXHocTn
Macno nI INHEMaTnKu 0,5JNTpOB CneuaJIbHoe MacNo nI INHEMaTnuecknx INCTpyMeHTOB, 6NOKOB TexO6CnyXnBaHn IN PnICTaBbIX MaCNeHOK. ApTKyI 090 100 8540
IpiuctabHna MacneHka R3/8" BHyTp. pe3b6a,ДЯ yCTaHOBKn HEnOcpeDCTBeHHo Ha nHEBMATnuecknx INCTpyMeHTax. YpoBeHb MaCna IOCTOARHNO BnDeH uepe3rna3OK.AptKyn 090 105 4592
IIOBOpOTHo-OTKnHoi BO3dyxo3a6OpHbI WapHnP DKG 1/4",ДЯ yCTaHOBKn HENOCpeDCTBeHHo Ha NHEBMATUcEcknx INCHTpymeHTax. YnyuWeHHa NOdBnXHoCTb npn IcNoJIb3OBaHHIn INCHTpymeHTa. ApTnKyI 090 106 0991
- PpeIaeraTc8 O6uHbI BbIbOp WnIPOBaIbHbIX NIOTeH, U1 150 MM, KopyHd, 3epHnCTocTb OT P 40 Do P 400.
7. PemOHr

OnachocTb!
PemOH TnHEBMaTHuecknx
HNCtpymeHTOBdoJXeH npOn3BODnTbCRA TOnbKO CneuaJIInCTAmI!
HncnpabHbIe HcTpyMeHTb MOxHO npcbJIaTb B cepBnchbO TdEIN B Baewc cTpaHe. AApec npBBeH B cnCke 3anaChbix YacteN.
PnBbCblke HcTpymeHa npoc6a OINCaTb BO3HkUyIO HEnCnpaBHOCTb.
8. 3aunTa OkpykaUouei Cpebl
Ynakobouhmy MaepnaJnI np6opa MoKet 6bItb nepepa6oTaH n100%.
Otpa6oTaBwne MaunHbI npHaJnEJXHOCTN coepKaT 60nbwoe KOJIuYeCTBO ueHHbIX uCXoJNbIX MaTePnaIOB IN NaCTMaCC, KOTOpBie
TAKKe MOrY T 6bITb NOBeprHyTbI BToPnHOn nepepa60Tke.
PykoBocTBHOHaneTaHoHa6ymare, 6eHoh6ecxNopHbIMcnoCobom.
- TexHnueckne xapaKTePncTnKn