SPHT9600iE - Exercise bike SportPlus - Free user manual and instructions
Find the device manual for free SPHT9600iE SportPlus in PDF.
| Product type | Exercise bike |
| Brand | SportPlus |
| Model | SPHT9600iE |
| Total weight | Approximately 36 kg |
| Maximum user weight | 150 kg |
| Usage class | HA (domestic use) according to BS EN ISO 20957-1/-5 |
| Power supply | Power adapter 9V / 500mA, input 100-240V~, 50/60 Hz |
| Computer functions | Time, speed, distance, calories, odometer, heart rate, RPM, watt |
| Training programs | 24 programs: manual, preset, user, heart rate, watt, body fat test |
| Adjustable resistance | 20 levels via UP/DOWN keys |
| Displays | TIME, DISTANCE, RPM, WATT, SPEED, CAL, PULSE |
| Heart rate measurement | Hand pulse sensors, recovery function |
| Connectivity | Bluetooth 4.0 for CardioFit app (iOS/Android) |
| Assembly | Required, tool provided (wrenches), illustrated manual, 2 people recommended |
| Transportation | Built-in transport wheels, tilt on front foot |
| Maintenance | Clean with damp cloth, lubricate bearings, check screws |
| Warranty | 2 years |
| Customer service | Hotline +33 1 76 36 14 93, email service@sportplus.org |
| Spare parts | Complete list in manual (74 numbered parts) |
| Safety | Detailed instructions: do not use by children without supervision, flat floor, clear space |
Frequently Asked Questions - SPHT9600iE SportPlus
User questions about SPHT9600iE SportPlus
0 question about this device. Answer the ones you know or ask your own.
Ask a new question about this device
Download the instructions for your Exercise bike in PDF format for free! Find your manual SPHT9600iE - SportPlus and take your electronic device back in hand. On this page are published all the documents necessary for the use of your device. SPHT9600iE by SportPlus.
USER MANUAL SPHT9600iE SportPlus
PRODUKTINFORMATIONEN
Abmessungen (L× B× H) : ca. 103× 52× 141cm
PROGRAMM 1 - MANUELLES PROGRAMM
WATT=Torque (KGM) RPM 1.03
Congratulations for choosing a SportPlus product. We have every expectation that you will be fully satisfied with your new purchase.
To guarantee optimal function of this product, please adhere to the following instructions:
Before using this product for the first time, please read the manual carefully!
The product has been designed with safety features. Nevertheless, please read the safety instructions carefully and use the equipment only as described in the manual to avoid hazards and personal injury.
- Please retain this manual for future reference.
- Should you pass on this product, ensure to include the corresponding instruction manual.
CONTENTS
- TECHNICAL DATA 33
- SAFETY INSTRUCTIONS 34
- EXPLODED DIAGRAM 36
- PART LIST 38
- PREPARATION 39
- ASSEMBLY INSTRUCTIONS 41
- USING THE COMPUTER 46
- TIPS ON HEALTHY TRAINING 54
- HEART RATE TABLE 58
- MAINTENANCE, CLEANING AND CARE 59
- NOTES ON DISPOSAL 59
12.COMPLAINTS & WARRANTY 60 - WARRANTY 61
1. TECHNICAL DATA
PRODUCT INFORMATION
Dimensions (W× H× D) : approx. 103× 52× 141cm
Total weight: approx. 36 kg
Class: HA (Domestic use), BS EN ISO 20957-1/-5
Maximum user weight: 150kg
Computer information
Model: B31942
Computer functions:
Time, speed, distance, approx. calorie consumption, pulse
Power adapter
Input: 100-240 V~, 50/60 Hz
Output:
9V = - - - ,500mA
2. SAFETY INSTRUCTIONS
INTENDED USE
This product is intended for private use and is not suitable for medicinal, therapeutic or commercial purposes.
The maximum permissible user weight for this product is 150kg
Before connecting the device to the mains, make sure the current and mains voltage match the specifications on the rating label.
- Never use the device if damaged! Disconnect the device from the mains and contact your customer service, if the device has been damaged in any way.
- Avoid damaging the cable by jamming, bending or rubbing it on sharp edges. Keep it away from hot surfaces and open flames.
- Guide the cable in such a way that it cannot be pulled down or tripped over accidentally.
- When using an extension cable, it must be suitable for the respective power used.
- Warning! Do not immerse any electric parts of the device into water or other liquids. Do not hold the device under running water.
- Never operate the device with wet hands or when standing on a wet floor. Never touch the mains plug with wet or moist hands.
The use of accessories not explicitly recommended by the manufacturer could cause injuries and damage. Only use original accessories.
- Keep the device away from hot surfaces and open flames. Always use the device on a flat, stable, clean and dry surface. Protect the device against extreme heat, dust, direct sunlight, moisture, and dripping and splashing water.
- Do not place any heavy objects on the device. Do not place any objects with open flames (e.g. candles) on or next to the device. Do not place any objects filled with water (e.g. vases) on the device.
This device is not intended to be used by persons (including children) with reduced physical, sensory or mental abilities or lack of experience and / or lack of knowledge unless they are supervised by a person responsible for their safety or have received instructions on how to use the device.
- Do not pull the cord when disconnecting the adapter from the wall socket and do not wind the mains cable around the device.
- Connect the adapter to a readily accessible wall socket in order to be able to disconnect the device from the mains immediately in case of emergency. Disconnect the adapter from the wall socket to fully switch off the device. Use the adapter as disconnecting device.
- Disconnect the adapter before each cleaning and if not using the device for a longer period of time.
- Only use the adapter included in the delivery scope.
DANGER FOR CHILDREN
- Children cannot recognize the hazards that this product may pose. For this reason, keep this product out of the reach of children. The product is not a toy. Store the product at a location out of the reach of children and pets.
- Keep packaging materials out of the reach of children. They pose a suffocation hazard!
2. SAFETY INSTRUCTIONS
- Parents and supervisors should be aware of their responsibility, since, due to children's natural playfulness and love of experimentation, situations and conduct will likely arise for which the training unit is not intended.
If you allow a child to use the product, do not leave it unattended during use. Make all necessary adjustments to the product yourself and supervise the child during exercise.
CAUTION - RISK OF INJURY
- Do not use the product if it is damaged or defective. In this case, contact a professional workshop or our customer service.
Always verify that the product is in impeccable condition before use. Defective components must be replaced immediately as failure to do so may impair the functioning and safety of the unit. - Make sure that no more than one person uses the product at a time.
Always use the product on a horizontal, level, nonslip and solid surface. Never use the product near water and make sure there is a safety clearance of at least 1 meter on both sides and 2 meters behind and in front of the device. Do not put any objects into any openings on the product.
CAUTION - PRODUCT DAMAGE
- Do not alter the product in any way and use only original replacement parts. Have all repairs carried out in a professional workshop or from similarly qualified persons - improper repairs can lead to serious risks for the user. Use the product for the intended purposes as described in the operating instructions only.
- Shield the product from spraying water, moisture, high temperatures and direct sunlight.
INFORMATION ON ASSEMBLY
The product should be carefully assembled by a responsible adult. Ask for the assistance of another, technically-skilled person in case of doubt.
Before beginning assembly of the product, read all assembly steps carefully and review the diagram.
- Remove all packaging materials and lay out all the parts. This will give you a good overview and simplify assembly. Shield the assembly surface from filth and scratching by laying down suitable padding.
- Check the components against the components list to make sure all are present. Do not dispose of all packaging materials until assembly is completed.
- Please note that there is always a risk of injury when using tools to carry out manual tasks. Therefore, please exercise caution when assembling this product.
- Make sure your work environment is hazard-free. For example, do not leave any tools lying around. Place the packaging materials somewhere where they will not pose any hazards during assembly. Packaging foil or plastic bags pose a suffocation hazard for children!
After assembling the product according to the instructions, make sure that all screws, bolts and nuts are installed correctly and tightened.
If necessary, lay out protective padding (not included) beneath the product to protect your floor as there is no guarantee that, for instance, the rubber feet will not leave marks behind.
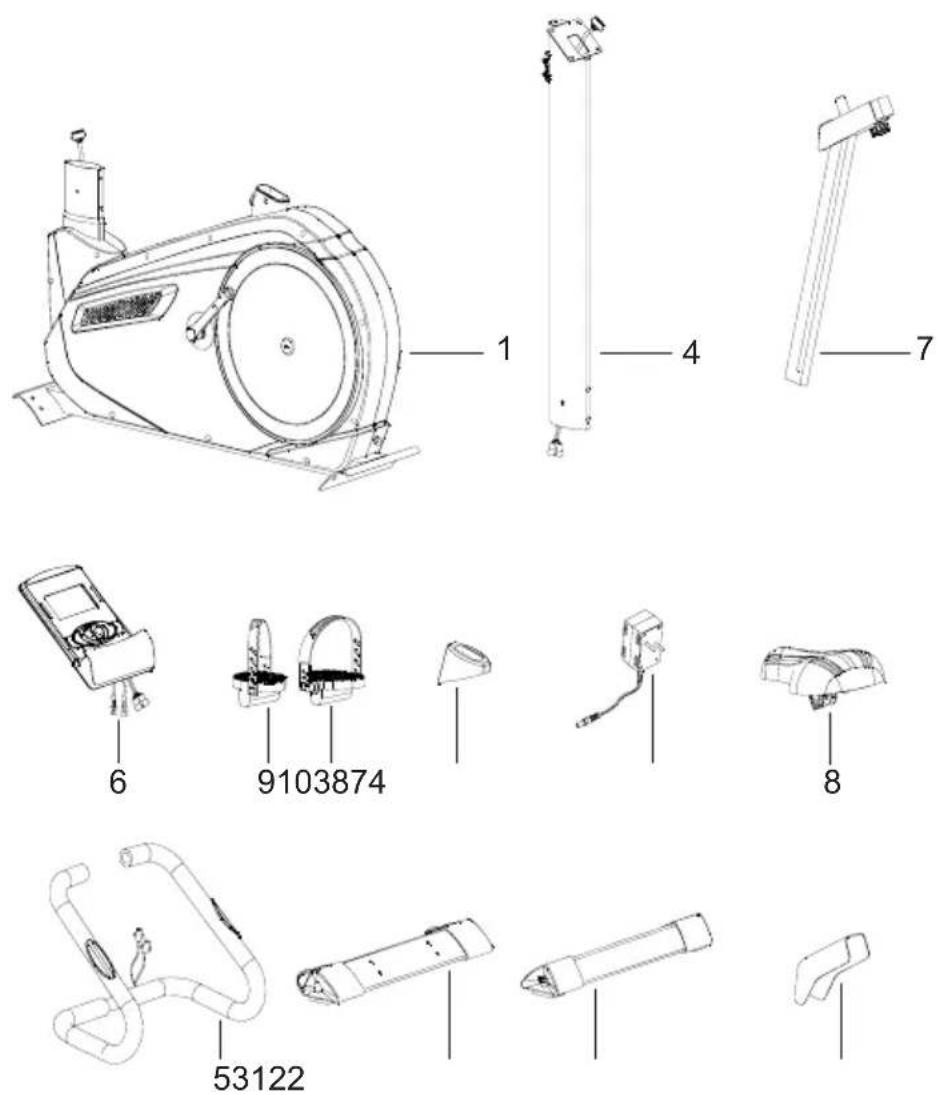
3. EXPLODED DIAGRAM
3. EXPLODED DIAGRAM
- PART LIST
| No. | DESCRIPTION Quantity | |
| 1 | Frame 1 | |
| 2 | Base column (front) 1 | |
| 3 | Base column (rear) 1 | |
| 4 | Head frame tube 1 | |
| 5 | Handlebar 1 | |
| 6 | computer 1 | |
| 7 | Seat post set 1 | |
| 8 | Saddle 1 | |
| 9 | Left pedal 1 | |
| 10 | Right pedal 1 | |
| 11 | Hand screw for saddle height adjustment | 1 |
| 12 | Cover for saddle guide tube 1 | |
| 13 | Slide tube 1 | |
| 14 | Seat slider control | 1 |
| 15 | Hexagon socket screw M8*16 | 12 |
| 16 | Curved washer Φ8*Φ20 | 10 |
| 17 | Tube bundle | 1 |
| 18 | Washer Φ8*Φ17 | 5 |
| 19 | Tube end cap 38*38 | 1 |
| 20 | Hand pulse cable | 2 |
| 21 | T-shaped round head grooved pin | 1 |
| 22 | Hexagon socket screw M8*20 | 2 |
| 23L | Stand end cap (front) L | 1 |
| 23R | Stand end cap (front) R | 1 |
| 24L | Stand end cap (back) L | 1 |
| 24R | Stand end cap (back) R | 1 |
| 25 | Clamp | 1 |
| 26 | Hand pulse sensors | 2 |
| 27 | Screw for computer M5*10 | 4 |
| 28 | Foam handle | 2 |
| 29 | End cap for handlebar | 2 |
| 30 | Self-tapping screw ST4*20 | 2 |
| 31 | Washer Φ4.2*Φ12 | 2 |
| 32 | Cable guide bushing | 1 |
| 33 | Upper computer cable | 1 |
| 34 | Lower computer cable | 1 |
| 35 | Washer Φ8*Φ17 | 1 |
| 36 | Hand screw for horizontal saddle adjustment | 1 |
| 37 | Handlebar rod cover | 1 |
| 38 | Saddle tube cover, bottom | 1 |
| 39 | Self-tapping screw | 10 |
| No. | DESCRIPTION Quantity | |
| 40 | Self-tapping screw ST5*15 | 8 |
| 41 | Motor | 1 |
| 42 | Power cable | 1 |
| 43 | Engine cable | 1 |
| 44 | Sensor cable | 1 |
| 45L | Housing L 1 | |
| 45R | Housing R | 1 |
| 46 | Cap for housing | 2 |
| 47 | Crank end cap | 2 |
| 48 | Pedal crank L | 1 |
| 49 | Pedal crank R | 1 |
| 50 | Flange nut | 4 |
| 51 | PVC end cap for housing | 2 |
| 52 | Belt wheel 1 | |
| 53 | Magnet set | 1 |
| 54 | Nylon nut M8 | 5 |
| 55 | Hex bolt M8*55 | 1 |
| 56 | Spacer for magnet set | 2 |
| 57 | Clamp Φ17 | 2 |
| 58 | Ball bearing 6203 | 2 |
| 59 | Nylon nut M6 | 4 |
| 60 | Belt wheel 1 | |
| 61 | Belt wheel axis | 1 |
| 62 | Hexagon socket screw M6*15 | 4 |
| 63 | Sensor mount | 1 |
| 64 | Belt | 1 |
| 65 | Hex bolt M6*25 | 1 |
| 66 | Hex nut M6 2 | |
| 67 | Spring | 1 |
| 68 | Spring | 1 |
| 69 | Set screw | 1 |
| 70 | Nut M8 | 1 |
| 71 | Idler rack | 1 |
| 72 | Spacer 1 | |
| 73 | Seat post set 1 | |
| 74 | Adaptor | 1 |
5. PREPARATION
This page and the next page list all parts and small components (screws, washers, nuts, and tools) required for the installation of this device. Check the package content for completeness before starting installation.
| No. Description Illustration No. | |||
| 11 Hand screw for saddle height adjustment 1 | |||
| 15 Hexagon socket screw M8*16 | 12 | ||
| 16 | Curved washer Φ10* Φ22 | 10 | |
| 18 Washer Φ8*Φ17 2 | |||
| 21 | Handlebar lock screw with T-shaped handle | 1 | |
| 37 Handlebar rod cover 1 | |||
| Wrench 1 | |||
| Hex key (6 mm) 1 | |||
5 PREPARATION
No.Description No.No.Description No.
1 Frame 19 Left pedal
2 Base column (front) 1 10 Right pedal 1
3 Base column (rear) 1 11 Hand screw for saddle height adjustment 1
4 Head frame tube 1 12 Cover for saddle guide tube 1
5 Handlebar 1 12 Cover for saddle guide tube 1
6 Computer 1 38 Saddle tube cover, bottom 1
7 Seat post set 174 Adaptor 1
8 Saddle 1
6. ASSEMBLY INSTRUCTIONS
Take all parts out of the packaging carefully and place them on a flat surface. When doing this, use suitable padding to protect the working surface. Assembly of the individual parts should be carried out by 2 people!
Some parts have already been pre-assembled to simplify the assembly process for you.
STEP1
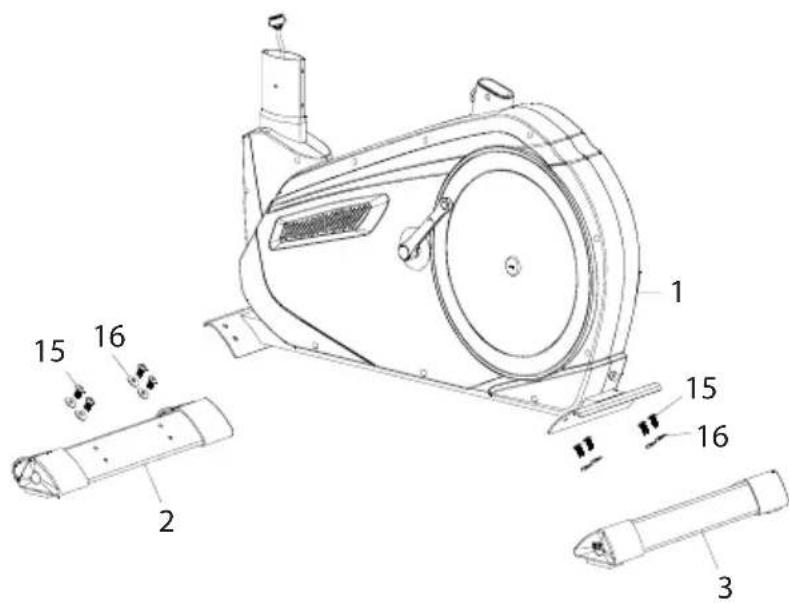
- Attach the front base column (2) to the main frame (1). Secure the connection with 4 hex screws (15) and 4 bent washers (16).
- Attach the rear base column (3) to the main frame (1). Secure the connection with 4 hex screws (15) and 4 bent washers (16).
6. ASSEMBLY INSTRUCTIONS
STEP2
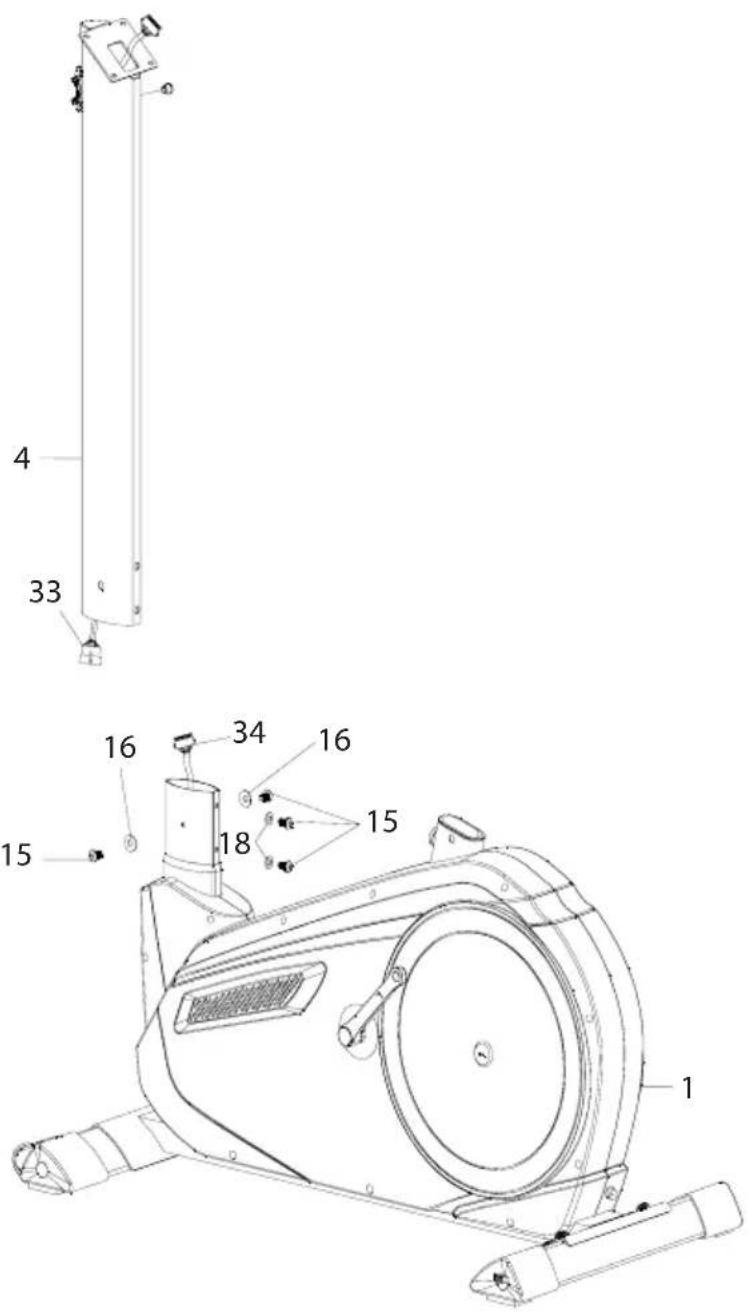
-
Connect the upper computer cable (33) to the lower computer cable (34).
-
Fasten the handlebar tube (4) to the main device (1). Secure from the front with 2 sets of hex screws (15) and flat washers (18) and from the side with 2 sets of hex screws (15) and bent washers (16).
6. ASSEMBLY INSTRUCTIONS
STEP3
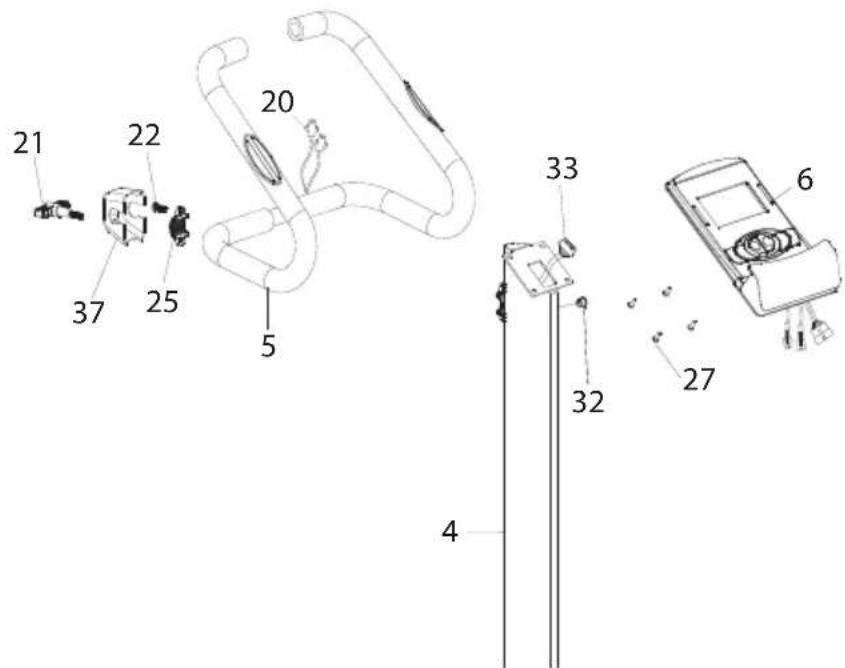
- Remove the hex screw (22) and clamp (25) from the handlebar tube (4).
- Fasten the handlebar (5) to the handlebar tube (4). Use the previously removed hex screw (22) and clamp (25).
- Put on the handlebar cover (37) and fasten with the T-shaped set screw (21).
- Guide the hand pulse cable (20) through the grommet (32) and pull it up into a vertical position.
- Loosen the 4 screws (27) on the back of the computer (6).
- Connect the upper computer cable (33) and the hand pulse cable (20) to the connections on the back of the computer (6).
- Place the computer (6) on the computer mount. Secure the computer with the 4 screws (27) removed earlier.
- You can readjust the handlebar position using the T-shaped set screw (21) at any time.
6. ASSEMBLY INSTRUCTIONS
STEP4
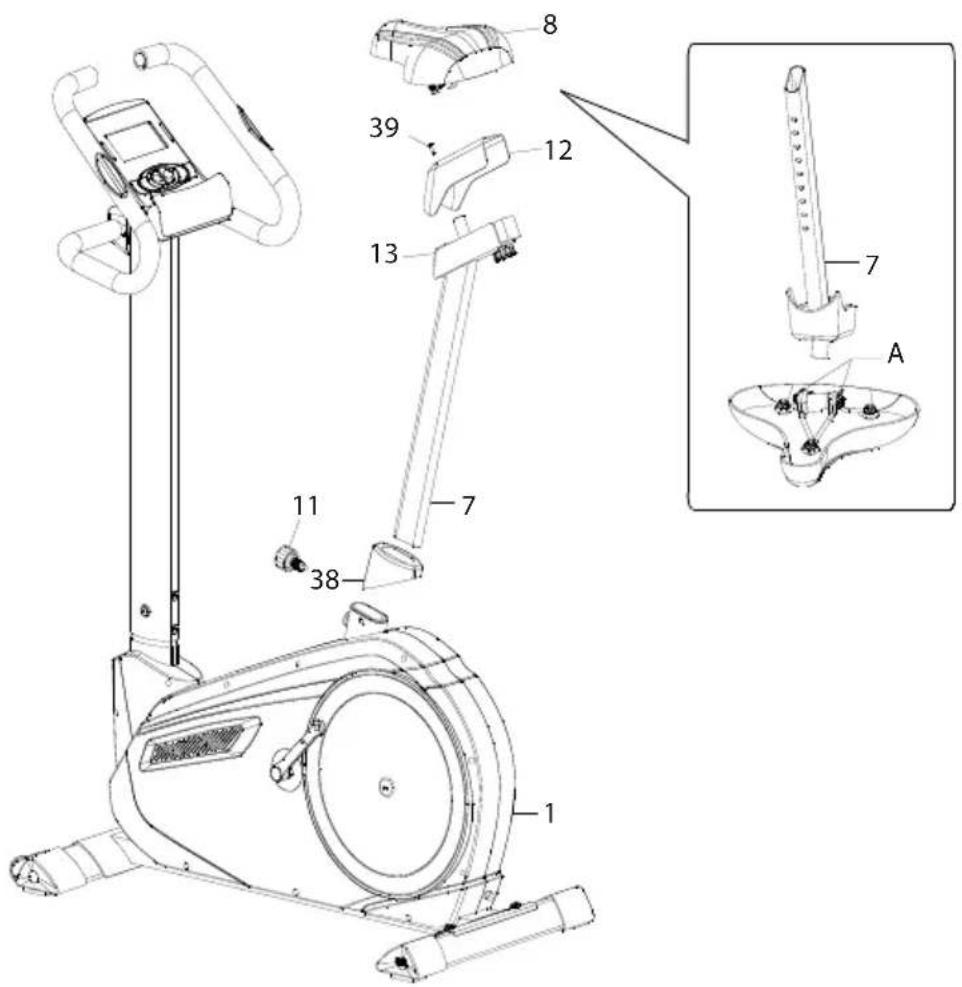
- Put the cover (12) on the saddle guide tube (13) and fasten using the screws (39) that are premounted to the saddle guide tube.
- Loosen the nuts (A) underneath the saddle (8). Then mount the saddle to the saddle guide tube (13) and fasten using the nuts. See detailed image.
- Insert the adjustable saddle support (7) through the lower saddle guide cover (38) into the flywheel frame (1). Set to the desired height and lock using the set screw (11). Fasten firmly.
- You can adjust the height of the saddle support up or down by loosening the set screw (11) and pulling out/pushing in the saddle support. The user could adjust the saddle backward and frontward as well by adjusting the knob (36).
6. ASSEMBLY INSTRUCTIONS
STEP5

- The left (9) and right (10) pedals are marked with the letters "L" and "R" respectively. The wordings left or right refer to the side located left or right from you when sitting on the saddle. Attach the straps to the pedals.
- Mount the left and right pedals (9/10) to the left and right pedal crank (48/49). Attach the pedals by turning the right pedal clockwise and the left pedal anti-clockwise.
- Connect the adapter (74) to the adapter socket (B) on the back of the main frame (see detailed illustration).
- Connect the adapter (74) to a suitable mains outlet.
- The device is then ready for use.
7. USING THE COMPUTER
CONTROL VIA CARIOFIT APP
You can connect the computer via Bluetooth® 4.0 to your smartphone/tablet. Please download the "Cardiofit" app from the Google Play Store on Android or the Apple App Store on iOS.
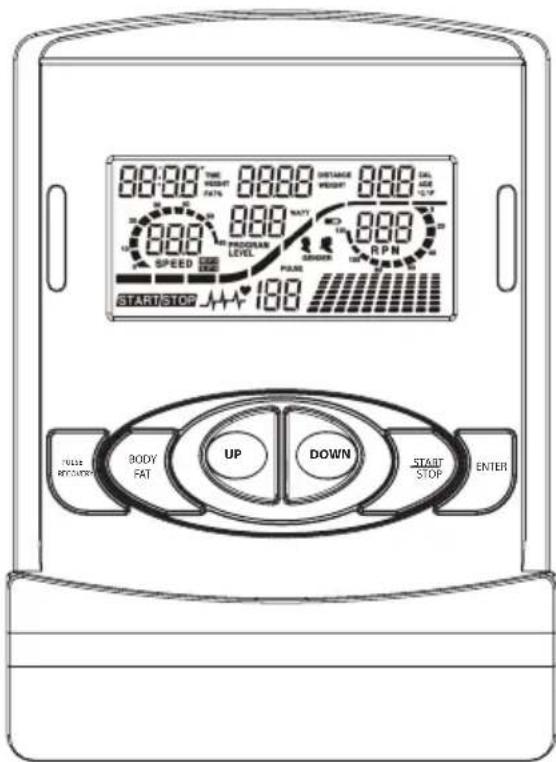
| CONTROLS/CONNECTIONS | FUNCTION |
| START/STOP button· | Quick start function for starting the computer without selecting a program in manual mode. • Stop the workout mode. • Start the workout. |
| UP button·Increase the resistance level during workout. • In setting mode: Increase the values for time, distance, calories and age, or select a program and gender. | |
| DOWN button·Reduce the resistance level during workout. • In setting mode: Decrease the values for time, distance, calories and age, or select a program and gender. | |
| ENTER button·In setting mode: Confirm currently entered data. • In stop mode: Press and hold for 2 seconds to reset all values to “0” or to default respectively. | |
| BODY FAT button·Calculate the body fat ratio based on data to be entered. | |
| PULSE RECOVERY button·Start the recovery pulse measurement. | |
7. USING THE COMPUTER
IMPORTANT DISPLAY INDICATIONS
| TIME | Shows workout time in minutes and seconds. The computer automatically counts the minutes from 0:00 to 99:59. |
| DISTANCE Shows | the distance covered during workout (range 0-999.9 km). |
| RPM Shows the current pedaling frequency (rounds/minute). | |
| WATT Shows the value of mechanical energy generated during workout. | |
| SPEED Speed (km/h) | |
| CAL Shows the calories consumed during training. This is an estimated value. | |
| PULSE | Automatically registers and shows the corresponding heart rate during training. In order to measure your pulse, place your palms on both pulse contact surfaces (26); the computer will display your current pulse per minute. |
IMPORTANT NOTES PRIOR TO WORKOUT
MAINS INLET
- Connect the adapter (74) to a wall socket and to the inlet located on the rear main housing of the ergometer. A signal sounds.
AUTO ON / OFF:
- The computer will automatically turn on once you press a button on the device. If not exercising for several minutes, the computer will automatically turn off.
QUICK START
- Press the START/STOP button.
- Start exercising.
- You can adjust the pedaling resistance using the UP/DOWN buttons.
SHORT INTRODUCTION OF THE COMPUTER PROGRAMS
PROGRAM 1 - MANUAL PROGRAM
- Select the manual program (P1) using the UP/DOWN buttons; confirm with ENTER.
- Enter the time, distance, calorie and pulse values using the UP/DOWN buttons.
- Confirm each entered value with ENTER.
- Press the START/STOP button to start exercising.
- Adjust the resistance level during workout as desired using the UP/DOWN buttons.
PROGRAMS P2 TO P13 - PRE-SET PROGRAMS
Programs P2 to P13 are pre-set programs.
You can exercise with different resistance levels and different intervals as shown in the picture on the next page.
7. USING THE COMPUTER
PROGRAM SELECTION AND SETTINGS
- Select the desired program with the UP/DOWN buttons and confirm with ENTER.
Use the UP/DOWN buttons to set the values for time, distance, calories and pulse one by one. - Confirm each entered value with ENTER.
- Press the START/STOP button to start exercising.
| P1-MANUAL | P2-STEPS | P4-HILL | P4-ROLLING |
| P5-VALLEY | P6-FAT BURN | P7-RAMP | P8-MOUNTAIN |
| P9-INTERVALS | P10-RANDOM | P11-PLATEAU | P12-FARTLEK |
| P13-PRECIPICE | P14-User „U1" | P14-Default | |
PROGRAMS P14 TO P17 - USER-DEFINED PROGRAMS
Programs P14 to P17 are user-defined programs.
- You can adjust the time, distance and calorie values as well as select one of 10 different resistance levels. The system will save all entered values and profiles for you to recall later.
Use the UP/DOWN buttons to select the desired program and confirm with ENTER.
Use the UP/DOWN button to select one of the 10 resistance levels ("1" is the default resistance setting; see above) and to adjust the values for time, distance, calories and pulse. - Press the START/STOP button to start exercising.
7. USING THE COMPUTER
Once you have reached the target entered by you, a signal will sound and the workout will stop.
Note: The heart rate monitor is intended as a training aid and not as a medical device. If you feel unwell, please cease training immediately and contact your physician.
RECOVERY PULSE:
- When in START mode, grab the handles with both hands and press the PULSE RECOVERY button. The timer starts running from 00:60 to 00:00. After the timer has elapsed, the computer will display the recovery pulse with a value from F1.0 to F6.0:
| 1.0 = Outstanding | 3.0≤ F ≤3.9 = Alright |
| 1.0< F <2.0 = Excellent | 4.0≤ F ≤5.9 = Below average |
| 2.0≤ F ≤2.9 = Good | 6.0 = Bad |
PROGRAMS P18 TO P22 - HEART RATE PROGRAMS
Programs P18 to P21 are programs controlled by your heart rate, and program P22 is the target heart rate program.
- When using one of these programs, the computer will adjust the resistance level based on the measured heart rate.
If the measured heart rate is lower than the target heart rate, the system will increase the resistance level every 20 seconds.
If the measured heart rate is higher than the target heart rate, the system will decrease the resistance level every 20 seconds.
| Program % | of max. heart rate Calculation of target heart rate |
| P18 55% 2 | 20 minus age x 55% |
| P19 65% 2 | 20 minus age x 65% |
| P20 75% 2 | 20 minus age x 75% |
| P21 85% 2 | 20 minus age x 85% |
| P22 User-defined | User-defined |
Use the UP/DOWN buttons to select the desired program (see image); confirm with ENTER.
P18-P21: Use the UP/DOWN buttons to enter your age first. 35is the default age setting.
P22: Use the UP/DOWN buttons to enter your target heart rate with a value between 80 and 180. 120is the default heart rate setting.
- Then enter other values for time, distance and calories using the UP/DOWN buttons.
- Press the START/STOP button to start exercising.
7. USING THE COMPUTER
PROGRAMS P18 TO P22 - HEART RATE PROGRAMS
OVERVIEW OF THE DISPLAY READINGS
| P18-55% | ||
| → | → | |
| P19-65% | ||
| → | → | |
| P20-75% | ||
| → | → | |
| P21-85% | ||
| → | → | |
| P22 –User-defined | ||
| → | → | |
7. USING THE COMPUTER
PROGRAM P23 - WATT PROGRAM
When using program P23, the resistance level cannot be adjusted during the workout, but the computer adjusts the resistance automatically based on the speed. When reducing the speed, the resistance will automatically increase. When increasing the speed, the resistance will automatically decrease.
Use the UP/DOWN buttons to select program P23 ; confirm with ENTER.
Using the UP/DOWN buttons, you can enter the values for time, distance, watts, calories and pulse one by one.
- Confirm each entered value with ENTER.
- Press the START/STOP button to start exercising.
Note:
WATT=torque (KGM) RPM 1.03
During this program, the WATTS value remains invariably. The resistance level decreases when the speed increases (pedaling frequency), and increases when the speed decreases.
When pedaling fast, the resistance will drop. When pedaling more slowly, the resistance will increase.

7. USING THE COMPUTER
PROGRAM P24-BODY FAT MEASUREMENT PROGRAM
Program P24 is a special program for determining a specific stress profile based on the body fat values of the user.
Use the UP/DOWN buttons to select program P24; confirm with ENTER.
Use the UP/DOWN buttons to adjust the values for size, weight, gender (1-male, 0-female) and age.
- Press START/STOP to start the body fat measurement.
- Make sure to securely hold the contact surfaces on the handle with your hands.
After measuring, the computer LCD will display the body fat ratio in %.
After the body fat measurement has been completed, the LCD will show one of the following 6 profiles.
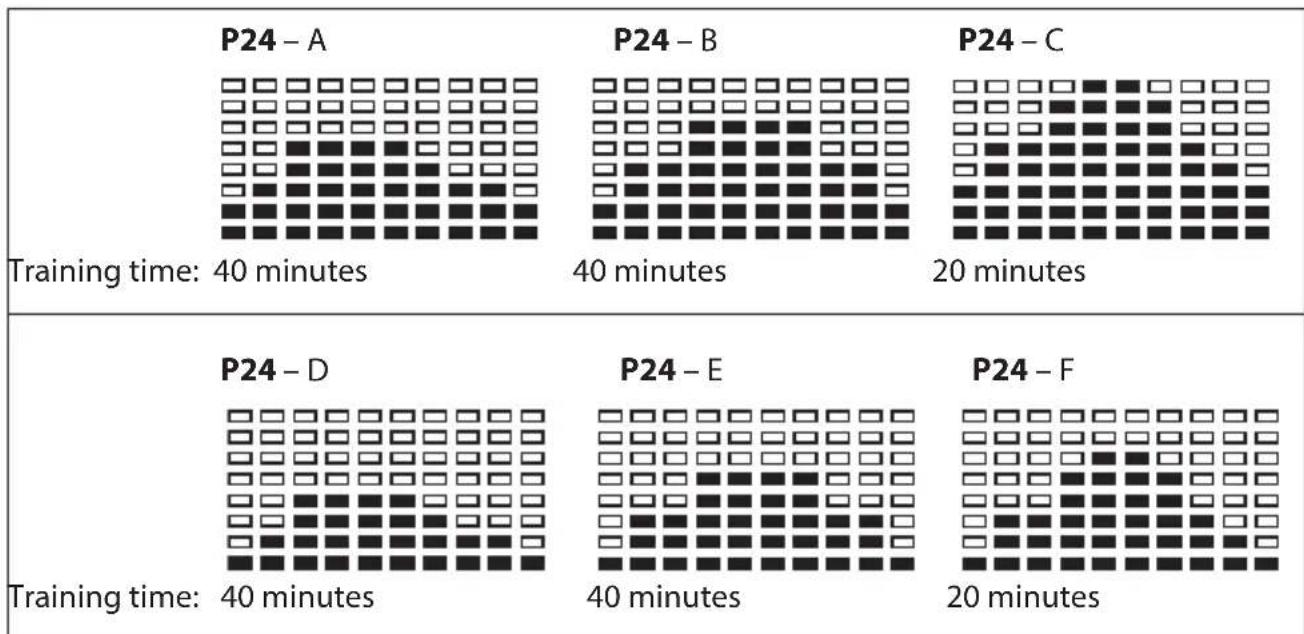
- Press the START/STOP button to start exercising.
7. USING THE COMPUTER
ERROR MESSAGES
| Display Cause | |
| E1 (ERROR 1) | The computer does not receive any position signal from the actuator (67), or the movement of the motor has been blocked. ·Check the wiring of the product for any damage or jamming. ·Check the movement range of the brake for any blockage. ·Please contact our customer service. |
| E2 (ERROR 2) The system can not recall the program data from the memory. ·The computer must be replaced. ·Please contact our customer service. | |
| E3 (ERROR 3) The actuator does not move to the designated position. ·Replace the actuator. ·Please contact our customer service. |
8. TIPS ON HEALTHY TRAINING
TRAINING INSTRUCTIONS
All recommendations in this manual apply only to healthy persons and are not intended for cardiovascular patients!
All recommendations are intended solely as general training guidelines. Consult your physician for recommendations tailored to your individual requirements. The following pages offer a detailed explanation on handling your new training device and outline the basics of fitness training. In order to reach your desired training results, it is imperative to inform yourself of some important general points on designing a fitness training program as well as how to handle your device using this manual. We therefore ask you to carefully read and follow all the information included here. Thank you and good luck!
DESIGNING A FITNESS TRAINING PROGRAM
Please consider the following factors when determining how extensive your training should be in order to achieve noticeable improvements of your physical condition and health:
INTENSITY
The level of physical strain during training must exceed normal strain without making you breathless and/or exhausted.
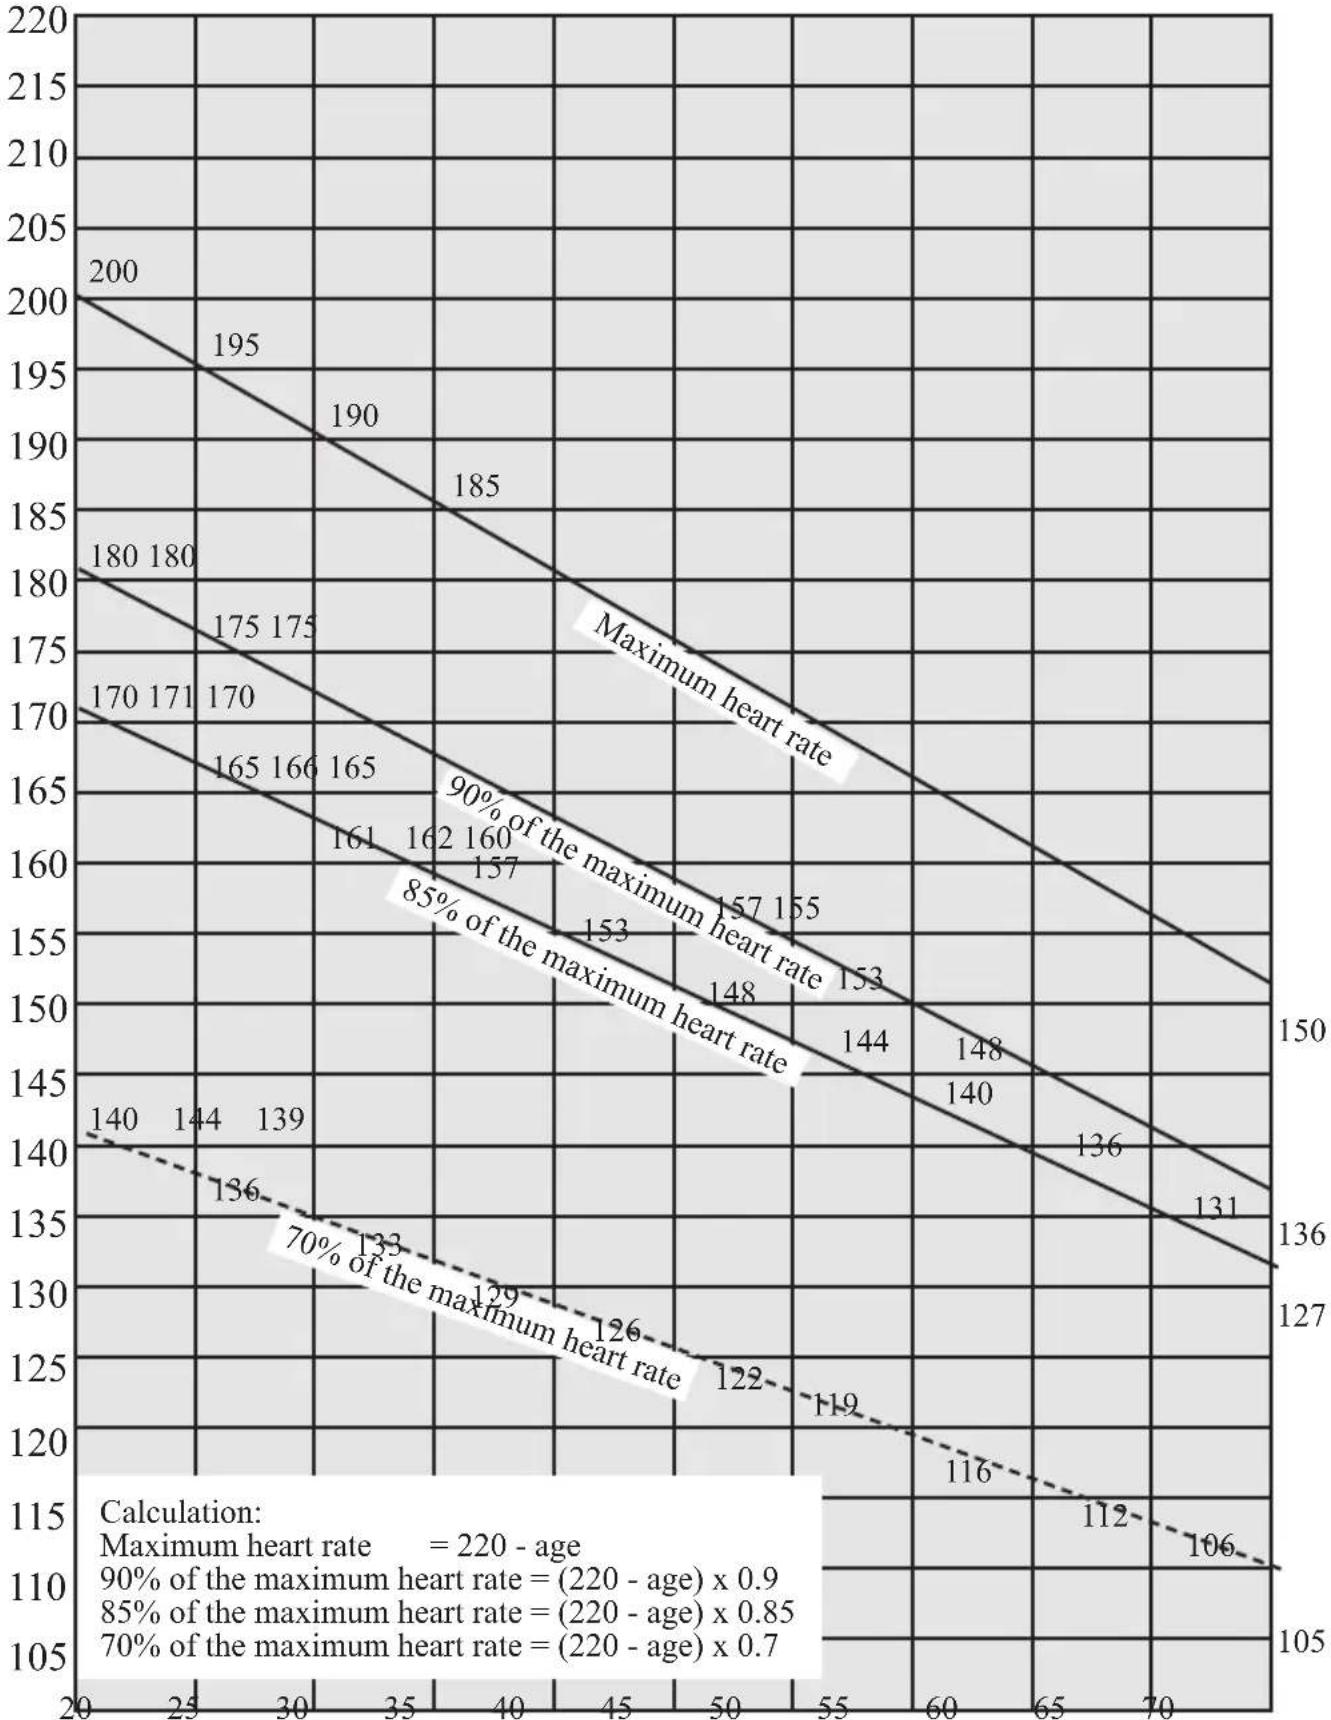
Your heart rate can serve as a suitable point of reference for effective training.
During training, it should be between 70 - 85% of your maximum heart rate (see the heart rate table in the appendix).
During the first week of training, your training heart rate should be in the lower 70% of your maximum heart rate. In the following weeks and months, you should slowly increase your heart rate to the upper limit of 85% of your maximum heart rate. The better your condition becomes, the more you will have to increase the training requirements. You can achieve this by lengthening your training and/or raising the difficulty level. Should you wish to manually monitor your heart rate in addition to the training computer attached to the cross trainer, try the following:
- Check your pulse manually (hold the pads of two fingers to your wrist and count the number of pulse beats in a minute).
- Check your pulse using a suitable calibrated heart rate monitor (available at medical supply shops).

CAUTION!
The heart rate monitor may be inexact. Overstrainng may result in serious injury and death. Cease training immediately if you feel weak.
FREQUENCY
Most experts recommend a combination of a health-conscious diet tailored to your training goal and physical exercise three to five times a week.
A normal adult needs to exercise twice a week to maintain his/her current condition. To improve one's condition and lose weight, at least 3 training units weekly are necessary.
PHASES OF TRAINING
Each training session should consist of 3 training phases:
"Warm up",
- "Training" and
"Cool down".
During the warm up phase, you slowly increase your body temperature and oxygen intake. Gymnastic exercises or stretches for 5 to 10 minutes are a good warm up.
The following contains workout instructions with useful stretches for your leg muscles.
After warming up, the actual exercise (training phase) begins. The training intensity should be low for the first few minutes before increasing to the desired level for a period of 15 to 30 minutes.
After training, a cool down phase is imperative to support your circulation and prevent sore or pulled muscles.
Cool down, 5 to 10 minutes long, should consist of stretching and steady exercises for at least 30 seconds and/or light gymnastic exercises.
MOTIVATION
To key to a successful training program is regularity. You should set up a fixed time and place per training day and prepare mentally for exercise. Only exercise when you are in a good mood and always keep your eyes on your goal. If you train regularly, you will notice your development day for day as you approach your training goal bit by bit.
STRETCHING EXERCISES
The stretches illustrated on the following pages are suited both for warming up and cooling down after training. Please note that during the warm-up phase, stretches should be held briefly (approx. 5 to 10 seconds) before being released. This increases muscle tension to prepare your muscles for training.
During cool down, stretches should be held longer (at least 30 seconds) in order to reduce muscle tension after the strain of exercise.
As a general rule, never take stretching to the extreme.
If you feel any discomfort, release the stretch immediately, and do this stretch with less intensity in the future.
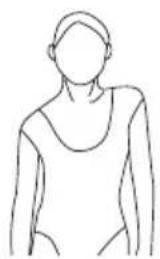
EXERCISE 1: NECK STRETCHES
Tilt your head to the right and feel the tension in your neck. Slowly lower your head in a semicircle to your chest before tilting your head to the left. Now feel the pleasant tension in your neck again. You can alternate and repeat this exercise several times.

EXERCISE 2: STRETCHES FOR YOUR SHOULDER REGION
Alternatively raise your left and right shoulders or both shoulders simultaneously.
EXERCISE 3: SHOULDER STRETCHES
In a standing position, guide your right elbow to your left shoulder and let your right lower arm dangle behind your back. Press the elbow as close to your left shoulder as possible without experiencing any pain. Hold this position for 10-15 seconds.
Repeat this exercise with your other arm.

EXERCISE 4: ARM STRETCHES
Lift your left and right arm in turns toward the ceiling. Feel the tension in the left and right halves of your torso.
Repeat this exercise several times.

EXERCISE 5: STRETCHES FOR YOUR TRICEPS AND OBLIQUE MUSCLES
Bend your right arm at a 90^ angle and guide it behind your head (as depicted). Slightly bend your torso to the opposite side (e.g. if you are stretching your right shoulder, bend to the left and vice versa). Hold this position for 10-15 seconds and repeat the exercise with the other arm.

EXERCISE 6: STRETCHES FOR YOUR QUADRICEPS
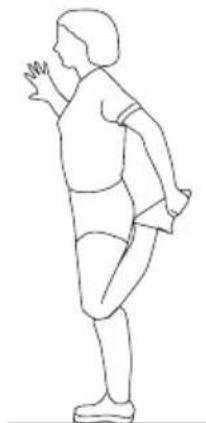
Brace yourself with one hand on the wall and grasp one foot with the other hand as depicted to stretch your quadriceps. Pull the heel of your foot as far as possible toward your buttocks without experiencing any pain.
Hold this stretch for approx. 5-10 seconds (warm up) or approx. 30-40 seconds (cool down), and repeat with the other foot.
Repeat the exercise at least twice on both sides.
EXERCISE 7: STRETCHES FOR YOUR INNER THIGHS
Sit on the floor and guide the soles of your feet together. Pull your heels as close to your body as possible and gently press your knees toward the floor. Do not use force and never press your knees using your hands! Stretch as far as you can without experiencing any pain.
Depending on the phase, hold this stretch for approx. 5-10 seconds (warm-up) or approx. 30 seconds (cool-down).
Repeat twice.

EXERCISE 8: STRETCHES FOR YOUR CALFS AND ACHILLES Tendon
(Gastrocnemius and biceps femoris)
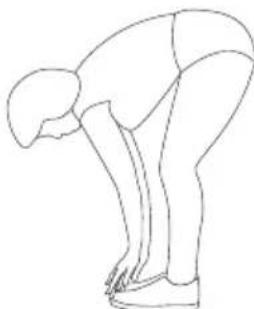
Stand up straight with your feet about a shoulder's width apart. Now bend forward at the waist and try to reach your feet with your hands (advanced persons can touch their feet without any pain). Depending on the phase, hold this stretch for approx. 5-10 seconds (warm-up) or approx. 30-40 seconds (coo-down). Repeat twice.
EXERCISE 9: STRETCHES FOR YOUR HAMSTRINGS
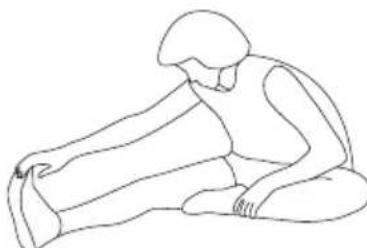
Sit on the floor and bend one leg as depicted, stretching the other out before you. Now bend forward and guide your hand along your outstretched leg as far as possible toward your foot without experiencing any pain. Advanced persons can touch their feet and even pull their toes back toward the body to simultaneously stretch the calves.
Depending on the phase, hold this stretch for approx. 5-10 seconds
(warm-up) or approx. 30 seconds (cool-down).Repeat the exercise twice on both sides.
9. HEART RATE TABLE
x-axis = Age in years from 20 to 70
y-axis = Pulse beats per minute from 100 to 220
10. MAINTENANCE, CLEANING AND CARE
- After the assembly and before using the home trainer, always make sure that all bolts/nuts are fully and correctly tightened.
- Clean the unit regularly with a slightly damp cloth and a mild cleaning agent.
This is especially important for the seat and the handles, as these parts are in contact with parts of your body during the entirety of training. - Regularly lubricate the bearing with commercially available grease.
TRANSPORT
-
Due to the heavy dead weight of the device, we recommend asking a 2nd person for help for transporting the device. Proceed as follows: Put one foot on the front pedestal, hold the device by its fixed handle located underneath the training computer, and then tilt the device in such a way, that it slides on the transport roller. When reinstalling the device, put one foot on the front pedestal again and let the device slip to the floor slowly.
-
Caution! The transport rollers can cause scratching or similar on parquet floors or other softwood surfaces. Always place the device on a cloth or mat, and move the device using the cloth/mat. The retailer or manufacturer is not liable for any damage caused by nonobservance!
11. NOTES ON DISPOSAL

Packaging materials are raw materials and can be recycled. Separate the packaging materials and dispose of them properly in the interest of the environment. Your local administration can provide additional information.

Used devices do not belong in household waste!
Dispose of used devices properly! Doing so helps fulfill our responsibility to protect the environment.
Your local administration can provide information on collection points and opening hours.
12.COMPLAINTS & WARRANTY
Please do not hesitate to contact our service team in one of the following ways if you have technical questions, questions about our products or to order replacement parts:
Service time: Monday to Friday, 9 am to 6 pm
Service hotline: +49 (0)40 - 780 896 - 35*
Email: Service@SportPlus.org
URL: http://www.SportPlus.org
- German national fixed-line network, call charges depend on your phone company/your phone contract.
Please have the following information at hand when you call.
- Operating instructions
- Model number (located on the title page of this manual)
Description of accessory parts - Accessory number
Proof of purchase with purchase date
Please note:
Please do not send your product to our service team without being requested to do so. The costs and risk of loss for unsolicited shipments will be borne by the sender. We reserve the right to refuse to accept unsolicited shipments or to return the corresponding merchandise to the sender carriage forward, that is, at the sender's expense.
13. WARRANTY
SportPlus guarantees that the product under warranty has been manufactured from the highest quality materials and has been checked with the utmost care.
The operation and assembly of the product according to the operating instructions is a precondition of this warranty. The warranty can be voided due to improper use and/or improper transport of the product.
The term of warranty lasts 2 years, beginning from the date of purchase. If the product you have purchased is defective, please contact our service team within 24 months from the date of purchase. Excluded from the warranty are:
- Damage due to external force.
Interference, repairs or alterations by amateurs and by persons who have not been authorized by us. - Failure to observe the operating instructions.
- If the afore-mentioned warranty terms are not met.
- If the defect was caused by improper use or maintenance, neglect or accidents.
- Wear and consumables - such as bearings and pads - are also excluded from the warranty.
This product is intended for private use only. There is no warranty for commercial use.
Chere clientele,
Cher client,
INFORMATIONS SUR LE PRODUIT
Dimensions (L× I× H) :env. 103× 52× 141cm
ATTENTION -DOMMAGES AU PRODUIT!
PROGRAMME 1 - PROGRAMME MANUEL
PROGRAMMA 1 - PROGRAMMA MANUALE
PROGRAMMA P23 - PROGRAMMA WATT
PROGRAMA 1 - PROGRAMA MANUAL
PROGRAMAS P23 - PROGRAMA WATT
WATT=Torque (KGM) RPM 1.03
(Call charges depend on your phone company / your phone contract.)
E-Mail: service@sportplus.org
URL: http://www.sportplus.org
FR
Service hotline: +33 - 176 361 493