SP-HT-2700 - Exercise bike SportPlus - Free user manual and instructions
Find the device manual for free SP-HT-2700 SportPlus in PDF.


User questions about SP-HT-2700 SportPlus
0 question about this device. Answer the ones you know or ask your own.
Ask a new question about this device
Download the instructions for your Exercise bike in PDF format for free! Find your manual SP-HT-2700 - SportPlus and take your electronic device back in hand. On this page are published all the documents necessary for the use of your device. SP-HT-2700 by SportPlus.
USER MANUAL SP-HT-2700 SportPlus
natural_image
Exterior view of a silver stationary exercise bike with adjustable arms and legs (no text or symbols visible)
sportplus _+
text_image
Technical diagram of a stationary exercise machine with numbered parts for identification- TEILELISTE
natural_image
Pure technical line drawing of a mechanical key or tool without any text, numbers, or symbolsB
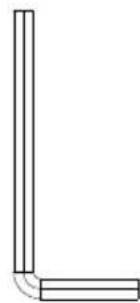
natural_image
Simple line drawing of a right-angle corner with two parallel bars and a curved arrow indicating angle (no text or symbols)5. MONTAGEHINWEISE
text_image
Technical diagram of a stationary exercise machine with numbered components for identificationSCHRITT 1:
text_image
Technical diagram of a stationary exercise machine with labeled parts and directional arrows indicating motion or assembly.SCHRITT 5:
text_image
Technical diagram of a stationary exercise machine with labeled parts including 11, 12, and 13.SCHRITT 6
natural_image
Line drawing of a seated human figure in profile, no text or symbols presentnatural_image
Line drawing of a person in a seated posture, no text or symbols presentCongratulations for choosing a SportPlus product. We have every expectation that you will be fully satisfied with your new purchase.
To guarantee optimal function of this product, please adhere to the following instructions: Before using this product for the first time, please read the manual carefully!
The product has been designed with safety features.
Nevertheless, please read the safety instructions carefully and use the equipment only as described in the manual to avoid hazards and personal injury.
Please retain this manual for future reference.
Should you pass on this product, ensure to include the corresponding instruction manual.
TABLE OF CONTENTS
-
TECHNICAL DATA....30
-
SAFETY INSTRUCTIONS 30
-
EXPLOSION VIEW 33
-
PARTS LIST 34
-
ASSEMBLY INSTRUCTIONS 35
-
RESISTANCE ADJUSTMENT KNOB 42
-
OPERATING THE COMPUTER 43
-
TRAINING 46
-
TROUBLESHOOTING - PROBLEMS WITH THE COMPUTER DISPLAY ..... 50
-
MAINTENANCE, CLEANING AND CARE 51
-
DISPOSAL ADVICE....51
-
RECLAMATIONS & GUARANTEES 52
-
PULSE MEASURING TABLE 54
1. TECHNICAL DATA
Product Information
Measurements (L x W x H): 100 x 55 x 126cm
Total weight: approx. 24.5kg
Class: H.C. (Domestic use), EN 957-1, EN 957-5
Maximum user weight: 120kg
Computer Information
Model: LT-9416
Number of batteries: 2
Type of batteries: LR 03, AAA, 1.5V
Computer features: Time, speed, distance, approx. calorie consumption*, pulse, pulse recovery
* this is based on an estimated value, which is determined independently of the preset resistance level.
2. SAFETY INSTRUCTIONS
INTENDED PURPOSE
- The product is intended for domestic use only and is not suitable for medical or commercial use.
• The maximum permissible weight of a person using this product is 120kg.
DANGER FOR CHILDREN
- Batteries can be extremely dangerous if swallowed. Therefore store batteries out of the reach of children. If a battery has been swallowed, immediately contact a doctor.
- Children do not recognize the danger connected with handling the product. Keep it away from children. The product is not a toy. The product should be stored in a place out of the reach of children and pets.
- Parents and other responsible adults should be aware of the fact that due to the natural play instinct and the experimental nature of children, situations and behaviour can be expected to occur, which are not suitable for the construction of this training device.
- Do not leave children unsupervised with this equipment. A responsible adult should make the appropriate equipment adjustments and supervise activity at all time.
- Please make sure that children do not play with the packaging material. There is a danger of suffocation!
CAUTION – RISK OF INJURY
- Do not use the product if it is damaged or defective. Should this be the case, please consult a qualified technician or our service centre.
- Check this product prior to each use for soundness. Defective parts should be repaired or replaced immediately, otherwise they may affect the function and safety of the machine.
• This equipment is not to be used by more than one person at a time. - Only use this product on flat, non-slip solid surfaces. Do not use it near water and always allow sufficient surrounding space of at least 1 metre for safety reasons.
• Make sure that your arms and legs are not in the proximity of the movable parts. - Do not insert any materials in the existing openings of the product.
CAUTION - DAMAGES TO PRODUCT COULD OCCUR
- Please do not attempt to alter or modify the product in any way. Only use original spare parts. Repairs should only be carried out by qualified technicians repairs could put the user at risk. Use this product only for the intended purposes as described in this manual.
- Protect this product from splashes, humidity, high temperatures and direct sunlight.
ADVICE WITH REGARD TO BATTERIES
- Remove the batteries if they are empty or if you do not use the product anymore. In this way you will avoid damages that can be caused by leaking.
- The batteries must not be charged or activated with other means, dismantled, thrown into fire or short-circuited. There is a DANGER OF EXPLOSION!
- Use preferably alkaline batteries since they last longer than regular zinc-carbon batteries.
- A battery replacement is necessary as soon as the display starts to fade or is completely faded. Always replace all old batteries with new ones and make sure that the batteries are inserted with the correct polarity.
ADVICE FOR ASSEMBLY
- The product should be carefully assembled by a responsible adult. In cases of doubt, please consult a technically qualified person.
- Before commencing with assembly, read the safety and assembly instructions carefully.
-
Remove all packaging materials and lay out all the parts. This will give you an overview and simplify assembly. If possible, use an underlay to protect the assembly space from dirt and scratches.
-
Use the "Parts List" to ensure that no parts are missing. Dispose of all packaging materials first when the assembly is completed.
- Please bear in mind that there is always a risk of injury when using tools for technical work. Therefore, proceed carefully and cautiously when assembling this product.
• To avoid danger, please keep the working area clear of tools. Dispose of all the packaging materials in such a way that danger can be avoided. Foils and plastic bags are potentially hazardous to children (danger of suffocation)!
• After you have assembled the product according to the instructions, ensure that all screws, bolts and nuts are correctly affixed and tightened. - If needed, place a protective mat (not supplied) under the product in order to protect the floor, since e.g. the rubber feet might leave marks.
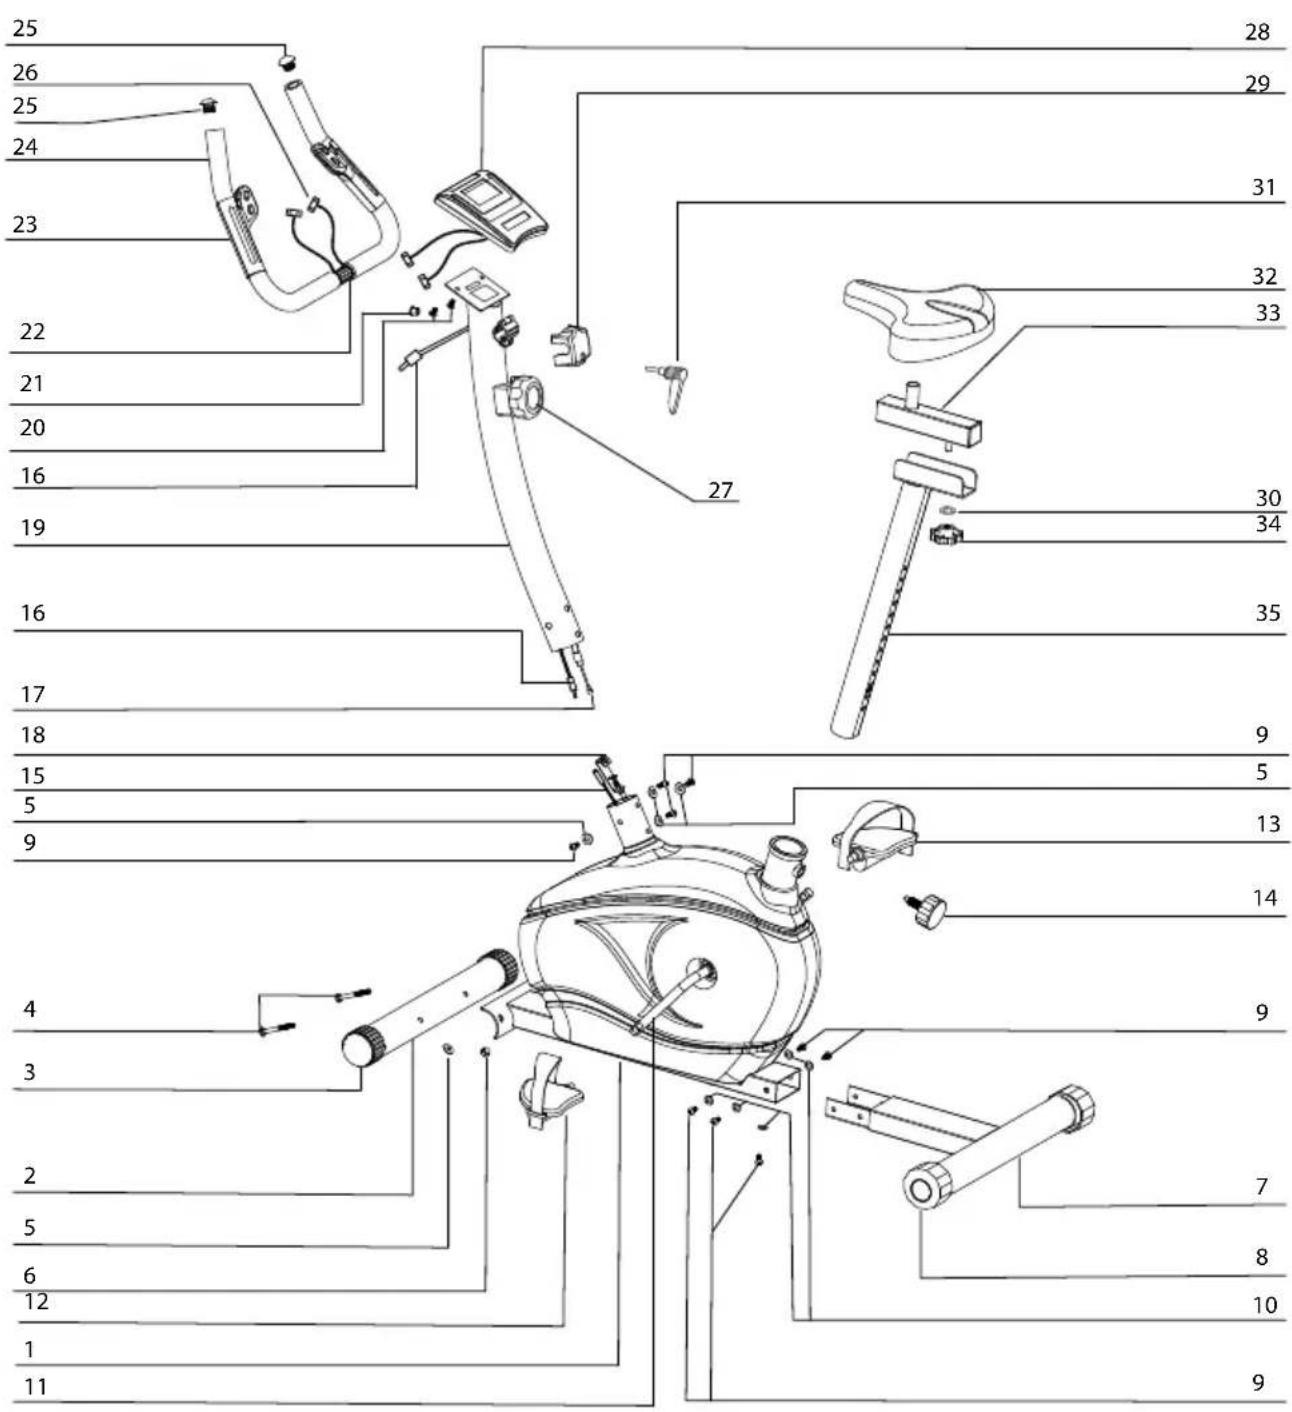
3. EXPLOSION VIEW
text_image
Technical diagram of a stationary exercise machine with numbered parts for identification- PARTS LIST
| 1. Main frame 1 | |
| 2. Front stabilizer 1 | |
| 3. End cap with casters (front) 2 | |
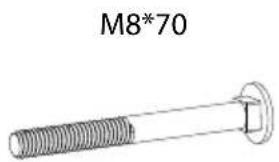
| 4. Bolt screw M8*70 2 | |
| 5. Curved washer ø20*ø8.5 6 | |
| 6. Domed nut M8 2 | |
| 7. Rear stabilizer 1 | |
| 8. Floor levelling end cap (rear) 2 | |
| 9. Allen key bolt M8*15 9 | |
| 10. Washer ø20*ø8.5 5 | |
| 11. Crank arm 1 | |
| 12. Pedal (left) 1 | |
| 13. Pedal (right) | 1 |
| 14. Adjustment knob M16 | 1 |
| 15. Lower computer wire | 1 |
| 16. Upper computer wire | 1 |
| 17. Upper tension cable | 1 |
| 18. Lower tension hook | 1 |
| 19. Front handle bar tube | 1 |
| 20. Screw M5*10 (located on computer's rear) | 2 |
| 21. Stopper ø13 | 1 |
| 22. Handle bar | 1 |
| 23. Pulse sensor | 2 |
| 24. Handle bar foam grip | 2 |
| 25. End cap | 2 |
| 26. Pulse sensor wire | 1 |
| 27. Resistance adjustment knob | 1 |
| 28. Computer | 1 |
| 29. End cover | 1 |
| 30. Washer ø 20*ø10.5 | 1 |
| 31. Handle bar adjustment knob | 1 |
| 32. Saddle | 1 |
| 33. Saddle support | 1 |
| 34. Adjusting knob M10 | 1 |
| 35. Seat pillar | 1 |
natural_image
Technical drawing of a bolt with threaded shaft and flange (no text or symbols)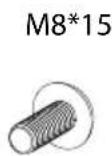
2010.5M8208.5 20*8.5
PARTS AND TOOLS:


A
natural_image
Pure technical line drawing of a mechanical key or tool (no text or symbols)B
natural_image
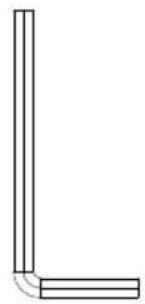
Simple line drawing of a right-angle corner with two parallel bars and a curved arrow indicating angle (no text or symbols)5. ASSEMBLY INSTRUCTIONS
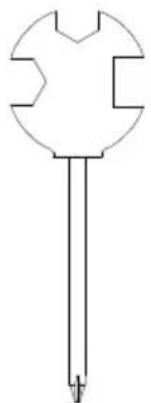
Take all parts out of the packaging carefully and place them on a flat surface. When doing this, use a floor-protecting underlay. Assembly of the individual parts should be carried out by 2 people!
Before assembly, check the parts list to see whether all parts are present. Some parts have already been pre-assembled to simplify the assembly process for you. We recommend using the supplied tools to assemble this hometrainer.
text_image
Technical diagram of a mechanical device with numbered parts for identificationSTEP 1:
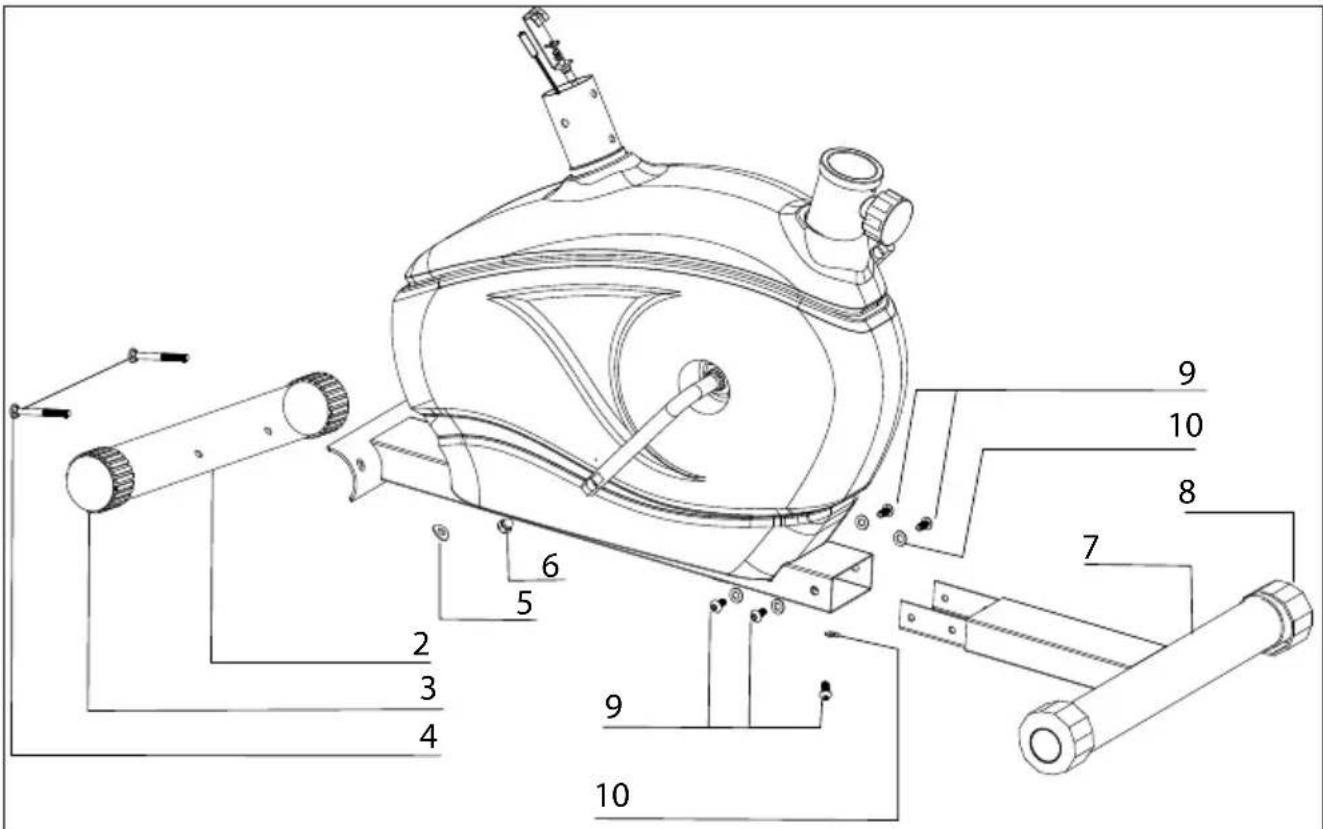
- Attach the front stabilizers (2) to the main frame (1) using 2 sets of M8 domed nuts (6), ∅8 curved washers (5) and M8*60mm bolt screws (4). Slide the rear stabilizer (7) into the main frame (1), making sure the open side of the bracket is facing up, as shown, then fix with 5 ∅20*∅8.5 washers (10) and 5 M8*15mm Allen key bolts (9).
text_image
27 19 17 16 15 18 9 5STEP 2:
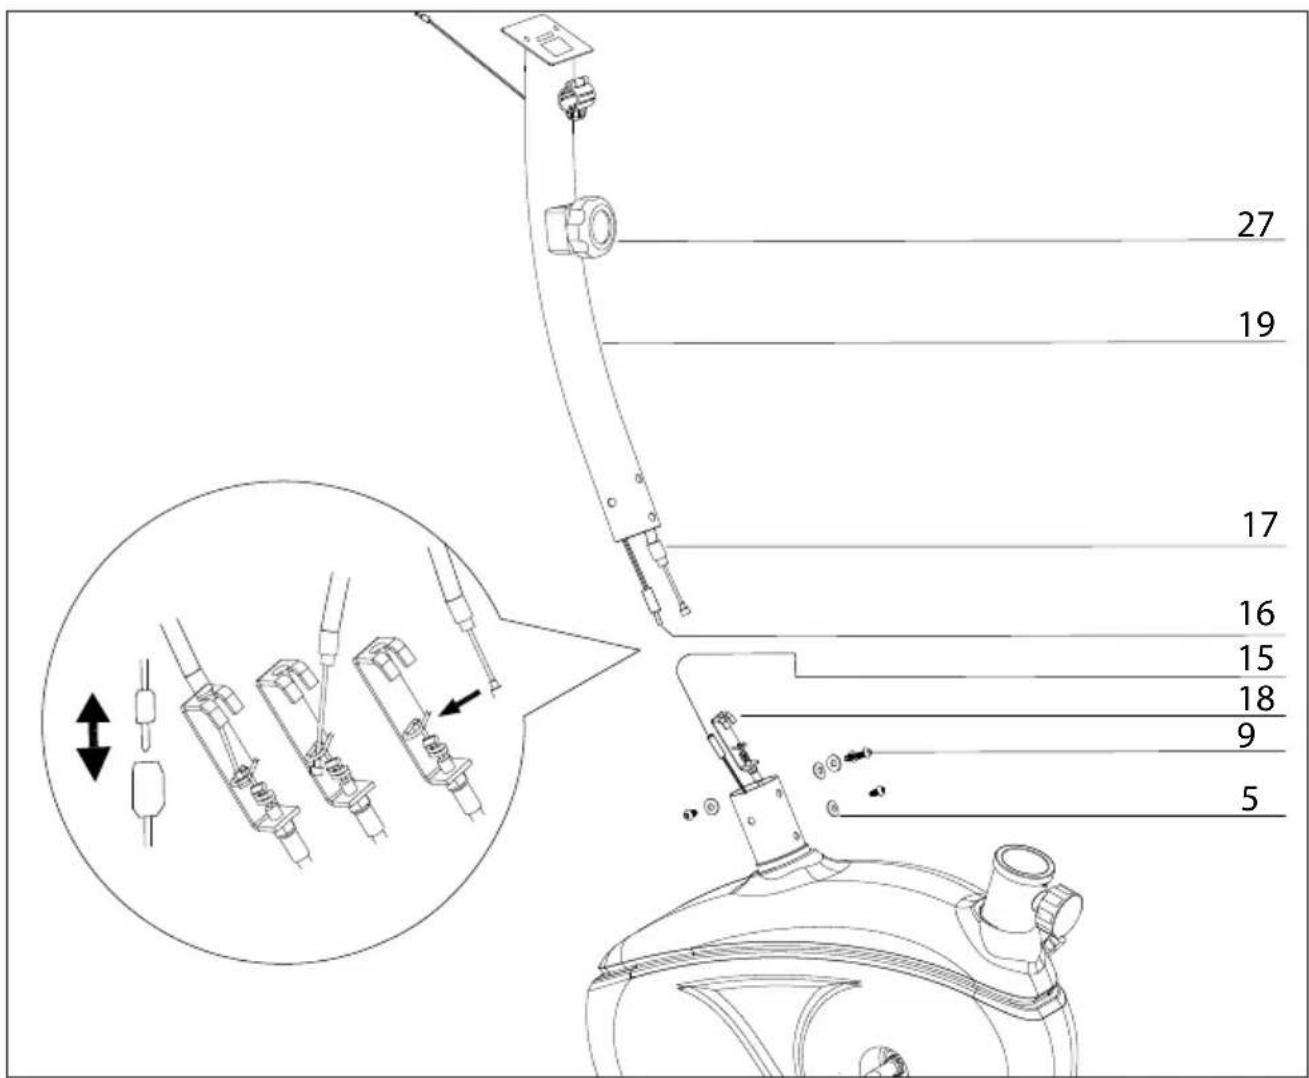
• Take the front handle bar tube (19) and connect the upper computer wire (16) with the lower computer wire (15). Then connect the tension cable (17) to the tension hook (18).
- Slide the front handle bar tube (19) into the housing, then fix it with 4 sets of M8*15mm allen key bolts (9) and ∅8 curved washers (5).
text_image
25 26 25 24 23 22 19 31 29 19STEP 3:
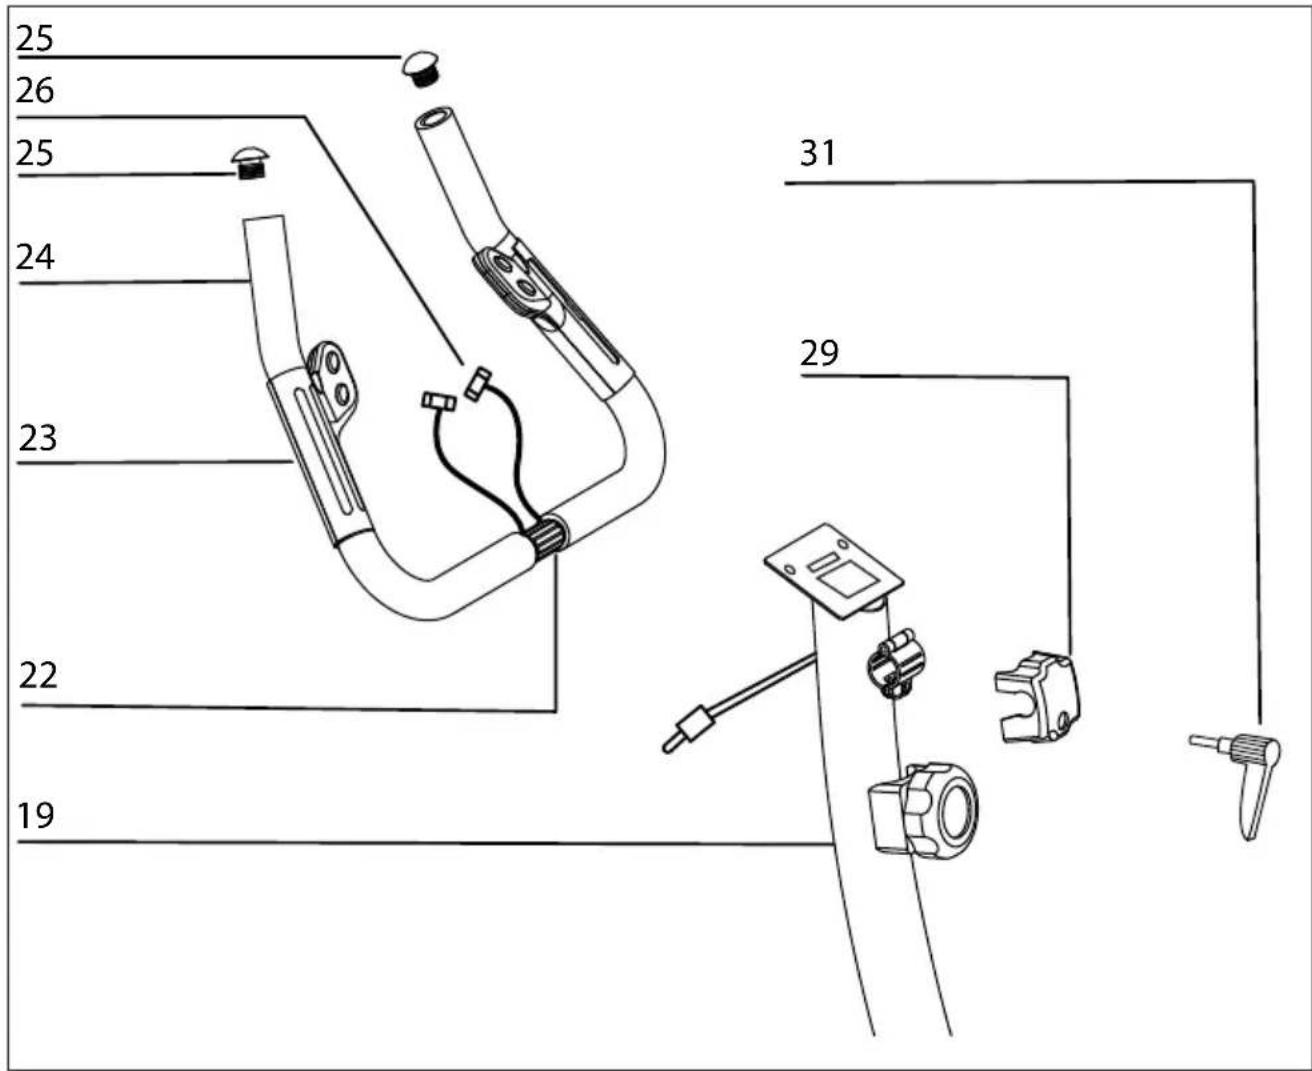
- Attach the handle bar (22) to the front handle bar tube (19), and fix it with handle bar adjustment knob (31).
text_image
32 33 30 34 35STEP 4
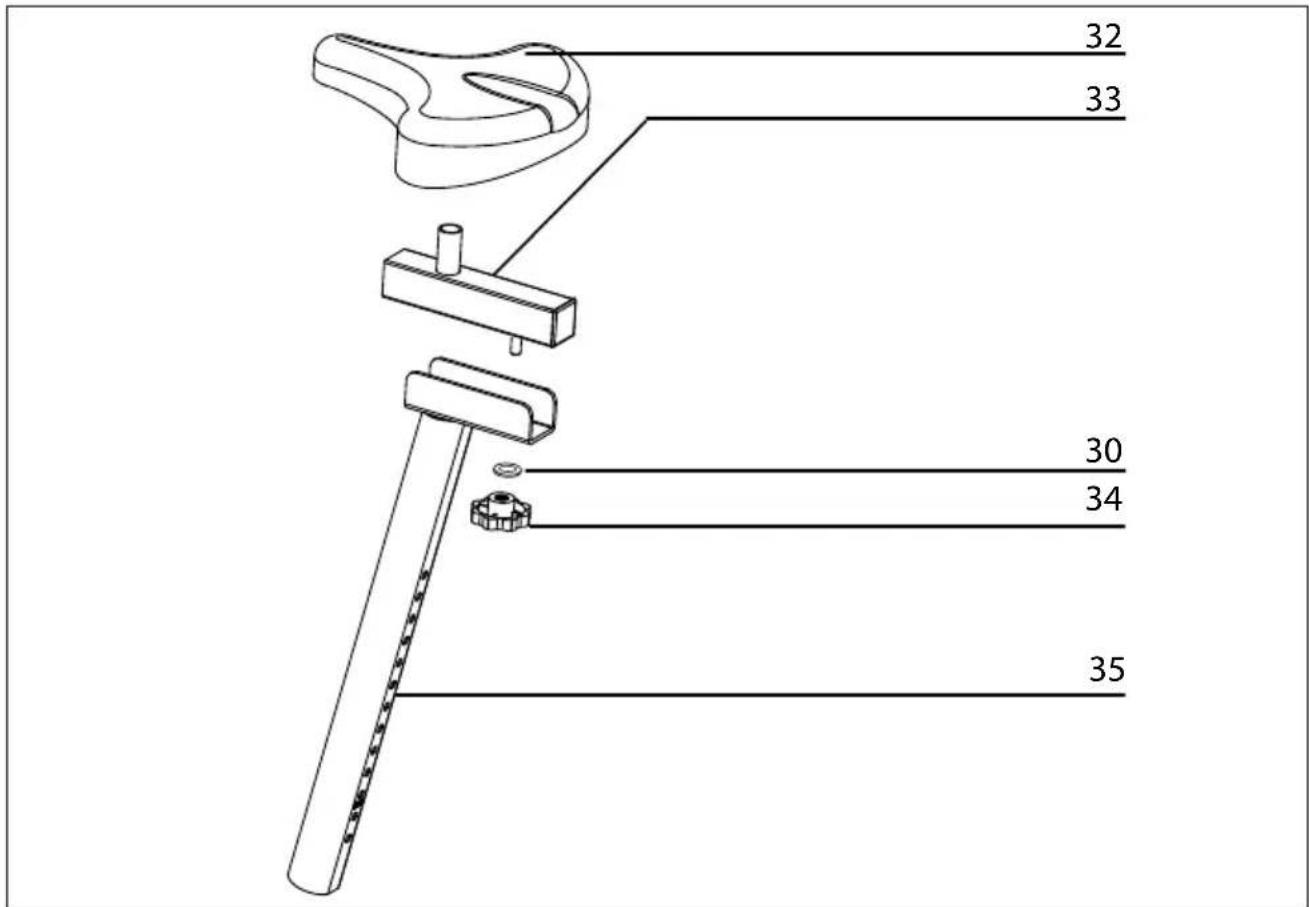
- Attach the saddle support (33) to the seat pillar (35), fixing it with the adjustment knob (34) and washer (30). Attach the saddle (32) to the saddle support (33), and fix it with bolts (attached on saddle, left and right) very tightly. The saddle's (32) position can be optimized to your needs by adjusting the saddle support's (33) inclination and by adjusting its horizontal position.
text_image
Technical diagram of a stationary exercise machine with labeled parts and directional arrows indicating motion or assembly.STEP 5:
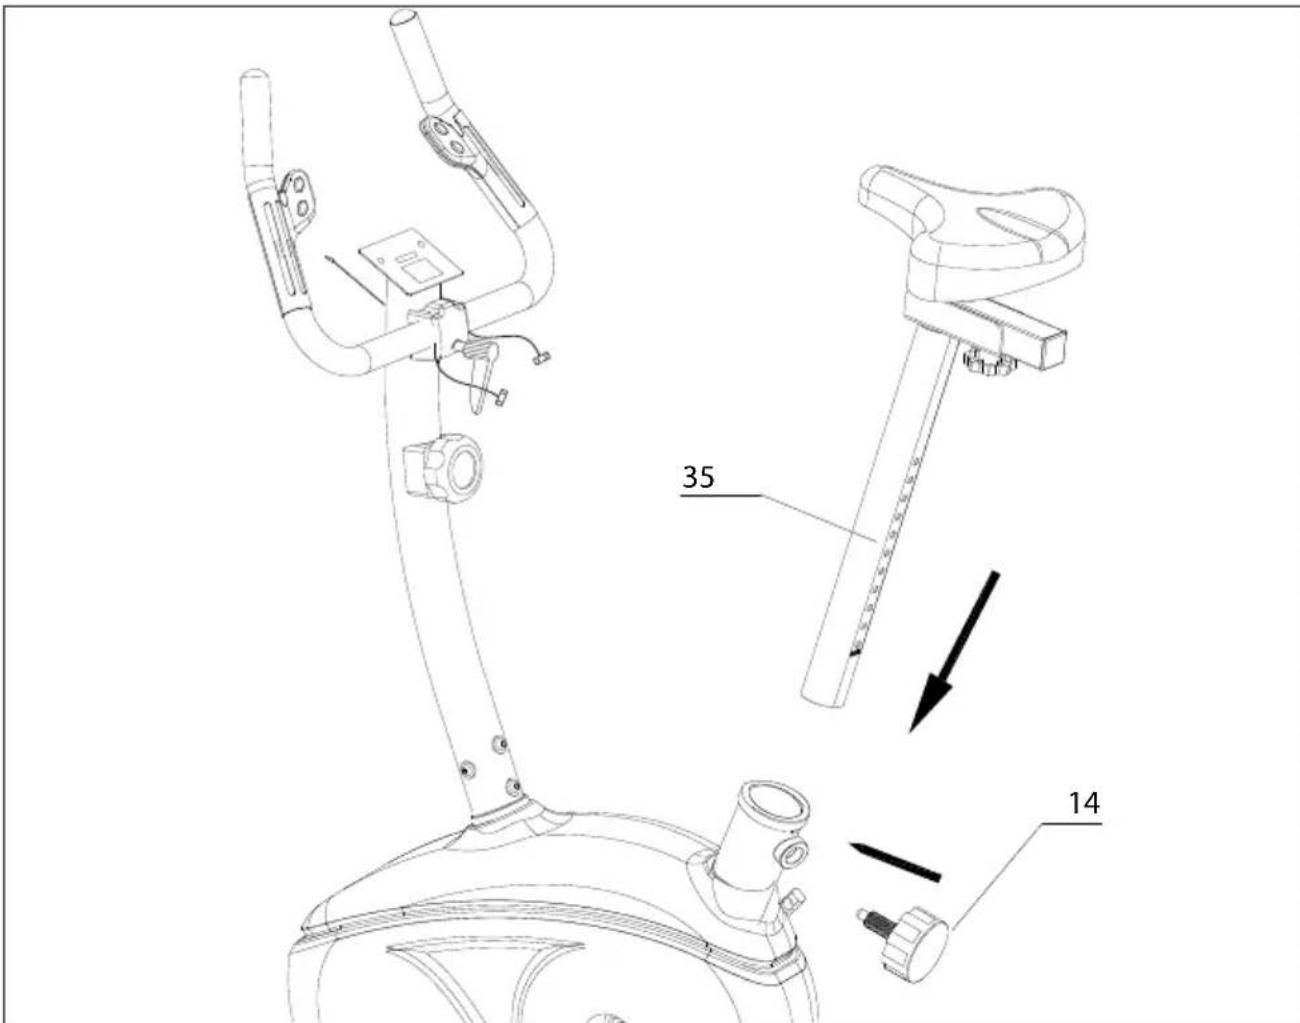
- Insert the seat pillar (35) into the housing and line up the holes (the correct height adjustment can be made when the hometrainer is fully assembled). Secure the seat in position with the adjustment knob (14). Warning! Do not adjust the seat pillar higher than the maximum mark.

text_image
Technical diagram of a stationary exercise machine with labeled parts including 11, 12, and 13.STEP 6
• The pedals (12 & 13) are marked "L" and "R" - Left and Right.
- Connect them to their appropriate crank arms (11). The right crank arm is on the right hand side of the Hometrainer as you sit on it. Note that the right pedal (13) should be threaded on clockwise and the left pedal counter-clockwise.
text_image
28 19 20 16 26STEP 7:
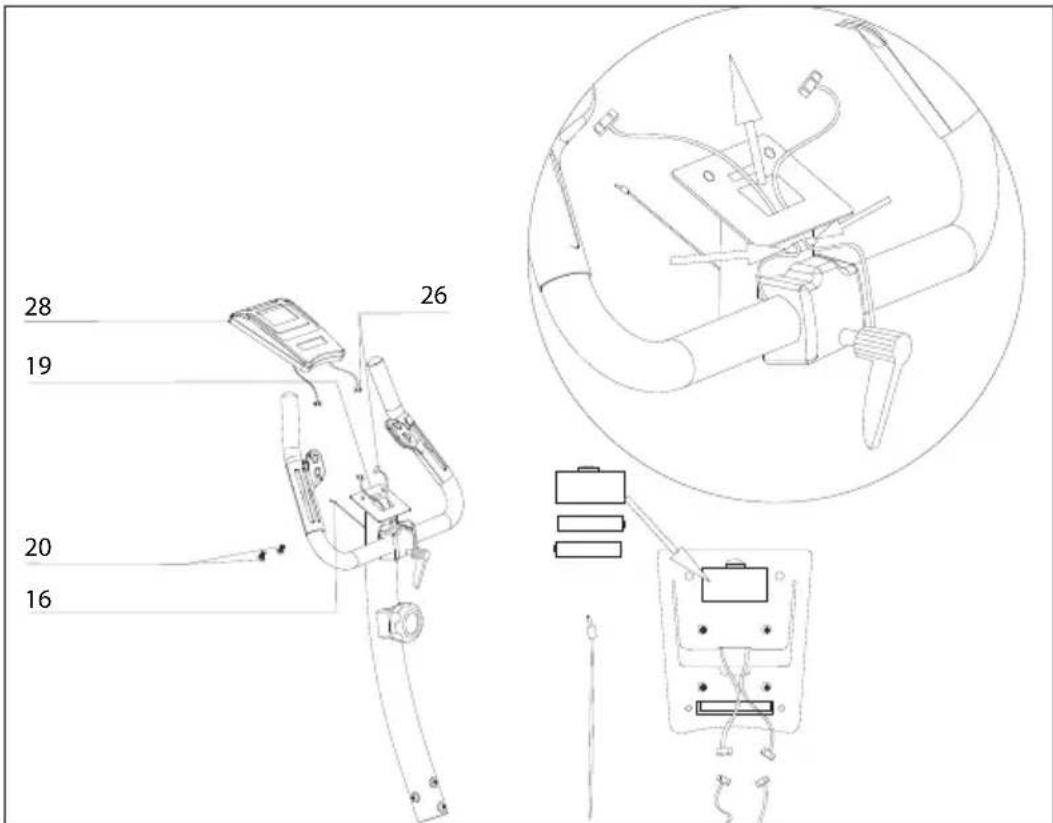
- Lead the pulse sensor cables (16) out of the computer holder, via the hole of the front handle bar tube (19). Connect the pulse sensor cables protruding out of the computer with these pulse sensor cables (26). Both plug sets have a unique fit. However, be cautious not to damage the plugs. Plug the upper computer wire (16) to the back of the computer (28), and then slide the computer (28) onto the computer holder, and fix it with two screws M5*10 (20). The screws have been pre-assembled in the two upper drill holes of the computer holder. Make sure not to pinch or damage any of the cables.
6. RESISTANCE ADJUSTMENT KNOB
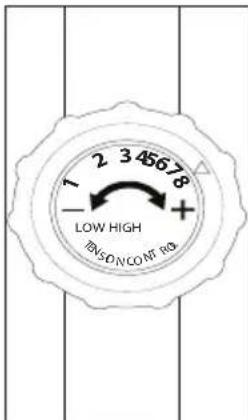
- The resistance adjustment knob (35) is intended to increase or decrease the intensity of the training.
- Turn the resistance adjustment knob (35) clockwise to increase the resistance, and turn it counterclockwise to decrease it. 1 is the setting that offers the lower resistance, whereas 8 is the one with the maximum resistance. Select the correct setting according to your age, weight, health condition and type of training you wish to carry out.
text_image
1 2 3 45678 - + - LOW HIGH INSONCOW ROThe provided training computer is easy to operate during training by using the computer's buttons, or the buttons of the pulse sensors. The individual training values will be shown on the display.
Training time, speed, distance, number of calories burned (approx. amount) and heart rate will be measured from the beginning of training.
- The training computer will turn on when pressing the MODE button or automatically as soon as you begin training.
- The individual training values will be continuously measured, saved and shown on the display.
- To stop the computer, just stop exercising. The computer will save the values that were last displayed on the monitor so that, if you would like to, you can continue that same training session from where you left off.
• After the training has been stopped for approx. 2 minutes, the training computer switches itself off.
text_image
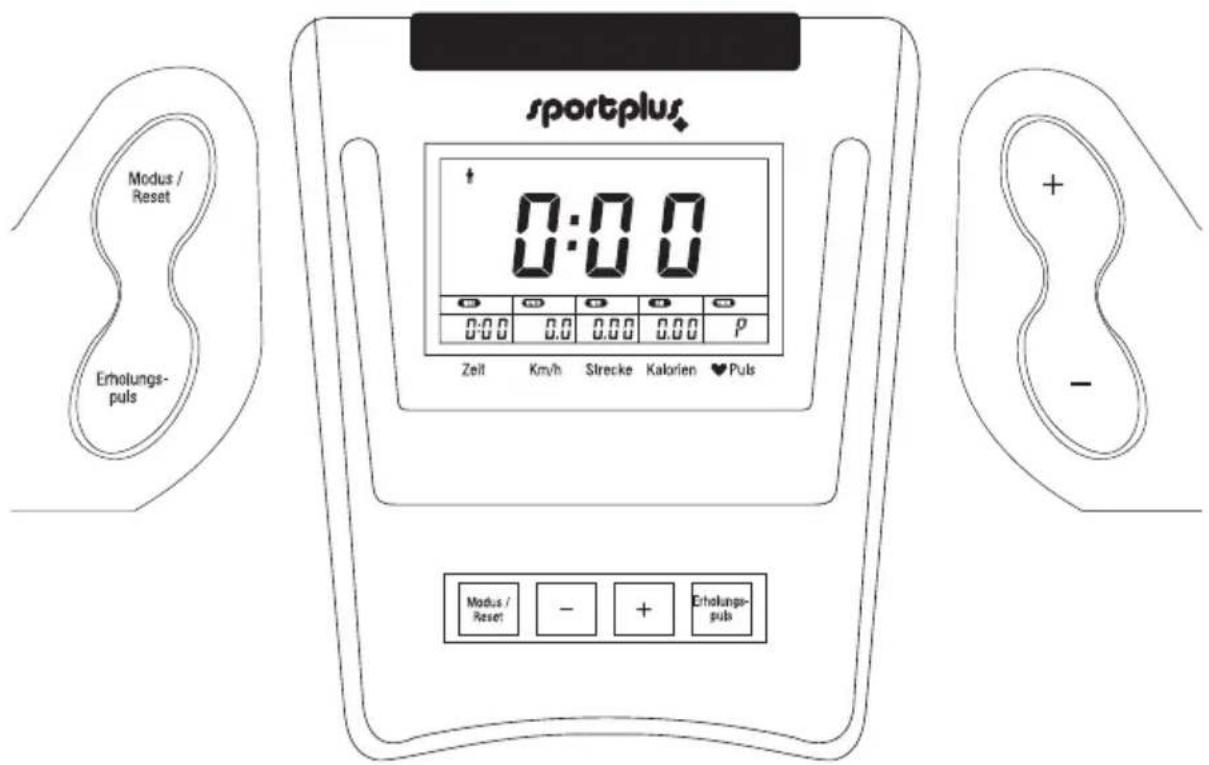
sportplus Modus / Reset Erholungs- puls 0:00 + P Zeit Km/h Strecke Kalorien ♥ Puls Modus / Reset - + Erholungs- pulsCOMPUTER FUNCTION BUTTONS:
MODUS / RESET BUTTON
- By pressing lightly on the MODUS / RESET button, you can switch between the following functions for pre-adjusting the training times: TIME, DISTANCE, CALORIE, PULSE.
- Hold the button down for 2 seconds to reset all the values to zero.
BUTTONS + AND -
- Increase or decrease the setting value by pushing the buttons + or -.
- During training, you may use these buttons to show the desired data in the large display area. You may toggle between time, km/h, distance, calories, and pulse displays.
RECOVERY BUTTON (ERHOLUNGSPULS)
- Press this button to switch to pulse recovery calculation.
DISPLAY FUNCTIONS:
TIME (DISPLAY SHOWS: TIME)
• The overall training time is displayed in minutes and seconds.
• You can enter a preset value for this function by pressing Modus button.
• If a preset time has been entered, the remaining time is shown on the display.
• If the preset time is reached, an audio signal is given.
• Note: The max. shown time is 99.59.
KM/H (DISPLAY SHOWS: SPEED)
• The current measured speed during a training unit is shown in km/h on the display.
• For this function, no preset value can be entered.
• The last measured values are not saved by the computer.
DISTANCE (DISPLAY SHOWS: DIST)
- This function shows the distance of the training unit. For this function, a preset value can be entered with the Modus button.
• After entering the preset distance, the remaining distance is shown on the display.
• If the preset distance is reached, an audio signal is given.
• Note: The max. shown distance is 999.9Km.
CALORIES (DISPLAY SHOWS: CAL)
- With this function the estimated amount of calories burnt in the training unit is shown.
- For this function, a preset value can be entered with the Modus button.
• After entering the preset value, the remaining calories are shown on the display, measured one time per minute.
• If the preset calories are reached, an audio signal is given.
• Note: The max. shown calories are 999.9 calories.
PULSE (DISPLAY SHOWS: PULSE)
• The current measured function is shown in heartbeats per minute.
- For this function it is possible to preset a target pulse rate by pressing the Modus button. If the preset pulse rate is exceeded, the pulse display starts blinking.
- To measure the heartbeat: Hold both pulse sensors (23) with both hands at the same time to start measuring.
• Make sure you are holding the sensor surfaces in the middle of your palm.
• Note: The max. pulse rate is 220 heartbeats per minute.
SCAN FUNCTION
• The training computer automatically changes the shown values in the big display.
- If you have preset a value the training computer will automatically change back to scan mode after 10 seconds after last entry.
PRESET TIME, DISTANCE & CALORIES
- You can preset your exercise goal for the following functions: TIME, DISTANCE and CALORIES.
- Press the MODUS / RESET button repeatedly, until the a dot appears in front of the icon to be preset.
- Choose the training goal by pressing the buttons + or – and confirm by pressing the MODE / RESET button.
- As soon as the speed sensor receives any signal input, the display will start to count down. After reaching the training goal, the computer will give an audio signal. Press any button to stop beeping.
- If no training goal has been preset, the display will start to count up as soon as the speed sensor receives an input signal.
PRESET YOUR T.H.C.: TARGET HEART RATE
- Press the MODUS / RESET button repeatedly, until a dot appears in front of the PULSE display.
- To set a target pulse rate, press the buttons + or - to set the desired value and confirm by pressing the MODE / RESET button.
- Place the palms of your hands on both sensors for accurate reading during the exercise.
• After reaching your pulse target, the pulse display starts blinking. You should now reduce your speed or the selected resistance until your heartrate is below your target and the display stops blinking.
Note:
If no pulse signal is received within 16 seconds the display will indicate "P".
PULSE RECOVERY
This function analyzes your pulse recovery at the end of the exercise. This will be indicated with a value ranging from F1.0 (best recovery) to F6.0 (worst recovery) with 0.1 increments in the first left square of the lower display. The peak heart beat will be indicated in the second right square of the lower display.
• To activate the function press the ERHOLUNGSPULS button directly after finishing the exercise, and grip with puls sensors with the palms of your hands.
• The test will last 1 minute and the result will be shown on the display.
• To quit the pulse recovery mode press the ERHOLUNGSPULS button again.
ENDING THE TRAINING
If the computer does not receive a signal for approx. 2 minutes, then it switches itself off. When you begin to exercise or press a button, the computer switches on again.
8. TRAINING
TRAINING TIPS
All recommendations in this manual are only intended for healthy persons and not for persons with heart/cardiovascular problems!
All tips are only rough suggestions for a training program. If necessary, consult your doctor for corresponding tips with respect to your personal requirements.
The following pages will explain exactly how to operate your new training device and will illustrate the fundamentals of fitness training. In order to reach your desired training goal, it is imperative to inform yourself about important points for creating a training program in general and about the exact way to operate your Hometrainer using this manual as a guide. That is why we ask you to please read all of the points listed here thoroughly and to pay close attention to them.
DESIGNING A TRAINING PROGRAM
In order to reach noticeable physical and health improvements, the following factors have to be considered before determining the necessary training effort.
1. INTENSITY
The level of physical strain during training must exceed the normal burden without reaching a point of breathlessness or exhaustion.
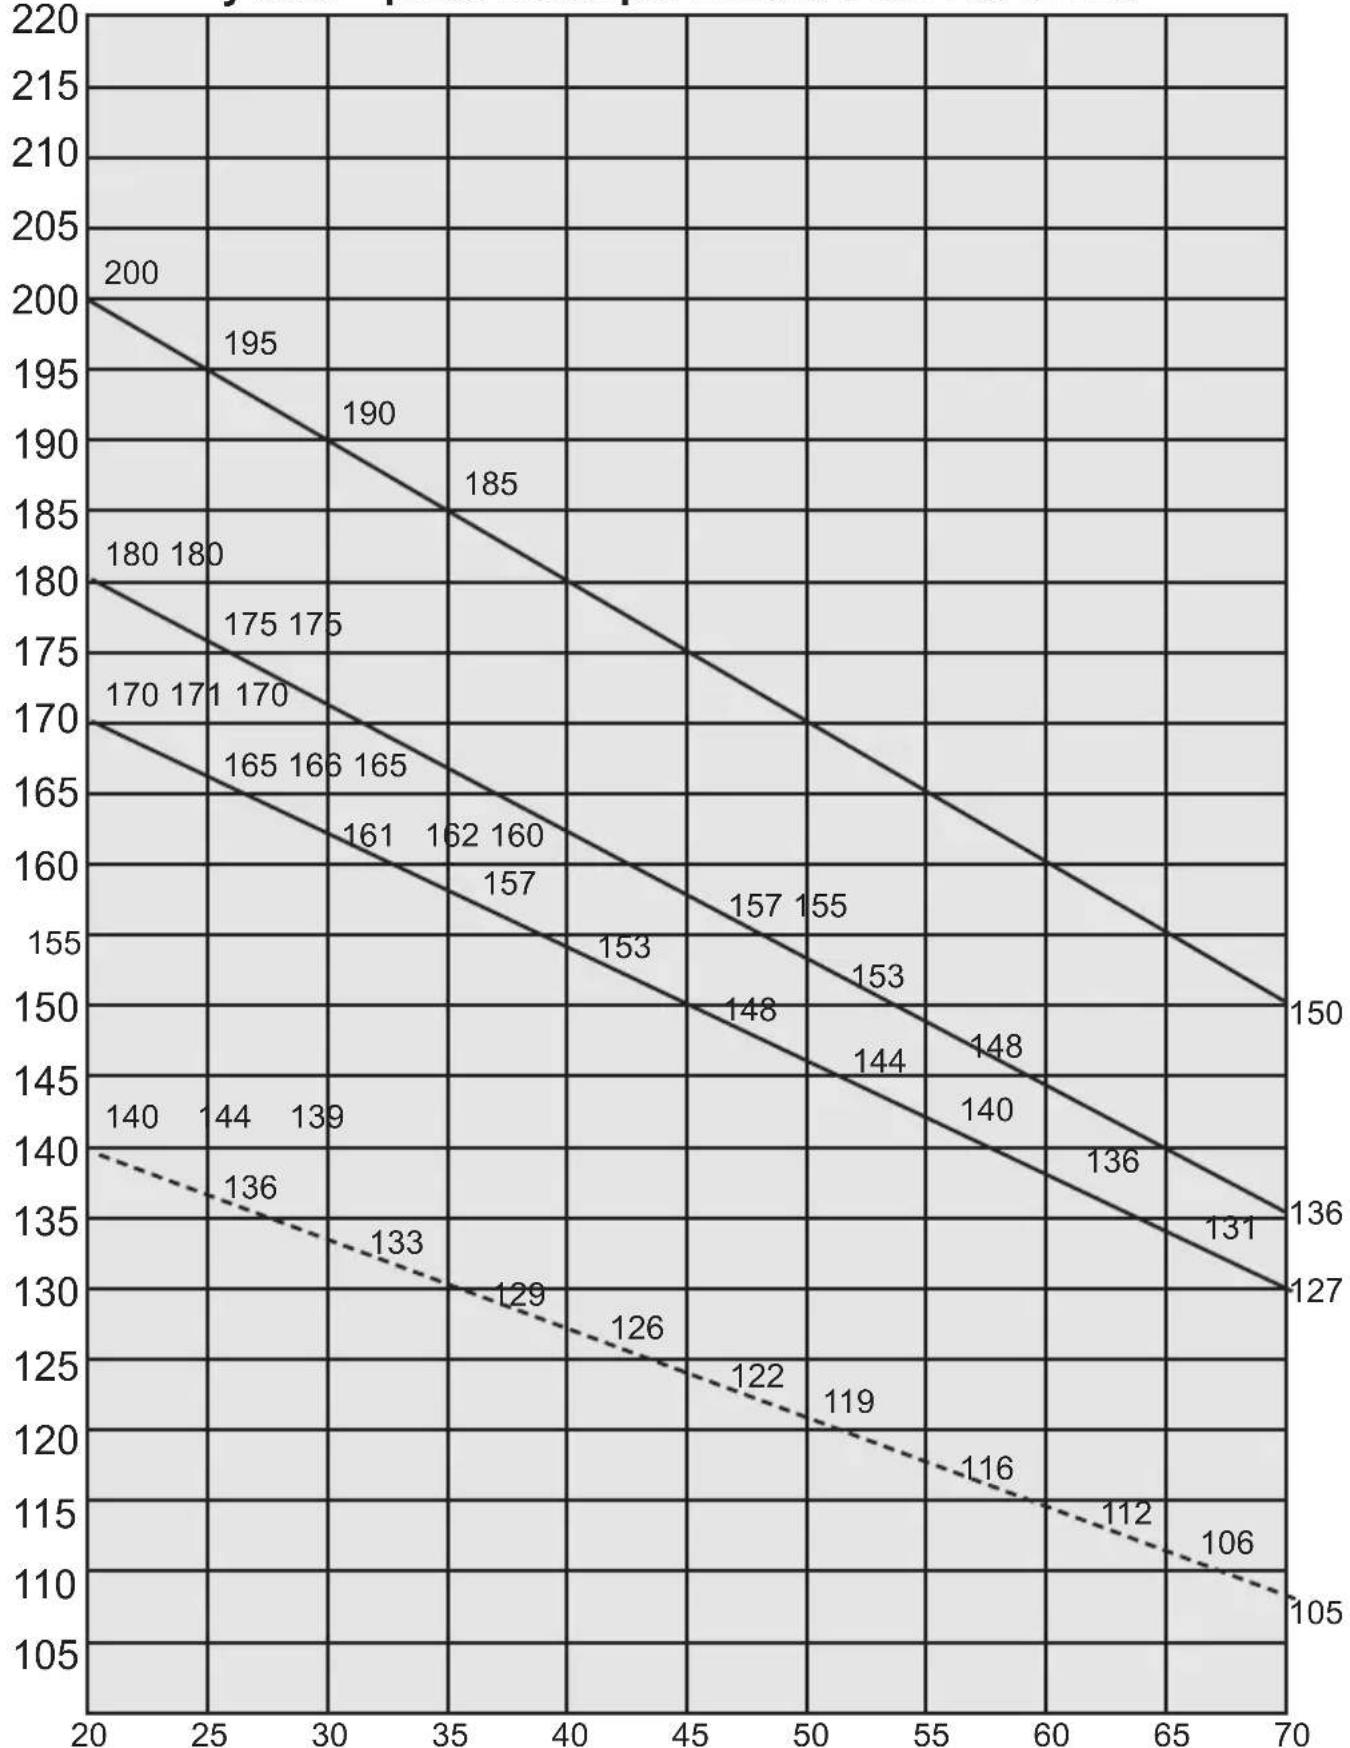
A suitable guideline for effective training is your pulse. During training, it should be at a level between 70% and 85% of your maximum pulse. (For determination and calculation thereof, see 13. PULSE MEASURING TABLE).
During the first week, your pulse should remain in the lower 70% of your maximum pulse during training. Over the course of the following weeks and months, your pulse frequency should slowly increase to the upper level of 85% of your maximum pulse. The better your physical condition gets, the more your training efforts must be increased. This can be achieved by increasing the training duration and/or increasing the difficulty level.
If you would like to measure and monitor your pulse frequency manually in addition to the measurements carried out by the training computer on the Hometrainer, you can use the following methods:
a) Pulse control measurement in the usual manner (feeling your pulse on your wrist for example and counting the beats within one minute).
b) Pulse control measurement using suitable and calibrated pulse measurement devices (available in a medical supplies store).

WARNING!
The pulse rate monitoring systems may be inaccurate. Over exercise may result in serious injury or death. If you feel faint stop exercising immediately.
2. FREQUENCY
Most experts recommend a combination of health-conscious nutrition, which must be adapted accordingly to the training goal, and physical strengthening three to five times per week. A normal adult must train twice per week to retain his/her current level of fitness. In order to improve his/her condition and to change body weight, a person requires minimum 3 training sessions per week.
3. TRAINING PHASES
Each training session should consist of 3 training phases:
• "Warm-up phase",
• "Training phase" and
• "Cool-down phase"
In the "warm-up phase", your body temperature and oxygen intake should slowly increase.
This can be achieved with gymnastic exercise or stretches lasting from 5 to 10 minutes.
A list of exercises for properly stretching leg muscles can be found below.
After the warm-up, the real training should begin (“training phase”). The training intensity should be low for the first few minutes and should then increase to the corresponding training intensity for a period of 15 to 30 minutes. To relieve your circulation after the training phase and to prevent muscle cramps or pulled muscles, you should have a “cool-down phase” after the “training phase”.
During this phase, which should be approx. 5 to 10 minutes long, 30 seconds long stretching exercises and/or light gymnastic exercises should be carried out.
4. MOTIVATION
The key for a successful training program is regularity. You should set a firm time and place for each training day and also prepare yourself mentally for your training session. Only exercise when you are in a good mood and always focus on your goal. With regular training, you will notice daily improvements and how you are approaching your personal training goals.
STRETCHING EXERCISES
The stretching exercises illustrated on the following pages are suitable for the warm-up and the cool-down phases. Please note that in the warm-up phase, the stretches should only be held briefly (approx. 5 to 10 seconds) and should then be relaxed again. This should increase muscle tension and prepare the muscle for the approaching training phase. In the cool-down phase, the stretches should be held longer (at least 30 seconds) in order to decrease muscle tension again after the training demands. As rule of thumb, never complete all stretches to the extreme. Should you feel pain, stop the stretch immediately and try it again a bit later, but less intensively.
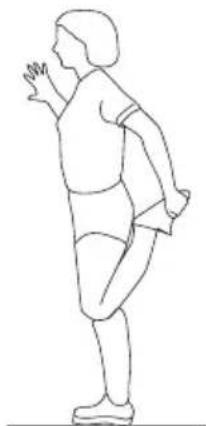
EXERCISE 1: STRETCHING THE QUADRICEPS (FRONT THIGH)
Support yourself on the wall with one hand and grasp one foot with the other one as illustrated and guide it into the front thigh stretching position. To do this, pull the heel of the grasped foot as far as possible towards your buttocks (without feeling pain). Depending on the phase, hold this stretch for approx. 5-10 seconds (warm-up) or approx. 30-40 seconds (cool-down) and then repeat with the other foot. Repeat this stretch at least twice per side.
natural_image
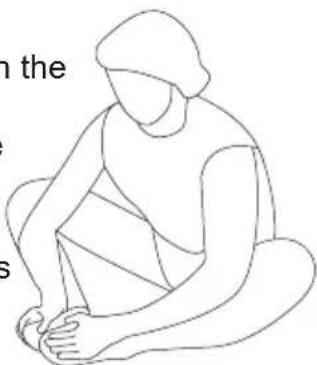
Line drawing of a human figure in a standing pose, possibly dancing or stretching (no text or symbols)EXERCISE 2: STRETCHING THE INNER THIGH
Sit on the floor and bring the soles of your feet together. In the process, pull your heels as far as possible towards you and then carefully push your knees down towards the floor. Do not use force and never push your knees down with your hands! Only stretch as far as you can without feeling pain. Depending on the phase, hold this stretch for approx. 5-10 seconds (warm-up) or approx. 30- seconds (cool-down). Repeat twice.
natural_image
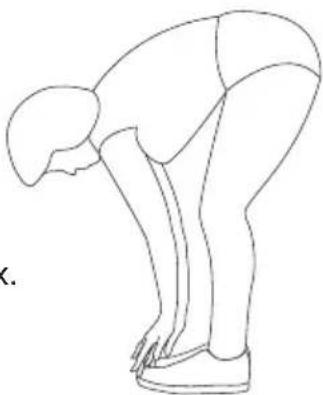
Line drawing of a seated human figure with hands on knees, no text or symbols presentEXERCISE 3: STRETCHING THE CALF MUSCLES AND THE HAMSTRINGS
(Gastrocnemius and biceps femoris)
Stand up straight with your feet about shoulder width apart. Now bend over forward at the hips and try to bring your hands as close as possible to your feet (advanced learners can touch their feet without pain). Depending on the phase, hold this position for approx. 5–10 seconds (warm-up) or approx. 30 seconds (cool-down). Repeat twice.
natural_image
Line drawing of a person in a forward bend yoga pose (no text or symbols)EXERCISE 4: STRETCHING THE HAMSTRINGS
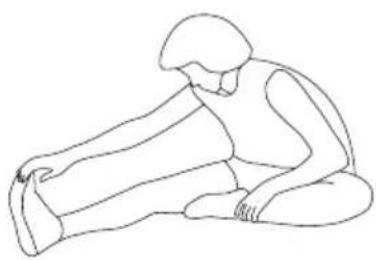
Sit on the floor and bend one leg as illustrated and straighten the other one out. Bend forward and try to guide your hand on the side of the straight leg as far as possible towards your foot without pain. Here, advanced learners can touch their foot and can even pull their toes back to stretch their calves as well. Depending on the phase, hold this stretch for approx. 5-10 seconds (warm-up) or approx. 30 seconds (cool-down). Repeat this stretch at least twice per side.
natural_image
Line drawing of a person in a seated posture, no text or symbols presentBASICS ON TRAINING
These are very general tips on training, they have no medical value and their only purpose is to provide you with basic knowledge about different kinds of training. For a personal detailed training program please consult specialists. People that have heart problems or suffer from any kind of conditions, that might be worsened by unusual or not taylored training programs or activities, MUST consult their physicians before approaching any kind of training.
When training people have different goals. Some can be pushed by the desire of toning their muscles whereas some seek a way to improve their body shape and general health. Muscles respond to stimuluses and, simply put, the higher the stimulus the stronger the response. In layman words this means that when a muscle is required to make a great effort, it will grow in size, so to be able to face the same effort in the future. Opposedly when muscles are required to do very long sessions they tend to decrease in size so in order to be able to sustain the effort for an extended time.
When training, people need to set their goals, and then strongly commit to these very goals.
Losing weight
In order to lose weight it's necessary to burn fat. Our body starts burning the fat that is stacked up all over it only when the very last reserve of sugar has been used. A long training is intended to first burn all the sugar that is in your blood and only afterwards burn the fat. Pedaling for 30, 40 minutes (longer if the last meal before the training was excessively rich) setting the resistance adjustment knob (36) at a very low level (from 1 to 4) should be enough to start this process.
Toning muscles
In order to tone muscles you have to have them work hard. Set the resistance adjustment knob (36) at a very high level (from 5 to 8) and push hard on the pedals.
An interesting variation is the training in intervals. This training method alternates very brief efforts at a very high intensity to very long efforts at a very low intensity. This roughly combines the benefits of the “Toning muscles” and “Losing weight”.
9. TROUBLESHOOTING – PROBLEMS WITH THE COMPUTER DISPLAY
"No function values are displayed. Only the pulse display works"
This could mean there is a defect in the transmission between the Hometrainer and the computer. Check to see that all wires are properly connected to one another and that all wires are not damaged.
"The pulse display does not work anymore / always displays zero".
If all other computer function values are being displayed, then the problem is either the hand sensor or the wire connection of the sensor to the computer. Check to see that all wires are properly connected to one another and that all wires are undamaged.
TROUBLESHOOTING
| Problem Solution | |
| No computer display. Replace the computer's batteries by new batteries. | |
| Erroneous computer display. | - Check cables leading towards the computer.- Remove and reinsert batteries after one minute. |
| Pedal resistance does not change. | Check connection of tension cable (17) and tension hook (18) (Assembly: Step 2). Both tension cables need to be able to move by about 1cm whilst the resistance knob is set from 1 to 8. |
| No pulse display ("P" shown in display). | Check the cable connection leading towards front handle bar tube. |
| Pulse display data imprecise. | Moisten your palms a little, and clasp the contacts with equal force – measuring pulse data via hand contacts will not be as precise as measuring with a chest belt. For precise measurements, use a pulse monitor watch. |
10. MAINTENANCE, CLEANING AND CARE
• After the assembly and before using the Hometrainer, always make sure that all bolts/nuts are fully and correctly tightened.
- Once every so often, clean the Hometrainer with a mildly moisted cloth and a mild detergent. This is especially important for the seat and the handles, for these parts are in constant contact with parts of your body during the whole training.
- Exhausted batteries are hazardous waste, please dispose of them correctly, and do not throw them in normal household trash.
- When eventually you want to dismiss the machine, you should remove the batteries from the computer, and dispose separately as hazardous waste.
CHANGING THE BATTERIES:
If the display gets dim or cuts out occasionally or the pulse rate is not longer accurately measured, the batteries must be replaced.
To do this, open the battery compartment cover on the back of the computer and insert new batteries. Needed are 2x 1.5 V AAA batteries. Always replace all old batteries with new ones and pay attention to install them respecting the correct polarities.
11. DISPOSAL ADVICE

Packaging material and raw materials can be reused.
Separate the packaging correctly and, in the interests of the environment, take it to a suitable recycling depot. More information regarding recycling can be found appropriate administration office.
Old appliances do not belong in household waste!
Dispose of old appliances properly! You are thereby participating in environmental protection.
Your local administration office can inform you regarding collection points and opening hours.
Batteries do not belong in household waste!
As an end user, you are legally required to return discharged batteries.
You can take your old batteries to the public collection points in your community or you can take them to any place where batteries of that type are being sold.
12. RECLAMATIONS & GUARANTEES
In the case of a product defect, please contact our customer service directly. For this purpose, it is recommended that you retain the sales receipt for proof of purchase. Of course our service team is available at any time to assist you with additional questions regarding the assembly, to the use of your SportPlus product as well as regarding the ordering of spare parts.
CUSTOMER SERVICE
For technical questions, information about our products and to order spare parts, our service team is available for you as follows:
Service time: Monday to Friday, 9.00 a.m. to 6 p.m.
Service hotline: 0700 - 77 67 87 587 (12 cent/min from the German network) +41 315500845 (Switzerland) +43 720880801 (Austria)
E-Mail: Service@SportPlus.org
URL: http://www.SportPlus.org
Please ensure that you have the following information ready.
- Operating Instructions
• Model number (located on the front cover of these instructions)
• Description of accessories - Accessory number
• Proof of purchase with purchase date
Important note:
Please do not send your product to our service team without a request for it. The costs and danger of losing a non-requested delivery will be at the expense of the sender. We reserve the right to refuse non-requested deliveries or to send back such packages at the expense of the sender.
TERMS OF WARRANTY
SportPlus guarantees that the product under warranty has been manufactured from the highest quality materials and has been checked with the utmost care.
A prerequisite for the warranty is the operation and proper assembly of the product according to the operating instructions.
Improper use and/or improper transport of the product can result in the warranty becoming invalid.
The term of warranty lasts 2 years, beginning from the date of purchase. Should your purchased product be defective, please consult our customer service team within 24 months (starting at the date of purchase). The warranty cannot be honoured when defects or damages occur as a result of:
• External forceful impacts.
- Tampering, repairs or alterations made by unauthorised or untrained persons in any way.
• The operating instructions not being followed.
• The aforementioned warranty conditions not being followed.
• Incorrect use or maintenance, neglect or accidents.
• The warranty also does not apply to wearing and consumable items.
• Also excluded are wear parts and expendable items (foam, cushioning, bearings).
- This product is intended only for domestic use. The warranty does not extend to equipment used for commercial purposes.
13. PULSE MEASURING TABLE
line
| X | Y | |---|---| | 20 | 200 | | 25 | 195 | | 30 | 190 | | 35 | 185 | | 40 | 165 | | 45 | 153 | | 50 | 148 | | 55 | 144 | | 60 | 140 | | 65 | 136 | | 70 | 131 | | 70 | 127 | | 70 | 126 | | 70 | 122 | | 70 | 119 | | 70 | 116 | | 70 | 112 | | 70 | 106 | | 70 | 105 | The chart displays a single descending linear trend with labeled data points (e.g., '180', '175', '165', etc.) along the diagonal lines.Calculation:
Maximal pulse = 220 - age
90% of the max. pulse = (220 - age) x 0,9
85% of the max. pulse = (220 - age) x 0,85
70% of the max. pulse = (220 - age) x 0,7