SPT110 - Trampoline SportPlus - Free user manual and instructions
Find the device manual for free SPT110 SportPlus in PDF.
| Product Type | Fitness trampoline with handle |
| Brand | SportPlus |
| Model | SPT110 |
| Total weight | Approximately 11 kg |
| Maximum user weight | 130 kg |
| Minimum recommended age | 14 years |
| Intended use | Indoor, private sector, fitness use |
| Jumping surface | Mat with 36 elastic attachment bands |
| Handle | Height adjustable with locking screw |
| Protective cover | Yes, included to cover the mat and springs |
| Assembly | By 2 adults, tools provided |
| Care and cleaning | Clean with a slightly damp cloth and mild detergent |
| Safety | Use on a flat floor, clear space of at least 1 m around, check before each use |
| Spare parts and repairability | Replacement parts available via customer service |
| Warranty | 2 years from the date of purchase |
| Customer service | Email: service@sportplus.org, Tel: +33 176 361 493 |
Frequently Asked Questions - SPT110 SportPlus
User questions about SPT110 SportPlus
0 question about this device. Answer the ones you know or ask your own.
Ask a new question about this device
Download the instructions for your Trampoline in PDF format for free! Find your manual SPT110 - SportPlus and take your electronic device back in hand. On this page are published all the documents necessary for the use of your device. SPT110 by SportPlus.
USER MANUAL SPT110 SportPlus
natural_image
Illustration of a small outdoor doghouse with a woven mesh cushion and a curved top-mounted stand (no text or symbols)sportplus+
DE
GB
FR
IT
ES
PRODUKTINFORMATIONEN
text_image
Technical diagram showing a lever mechanism with labeled parts and directional arrows indicating motion or rotation.natural_image
Simple line drawing of a mechanical setup with a cylindrical component and a lever, showing motion direction (no text or symbols)text_image
Technical diagram of a table tennis setup with labeled parts and an inset showing magnified detail of the handle.natural_image
Line drawing of a rectangular mechanical frame with four legs and a central rod, showing a close-up inset of the top section (no text or symbols)text_image
Technical diagram of a woven mesh device with numbered components and an inset close-up view showing internal structure.
text_image
Technical diagram showing a mechanical clamp or bracket with numbered annotations (9 and 17) indicating parts of the structure.
natural_image
Diagram showing a mechanical clamp or bracket with an arrow indicating rotational motion (no text or symbols present)
natural_image
Diagram of a mechanical clamp or bracket assembly with directional arrows (no text or symbols)
natural_image
Diagram of a rope knot with a hook and directional arrow indicating rotation (no text or symbols)
natural_image
Pure technical line drawing of a mechanical assembly or mounting bracket without any text, numbers, or symbolstext_image
Technical diagram of a mechanical component with numbered parts and an inset close-up view showing internal assembly details.text_image
Technical diagram of a woven mesh structure with numbered components and an inset view showing labeled parts.text_image
Technical diagram of a woven mat device with numbered components and an inset close-up showing internal structure details.natural_image
Technical line drawings of two electronic devices: a rectangular box and a woven-wrapped device with legs and legs (no text or symbols)text_image
Technical diagram of a portable stove with labeled components and close-up views showing internal structure details.text_image
Technical diagram showing a person using a balance scale with numbered instructions and cross-sectional views for testing or maintenance.natural_image
Line drawing of a person performing a jump on a trampoline (no text or symbols)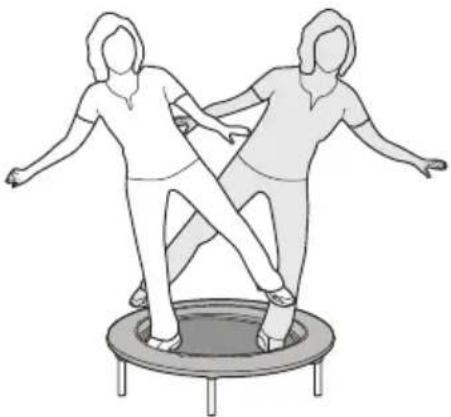
natural_image
Illustration of two people performing a trampoline exercise (no text or symbols)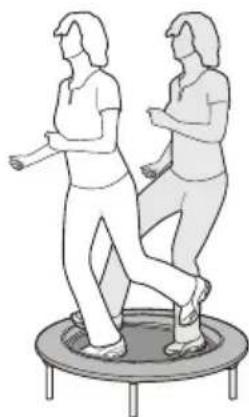
natural_image
Illustration of two people jogging on a trampoline (no text or symbols)
natural_image
Illustration of two people performing a trampoline exercise (no text or symbols present)5. TRAINING, KRAFT
ÜBUNG 5: DAS VORDERE KNIE LANGSAM BEUGEN UND WIEDER STRECKEN.
natural_image
Illustration of two people performing trampoline exercises on circular bases (no text or symbols)
natural_image
Illustration of two people performing a trampoline exercise (no text or symbols)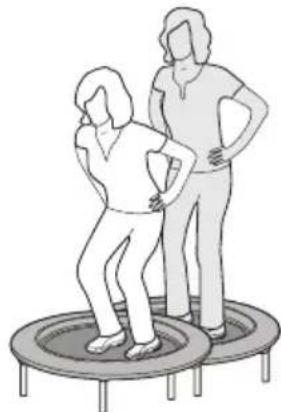
natural_image
Illustration of two people standing on a trampoline (no text or symbols)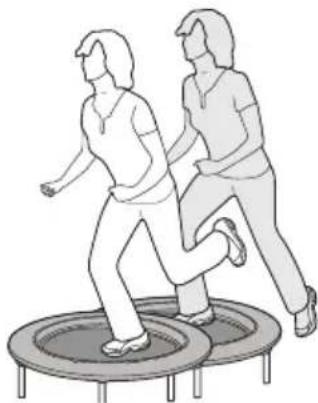
natural_image
Illustration of two people jumping on a trampoline (no text or symbols)5. TRAINING, KOORDINATION
natural_image
Line drawing of a person jumping on a trampoline (no text or symbols)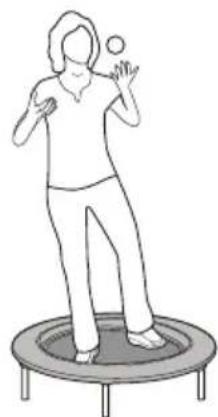
natural_image
Line drawing of a person performing a trampoline exercise (no text or symbols)
natural_image
Line drawing of a person performing a trampoline exercise (no text or symbols)Congratulations for choosing a SportPlus product. We have every expectation that you will be fully satisfied with your new purchase.
To guarantee optimal function of this product, please adhere to the following instructions:
- Before using this product for the first time, please read the manual carefully!
- The product has been designed with safety features. Nevertheless, please read the safety instructions carefully and use the equipment only as described in the manual to avoid hazards and personal injury.
- Please retain this manual for future reference.
• Should you pass on this product, ensure to include the corresponding instruction manual.
CONTENTS
- TECHNICAL DATA....24
- ⚠️ SAFETY INSTRUCTIONS 25
- PART LIST 27
- ASSEMBLY INSTRUCTIONS....28
- TRAINING....39
- MAINTENANCE, CLEANING AND CARE....43
- NOTES ON DISPOSAL 43
- SERVICE AND REPLACEMENT PARTS 44
- WARRANTY 45
1. TECHNICAL DATA
PRODUCT INFORMATION
Dimensions (W x H x D): approx. 111.5 x 124 x 117\~151 cm
Total weight: approx. 11 kg
Maximum user weight: 130 kg
2. SAFETY INSTRUCTIONS
INTENDED PURPOSE
- This product is intended for private indoor use and is not suitable for medical, therapeutic or commercial purposes.
- The maximum permissible user weight for this product is 130 kg.
• The minimum age for using the product is 14 years.
• Supervision by an adult is required.
HAZARD FOR CHILDREN
• Children cannot recognize the hazards that this product may pose. For this reason, keep this product out of the reach of children. The product is not a toy. Store the product at a location out of the reach of children and pets.
- Keep packaging materials out of the reach of children. They pose a suffocation hazard!
- Parents and other supervising persons must be aware of their responsibility, since the natural ludic drive and curiosity of children can cause situations or behaviors, for which the device has not been designed.
- If you allow a child to use the product, do not leave it unattended during use. Make all necessary adjustments to the product yourself and supervise the child during exercise.
CAUTION - RISK OF INJURY
- Do not use the product if it is damaged or defective. In this case, contact a professional workshop or our customer service.
• Always verify that the product is in impeccable condition before use. Defective components must be replaced immediately as failure to do so may impair the functioning and safety of the unit.
• Make sure that no more than one person uses the product at a time.
• Always use the product on a horizontal, level, nonslip and solid surface. Do not use it near water, and keep a distance of 1 meter around the product for safety reasons. Do not put any objects into any openings on the product.
CAUTION - PRODUCT DAMAGE
- Do not alter the product in any way and use only original replacement parts. Have all repairs carried out in a professional workshop or from similarly qualified persons - improper repairs can lead to serious risks for the user. Use the product for the intended purposes as described in this user manual only.
• Shield the product from spraying water, moisture, high temperatures and direct sunlight.
INFORMATION ON ASSEMBLY
- Assembly of the product must be carried out carefully by 2 adult persons.
- Before beginning assembly of the product, read all assembly steps carefully and review the diagram.
- Remove all packaging materials and place all individual components on a free surface. This will give you a good overview and simplify assembly. Shield the assembly surface from filth and scratching by laying down suitable padding.
- Check the components against the components list to make sure all are present. Do not dispose of the packaging materials until assembly is complete.
- Please note that there is always a risk of injury when using tools to carry out manual tasks. Therefore, please exercise caution when assembling this product.
• Make sure your work environment is hazard-free. For example, do not leave any tools lying around. Place the packaging materials somewhere where they will not pose any hazards during assembly. Packaging foil or plastic bags pose a suffocation hazard for children!
• After having assembled the product based on the operating instructions, make sure all screws, bolts and nuts have been installed and tightened properly and all frames are connected correctly.
• Install the trampoline on a flat, horizontal and solid floor before use.
- Do not install near other free-time equipment or structures.
- If necessary, lay out protective padding (not included) beneath the product to protect your floor as there is no guarantee that, for instance, the rubber feet will not leave marks behind.
OTHER TIPS
• This product may be used by one person at a time and for training purposes only.
- Before first-time use and later on periodically check that all screws, bolts and connections are securely fastened.
- Remove all sharp objects from the vicinity of the device before starting to exercise.
- When installing the product, leave sufficient space (at least 1 m at each side) around the device.
• Never exercise immediately after eating!
• In order to get off the trampoline, first stop jumping and then slowly walk off the device! Do not directly jump from the trampoline to the ground!
• When assembling the product, make sure not to pinch any body parts, especially fingers.
- It is the responsibility of the owner or supervising adult to ensure all users of the trampoline are sufficiently familiar with all warnings and safety instructions.
- Replace a worn-out or damaged trampoline net immediately.
- Secure the trampoline against unauthorized and unsupervised use.
- Do not use the trampoline as a means to jump onto other objects.
- Do not jump from other objects onto the trampoline.
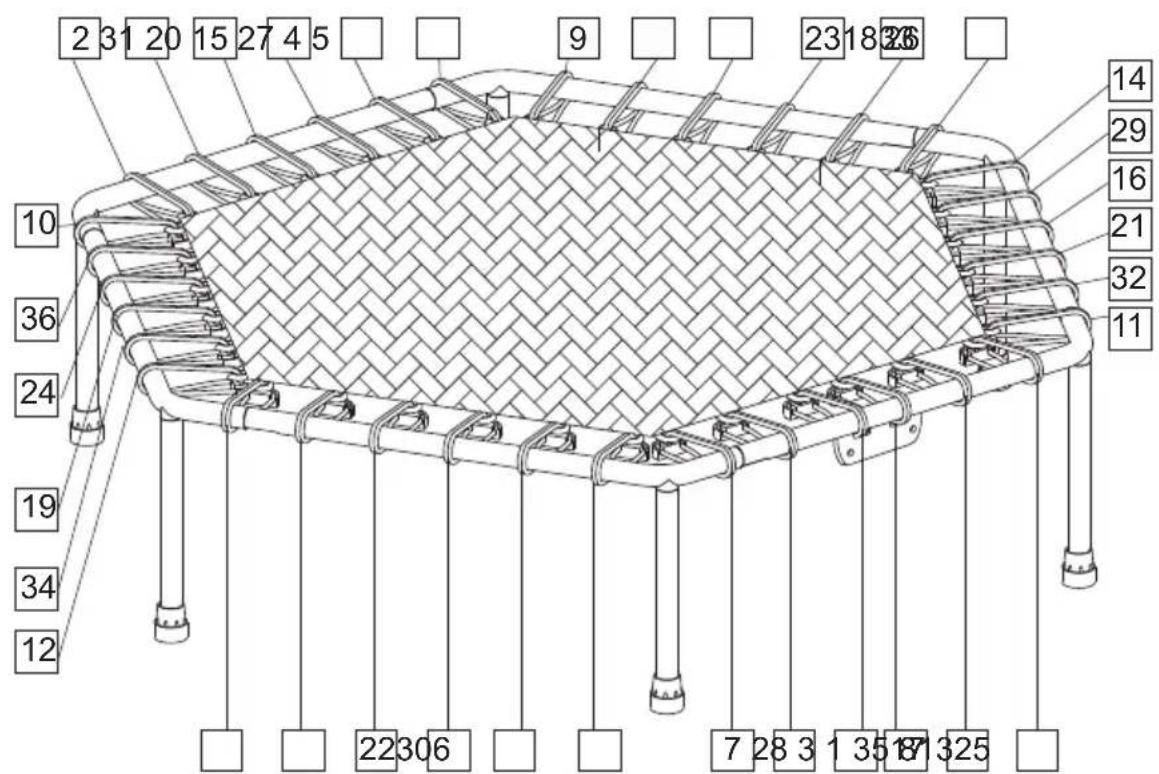
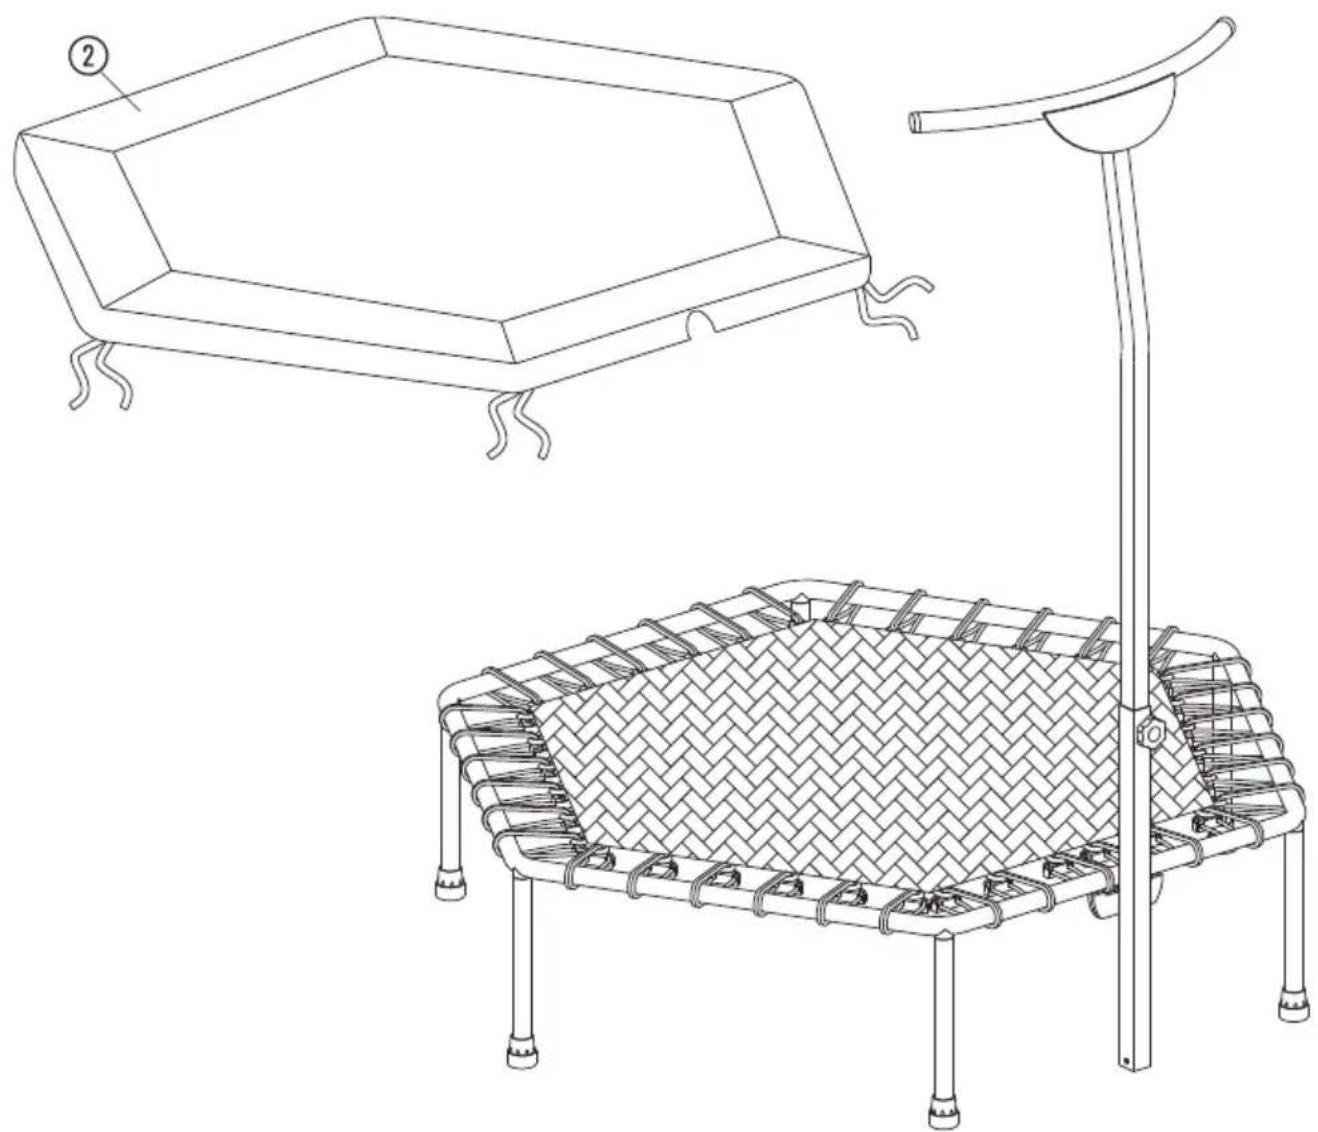
3. PART LIST
| No. | DESCRIPTION FIGURE QUANTITY | ||
| 1 | Trampoline net 1 |  | |
| 2 | Trampoline net cover 1 | 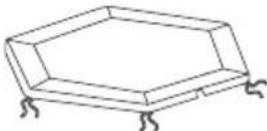 | |
| 3 | Frame tube 5 |  | |
| 4 | Frame tube with metal plate 1 |  | |
| 5 | Support frame with rubber foot 6 |  | |
| 6 | Handle 1 | 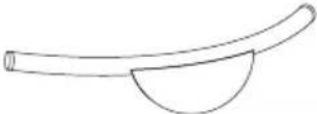 | |
| 7 | Top frame 1 |  | |
| 8 | Bottom frame 1 |  | |
| 9 | Flexible attachment loop | 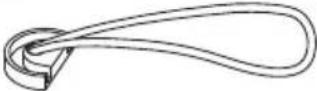 36 36 | |
| 10 | Bolt |  | 2 |
| 11 | Nut |  | 2 |
| 12 | Spring washer |  | 2 |
| 13 | Washer |  | 2 |
| 14 | Set screw |  | 1 |
| 15 | Wrench |  | 1 |
| 16 | Hex key | 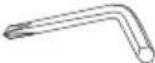 | 1 |
| 17 | Outil pour tendre | 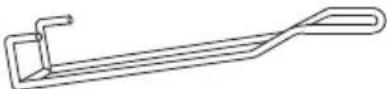 | 1 |
| 18 | Protection ring | 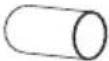 | 6 |
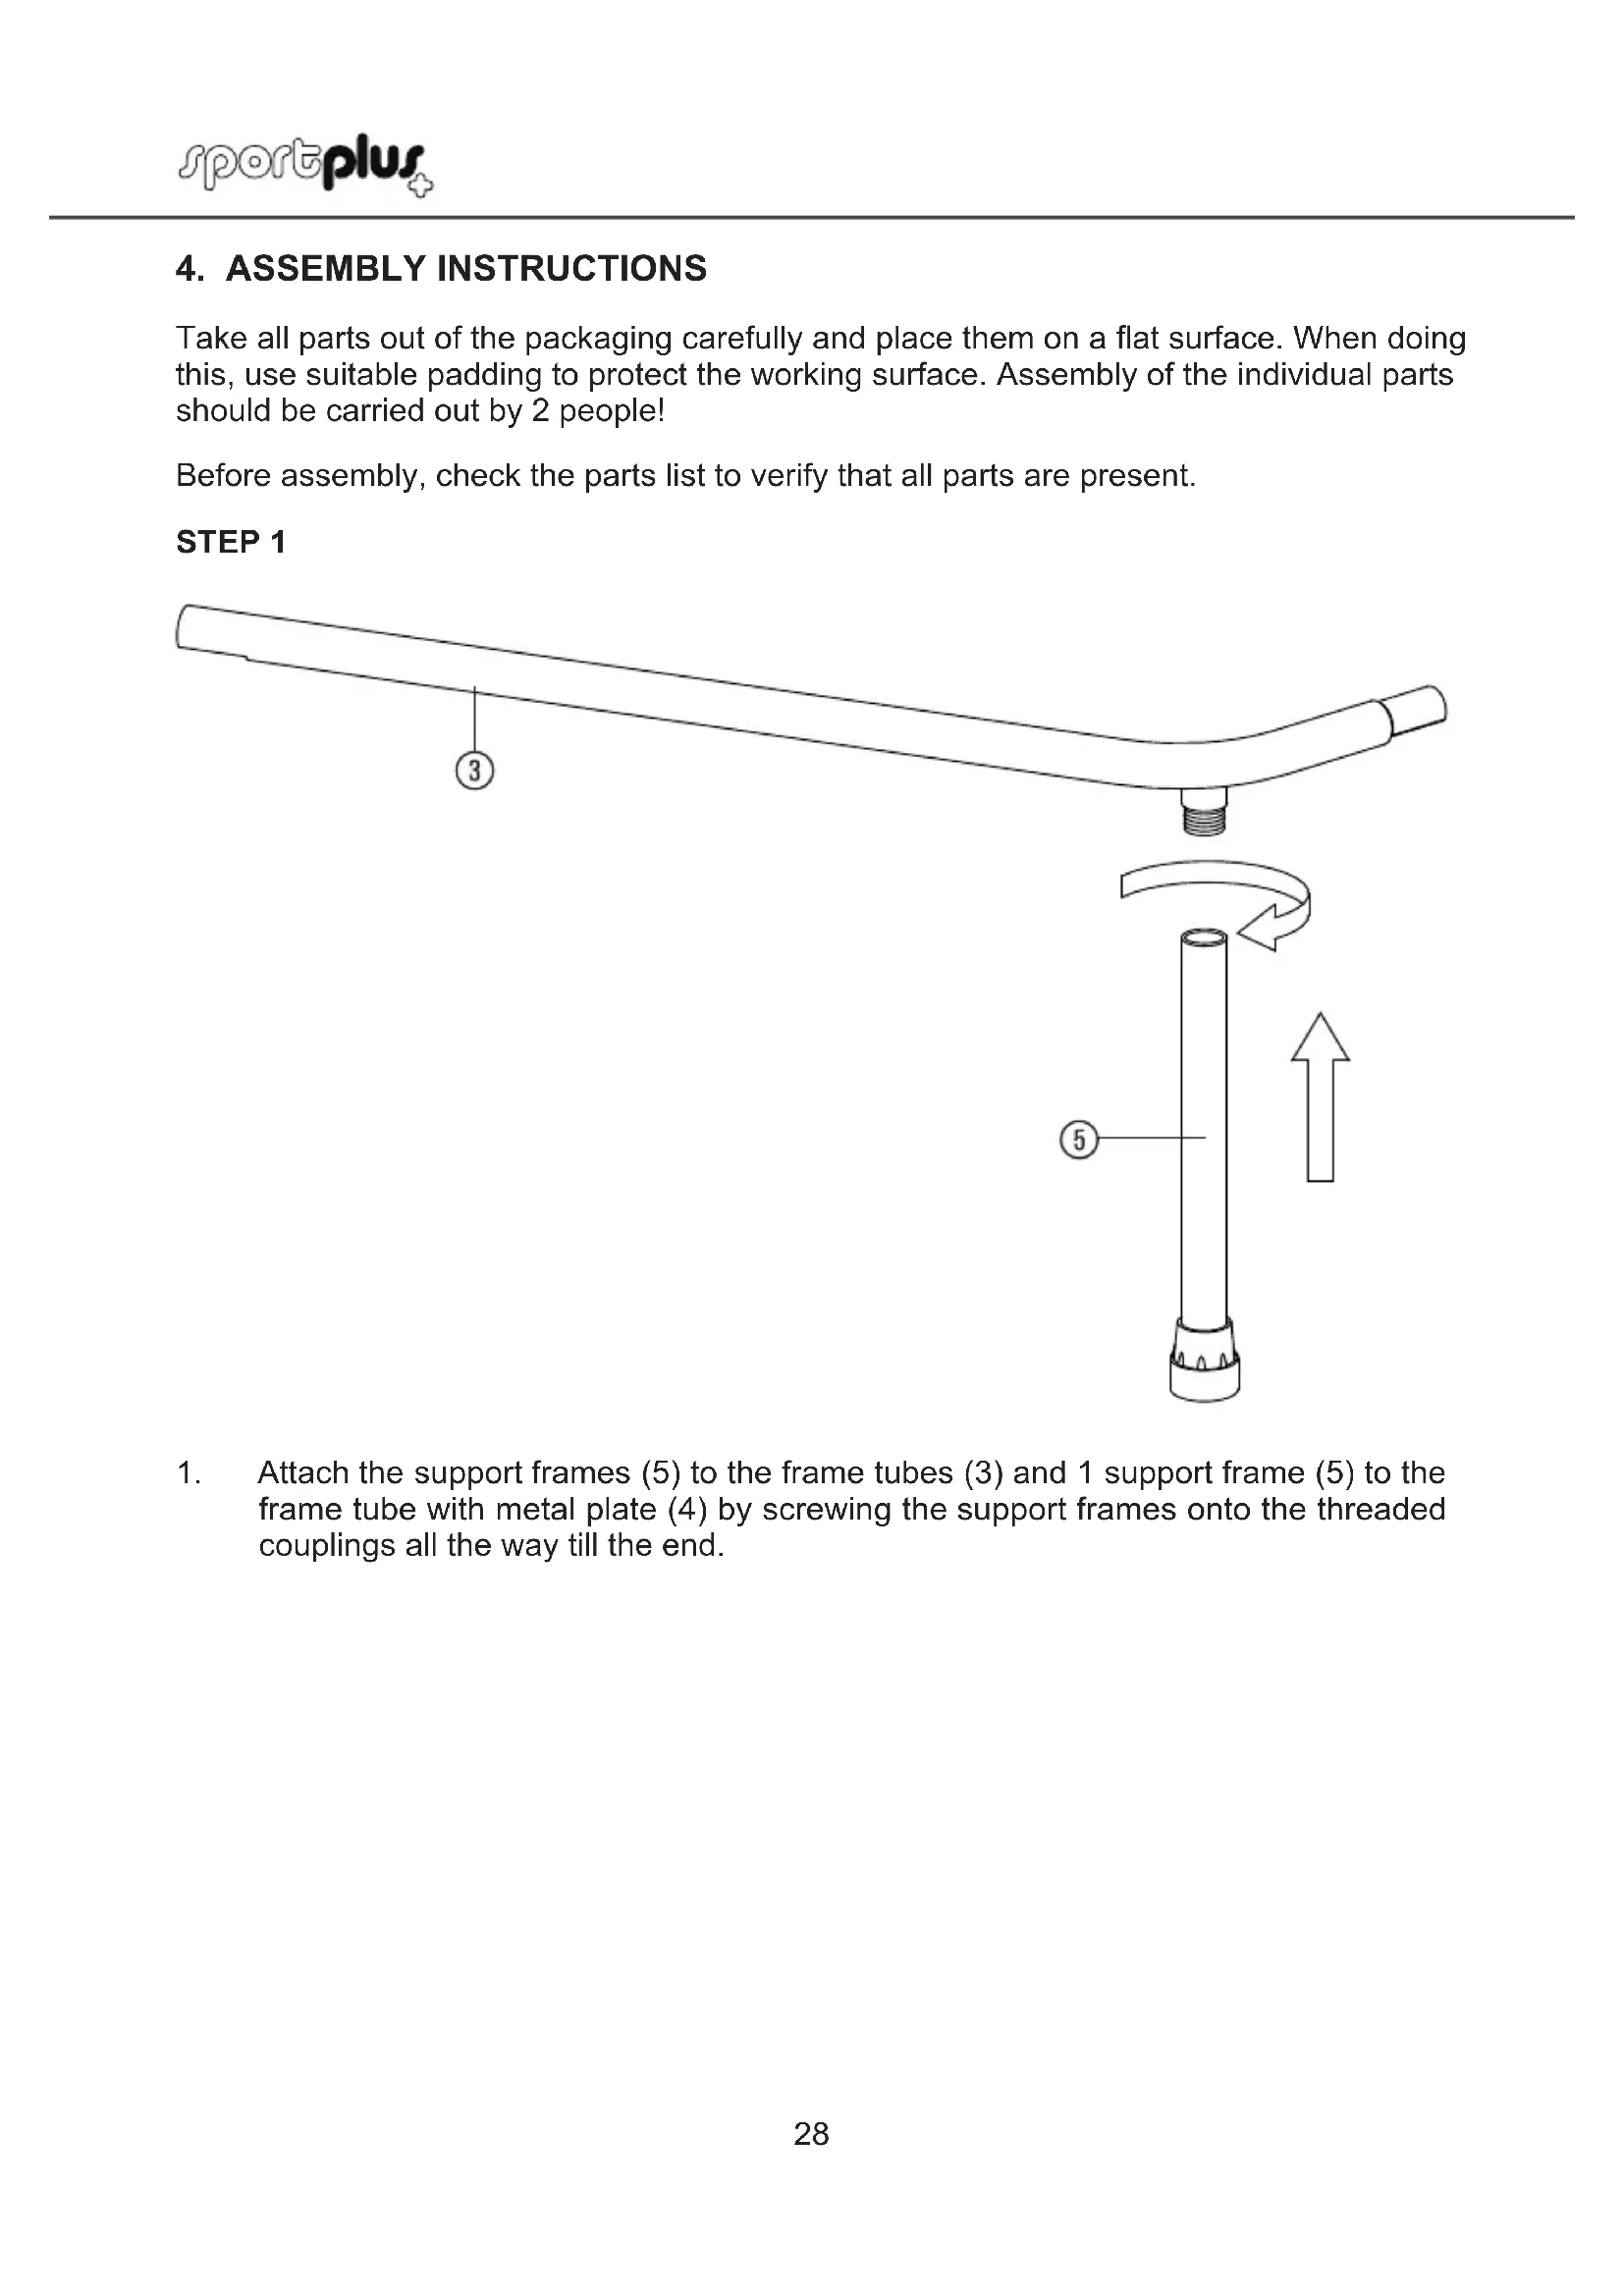
4. ASSEMBLY INSTRUCTIONS
Take all parts out of the packaging carefully and place them on a flat surface. When doing this, use suitable padding to protect the working surface. Assembly of the individual parts should be carried out by 2 people!
Before assembly, check the parts list to verify that all parts are present.
STEP 1
text_image
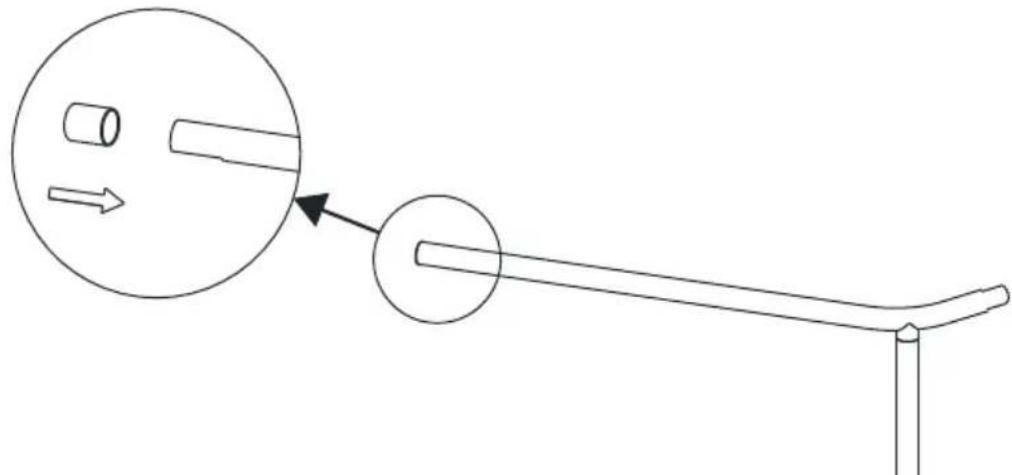
Technical diagram showing a lever mechanism with labeled parts and directional arrows indicating motion or rotation.- Attach the support frames (5) to the frame tubes (3) and 1 support frame (5) to the frame tube with metal plate (4) by screwing the support frames onto the threaded couplings all the way till the end.
4. ASSEMBLY INSTRUCTIONS
STEP 2
natural_image
Simple line drawing of a mechanical lever system with two circular components and directional arrows indicating motion (no text or symbols)Slide one protective ring (18) on each longer arm of the frame parts (3, 4).
STEP 3
text_image
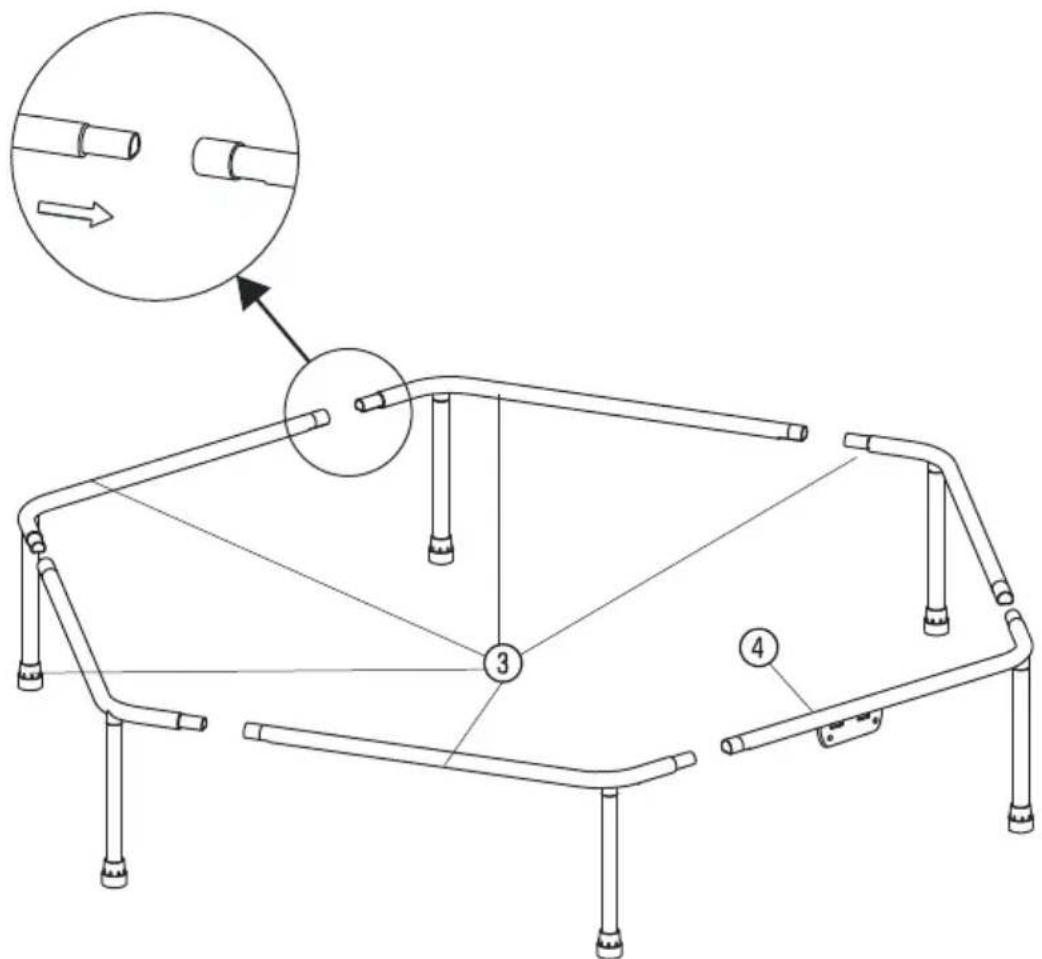
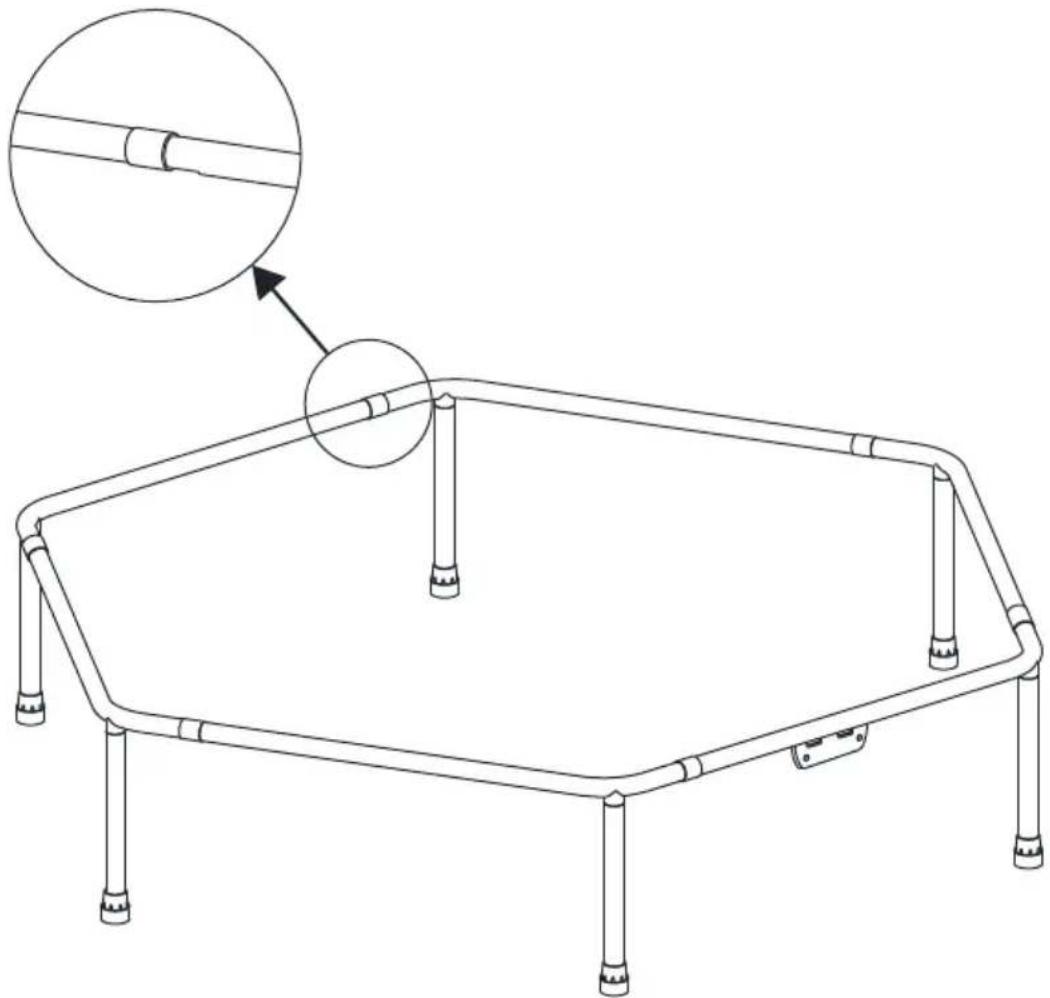
Technical diagram of a mechanical device with labeled components and an inset showing a magnified view of cylindrical parts.- Put the 6 frame tubes (3, 4) together.
4. ASSEMBLY INSTRUCTIONS
STEP 4
natural_image
Line drawing of a rectangular mechanical frame with four legs and a central rod, showing a close-up inset of the top section (no text or symbols)Slide the protective rings (18) over the contact points of the frame parts (3, 4).
Note: The protective rings protect the mounting loops (9) from friction on the tube edges.
4. ASSEMBLY INSTRUCTIONS
STEP 5
text_image
Technical diagram of a woven mesh device with numbered components and an inset close-up view showing internal structure.
text_image
Technical diagram showing a mechanical clamp or bracket with numbered annotations 9 and 17 pointing to specific parts.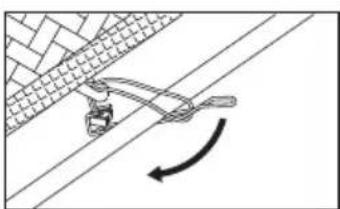
natural_image
Diagram showing a mechanical clamp or bracket with an arrow indicating rotational motion (no text or symbols present)
natural_image
Diagram of a mechanical clamp or bracket assembly with directional arrows (no text or symbols)
natural_image
Diagram of a rope knot with a hook and directional arrow indicating rotation (no text or symbols)
natural_image
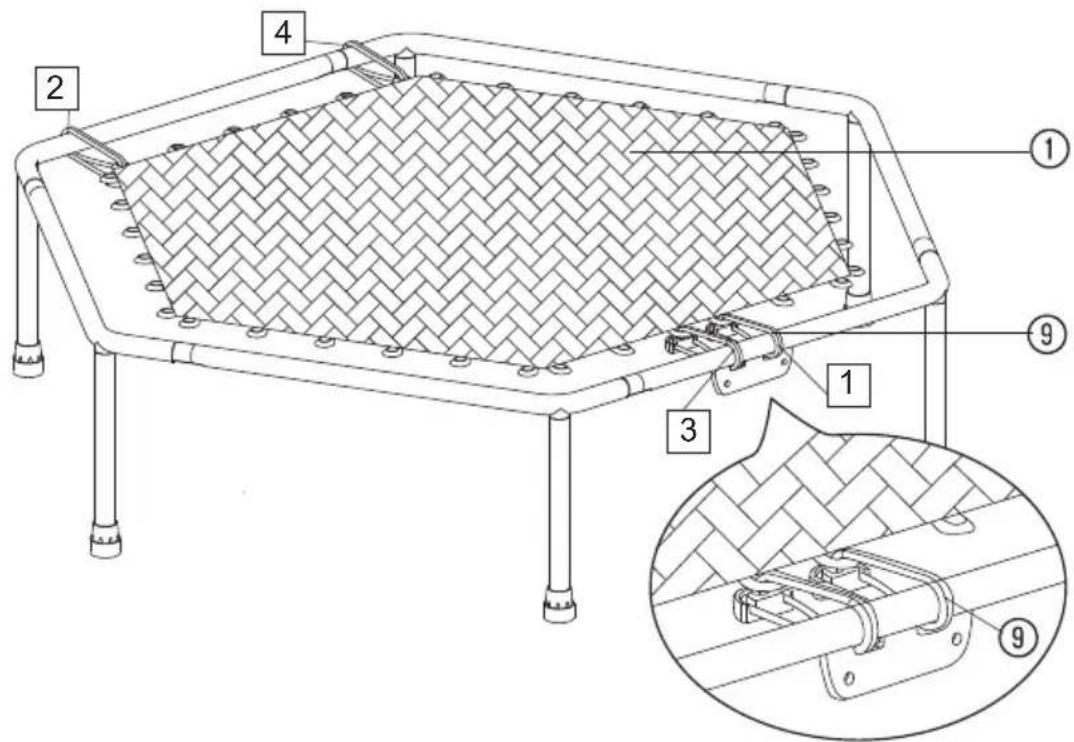
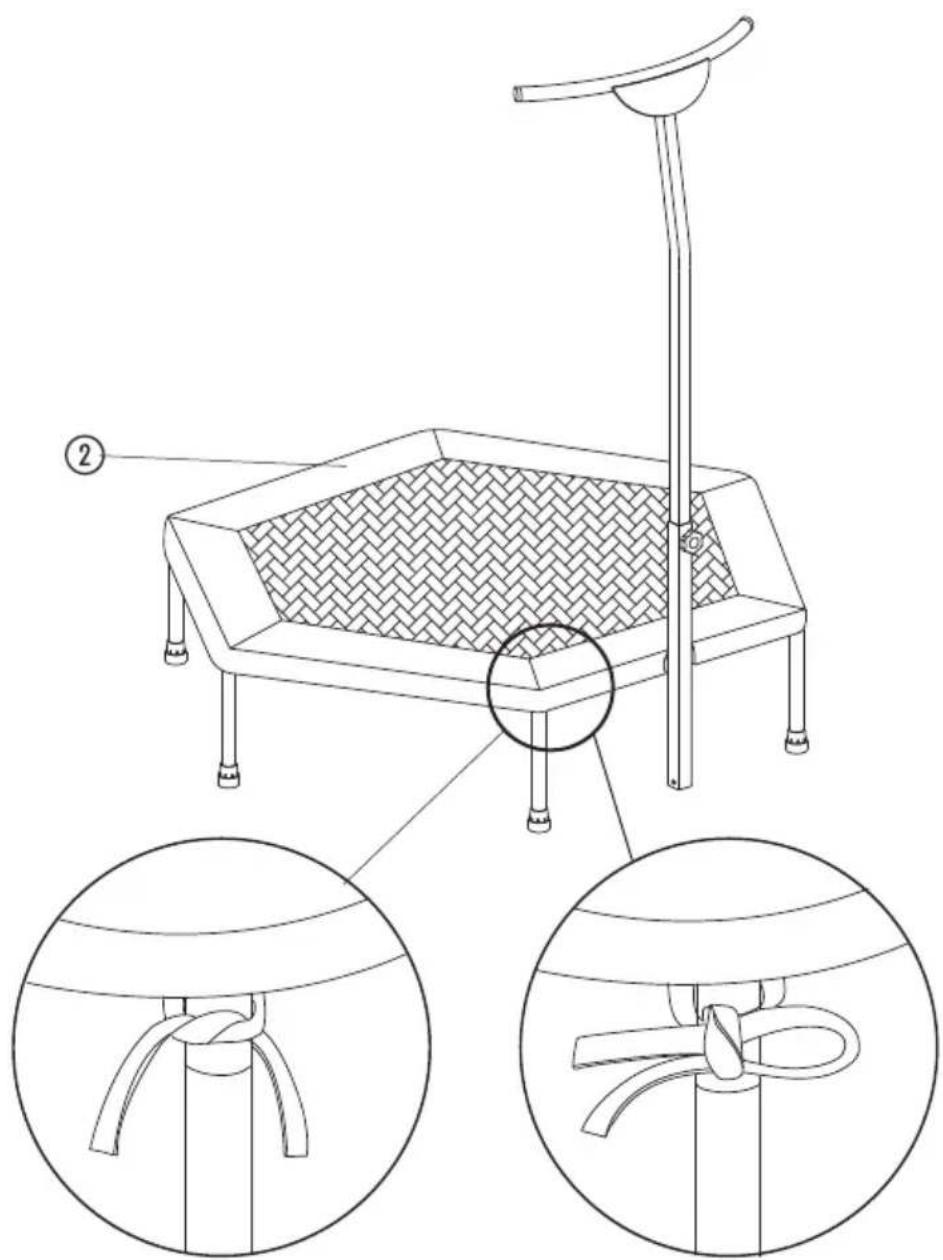
Pure technical line drawing of a mechanical assembly or mounting bracket without any text, numbers, or symbols- Fix the trampoline net (1) to the trampoline frame. To do so, attach the 36 flexible attachment loops (9) using the clamping tool (17).
- Start with one of the two attachment loops located on the metal plate and guide the loop through the opening in the metal plate (see detailed diagram).
- In order to ensure even net tension and to facilitate assembly, fix the elastic attachment loops alternately to the respective opposite side (1-2-3-4 etc.)
4. ASSEMBLY INSTRUCTIONS
STEP 6
text_image
2 31 20 15 27 4 5 9 23 18 26 14 29 16 21 32 11 10 36 24 19 34 12 22 30 6 7 28 3 1 35 17 32 5- Continue assembling the trampoline net using the remaining 32 elastic attachment loops.
- Refer to the upper picture for more details on the order of attachment.
- Secure 6 elastic attachment loops each to each of the 6 sides.
4. ASSEMBLY INSTRUCTIONS
STEP 7
text_image
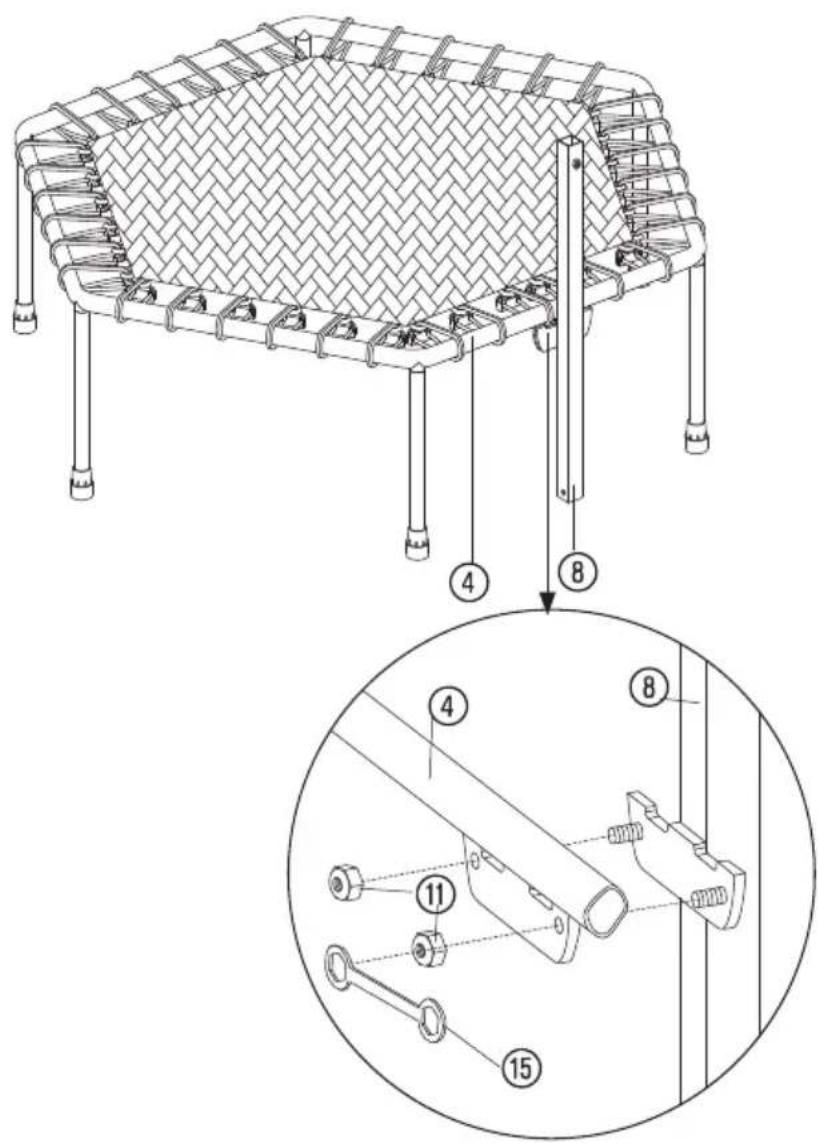
Technical diagram of a mechanical component with numbered parts and an inset close-up view showing internal assembly details.- Using the metal plate, attach the bottom frame (8) to the respective mounting metal plate on the frame tube (4).
- Secure the connection with 2 nuts (11). To do so, us the wrench (15) provided.
4. ASSEMBLY INSTRUCTIONS
STEP 8
text_image
Technical diagram of a woven mesh structure with numbered components and an inset view showing labeled parts.-
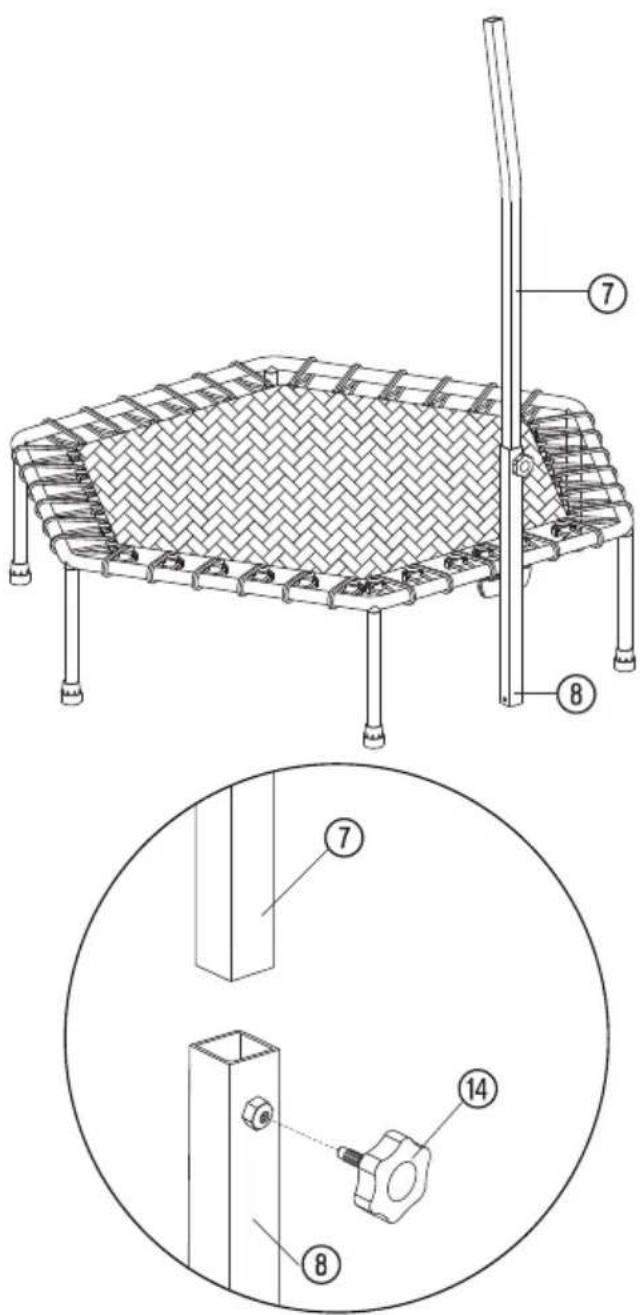
Insert the top frame (7) into the bottom frame (8).
-
Adjust the length as desired and secure the connection by screwing the set screw (14) onto the mount of the bottom frame.
4. ASSEMBLY INSTRUCTIONS
STEP 9
text_image
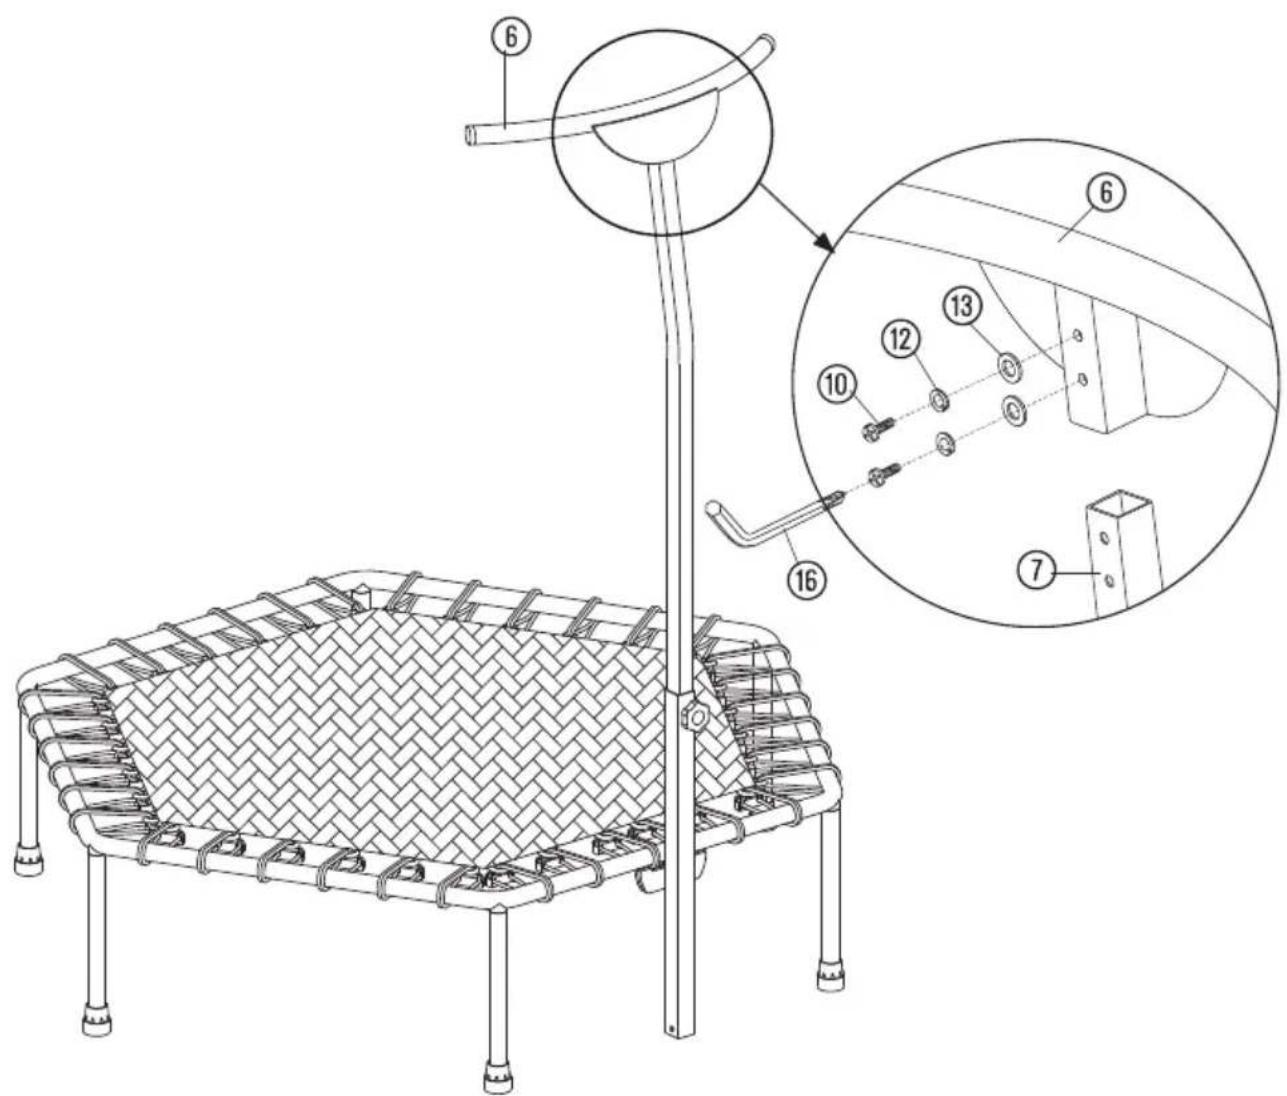
Technical diagram of a woven textile or leather structure with numbered components and an inset close-up showing internal assembly details.- Attach the handle (6) to the top frame (7).
- Secure the connection with 2 bolts (10), 2 spring washers (12) and 2 washers (13).
4. ASSEMBLY INSTRUCTIONS
STEP 10
natural_image
Technical line drawings of two household appliances: a rectangular box and a woven-patterned table with legs (no text or symbols)- Place the trampoline net cover (2) on the trampoline framework.
- Check the correct position of the recess for the bottom frame.
4. ASSEMBLY INSTRUCTIONS
STEP 11
text_image
Technical diagram of a portable stove with labeled components and close-up views showing internal structure details.- Attach the trampoline net cover (2) to the support frames of the framework using the straps.
4. ASSEMBLY INSTRUCTIONS
STEP 12
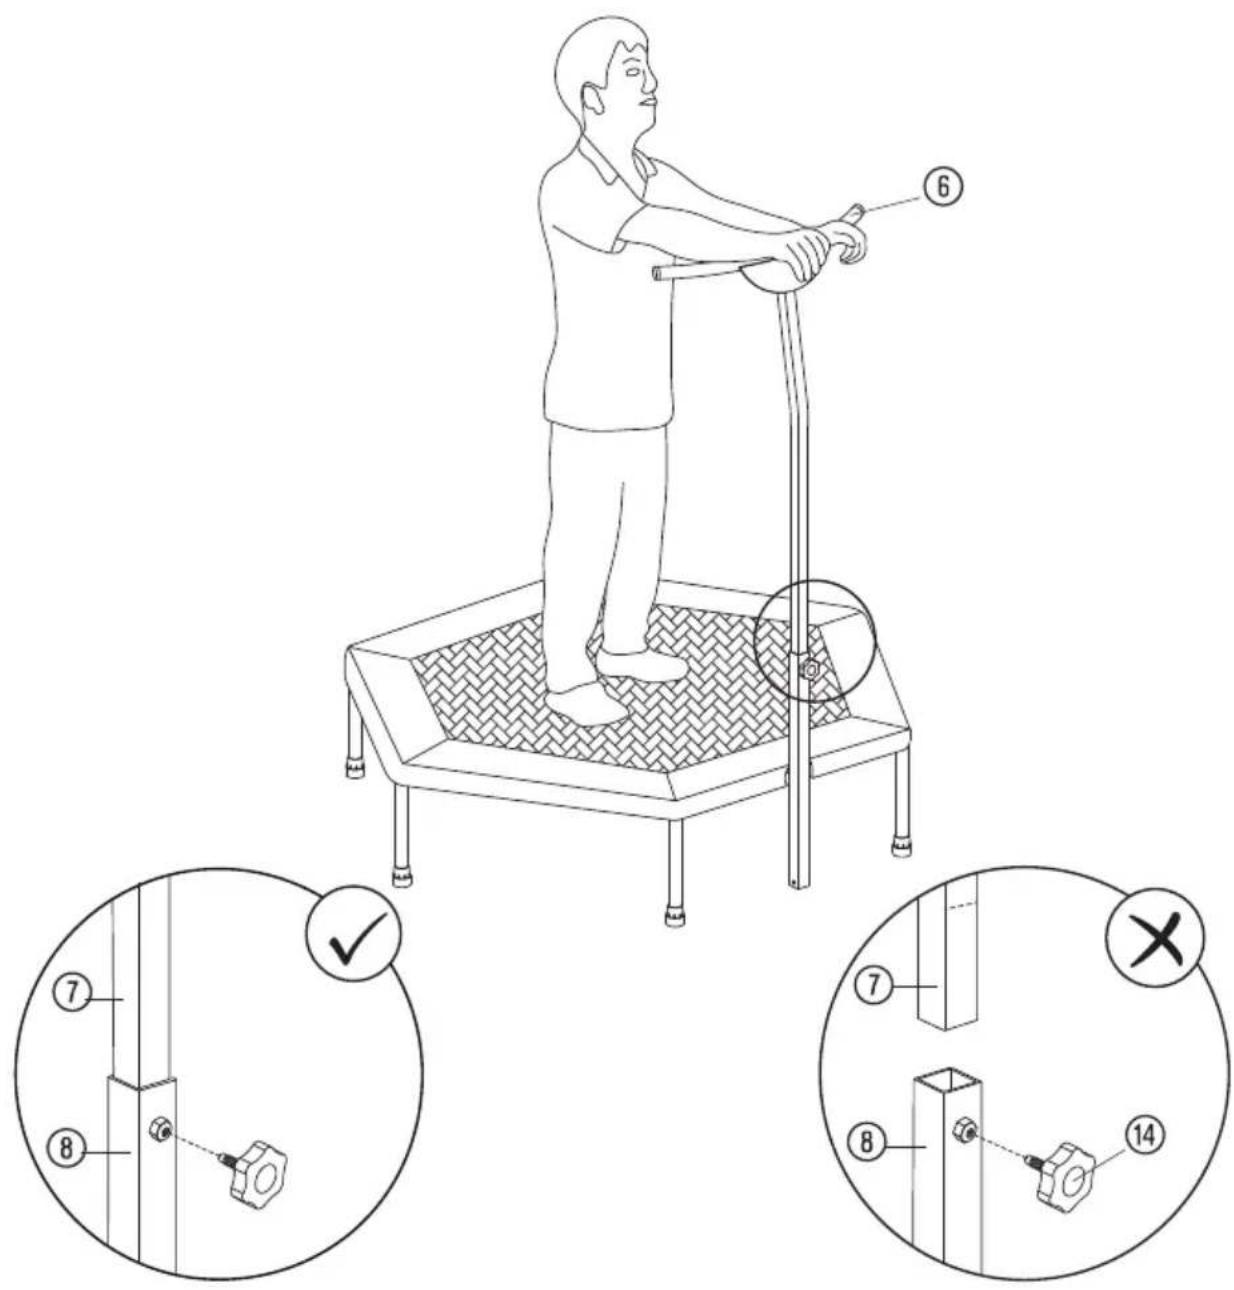
text_image
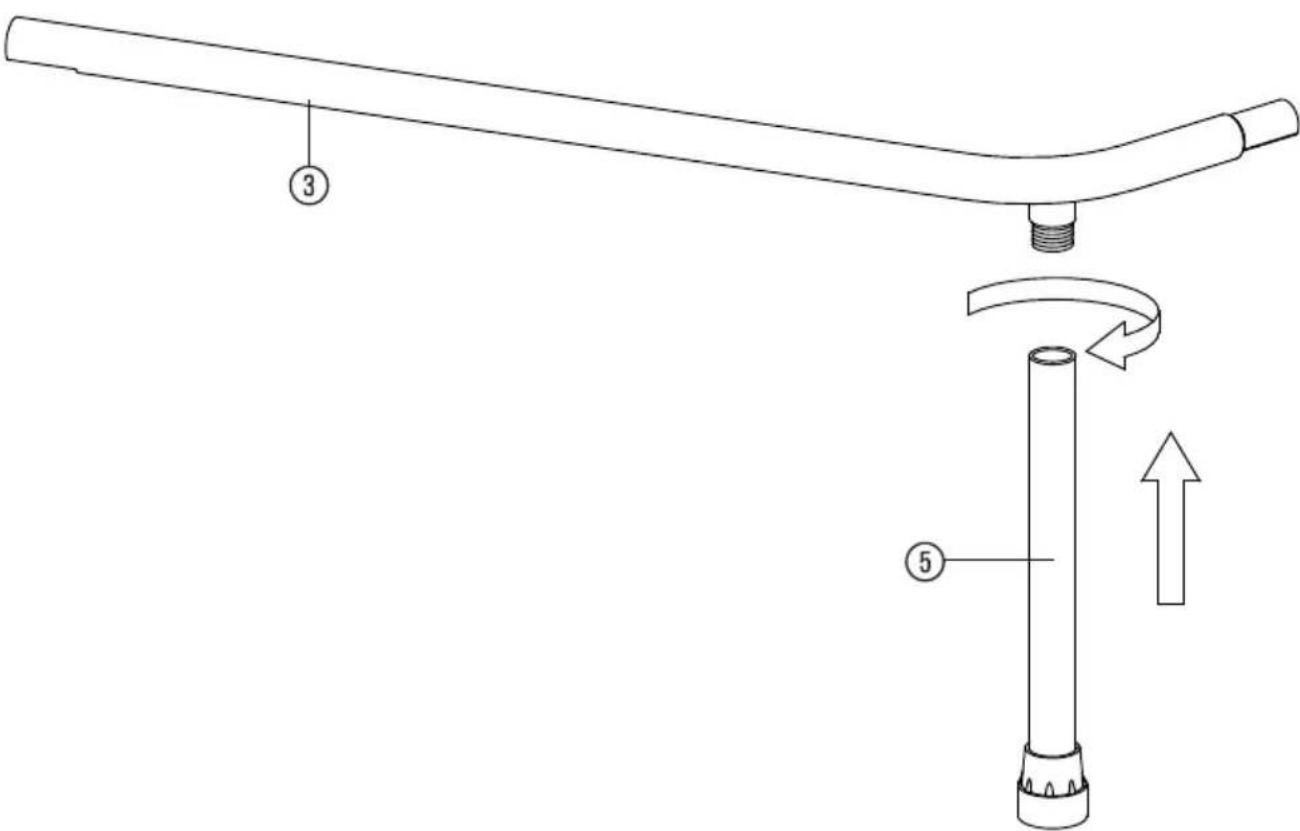
Technical diagram showing a person using a balance scale with numbered instructions and cross-sectional views for testing or maintenance.- Adjust the handle height (6) to your body height by adjusting the length of the holding rod accordingly.
- Make sure the marking on the top frame (7) will not be visible after installation.
- Secure the height using the set screw (14).
5. TRAINING
TIPS FOR YOUR WORKOUT
All recommendations in this manual are intended exclusively for healthy persons and not for persons with heart/cardiovascular problems!
All tips are intended only as rough suggestions for a training program. If necessary, consult your physician for tips that meet your personal requirements. The following pages will explain exactly how to operate your new training device and will illustrate the fundamentals of fitness training. To achieve your set training target, it is necessary that you read this user manual to inform yourself about important points regarding the general development of a workout program and the exact use of your fitness trampoline. Therefore, please thoroughly read all of the points listed here and pay them close attention.
DESIGNING A TRAINING PROGRAM
In order to achieve noticeable physical and health improvements, the following factors have to be considered before determining the necessary training effort.
INTENSITY
The level of physical strain during training must exceed the normal burden without reaching a point of breathlessness or exhaustion. A suitable guideline for effective training is your pulse.

WARNING!
Over-exercise may result in serious injury or death. If you feel faint stop exercising immediately.
PHASES OF TRAINING
Each training session should consist of 3 training phases:
- "Warm-up phase"
- "Training phase"
- "Cool-down phase"
In the “warm-up phase”, your body temperature and oxygen intake should slowly increase. This can be achieved with gymnastic exercise or stretches lasting from 5 to 10 minutes. A list of exercises for properly stretching your leg muscles can be found on the following pages. After the warm-up, the real training should begin (“training phase”). Training intensity should be low for the first few minutes and should then increase to the appropriate training intensity for a period of 15 to 30 minutes. To ease circulation after the training phase and to prevent muscle cramps or pulled muscles, a “cool-down phase” should follow the “training phase”. During this phase, which should be approx. 5 to 10 minutes long, carry out stretching exercises and/or light gymnastic exercises lasting 30 seconds each.
5. TRAINING, GENERAL
The low-impact features and the high calorie consumption make this fitness trampoline a popular fitness equipment.
The following sample exercises will show a simplified version of the device without holding rod. If suitable, place your hands on the handle for more stability.
5. TRAINING, ENDURANCE
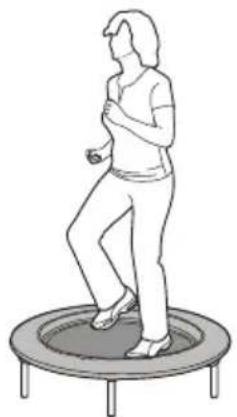
EXERCISE 1: LIGHT JOGGING.
Do not lift the knees up too high; avoid bouncing or jumping movements. Stabilize your leg axis correctly (keep foot, knee and hip in one line, avoid knock-knees)
5 to 45 minutes depending on endurance.
EXERCISE 2: JUMP LATERALLY FROM ONE LEG TO THE OTHER.
Land with knees slightly bent. Stabilize your leg axis correctly (keep foot, knee and hip in one line, avoid knock-knees)
1 to 3 minutes. Then continue again with running (exercise 1).
EXERCISE 3: Jump from the back leg onto the front leg and vice versa.
Land with knees slightly bent. Stabilize your leg axis correctly (keep foot, knee and hip in one line, avoid knock-knees)
1 to 3 minutes. Then continue again with running (exercise 1).
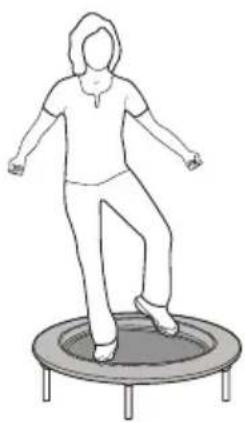
EXERCISE 4: SLIGHTLY BEND YOUR KNEES AND JUMP, THEN LAND SOFTLY ON THE TRAMPOLINE.
Keep your leg axis stable when jumping off and landing.
Repeat 15 times.
natural_image
Line drawing of a person performing a jump on a trampoline (no text or symbols)
natural_image
Illustration of two people performing a trampoline exercise on a circular platform (no text or symbols)
natural_image
Illustration of two people jogging on a trampoline (no text or symbols)
natural_image
Illustration of two people performing a trampoline exercise (no text or symbols present)5. TRAINING, POWER
EXERCISE 5: SLOWLY BEND AND EXTEND YOUR FRONT KNEE.
Big stride; weight on the front leg; the back leg touches the trampoline only slightly; foot, knee and hip in one line. Keep the leg axis stable. Do not fully straighten the knee; when bending, the knee of the supporting leg must not fully reach over the foot.
Repeat 10-15 x.
EXERCISE 6: SHIFT WEIGHT TO ONE LEG; MOVE THE FREE LEG LATERALLY TOWARDS THE EDGE OF THE TRAMPOLINE.
Legs hip-width apart and knees slightly bent; hands rest on your waist; upper body slightly bent forward. Keep the leg axis stable. Do not move the knees in bent position. Return to starting position.
Repeat 10 x.
EXERCISE 7: BEND YOUR KNEES; MOVE THE PELVIS BACKWARDS AND THE UPPER BODY FORWARD.
Legs hip-width apart; hands rest on waist; foot, knee and hip in one line. Return to starting position. Keep the back straight. Avoid knock-knees. Do not fully extend the knees during exercise.
Repeat 10 x.
EXERCISE 8: SHIFT THE BODY WEIGHT TO THE FRONT LEG. SLIGHTLY LIFT THE BACK LEG.
One knee bent far down with the other leg touching the floor. Keep the leg axis stable. Avoid rounded spine.
Repeat 10 x.
natural_image
Illustration of two people performing trampoline exercises on circular bases (no text or symbols)
natural_image
Illustration of two people standing on a trampoline with legs raised (no text or symbols)
natural_image
Illustration of two people standing on a trampoline, no text or symbols present
natural_image
Illustration of two people performing a trampoline exercise (no text or symbols)5. TRAINING, COORDINATION
EXERCISE 9: WRITING YOUR NAME
Stand on one leg. Knee slightly bent; write your name into the air using your free leg. Keep the supporting leg stable during the whole exercise. Keep the leg axis stable. Avoid <
Repeat 2 to 3 x.
Advanced option: "Writing the address"
EXERCISE 10: THROWING A BALL
Stand on one leg. Other leg in the air. Knee slightly bent. Throw a ball (apple) from one hand to the other. Keep the supporting leg stable during the exercise. Keep the leg axis stable. Avoid <
Repeat 2 to 3 x.
EXERCISE 11: STAND ON ONE LEG.
Knee slightly bent; foot of the other leg does not touch the trampoline. Close your eyes. Move both arms 3x towards the ceiling and back. If you cannot keep the balance, open your eyes.
Repeat 2 to 3 x.
natural_image
Line drawing of a person jumping on a trampoline (no text or symbols)
natural_image
Line drawing of a person performing a trampoline exercise (no text or symbols)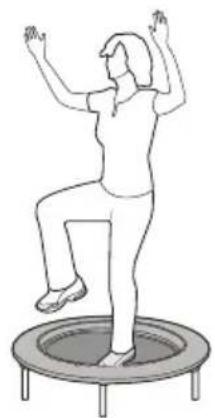
natural_image
Line drawing of a person performing a trampoline exercise (no text or symbols)6. MAINTENANCE, CLEANING AND CARE
• After the assembly and before using the home trainer, always make sure that all bolts/nuts are fully and correctly tightened.
- Clean the unit regularly with a slightly damp cloth and a mild cleaning agent.
- This is especially important for the seat and the handles, as these parts are in contact with parts of your body during the entirety of training.
TRANSPORT
- When transporting the device, ask a 2nd person for help to facilitate transport.
7. NOTES ON DISPOSAL

Packaging materials are raw materials and can be recycled. Separate the packaging materials and dispose of them properly in the interest of the environment. Your local administration can provide additional information.
8. SERVICE AND REPLACEMENT PARTS
In the case of a product defect, please directly contact our customer service team. For this purpose, we recommend that you retain the sales receipt as proof of purchase.
Our service team is naturally available at any time to assist you with additional questions regarding the assembly and use of your SportPlus product as well as ordering spare parts.
Service time: Service time: Monday to Friday, 9.00 a.m. to 6 p.m.
Service hotline: +44 203 318 4415 *
Email: service@sportplus.org
Web: http://www.sportplus.de
* National fixed-line network, call charges depend on your phone company/your phone contract.
Please have the following information at hand when you call:
- User manual
• Model number (located on the title page of this manual)
• Description of accessory parts
• Proof of purchase with purchase date
IMPORTANT NOTE:
Please do not send your product to our service team without being requested to do so. The costs and risk of loss for unsolicited shipments will be borne by the sender. We reserve the right to refuse to accept unsolicited shipments or to return the corresponding merchandise to the sender carriage forward, that is, at the sender's expense.
9. WARRANTY
SportPlus guarantees that the product this warranty applies to was manufactured using high-quality materials and has been inspected with the utmost attention. Should there be any defects within the hereinafter stipulated warranty period and under normal use and maintenance conditions, please contact our service team.
The operation and assembly of the product according to the user manual is a precondition of this warranty. The warranty can be voided due to improper use and/or improper transport of the product.
The warranty period is 2 years beginning on the date of purchase. If the product you have purchased is defective, please contact our service team within 24 months from the date of purchase. Excluded from the warranty are:
• Damage due to external force.
• Interference, repairs or alterations by amateurs and by persons who have not been authorized by us.
- Failure to observe the user manual.
- If the afore-mentioned warranty terms are not met.
- If the defect was caused by improper use or maintenance, neglect or accidents.
- Also excluded are wear parts and consumable materials.
This product is intended for private use only. There is no warranty for commercial use.
Chère cliente,
Cher client,
INFORMATIONS SUR LE PRODUIT
Dimensions (L x l x H) : env. 111,5 x 124 x 117\~151 cm
ATTENTION – DOMMAGES AU PRODUIT!
text_image
Technical diagram showing a lever mechanism with labeled parts and directional arrows indicating motion or rotation.natural_image
Simple line drawing of a mechanical setup with a cylindrical component and a lever, no text or symbols present.text_image
Technical diagram of a table tennis setup with labeled parts and an inset showing magnified detail of the table.natural_image
Line drawing of a rectangular mechanical frame with four legs and a central rod, showing a close-up inset of the top section (no text or symbols)text_image
Technical diagram of a woven mesh device with numbered components and an inset close-up showing internal structure.
text_image
Technical diagram showing a mechanical clamp or bracket with numbered annotations 9 and 17 pointing to specific parts.
natural_image
Diagram showing a mechanical component interacting with diagonal lines and a curved arrow indicating rotation (no text or symbols)
natural_image
Diagram of a mechanical clamp or bracket assembly with directional arrows (no text or symbols)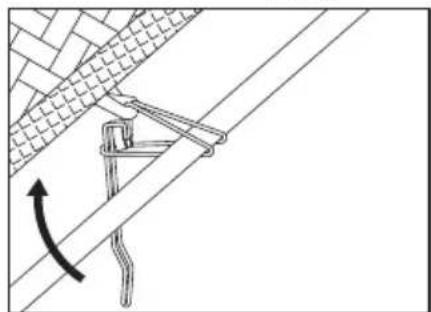
natural_image
Diagram of a rope knot with a hook and directional arrow indicating rotation (no text or symbols)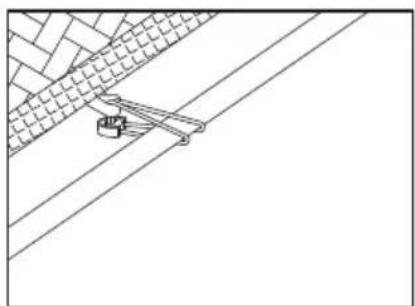
natural_image
Pure technical line drawing of a mechanical assembly or mounting bracket without any text, numbers, or symbolstext_image
Technical diagram of an electronic component with labeled parts and a magnified detail view showing internal components.text_image
Technical diagram of a woven mesh structure with numbered components and an inset view showing labeled parts.text_image
Technical diagram of a woven textile or leather structure with numbered components, including a magnified inset showing internal assembly details.natural_image
Technical line drawings of two household appliances: a rectangular box and a woven-patterned table with legs (no text or symbols)text_image
Technical diagram of a portable stove with labeled components and close-up views showing internal structure details.text_image
Technical diagram showing a person using a balance scale with numbered instructions and cross-sectional views for mechanical testing or safety.natural_image
Illustration of two people performing trampoline exercises on circular bases (no text or symbols)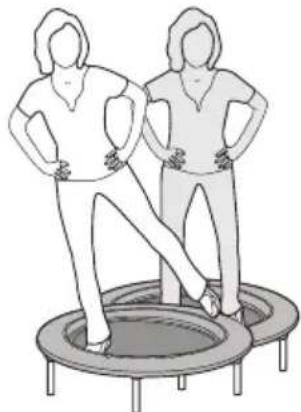
natural_image
Illustration of two women standing on a trampoline with legs raised (no text or symbols)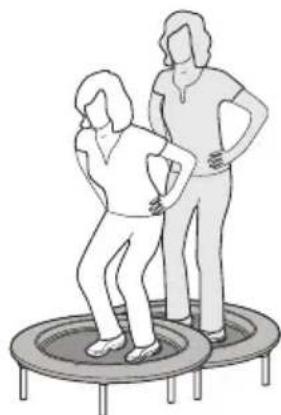
natural_image
Illustration of two people standing on a trampoline, no text or symbols present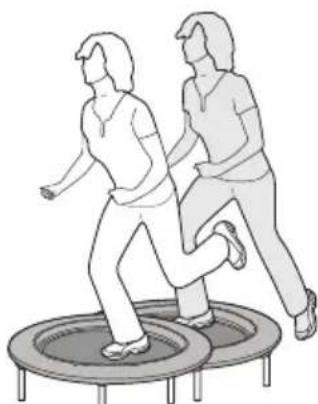
natural_image
Illustration of two people performing a trampoline exercise (no text or symbols)5. ENTRAÎNEMENT, COORDINATION
EXERCICE 9 : ÉCRIRE SON NOM.
natural_image
Line drawing of a person jumping on a trampoline (no text or symbols)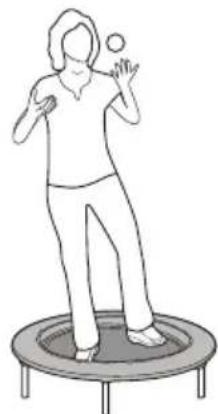
natural_image
Line drawing of a person performing a trampoline exercise (no text or symbols)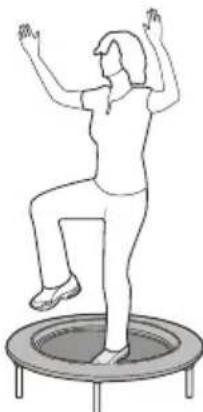
natural_image
Line drawing of a person performing a trampoline exercise (no text or symbols)6. MAINTENANCE, NETTOYAGE ET ENTRETIEN
MISES EN GARDE IMPORTANTES!
text_image
Technical diagram showing a lever mechanism with labeled parts and directional arrows indicating motion or rotation.natural_image
Simple line drawing of a mechanical lever system with two circular components and directional arrows indicating motion (no text or symbols)text_image
Technical diagram of a mechanical assembly with numbered components and an inset showing pipe connection details.natural_image
Line drawing of a rectangular frame with four legs and two vertical posts, showing a close-up inset of a cylindrical object (no text or symbols)text_image
Technical diagram of a woven mesh device with numbered components and an inset close-up showing internal structure.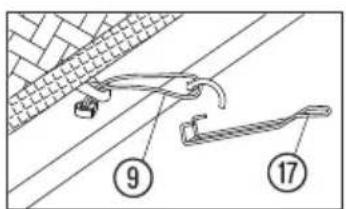
text_image
Technical diagram showing a mechanical clamp or bracket with numbered annotations 9 and 17 pointing to specific parts.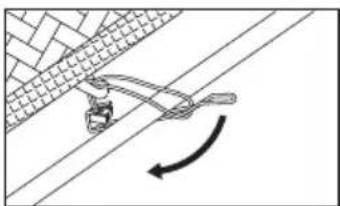
natural_image
Diagram showing a mechanical component interacting with diagonal lines and a curved arrow indicating rotation (no text or symbols)
natural_image
Diagram of a mechanical clamp or bracket assembly with directional arrows (no text or symbols)
natural_image
Diagram of a rope knot with a hook and directional arrow indicating rotation (no text or symbols)
natural_image
Pure technical line drawing of a mechanical assembly or mounting bracket without any text, numbers, or symbolstext_image
Technical diagram of an electronic component with labeled parts and a magnified detail view showing internal components.text_image
Technical diagram of a woven mesh structure with numbered components and a magnified detail view showing internal components.text_image
Technical diagram of a woven textile or leather structure with numbered components, including a magnified inset showing internal assembly details.natural_image
Technical line drawings of two electronic devices: a rectangular box and a woven-wrapped device with legs and legs, both without any text or symbols.text_image
Technical diagram of a portable stove with labeled components and close-up views showing internal structure details.text_image
Technical diagram showing a person using a balance scale with numbered instructions and cross-sectional views for testing or maintenance.natural_image
Line drawing of a person performing a jump on a trampoline (no text or symbols)
natural_image
Illustration of two people performing a trampoline exercise (no text or symbols)
natural_image
Illustration of two people performing a trampoline exercise (no text or symbols)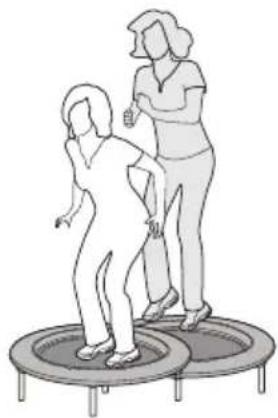
natural_image
Illustration of two people performing a trampoline exercise (no text or symbols present)natural_image
Illustration of two people performing trampoline exercises on circular bases (no text or symbols)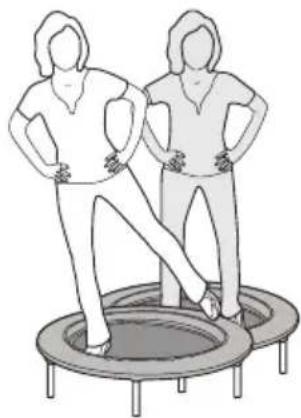
natural_image
Illustration of two people standing on a trampoline with legs raised (no text or symbols)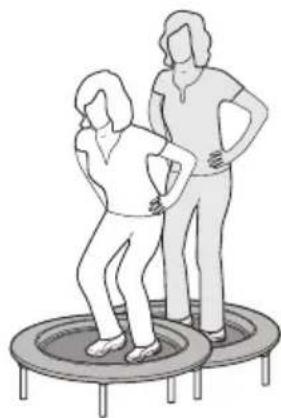
natural_image
Illustration of two people performing a trampoline exercise (no text or symbols)
natural_image
Illustration of two people performing a step-up exercise on a trampoline (no text or symbols)natural_image
Line drawing of a person jumping on a trampoline (no text or symbols)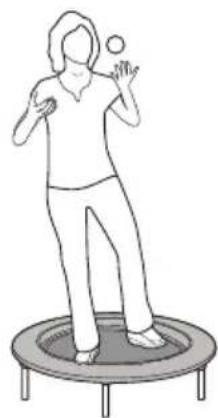
natural_image
Line drawing of a person performing a trampoline exercise (no text or symbols)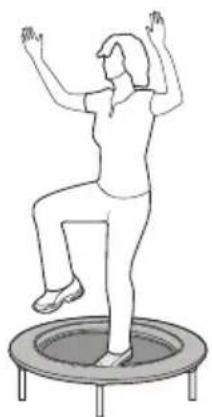
natural_image
Line drawing of a person performing a trampoline exercise (no text or symbols)6. MANUTENZIONE, PULIZIA E CURA
text_image
Technical diagram showing a lever mechanism with labeled parts and directional arrows indicating motion or rotation.natural_image
Diagram showing a mechanical setup with a cylindrical component and a lever mechanism, no text or symbols present.text_image
Technical diagram of a mechanical device with labeled components and an inset showing a magnified view of a cylindrical component.natural_image
Line drawing of a rectangular mechanical frame with four legs and a central rod, showing a close-up inset of the top section (no text or symbols)text_image
Technical diagram of a woven mesh device with numbered components and an inset close-up view showing internal structure.
text_image
Technical diagram showing a mechanical clamp or bracket with numbered annotations 9 and 17 pointing to specific parts.
natural_image
Diagram showing a mechanical clamp or spring attached to a textured surface with directional arrows (no text or symbols)
natural_image
Diagram of a mechanical clamp or bracket assembly with directional arrows (no text or symbols)
natural_image
Diagram of a rope knot with a hook and directional arrow indicating rotation (no text or symbols)
natural_image
Pure technical line drawing of a mechanical assembly or mounting bracket without any text, numbers, or symbolstext_image
Technical diagram of an electronic component with labeled parts and a magnified detail view showing internal components.text_image
Technical diagram of a woven mesh structure with numbered components and an inset view showing labeled parts.text_image
Technical diagram of a woven textile or leather structure with numbered components, including a magnified inset showing internal assembly details.natural_image
Technical line drawings of two household appliances: a rectangular box and a woven-patterned table with legs (no text or symbols)text_image
Technical diagram of a portable stove with labeled components and close-up views showing internal structure details.text_image
Diagram illustrating a person using a balance scale with numbered instructions and safety symbols for testing or monitoring.natural_image
Illustration of two people performing trampoline exercises on circular bases (no text or symbols)
natural_image
Illustration of two people standing on a trampoline with legs raised (no text or symbols)
natural_image
Illustration of two people performing a trampoline exercise (no text or symbols)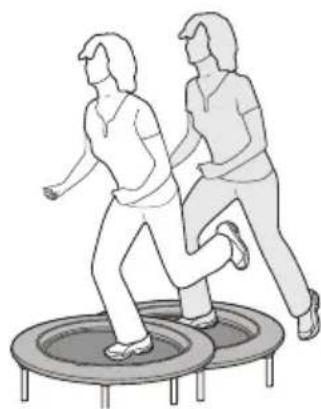
natural_image
Illustration of two people performing a step-up exercise on a trampoline (no text or symbols)natural_image
Line drawing of a person jumping on a trampoline (no text or symbols)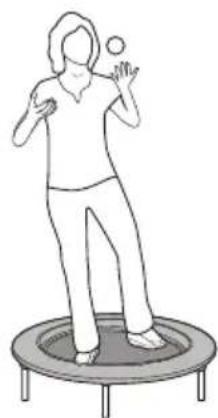
natural_image
Line drawing of a person performing a trampoline exercise (no text or symbols)
natural_image
Line drawing of a person performing a trampoline exercise (no text or symbols)6. LIMPIEZA, CUIDADO Y MANTENIMIENTO
(Call charges depend on your phone company / your phone contract.)
E-Mail: service@sportplus.org
URL: http://www.sportplus.org
FR
Service hotline : +33 - 176 361 493