
SmartHome Motion Sensor MS101 - Keyboard ASUS - Free user manual and instructions
Find the device manual for free SmartHome Motion Sensor MS101 ASUS in PDF.
| Product Type | Infrared motion sensor |
| Dimensions | 87 x 51 x 53 mm |
| Weight | 68 g |
| Wireless | ZigBee PRO |
| Operating range | 50 m (without obstruction) |
| Power supply | 2 AA alkaline batteries (1.5 V) |
| Battery life | Approximately 1 year (varies with use) |
| Infrared range | 8 m, 90-degree detection angle |
| Operating temperature | -10 to 50 °C |
| Operating humidity | 0 to 95% |
| Compatibility | Asus SmartHome Gateway (HG 100) |
| Application | ASUS SmartHome (iOS and Android) |
| Main functions | IR motion detection, ZigBee connection, LED indicator, reset button |
| Maintenance and cleaning | Use a soft, dry cloth. Do not use water, alcohol, or chemicals. |
| Safety | Use indoors only. Do not repair yourself. Observe battery polarity. |
| LED indicator | Solid blue (power on and identification), flashing blue (connection) |
Frequently Asked Questions - SmartHome Motion Sensor MS101 ASUS
User questions about SmartHome Motion Sensor MS101 ASUS
0 question about this device. Answer the ones you know or ask your own.
Ask a new question about this device
Download the instructions for your Keyboard in PDF format for free! Find your manual SmartHome Motion Sensor MS101 - ASUS and take your electronic device back in hand. On this page are published all the documents necessary for the use of your device. SmartHome Motion Sensor MS101 by ASUS.
USER MANUAL SmartHome Motion Sensor MS101 ASUS
natural_image
Simple line drawing of an electronic device with a circular button and the brand logo (no text or symbols beyond the label)Q12203
Revised Edition V2
December 2016
Contents
English 4
繁體中文....10
简体中文....16
Русский....22
Deutsch 28
Italiano....34
Français....40
Dansk 46
Norsk 52
Suomi....58
Svenska....64
Español....70
Português 76
Polski 82
Čeština 88
日本語 94
عربي 100
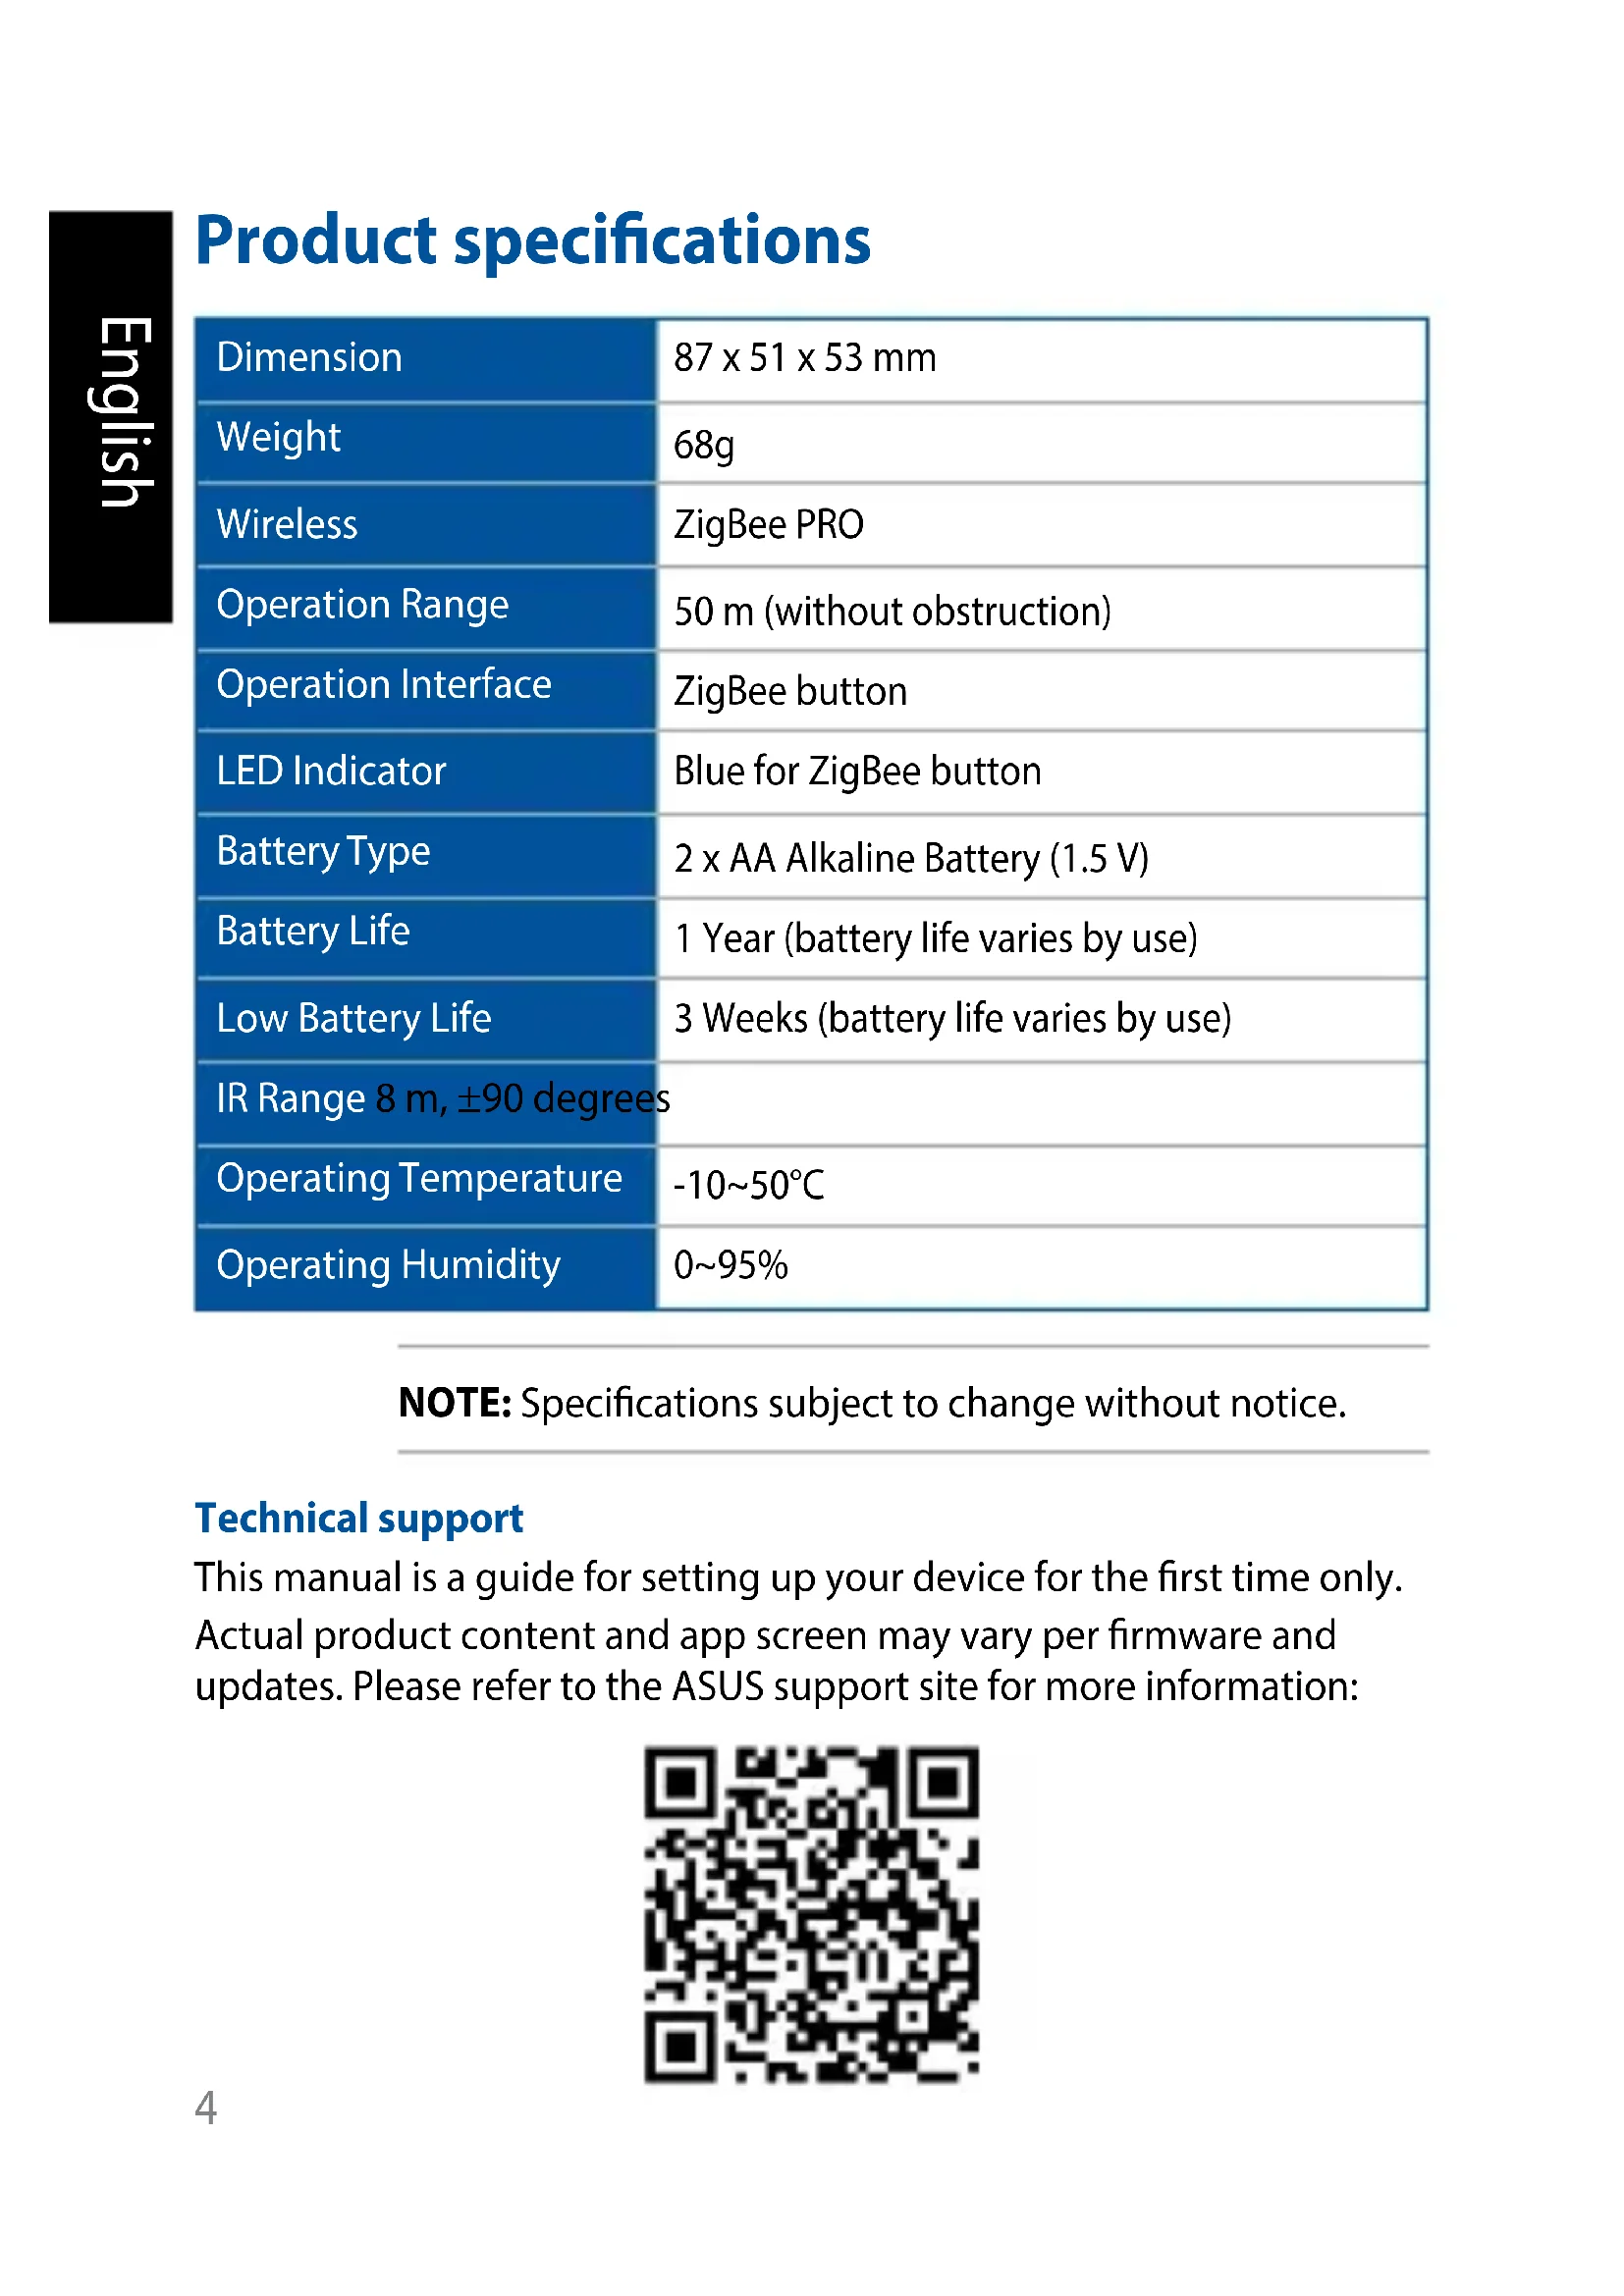
Product specifications
| Dimension | 87 x 51 x 53 mm |
| Weight | 68g |
| Wireless | ZigBee PRO |
| Operation Range | 50 m (without obstruction) |
| Operation Interface | ZigBee button |
| LED Indicator | Blue for ZigBee button |
| Battery Type | 2 x AA Alkaline Battery (1.5 V) |
| Battery Life | 1 Year (battery life varies by use) |
| Low Battery Life | 3 Weeks (battery life varies by use) |
| IR Range 8 m, ±90 degrees | |
| Operating Temperature | -10~50°C |
| Operating Humidity | 0~95% |
NOTE: Specifications subject to change without notice.
Technical support
This manual is a guide for setting up your device for the first time only. Actual product content and app screen may vary per firmware and updates. Please refer to the ASUS support site for more information:

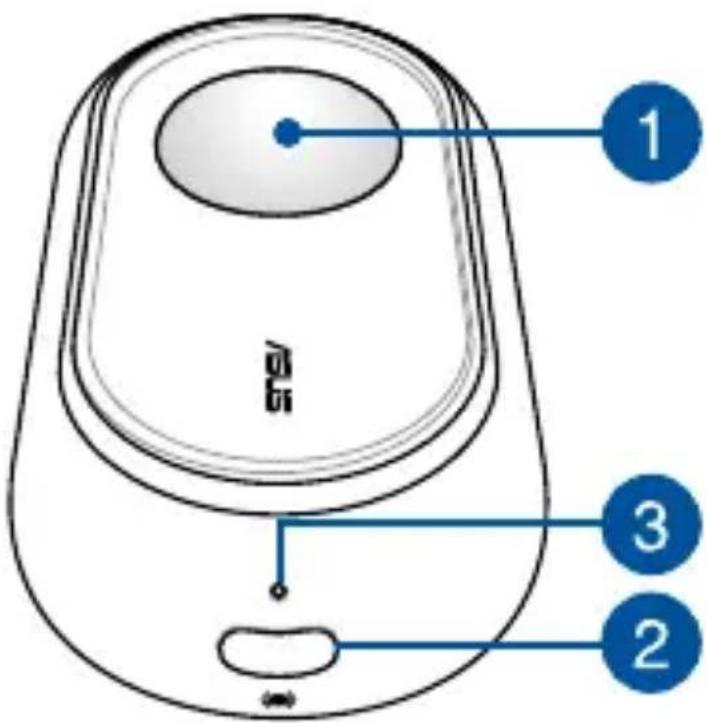
Product overview
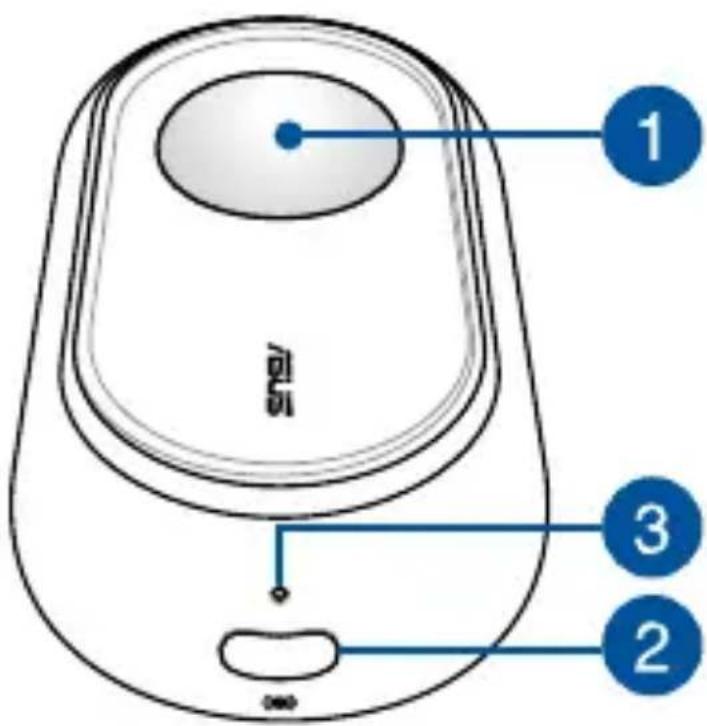

IR motion sensor
Detects motion though IR technology. The detection range of this device is ±90 degrees, with a range of 8 m.

ZigBee button
Press to connect with home gateway. Press and hold for 5 seconds to reset the device.
NOTE: Ensure to reset your ASUS Smart Home device and delete the device from the companion app to remove it completely.

ZigBee LED indicator
Refer to the following table for details on the LED status indicator:
| Color Status Description | ||
| Solid Blue | Device powering on Lights up for 1 second | |
| Disconnecting with home gateway | Press and hold the ZigBee button for 5 seconds | |
| Identifying device Lights up for 5 seconds | ||
| Blinking Blue | Connecting with home gateway | Press the ZigBee button to connect with home gateway |
System requirements
- iOS or Android smartphone.
• Wi-Fi router with Internet access. - Asus SmartHome gateway and SmartHome user account.
Safety tips
- This device is not water resistant and for indoor use only.
- Insert the battery according to the correct polarity.
- DO NOT attempt to repair the product yourself.
- Minimize the exposure to moisture including wet hands and direct contact with liquids.
- Use soft, dry cloth to clean and avoid cleaning with water, alcohol or other chemicals.
Installing ASUS SmartHome app
- This device can be set up and operated though the companion app. Search for ASUS SmartHome and download the companion app through the Apple App Store or Google Play.
- Ensure you have Internet connection before downloading.
- Ensure your smartphone is connected to your router before setting up.


ASUS
SmartHome
Refer to a qualified vendor or the ASUS website for the minimum system requirements.
Getting started
Connecting to your HG 100
-
Launch the ASUS SmartHome APP.
-
Tap + on the main page of Home Control to add devices for the home gateway.
-
Tap Add Device to join your ASUS SmartHome device to the SmartHome Gateway.
-
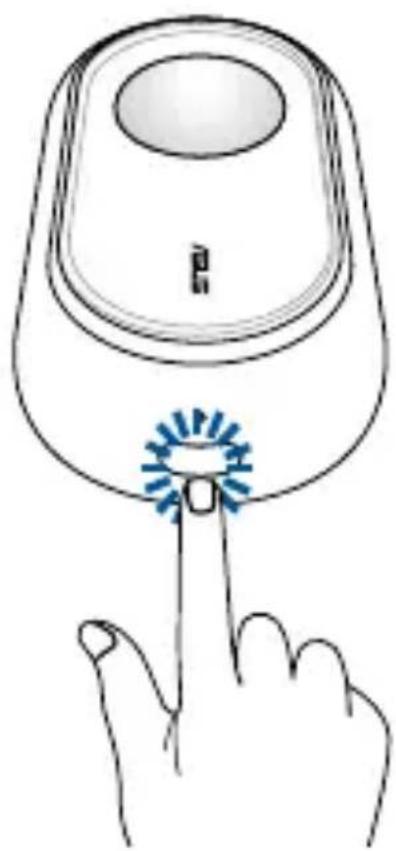
Press the Zipase button on your ASUS Smart Home device to add the device.
natural_image
Line drawing of a hand pressing a button on a device (no text or symbols)NOTE: After tapping Add Device, you can press the
ZigBee button on all your ASUS Smart Home devices to add them all at once.
5. Tap Done once all the devices are added to complete.
NOTE:
- Ensure that the battery is installed before connecting. Refer to the LED indicator to check the status of your device.
- Ensure that your device is within 50 meters of your ASUS SmartHome Gateway, and there are no obstructions such as thick solid walls or other electronic devices that may cause interference.
- The LED status indicator on your ASUS SmartHome Gateway will blink blue for sixty (60) seconds to indicate that devices can be added.
- Ensure to reset your ASUS Smart Home device and delete the device from the companion app to remove it completely.
Additional information
• This device is for indoor use only.
- Use screws or an adhesive to position the device onto a flat surface (such as a window pane or wall).
- This device will update data to the Home Gateway every time it detects a signal. You can view the current status through the companion app.
- When this device loses power, the companion app will display a gray icon and cannot be configured. The status will be updated every 5 minutes.
產品規格
產品概觀

1 IR 動作感應器
natural_image
Line drawing of a hand pressing a button on a device (no text or symbols)产品概观

1 IR 动作感应器
natural_image
Line drawing of a hand pressing a button on a device (no text or symbols)Обзор продукта
natural_image
Line drawing of a hand pressing a button on a device (no text or symbols)Produktübersicht


natural_image
Line drawing of a hand pressing a button on a device (no text or symbols)
ASUS
SmartHome
natural_image
Line drawing of a hand pressing a button on a device (no text or symbols)
ASUS SmartHome
natural_image
Line drawing of a hand pressing a button on a device (no text or symbols)Produktoversigt

IR-bevægelsessensor
natural_image
Line drawing of a hand pressing a button on a device (no text or symbols)Produktoversikt


IR-bevegelsessensor
Registrerer bevegelse via IR-teknologi.
natural_image
Line drawing of a hand pressing a button on a device with a blue starburst icon (no text or symbols)ASUS SmartHome
natural_image
Line drawing of a hand pressing a button on a device with a blue starburst icon (no text or symbols)Produktöversikt

IR-rörelsesensor
natural_image
Line drawing of a hand pressing a button on a device (no text or symbols)natural_image
Line drawing of a hand pressing a button on a device (no text or symbols)natural_image
Line drawing of a hand pressing a button on a device with a blue circular indicator (no text or symbols)natural_image
Line drawing of a hand pressing a button on a device with a blue starburst icon (no text or symbols)Popis produktu


IR snímač pohybu
natural_image
Line drawing of a hand pressing a button on a device with a blue starburst icon (no text or symbols)製品の概要
赤外線監視センサー
natural_image
Line drawing of a hand pressing a button on a device (no text or symbols).ASUS SmartHome APP

- ابدا تشفيل
natural_image
Line drawing of a hand pressing a button on a device (no text or symbols)Federal Communications Commission Interference Statement
This equipment has been tested and found to comply with the limits for a Class B digital device, pursuant to part 15 of the FCC Rules. These limits are designed to provide reasonable protection against harmful interference in a residential installation. This equipment generates, uses and can radiate radio frequency energy and, if not installed and used in accordance with the instructions, may cause harmful interference to radio communications. However, there is no guarantee that interference will not occur in a particular installation. If this equipment does cause harmful interference to radio or television reception, which can be determined by turning the equipment off and on, the user is encouraged to try to correct the interference by one or more of the following measures:
-Reorient or relocate the receiving antenna.
-Increase the separation between the equipment and receiver.
- Connect the equipment into an outlet on a circuit different from that to which the receiver is connected.
-Consult the dealer or an experienced radio/ TV technician for help.
CAUTION! Any changes or modifications not expressly approved by the grantee of this device could void the user's authority to operate the equipment.
This device complies with Part 15 of the FCC Rules. Operation is subject to the following two conditions: (1) this device may not cause harmful interference, and (2) this device must accept any interference received, including interference that may cause undesired operation.
RF exposure warning
This equipment must be installed and operated in accordance with provided instructions and the antenna(s) used for this transmitter must be installed to provide a separation distance of at least 20 cm from all persons and must not be co-located or operating in conjunction with any other antenna or transmitter. End-users and installers must be provide with antenna installation instructions and transmitter operating conditions for satisfying RF exposure compliance.
Canada, Industry Canada (IC) Notices
This device complies with Canada licence-exempt RSS standard(s).
Operation is subject to the following two conditions: (1) this device may not cause interference, and (2) this device must accept any interference, including interference that may cause undesired operation of the device.
Canada, avis d'Industry Canada (IC)
ASUS recycling and takeback programs come from our commitment to the highest standards for protecting our environment. We believe in providing solutions for you to be able to responsibly recycle our products, batteries, other components as well as the packaging materials. Please go to http://csr.asus.com/english/Takeback.htm for detailed recycling information in different regions.
Radio Frequency (RF) Exposure Information
The radiated output power of the Wireless Device is below the Industry Canada (IC) radio frequency exposure limits. The Wireless Device should be used in such a manner such that the potential for human contact during normal operation is minimized.
This device has also been evaluated and shown compliant with the IC RF Exposure limits under mobile exposure conditions. (antennas are greater than 20cm from a person's body).
Do not throw your ASUS MS101 in municipal waste. This product has been designed to enable proper reuse of parts and recycling. The symbol of the crossed out wheeled bin indicates that the product (electrical, electronic equipment and mercury-containing button cell battery) should not be placed in municipal waste. Check local regulations for disposal of electronic products.
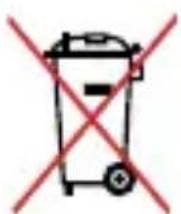
Do not throw the battery in municipal waste. The symbol of the crossed out wheeled bin indicates that the battery should not be placed in municipal waste.

English AsusTek Inc. hereby declares that this device is in compliance with the essential requirements and other relevant provisions of CE Directives. Please see the CE Declaration of Conformity for more details.
EU Declaration of Conformity

We, the undersigned,
| Manufacturer: | ASUSTeK COMPUTER INC. |
| Address: | 4F, No. 150, LI-TE Rd., PEITOU, TAIPEI 112, TAIWAN |
| Authorized representative in Europe: | ASUS TECHNOLOGY HOLLAND B.V. |
| Address, City: | FULTONBAAN 12, 3439 NE, NIEUWEGEIN |
| Country: | THE NETHERLANDS |
declare the following apparatus:
| Product name : | Motion Sensor |
| Model name : | MS101 |
conform with the essential requirements of the following directives:
2004/108/EC-EMC Directive
| EN 55022.2010+AC.2011 | EN 55024.2010 |
| EN 61000-3-2:2006+A2:2009 | EN 61000-3-3:2008 |
| EN 55013:2001+A1:2003+A2:2006 | EN 55020:2007+A11:2011 |
1999/5/EC-R&TTE Directive
| EN 300 328 V1.6.1(2012-06) | EN 301 489-1 V1.9.2(2011-09) |
| EN 300 440-1 V1.6.1(2010-08) | EN 301 489-3 V1.6.1(2013-12) |
| EN 300 440-2 V1.4.1(2010-08) | EN 301 489-4 V2.1.1(2013-12) |
| EN 301 511 V9.0.2(2003-03) | EN 301 489-7 V1.3.1(2005-11) |
| EN 301 908-1 V6.2.1(2013-04) | EN 301 489-9 V1.4.1(2007-11) |
| EN 301 908-2 V6.2.1(2013-10) | EN 301 489-17 V2.2.1(2012-09) |
| EN 301 908-13 V6.2.1(2014-02) | EN 301 489-24 V1.5.1(2010-09) |
| EN 301 893 V1.7.1(2012-06) | EN 301 357-2 V1.4.1(2008-11) |
| EN 300 330-2 V1.5.1(2010-02) | EN 302 291-2 V1.1.1(2005-07) |
| EN 50360:2001/A1:2012 | EN 302 623 V1.1.1(2009-01) |
| EN 62479:2010 | EN 50566:2013/AC:2014 |
| EN 62311:2008 | EN 50385:2002 |
2014/35/EU-LVD Directive
| EN 60950-1: 2006 / A12: 2011EN 60950-1: 2006 / A2: 2013 | EN 60065:2002 / A12: 2011 |
2009/125/EC-ErP Directive
| ☐ Regulation (EC) No. 1275/2008 | ☐ Regulation (EC) No. 276/2009 |
| ☐ Regulation (EC) No. 642/2009 | ☐ Regulation (EU) No. 617/2013 |
2011/65/EU-RoHS Directive
CE marking
| 图 | Equipment Class 1 |
Ver. 151216

(EU conformity marking)

Signature
Jerry Shen
Printed Name
CEO
Position
Taipei, Taiwan
Place of issue
4/1/2016
Date of issue
2015
Year CE marking was first affixed
Directiva 2006/95/EC-LVD
| EN 60950-1: 2006 / A12:2011EN 60950-1: 2006 / A2: 2013 | EN 60065:2002 / A12:2011 |
| Directiva 2009/125/EC-ErP | |
| Regulation (EC) No. 1275/2009Regulation (EC) No. 642/2009 | Regulation (EC) No. 278/2009Regulation (EU) No. 617/2013 |
Directiva 2011/65/EU-RoHS
Directiva 2006/95/EC-LVD
| EN 60950-1: 2006 / A12: 2011EN 60950-1: 2006 / A2: 2013 | EN 60065:2002 / A12: 2011 |
Directiva 2009/125/EC-ErP
| Regulation (EC) No: 64252898 | Regulation (EG) No: 679/2093 |
| Regulation (EG) No. 34752809 ^ | Regulation (EG) No. 379/2093 |
2011/65/EU-RoHS Direktifi Ver. 151216