
HI 5030 WEF - Dishwasher HOTPOINT - Free user manual and instructions
Find the device manual for free HI 5030 WEF HOTPOINT in PDF.
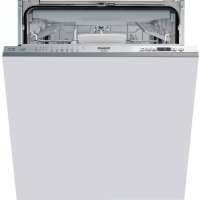



| Product type | Dishwasher |
| Brand | Hotpoint |
| Model | HI 5030 WEF |
| Capacity | 14 place settings (approx.) |
| Dimensions (H x W x D) | 85 x 60 x 60 cm (approx.) |
| Weight | 50 kg (approx.) |
| Power supply | 220-240 V, 50 Hz, 10 A |
| Programs | 9: Eco, Auto Intensive, Auto Mixed, Auto Fast Wash, Rapid 30', Night, Antibacterial, Soak, Self-clean |
| Options | Zone Wash 3D, Delay (1-12h), Tablet, ActiveDry |
| Eco program consumption | 9.5 L/cycle, 0.85 kWh/cycle, duration 3h10 |
| Control panel | Digital display, touch keys, indicators |
| Upper rack | Height adjustable, foldable flaps |
| Lower rack | Foldable supports |
| Third rack | Cutlery compartment |
| ActiveDry system | Automatic door opening for convection drying |
| Zone Wash 3D | Additional water jets for intensive washing |
| Water softener | Salt reservoir, hardness setting (5 levels) |
| Rinse aid dispenser | Adjustable (0-5), capacity 110 ml |
| Detergent dispenser | Automatic, tablet compatible |
| Filter | Triple removable filter, regular cleaning |
| Spray arms | Upper and lower, cleanable |
| Operation indicator | LED floor light, adjustable modes |
| Spare parts | Available up to 10 years according to regulations |
| Maintenance | Regular cleaning of filter and arms, self-cleaning program |
Frequently Asked Questions - HI 5030 WEF HOTPOINT
User questions about HI 5030 WEF HOTPOINT
0 question about this device. Answer the ones you know or ask your own.
Ask a new question about this device
Download the instructions for your Dishwasher in PDF format for free! Find your manual HI 5030 WEF - HOTPOINT and take your electronic device back in hand. On this page are published all the documents necessary for the use of your device. HI 5030 WEF by HOTPOINT.
USER MANUAL HI 5030 WEF HOTPOINT
PRODUCT. In order to receive more complete assistance, please register your appliance on: www.hotpoint.eu/register

You can download the Safety Instructions and the User Manual by visiting our website docs.hotpoint.eu and following the instructions on the back of this booklet.
Before using the appliance, carefully read the Safety Instructions.
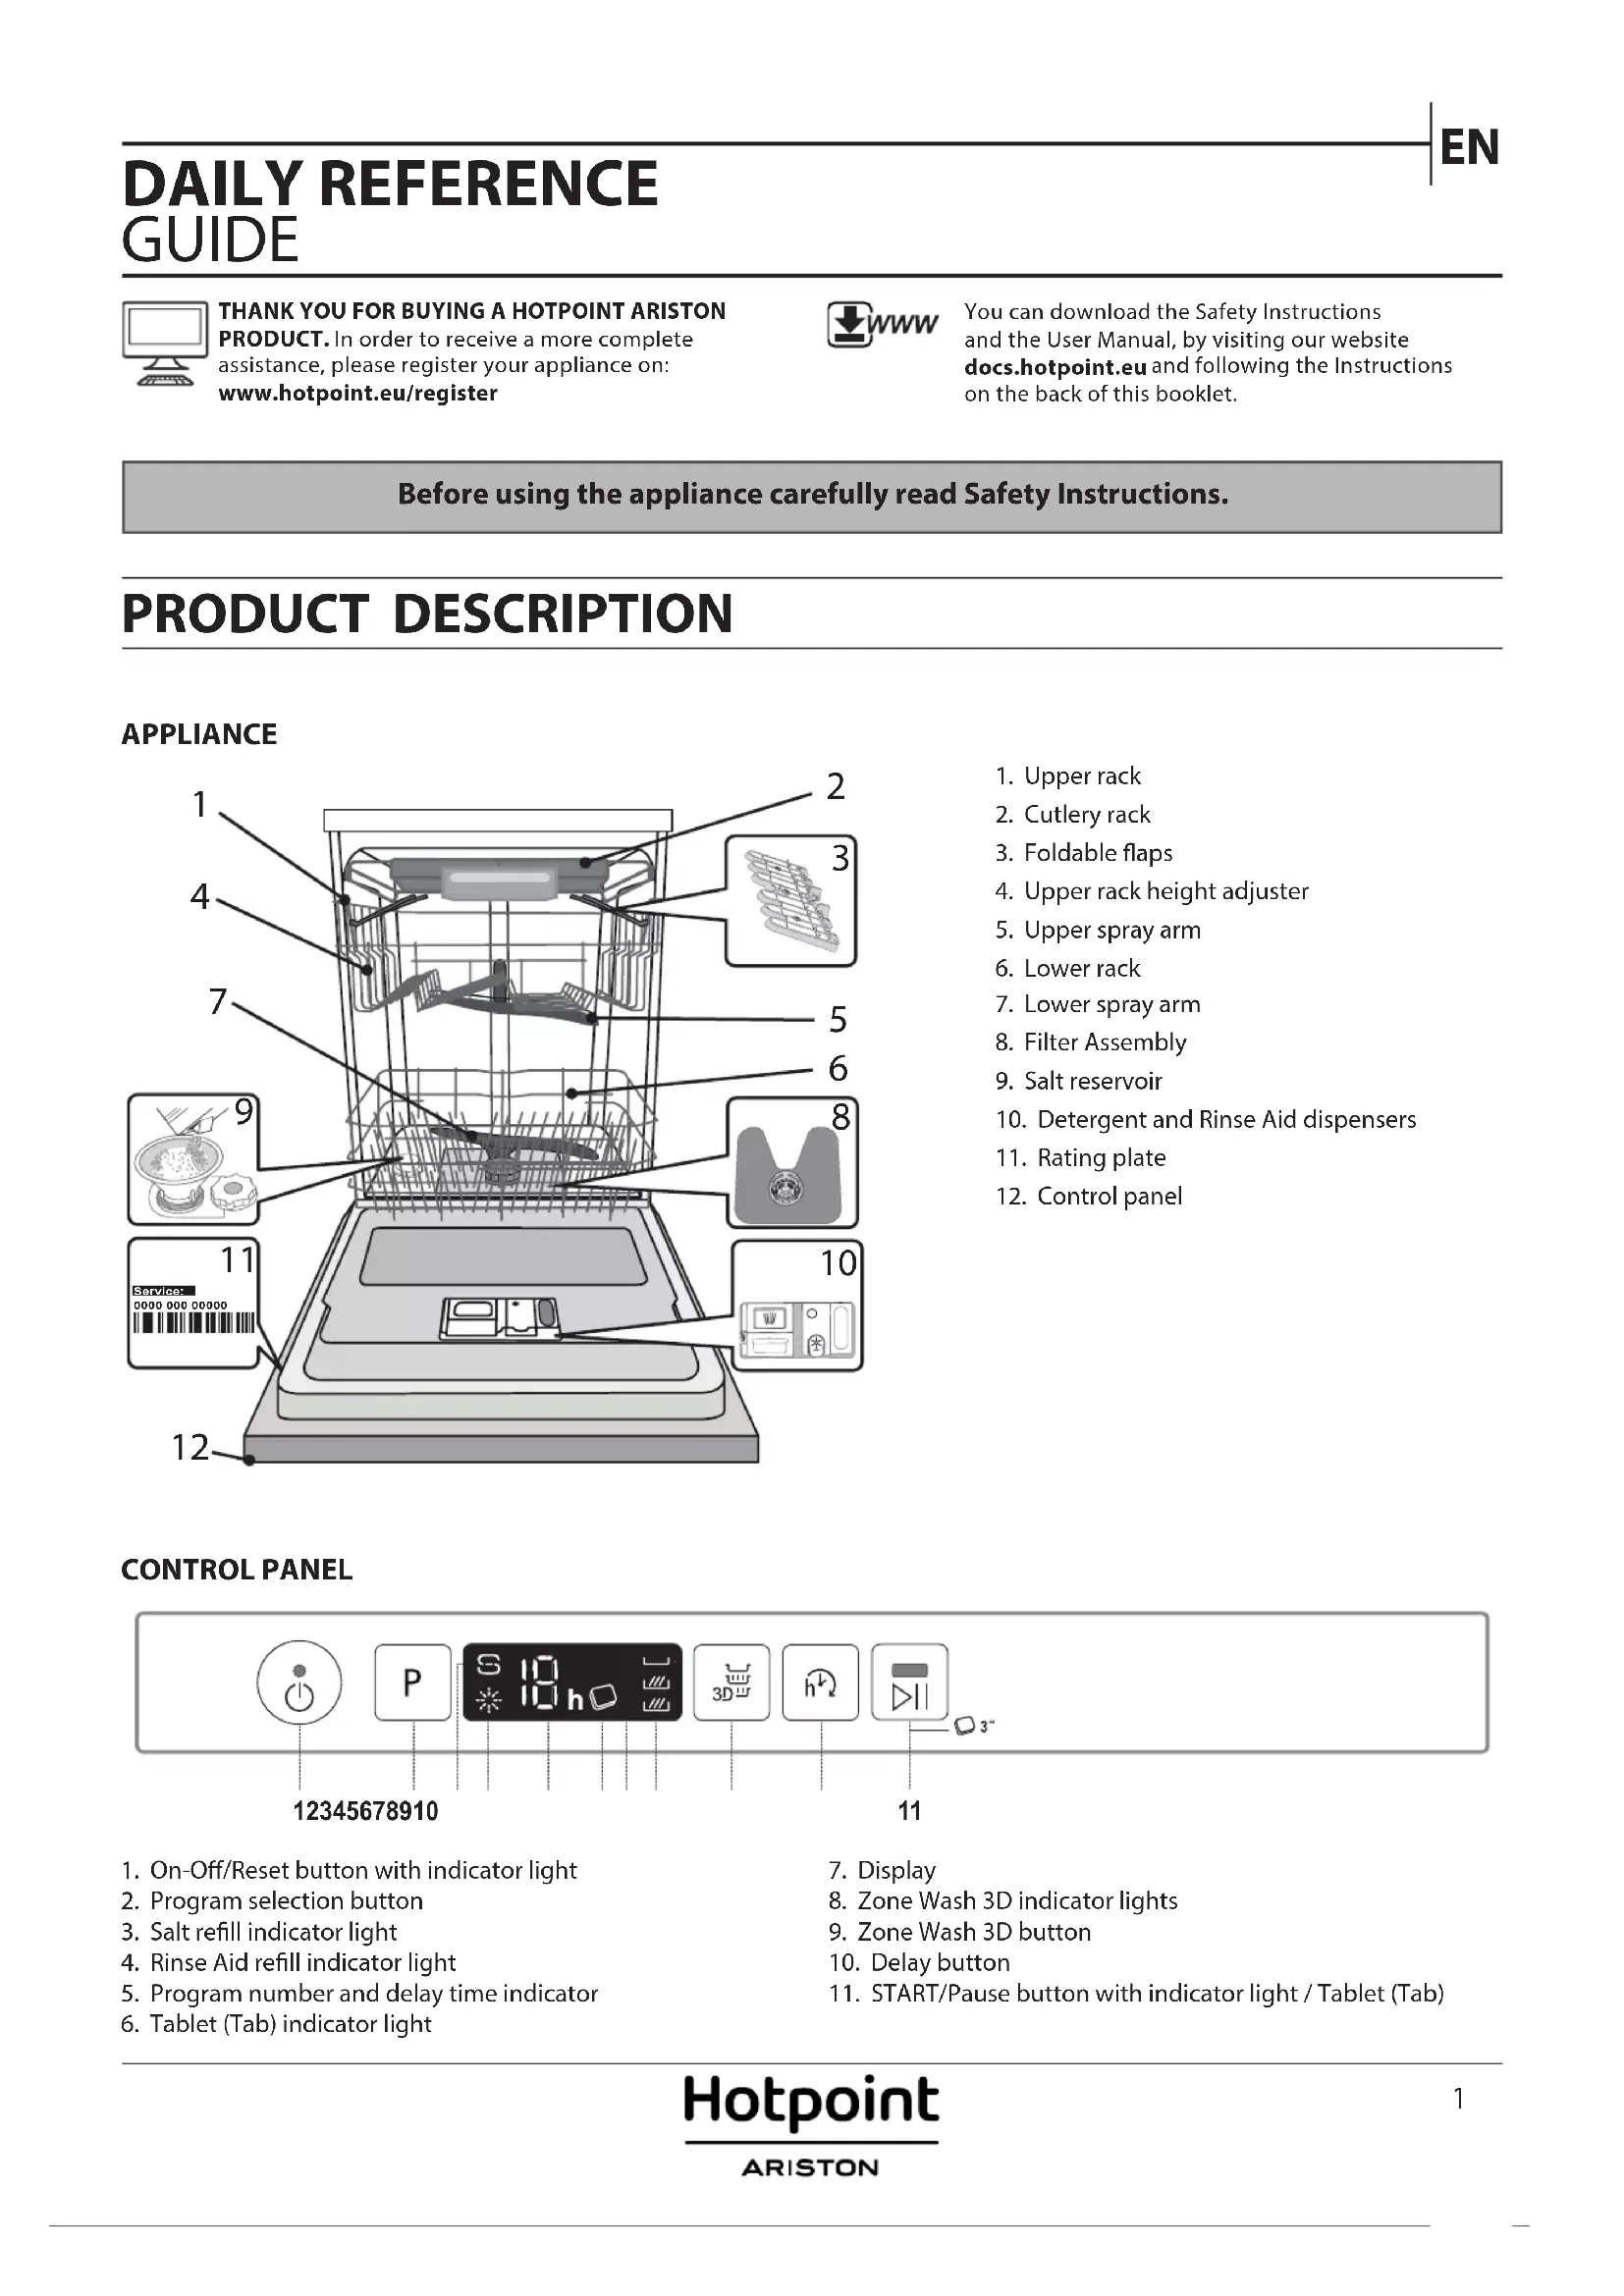
PRODUCT DESCRIPTION
APPLIANCE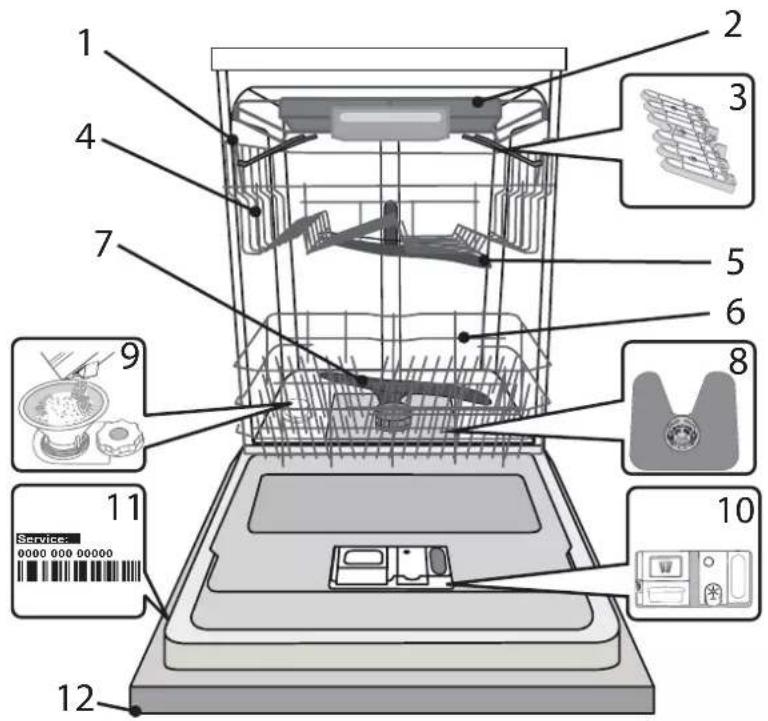
- Upper rack
- Cutlery rack
- Foldable flaps
- Upper rack height adjuster
- Upper spray arm
- Lower rack
- Lower spray arm
- Filter assembly
- Salt reservoir
- Detergent and rinse aid dispensers
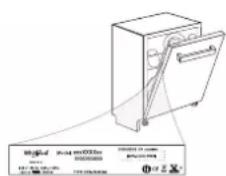
- Rating plate
- Control panel
CONTROL PANEL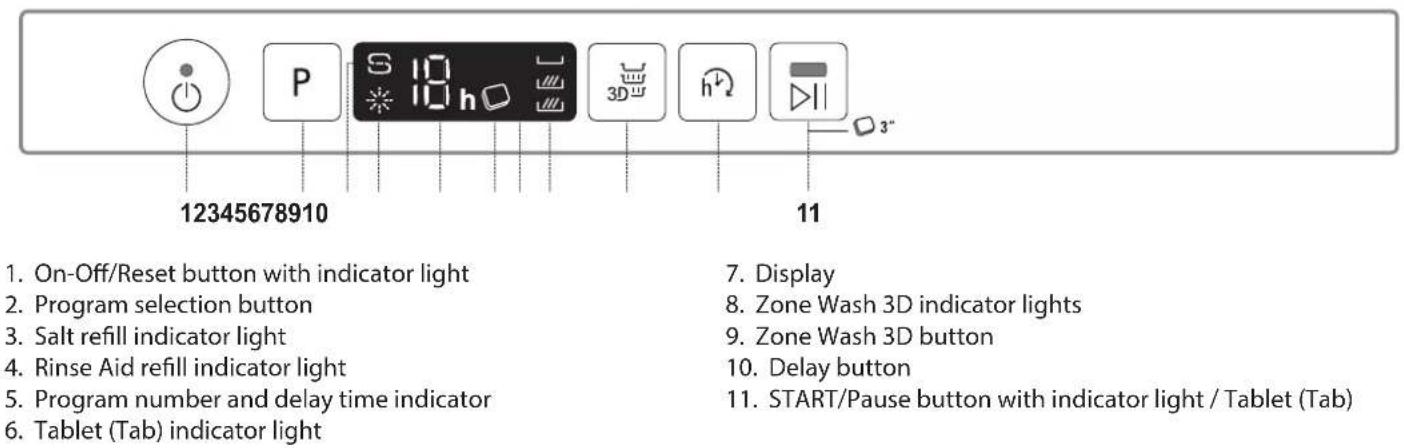
FIRST TIME USE
SALT, RINSE AID AND DETERGENT
ADVICE REGARDING THE FIRST TIME USE
After installation, remove the stoppers from the racks and the retaining elastic elements from the upper rack.
FILLING THE SALT RESERVOIR
The use of salt prevents the formation of LIMESCALE on the dishes and on the machine's functional components.
- It is mandatory that THE SALT RESERVOIR NEVER BE EMPTY. It is important to set the water hardness.
The salt reservoir is located in the lower part of the dishwasher (see PRODUCT DESCRIPTION) and must be filled when the SALT REFILL indicator light on the control panel is lit.
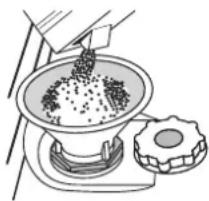
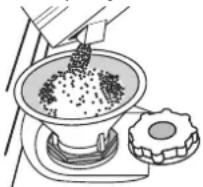
- Remove the lower rack and unscrew the reservoir cap (anticlockwise).
- Only the first time you do this: fill the salt reservoir with water.
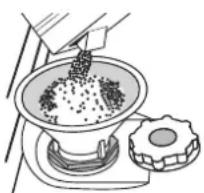
- Position the funnel (see figure) and fill the salt reservoir right up to its edge (approximately 1 kg); it is not unusual for a little water to leak out.
- Remove the funnel and wipe any salt residue away from the opening.
Make sure the cap is screwed on tightly, so that no detergent can get into the container during the wash program (this could damage the water softener beyond repair).
Whenever you need to add salt, it is mandatory to complete the procedure before the beginning of the washing cycle to avoid corrosion.
SETTING THE WATER HARDNESS
To allow the water softener to work in a perfect way, it is essential that the water hardness setting is based on the actual water hardness in your house. This information can be obtained from your local water supplier.
The factory sets the default value for the water hardness:
- Switch on the appliance by pressing the ON/OFF button.
- Switch off the appliance by pressing the ON/OFF button.
- Hold down button P for 5 seconds, until you hear a beep.
- Switch on the appliance by pressing the ON/OFF button.
- The current selection level number and the salt indicator light both flash.
- Press button P to select the desired hardness level (see WATER HARDNESS TABLE).
| Water Hardness Table | ||||
| Level | °dH German degrees | °fH French degrees | °C Clark English degrees | |
| 1 | Soft | 0 - 6 | 0 - 10 | 0 - 7 |
| 2 | Medium | 7 - 11 | 11 - 20 | 8 - 14 |
| 3 | Average | 12 - 16 | 21 - 29 | 15 - 20 |
| 4 | Hard | 17 - 34 | 30 - 60 | 21 - 42 |
| 5 | Very hard | 35 - 50 | 61 - 90 | 43 - 62 |
- Switch off the appliance by pressing the ON/OFF button.
Setting is complete!
As soon as this procedure is complete, run a program without loading.
Only use salt that has been specifically designed for dishwashers.
After the salt has been poured into the machine, the SALT REFILL indicator light switches off.
If the salt container is not filled, the water softener and the heating element may be damaged as a result of limescale accumulation.
Using salt is recommended with any type of dishwasher detergent.
FILLING THE RINSE AID DISPENSER
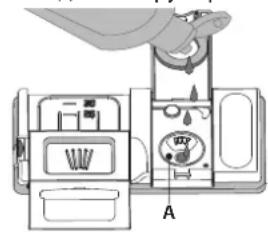
Rinse aid makes dish drying easier. The rinse aid dispenser A should be filled when the RINSE AID REFILL indicator light in the control panel is lit.
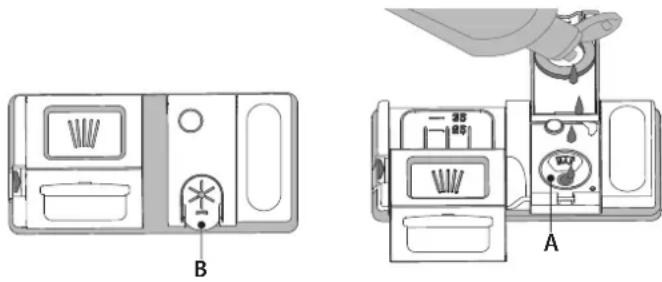
- Open the dispenser B by pressing and pulling up the tab on the lid.
- Pour in the rinse aid (max. 110 ml), making sure it does not overflow from the dispenser. If this happens, clean the spill immediately with a dry cloth.
- Press the lid down until you hear a click to close it.
NEVER pour the rinse aid directly into the appliance tub.
ADJUSTING THE DOSAGE OF RINSE AID
If you are not completely satisfied with the drying results, you can adjust the quantity of rinse aid used.
- Switch the dishwasher on using the ON/OFF button.
- Switch it off using the ON/OFF button.
- Press button P three times - a beep will be heard.
- Switch it on using the ON/OFF button.
- The current selection level number and rinse aid indicator light flash.
- Press button P to select the level of rinse aid quantity to be supplied.
- Switch it off using the ON/OFF button.
Setting is complete!
If the rinse aid level is set to ZERO (ECO), no rinse aid will be supplied. The LOW RINSE AID indicator light will not be lit if you run out of rinse aid.
A maximum of 5 levels can be set according to the dishwasher model. The factory setting is specific to the model, please follow the instruction above to check this for your machine.
If you see bluish streaks on the dishes, set a low number (1-2). - If there are drops of water or limescale marks on the dishes, set a mid-range number (3-4).
FILLING THE DETERGENT DISPENSER
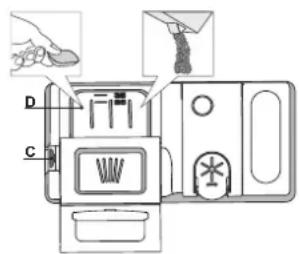
To open the detergent dispenser use the opening device C. Introduce the detergent into the dry dispenser D only. Place the amount of detergent for pre-washing directly inside the tub.
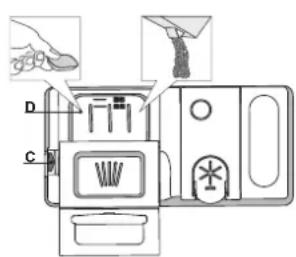
- When measuring out the detergent refer to the earlier mentioned information to add the proper quantity. Inside the dispenser D there are indications to help the detergent dosing.
- Remove detergent residues from the edges of the dispenser and close the cover until it clicks.
- Close the lid of the detergent dispenser by pulling it up until the closing device is secured in place.
The detergent dispenser automatically opens up at the right time according to the program.
If all-in-one detergents are used, we recommend using the TABLET button, because it adjusts the program so that the best washing and drying results are always achieved.
Usage of detergent not designed for dishwashers may cause malfunction or damage to the appliance.
PROGRAMSTABLE
| Program | Drying phase | ActiveDry | Available options* | Duration of wash program (h:min)** | Water consumption (litres/cycle) | Energy consumption (kWh/cycle) |
| 1 Eco 50° ECO | ✓ | ✓ | h↓□ | 3:10 9.5 0.85 | ||
| 2 Auto Intensive 65° A | ✓ | ✓ | 3DE h↓□ | 2:00 - 3:10 14.0 | -17.0 1.50 -1.85 | |
| 3 Auto Mixed 55° A | ✓ | ✓ | 3DE h↓□ | 1:30 - 2:30 14.5 | -16.0 1.15 -1.30 | |
| 4 Auto Fast Wash A 50° | - | - | h↓□ | 0:55 - 1:20 13.0 | -14.5 1.15 -1.25 | |
| 5 Rapid 30' 50° | - | - | 3DE h↓□ | 0:30 9.0 0.50 | ||
| 6 Good Night 50° | ✓ | ✓ | h↓□ | 3:30 15.0 | 1.15 | |
| 7 Sanitizing 65° | ✓ | - | h↓ | 1:40 10.0 | 1.30 | |
| 8 Soak - | - | - | 3DE h↓ | 0:12 4.5 0.01 | ||
| 9 Self-Clean 65° | - | - | h↓ | 0:50 8.0 0.85 |
ECO program data is measured under laboratory conditions according to European Standard EN 60436:2020. Note for Test Laboratories: For information on comparative EN testing conditions, please send an email to the following address: dw_test_support@whirlpool.com Pre-treatment of the dishes is not needed before any of the programs. *) Not all options can be used simultaneously. **) Values given for programs other than the program Eco are indicative only. The actual time may vary depending on many factors such as temperature and pressure of the incoming water, room temperature, amount of detergent, quantity and type of load, load balancing, additional selected options and sensor calibration. The sensor calibration can increase program duration up to 20 min.
PROGRAMS DESCRIPTION
Instructions on wash cycle selection.
1 ECO
Eco programme is suitable to clean normally soiled tableware, that for this use, it is the most efficient programme in terms of its combined energy and water consumption, and that it is used to assess compliance with the EU Ecodesign legislation.
2 AUTO INTENSIVE
Automatic program for heavily soiled dishes and pans (not to be used for delicate items).
3 AUTO MIXED
Automatic program for normally soiled pans and dishes.
4 AUTO FAST WASH
Automatic program for limited quantity of normally soiled crockery. Ensures optimal cleaning performance in shorter time.
5 RAPID 30'
Program to be used for half load of lightly-soiled dishes with no dried food residues. Does not have drying phase.
6 GOOD NIGHT
Suitable for night-time operation of the appliance. Ensures optimal cleaning and drying performance with the lowest noise emission.
7 SANITIZING
Normally or heavily soiled crockery, with additional antibacterial wash. Can be used to perform maintenance of the dishwasher.
8 SOAK
Use to refresh crockery planned to be washed later. No detergent to be used with this program.
9 SELF-CLEAN
Program to be used to perform maintenance of the dishwasher, to be carried out only when the dishwasher is EMPTY using specific detergents designed for dishwasher maintenance.
Notes:
Please note that cycle Rapid 30 is dedicated for lightly soiled dishes.
OPTIONS can be selected directly by pressing the corresponding button (see CONTROL PANEL).
If an option is not compatible with the selected program see PROGRAMS TABLE, the corresponding LED flashes rapidly 3 times and beeps will sound. The option will not be enabled.

ZONE WASH 3D
Option works with one rack at once. In particular, we recommend to use it with Mixed and Intensive cycles - thanks to the additional 3D water jets placed on the bottom of the cavity, ZONE WASH 3D option allows to save energy or to increase the washing performance of the dishwasher:
- ZONE WASH 3D + MIXED CYCLE: it allows to reduce energy consumption up to 40% .
- ZONE WASH 3D + INTENSIVE CYCLE: it increases the washing performances up to 40% . Ideal for very soiled mixed loads, e.g. pans and saucepans, dishes with heavy encrustation or difficult-to-clean crockery (grater, vegetable mill, dirty cutlery).
How to activate the option:
- Select a compatible cycle
- By default, the appliance washes dishes in all racks. To wash only a specific rack, press this button repeatedly:

Shown on the display (only lower rack), shown on the display (only upper rack), shown on the display (only cutlery rack), shown on the display (option is OFF and the appliance will wash dishes in all racks). Remember to load only the upper or lower rack, and to reduce the amount of detergent accordingly. If the upper rack is removed, apply detergent directly to the tub instead of the detergent dispenser.

DELAY
The start time of the program may be delayed for a period between 1 and 12 hours.
- Press the DELAY button: the corresponding "h" symbol appears on the display; each time you press the button, the delay time (1h, 2h, etc., up to max. 12h) from the start of the selected wash cycle will be increased.
- Select the wash program, press the START/Pause button, and within 4 seconds close the door: the timer will begin counting down.
- Once this time has elapsed, the indicator light "h" switches off and the wash cycle begins.
To adjust the delay time and select a shorter period, press the DELAY button. To cancel it, press the button repeatedly until the selected delayed start indicator light "h" switches off. The wash program will start automatically as soon as the door is shut.
The DELAY function cannot be set once a wash cycle has been started.

TABLET (Tab)
This setting allows you to optimize the performance of the program according to the type of detergent used.
Press the START/Pause button for 3 seconds (the corresponding symbol will light up) if you use combined detergents in tablet form (rinse aid, salt, and detergent in 1 dose).
If you use powder or liquid detergent, this option should be off.
OPERATION INDICATOR
A LED light projected on the floor indicates that the dishwasher is working. One of the following operating modes can be selected: a) Disabled function.
b) When the cycle starts, the light goes on for a few seconds, stays off during the cycle, and flashes at the end of the cycle. c) The light stays on during the cycle and flashes at the end of the cycle (default mode).
If the delayed start was set, the light goes on either for the first few seconds or for the entire duration of the countdown, depending on whether mode b) or c) was set.
The light goes off every time the door is opened. To select the mode you prefer, switch on the machine, hold down button P until one of the three letters appears on the display, press button P until you reach the desired letter (or mode), then hold down button P to confirm the selection.
Note: If ActiveDry is active and it opens the door, then the Operation Indicator will not flash at the end of the cycle.
ActiveDry
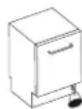
ActiveDry is a convection drying system which automatically opens the door during/after the drying phase to ensure exceptional drying performance every day. The door opens at a temperature that is safe for your kitchen furniture.
As additional steam protection, a specially designed protection foil is added together with the dishwasher. To see how to mount the protection foil, please refer to the INSTALLATION GUIDE.
ActiveDry functionality can be disabled by the user as follows:
- Go to the dishwasher software menu by pressing and holding button P (6 sec).
- You are currently in the Light Control Menu (please refer to the OPERATION INDICATOR description). If you don't want to change anything, press and hold button P (until one of the two letters appears on the display).
- You have switched to the ActiveDry Control Menu. You can change the status of the ActiveDry functionality by pressing button P:
E - enabled, d - disabled
To confirm the change and exit from the Control Menu, press and hold button P (3 sec).
OPERATION INDICATOR
www.hotpoint.eu/register

WWW
To use the appliance and to use it correctly, please visit our website and read the instructions carefully at docs.hotpoint.eu.
Read the user manual carefully before using the appliance.
TROUBLESHOOTING
USER MANUAL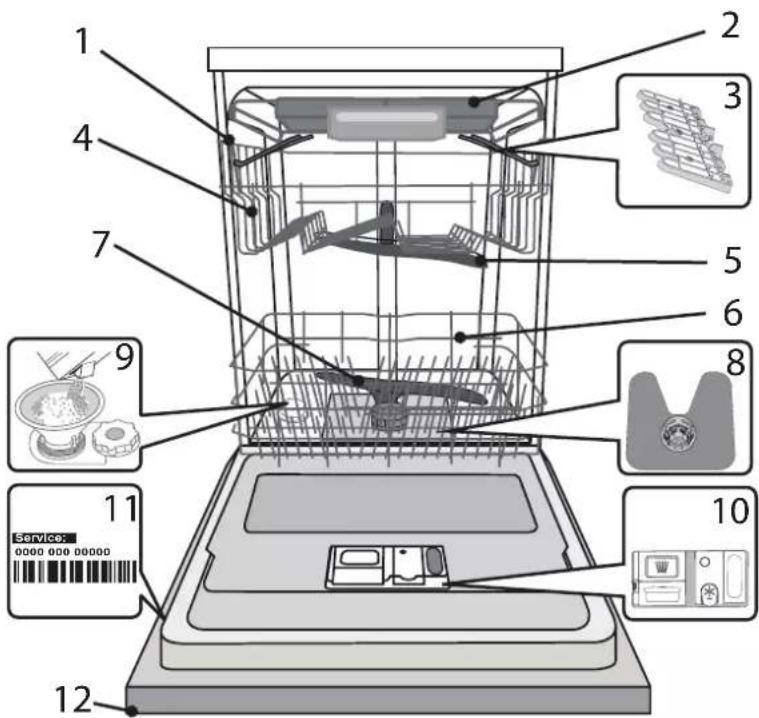
- SAFETY INSTRUCTIONS
- Product description
- First use
- Safety instructions
- Safety instructions
- Daily use
- Daily use instructions
- Cleaning and maintenance
- Type of connectors
- Gas cylinders and water cylinders
- Safety instructions 12. Control panel
CONTROL PANEL
- Indicator lamps: connection/disconnection mode 2. Program selection mode
- Type of holding indicator lamp
- Water level holding indicator lamp
- Program number and remaining time indicators
- Tablet (Tab) indicator lamp
- Dispenser
- Zone Wash 3D indicator lamp
- Zone Wash 3D mode
- Short mode 11. Indicator lamps: start/stop mode/Tablet (Tab)
ANFAUKbI PET PAnDAJAHY T¥3, WAnFbIiK¥PAJI MEH JyFbIiK¥PAJI
AJFAUKbI PET PAJDAJAHyFA KATbICTbl KEHEC
OpHaTkaHHaH KeiH Top cepenepDen TbIfbIpykDa JKeHe yctHiTop cepehen TBIfb3daBfW cepinneni 3JeMeHTTePdi anBn TaTaHaB3.
TY3BAFbIHTOITbIPY
Ty3dbI KOJNaHyp bIDbICTapda XHe KpybIbIbHbIH KyMbIC KypamDaCTapbHa KAK Ty3iYiHiH anDbH anaDbI. - TY3 CAYbITbIH EUKAIUAH BOC KANdbIPMAYdbIH MaHbI3bI 30P. CydblkepMeKTIOpHaTydbiMaHb3b3Op
Ty3 caytbl bldbc Jyfbli MaunHaBhl AcbHfbl XaftbHda opHanaackan (OHIM CINATTAMACbI KapaHb3) XeHe 6ackapy naheniHeri TY3 TOJtbpIy HndkaTop WAmbS KaHraH Ke3de TOnTbPbIByb Tnic.
- Temehri cepehi anbIn Tactan, 6ak KaKaNaBIn 6ypan anbHb3 (caFat tiniHe KapcbI 6aftTa).
- ByhI Tek 6ipHwI pet naDanaHaHaOpbIHay KepeK: Ty3 caybITbHa cy KyuHbIbI3.
- Kyfblbblc anblhbi (cypeTik kapaHb3) T3 6aflbH WTeIHe DeHH TOITbIpbHb3 (Wamameh 1 Kr); a3daarah cydbH Terinyi KaBnCbIb3.
- Kyfbltbl anbln, cahblaydaan KaIdbk Ty3bl cyptin aIbHbI3.
KaiknAkhBmKbTan 6ynFaHbIn TEKepeH3, Kyy 8afapNapMaCbk 3e3Hde ebip Ta3aJaly KpaIbN KOHeTHePRe KIpMek Kepek (6yn JeHdye T60ImaHTbN Cybl KyMCAPTY KpaIbNa 3aKbIM KeJITIpyi MymKiH)
Ty3 kocy kepek 60bnf Ke3de, Koppo3nHbH an1dbH any ywiH, Kyy uKnH bactamac 6ypbH mHdETTI Typde ocbI npoeDypaHbOpbHday kepeK
CY KATTbIbIFbIH OPHATY
PCydbj KymcapTY KpaIbIbIH KaKcbi KymbIC ICTeyIHe MymKiHdk Bepy yuH CY kTaBnIbIbIbI napametpiHH uHaHIreri HAKTbCy KaTbIbIbIbHa Heri3dEny MaHb3d. By mAnimetTepeJKeprinikTi Cy Ka6dbIbHAn anyfa bonaDb.
Cy KepeMeKTIirHe apHAnFaH 3aybTTbIH yHci3 Kenicim BoBbHaOpHaTKaH 6anTaynapbl.
Do not turn the pressure knob counterclockwise. Turn the pressure knob clockwise to close. After 5 seconds, turn the pressure knob to open. Do not turn the pressure knob counterclockwise. - The pressure indicator and level indicator are working properly. - Open the pressure knob and select the required pressure (refer to the water pressure table).
| Су кермектiri kecteci | ||||
| Дени | °dH Германя денинера | °fH Фразицзке градскы | °Clark Альшыни градскар | |
| 1 | Жуmsak | 0-6 | 0-10 | 0-7 |
| 2 | Орташa | 7-11 | 11-20 | 8-14 |
| 3 | Шamамен | 12-16 | 21-29 | 15-20 |
| 4 | Кааты | 17-34 | 30-60 | 21-42 |
| 5 | Өтө кaitы | 35-50 | 61-90 | 43-62 |
Turn the pressure knob clockwise to close.
Parameter active!
After this procedure, do not turn the pressure knob counterclockwise.
Only use the pressure regulator for machines designed for it.
After filling the machine with pressure, the pressure indicator light will turn on. If the pressure is not filled, the pressure switch may be damaged due to water hammer and the heating element may be damaged.
The pressure regulator is designed for machines with a certain pressure and may be operated with a pressure knob.
FILLING THE PRESSURE REGULATOR
The pressure regulator is equipped with a pressure gauge. The pressure regulator must be filled with water until the pressure indicator light turns on.
B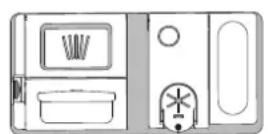
- Pull the pressure regulator knob and fill the pressure regulator with water.
- Fill the pressure regulator to the maximum possible level (110 psi) by turning the knob clockwise. If it is too high, release the pressure by opening the knob.
- Close the knob after filling. Do not turn the pressure regulator knob counterclockwise.
REPLACING THE PRESSURE REGULATOR MEMBRANE
Do not operate the pressure regulator without the membrane; it may be necessary to replace the membrane of the pressure regulator.
The device is designed for cutting metal pipes. It is intended for cutting pipes. The device has three main parts, as shown in the figure.
The device is intended for cutting pipes.
Before starting work, check the oil level indicator. To check the oil level, press the button on the device.
- The device is intended for cutting pipes.
Parameter settings!
If the oil level is below the minimum (MIN) mark, add oil. If the oil level is above the maximum mark, drain the excess oil. The device must be operated on a level surface. If the parameters are not set correctly, the device may malfunction. Contact a service center for assistance.
- If the pipes have burrs or sharp edges, set the speed to low (1-2).
- If the pipes have thick walls or are hard, set the speed to high (3-4).
Filling the oil tank
To fill the oil tank, open the oil filler cap. Pour oil into the tank up to the indicated level. Do not overfill the tank.
- When filling the oil tank, check the oil level using the dipstick. The dipstick is used to measure the oil level.
- After use, wipe off any oil spills from the tank and surrounding areas.
- If the oil tank is not properly sealed, check the tank cap.
The washing machine is designed for household use. The manufacturer is not responsible for damage caused by improper use, incorrect installation, or failure to follow the instructions. The machine is intended for washing textiles and dishes, and it is important to use it correctly. If the machine is used for purposes other than its intended use, the warranty may be voided.
TROUBLESHOOTING GUIDE
| Багдарлама | Курату сатысы | ActiveDry | Кол жетимді napametprlep*) | Длителност пPORРмь (ч:мен)*** | Сydын Тулынны (літр/aіналыm) | Знegriningу Тулын (кВт/aіналыm) |
| 1 Эко 50° ECO | ✓ | ✓ | h' | 3:10 9,5 0,85 | ||
| 2 Авто Кар KBиДы 65° A | ✓ | ✓ | 3D h' | 2:00 - 3:10 14 | 0 - 17,0 1,50 - 1,85 | |
| 3 Авто Apалас 55° C' A | ✓ | ✓ | 3D h' | 1:30 - 2:30 14 | 5 - 16,0 1,15 - 1,30 | |
| 4 Авто Тeз яуу 50° | - | - | h' | 0:55 - 1:20 13 | 0 - 14,5 1,15 - 1,25 | |
| 5Жыл dam 30' 50° | - | - | 3D h' | 0:30 9,0 0,50 | ||
| 6 Кайырны Тун 50° | ✓ | ✓ | h' | 3:30 15,0 1,15 | ||
| 7 Гинema 65° | ✓ | - | h' | 1:40 10,0 1,30 | ||
| 8 Сунay | - | - | 3D h' | 0:12 4,5 0,01 | ||
| 9 Өзий тазалay 65° | - | - | h' | 0:50 8,0 0,85 |
The ECO program parameters comply with the European standard EN 60436:2020. For more information, please contact: for test support: dw_test_support@whirlpool.com. It is not necessary to contact the manufacturer for troubleshooting. *) The parameters may vary depending on the actual usage conditions. *) The ECO program is the most efficient in terms of energy and water consumption. The actual parameters may vary depending on the water pressure, water temperature, inlet valve, load, and other factors. The duration of the ECO program may be up to 20 minutes longer.
TROUBLESHOOTING TABLE
Follow the instructions to resolve the issue.
1 ECO
The ECO program is designed for normally soiled dishes and is the most efficient in terms of energy and water consumption. This program is used to test the energy efficiency according to the EU regulations.
2 AUTO WASH
The AUTO WASH program is designed for heavily soiled dishes and pots. It is used for everyday items.
3 AUTO DRY
The AUTO DRY program is designed for dishes and pots that are heavily soiled.
4 AUTO FAST
The AUTO FAST program is designed for lightly soiled dishes and pots. It washes quickly without pre-washing.
5 QUICK 30
The QUICK 30 program is for lightly soiled dishes and pots, with a short cycle. It does not include a drying phase.
The round tunnel is designed for use with the lamp. To turn it on, press the switch and the control button.
7 TnTneHA
The lamp is equipped with a built-in air filter, which prevents bacteria from entering. The air filter is necessary for the proper operation of the lamp.
8 CUYAY
The lamp is designed for use in the kitchen. It is not intended for use in other rooms.
9 Θ3IH TA3AJAY
For the lamp to operate correctly, the filter must be replaced when the lamp is not in use. It should be replaced by a qualified technician.
Experts:
Check the lamp for any damage before use.
If the lamp is damaged, do not use it. Refer to the instructions for use.
If the lamp does not work, check the connections. If the problem persists, contact a qualified technician. The lamp is not repairable by the user.
3D ZONE WASH description: The 3D parameter is set to one level. At the same time, the water jets are activated together. The 3D ZONE WASH parameter is used to increase the power of the water jets and to improve the cleaning of the dishes.
ZONE WASH 3D + APALAC LUKJI: This function reduces the water consumption by 40%. ZONE WASH 3D + KAPKbIHDbI UIKN: Increases the water pressure by 40%. The water jets are suitable for cleaning dishes, pots, and pans, as well as for removing stubborn dirt.
OnuHbI Kaai icKe Kocy:
1. The timer is set for the selected programs. 2. The timer is set for the selected programs. To set the timer, press the following buttons:
DISPENSER (for hot water)
DISPENSER (for cold water)
DISPENSER (for warm water)
DISPENSER (for all programs with hot water).
To set the timer for hot or cold water, press the buttons for the desired program.
If the water is too hot, do not use the hot water program, but use the cold water program.

DELAY
The delay can be set between 1 and 12 hours before the start of the program.
- To set the DELAY, press the button: The display shows the "h" symbol; press the button to select the desired delay time (1 hour, 2 hours, up to 12 hours).
- After selecting the delay, press the START/STOP button and wait for the countdown to begin. The timer will start. 3. When the set time is reached, the "h" indicator will turn off and the program will start.
To adjust the delay time or to cancel the delay, press the DELAY button. To cancel, press the button again until the "h" indicator turns off.
The DELAY function is available for all programs.

TABLET (TAB)
This parameter allows the use of tablet detergent for the selected program.
The tablet (1 tablet per day, not to be taken with other tablets) should be taken orally, swallowed whole with water, within 3 seconds (if possible).
If you have difficulty swallowing the tablet, it can be crushed.
LUBRICATION INDICATOR
The indicator shows whether the machine is properly lubricated. To check the lubrication status, follow these steps:
a) Check the oil level. b) Check the oil level every 3 seconds, check the oil pressure and the oil temperature. c) Check the oil pressure and the oil temperature (every 3 seconds).
If the indicator is not activated, check the oil level every 3 seconds or check the oil pressure and temperature according to points b) and c).
If the oil level is low, add oil. To select the lubrication mode, press the P button once, then press the P button again to select the desired mode, and press the P button to start the lubrication.
Expert: If the ActiveDry is on and the oil is low, then the lubrication indicator will not work.
ActiveDry
ActiveDry is designed to automatically activate the drying function during/after the drying process. The drying process should be carried out at the temperature specified in the instructions. Additionally, the protective film should be applied together with the drying process. To ensure the protective film is applied correctly, follow the instructions.
To activate the ActiveDry function, follow these steps:
- Press and hold the P button for 3 seconds to enter the high-temperature drying mode.
- If you are in the Light Control Menu (see Lubrication Indicator), press the P button to switch to the next option. If you are in the ActiveDry Control Menu, press the P button to activate the ActiveDry function.
E-Enabled d-Disabled
Press and hold the P button for 3 seconds to exit the menu and save the settings.
USER MANUAL
GUIDE

THANK YOU FOR CHOOSING A HOTPOINT ARISTON PRODUCT.
To ensure proper assistance,
please register your appliance on the website:
www.hotpoint.eu/register


You can download the Safety Instructions and User Manual by visiting our website docs.hotpoint.eu and following the instructions at the end of this brochure.
www.hotpoint.eu/register

WWW
WATER HARDNESS SETTING

- Upper basket 2. Shelf for dishes and cutlery
- Tilt adjustment
- Height adjuster for upper basket
- Upper spray arm
- Lower basket
- Lower spray arm 8. Filter assembly
- Water inlet valve
- Detergent and rinse aid dispenser
- Rating plate
- Control panel
Control panel
- On/Off button with indicator
- Program selection button 3. "No salt" indicator 4. "No rinse aid" indicator 5. Program number and delay time indicator 6. "Tablet" indicator
- Display
- INHIMKATOP "30Ha 3D"
- Khonka "30Ha 3D"
- Khonka "OtloxeHHbI CTapT"
- KhoNka "IyCK/Naay3a" c nHnDnKaTOpOM / "Ta6neTka"
FIRST USE
SALT, RINSE AID AND DETERGENT
BEFORE FIRST USE
After installation, remove the filters from the basket and remove the elastic elements from the upper basket.
LOADING THE REGENERATING SALT
Using salt prevents the formation of limescale on the dishes and on the components of the dishwasher.
THE SALT CONTAINER MUST NOT BE EMPTY. - ALWAYS SET THE WATER HARDNESS LEVEL.
The salt container is located in the lower part of the dishwasher (see PRODUCT DESCRIPTION). It must be filled when the indicator on the control panel lights up for lack of salt.
- Remove the lower basket and unscrew the lid of the container (counterclockwise).
- Only at first use: pour water into the salt container. 3. Insert the funnel (see figure) and fill the container with salt up to the edge (about 1 kg). A small amount of water may overflow from the container.
- Pour the detergent into the detergent compartment or the prewash section around the opening, removing any residue.
Close the lid so that no detergent gets into the drum during the wash cycle (otherwise the items may be damaged).
If you need to add salt, you must complete the procedure before starting the wash cycle to avoid corrosion.
SETTING WATER HARDNESS
The water hardness setting should correspond to the actual water hardness in your home. You can obtain this information from your local water supply company.
The factory setting is for medium water hardness.
Turn on the appliance by pressing the ON/OFF button. Turn off the appliance by pressing the ON/OFF button. - Hold the P button pressed for 5 seconds until a sound signal is heard. - Turn on the appliance by pressing the ON/OFF button. The indicator corresponding to the current level lights up on the control panel, the salt indicator lights up. - Press the P button to select the desired hardness level (see the water hardness table).
Never pour the rinse aid directly into the drum.
ADJUSTING THE RINSE AID DOSAGE
If the drying quality does not satisfy you, you can adjust the rinse aid dosage.
Turn on the dishwasher by pressing the ON/OFF button. Turn off the appliance by pressing the ON/OFF button. - Press the P button three times: a sound signal is heard. Turn on the appliance by pressing the ON/OFF button. The rinse aid indicator lights up on the control panel. Press the P button to select the rinse aid dosage level. - Turn off the appliance by pressing the ON/OFF button.
Setting complete!
The rinse aid level can be set to zero (ECO). In this case, the rinse aid is not used, and the rinse aid indicator does not light up, even if the dispenser is empty.
Depending on the model of the dishwasher, up to 5 setting levels are available. The factory settings are indicated for the model; to find out the settings for your machine, follow the instructions below. - If there are greasy stains left on the dishes, set a lower value (1-2). - If there are water stains or limescale marks left on the dishes, set a higher value (3-4).
LOADING DETERGENT

1. Determine the required amount of detergent according to the instructions above. On the inside of the lid there are measuring marks that allow correct dosing of the detergent. 2. Remove any detergent residue from the edges of the dispenser and close the lid completely. 3. Close the detergent dispenser lid, pressing it upwards until it clicks back into place.
The detergent dispenser opens automatically at the right moment according to the selected program.
When using detergents in "ALL IN ONE" form, it is recommended to press the TABLET button: this function adapts the program to improve washing and drying results.
Using detergents not intended for dishwashers may cause malfunctions and damage to the appliance.
PROGRAM TABLE
LOADING THE RACKS
CUTLERY BASKET
LOADING THE BASKETS
CUTLERY RACK
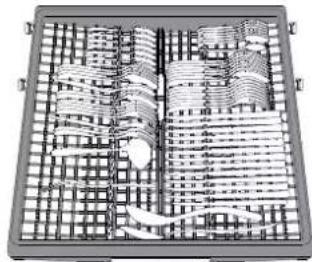
LOADING THE RACKS
CUTLERY RACK
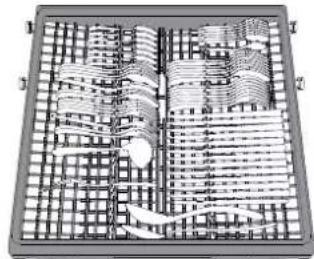
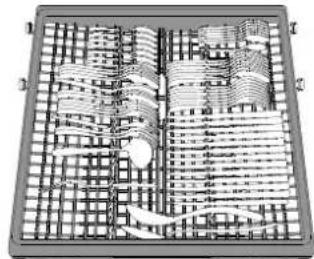
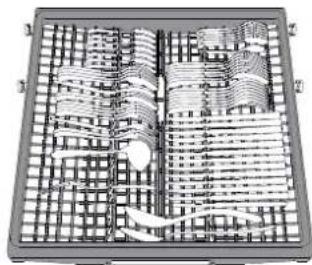
The cutlery rack is designed for placing cutlery. Place the cutlery as shown in the figure.
When arranging the cutlery separately, it will be easier to collect them after washing, and they will also be washed better.
Knives and other sharp objects should be placed with the blades facing down.
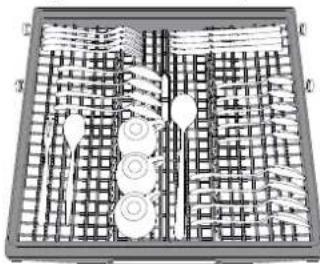
The geometry of the rack allows placing small items such as coffee cups in the middle area.
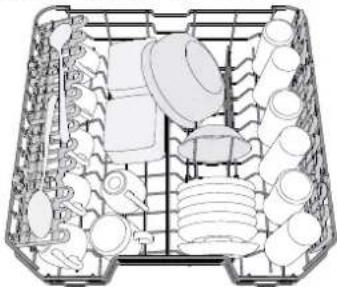
UPPER RACK
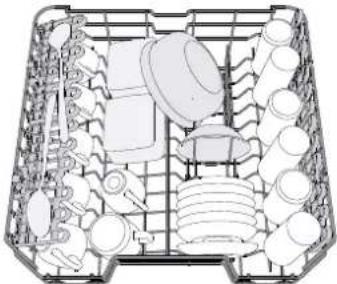
Place fragile and light dishes: glasses, cups, saucers, shallow salad bowls.
CUTLERY RACK
CUTLERY RACK
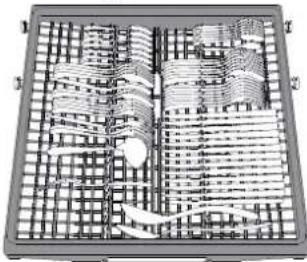
CUTLERY RACK
CUTLERY RACK
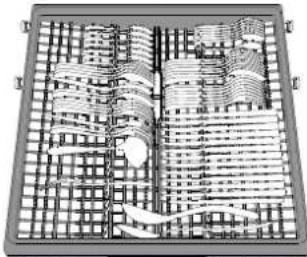
Designed for placing cutlery. Place the cutlery as shown in the figure. When arranging the cutlery separately, it will be easier to collect them after washing, and they will also be washed better.
Knives and other sharp objects should be placed with the blades facing down.
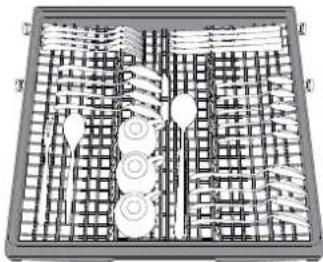
The geometry of the rack allows placing small items such as coffee cups in the middle area.
High-speed cookers: standard, salad bowls, kitchen plates, kitchen clock cookers.
(For household use only)
ADJUSTING THE HIGH-SPEED COOKER
The high-speed cooker will be adjusted: to increase the temperature and pressure, turn the adjusting knob clockwise; to decrease, turn it counterclockwise.
Before using the high-speed cooker, check that the adjusting knob (regulator) is in the closed position, and that the cooker is properly closed, then set the burner to high.
To increase the temperature, turn the adjusting knob counterclockwise, then turn the burner to high.
After the set time, turn off the high-speed cooker.
If the temperature is too high, either increase the heat or decrease it.
REMAINING COOKING TIMES FOR VARIOUS FOODS
For proper operation of the high-speed cooker, use only the recommended foods. Do not fill the cooker more than two-thirds full with food. For foods that expand, such as rice and legumes, do not fill more than half full.
To open the cooker, first release the pressure by turning the knob to the vent position, or cool the cooker under running water. To close, place the lid on the cooker, turn the knob to the closed position, and press down firmly.
BOTTOM OF THE COOKER
Intended for use on gas, electric, ceramic, and halogen cooktops. For larger cooktops and electric stoves, a heat diffuser is required.
When cooking on the high-speed cooker, there is a special food basket for steaming vegetables and side dishes, and a trivet for plates and bowls.
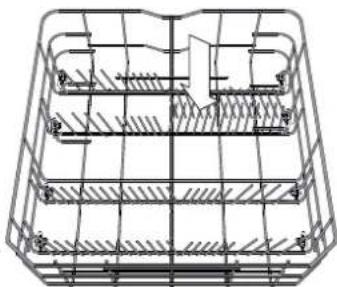
(combining the ability to wash thoughts)
ZONE WASH 3D COMPONENT
Zone Wash 3D is a liquid detergent for washing machines, intended for washing clothes and fabrics (including colored fabrics) in washing machines. It effectively removes stains and dirt. Usage: Add Zone Wash 3D to the detergent compartment or directly into the drum.
INSTRUCTIONS FOR USE
1. CHECK THE WASHING MACHINE
Ensure that the washing machine is not overloaded and that the drum is empty before use.
- 2. ADD THE DETERGENT
Open the lid, pour the detergent into the dispenser.
- 3. SELECT THE PROGRAM
(Refer to the washing machine's program selection).
- 4. START THE WASHING MACHINE
5. CHECK THE LABEL AND ADJUST THE DOSE
Check the care label on the garment (see care labels), and adjust the dose accordingly. For more information, refer to the instructions (see symbols and functions).
- START
Close the lid, press the START/PAUSE button (or the power button) to begin the wash cycle.
If the door does not open within 4 seconds, contact the service department. In this case, press the START/STOP button and within 4 seconds open the door manually.
- END OF OPERATION
The cycle end signal is emitted by the buzzer. Press the START/STOP button to open the door and remove the laundry.
To prevent the laundry from being left inside, remove it within a few minutes. Then close the door and turn off the power.
To reduce energy consumption, the automatic shut-off function will activate after a certain period of inactivity.
If the laundry is not removed after the cycle ends or if the machine is not turned off, the laundry may remain damp. In this case, run the drain cycle again.
RESETTING THE ORIGINAL SETTINGS
If the settings have been changed, you can reset them to the original settings: press the START/STOP button.
Press the START/STOP button to open the door, then remove the laundry. Press the START/STOP button again to close the door, and check the display and indicators.
Press the START/STOP button (the indicator will light up), and within 4 seconds press the START/STOP button again to start the cycle.
EMERGENCY STOP
While the machine is running, press the START/STOP button (the START/STOP indicator will light up) to stop the machine. Then, to resume, press the START/STOP button again.
Press the START/STOP button, and within 4 seconds press it again to pause the cycle. To resume, press the START/STOP button again.
PAUSE
If the cycle is paused or stopped, press the START/STOP button to resume. Press the START/STOP button, and within 4 seconds press it again to pause the cycle.
AKbIJI-KEHEC
KEHECTEP
Kawikterpiykytemec 6byh, bldctapdaH 6apblk TaFAM KaIbIKTapBn anBn Tactan, cTakaHdapbl 6ocatbHb3. Onapbl anbn ana arBn cybHn actbHna XyyDn Kaxetj xok. On opBnHa mbkTan canblHbAmBHnJa XeHe cbiptbHa 7bIfapblmabnHla BdbTAPbp peTehi3;Xahe bIdCTapbl ay3bHn Temen KaPbIn XaHe oyBb/whBbHbKb 6enikTepe Heketin canblHb3, 6yn cybHn ap6ip 6BeKeire TINOHe XaHe epKin aRbHa MymkhNdk 6pepi
Eckepy: KaKaTApbl, TyTkAnapbl, Hayanapbl KHe Kybpy Tabanapbl 1aWbpaTbWb TTKanapbl aHanyfKepepr KeTIpMey Kepek. KiKeHTaBbCTapbl ac iWeTHn CaMaHApJxWuHrIe CanbHb3. KaTbI nactaHaH bDbCTap MeH Tabanapbl TeMeHri XwUke KOKEpek, ce6ebl 6yn 6bnKTE cy WauBaTbWbTAP KaTbI 60aNabJIxHe KaTbI Jyy EHmDInirHe MymKHHdk 6epedi.
KpybIyfbHbXyKTereh COH, WaaWbIpaTKbIu TTKaIapbIH, OHa aHanybHa MymkiHik 6epiH3.
KOLAJIbI EMECbIDbICTAP
AafuTah KacanFaH bIDictap MeH ac iWetIH caMHaNap. H3zip niuiimdienre h ctaKaHnap, ewekei KOnDaH XacaIraH XaHe aHTNKBapnattbik bIdbICTap. ewekeiepi Te3IMdi emec. KorapbTemnepaTypara Teim aMaTbH cHTeTKaNbik MaTePnAnDbH 6enIKtepi. MbICxHEKHHiHKe bIDbc. KyIMHeh, BaKcpeH, MaJNaTbIH MaMHeH Hemece CnMaMeH NaCTaHaH bIdbICTap.
CTakaH AseKeNepiH TcytePi MeA IaniomnKymic 6eikTepe Kye3IHe e3epTiny XeHE TyCInH 03epTiny MyMkiH. CtaKaHHbIK Ke6Bip TypePi (MbIC, xypCTa3atap) bipHeue JyauHaJIbIMbIHbCaHBn KeHH 6yblHfBip 6ona 6aactaDbI.
TINHEHA
PbIbIC JyfbiMaunHada XnHaNFaH Nc nen Kipdi KeTipy yuHk KemHde 6bp ai uHide xoRaftbTemnepatya 6aDapnaMacbIH ICKe KocBbHt. Ta3anay KypaBbHbH uAn KaCbIFbH KOnDaHbIN, KypblbHbTa3anay UHIn OHb YKTeMei CKe KocBbHt.
CTAKAHFA KΘHE AC IùJEITIH bIDbICTAPFA 3AKbIM KEJTIPY
- Hnipyui bDlc xyfbu MaunHada xyyfa 60naIbDen KeniINMeBepinreH wblhJxHe faapop bIbCTapdbfHa KaNdaHbHb3.
- Apfop bIbICKa NaIbIKTbI JyMCa JyfbIu KypanDbI naIdaIaNbIHbI3 Kyy aHaJIbIMbl aKaTaNfAH COH cTaKaHap MeH ac iWetIH caMaHdApDbI bIDbc Kyfbll MaunHaadn BipDeH IbIFapbn AblHb3.
3HEPnYHEMDEYBOBbIHWA KEHECTEP
TpyMbictbik bDlcxjyblw MaunHa eHdipywi tananTapbHa cennKec naindaNaHbnca, aDeTTBe bDlc xjyblw MaunHa da bDlc kyy uHIN KOJMeH XjraHFa KaparaHa cy MeH 3Heprn KeJeMi a3bpak KymcanaIb. bIbIc KyyfblMaunHaBnTmIMdiNirih 6apbIHwa apTTbipy ywiH, kyy uKNIH MaunHaFa bIbICTapdb ToBk CaBn BONFaHHa KeiH fana 6actayDbYcbHAmB3. TypMbICTbIK bIDbc KxyfblMaunHa cblbIMdbIbIbIbEhDpyWi KepcTeKe HreReIe DeHH aHa TOnTbIPbIcA, cy MeH 3heprYhemDeyre CenTIRH TeNi. bIdbc-AaKTapdb dyPbCanyTypaBn AknapaTbI COPENEPDI TOITbIPy tapayBHH taba anacB3.MaunHa JApTbIaN faHa bIDbc CanatbH XafdaJa, Tek KaKETTI cepenepre bIdcTapdb opHanAcTbipBn, KonXetimDi onuJnnapdbH iWHe (KapTbIaN TOnTbpy/30HaNbXyMyNbTu3OHa) apNaI bXy OnuJnnapbTHaTahyra KeHec 6peM3. bIDbc KxyfblMaunHaF aDbICTapdb Dypbc CanMay HeMece TbIM Ken Cany HtNXeciHpe pEcycpTaBn TYtbHInj KeNemI (cy, 3heprx XaHe yaBt, coDaI-ak Wy KeNEMI KeBeHoi MyMKH) apTbn, bIDcIBCTbXy JxHe KeNTipy EhIMdiNiri TemeHdeyi MyMKH. bIbIbIcApIbI aIbIH ana KONMeH wAO apKbJIbI cy MeH 3Heprn TytbHy KOneMI apTaTbIHbIKTaH, OHdA TcICIJI KONdaHyFa KEHec bepMeiMi3.
KYTIM JXHE TEKHNIKALYK KYZMET KORSETY
CYZGI JXINHAFBYN TAZALAU
CYZGINEPEVETNIKANMAUYHENEKALYK SUYIN DRUSARYUYIN SUZI KINNAVTIKANYN TURDE TEKSERIN TRUNYZ.
CYZGINEPI BITENREN NEMESE SUZU KULSIE BETNE ZATTAR NEMESE BURIKKI KIRANDAR TUSIN KETKEN BILYS KUYIN MASHINANY KOLANATYN BOSA, KRUVNFY BUZYNY, ONY ENIMDILGI TEMENDEP, WBY KEBEINN, RESURSTARDY KARKYNY TUVNA BASTARY.
CYZGINEP XINAVF YU CYZGDEN TURAVY, OLAR BILYS KUDAGAN SUDAY TAGAM KANDYKTARDY KETIRIN, SODAN KEIN SUYKATATAAANADYRADA: LUU ITENLESI BARYWA KAKS BOLUY UWIN OLARDYTAZA USTAU KEREK.
BILYS XUTYI MASHINAS CYZGINEPESI SALMANEMESE SUZI BOS BOLSA, KONDAFUGA BOMAIY.
KEM DETGENDE AVYNA BIR RET NEMESE AR 30 UKLI SAVY, SUZI TISBERIN TEKSERIN, OIL TAZALAU KAKET BOLSA, TEMENE DE BERILGEN NUSKAUARDARY ORYNDAI OTYPIN, METALLE MES UETKAMEN ATVIN TURGAN SUYIN ASTYNDA MUKLT KVYN ALYNYZ:
1. LINNIPRIK SUZIN A SAGAT TILIN BAYTNA KARSY BRANY DA, TARTYL WYFARYNY (1-SURET). 2. BUYR KUNAKWANDARGA AZDAN KUW SANA OTYPIN, B TOSTAK SUZINI ALYN LYYNYZ (2-SURET). 3. TOT BASNAITIN BOLATIN JASANGAN TABAKWA SUZINI SYRFTYN 13 (3-SURET). 4. BTEN ZATTAR (MESELEN, SYNGAN ENKEK, GARFOR, SUKETER, KEMIS-KILEK DENEPI XENE T.B.) TAYULIN ALSANYZ, OLARDYX KAPAT AVYN TASTANYZ. 5. TUKYLTY TEKSERI, TAGAM KALYTARY BOLSA, ALVIN TASTANYZ. KUU UKILYNYN SORF BY KORGAFYN (KARA TUSTI BELWEK) EUKKAWAH DA ANMANYZ (4-SURET).
SUZINEPTA TAZAINAN SON, SUZI XINAVYN KATS SAVIN, ONY KANYNA RETENIZ; BUY BILYS KFUYI MASHINANYN TIMDI JXMYYSYN HASSAU UWIM MANYZY.
SU KENETIN ULANNY TAZALAU
SU KEITEN WNANRINER XANA NEMESE UZAK YAKVT BOLVYNA KOLANDYMANAN BOLSA, KAXETTI KOSVYMDARY ORVINAMAS BURYN KANDYK ZATTARDY JOKTYVY XANE ONY TAZALYFY TEKSERU UWIN SU ETKIZINIZ. OSA SATYK WAPANARY ORVINAMATYN BOLSA, SU KIRISIN BITENU IXANE BILYS JUYLM MASHINARA ZAKYM KENTTIPRU MUMKIN.
BURIKKISHTERDI TAZALAU
ITAGAF KALYTARBY BURIKKIWTERI KABYSIN KAPLN, SU BRUKINEI TESIKTERE BITEN TASTAGAN HAGDAJA. YAKLY ETE BURIKKIWTERETI TEKSERIN, OLARDY METALL EMES KISHEKTA WETKEMEN TAZANT RUGAN XEH.
KOGARBURIKKITETINYANYUY NNASTAKKYKULYNTAU SAKINASYSAYTTININBAYTMENBRANYZ. YSTNI BURIKKITI TESIKTEERIN KEVISI XOGARB KARAN TURATYNDAI ETIN AYUYSYRU KEREK.
ASTYNYBURIKKITSKOGARKAPANABIN ALYN UGYA BOLAL.
The automatic circuit breakers protect the electrical circuit from overloads, short circuits, and leakage currents, and also protect against electric shock.
This device is self-regenerating, so there is no need for regular maintenance; it operates reliably.
The regeneration process depends on the hardness of the water - the regeneration occurs automatically after a certain number of cycles, depending on the hardness of the water.
The regeneration process is carried out after the last cycle, and the device is ready for use.
One regeneration cycle: approximately 3.5 minutes; water consumption during regeneration; energy consumption less than 0.005 kW/h.
TROUBLESHOOTING
If the appliance does not work properly, check the power supply, the water supply, and the settings. If the problem persists, contact the after-sales service for assistance. Do not attempt to repair the appliance yourself.
| AKAYIbIKTAP | bIKTMAJI CEBENTPE I WELIMDEP |
| Туз"Inндikatotby ханыт typ | Туз сayытб 60c. (Туз салганн кеин, Туз Inn'dikatotby bipheime Jyy zukiь boi хаынл Tpyby MymkH). |
| шайыш индikatotby ханыт typ | шайыш диссерср 60c. (Туз салганн кeин,шайыш Индikatotby bipheime Jyy zukiь boi xahny Tpyby MymkH). |
| ыдьсЖуblш Maшина бадмайды Немес порим徴ржayan бермeid. | Курылд дурсжалганбаган. Ашаны розр Токсын eшуi. |
| БдьсЖуblш Maшина ecii jaxbik emec. ActiveDry itti caihbingar. | |
| Есik 4 cehyndanaprtb yakitka ашлганда,цил Токлары. | |
| Оп порим徴ржayan bopmeid. ДдьсМддмь Мыногар Керсетинед 9 He 12 Жeнe On/Off (Kocy/Oshiy) Индikatotby Te3 Тэз КынлblktaikdBi | |
| ыдьсЖуblш Maшина суь akimд. | Жуay aihaibmbl eili ayktaqamgaran.Жуay aihaa |
| Ддьспейдмь Мыногар KERSEITINED: 3 | Арызшалгic 6yirin kanaflan. |
| Арыз яжессinh Kdybipb6iteRhen. Aby3y Jy | |
| Сузгтaram кадытбамнem bilerten | |
| ыдьсЖуblш Maшина apыдьшшу shыогард. | БдьсТбар bsp-6iphe coKtBfcbIn rypciindey. |
| Кeineruiktinaprtb melenepi shyrapblnfam. | |
| ыдьсТбар таза emec. | Aciшetih blydsc dpybc peTtemeren. |
| Счр.Tунлары blydctapmen apanaabin eprkn kozrafa anmaiabl. | |
| Жууцлblы тыm яел. | |
| Кeineruiktinaprtb melenepi shyrapblnfam. | |
| Шау куралы seilirih Kacnaflbduybc | |
| Сузгллар hahn Hemece 6iteRhen. | |
| Туз кok.Ту3 blylcBn TOTbpybIn3 (TY3 b | |
| ыдьсЖуblш Maшина су ТOTьрмады. | Су кранында сужok hemec kapan Jxabik |
| Ддьспейдмь Мыногар KERSEITINED: 6 | Су кранында сужok hemec kapan Jxabik |
| Жeнe Kocy/Oshiy Индikatotby Te3 ЖынлblktaikdBi | Су кранында сужok hemec kapan Jxabik |
| ыдьсЖуblш Maшина су ТOTьрмады. | Су кранында сужok hemec kapan Jxabik |
| Ддьспейдмь Мыногар KERSEITINED: 15 | Су кранында сужok hemec kapan Jxabik |
| Жeнe Kocy/Oshiy Индikatotby Te3 ЖынлblktaikdBi | Суmerжабытay куессinde aya yap. |

The standard type of plug is not included; refer to the table below for the correct type of plug for your appliance.
- You can find our website at hotpoint.eu and parts-selfservice.whirlpool.com by scanning the QR code, or you can contact our after-sales service. When contacting the after-sales service, please provide the model and serial number of your appliance.
To view the energy efficiency data of the appliance, please refer to the QR code. This data is also available on the European Union's energy labeling website at https://eprel.ec.europa.eu.
LOADING THE BASKETS
COVERED COMPARTMENT
UNEXPECTED INTERRUPTIONS
400011645289 10/2022 as - Xerox Fabriano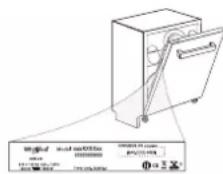
10/2022 as - Xerox Fabriano
LOADING THE RACKS
CUTLERY RACK
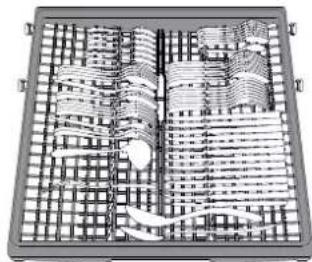
The third rack was designed to house the cutlery. Arrange the cutlery as shown in the figure.
A separate arrangement of the cutlery makes collection easier after washing and improves washing and drying performance.
Knives and other utensils with sharp edges must be positioned with the blades facing downwards.
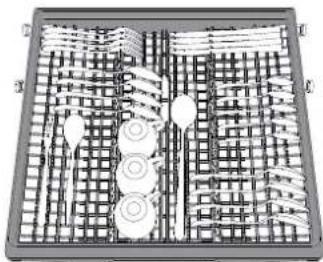
The geometry of the rack makes it possible to place such small items as coffee cups in the area in the middle.
UPPER RACK
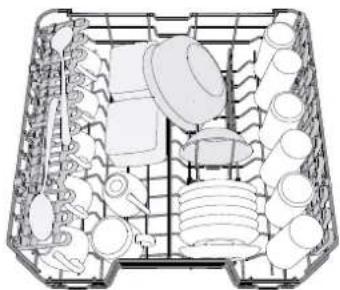
Load delicate and light dishes: glasses, cups, saucers, low salad bowls.
(loading example for the upper rack)
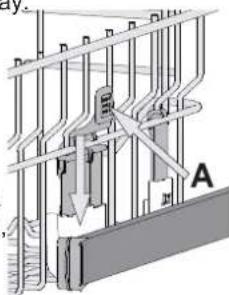
ADJUSTING THE HEIGHT OF THE UPPER RACK
The height of the upper rack can be adjusted: high position to place bulky crockery in the lower basket and low position to make the most of the tip-up supports by creating more space upwards and avoid collision with
the items loaded into lower rack.
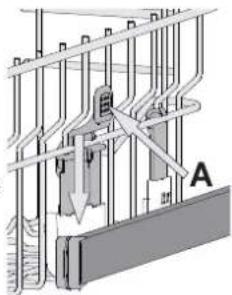
The upper rack is equipped with an Upper Rack height adjuster (see figure). Without pressing the levers, lift it up by simply holding the rack sides, as soon as the rack is stable in its upper position. To restore to the lower position, press the levers A at the sides of the rack and move the basket downwards.
We strongly recommend that you do not adjust the height of the rack when it is loaded. NEVER raise or lower the basket on one side only.
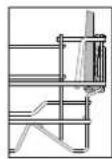
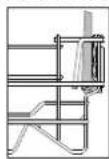
FOLDABLE FLAPS WITH ADJUSTABLE POSITION
The side foldable flaps can be folded or unfolded to optimize the arrangement of crockery inside the rack.
Wine glasses can be placed safely in the foldable flaps by inserting the stem of each glass into the corresponding slots.
Depending on the model:
To unfold the flaps, slide them up and rotate, or release them from the snaps and pull them down. To fold the flaps, rotate them and slide them down, or pull them up and attach them to the snaps.
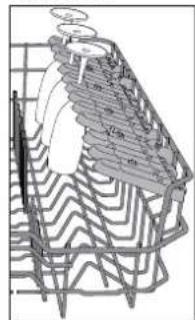
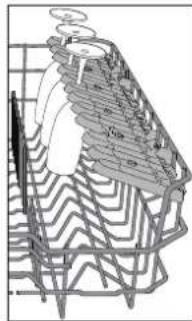
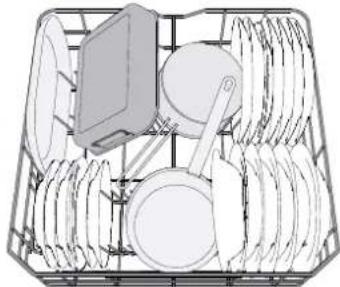
LOWER RACK
For pots, lids, plates, salad bowls, cutlery, etc. Large plates and lids should ideally be placed at the sides to avoid interference with the spray arm. The lower rack has tip-up supports which can be used in a vertical position when arranging plates or in a horizontal position (lower) to load pans and salad bowls easily.
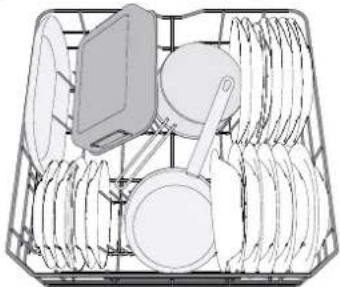
(loading example for the lower rack)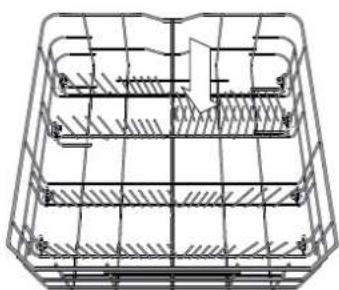
ZONE WASH 3D
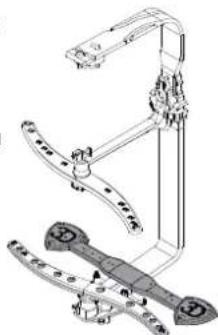
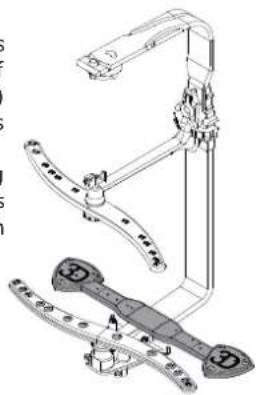
Zone Wash 3D uses additional water jets located both in the lower and upper part of the dishwasher (marked with orange color) to wash more intensively heavily soiled items by increasing water coverage on dishes. Example: Load pots and casseroles facing the lower part of Zone Wash 3D components and activate the 3D Zone Wash option on the panel.
DAILY USE
1. CHECK WATER CONNECTION
Check that the dishwasher is connected to the water supply and that the tap is open.
2. SWITCH ON THE DISHWASHER
Open the door and press the ON/OFF button.
- LOAD THE RACKS (see LOADING THE RACKS).
4. FILLING THE DETERGENT DISPENSER
5. CHOOSE THE PROGRAM AND CUSTOMISE THE CYCLE
Select the most appropriate program in accordance with the type of crockery and its soiling level (see PROGRAMS DESCRIPTION) by pressing the P button.
Select the desired options (see OPTIONS AND FUNCTIONS).
6. START
Start the wash cycle by pressing START/Pause button (led is lit) and closing the door within 4 sec. When the program starts you hear a single beep. If the door was not closed within 4sec., the alarm sound will be played. In this case, open the door, press START/Pause button and close the door again within 4 sec.
7. END OF WASH CYCLE
The end of the wash cycle is indicated by beeps and by the flashing of the wash cycle number on the display. Open the door and switch off the appliance by pressing the ON/OFF button.
Wait for a few minutes before removing the crockery - to avoid burns. Unload the racks, beginning with the lower one.
The machine will switch off automatically during certain extended periods of inactivity, in order to minimise electricity consumption. If the crockery is only lightly soiled or if it has been rinsed with water before being placed in the dishwasher, reduce the amount of detergent used accordingly.
MODIFYING A RUNNING PROGRAM
If a wrong program was selected, it is possible to change it, provided that it has only just begun: open the door, press and hold the ON/OFF button, the machine will switch off.
Switch the machine back on using the ON/OFF button and select the new wash cycle and any desired options; Start the wash cycle by pressing the START/Pause button (LED is lit) and closing the door within 4 seconds.
ADDING EXTRA CROCKERY
Without switching off the machine, open the door (START/Pause LED starts blinking) (beware of HOT steam!) and place the crockery inside the dishwasher. Press the START/Pause button and close the door within 4 seconds; the cycle will resume from the point at which it was interrupted.
ACCIDENTAL INTERRUPTIONS
If the door is opened during the wash cycle, or if there is a power cut, the cycle stops. Press the START/Pause button and close the door within 4 seconds; the cycle will resume from the point at which it was interrupted.
ADVICE AND TIPS
TIPS
Before loading the baskets, remove all food residues from the crockery and empty the glasses. You do not need to rinse beforehand under running water.
Arrange the crockery so that it is held in place firmly and does not tip over; and arrange the containers with the openings facing downwards and the concave/convex parts placed obliquely, thus allowing the water to reach every surface and flow freely.
Warning: lids, handles, trays and frying pans do not prevent the sprayer arms from rotating.
Place any small items in the cutlery basket.
Very soiled dishes and pans should be placed in the lower basket because in this sector the water sprays are stronger and allow a higher washing performance.
After loading the appliance, make sure that the sprayer arms can rotate freely.
UNSUITABLE CROCKERY
- Wooden crockery and cutlery.
- Delicate decorated glasses, artistic handicraft and antique crockery. Their decorations are not resistant.
- Parts in synthetic material which do not withstand high temperatures. Copper and tin crockery. Crockery soiled with ash, wax, lubricating grease or ink.
The colours of glass decorations and aluminium/silver pieces can change and fade during the washing process. Some types of glass (e.g. crystal objects) can become opaque after a number of wash cycles too.
DAMAGE TO GLASS AND CROCKERY
- Only use glasses and porcelain guaranteed by the manufacturer as dishwasher safe.
- Use a delicate detergent suitable for crockery
- Collect glasses and cutlery from the dishwasher as soon as the wash cycle is over.
TIPS ON ENERGY SAVING
- When the household dishwasher is used according to the manufacturer's instructions, washing tableware in a dishwasher usually consumes less energy and water than hand dishwashing.
- In order to maximize dishwasher efficiency it is recommended to initiate the wash cycle once dishwasher is fully loaded. Loading the household dishwasher up to the capacity indicated by the manufacturer will contribute to energy and water savings. Information on correct loading of tableware can be found in Loading chapter. In case of partial loading it is recommended to use dedicated wash options if available (Half load/ Zone Wash, Multi Zone), filling up only selected racks. Incorrect loading or overloading the dishwasher may increase resources usage (such as water, energy and time, as well as increase noise level), reducing cleaning and drying performance.
- Manual pre-rinsing of tableware items leads to increased water and energy consumption and is not recommended.
HYGIENE
To avoid odour and sediment which can be accumulated in the dishwasher please run a high temperature program at least one a month. Use a tea spoon of detergent and run it without the loading to clean your appliance.
CARE AND MAINTENANCE
CLEANING THE FILTER ASSEMBLY
Regularly clean the filter assembly so that the filters do not clog and that the waste water flows away correctly.
Using the dishwasher with clogged filters or foreign objects inside the filtration system or spray arms may cause unit malfunction, resulting in loss of performance, noisy operation, or higher resource usage.
The filter assembly consists of three filters which remove food residues from the washing water and then recirculate the water.
The dishwasher must not be used without filters or if the filter is loose.
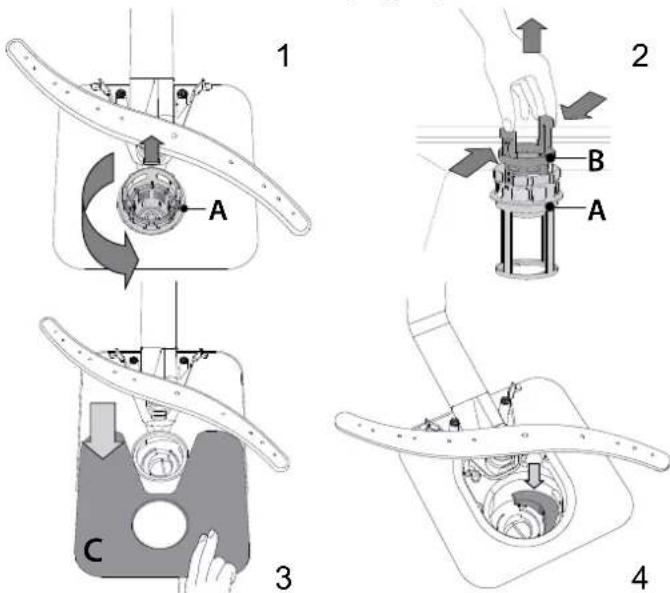
At least once per month or after each 30 cycles, check the filter assembly and if necessary clean it thoroughly under running water, using a non-metallic brush and following the instructions below:
- Turn the cylindrical filter A in an anti-clockwise direction and pull it out (Fig 1).
- Remove the cup filter B by exerting a slight pressure on the side flaps (Fig 2).
- Slide out the stainless-steel plate filter C (Fig 3).
- In case you find foreign objects (such as broken glass, porcelain, bones, fruit seeds etc.) please remove them carefully.
- Inspect the trap and remove any food residues. NEVER REMOVE the wash-cycle pump protection (black detail) (Fig 4).
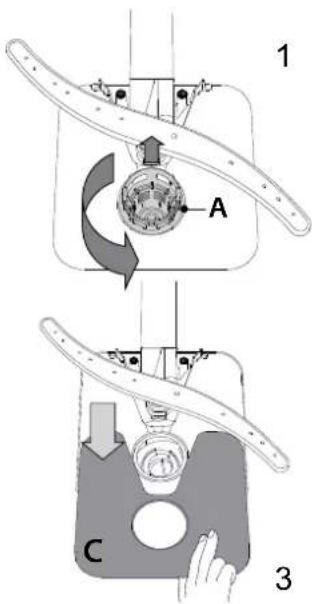
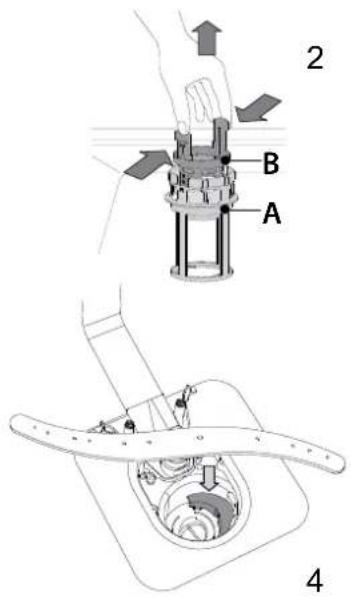
After cleaning the filters, re-place the filter assembly and fix it in position correctly; this is essential for maintaining the efficient operation of the dishwasher.
CLEANING THE WATER INLET HOSE
If the water hoses are new or have not been used for an extended period of time, let the water run to make sure it is clear and free of impurities before performing the necessary connections. If this precaution is not taken, the water inlet could become blocked and damage the dishwasher.
CLEANING THE SPRAY ARMS
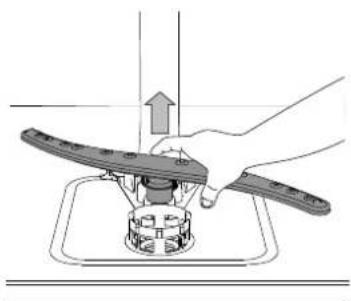
On occasions, food residue may become encrusted onto the spray arms and block the holes used to spray the water. It is therefore recommended that you check the arms from time to time and clean them with a small non-metallic brush.
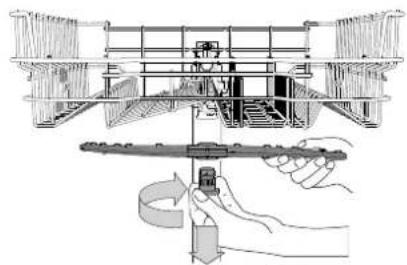
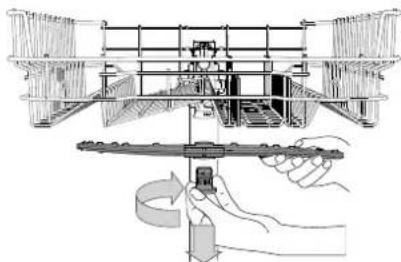
To remove the upper spray arm, turn the plastic locking ring in a clockwise direction. The upper spray arm should be replaced so that the side with the greater number of holes is facing upwards.
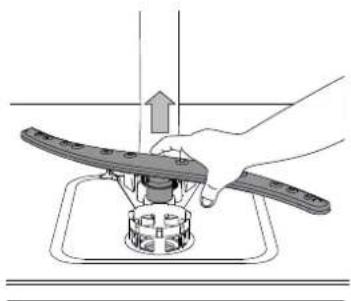
The lower spray arm may be removed by pulling it upwards.
WATER SOFTENING SYSTEM
Water softener automatically reduces water hardness, consequently preventing scale buildup on heater, contributing also to better cleaning efficiency.
This system regenerates itself with salt, therefore it is required to refill salt container when empty.
Frequency of regeneration depends on water hardness level setting - regeneration takes place once per 6 Eco cycles with water hardness level set to 3.
Regeneration process starts in final rinse and finishes in drying phase, before cycle ends.
- Single regeneration consumes: ~3.5 L of water;
- Takes up to 5 additional minutes for the cycle; Consumes below 0.005 kWh of energy.
TROUBLESHOOTING
In case your dishwasher doesn't work properly, check if the problem can be solved by going through the following list.
For other errors or issues please contact authorized After-sales Service which contact details can be found in the warranty booklet.
Spare parts will be available for a period of either up to 7 or up to 10 years, according to the specific Regulation requirements.
| PROBLEMS POSSIBLE CAUSES SOLUTIONS | ||
| Salt indicator is lit | Salt reservoir is empty. (After refill the salt indicator may remain lit for several wash cycles). | Refill reservoir with salt (for more information - see page 2).Adjust water hardness - see table, page 2. |
| Rinse aid indicator is lit | Rinse aid dispenser is empty. (After refill the rinse aid indicator may remain lit for several wash cycles). | Refill dispenser with rinse aid (for more information - see page 2). |
| The dishwasher won't start or does not respond to commands. | The appliance has not been plugged in properly. | Insert the plug into the socket. |
| Power outage. | For safety reasons, dishwasher will not re-start automatically when power returns.Open dishwasher door, press Start/Pause button and close the door within 4 seconds. | |
| The dishwasher door is not closed.ActiveDry pin is not pulled in. | Vigorously push the door until you hear the "click". | |
| Cycle is interrupted by door opening for more than 4 seconds. | Press START/Pause and close the door within 4 seconds. | |
| It does not respond to commands.Display shows: 9 or 12 and On/Off LED is blinding rapidly | Switch off the appliance by pressing the ON/OFF button, switch it back on after approximately one minute and restart the program. If problem persists, unplug the appliance for 1 minute, then plug it back in. | |
| The dishwasher won't drain. | The wash cycle has not finished yet. Wait until the drain hose is bent. Check that the drain hose is not bent (see INSTALLATION INSTRUCTION). | wash cycle finishes. |
| Display shows: 3 and On/Off LED is blinking rapidly | The drain hose is bent. Check that the drain hose is bent (see INSTALLATION INSTRUCTION). | not bent (see INSTALLATION INSTRUCTION). |
| The sink drain pipe is blocked. Clean the sink drain | pipe. | |
| The filter is clogged up with food residues. Clean | the filter (see CLEANING THE FILTER ASSEMBLY). | |
| The dishwasher makes excessive noise. | The dishes are rattling against each Position the crocckery correctly (see LOADING THE RACKS). | rockery correctly (see LOADING THE RACKS). |
| An excessive amount of foam has been produced. | The detergent has not been measured out correctly or it is not suitable for use in dishwashers (see FILLING THE DETERGENT DISPENSER). Restart the current cycle by switching OFF the dishwasher, then switch it on again, select a new program, press START/Pause and close the door within 4 seconds. Please do not add any detergent. | |
| The dishes are not clean. | The crockery has not been arranged properly. | Arrange the crockery correctly (see LOADING THE RACKS). |
| The spray arms cannot rotate freely, being hindered by the dishes. | Arrange the crockery correctly (see LOADING THE RACKS). | |
| The wash cycle is too gentle. Select an appropriate wash cycle (see PROGRAMS TABLE). | wash cycle (see PROGRAMS TABLE). | |
| An excessive amount of foam has been produced. | The detergent has not been measured out correctly or it is not suitable for use in dishwashers (see FILLING THE DETERGENT DISPENSER). | |
| The cap on the rinse aid compartment has not been shut correctly. | Make sure the cap of the rinse aid dispenser is closed. | |
| The filter is soiled or clogged. Clean the filter assembly | bly (see CARE AND MAINTENANCE). | |
| There is no salt. Fill the salt reservoir (see FILLING TABLE SALT RESERVOIR). | ||
| The dishwasher does not fill the water. Display shows: H, 6 and On/Off LED is blinking rapidly | No water in the water supply or the tap is closed. | Make sure there is water in the water supply or the tap running. |
| The inlet hose is bent. | Make sure the inlet hose is not bent (see INSTALLATION) reprogram the dishwasher and reboot. | |
| The sieve in the water inlet hose is clogged; it is necessary to clean it | After having carried out the verification and cleaning, turn off and turn on the dishwasher and restart a new program. | |
| Dishwasher finishes the cycle prema-turely. Display shows: 15 and On/Off LED is blinking rapidly | Drain hose positioned too low or siphoning into home sewage system. | Check if end of drain hose is placed at correct height (see INSTALLATION).Check for siphoning into home sewage system, install air admittance valve if necessary. |
| Air in water supply. | Check water supply for leaks or other issues letting air inside. | |

Policies, standard documentation, ordering of spare parts and additional product information can be found by:
- Visiting our website: docs.hotpoint.eu and parts-selfservice.whirlpool.com Using QR Code
- Alternatively, contact our After-sales Service (see phone number in the warranty booklet). When contacting our After-sales Service, please state the codes provided on your product's identification plate.
The model information can be retrieved using the QR-Code reported in the energy label.
The label also includes the model identifier that can be used to consult the portal of the registry at https://eprel.ec.europa.eu
- BEFORE USING THE APPLIANCE, CAREFULLY READ THE SAFETY INSTRUCTIONS
- PRODUCT DESCRIPTION
- FIRST TIME USE
- SALT, RINSE AID AND DETERGENT
- ADVICE REGARDING THE FIRST TIME USE
- FILLING THE SALT RESERVOIR
- SETTING THE WATER HARDNESS
- FILLING THE RINSE AID DISPENSER
- ADJUSTING THE DOSAGE OF RINSE AID
- FILLING THE DETERGENT DISPENSER
- PROGRAMS DESCRIPTION
- INSTRUCTIONS ON WASH CYCLE SELECTION
- ECO
- AUTO INTENSIVE
- AUTO MIXED
- AUTO FAST WASH
- RAPID
- GOOD NIGHT
- SANITIZING
- SOAK
- SELF-CLEAN
- NOTES
- ZONE WASH 3D
- DELAY
- TABLET (TAB)
- OPERATION INDICATOR
- ACTIVEDRY
- TROUBLESHOOTING
- ANFAUKBI PET PANDAJAHY T¥3, WANFBIIK¥PAJI MEH JYFBIIK¥PAJI
- AJFAUKBI PET PAJDAJAHYFA KATBICTBL KEHEC
- TY3BAFBIHTOITBIPY
- CY KATTBIBIFBIH OPHATY
- FILLING THE PRESSURE REGULATOR
- REPLACING THE PRESSURE REGULATOR MEMBRANE
- FILLING THE OIL TANK
- TROUBLESHOOTING TABLE
- AUTO WASH
- AUTO DRY
- AUTO FAST
- QUICK
- TNTNEHA
- CUYAY
- Θ3IH TA3AJAY
- EXPERTS
- LUBRICATION INDICATOR
- USER MANUAL
- GUIDE
- WATER HARDNESS SETTING
- FIRST USE
- BEFORE FIRST USE
- LOADING THE REGENERATING SALT
- SETTING WATER HARDNESS
- ADJUSTING THE RINSE AID DOSAGE
- LOADING DETERGENT
- LOADING THE RACKS
- CUTLERY BASKET
- LOADING THE BASKETS
- CUTLERY RACK
- UPPER RACK
- KNIVES AND OTHER SHARP OBJECTS SHOULD BE PLACED WITH THE BLADES FACING DOWN
- ADJUSTING THE HIGH-SPEED COOKER
- REMAINING COOKING TIMES FOR VARIOUS FOODS
- BOTTOM OF THE COOKER
- ZONE WASH 3D COMPONENT
- INSTRUCTIONS FOR USE
- AKBIJI-KEHEC
- KEHECTEP
- KOLAJIBI EMECBIDBICTAP
- TINHEHA
- CTAKAHFA KΘHE AC IÙJEITIH BIDBICTAPFA 3AKBIM KEJTIPY
- HEPNYHEMDEYBOBBIHWA KEHECTEP
- KYTIM JXHE TEKHNIKALYK KYZMET KORSETY
- CYZGI JXINHAFBYN TAZALAU
- SU KENETIN ULANNY TAZALAU
- BURIKKISHTERDI TAZALAU
- COVERED COMPARTMENT
- UNEXPECTED INTERRUPTIONS
- ADJUSTING THE HEIGHT OF THE UPPER RACK
- FOLDABLE FLAPS WITH ADJUSTABLE POSITION
- LOWER RACK
- DAILY USE
- CHECK WATER CONNECTION
- SWITCH ON THE DISHWASHER
- CHOOSE THE PROGRAM AND CUSTOMISE THE CYCLE
- START
- END OF WASH CYCLE
- MODIFYING A RUNNING PROGRAM
- ADDING EXTRA CROCKERY
- ACCIDENTAL INTERRUPTIONS
- ADVICE AND TIPS
- TIPS
- UNSUITABLE CROCKERY
- DAMAGE TO GLASS AND CROCKERY
- TIPS ON ENERGY SAVING
- HYGIENE
- CARE AND MAINTENANCE
- CLEANING THE FILTER ASSEMBLY
- THE DISHWASHER MUST NOT BE USED WITHOUT FILTERS OR IF THE FILTER IS LOOSE
- CLEANING THE WATER INLET HOSE
- CLEANING THE SPRAY ARMS
- WATER SOFTENING SYSTEM
- THIS SYSTEM REGENERATES ITSELF WITH SALT, THEREFORE IT IS REQUIRED TO REFILL SALT CONTAINER WHEN EMPTY
Brand : HOTPOINT
Model : HI 5030 WEF
Category : Dishwasher