
SPLB 44 A1 - Loudspeaker SILVERCREST - Free user manual and instructions
Find the device manual for free SPLB 44 A1 SILVERCREST in PDF.
| Product Type | Portable Bluetooth speaker with karaoke function |
| Brand and model | SilverCrest SPLB 44 A1 |
| Dimensions (W × H × D) | Approx. 60.0 × 26.0 × 28.0 cm |
| Weight | Approx. 8.1 kg |
| Mains power supply | 100-240 V ~, 50/60 Hz |
| Built-in battery | Lead-gel 12 V, 7000 mAh (84 Wh), charging time approx. 9 h (device off) |
| Output power | 2 × 22 W RMS |
| Frequency response | 60 – 20,000 Hz |
| Bluetooth | Version 4.2, max. range 10 m, profiles A2DP and AVRCP |
| FM radio | Range 87.5 – 108 MHz, with wire antenna |
| USB ports | 2 × USB-A (USB 2.0), compatible up to 32 GB, formats MP3, WMA, AAC, WAV, FLAC |
| Auxiliary audio input | 3.5 mm jack socket (AUX IN) |
| Microphone inputs | 2 × 6.3 mm jack sockets (MIC1/MIC2), with volume control and echo effect |
| Supplied microphone | 1 dynamic microphone, cable approx. 2.5 m |
| Light effects | Two lighting zones (speaker and rings) with multiple modes |
| Additional functions | Bass boost (SUPER BASS), sound programs (FLAT, POP, CLASSIC, JAZZ, ROCK) |
| Cleaning and maintenance | Clean with a soft, dry cloth; do not use abrasive or solvent-based products |
| Safety | Do not open the casing, avoid moisture, keep away from heat sources, use on a stable surface |
| Warranty period | 3 years from date of purchase |
Frequently Asked Questions - SPLB 44 A1 SILVERCREST
User questions about SPLB 44 A1 SILVERCREST
0 question about this device. Answer the ones you know or ask your own.
Ask a new question about this device
Download the instructions for your Loudspeaker in PDF format for free! Find your manual SPLB 44 A1 - SILVERCREST and take your electronic device back in hand. On this page are published all the documents necessary for the use of your device. SPLB 44 A1 by SILVERCREST.
USER MANUAL SPLB 44 A1 SILVERCREST
BLUETOOTH® PARTY SPEAKER SPLB 44 A1
QUICK START GUIDE
IAN 305947
DE AT CH Dieses Informationsblatt ist fester Bestandteil der Bedienungsanleitung. Bewahren Sie es zusammen mit der Bedienungsanleitung gut auf. Handigen Sie alle Unterlagen bei Weitergabe des Produkts an Dritte mit aus. Lesen Sie vor der Verwendung die Bedienungsanleitung und beachten Sie insbesondere die darin enthaltenen Sicherheitshinweise. Die Abbildungen gelten nur für die Erstinbetriebnahme.
PL Ta broszura informacyna stanowi integralnq czesc instrukcji obstugi. Przechowuj jq razem z instrukcjq. W przypadku przykazania urzadzenia osobie trzechiej do质量和 do niego rawniez calq dokumentacja. Przed uzyciem przyczytaj instrukcje obstugi i zwroc szczegolnq uwage na zawarte w nied instrukcje bezpieczeniasta. Ilustracje dotyczq tylko pierwszego uruchomenia.
NL BE Dit informatieblad maakt deel uit van de gebruiksaanwijzing. Berg het samen met de gebruiksaanwijzing zorgvuldig op. Geef alle documenten mee als u het product overdraagt aan een derde. Lees, voordat u het product gebruikt, de gebruiksaanwijzing en let met name op de daarin opgenomen veiligheidsvoorschriften. De afbeeldingen gelden alleen voor de eerste ingebruikname.
This information sheet is an integral part of the operating instructions. Keep it together with the operating instructions. Please also pass all associated documents on to any future owner(s). Before using the product for the first time, read the operating instructions and pay close attention to the safety instructions. Illustrations apply to initial operation.
FR BE Cette feuille d'information fait partie intégrante du mode d'emploi. Conservez-la bien avec le mode d'emploi. Si vous cédez le produit à un tiers, remettez-lui également tous les documents. Veuillez lire le mode d'emploi avant l'utilisation et observez tout particulièrement les consignes de sécurité. Les illustrations sont uniquement valables pour la première mise en service.
Tento informacni list je nedilnou soucasti navodu k obsluze. Uschoveje ho spolecné s nadvodem k obsslze. Pri predavani vyrobku tretim osobam predeje spolu s nim i tyto podklady. Prectete si prd pouzitim nadvod k obsslze a zejmena dodržujte bezpecnostni pokyny v nem obsažene. Obrázky plati pouze pro první uvedeni do provozu.
EsEsta hoja informativa forma parte de las instrucciones de uso. Guardela bien bajo con las instrucciones de uso. Entregue todos los documents cuando transfiera el producto a cerceros. Antes de utiliser el producto, lea las instrucciones de uso y observe especially lasindicaciones de seguridad. Las ilustraciones solo son relevantes para la prima puesta en configuracion.
Esta folha informativa e parte integrante do manual de instruções. Guarde-a bem muito do manual de instruções. Ao transferir o produto para terreiros, entrega todos os respetivos documentos. Antes dautilização, lei a o manual de instruções e de especial atençao as instruções de seguranca constantes no mesmo. As figuras são validas apenas para a primeira colocação em funconamento.

1
2
3
4
5
6

7
KOMPERNASS HANDELS GMBH
BURGSTRASSE 21
DE-44867 BOCHUM
GERMANY
www.kompernass.com
Operating instructions and safety instructions
NL BE
Before reading, unfold the page containing the illustrations and familiarise yourself with all functions of the device.
FR BE
GB/IE Operating instructions and safety instructions Page 25
KOMPERNASS HANDELS GMBH
BURGSTRASSE 21
DE-44867 BOCHUM
DEUTSCHLAND
www.kompernass.com
Contents
Introduction 26
Information about these operating instructions 26
Copyright 26
Notes on trademarks 26
Intended use 27
Warning notices 27
Safety. 28
Risk of electrocution 28
Basic safety instructions 29
Notes on the radio interface 30
Controls/parts description 31
Indicators on the display 32
Use 33
Check package contents 3 3
Disposal of packaging 33
Setting up the device 34
Connecting the power supply 34
Unwinding the FM wire aerial 34
Charging the battery 35
Handling and operation 35
Switching the device on/off 35
Adjusting the volume 35
Selecting a sound preset 36
Activate/deactivate bass boost 36
Setting the lighting effects 36
Connecting an external playback device 37
Setting the radio station 37
Using a USB memory stick 38
Pairing the device with a Bluetooth® playback device 40
Connecting the microphone 41
Troubleshooting 42
Cleaning 43
Storage when not in use 44
Disposal 44
Disposal of the device 44
Appendix 45
Technical data 45
Notes on the EU Declaration of Conformity 46
Kompernass Handels GmbH warranty 46
Service 48
Importer 48
Introduction
Information about these operating instructions
Congratulations on the purchase of your new device.
You have selected a high-quality product. The operating instructions are part of this product. They contain important information on safety, usage and disposal. Before using the product, please familiarise yourself with all operating and safety instructions. Use the product only as described and for the range of applications specified. Retain these operating instructions for future reference. Please also pass on these operating instructions to any future owner.
Copyright
This documentation is protected by copyright. Any copying or reproduction, including in the form of extracts, or any reproduction of images (even in a modified state), is permitted only with the written authorisation of the manufacturer.
Notes on trademarks
USB is a registered trademark of USB Implementers Forum, Inc.
The Bluetooth® logotype and Bluetooth® logo are registered trademarks of Bluetooth SIG, Inc. (Special Interest Group). Any use of the trademarks by Kompernaß Handels GmbH is made under the provisions of a licence.
■ The SilverCrest trademark and the retail name are the property of their respective owner.
All other names and products may be trademarks or registered trademarks of their respective owner.
Intended use
This is a consumer electronics device and is intended exclusively for the playback of audio files via Bluetooth®, USB® cable and 3.5 mm jack cable and for the reception of FM radio programmes. On top of this, the device can be used to sing karaoke and as a paging amplifier via a 6.3 mm microphone input. The product is ideal for creating a cheerful, colourful lighting effect for decorative purposes, but not suitable for lighting rooms in houses. The device can be powered by the mains or using the integrated rechargeable battery.
It is not intended for any other use or use beyond that specified. The device is not intended for use in commercial or industrial environments. The manufacturer accepts no responsibility for damage caused by failure to observe these instructions, improper use or repairs, unauthorised modifications or the use of unapproved replacement parts. The risk is borne solely by the user.
Warning notices
The following warnings are used in these operating instructions:
DANGER
A warning notice at this hazard level indicates an imminently hazardous situation.
Failure to avoid this hazardous situation could result in serious injuries or even death.
- Follow the instructions in this warning notice to avoid the risk of serious injuries or death.
CAUTION!
A warning notice at this hazard level indicates a risk of property damage.
Failure to avoid this situation could result in property damage.
Follow the instructions in this warning to prevent property damage.
NOTICE
A note provides additional information that makes handling the device easier for you.
Safety
This section contains important safety instructions for handling the device. This device complies with statutory safety regulations. Improper use may result in personal injury and property damage.
Risk of electrocution
DANGER
Risk of fatal injury from electrocution!
Contact with live cables or components can result in a fatal injury!
Comply with the following safety information in order to avoid hazards from electrical current:
- Do not use the device if the mains plug or the mains cable is damaged.
- When disconnecting the device from the mains supply, always pull on the plug and never on the cable.
- Never touch the mains plug or the device with wet hands.
- Never open the device housing. Touching live connections or making modifications to the electrical or mechanical assembly can lead to a risk of electrocution and fire.
- Do not expose the device to any large temperature fluctuations. Condensing moisture may lead to a risk of short-circuiting. If you move the device from a cold to a warm environment, allow the device to acclimatise before using it. This can take up to two hours.
- Do not insert any objects into the ventilation slots or other openings on the device.
The device consumes power in standby mode. The main switch / 1 for this device does not completely disconnect it from the power supply. To completely disconnect the device from the mains power, the power plug must be removed from the mains power socket. The device must be positioned so that you have unrestricted access to the mains socket at all times and can pull out the plug immediately in an emergency.
Basic safety instructions
To ensure safe operation of the device, follow the safety guidelines set out below:
Check the device for visible external damage before use. Do not operate a device that has been damaged or dropped.
If the cables or connections are damaged, have them replaced by authorised specialists or Customer Service.
This device may be used by children aged 8 years and above and by persons with limited physical, sensory or mental capabilities, or lack of experience and knowledge, provided that they are under supervision or have been told how to use the device safely and are aware of the potential risks. Do not allow children to play with the device. Cleaning and user maintenance tasks may not be carried out by children unless they are supervised.
DANGER! Do not allow children to play with the packaging material! Keep all packaging materials away from children. Risk of suffocation!
- Protect the mains cable from hot surfaces and sharp edges. Ensure that the mains cable is not taut or kinked. Do not leave the mains cable hanging over edges (tripping hazard).
All repairs to the device and the microphone must be carried out by authorised specialist companies or Customer Service. Failure to make proper repairs can put the user at risk. They will also invalidate any warranty claim.
Defective components must always be replaced with original replacement parts. Compliance with the safety requirements can only be guaranteed by using these replacement parts.
■ Do not make any unauthorised modifications or alterations to the device.
■ Never open the device housing. There are no parts inside the device which require user maintenance. In addition, this will invalidate the warranty.
Always place the device on a stable and level surface. It can be damaged if dropped. Risk of injury! - Do not expose the device to direct sunlight or high temperatures. Otherwise it may overheat and be irreparably damaged.
■ Be sure to provide sufficient air circulation to avoid a heat build-up. Never cover the device. There is a risk of fire! -
Do not place the product near heat sources such as radiators or other heat-generating devices.
■ Keep the device away from open flames (e.g. candles) at all times.
The device is not designed for use in rooms with high temperature or humidity (e.g. bathrooms) or excessive dust. -
Protect the device from drips or splashes of water. Never submerge the device in water; do not place the device near water and do not place any object filled with liquid (e.g. vases) on top of the device.
The device has an integrated lead gel battery. Improper use of lead gel batteries can cause fires, explosions, leakages of hazardous materials or other hazards! Do not throw the device into an open fire.
Pull the plug out of the mains power socket if there are any malfunctions, unusual noises, a smell of burning or smoke, and also during thunderstorms. Have the device checked by a qualified specialist before using it again.
Risk of hearing damage

DANGER
Risks due to extreme volume levels!
Loud music can lead to hearing damage.
- Avoid listening to music at an extremely high volume, especially over long periods of time, when using this device.
Notes on the radio interface
- Keep the device at least 20~cm away from a pacemaker or implanted defibrillator, as the proper functioning of the pacemaker or the implanted defibrillator could be affected by radio waves.
The transmitted radio waves can cause noise interference in hearing aids. - Do not use the unit with the radio components switched on in the presence of flammable gases or in a potentially explosive atmosphere (e.g. in a paint shop), as the transmitted radio waves could trigger an explosion or ignite a fire.
The range of the radio waves is dependent on the environment and the ambient conditions.
Data transmissions via a wireless connection can be intercepted by un authorised third parties.
Controls / parts description
(See fold-out page for illustrations)
3.5 mm Jock socket AUX IN
6.3 mm jack socket MIC1
6.3 mm jack socket MIC2
4 Main switch0/1
USB sockeUSB2
-3006M./FOLD
7 +BouM./FOLD
8 电电
9 BMODE/M.
10 MOPDE
1 Borton
12 -VQALUME+
Charging LEDCHARGE
Bluetooth® LED PAIR
15 Display
16 $UIRBASS
- -MikCVOL+
18 /AMS button
19 Button (Bluetooth ®)
20 TUN+button
TUN button
2 LIGHT 1 button
LIGHT2button
USB sockeUSB1
FM wire aerial
26 Bass reflex openings
Mains connectionAC~
23 Mains cable
29 Microphone
30 On/Off switchON/OFF
6.3 mm jack plug
Quick guide (symbol)
3 Operating instructions (symbol)
Indicators on the display
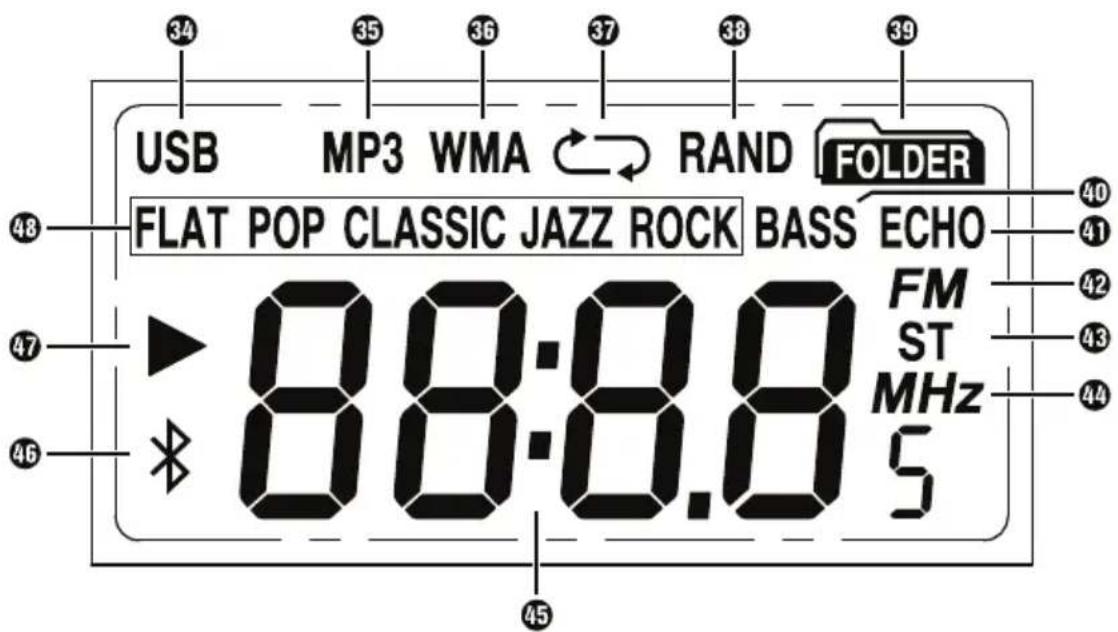
| 34 | USB | Playback via USB |
| 35 | MP3 | MP3 playback |
| 36 | WMA | WMA playback |
| 37 | C / Repeat functions | |
| 38 | RAND | Random playback |
| 39 | FOLDER | Repeat current directory |
| 40 | BASS | Bass amplification |
| 41 | ECHO | Echo function during microphone use |
| 42 | FM | Radio playback |
| 43 | ST | Stereo radio reception |
| 44 | MHz | Radio frequency |
| 45 | 8888s | Frequency in MHz / playback time, etc. |
| 46 | $ | Playback via Bluetooth® |
| 47 | /II/ | Playback mode (show▶, pause||) stop fast forward/rewind←/→) |
| 48 | FLAT,POP CLASSIC JAZZ and ROCK | Sound presets |
Use
Check package contents
(See fold-out page for illustrations)

DANGER
Do not allow children to play with packaging materials.
Risk of suffocation!
Remove all parts of the device and the operating instructions from the box.
Remove all packaging material.
The following components are included in delivery:
- Bluetooth® party loudspeaker SPLB 44 A1
- Mains cable28
- 1× microphone
Quick guide
These operating instructions
NOTICE
- Check the package for completeness and signs of visible damage.
If the delivery is incomplete or damage has occurred as a result of defective packaging or during transport, contact the service hotline (see section Service).
Disposal of packaging

Dispose of the packaging in an environmentally friendly manner. Note the labelling on the packaging and separate the packaging material components for disposal if necessary.
The packaging material is labelled with abbreviations (a) and numbers (b) with the following meanings:
1-7:plastics,
20-22: paper and cardboard,
80-98: composites
NOTICE
If possible, keep the original packaging for the complete warranty period of the device so that the device can be packaged properly for return shipment in the event of a warranty claim.
Setting up the device
For safe and trouble-free operation of the device, the set-up location must fulfil the following requirements:
Place the device on a firm, flat and level surface.
The surfaces of some items of furniture might contain components that can corrode and soften the rubber feet of the device. If necessary, place a mat under the device's rubber feet.
Do not operate the device in a hot, wet or extremely damp environment.
Keep a minimum distance of 30~cm to heat-emitting devices such as heaters, ovens, etc.
Operate the device only in locations with adequate ventilation.
The mains socket must be easily accessible so that the plug can be easily pulled out in an emergency.
To achieve optimum sound, place the device on its side.
Connecting the power supply
CAUTION!
Before connecting the device, compare the connection data (voltage and frequency) on the device rating plate with that of your mains power supply. This data must agree so that the device is not damaged.
Make sure that the mains cable is not damaged and is not routed over hot surfaces and/or sharp edges.
Connect the plug of the mains cable28 to the mains connection socket AC~ 27 for the power supply on the rear of the device and plug the mains plug into a mains socket. Ensure that the mains cable 28 is not taut or kinked.
Route the mains cable28 so that no one can stumble over it.
Do not place the device, furniture or any other objects on the cable. Do not kink the cable or knot it and do not connect it to other cables. Never wrap the cable tightly around other objects otherwise the conductors inside the cable could break and cause a malfunction.
Unwinding the FM wire aerial
Completely unwind the FM wire aerial for FM reception on the rear of the device and route it so that you achieve optimum reception.
Charging the battery
Once you have connected the power supply, the integrated rechargeable battery in the device will charge automatically. The charging LED CHARGE p3 orange. Once the integrated battery is completely charged, the charging LED CHARGE lights up green.
NOTICE
If the battery charge status is low, the charging LECHARGE flashes orange.
The charging time is around 9 hours with the device switched off.
Handling and operation
Switching the device on/off
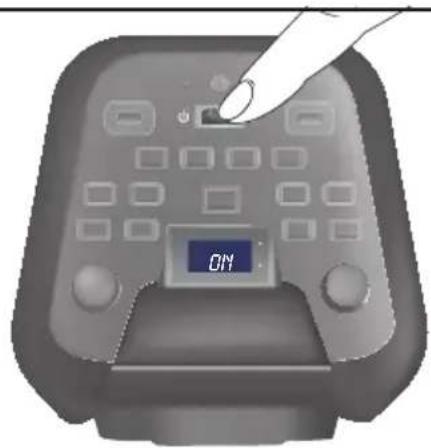
Set the main switch to the position to switch the device on. On appears briefly on the device display 15
NOTICE
When started for the first time, the device will start up in Bluetooth® mode.
Every time the device is switched on after this, it will start up in the previously used operating mode.
If the device does not receive any signals for 15 minutes, it will automatically switch to power-saving mode. Any existing Bluetooth® connection will be terminated.
To quit power-saving mode, press the MODE button 10
Set the main switch to the position to switch the device off. The display 15 and all other device parts will switch off.
Adjusting the volume
Adjust the volume by using the volume +
To increase the volume, turn the dial in the direction until maximum) is shown on the display 15
To decrease the volume, turn the dial in the direction until minimum) is shown on the display 15f 100wn on the display the found is muted.
NOTICE
Every time the device is switched on, it starts with a volume leave 003.
You should select a moderate volume before starting playback.
The volume can also be regulated using a connected playback device.
Selecting a sound preset
Press the EQ button 11 several times to select a preprogrammed sound preset 48
The sound presets 48 are available in the following sequence: FLAT POP CLASSIC, JAZZ ROCK
Activate/deactivate bass boost
Press the SUPER BASS button 16 to activate bass boost. BASS 40 appears on the display 15
Press the SUPER BASS button 1b deactivate bass boost. Bass 40 out on the display 15
Setting the lighting effects
LIGHT1button
Press the LIGHT 1 button 2 several times to select a preset lighting effect for the loudspeaker. The display 15 shows the lighting effects briefly (L - 1 to L - 5)
Lighting effects are available in the following sequence:
Blue illuminated (4-7)
Blue flashing in time with music 4-2)
Red illuminated 4-3)
Red flashing in time with music 4-4
Colour change flashing in time with music 4-5)
OffFF)
LIGHT 2 button
Press the LIGHT 2 button 23 several times to select a preset lighting effect for the external loudspeaker rings. The display 1 shows the lighting effects briefly (E - 1 to E - 3)
Lighting effects are available in the following sequence:
Blue illuminated -1)
Red illuminated (F-2)
■ Flashing alternately red/blue (F-3)
OffFF)
NOTICE
The button background illumination lights up blue for as long as a lighting effect has been selected using the LIGHT 2 button
Connecting an external playback device
You can connect a wide variety of playback devices to this device, for example MP3 or CD players. Please refer to the operating instructions of the respective playback device.
Switch all devices off before you connect them with each other.
Connect the line out connection on the external playback device (e.g. head phone connection) using a 3.5mm jack cable (not supplied) to the 3.5mm jack socket AUX IN 1.
Set the main switch to the position to switch the device on.
Press the MODE button repeatedly until is shown on the display. 15
Switch on the connected playback device and start playback.
NOTICE
▶ During music playback via the 3.5 mm jack sockeAUX IN ①he
//AMSB/TUNtiontheMIDJN-2
are inactive. Use the play/pause and skip functions on the external playback device that you have connected.
Setting the radio station
NOTICE
The technical features of this device enable an adjustable reception capability that exceeds the permitted FM frequency range of 87.5-108 MHz. In some countries, different national regulations may apply to the assigned radio frequency ranges. Please note that information received outside of the assigned radio frequency ranges may not be exploited, passed on to third parties or otherwise misused.
Press the MODE button 10 repeatedly until FM 42 and the current frequency 45 are shown on the display 15
Search for a station
Press|/BUN+ tiefly mounn-025 MHz increments to a station with a higher or lower frequency.
Press TUN+20 for automatically change to the next receivable station at a higher or lower frequency.
The station frequency is shown on the display and the speakers are switched off during the station search.
Saving stations manually
Select a station to store.
Press theP-MODE/M. button 9The current preset number flashes on the display 15, e.g. P01
Press-10pM./F@ldp orel of tMe/FOLD 7 30 available memory slots.
Press theP-MODE/M. button save the selected station.
Saving stations automatically (AMS function)
The device uses the AMS function to automatically search for stations and saves them in the 30 preset slots of the device. The device starts at the lowest frequency. Depending on reception, it is possible that not all 30 preset can be assigned.
Press the I/AMS button for 2 seconds. The device begins the station search automatically and allocates the stations found to the preset slots from POI to max. Every time a station is saved, the frequency remains briefly on the display Once all the station presets are filled (if that many stations are receivable), the search is terminated and the station saved in the first preset is played.
Calling up stations
Press-10M./Folalop the requmeAFOLD 7 memory slots.
The memory slot is shown on the display 15 and the station will be played back through the loudspeaker.
Using a USB memory stick
Connecting a USB memory stick
NOTICE
It is not possible to guarantee that all USB memory sticks will work, because some file systems and file formats are not compatible.
The device supports USB memory sticks with a memory capacity of up to 32 GB, the FAT16 and FAT32 file systems and the MP3, WMA, AAC, WAV and FLAC file formats.
External hard disks are not supported.
Insert a USB memory stick into the USB socketUSB1
Press the MODE button repeatedly until Usfd briefly appear on the display 1b indicate operation via the USB socket USB1
The number of files contained on the stick is displayed briefly after the USB memory stick is recognised. Music playback starts automatically and the music playback runtime will be displayed. If the USB memory stick is not recognised, no will be displayed.
If necessary, insert a second USB memory stick into the USB socket USB2
Press the MODE button 10 until USB and briefly -2- appear on the display 15 to indicate operation via the USB socket USB2
Pause/continue playback
Press the / / AMS button to pause music playback. The music playback runtime will flash on the display 15
Press the | / A to resume music playback.
Rewinding/fast forwarding
Press and hold the 1 / TUN - button 2 to rewind through a track.
Press and hold the / to fast forward through a track.
Skipping tracks
Press the / TUN - button 2 to skip to the previous track. The current track number will appear briefly on the display 15
Press the / to skip to the next track. The current track number will appear briefly on the display 15
Skipping tracks in steps of 10
Press the -10 / M. FOLD button 6 to skip backwards 10 tracks. The current track number will appear briefly on the display 15
Press the +100 / M_- FOLDrip forwds 10 tracks. The current track number will appear briefly on the display 15
Changing directories
Press and hold the -10 / M_* / FOLD button 6 for 2 seconds to skip to the previous directory, e.g. F01.
Press and hold the+10/M./FOLD button 7or 2 seconds to skip to the next directory.
Setting repeats and random playback
Press the P-MODE/M. button repeatedly until one of the following is shown on the display 15:
-
C37: The current track will be repeated.
-
/ : The current directory will be repeated.
FOLDER 39
- C7: The entire contents of the USB memory stick will be repeated.
RAND 38 tracks will be played back in a random sequence.
NOTICE
To deactivate all repeats or random playback, press the P-MODE/M. button repeatedly until the respective repeat or random playback symbol is no longer shown in the display 15
Pairing the device with a Bluetooth® playback device
To play audio files via Bluetooth, the party loudspeaker must previously have been paired with a compatible Bluetooth playback device.
Set the main switch to the position to switch the device on.
on appears briefly on the device display 15
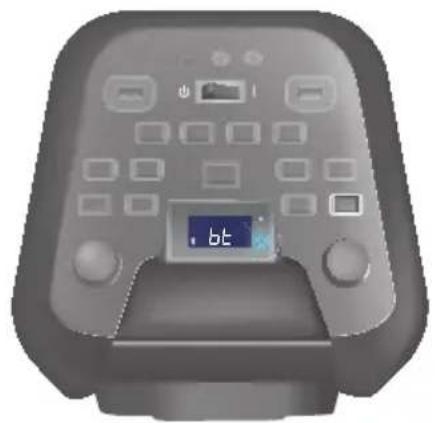
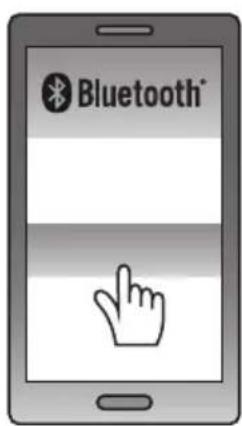
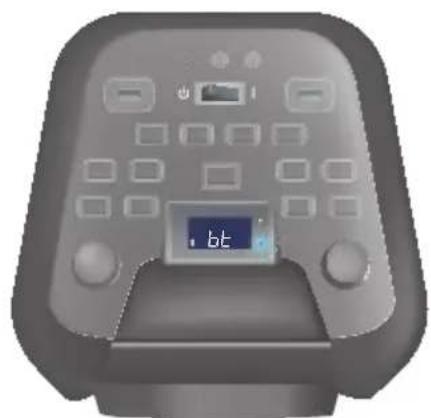
Press the MODE button repeatedly until and are shown on the display 15 You will hear a sequence of beeps and the Bluetooth ® LED PAIR flashes blue. The device is ready to be paired with a Bluetooth ® playback device. The Bluetooth® function is activated automatically on first use.
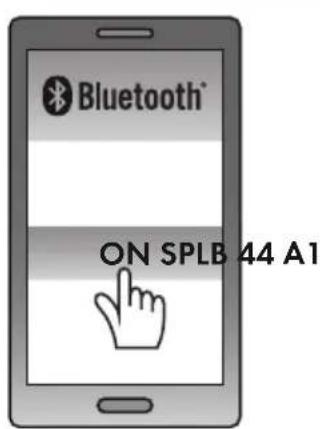
Set the Bluetooth® playback device so that it scans for Bluetooth® devices. A detailed description of how to do this can be found in the operating manual for your Bluetooth® playback device.
Select the entrySPLB 44 A1 from the list of found devices on your Bluetooth® playback device and, if required, enter the code0000 connect the two devices. If the pairing is successful, you will hear a beep and the Bluetooth® LED PAIRs blue.
NOTICE
The next time you turn on the party loudspeaker, it will connect automatically to the most recently connected Bluetooth® playback device. If your Bluetooth® playback device does not automatically reconnect to the party loudspeaker, you will have to manually re-establish the connection to your Bluetooth® playback device. A detailed description of how to do this can be found in the operating manual for your Bluetooth® playback device.
If you want to connect the device to another Bluetooth device, start by pressing the (Bluetooth) button for about 2 seconds to disconnect the currently connected Bluetooth playback device from the device. Alternatively, you can deactivate the Bluetooth function on the connected Bluetooth playback device. You will hear a beep and the Bluetooth LED PAIR flashes blue. The device is now ready to be paired with another Bluetooth playback device.
If you use a smartphone as your Bluetooth playback device, the audio playback will be paused when there is an incoming call. Acceptance/termination of the call is carried out via the smartphone. After finishing the call, playback of the audio file will resume automatically.
- During music playback in Bluetooth mode, the basic functions can be operated using the / / AMS 13and / TUN + 20 / TUN - 21 buttons on the device.
Note that while in Bluetooth mode, you can also set the volume using the Bluetooth® playback device.
NOTICE
If playback sounds distorted, reduce the volume on the Bluetooth® playback device.
- Depending on the Bluetooth playback device being used and the operating system, it is possible that not all functions will be supported.
In an environment with high-frequency interference, you may experience noise interference during music playback in Bluetooth® mode. As soon as the interference no longer exists, music playback should automatically continue in Bluetooth® mode without any further problems.
Connecting the microphone
You can connect up to two microphones simultaneously. One microphone is supplied with the product. You can purchase a second suitable microphone from a specialist dealer. The microphones function in all the operating modes. The volume of the microphone can be adjusted independently of the music playback volume. You can give a speech, with accompanying music playback if required, or you can use the microphones to sing karaoke, for example.
Set the main switch to the position to switch the device on.
Connect the 6.3 mm jack plug on the microphone 2 to one of the two 6.3 mm jack sockets MIC1 MIC2
If required, connect a second microphone to the free 6.3mm jack socket MIC1 2r MIC2 3
In each case, slide the On/Off switch ON/OFF 3 position switch a microphone on.
Adjust the volume for the microphone using the MioGvOL+
Press the ECHO button 8o activate the echo function. Echo on the display 15
Press the ECHO button again to deactivate the echo function. ECHO 41 goes out on the display 15
NOTICE
The echo function does not influence music playback, but only applies during microphone use.
Press the MODE button until the required operating mode is displayed.
If required, adjust the music playback volume using the VOLUME+ or mute the sound.
In each case, slide the On/Off switch ON/OFF position switch a microphone off.
Troubleshooting
This section contains important information about fault identification and rectification. Follow the instructions to avoid hazards and damage. The following table will help you to identify and rectify minor malfunctions:
| Fault Possible cause Remedy | ||
| There is nothing on the display 15. | The integrated battery is empty. | Plug the power plug into the socket to recharge the integrated battery. |
| The socket is not supplying any power. | Check the house fuses. | |
| The main switch 4 is set to the 0 position. | Set the main switch 4 to the 1 position. | |
| No sound. | The volume is set to minimum. | Increase the volume using the -VOLUME+ 12 |
| The device is not in the required operating mode. | Press the MODE button until you have selected the required operating mode. | |
| Interference occurs during radio reception. | The reception is too weak. | Try to improve reception by moving the FM wire aerial 25. |
| The Bluetooth® connection cannot be established. | The Bluetooth® connection is not activated on your playback device. | Make sure that the Bluetooth® function is activated on the playback device. |
| Another playback device is still paired with the device. | If you use several playback devices, ensure that any previous connection is disconnected. There may be a previously paired playback device still within range. | |
| The distance between the device and the playback device is too great. | Ensure that the device is no more than 10 metres away from the playback device. | |
| No sound is produced by the microphone. | The microphone has not been correctly connected. | Ensure that the microphone is correctly connected to one of the two 6.3 mm jack sockets MIC1 2 MIC2 3 |
| The volume is set to minimum. | Increase the volume using the -MIC2QOL+ 17 | |
| The microphone is not switched on. | Slide the On/Off switch ON/OFF 30 to the ON position to switch the microphone on. | |
NOTICE
If you cannot solve the problem with the above-mentioned solutions, please contact the Service Hotline (see section Service).
Cleaning

DANGER
Risk of fatal injury from electrocution!
- Pull out the plug from the mains power socket before starting to clean the device.
CAUTION!
Damage to the device!
- There are no serviceable parts or parts requiring cleaning inside the device. Moisture can cause damage to the device.
- To avoid irreparable damage to the device, ensure that no moisture gets into the device during cleaning.
- Do not use caustic, abrasive or solvent-based cleaning materials. These can damage the surfaces of the device.
Clean the surfaces of the device with a soft, dry cloth.
Use a lightly moistened cloth and a mild detergent to remove stubborn dirt residues.
Storage when not in use
If you decide not to use the device for a long period, disconnect it from the mains power supply and store it in a clean, dry place away from direct sunlight.
For long-term storage, the integrated battery should be fully charged to extend its operating life. During extended periods of non-use, you should top up the battery charge regularly. This is necessary to prolong the battery life.
Disposal
Disposal of the device

The adjacent symbol of a crossed-out dustbin means that this device is subject to Directive 2012/19/EU. This directive states that this device may not be disposed of in the normal household waste at the end of its useful life, but must be handed over to specially set-up
collection locations, recycling depots or disposal companies. The integrated rechargeable battery in this device cannot be removed for disposal.
This disposal is free of charge for the user. Protect the environment and dispose of this device properly.
You can obtain further information from your local disposal company or the city or local authority.

Your local community or municipal authorities can provide information on how to dispose of the worn-out product.
Appendix
Technical data
| Party loudspeaker | |
| Input voltage/frequency 100-240 V ~ (AC) 50/60 Hz | |
| Protection class | II/□ (double insulation) |
| Power consumption (in operation) max. 33 W | |
| Power consumption (standby) approx. 0.5 W | |
| Integrated battery (lead gel) 12 V | --- (DC), 7000 mAh (84 Wh) |
| Battery charging time approx. 9 hrs (when device is switched off) | |
| Speaker output 2 × 22 W RMS | |
| Loudspeaker impedance 3 Ω (Ohm) | |
| Frequency range 60-20,000 Hz | |
| Bluetooth® specifications Version 4.2 | |
| Frequency band 2.4 GHz | |
| Transmission output < 10 dBm | |
| Supported Bluetooth® profiles | AVRCP* and A2DP* *if supported by Bluetooth® playback device |
| Bluetooth® range max. 10 m | |
| VHF frequency range (FM) 87.5-108 MHz | |
| USB connections | 2 × USB Type A (USB 2.0) 5 V = = (DC), max. 200 mA |
| Audio connections | 1 × 3.5 mm Ø jack socket (AUX IN) 2 × 6.3 mm Ø jack socket (MIC1/MIC2) |
| Audio formats supported | MP3, WMA, AAC, WAV, FLAC |
| Operating temperature | 15°C to 35°C |
| Storage temperature | 0°C to 40°C |
| Humidity (no condensation) | ≤ 75% |
| Dimensions | approx. 60.0 × 26.0 × 28.0 cm |
| Weight | approx. 8.1 kg |
| Microphone | |
| Type dynamic | |
| Frequency response 20 Hz-20,000 Hz | |
| Sensitivity -49,7 dB ± 5 % (re 1 V/Pa) | |
| Impedance 600 Ω (Ohm) ± 30% | |
| Dimensions approx. 17.2 × 3.6 × 3.6 cm | |
| Weight approx. 170 g | |
| Cable length approx. 2.5 m | |
Notes on the EU Declaration of Conformity
CE This device complies with the essential requirements and other relevant provisions of the RE Directive 2014/53/EU, the Ecodesign Directive 2009/125/EC and the RoHS Directive 2011/65/EU.
You can download the complete EU conformity declaration from www.kompernass.com/support/305947_DOC.pdf.
This appliance has a 3-year warranty valid from the date of purchase. If this product has any faults, you, the buyer, have certain statutory rights. Your statutory rights are not restricted in any way by the warranty described below.
Warranty conditions
The validity period of the warranty starts from the date of purchase. Please keep your original receipt in a safe place. This document will be required as proof of purchase.
If any material or production fault occurs within three years of the date of purchase of the product, we will either repair or replace the product for you at our discretion. This warranty service is dependent on you presenting the defective appliance and the proof of purchase (receipt) and a short written description of the fault and its time of occurrence.
If the defect is covered by the warranty, your product will either be repaired or replaced by us. The repair or replacement of a product does not signify the beginning of a new warranty period.
Warranty period and statutory claims for defects
The warranty period is not prolonged by repairs effected under the warranty. This also applies to replaced and repaired components. Any damage and defects present at the time of purchase must be reported immediately after unpacking. Repairs carried out after expiry of the warranty period shall be subject to a fee.
Scope of the warranty
This appliance has been manufactured in accordance with strict quality guidelines and inspected meticulously prior to delivery.
The warranty covers material faults or production faults. The warranty does not extend to product parts subject to normal wear and tear or fragile parts such as switches, batteries, baking moulds or parts made of glass.
The warranty does not apply if the product has been damaged, improperly used or improperly maintained. The directions in the operating instructions for the product regarding proper use of the product are to be strictly followed. Uses and actions that are discouraged in the operating instructions or which are warned against must be avoided.
This product is intended solely for private use and not for commercial purposes. The warranty shall be deemed void in cases of misuse or improper handling, use of force and modifications / repairs which have not been carried out by one of our authorised Service centres.
Warranty claim procedure
To ensure quick processing of your case, please observe the following instructions:
Please have the till receipt and the item number (e.g. IAN 12345) available as proof of purchase.
■ You will find the item number on the type plate, an engraving on the front page of the instructions (bottom left), or as a sticker on the rear or bottom of the appliance.
If functional or other defects occur, please contact the service department listed either by telephone or by e-mail.
■ You can return a defective product to us free of charge to the service address that will be provided to you. Ensure that you enclose the proof of purchase (till receipt) and information about what the defect is and when it occurred.

You can download these instructions along with many other manuals, product videos and software on www.lidl-service.com.
Service
GB Service Great Britain
Tel.: 0800 404 7657
E-Mail: kompernass@lidl.co.uk
IE Service Ireland
Tel.: 1890 930 034
(0,08 EUR/Min., (peak))
(0,06 EUR/Min., (off peak))
E-Mail: kompernass@lidl.ie
IAN 305947
Importer
Please note that the following address is not the service address. Please use the service address provided in the operating instructions.
KOMPERNASS HANDELS GMBH
BURGSTRASSE 21
DE-44867 BOCHUM
GERMANY
www.kompernass.com
Table des matieres
Introduction 50
Selection de stations
Chere cliente, cher client,
KOMPERNASS HANDELS GMBH
BURGSTRASSE 21
DE-44867 BOCHUM
ALLEMAGNE
www.kompernass.com
Inhoud
Inleiding 74
KOMPERNASS HANDELS GMBH
BURGSTRASSE 21
DE-44867 BOCHUM
DUITSLAND
www.kompernass.com
Obsah
Uvod. 98
Informace k tomuto navodu k obsluze 98
Autorske pravo 98
Informace o ochrannych známkach 98
Pouziti v souladu s urcenim 9 9
KOMPERNASS HANDELS GMBH
BURGSTRASSE 21
DE-44867 BOCHUM
NEMECKO
www.kompernass.com
Indices
Introduccion 122
KOMPERNASS HANDELS GMBH
BURGSTRASSE 21
DE-44867 BOCHUM
ALEMANIA
www.kompernass.com
Indices
Introdução 146
KOMPERNASS HANDELS GMBH
BURGSTRASSE 21
DE-44867 BOCHUM
ALEMANHA
www.kompernass.com
KOMPERNASS HANDELS GMBH
BURGSTRASSE 21
DE-44867 BOCHUM
GERMANY
www.kompernass.com

- BLUETOOTH® PARTY SPEAKER SPLB 44 A1
- FR BE
- Contents
- Introduction 26
- Safety. 28
- Controls/parts description 31
- Indicators on the display 32
- Use 33
- Handling and operation 35
- Troubleshooting 42
- Cleaning 43
- Storage when not in use 44
- Disposal 44
- Appendix 45
- Introduction
- Information about these operating instructions
- Copyright
- Notes on trademarks
- Intended use
- Warning notices
- DANGER
- A warning notice at this hazard level indicates an imminently hazardous situation.
- CAUTION!
- A warning notice at this hazard level indicates a risk of property damage.
- NOTICE
- Safety
- Risk of electrocution
- Risk of fatal injury from electrocution!
- Contact with live cables or components can result in a fatal injury!
- Basic safety instructions
- Risk of hearing damage
- Risks due to extreme volume levels!
- Notes on the radio interface
- Controls / parts description
- (See fold-out page for illustrations)
- Indicators on the display
- Use
- Check package contents
- Disposal of packaging
- Setting up the device
- Connecting the power supply
- Unwinding the FM wire aerial
- Charging the battery
- Handling and operation
- Switching the device on/off
- Adjusting the volume
- Selecting a sound preset
- Activate/deactivate bass boost
- Setting the lighting effects
- LIGHT1button
- LIGHT 2 button
- Connecting an external playback device
- Setting the radio station
- Search for a station
- Saving stations manually
- Saving stations automatically (AMS function)
- Calling up stations
- Using a USB memory stick
- Connecting a USB memory stick
- Pause/continue playback
- Rewinding/fast forwarding
- Skipping tracks
- Skipping tracks in steps of 10
- Changing directories
- Setting repeats and random playback
- Pairing the device with a Bluetooth® playback device
- Connecting the microphone
- Troubleshooting
- Cleaning
- Damage to the device!
- Storage when not in use
- Disposal
- Disposal of the device
- This disposal is free of charge for the user. Protect the environment and dispose of this device properly.
- Appendix
- Technical data
- Notes on the EU Declaration of Conformity
- Warranty conditions
- Warranty period and statutory claims for defects
- Scope of the warranty
- Warranty claim procedure
- Service
- Importer
- Table des matieres
- Introduction 50
- Selection de stations
- Inhoud
- Inleiding 74
- Obsah
- Uvod. 98
- Indices
- Introduccion 122
- Introdução 146
Brand : SILVERCREST
Model : SPLB 44 A1
Category : Loudspeaker