MicroDirect - Microscope CELESTRON - Free user manual and instructions
Find the device manual for free MicroDirect CELESTRON in PDF.
User questions about MicroDirect CELESTRON
0 question about this device. Answer the ones you know or ask your own.
Ask a new question about this device
Download the instructions for your Microscope in PDF format for free! Find your manual MicroDirect - CELESTRON and take your electronic device back in hand. On this page are published all the documents necessary for the use of your device. MicroDirect by CELESTRON.
USER MANUAL MicroDirect CELESTRON
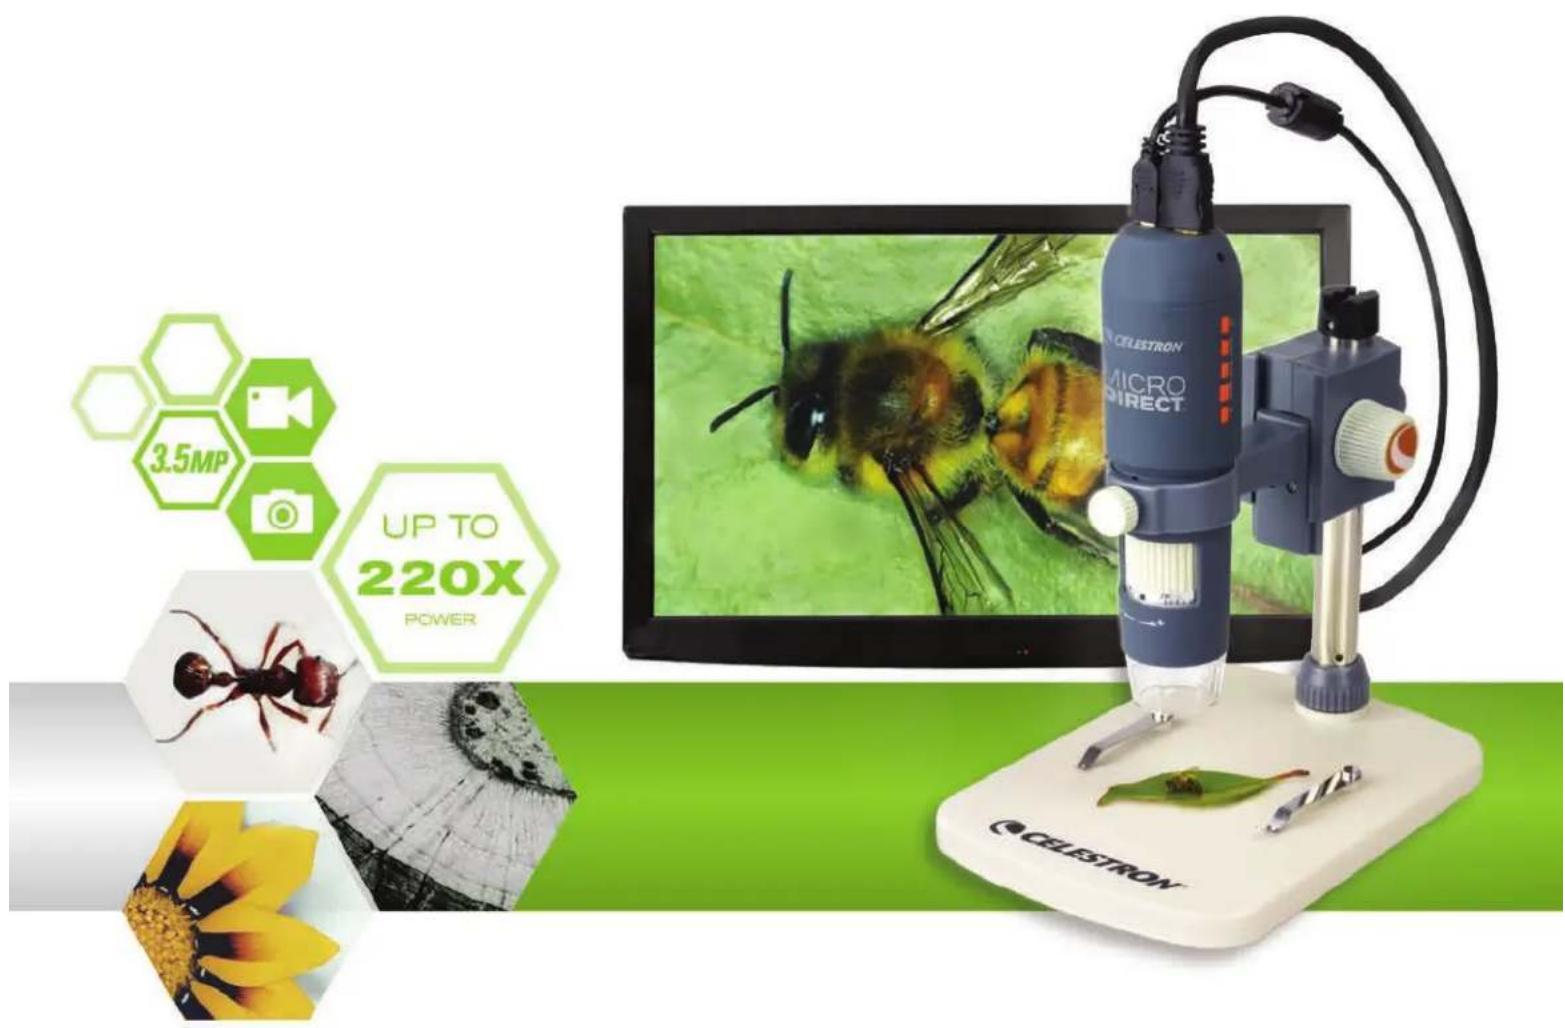
HANDHELD DIGITAL MICROSCOPE

INSTRUCTION MANUAL
MODEL #44316
1. INTRODUCTION
Thank you for purchasing the Celestron MicroDirect 1080p HD Handheld Digital Microscope and stand. Your microscope is a precision optical instrument, made of the highest quality materials to ensure durability and long life. It is designed to give you a lifetime of viewing pleasure with a minimal amount of maintenance.
Before attempting to use your MicroDirect® 1080p HD microscope, please read through the instructions and reference the diagrams below. Familiarizing yourself with the many features of the MicroDirect® 1080p HD microscope will go a long way to making your experience an enjoyable one.
The MicroDirect1080p HD microscope is a handheld digital microscope designed to connect, via the included HDMI cable, directly to your TV monitor or projector displaying full 1080p HD streaming video! There is no need for a computer when using the MicroDirect1080p HD microscope.
This microscope is a low magnification power microscope, mainly suited for examining specimens like coins, stamps, rocks, electronics, insects, and other 3D objects. Specimens on slides can be viewed, but this microscope is not ideal for this purpose. You can see some of our biological microscopes more suited to this type of viewing at www.celestron.com.
The Celestron MicroDirect® 1080p HD microscope does not use an eyepiece like a traditional microscope. Instead, the embedded camera sensor acts as the eyepiece, and combined with the lens assembly, the object is magnified and digitized. The HDMI connection then sends that digital signal out to your monitor or projector for incredibly clear 1080p video streaming. This allows you to view specimens easily and share the large live streaming image with a room full of people. Viewing is also more immediate and eye and neck strain are removed from the equation, unlike traditional microscopes. You can hold the microscope in your hand while observing large surfaces away from a normal lab setting, or use the included professional stand for more precise, hands-free viewing. Capture still images directly to your MicroSD card for download later. Record video by connecting the MicroDirect® 1080p HD microscope directly to you PC using the USB cable and you are ready to start capturing 720p HD movies.
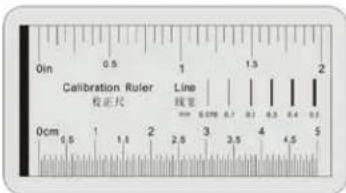
Calibration Ruler (1)
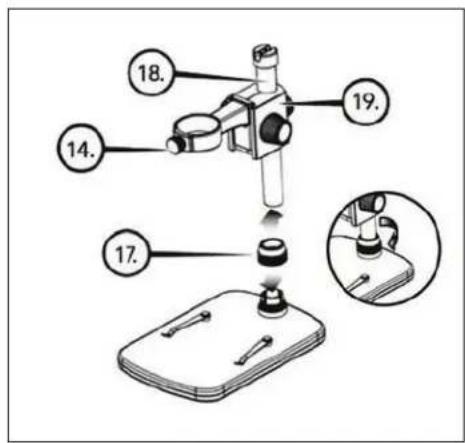
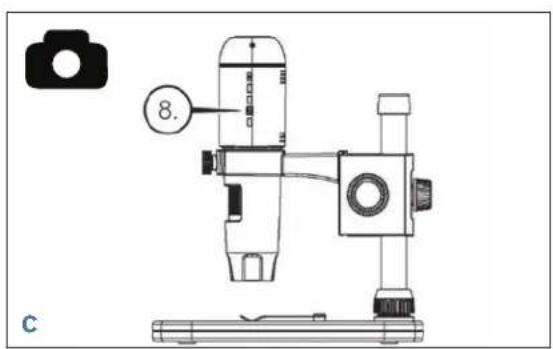
B. PARTS
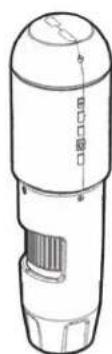
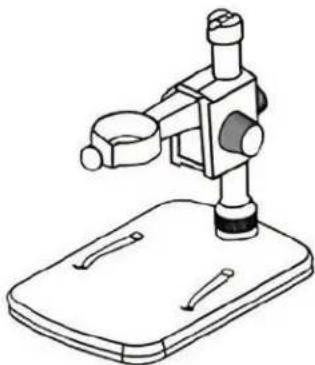
| PART FUNCTION PART FUNCTION | |||
| 1. | Mini USB Port (Power) | 11. | Focus Wheel |
| 2. | Mini (Type C) HDMI OUT Port | 12. | Magnification Gauge |
| 3. | Micro-SD Card Slot | 13. | Height Adjustment Lock Nut |
| 4. | LED Dimmer Switch | 14. | Microscope Holder Lock Nut |
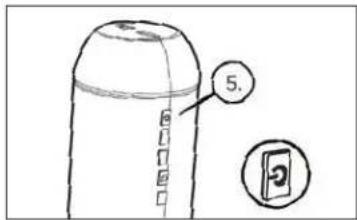
| 5. | ON/OFF Button | 15. | Lock Wheel |
| 6. | Mode Button | 16. | Course Focus Wheel |
| 7. | Menu Button | 17. | Shaft Connection Lock Collar |
| 8. | Shutter Trigger/OK Button | 18. | Support Shaft |
| 9. | Down Arrow Button | 19. | Microscope Holder Assembly |
| 10. | 8 LED Ring Illuminator | ||

C. SYSTEM REQUIREMENTS
1. Monitor or Projector
- Must have open HDMI port
+USB with power OUT (optional)
2. PC (Optional)
+WindowsXP/7/8/10
+P4 1.8 or above
- RAM: 512M
+ Video Memory: 64M
+USB port: 2.0
NOTE: Software is downloaded from celestron.com
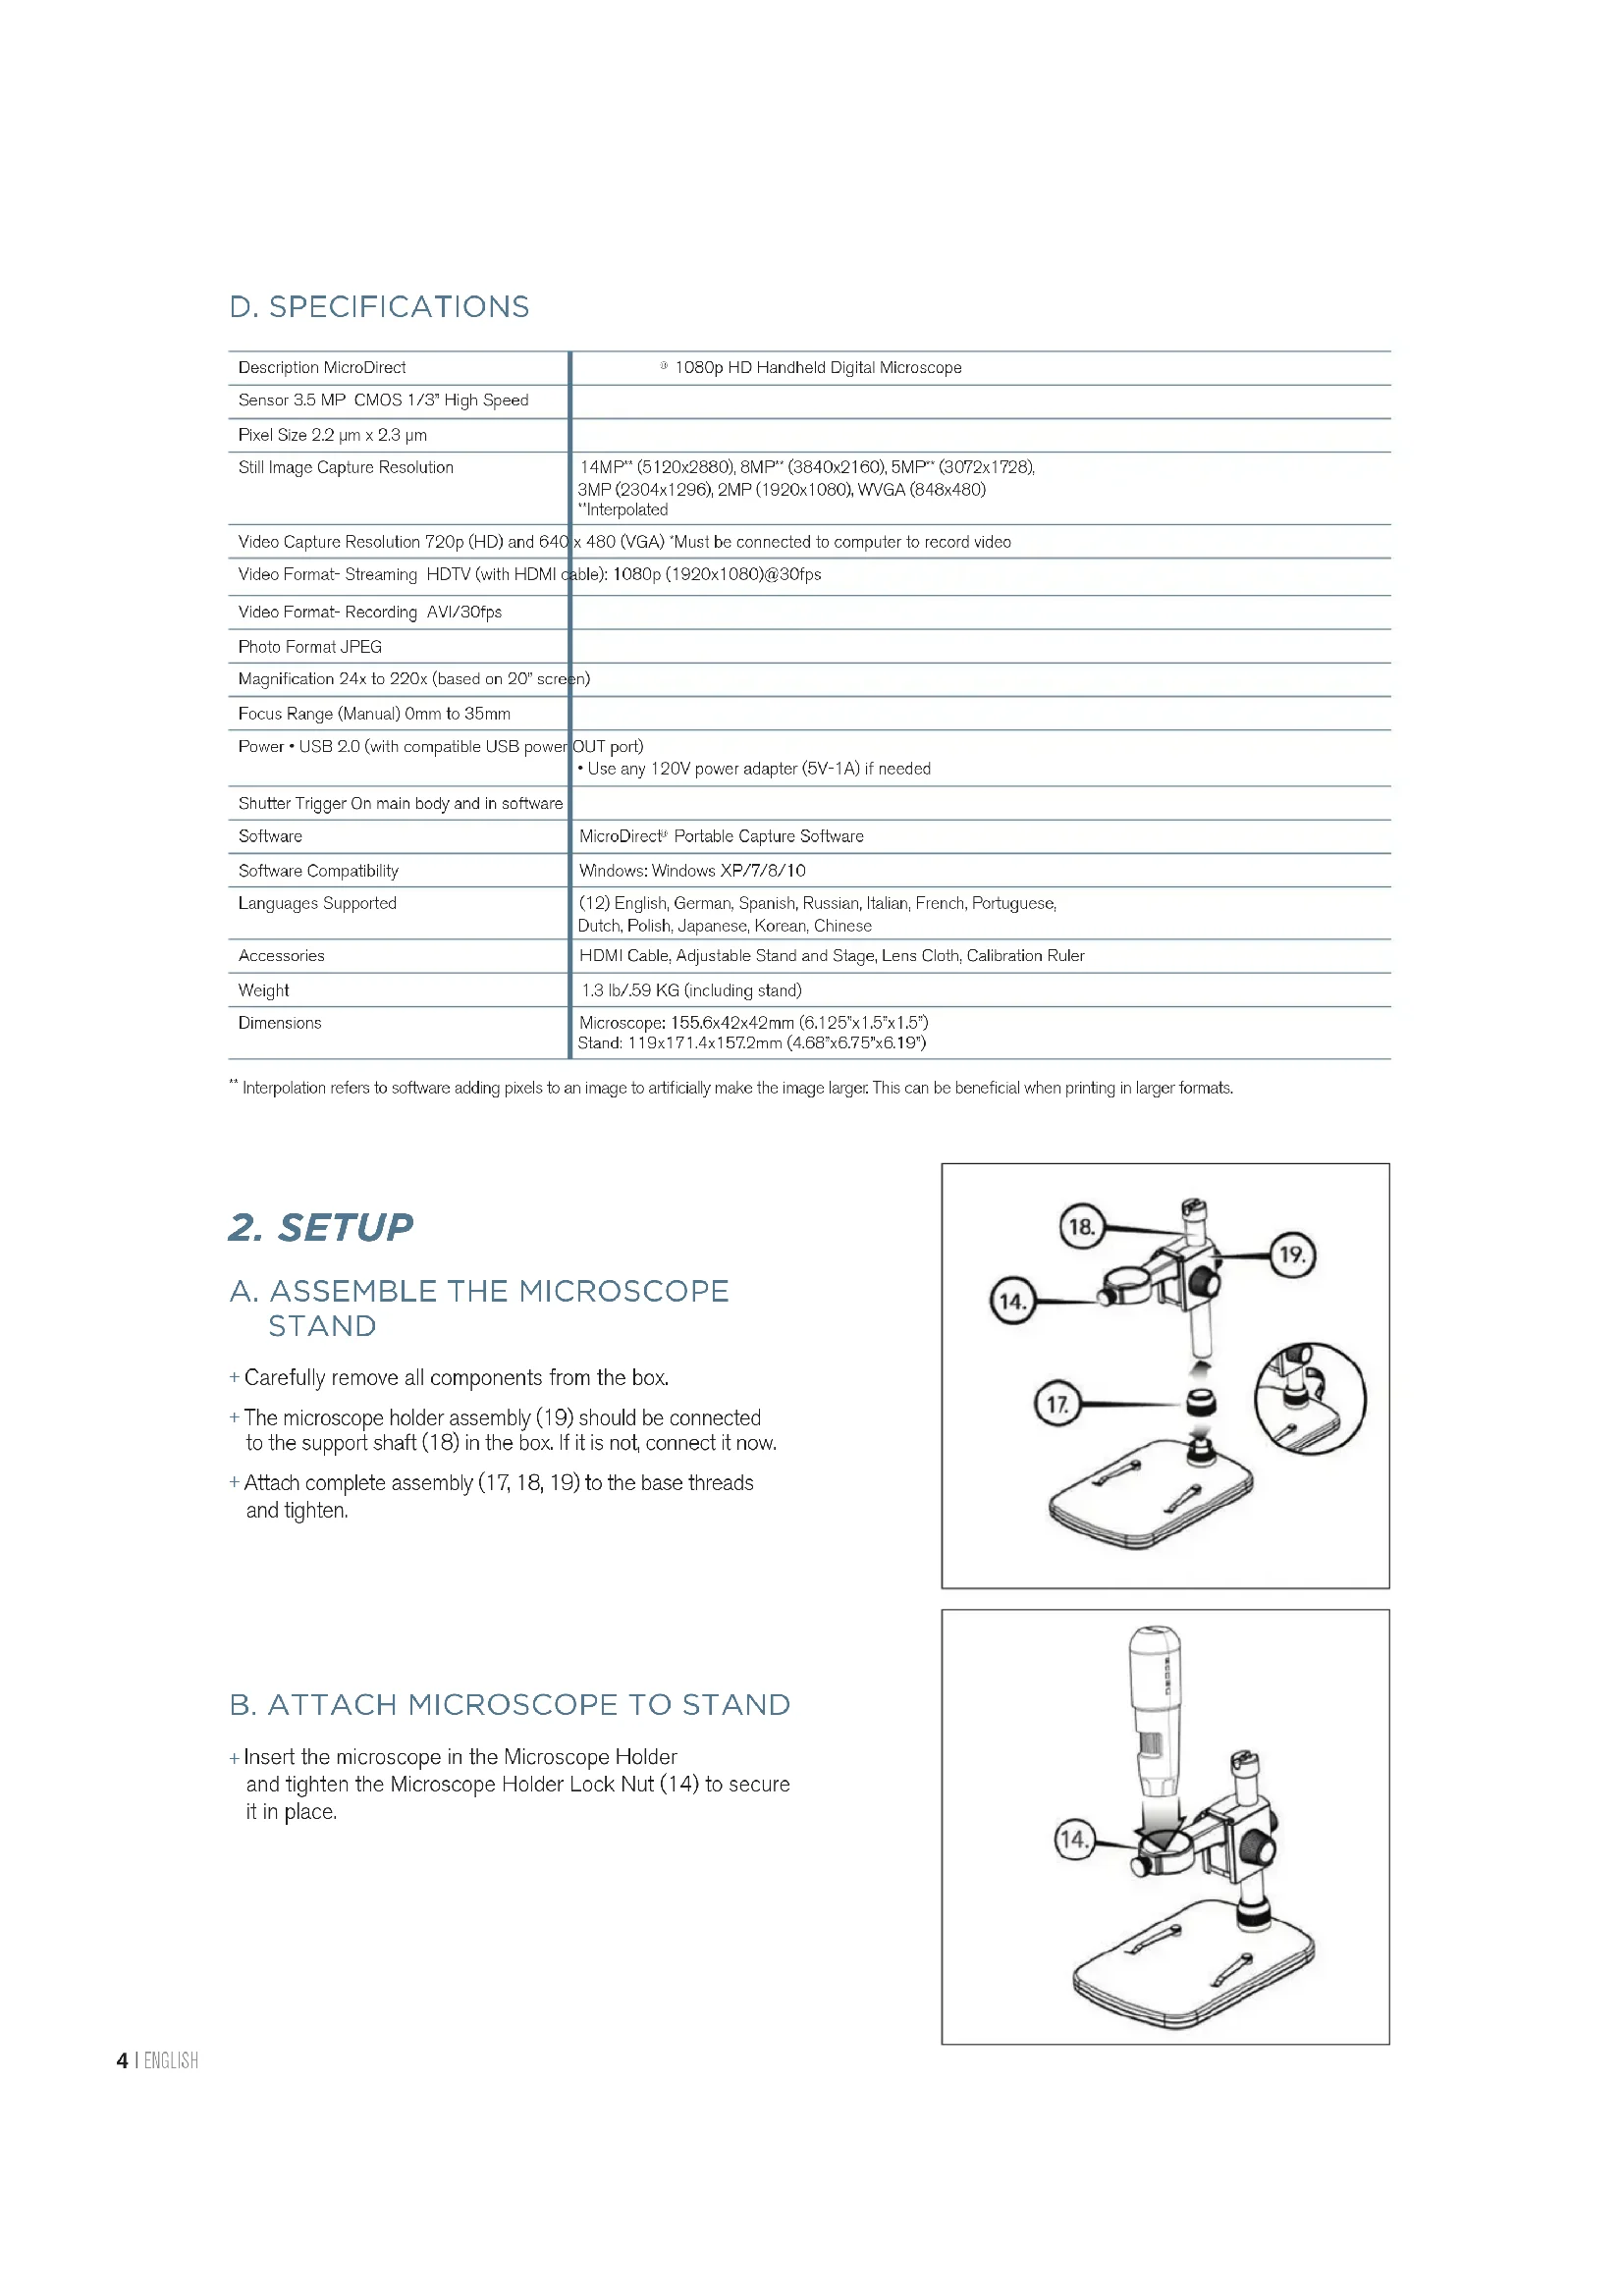
D. SPECIFICATIONS
| Description MicroDirect | * 1080p HD Handheld Digital Microscope |
| Sensor 3.5 MP CMOS 1/3" High Speed | |
| Pixel Size 2.2 μm x 2.3 μm | |
| Still Image Capture Resolution | 14MP** (5120x2880), 8MP** (3840x2160), 5MP** (3072x1728), 3MP (2304x1296), 2MP (1920x1080), WVGA (848x480) *Interpolated |
| Video Capture Resolution 720p (HD) and 640 x 480 (VGA) *Must be connected to computer to record video | |
| Video Format- Streaming HDTV (with HDMI cable): 1080p (1920x1080)@30fps | |
| Video Format- Recording AVI/30fps | |
| Photo Format JPEG | |
| Magnification 24x to 220x (based on 20" screen) | |
| Focus Range (Manual) 0mm to 35mm | |
| Power • USB 2.0 (with compatible USB power) OUT port • Use any 120V power adapter (5V-1A) if needed | |
| Shutter Trigger On main body and in software | |
| Software | MicroDirect® Portable Capture Software |
| Software Compatibility | Windows: Windows XP/7/8/10 |
| Languages Supported | (12) English, German, Spanish, Russian, Italian, French, Portuguese, Dutch, Polish, Japanese, Korean, Chinese |
| Accessories | HDMI Cable, Adjustable Stand and Stage, Lens Cloth, Calibration Ruler |
| Weight | 1.3 lb/59 KG (including stand) |
| Dimensions | Microscope: 155.6x42x42mm (6.125"x1.5"x1.5") Stand: 119x171.4x157.2mm (4.68"x6.75"x6.19") |
Interpolatlon refers to software ading pixels to an image to artificially make the image largcr. This can be beneficial when printing in larger formals.
2. SETUP
A. ASSEMBLE THE MICROSCOPE STAND
- Carefully remove all components from the box.
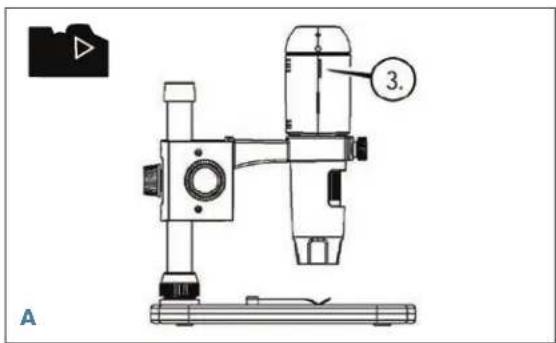
+The microscope holder assembly (19) should be connected to the support shaft (18) in the box. If it is not, connect it now. - Attach complete assembly (17, 18, 19) to the base threads and tighten.
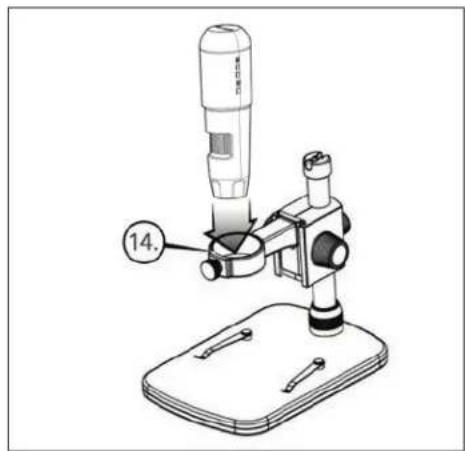
B. ATTACH MICROSCOPE TO STAND
+Insert the microscope in the Microscope Holder and tighten the Microscope Holder Lock Nut (14) to secure it in place.
3. USING YOUR MICROSCOPE
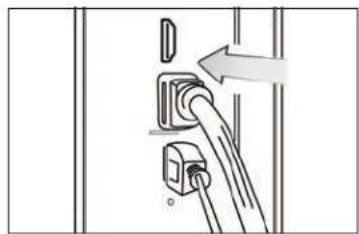
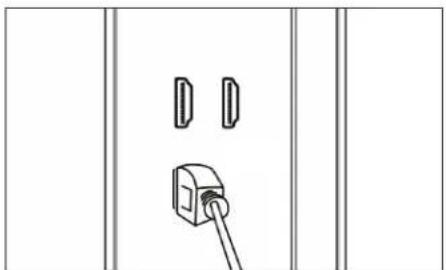
A. CONNECT TO A MONITOR OR PROJECTOR
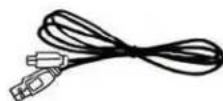
- Plug one end of the included HDMI cable into the microscope's Mini (Type C) HDMI port and the other end into your monitor's standard (Type A) HDMI port.
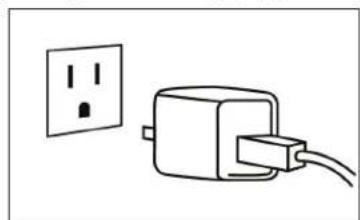
- Plug the USB cable into the microscope and then into an open USB 2.0 port on your monitor or projector (if available).
- If there is no USB 2.0 port on the monitor or projector, use any 5V-1A USB plug and plug the USB cable into it, and then into an available power outlet. DO NOT plug the USB cable directly into a desktop or laptop computer as it will misread the signal from the cable as a storage device and cause a blank blue screen to appear on the monitor screen.
NOTE: The included USB cable works with all standard USB plugs that come with many of today's electronics such as smartphones and tablets.
NOTE: An additional option for power is an external power source such as a power bank that has a standard USB OUT port. All Celestron Elements hand warmers and power banks will work for this purpose. You can find them at celestron.com
- Power up the microscope by pressing the ON/OFF button (5).
B. TAKE A STILL IMAGE
- Insert your Micro-SD card in the Micro SD card slot (3) on the MicroDirect body.
NOTE: Micro SD Card NOT included.
NOTE: SD Card slot supports up to 32G SDHC.
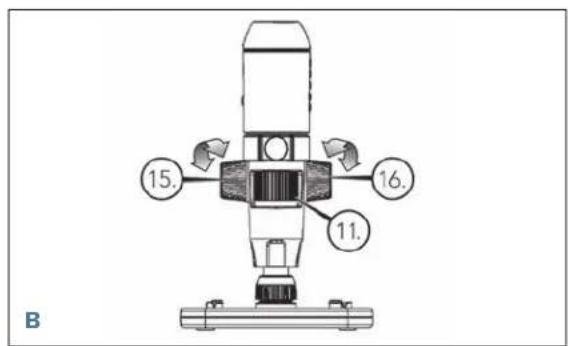
- Loosen the Lock Wheel (15) adjust the course focus by rotating the Course Focus wheel (16).
- Tighten the Lock wheel (15) to hold the assembly in place.
- Turn the Fine Focus wheel (11) to focus on the specimen.
- Press the Shutter Trigger button (8) and the captured image will be saved in the Micro-SD card.
C. REVIEW YOUR RECORDED IMAGES
- With MicroSD card in place in the MicroSD card slot, press the Mode button (6) to switch to playback mode.
- Press the Down button (9) to view the previously captured image.
- Press the Mode button (6) again to return to the streaming image.
D. DOWNLOADING IMAGES TO PC
- With the MicroSD card in SD card slot, connect the microscope to your PC via the included USB 2.0 Cable.
- Your PC should recognize the device as a storage device.
- Download the images as you would with any digital camera.
4. MENU SETTINGS
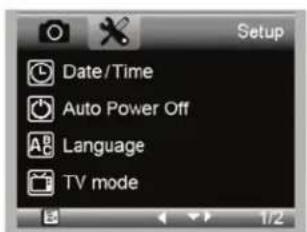
A. MAIN MENU
+Press Menu button (7) to enter the Main menu.
NOTE: The MAIN MENU consists of 2 main windows. To gain access to MAIN WINDOW 2 press the Menu button (7) again now.
- Here you can adjust the Resolution, Image Quality, Sharpness, Exposure, Choose to have the Date stamp or choose a Time Lapse option, set the Date and Time, set the Auto Power Off, Choose a language, set the TV mode and frequency, reformat your MicroSD card etc.
- Press the Down button (9) to scroll through your choices.
- When your setting choice is highlighted, press the Capture/OK button (8).
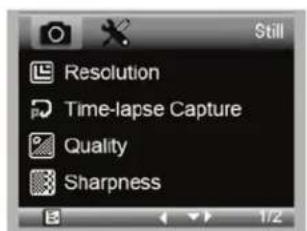

MAIN MENU 1
MAIN MENU 2
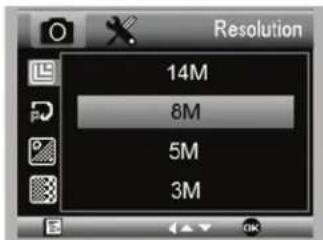
B. RESOLUTION
- Select a resolution setting for your still image.
- Your choices are: 14M, 8M, 5M*, 3M, 2MP or WVGA
NOTE: 14MP, 8MP and 5MP settings are based on interpolation. Interpolation refers to software adding pixels to an image to artificially make the image larger. This can be beneficial when printing in larger formats.
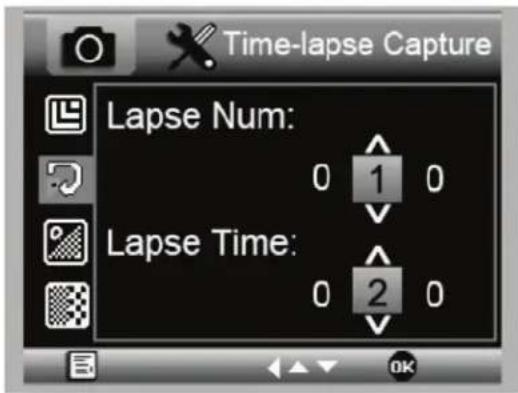
C. TIME-LAPSE CAPTURE
- Your MicroDirect allows you to set the device to take images over a defined time period. This is referred to as Time-Lapse.
+You will first select the number of still images or Lapse Num you want your device to take. This can range from 2 to 999 images.
+Use the Down button (9) to scroll through the numbers from 0 to 9. When satisfied with the first digit, press the Mode button (6) to jump to the next digit.
+Again, using the Down button (9), set that digit.
+Once the number of still images has been chosen, press the Mode button (6) to move to the Lapse Time choice.
+The Lapse Time determines the amount of time that will pass between each still image capture.
+Set these numbers using the same method as above for the Lapse Num.
+The choices are in seconds and range from 1 second to 999 seconds.
+This, along with the number of images, will determine your overall length of time for your time lapse.
+For example: If you choose to take 999 total images and the interval between each is 999 seconds you will have 277 hours documented. 999 seconds = 16.65 minutes. Multiply that by 999 (images) = 16,633.35 minutes. 16,633.35 / 60 (minutes per hour) = 277 hours or 11.55 days of documentation. - Once you have set your number of images and interval, press the Capture/OK button (8) to confirm.
+Press the Menu button (7) to return to the streaming image.
+Press the Capture button (8) to start the time lapse.
+Once all frames have been taken in the Time Lapse mode, the MicroDirect*1080p HD microscope will revert back to the normal preview mode.
NOTE: The AUTO POWER OFF time needs to be set to a number higher than the set Time Lapse time. See section on AUTO POWER OFF FEATURE and make sure to do your calculations correctly.
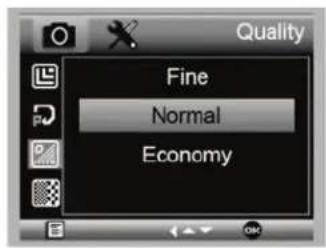
D. IMAGE QUALITY
+Once in the Image Quality section of the Settings menu, scroll using the Down button (9) and select either: Fine, Normal or Economy.
+The Image Quality will determine the compression ratio of the image.
+Once you are satisfied with your Images Quality selection, press the Capture /OK button (8) to confirm.
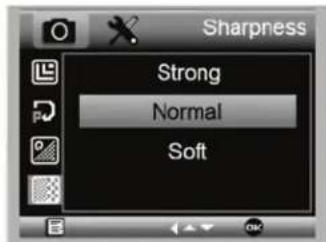
E. SHARPNESS
+You can adjust the image sharpness here. The choices are Strong, Normal, Soft.
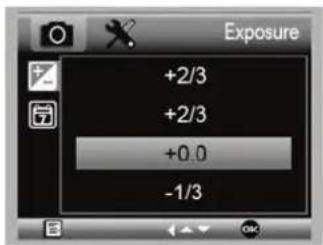
F. EXPOSURE (BRIGHTNESS)
- Select the target value by pressing the Down button (9).
+Confirm choice by pressing Capture/OK button (8).
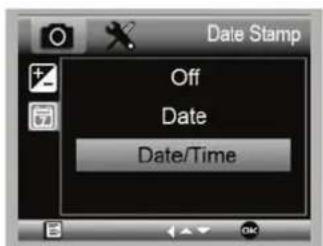
G. DATE STAMP
+Choose to have the date stamp display.
- Off
- Date only
- Date/Time
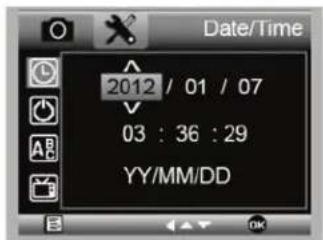
H. DATE/TIME (MAIN MENU 2)
Select the target value by pressing the Down button (9).
+Confirm choice by pressing Capture/OK button (8).
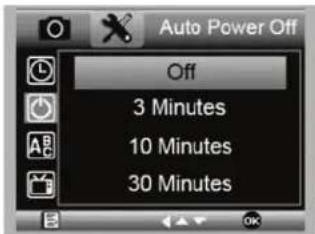
I. AUTO POWER OFF
+Here you can set the unit to turn off automatically after no use. The choices are:
- OFF (Default)- This will keep your device on until you manually turn it off.
2.3 minutes- Will turn off after 3 minutes of continuous non-use. - 10 minutes- Will turn off after 10 minutes of continuous non-use.
- 30 minutes- Will turn off after 30 minutes of continuous non-use.
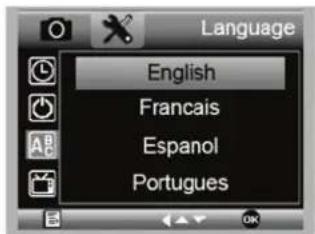
J. LANGUAGE
+Here you can choose your preferred language. The choices are:
-
English
-
Portuguese
-
German
-
Dutch
-
Spanish
-
Polish
-
Russian
10.Japanese
-
Italian
-
Korean
-
French
-
Chinese
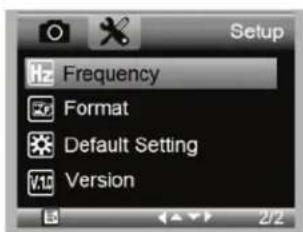
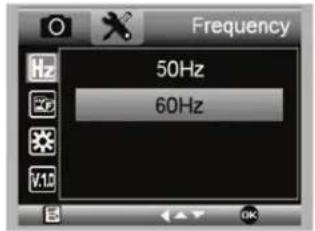
K. FREQUENCY
+Here you will select the frequency. The choices are:
- 50Hz (Default) (United States)
- 60 Hz (Most other countries)
NOTE: Research your specific country before setting the Hz setting.
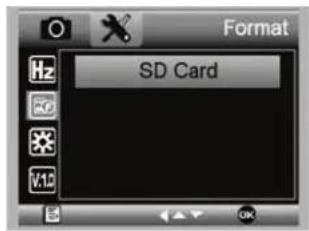
L. FORMAT
+Here you re-format your MicroSD card.
WARNING: When re-formattling, all the files and information saved on the MicroSD will be erased.
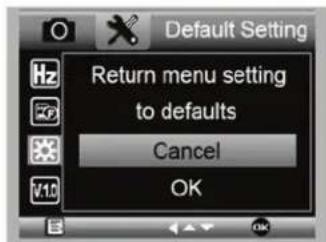
M. DEFAULT SETTING
Here you can choose to reset all the system settings back to default.
For complete manual with detailed settings and PC connection option use the included CD/DVD ROM to Download the manual. If you do not have a CD/DVD ROM drive, go to www.celestron.com then click on SUPPORT to download.
5. CARE AND MAINTENANCE
Your Celestron MicroDirect® 1080p HD microscope is a precision optical instrument and should be treated with care at all times. Follow these suggestions and your microscope will need very little maintenance throughout its lifetime.
+Store your microscope in a clean, dry place.
+ Never use your microscope where operation of such devices is restricted. Improper use creates the risk of serious accident.
+ Only use your microscope within the 23^ to 120^ (-5^ to 50^) temperature range. Try to limit sudden temperature changes as this may create moisture in the microscope housing.
- Do not try to access the internal components of your microscope or attempt to modify it in any way. Only authorized technicians should perform maintenance or repairs.
- Keep your microscope away from water and other liquids. Never use it in rain or snow. Moisture creates the danger of fire and electric shock.
- If the exterior of your microscope needs cleaning, wipe it with a moist cloth.
6. WARRANTY
Your Celestron MicroDirect® 1080p HD microscope has a two year limited warranty. Please visit the Celestron website for detailed information on all Celestron microscopes.
NOTES
CELESTRON
© 2020 Celestron • All rights reserved
celestron.com/pages/technical-support
2835 Columbia Street • Torrance, CA 90503 USA
CC
RoHS

FCC Note: This equipment has been tested and found to comply with the limits for a Class B digital device, pursuant to part 15 of the FCC Rules. These limits are designed to provide reasonable protection against harmful interference in a residential installation. This equipment generates, uses, and can radiate radio frequency energy and, if not installed and used in accordance with the instructions, may cause harmful interference to radio communications. However, there is no guarantee that interference will not occur in a particular installation. If this equipment does cause harmful interference to radio or television reception, which can be determined by tuning the equipment off and on, the user is encouraged to try to correct the interference by one or more of the following measures:
-
Reorient or relocate the receiving antenna.
-
Connect the equipment into an outlet on a circuit different from
-
Increase the separation between the equipment and receiver.
that to which the receiver is connected.
- Consult the dealer or an experienced radio/TV technician for help.
This product is designed and intended for use by those 14 years of age and older. Product design and specifications are subject to change without prior notification.
MICRODIRECT
1080p HD
HANDHELD DIGITAL MICROSCOPE

MODE D'EMPLOI
MODELE N° 44316
1. INTRODUCTION
Microscope MicroDirect 1080p HD (1)
Pied(1)
Cable USB (1)

Cable HDMI (1)
HANDHELD DIGITAL MICROSCOPE
HANDHELD DIGITAL MICROSCOPE

HANDHELD DIGITAL MICROSCOPE