Digital Microscope Pro - Microscope CELESTRON - Free user manual and instructions
Find the device manual for free Digital Microscope Pro CELESTRON in PDF.
User questions about Digital Microscope Pro CELESTRON
0 question about this device. Answer the ones you know or ask your own.
Ask a new question about this device
Download the instructions for your Microscope in PDF format for free! Find your manual Digital Microscope Pro - CELESTRON and take your electronic device back in hand. On this page are published all the documents necessary for the use of your device. Digital Microscope Pro by CELESTRON.
USER MANUAL Digital Microscope Pro CELESTRON
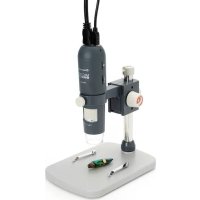
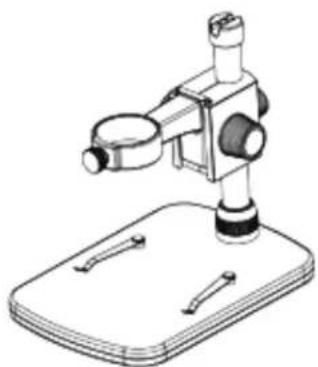
Thank you for purchasing the Celestron Handheld Digital Microscope Pro with a 5MP sensor and professional stand. Your microscope is a precision optical instrument, made of the highest quality materials to ensure durability and long life. It is designed to give you a lifetime of pleasure with a minimal amount of maintenance.
Before attempting to use your microscope, please read through the instructions and reference the diagrams below. Familiarizing yourself with the many features of the Handheld Digital Microscope Pro will go a long way to making your experience an enjoyable one.
The Handheld Digital Microscope Pro provides low powers from 20x up to 200x and connects to your Macintosh or Windows PC via USB 2.0. (NOTE: Depending on the size of your monitor, you may be able to attain 800x magnifi cation) This microscope is a low magnifi cation power microscope, mainly suited for examining specimens like coins, stamps, rocks, electronics, insects, and other 3D objects. Specimens on slides can be viewed, but this microscope is not ideal for this purpose. You can see some of our biological microscopes more suited to this type of viewing at www. celestron.com.
The Celestron Handheld Digital Microscope Pro does not use an eyepiece like a traditional microscope. Instead, the camera sensor "sees" the specimen with 10x magnifi cation, and the image is displayed on the computer screen. This makes viewing fun, cuts down on eye and neck strain, and allows for easy sharing with others. You can hold the microscope in your hand while observing large surfaces away from a normal lab setting, or use the included professional stand for more precise, hands-free viewing. Recording still images and video is a snap. You can save, transfer, and share your image files quickly and easily with the included Celestron Micro CapturePro software.
Take some time to read the simple care, maintenance tips in this manual to ensure that your Handheld Digital Microscope Pro provides you with years of quality performance.
A. IN THE BOX

Microscope (1)
Professional Stand (1)
Quick Setup Guide (1)

CD (1) Calibration Ruler (1)

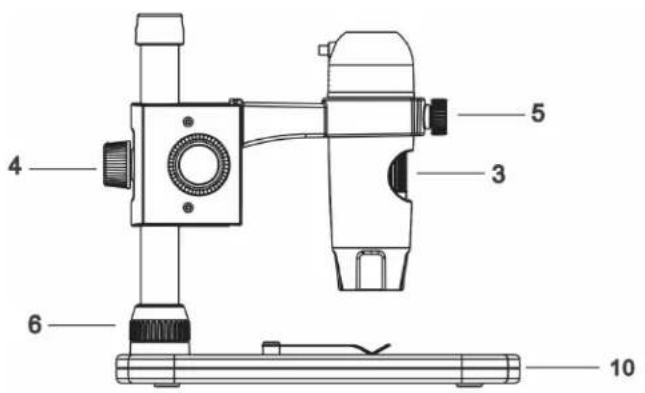
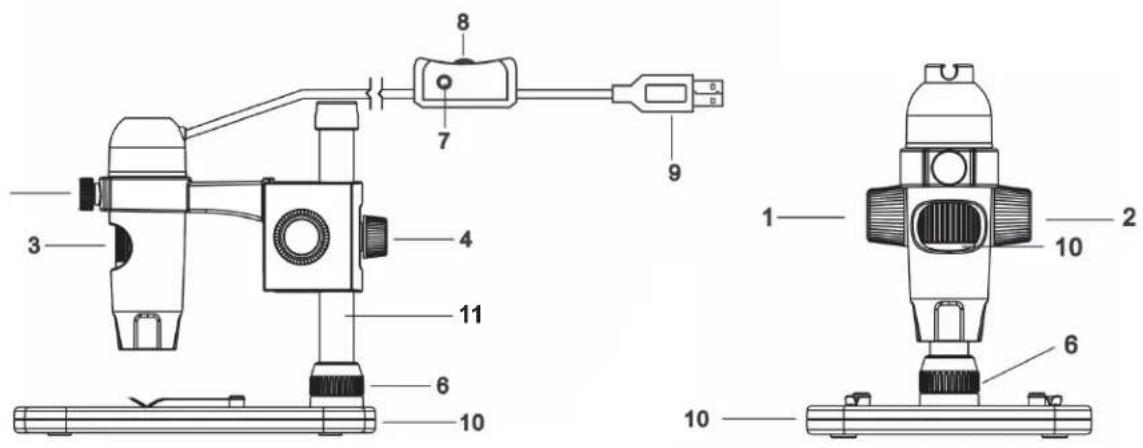
B. PARTS
NO. FUNCTION
| 1. | Lock Wheel |
| 2. | Height Adjustment Wheel |
| 3. | Focus Wheel |
| 4. | Height Adjustment Lock Nut |
| 5. | Microscope Holder lock Nut |
| 6. | Shaft Connection Lock Collar |
| 7. | Shutter Button |
| 8. | Illuminator Adjustment Wheel |
| 9. | USB Plug |
| 10. | Stage Base |
| 11. | Support Shaft |
C. SPECIFICATIONS
| SKU 44308 | |
| Camera sensor size 5 MP (mega pixels) | |
| Stand Professional stand with adjustable height | |
| Lens | 5 element IR cut, high quality GLASS /EFL(Equivalent Focal Length): 15.8 mm /FOV: 13.0° |
| Focuser range 10 mm to infinity | |
| Illuminator Upper ring- 8 bright white adjustable | LEDS (adjuster on cord) |
| Magnificatior 20x to 200x | |
| Shutter trigger On cord - limits image shake | |
| Still Image resolution 5 MP, 3 MP, 1.3 MP, VGA | (12 MP with interpolation*) |
| Video resolution VGA, 30fps | |
| Computer interface 2.0 USB | |
| Software Celestron Micro CapturePRO (with m | easuring and note taking features) |
| Operating systems supported | Windows: Windows XP/Vista/7.0/8.0 Mac: OSX 10.6/10.7 |
| Software languages | (12) English, German, French, Spanish, Russian, Italian, Portuguese, Dutch, Polish, Japanese, Korean and Chinese |
| Minimum system requirements | 512MB RAM/ 64M Video Memory/ Open USB port/ CD-ROM Drive |
| Dimensions | Microscope: 110x35 mm (4.33"x1.38") Stand: 175x140x110 mm (6.90"x5.51"x4.33") |
| Weight | 2 lbs. (907 grams) (including base and packaging) |
- Interpolation refers to software adding pixels to an image to artificially make the image larger. This can be beneficial when printing in larger formats.
2. SETUP
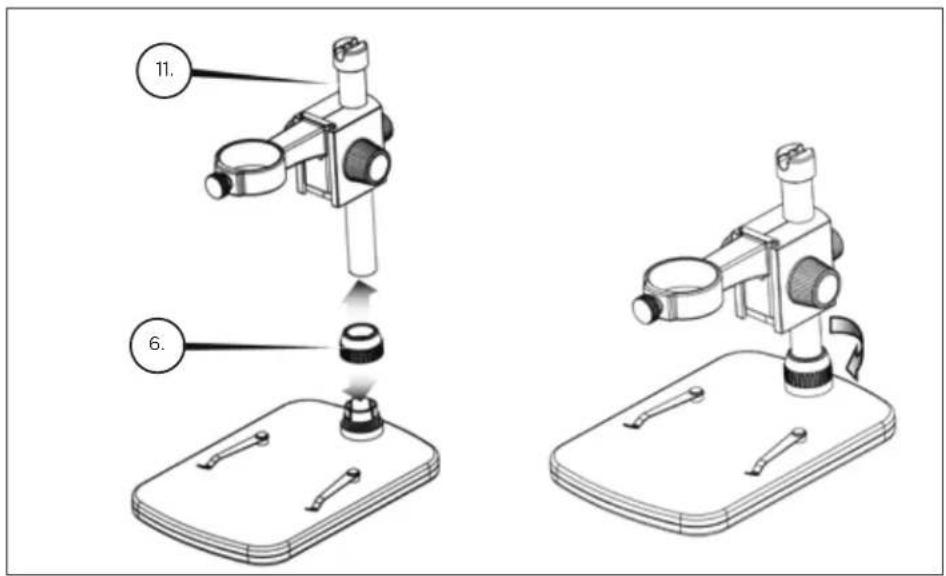
A. ASSEMBLE THE MICROSCOPE STAND
- Carefully remove all components from the box.
- Slide the Shaft Connection Lock Collar (6) onto the Support Shaft (11).
+Attach the Shaft Connection Lock Collar (6) to base threads and tighten.
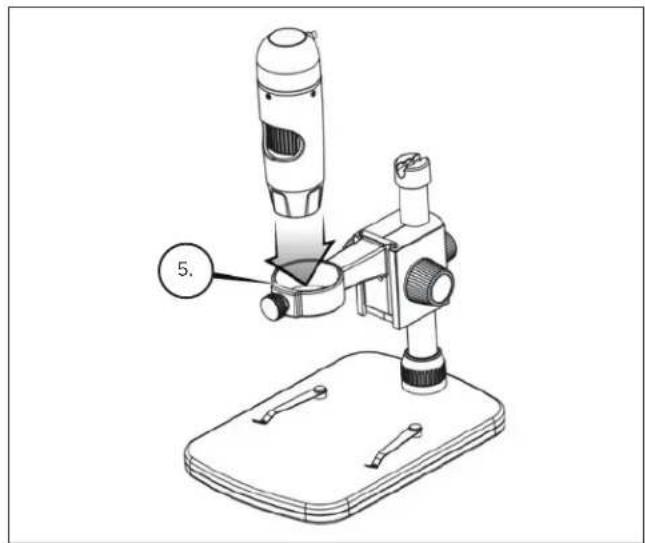
B. ATTACH MICROSCOPE
- Insert the microscope in the Microscope Holder and tighten the Lock Nut (5) to secure it in place.
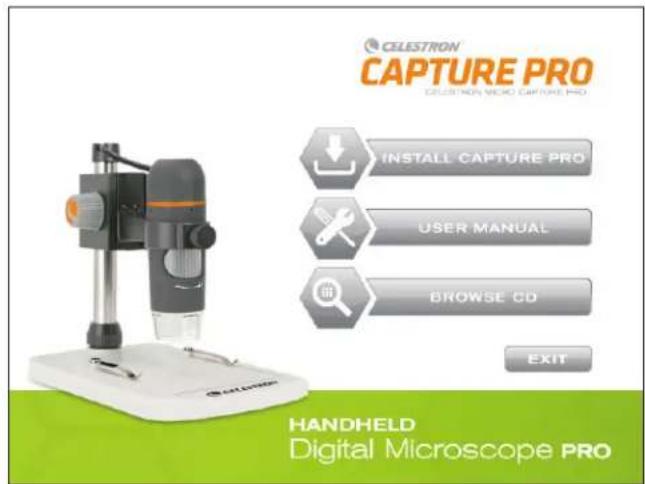
C. INSTALL SOFTWARE-WINDOWS
- Insert the Micro CapturePro CD into CD-ROM Drive. The following interface will display automatically:
- Click the "Install Capture Pro" button and follow the Setup Wizard as it guides you through the installation
D. INSTALL SOFTWARE-MACINTOSH
- Open the MAC folder on the included CD and install following on-screen prompts
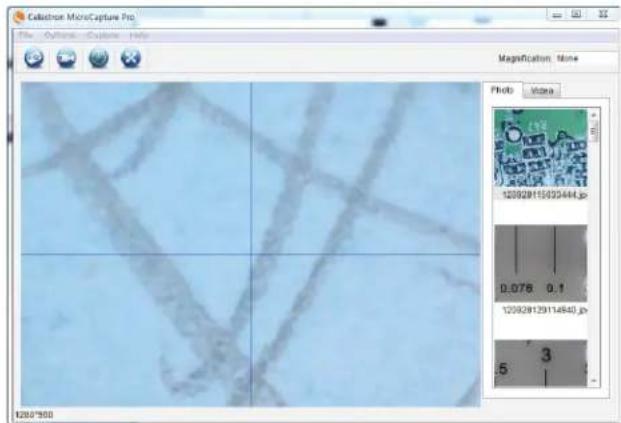
- To begin recording video, click on the Capture menu and scroll down to Video. Repeat to stop recording.
- Plug in the Handheld Digital Microscope Pro and open the Celestron Micro CapturePro software. Your microscope is now ready to use.
NOTE: The software interface is the same as the PC version, but will look slightly different.
3. USING YOUR MICROSCOPE
A. CONNECTING
-
Connect the microscope to your computer via the USB 2.0 cable.
-
Click on the Micro CapturePro desktop icon to launch the software.

- Your microscope should automatically connect and begin streaming images.
NOTE: If the microscope is not connected to the USB port, the following error message will be displayed: "No device detected. Please connect your microscope directly to an open USB port."
B. FOCUSING
- To focus on an image using the included stand:
- Adjust the height of the carriage holding the microscope.
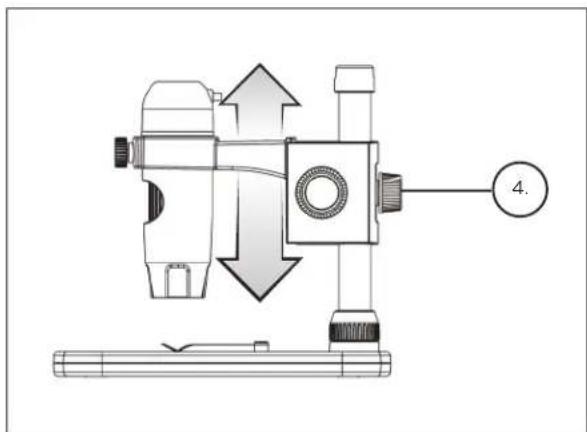
- Tighten the Carriage Height Adjustment Lock Nut (4) to hold in place.
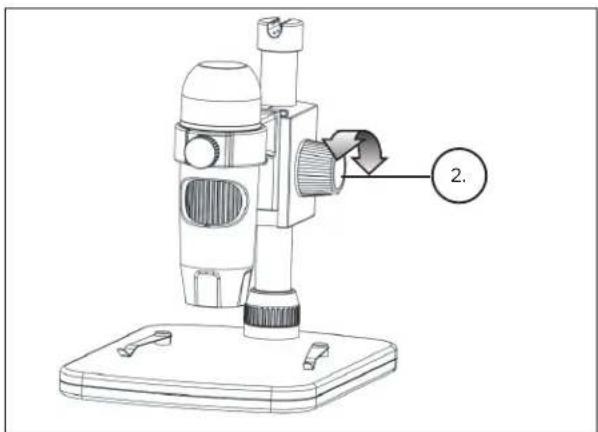
- Turn the Height Adjustment Wheel (2) to set the coarse focus.
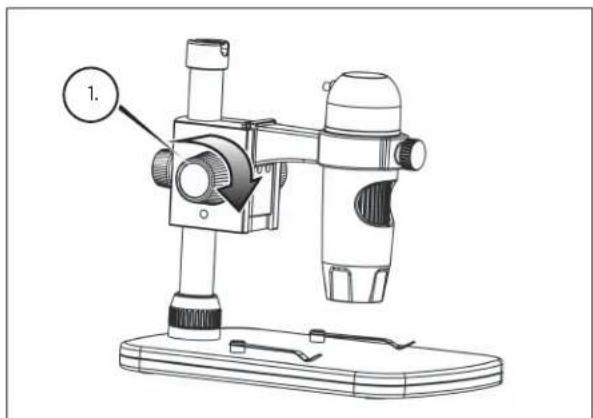
- Once satisfi ed with the position, tighten the Lock Wheel (1), securing the carriage in place.
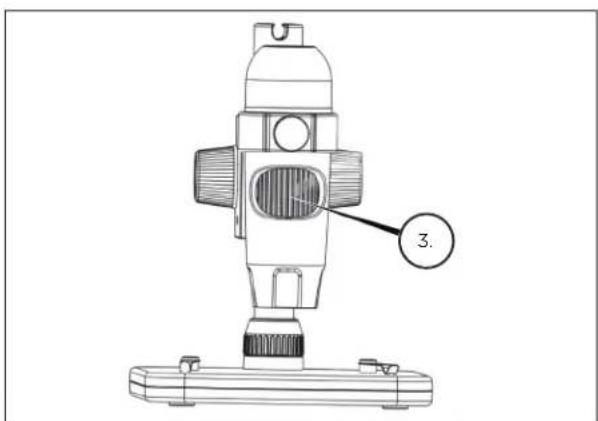
- Now, rotate the Focus Wheel (3) to set the fine focus.
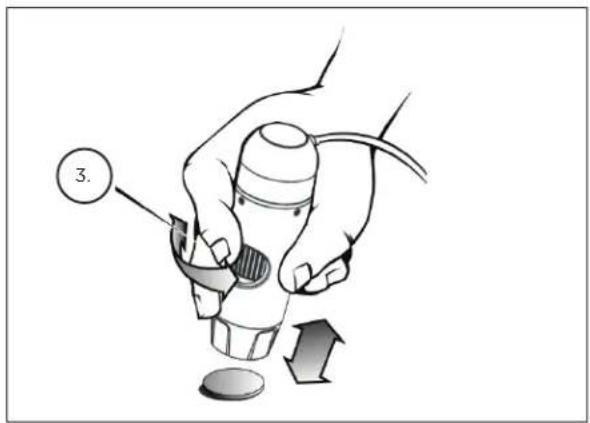
+ When using the microscope in handheld mode, adjust the coarse focus by changing the distance between the microscope and your subject. Adjust fine focus with the Focus Wheel (3).
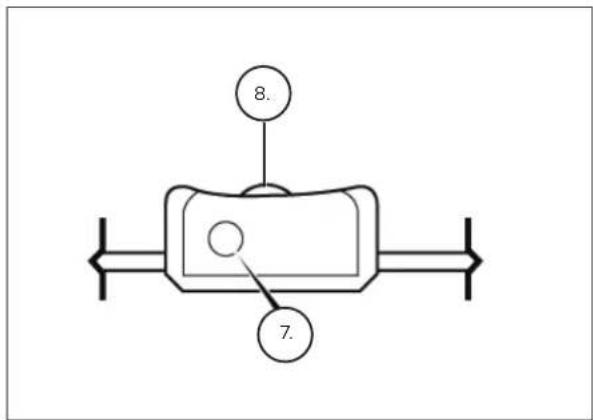
+ The Shutter Trigger (7) and the Illuminator Adjustment Wheel (8) are located on the cord.
4. USING THE SOFTWARE
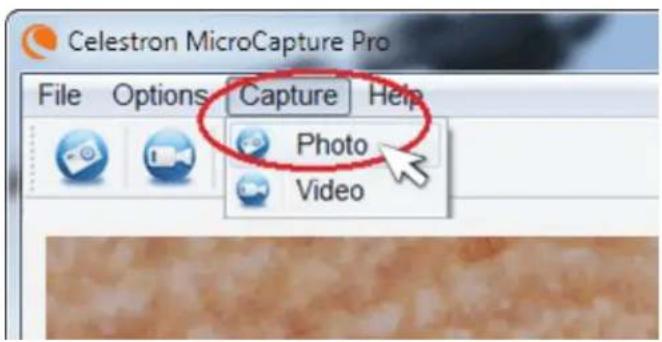
- To capture a photo, click on the Capture menu and scroll down to Photo.
- To begin recording video, click on the Capture menu and scroll down to Video. Repeat to stop recording.
B. OTHER MENU ITEMS
FILE: Under the File menu item, you will find:
- Photos Directory: Directs you to designate a folder on your hard drive for photo storage.
-
Videos Directory: Directs you to designate a folder on your hard drive for video storage.
-
Exit: Closes the Micro CapturePro software.
OPTIONS: Under the Options menu item, you will find:
- Resolution: Sets the sensor image resolution. Choose from 4 resolution settings:
-1280x960(1.3MP)
-1600×1200(2MP)
-2048x1536(3MP)
-2592×1944(5MP)
-
Date/Time: Turns the Date and Time stamp on or off.
-
Language: Changes the language setting. Choose from 12 languages:
-
English, German, French, Spanish, Russian, Italian, Portuguese, Dutch, Polish, Japanese, Korean and Chinese
-
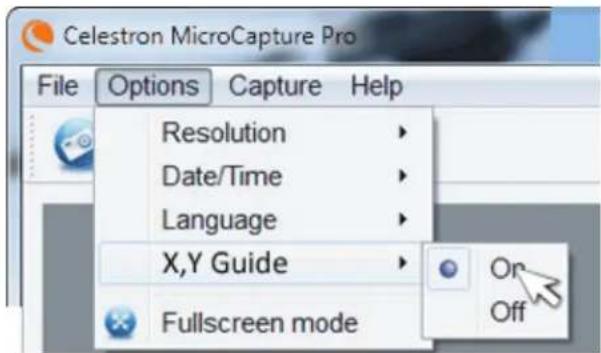
X,Y Guide: Turns the reticle guide on the preview screen on or off.
- Full Screen Mode: Enters full screen mode. Press ESC to exit.
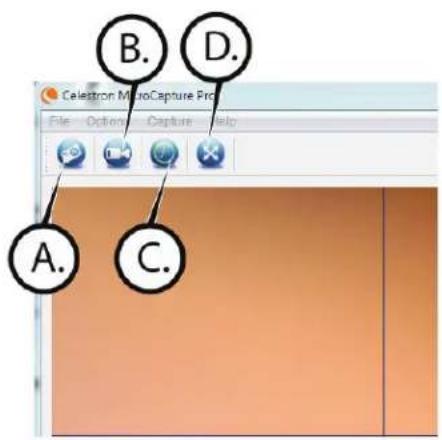
ICONS: Along with the menu items, there are icons which mean the following:
A. Take Snap Shot
B. Start Video. Stop Video
C. Set Time Lapse Intervals
D. Full Screen Mode (press ESC to go back to main screen)
C. CALIBRATION AND MEASUREMENT
+The Celestron Micro CapturePro software includes a measurement feature. To use this feature, you must first perform a measurement calibration.
+Make sure the X,Y Guide is set to "On" by selecting it in the Options Menu.
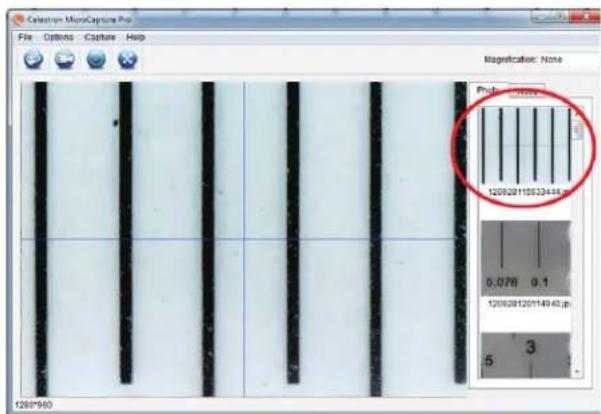
+Take a still image. The image will be displayed in the column on the right side of the screen.
- Set the height of the microscope and focus on your specimen. Then, replace your specimen with the calibration ruler.
- Re-adjust the focus and align the calibration ruler so that the lines on the ruler are parallel with the vertical line on the X,Y Guide.
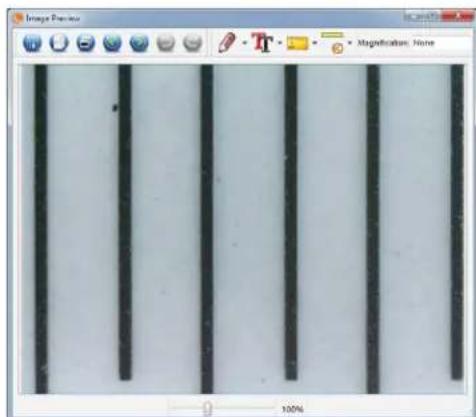
- Double click the saved image to open it in the Image Preview screen.

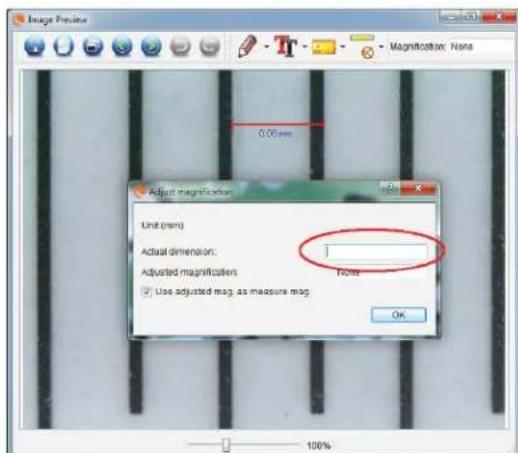
+Click on the Calibration icon
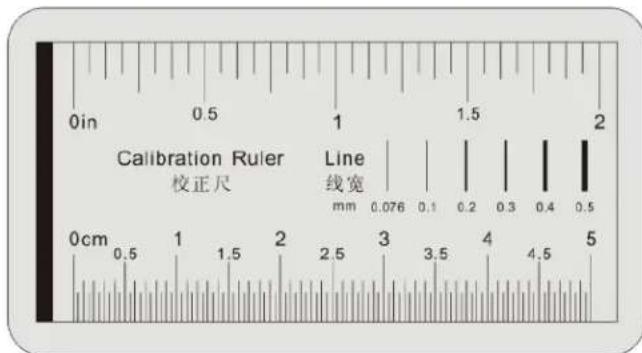
+Click and drag a line across a "known value" on the ruler image. Try to keep the line as perpendicular to the lines on the ruler as possible.
+The "Adjust magnification" window will pop up as shown here.
+In the box "Actual Dimension", enter the "known value" from the calibration ruler
- To ensure that calibration was successful, go back to the Image Capture screen.

- Click and drag a line across the same "known value" as before.
- If the calibration was successful, the distance you measured should be exact to the "known value"
- To capture images without changing the height or magnifi cation, click on the Calibration icon. In the dropdown menu, select "Set Magnifi cation," then "Set Capture Magnifi cation."
- A pop-up window will appear. Type in the magnification shown in the upper right corner of the main window.
D. MEASURING TOOLS
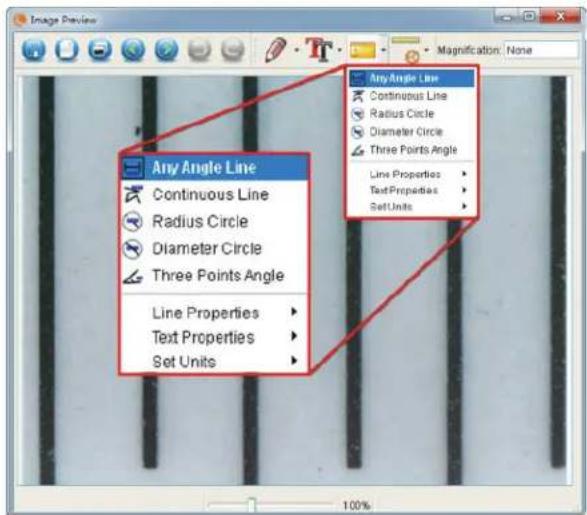
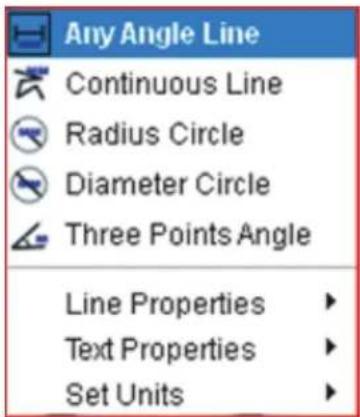
You will notice in the measuring drop down menu there are many tools. Here is the list of measurements you can take:
MAIN
- Any Angle: Measures from point A to point B in a straight line.
- Continuous Line: Measures the total distance between multiple points. Start by measuring a straight line from point A to point B. Then, click and drag to continue measuring from point B to point C. (Can be repeated as many times as you like.)
- Radius Circle: Measures a circle's radius. Starting at the center, drag the cursor out to any edge.
- Diameter Circle: Measures a circle's diameter. Starting at one outside edge, drag the cursor across to the opposite edge.
- Three Point Angle: Measures an angle between two points, starting from a radius point or an intersection point. Click on point A, (radius point) drag and click on point B, then click on point C. The angle will be drawn and the angle degree will be displayed.
SETTINGS
- Line Properties: Changes the settings for line type, width, size and color.
- Text Properties: Changes the settings for font type, size, style and color.
- Set Units: Changes the units setting. Choose from millimeters, centimeters, pixels or inches.

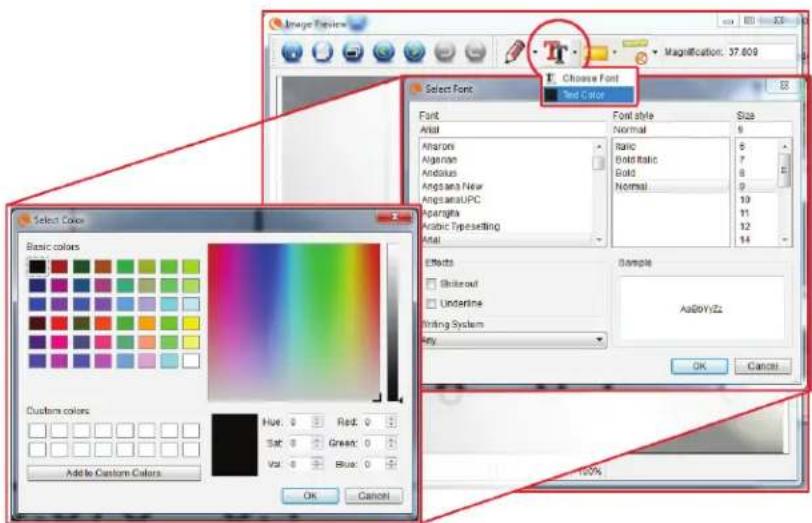
E. TAKING NOTES AND MARKING THE IMAGE
Micro CapturePro includes functionality to mark, draw on, or and add notes to saved images. This can be handy for quick note taking and pointing out features on your specimen image.
1. MARKING
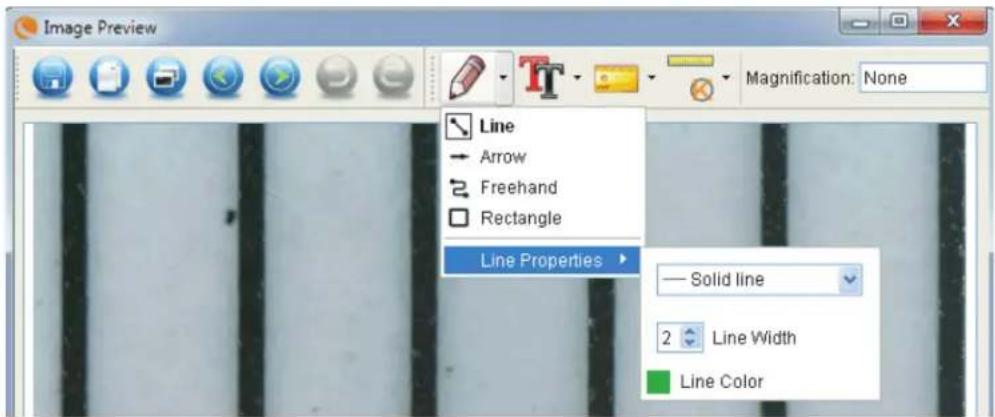
To use this feature, click the Draw icon in the Image Preview window. The complete choices in the Draw dropdown menu are:
MAIN
- Line: Draws a straight line on the image.
-
Arrow: Draws a line with an arrow on the image.
-
Freehand: Allows user to draw freehand. Good for quick, handwritten notes.
- Rectangle: Draws a box. Good for calling out features on the image or framing text.
SETTINGS
- Line Properties: Allows for setting the line type, size and color
2. ADD TEXT
To type notes on the image, select the Type icon
+ In the dropdown menu, you can choose the font type, size and color.
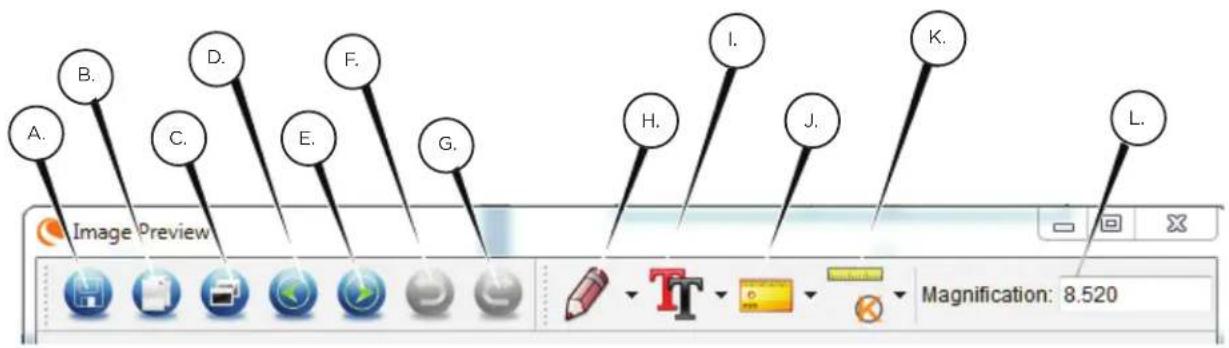
F. IMAGE PREVIEW ICONS EXPLAINED
A. Save: Save your file
B. Copy to clipboard: Copy to open in other program
C. Copy: Save as a copy
D. Previous: Takes you back to the previous image in save folder
E. Next: Takes you forward to the next image in save folder
F. Undo: Takes you back one step
G. Redo: Takes you forward one step
H. Draw
I. Text/Notes
J. Measure
K. Calibration
L. Current Magnification (based on the latest calibration)
5. CARE AND MAINTENANCE
Your Celestron Handheld Digital Microscope Pro is a precision optical instrument and should be treated with care at all times. Follow these suggestions and your microscope will need very little maintenance throughout its lifetime.
- Store your microscope in a clean, dry place.
- Never use your microscope where operation of such devices is restricted. Improper use creates the risk of serious accident.
-
Only use your microscope within the 23^ to 120^ (-5^ to 50^) temperature range. Try to limit sudden temperature changes as this may create moisture in the microscope housing.
-
Do not try to access the internal components of your microscope or attempt to modify it in any way. Only authorized technicians should perform maintenance or repairs.
- Keep your microscope away from water and other liquids. Never use it in rain or snow. Moisture creates the danger of fire and electric shock.
- If the exterior of your microscope needs cleaning, wipe it with a moist cloth.
6. WARRANTY
Your Celestron Handheld Digital Microscope Pro has a two year limited warranty. Please visit the Celestron website for detailed information on all Celestron microscopes.
www.celestron.com
CELESTRON
© 2013 Celestron • All rights reserved. • www.celestron.com
2835 Columbia Street • Torrance, CA 90503 U.S.A.
Telephone: 1(800) 421-9649 • Printed in China 2013
CC
RoHS

FCC Note: This equipment has been tested and found to comply with the limits for a Class B digital device, pursuant to part 15 of the FCC Rules. These limits are designed to provide reasonable protection against harmful interference in a residential installation. This equipment generates, uses, and can radiate radio frequency energy and, if not installed and used in accordance with the instructions, may cause harmful interference to radio communications. However, there is no guarantee that interference will not occur in a particular installation. If this equipment does cause harmful interference to radio or television reception, which can be determined by turning the equipment off and on, the user is encouraged to try to correct the interference by one or more of the following measures:
-
Reorient or relocate the receiving antenna.
-
Connect the equipment into an outlet on a circuit different from
-
Increase the separation between the equipment and receiver.
that to which the receiver is connected.
- Consult the dealer or an experienced radio/TV technician for help.
This product is designed and intended for use by those 14 years of age and older. Product design and specifications are subject to change without prior notification.