Masterchef Gourmet QA502 - Food Processor MOULINEX - Free user manual and instructions
Find the device manual for free Masterchef Gourmet QA502 MOULINEX in PDF.

| Product type | Multifunction food processor |
| Brand | Moulinex |
| Model | Masterchef Gourmet QA502 |
| Power supply | 220-240 V, 50/60 Hz |
| Power | 1000 W |
| Stainless steel bowl capacity | 4.5 L (up to 1.8 kg of dough) |
| Mixer bowl capacity | 1.5 L for thick mixtures, 1.25 L for liquids |
| Juicer capacity | Up to 1.5 kg of fruits/vegetables per use |
| Meat grinder capacity | Up to 3 kg of meat |
| Mini chopper capacity | 100 g max (solids), 150 g max (purée) |
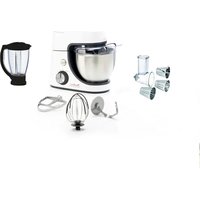
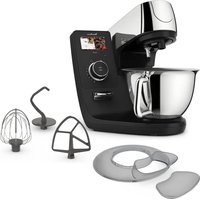
| Included accessories | Stainless steel bowl, lid, dough hook, kneader, multi-wire whisk, mixer bowl, meat grinder, vegetable slicer, juicer, mini chopper |
| Speeds | 8 speeds (1 to 8) + Pulse position |
| Functions | Knead, mix, beat, whisk, blend, mince, grate, slice, juice, emulsify |
| Maximum usage time | Dough hook/kneader: 13 min, whisk: 10 min, blender: 3 min, meat grinder: 10 min, juicer: 10 min |
| Bowl material | Stainless steel |
| Weight | Approximately 7 kg |
| Dimensions (W x D x H) | 40 x 25 x 35 cm |
| Safety | Automatic stop if the trapdoor or head is unlocked |
| Maintenance and cleaning | Dishwasher-safe accessories (except meat grinder head, dough hook, kneader). Wipe adapter and base with a damp cloth. |
| Spare parts and repairability | Accessories available on request; repair by authorized center |
Frequently Asked Questions - Masterchef Gourmet QA502 MOULINEX
User questions about Masterchef Gourmet QA502 MOULINEX
0 question about this device. Answer the ones you know or ask your own.
Ask a new question about this device
Download the instructions for your Food Processor in PDF format for free! Find your manual Masterchef Gourmet QA502 - MOULINEX and take your electronic device back in hand. On this page are published all the documents necessary for the use of your device. Masterchef Gourmet QA502 by MOULINEX.
USER MANUAL Masterchef Gourmet QA502 MOULINEX
ACCESSIONS DISPONIBLES
Warning : Please read the “safety guidelines” booklet and instructions carefully before initial use.
BEFORE FIRST USE
- Before using for the first time, wash all accessory parts in soapy water (except for the attachment (E): see § Cleaning) Rinse and dry.
- Place the appliance on a flat, clean and dry surface. Make sure that the selector button (A1) is in «0» position and plug in your appliance.
- You have several options for starting your appliance: (see diagram A1):

- Intermittent operation (pulse):
Turn the selector button (A1) to the «pulse» position. Using a succession of pulses can give you better control when preparing certain foods. - Continuous operation:
Turn the selector button (A1) to the desired position from 1 to 6 / or 1 to 8 (depending on model), depending on the food you are preparing. You can change it as required during preparation.
- To stop the appliance, turn the button (A1) to «0».
Important: The appliance will start only if the cover (A5) and the head (A3) are locked. The appliance will stop immediately if you unlock the cover (A5) and/or the head (A3) during operation. Lock the cover and/or the head, turn the control button (A1) to the «0» position, and then start the appliance normally by selecting the desired speed.
1 - MIXING / KNEADING / BEATING / EMULSIFYING / WHISKING
You can prepare up to 1.8kg light dough and heavy dough made with up to 500g flour using the stainless bowl (B1) and its lid (B2) depending on the food.
ACCESSORIES USED : Stainless steel bowl (B1), Lid (B2), Kneader (C1) or mixer (C2) or balloon whisk (C3).
1.1 - ASSEMBLING THE ACCESSORIES
Follow the diagrams from 1.1 to 1.4.
1.2 - USAGE, TIPS AND DISMANTLING
- Start by turning the selector button (A1) to the desired position according to the recipe.
- You can add food through the hole in the lid (B2) during preparation.
- To stop the appliance, turn the button (A1) to «0».
Tips :
KNEADING (Maximum time of use: 13 minutes)
- Use the kneader accessory (C1) at speed «1». You can knead up to 500 g of flour (e.g. white bread, grain bread, short crust pastry, etc.).
MIXING (Maximum time of use: 13 minutes).
- Use the mixer (C2) at speed 1 to 6 / or 1 to 8 (depending on model).
-
You can mix up to 1,8kg of light dough (light cake mixture, sponge cake, biscuit or cookie dough).
-
Never use the mixer (c2) to knead heavy dough and fresh pasta dough (lasagne, rigatoni, bigoli, etc.).
- BEATING / EMULSIFYING / WHISKING (Maximum time of use: 10 minutes).
- Use the balloon whisk (c3) at speed 1 to 6 / or 1 to 8 (depending on model).
- You can prepare: mayonnaise, aioli, sauces, whisked egg whites (up to 10 egg whites), whipped cream (up to 500~ml ), meringues etc.
- Never use the balloon whisk (C3) to knead heavy dough or mix light dough.
Dismantling the accessory: Wait for the appliance to come to a complete stop and proceed in the reverse order of the assembly. diagrams from 1.4 to 1.1.
2 - BLENDING/MIXING (DEPENDING ON MODEL)
Depending on the nature of the food, you can use the blender (D) to prepare up to 1.5L of thick mixtures and 1.25L of liquid mixtures.
EN
ACCESSORIES USED : Blender jug (D ou L).
2.1 - ASSEMBLING THE ACCESSORIES
Follow the diagrams from 2.1 to 2.3 and 10.
2.2 - USAGE, TIPS AND DISMANTLING (Maximum time of use: 3 minutes).
- Start by turning the selector button (A1) to the desired position (from speed «4 to 6/Max» or «7 to 8» (depending on model) or «pulse») according to the recipe. Use the «Pulse» position for better mixing control and for a better blending of your preparation.
- You can add food through the hole in the measuring cap (D2, L5) during preparation.
Tips :
-
You can prepare :
-
finely blended soups, cream soups, stewed fruit, milkshakes and cocktails.
-
liquid batter (pancake, fritters, Yorkshire pudding, waffles, clafoutis and custard flans).
-
If ingredients stick to the sides of the bowl when mixing, stop the appliance and wait until the blades have stopped completely. Remove the blender and push the food down onto the blades using a spatula, and put your blender back on the appliance to continue processing..
Dismantling the accessory : Wait for the appliance to come to a complete stop before removing the blender jug and proceed in the reverse order of the assembly, diagrams from 2.3 to 2.1 and 10.
3 - MINCING (DEPENDING ON MODEL)
ACCESSORIES USED : Attachment holder (E), Assembled mincer head (F)
3.1 - FITTING THE MINCER ATTACHMENT
Follow the diagrams 9, 10, and then from 3.1 to 3.3.
3.2 - USAGE, TIPS AND DISMANTLING
- Run the appliance by turning the selector (A1) to speeds «3 to 4» or «5 to 7» (depending on model).
-
Push the meat, piece by piece, down the feed tube, using the pusher (F7). Never push the ingredients down the feed tube with your fingers or any other utensil.
-
You can chop up to 3kg of meat, Maximum time of use: 10 minutes.
Tips :
- Prepare all of the foodstuffs to be minced (for meat, remove the bones, gristle and tendons and cut it into pieces of approximately 2 × 2 cm).
- Make sure that frozen meat is thoroughly thawed.
Dismantling the accessory : Wait for the appliance to come to a complete stop and proceed in the reverse order of the assembly diagrams 10, from 3.3 to 3.1 and then 9.
4 - GRATING / SLICING (DEPENDING ON MODEL)
ACCESSORIES USED : Attachment holder (E), Assembled vegetable slicer (G), Drums (depending on model)
4.1 - ASSEMBLING THE ACCESSORIES

Follow the diagrams 10, 9 and then from 4.1 to 4.2.
4.2 - USAGE, TIPS AND DISMANTLING
- Run the appliance by turning the selector (A1) to speed 3 or 5 (depending on model) to slice and to speed 4 or 7 (depending on model) to grate.
- Place the food in the feed tube on the body and press down with the pusher (G2).
Never push the ingredients with your fingers or any other utensil.
- You can prepare up to 2kg of food, maximum time of use: 10 min.
-
Use the drums to:
-
Grate coarsely (G4) / grate finely (G5): carrots, celery, potatoes, cheese, etc.
- Slice thickly (G3) : potatoes, carrots, cucumbers, apples, beetroot, etc.
- Potato shredder (G6): potatoes, parmesan, etc.
Dismantling the accessory : Wait for the appliance to come to a complete stop and proceed in the reverse order of the assembly, diagrams 10, 4.2, 4.1 and 9.
5 - EXTRACTING JUICE FROM FRUIT AND VEGETABLES (DEPENDING ON MODEL)
ACCESSIONS USED : Assembled juice extractor (H)
5.1 - ASSEMBLING THE JUICE EXTRACTOR
Follow the diagrams from 5.1 to 5.6.
5.2 - USAGE, TIPS AND DISMANTLING (maximum time of use: 10 minutes.)
- Cut the fruits and/or vegetables into pieces.
- Run the appliance by turning the selector (A1) to speed «3 or 5» (depending on model).
- Insert the ingredients down the feed tube in the lid (H2) push them slowly using the pusher (H1).
- Do not process 500g of food more than 5 times continuously, without allowing your appliance to cool down completely
- Important : clean the filter (H3) and the juice collector (H4) after every 300g of ingrédents.
Tips :
- You can make juice from: carrots, tomatoes, apples, grapes, raspberries, etc. but it is not possible to extract juice from certain fruits and vegetables: bananas, avocado pears, blackberries, some varieties of apples, etc...
- Peel fruits with thick skins; remove stones and the core of pineapples.
- Drink the juices immediately after preparation.
Dismantling the accessory : Wait for the appliance and rotary filter to come to a complete stop before removing the accessory from the appliance. Proceed in the reverse order of the assembly, diagrams from 5.6 to 5.1.
6 - FINELY CHOPPING SMALL QUANTITIES (DEPENDING ON MODEL)
ACCESSORIES USED : Mini chopper lid (N1), Mini chopper bowl (N2)
6.1 - ASSEMBLING THE ACCESSORIES
Follow the diagrams 10, 6.1 and 6.2.
6.2 - USAGE, TIPS AND DISMANTLING
-
You can finely chop with the mini chopper :
-
fresh herbs : 10g max. / 10secs max. / speed «4 or 7» (depending on model)
- dried fruits / Beef (boneless and trimmed meat) : 100g max. / 10secs max. / speed «1»
-
vegetable puree : 150g max. / 20secs max. / «pulse» or speed «1»
-
This grinder is not designed for hard products like coffee beans, hard spices nor liquids.
Dismantling the accessory : Wait for the appliance to come to a complete stop and proceed in the reverse order of the assembly, diagrams 10, 6.2 and 6.1.
EN
7 - ADJUSTING THE CORD LENGTH (see A7)
8 - ROUGH CHOPPING SMALL QUANTITIES (DEPENDING ON MODEL)
ACCESSORIES USED : Assembled grinder.
- Chop in a few seconds by pulsing: dried figs, dried apricots, etc. Quantity / max time : 100g / 5s
CLEANING
- Unplug the appliance.
- Do not immerse the motor unit (A) or the attachment (E) in water or under running water. Wipe them with a dry or slightly damp cloth.
- Disassemble completely and rinse the accessories quickly after use.
Handle the blades with care to prevent injury. (diagram 10).
- Wash, rinse and dry the accessories: they are dishwasher-safe, except for all the metal components in the mincer head: body (F), the kneader (C1) and the mixer (C2).
WHAT TO DO IF YOUR APPLIANCE DOES NOT WORK
please refer to the chapter «before first use».
Your appliance still does not work? Contact an authorised service centre (see the list in the service booklet).
AVAILABLE ACCESSORIES
See page 59 and visit the brand website.
Caution: this booklet contains instructions for additional accessories. Please keep safe for future reference. Please contact the Customer Service for further information on how to purchase accessories.
2 - MIXEN / MENGEN (AFHANKELIJK VAN HET MODEL) Depending on the nature of the food, you can use the blender (D) to prepare up to 1.5 L of thick mixtures and 1.25 L of liquid mixtures.
GEBRUIKTE ACCESSOIREs : Blender jug (D ou L).
2.1 - MONTEREN VAN DE ACCESSOIRES
5 - ENTSAFTEN VON OBST UND GEMÜSE (JE NACH MODELL)
WHAT TO DO IF YOUR APPLIANCE DOES NOT WORK
ACESSORIOS UTILIZADOS : Attachment holder (E), Assembled mincer head (F)
BVKOPNUCTOBYBAHI AKCECYAPN: Kpnska mHi-noDi6HIOBaHa (N1), yaa mHi-noDi6HIOBaHa (N2)
6.1 - YCTAHOBJIEHHRAKCECYAPIB:
DToPmMyTeecxem10,6.1i6,2.
6.2 - BUKOPUCTAHHA
Bn moxete npi6Ho Hapi3aTu 3a Donomoro MiHi-noDi6HIOBaHa:
-cbixi TpaBn: mac. 10 r / mac. 10 c / wBvNkictb «4 a6o 7» (zaJexKHO BiD MoJeNi)
-cyxofoptykn/ ynoBuHny (eTnloBaHe m'ro 6e3 kicToK): mac. 100 r / mac. 10 c / wBnDkictb «1»
- Obouebe niope: mac. 150 r / mac. 10 c / wBndkicTB «1»
- Lém MlHOK He npn3HaueHn dIy o6po6Kn TbePAn nPoDyKTiB Ha KItaTt KaBn.
Id'EDHaHnA kcecyapib: 3aueKaIte, IOKn npinad NOBHiCTIO 3yINHITbcra, i BIKOHyIe II B 3BOPOTHomy nopAky cKlaDaHHa: cxemn 10,6.2i 6,1.
7 - PEGYJIIOBAHHI IOBXHNI SHHYPA (dVB.A7)
8 - ПОДПIBHEHHA BEЛКИМN ISMATOYKAMN B HEBEJIHKI KINbKOCTI (3AJEXHO BID MODEJI)
BVKOPNUCTOBYBAHI AKCECYAPN: 3i6paHmMnHOK
- noDpi6HeHHBnpoIDOBK KInbKOx cekyH y imnyIbChOMy peXIMi: cyuHoro iHXNpy, cyuHnx abpIKocIB TOnO. KInbKiCTb / MaKcImaJIbHa TpUBAJIcTb 6oPo6Kn: 100 r/5 c
YINUENH
- BiD'edHaIte npnctpii Bd eJeKtpomepexi.
He 3aHypioTe 6nok DnBryHa (A) a6o Hacadky (E) y Body Ta He po3TaOboyte ix nip npotoUHO BOIOI. IpoTnpaTe ix cyxoIO a6o 3nerka 3BOJoxeHOIO TKAHNHOIO. - NobHicTIO po36epiB i cnoJIoCHyTB akceCyapn Biipa3y nicIa BIKOpncTaHH.
Ioo6 He OtpmaTn TpaBMy, o6epeXHO NOoBbTeC3 HOxamM. (cxema 10).
Bumnte, cnoonochytb i BnCywiB akcecyapn: ix MoJHa MHTN B NocydomnHi MaunHi 3a BnHrTKOM MeTaeBnx KOMNoHentB roIobKn noPi6HOBaHa: Kopnycy (F), ticTo miuaanKn (C1) imkcep a (C2).
IIOPOBNTN,AKUO PNUCTPIHNE IPAUIOE
DnB. po3dɪn «Пepeɪ nepiM BnKOpNCTaHHaM»
Ipnctpiyce ne He npaoue? 3BepHitbcra do aBtOpn3ObaHoro cepBicHoro ueHTpy (DINB. cncok y 6ykneti cepBicHoro o6cnyroByBaHH).
AKCECYAPN
ДиВ.Тор.59iВiДiBaIte Be6-caIr6peHda.
Ybara: 6poWypa miCTnTb iHcTpkyu II IJRAdoaTKOBnx akcecyapIB. 36epexiTB IJRA maBsyTHboro BHKOpNCtAHN. 3BepHiTbcra B Cnyk6y NiItpmKNI KJIeHTIB IJRA OTPMaHHra doaTKOBoi iHfOpMaui npo Te, JIKpNDaTu akcecyapu.

EckepTy: KoIdaHyfa DeiH "Kayinci3dk HycKayapbl" kITanwacbIH MyKnT OKbIN WbIfbIHbI3.
AJFAU KOJIaHAP AJDbIHDA
-
Anfaw Kondaanap andbHda 6apnbK canTamaNapDbI (kaFawTbH 6nOKTaH (E) baca: "Tasaay" 6enim KapaHb3) ca6bHdbI cyMeH xybln WbIfbHb3. OnapdbI Mkynrt WaBbHb3 XeHe KeNTipiH3.
KypanDbI teric, ta3a epi KypraK 6etke opHaTbIHbI3. XblnDAMdbIKtbl aybICTbIPbIN-Kocy 6aTbIPmacBbIH (A1) "0" karaa da opHaTbINFaHbIHa Ke3 JeTKi3iH3, COcbIH KypaNDbI XeIre KocBbI3.
Kypanblbiphewe aicneH icke kocyfa 6oIaIbI: (A1 narpaMMacbIH KapaHbI3) -
Kiidipmei xmbic ictey (cepnilicti pexim):
KbIaMbIKbI aybcTbipBn-Kocy 6aTbipMacbH (A1) "Pulse" KaFdaNbHa ("CepniicTi peXIM") KaFdaNbHa 6ypaHbI3. KiipMei Kymbic icTey TaFamdapdbH bipKaTapbH daNbIHday ysiH KOJaNbI.
-Y3diKci 3 xMybIC icTey:
KbIaMdbkTbI aybictbipbIN-Kocy 6aTbIPmacbH (A1) daBbHaJIbIN KaTkaH TaFAMfa 6aIIaHbICTbI "1-DeH 6/Max" Hemece "1-DeH 8" yInire 6aIIaHbICTbI -Ka DeiHri KaKeTTi KaFdaIa 6ypaHbI3. Kymblc icTey 6apbcIHda peXIMdi aybictbipyfa 60naDbI.
KypaIbI ToKtaty ywiH 6atbIpMaHbI (A1) "0" KaFdaNbHa 6ypaHbI3.
MaHbI3db! KypaIbI TeK KaKnak (A5) neH 6actneK (A3) opHbIKtbIpblnfaHHan KeiHa icKe Kocyra 60naDbI. Xymbc icTey 6apbcBHaKaKnak (A5) XeHe/Hemece 6actneK 6yFaTTah WbIFapblnFAH KaDaIaDa KaPaN XbINdAM TOkTaIaDbI. KaKnakTbI (A5) XeHe/ Hemece 6actneKti opHbIKtbIpblbI3, 6ackapy 6atbIPmacbIH (A1) "O" XaFdaNbHa 6ypaHbI3, COcbIH KaXeT XbINdAmDbIKTbI TaHday apKbInbI KypaIbI icKe KocbHbI3.
1 - APAJACTbIPY / INJEY / KÖNCITY / ɜMylbΓAUÇNIAJAY / ɜYNFAY
KaKnaftb (B2) 6ap TaTtah6aHbTH 60NaTTaH XacanfAH CbIbIMdbIbIKTBH (B1) KEMerimHeHaKTbTaFAMfa 6aJIaHbICTb1,8 Kr-fa DeiH JeHIn KaMbIPDbI daBihDayfa 60NaDbI.
KOJIaHbIaTbIH KEPEK-XAPAKTAP:TaTaNbIbH 6oJaTTaH Xacanfah TocTaFah (B1), KaNaK (B2), Kambip nneri (C1) apaJnactbipfbi (C2) Hemece deHreNek knciteTih canTama (C3)
1.1-KEPEK-JKAPAKTAPdbI XINHAY TOPTIBI
1.1 xhe 1.4. narpMaMnapbH opbHaHb3.
1.2 - KOJIДАнылуbl
- AaBbImeH aybICtbIPbIN-KoCKbIUtbIH, 6aTbIPmacbIH (A1) pecentire 6aJnHaNbICTbI KaKetTi KaFdaIra 6ypaHbI3.
XyMbic ictey 6apbcbHda kaKnaKaTaBb (B2) caHbInay apkblb eHimdepei kocyfa 6oJaIbI.
KypaIbI ToKtaty ywiH 6aTbIpMaHbI (A1) "0" KaFdaNbHa 6ypaHbI3.
KeHecTep:
NLEY (BapbHwa y3aK KOJaHy yaKbITbI: 13 MInHyT.)
- Canorama petiHde kambip nneriwi (C1 "1" KbldAmdbkta kondaHbHb3. 500 r-fa dein yHdbi (6nDaun H, ipine TapbInraH yHdbi, yrime kambip ywH xhe T.6.) nneye 6oanaBt.
-APAJACTbIPY(BapbHwa y3aK KOJdaHy yaKbITbl:13 MNHyT.).
-Дэнгrel ek kenciteiH canTamaHbI (C3)“1-den 6/Max" Hemece "1-den 8" (ynlire 6aJnahbICTbl) (eh KOrapbl) JbldAmdbIKKa Dein H KOJaHbIHbI3.
- Cizre: Maiohe3di, aioiDi, Tz3bIKTapbl, KeicITIReH akybl3apbl (8 kymblpTKa akybl3bHa deiH), wahtnlbn KpemH (500 mN-re DeiH) xeHe T.6. daBHdayra 6oJaBl.

-MnKcepdi (c2) aybip kambip JkHe JkBIma Kambip (kaIma HaH, mHTi, Tywnapa, T.6.) nIneyre kondaH6aHb3.
- KONCITY / 3MYIbIaIyIAY / BYIAY (BapbHwa y3ak konlaHy yaKbITbI: 10 MNHyT.).
-Дэнгrel ek kenciteiH canTamaHbI (C3)“1-den 6/Max" Hemece "1 -dEN 8" ynirE 6aJnaHbICTbI (eH KOrapbl) Xblndamdbikka DeinH KOJaHaHbIHbI3.
- Cizre: Maiohe3di, aonni, Tz3bikapdbi, kencitirreh akybi3napdbi (10 kymblpTk akybi3bHa deinH), wahtnlbn Kpemih (500 mn-ree deinH) xHe T.6. daibHdayra 6oanaBbl.
- DeHreIek Kencitetih canTamaHbI (C3) eWkaaah TbIfb13 KaMbipDbI INeY ywIH XeHJI KaMbipDbI apaJacTbIPy ywiH KOJaHa6aHbI3.
KEPEK-JKAPAKTAPdbI BOLWEKTEY TOPTIBI: Kypan 6bDen TOKtaHaHa KaTiHi3, OdaH KeiH 1.4 XeHe 1.1 XnHay DnaRpaMaJapbH Kepi opbHaHbI3.
2 - APANACTbIPY(YJITGE BAIJIAHbICTbl)
KoIaHbIaTbIH eHIMdepre 6aIIaHbICTbI 6JIeHdepDIn (D) KemerimEn 1,5 I- re deiH KOIO KocnabHbI Hemece 1,25 I- re deiH cyMbIK KocnaHbI daBbHdayf a6OaNbl.
KoJIaHbIJIATbIH KEPEK-KAPAKTAP: BneHep TocTaHaBl (D, L).
2.1 - KEPEK-JKAPAKTAPdbI JxHAY TəPTIBI
2.1, 2.3 XeHe 10 nIarpaMmApbIH KOJdaHbIHbI3.
2.2 - KONDAHbIybl (BapbIHwa y3aK KOJaHy yaKbITbl: 3 MInHyT.).
AaBIMeH aybICbIPbIN-KoCKblWtBIn 6aTbIPmacbH (A1) peCenTire 6aIaNbICTbI -deH 6/Max" Hemece "7-DeH 8"(yIrre 6aIIaNbICTbI) Hemece "pulse" (Cepnici pexim)) kaxeTTi kafdaiaRa 6ypaHb3. Apanactbyp ydepicin 6akblaydbj xakcapTy wih XHe apanaCTbpy canacBH JxakcapTy ywiH "Pulse" (Cepnici TpeXim) kafdaibn KOndaHbHb3.
-Жуmbic ictey 6apbcsbHda MeIwepneriш KaKnaKsacbHdaFbI (D2, L5) caHbIay apKbIbI bHimdepi Kocyra 6oJaIbI.
KeHecTep:
-
Keneci taramapdbi daibihayfa 6ojaabi:
-
6ipkeJIki copnapanap, BEnIOTe Ty3bIKTapbl, HApCynap, cyt XHe 6acka KOKTeINdep.
- MaH Heri3iHderi cybIK Kocnapanap (kaIMa KymaKTap, KymaKTap, nicipMeIep, nicipiIreH Kpem6ap fnaHap).
Kypam 6eikTepeBbIMdbIbIKtbIH Ka6bipfacbiHa Xa6bcIn KaNFaH Ke3de KypaIbIH KymblcBtOKTaTbIHbI3. KypaIbIH TOIbIFbImEH ToKtaFahbIH KyTIHi3. BneHepdi anbHbI3, Ka6bpafapra Xa6bICbIn KaNFAH eHIMdepdi KaNAkwaHbIH Kemerimn nbIwakTapfa TycipiH3 XHe KymblCTbIXaNfactbpy ysiH 6neHepdi opHbHa opHaTbIHbI3.
KEPEK-JKAPAKTAPbI B0JIWEKTEY TOpTIbI: KypaIbIH 6eH ToKtaybIH KyTiHi3, 6JeHep bIbICbIH aIbIn, 2.3, 2.1 JHe 10 dIarpaMmaIapbIH kei opbIHdaHbI3.
3 - ET TAPTKbIWTbI KOJIDAHy(YJITRE BAJIAHbICTbl)
KoJIaHbIaTbIH KEPEK-APAKTAP: Cantamapra apHaIraH 6eKITkiu (E), KInHaKTaftbI et TapTKblTbIH bactneri (F)
3.1 - JKAJIFAHATbIH BJOKTBI OPHATY
9, 10 dɪnərpaɪmmaɪapbɪH, Óɒʌn KeɪɪH 3.1 JɔːHe 3.3 ἀnərpaɪmmaɪapbɪH opbɪnʌhɪzɪs.
3.2 - ET TAPTKbIb BACTNEIIN OPHATY
-
AybictbipbIn-KockbltBn (A1) Kemerimeh "3 -dH 4" Hemece "5 -dH 7" (yIrre 6aJnaHbICTbl) XblndamdbIfbIH TaHday apKblbl KypaIbI icKe Kocblbl3.
KyTeiH Kybipra eTTi nTepriTih (F7) Kemerimn 6eKeTEN nTepiHi3. Kypam 6eKeTpdi KytEnIH Kybipra eWkaaah CaycaKTapbIbI36eH HeMece KaHdai da bip BaCKa 3aTTapMeH nTepmHe3. -
Ciz 3 Kr-fa deiH eTIxkykTe anacbI3, BapbiHwa y3ak KOndaHy yaKbITbl: 10 MInHyT.

KeHecTeP:
- Et tapTkblka apHaIraH eHIMdepei daBbIHdaHb3 (erep 6yn et 6oJca, cyneKtepiH, wemipweKtepiH xHe ciHIpnePi anbIn TactaHb3, etTI WAMAMEH 2x2 cm enWemDe 6nweKten TypaHb3).
- ETTINTOJIbIFImEHXi6ITINREHHeK3XeTI3H3.
KEPEK-JXAPAKTAPdbI B0JIWEKTEY TOPTIBI: KypaIbIH 6dEN ToKtaybIH KyTIN, 10 XnHay DnarpMaMcbH Kepi opbIHdaHb3, 3.3 XeHe 3.1, OdaH KeiH 9 DnarpMaMapabH OpbIHDaHb3.
4 - Eγ / TγPY (YJIΓΕ ΕΑΙΑΗβICTbl)
KOLDAHbIATbIH KEPEK-JAPAKTAP: CanTaMaJapra apHaJIrah 6ekITkiu (E), KInaHraH KeKeHic Tpyarbiu (G), LInnHdPnep (yInrre 6aIIaHbICTbl)
4.1 - KEPEK-JKAPAKTAPdbI JKHHAY T°PTIBI
10,9 narpaMaIapbH, oan KeiH 4.1 xe He 4.2 narpMaIapbH opbHaB3.
4.2 - KÖNJDAHbIybl JXÖHE KEHECTEP
AybICTbIPbIN-KOCKbltBIn (A1) Kemerimeh "3 Hemece 5" (yIrrire 6aIIaHbICTbl) Hemece "4 Hemece 7" (yIrrire 6aIIaHbICTbl) XblIdAmdbfBIn TaHday apKblbl KypalnbI IcKe KOcbIHbI3.
- KyktenTih Ky6bipfa eHimdepdi caIbHb3 kHe ky6bipdi iwihe nTepriWtIH (G2) kemerimeh nTepiHi3.
Kypam 6oIweKTeepi KyKTeiH Ky6bipra eUkaaH CaycaKTapbIb36eH HeMece KaHa da 6ip 6acka 3aTTapMeH nTepMeHi3.
C3 2 Kr-fa deiH eHIMdi daBbHdAn aacbl3, BapbHsa y3ak kondaHy yaKbITbl: 10 MNHyT. -
LünlinHdppePiH apHaanybl:
-
Ipinen yry (G4) / ycaKTan yry (G5): cəbi3, 6aIbIpKek, Kapton, ipimwiK xhe T.6.
- KaIbIHnTyn (G3): Kapton, c6i3, Knyap, anMa, KbI3blwJx He T.6.
- Kapton Драноктepi (G6): Kapton, napme3ан жэн т.6.
KEPEK-KAPAKTAPI BOLWEKTEY TOPTIBI: Kypan 6dEN TOKTaraHwa KyTiH3, OdaH KeiH 10, 4.2, 4.1 XHe 9 DaarpaMaJapbH Kepi opbHaHbI3.
5 - JEMICTEP MEH KOKOHICTEPDEH ьIPbIHDbI CbIFY (YJIIGE BAJIAHbICTbl)
KoJDAHbIJIATbIH CANTAMJAP: XnHaIfAH WbIPbIH CbIKKbI (H)
5.1 - UbIPbIH CbIKKbIWTbl OPHATY
5.1 XeHe 5.6 dnaIpaMaMmaIapbIH opbIHdaHbI3.
5.2 - WbIPbIH CbIKKblWTbl KYPAJFA OPHATy (BapbHwa y3ak konlahy yaKbITbl: 10 MmHyT)
- Xemictepdi jxhe / Hemece KekeHicTepeTiImdepre TypaHbI3.
- Aybictbipbn-KockbltBn (A1) Kemerimeh "3 Hemece 5" (yIrire 6aJnaHbICTbI) XblndamMbIFbIH TaHday apKblbl KypaIdbI Icke KocblbI3.
- Onapdbi nTepriwi (H1) kemerimen KypaI iWine 6aay nTepy apKbIbI KaKaNaKTarbl (H2) KyKteiTH Ky6bip apKbIbI caNbIHbI3.
- CeaHCTap apacbIHda KypaIbI TOIbIFbIMeH cyblTnai y3dkci3 5 peTTeh apTBk 500 r eHIMHeH apTBk eHdyeRe 6oImaIbI.
MaHbI3dbI:ep 300 rp INHpeDneHT KOJaHaBilraH caBH, cy3ri (H3) XeHe UbIPbIH XnHaftbI (H4) Ta3aAnr OTBipbIHbI3.
KeHecTep:
- Keleci JemicTepeH 7bipbH anyra 60anaBbI: c6i3, Kbl3aHaK, aIma, Jy3im, TaHKypaN, T.6., 6ipak Ke6ip JemicTepeM He KeKHeCtepeH 7bipbH any MymKHiDiri Jok: 6aHaH, ABOKado, anMyPT, KapakaT, anMaHbH Ke6ip Typnepi, T.6...
- Kei6ip KEMicTepe MeH KeKHeCTep 1bIPbIH CbIFy yWIn JapamaiDbI: 6yI 6aHaH, aBOKaDo, kapa 6ynDipreH, anMaHbIH Kei6ip cyPbINTapbl XHe T.6.
- KaHa cblbIraH 乌bipHapdbi 6ipdeH iwiHi3.
KEPEK-JKAPAKTAPbI B0JIWEKTEY TOPTIB: KypaIbIH Jaa6dbIKTapbIH anyra deiH, KypaI MeH aHaIMaIbI cy3rIH e6deH ToKtaybIH KyTIi3. XInHay dNarpaMmaIapbIH kepi opbIHdaHbI3, 5.6-dan 5.1-reeiH.
6-ΘHIMДЕРДIH A3 FAHA MÖJIUSHEPIH YCAKTAY(YIΓE BAJIAHBICTbl)
KoJIaHbIJIATbIH KEPEK-KAPAKTAP: XHaJIFaH yCaKaTafbl.
- Biphewe cekynd iwiHde cepnilicti peximde: kentipiInreH iXkip, kentipiInreH epiKTeP xHe T.6. ycaKtayra 6oIaIbI. BapbIHsa y3ak konlaHy yaKbITbI: 100 r / 5 c
TA3AJIAY
KypbInFbIHb 3neKtp XeNiciHeaXkbIpaTbIHb3.
Ko3raNTkbIb6IorH (A) HeMece XaIraTbIH 6IokTi (E) cyfa 6aTbIPMaHbI3 XHe aRbIn TyprAh cy acTbHa caImaHbI3. KypaIdbI KypraK HeMece XapTbIaN bINFaI Wy6epeKeNeh CypTHi3.
- KonlaHbIcTaH KeiH ToJIbIFbIMeH 6aJIweKTeN, Xa6DbIKTapbIH XblIam WaIbIH3.
Kapakat any mymkiHirih andbin any ywiH, ky3epiH abaian ycTaHbI3. (dnapamma 10).
- Ka6dbkTapbH KybIn, WaiBn, KypTaTbIHb3: Ka6dbkTapbH bIDbc KyaTbH MaunHara canyra 60anaBbl, MmKcep BaCbIHdaFbI MeTaN BcJIeKTePIHeh BacKacbH: KopnycbI (F), nneriwi (C1) KHe MmKcepI (C2).
EREP K¥PAJI X¥MbIC ICTEMCE, HE ICTEV KEPEK

- "KoJdaHyf a DeiH" TapaybIH KapaHbI3
KypbInfbl ani de xymbc ictemei me? YekineTTi KbI3MeT Kepcety opTaIbIFbHa xa6apnacbl3 (Ti3IMDi KbI3MeT Kepcety bYkTemecinH kapaHbI3).
KEPEK-XAPAKTAP
59-6eTTi JxHe Be6caNTbI KapaHbI3.
EckepTy: 6yn kITanwada KocbIMwa Ka6dbIKTapra KaTbICTbI HycKaynap 6epiInreH.
KeenekeTe KOJaHy ywiH caKan KoBih3. Ka6dbIKTapbH caTbIn any TypaNbI aKnapat
kaxet 6oJca, TyTbHybifa KbI3MeT KepcTeOpTaNbIFbHa xa6apnaCbIHbI3.
s s 111111111111111111111111111
.5.1 5.6 20
(1)
.(N2)"sio"dofo slog (N1)"sio"dofo slof :dloaxuibl
6.1
.6.2,6.1,10 a
Juswyl-6.2
:《
()"74"4"1/10/10:
slllglbfoafofofofofofofofofofofofofofofofofofofofofofofofofofofofofofofofofofofofofofofofofofofofofofofofofofofofofofofofofofofofofofofofofofofofofofo
9,4.1 4.2.10 a
()jgglg-5
(H) Cuao ojbs:alosuiu bI aolbl
Loo 5-5.1
.5.6 5.1 2
10:JooWU GgJgJgJgJgJgJgJgJgJgJgJgJgJgJgJgJgJgJgJgJgJgJgJgJgJgJgJgJgJgJgJgJgJgJgJgJgJgJgJgJgJgJgJgJgJgJgJgJgJgJg
bb ②
.(Jgbl)"5L3"4cJ1(A1)jiiibJyogjbjj
.(H1) 1J (H2)
.15e 2n jg clll gnn n 5 n 500 n jy jy k
300J (H4) gog (H3) jldj:pa
:
Jg 100000000000000000000000000000000000000000
.11 11 11 11 11 11 11 11 11 11 11 11 11 11 11 11 11 11
. wlll lglg jggjll gao jkawll o aal cd slgai
.


.6/max" aCswll 1I I1 1 (C3) jJL J
10 10 10 10
.500 500
Aaaglllalg (C3) jgllae y
4.1 no aaggagagagagagagagagagagagagagagagagagagagagagagagagagagagagagagagagagagagagagagagagagagagagagagagagagagagagagagagagagagagagagagagagag
.1.1 J
()1/2
1.5 15 j 15000000000000000000000000000000000000000000
1.25
(D/L) bxyol alg: alaxunl lalb1
山 2.1
1092.3 2.1 2
.(g3:JooWU gyl)JooWy-2.2
J (J) 8 7" Max/6 4" (A1)
"pulse"
(L2/L5) 10000000000000000000000000000000000000
:
$$ \begin{array}{l} \therefore y = \frac {1}{2} x - 1 \ - \therefore \angle x = 5 ^ {\circ} \ - \cdot (j i) d s d \ \end{array} $$
a 1
bIg aelol lsswly 1 g j 1 pabll g bI I J
a
sSg 1000
10g2.1 2.3 a a g jll lssjll
()-3
(F) SbI pJ (E) 1aolol aolol
a0rab1gdo 3.1
3.3 3.1000019 aagwglg
3.2
.()"7s5"43(A1)
1 1
.
.4001 3 4
:
1
2x p 2000
J 1
JgV Jy
JgJy JyJy
.():(E)gllllo)jolalglbblgclalglg jy
.
.111111111111111111111111111111111111
)(A1
"pulse" ggl (A1) glj: (la) ghgl
.(C3) (C2) (C1) (B2) (B1)
1.1
1.4 1.1 a
Juswyl-1.2
AaBaaag Gg 1000000000000000000000000000000000000000
.(B2)1b(30ggl aaiJylo pabll 15x
.0"gbl (A1) jJl Jb
:
13:JooWU 00
500 1" c (C1)
...aaiil aiai, iugaiii iiai gaii j
13:JooWU
.8 1"Max/6 1"1" (C2)
.(11..)
...g jy jy) a jbll g k sb l aal 1 (C2) bI J Ios
10:JU 1/

(juoo) 6
(N2) SgS jSd 4wS g (N1) SgS jSd bD:0000
6.1
.6.2 6.1 .10
Lg 6.2
:
(ju 4"7g14"cc/du10j51du/ps10j51du:ojt jz
j1/100 j1:(o1w0ybrg g jg2xu )gl cws/s
"1" / 10
."1" 20 150
.
sIggs.ogoo 1 jIggo gdsgfool5 oksos L: pglj0
6.1 g 6.2 10
(u5oLioA7)psgbs
(juobj) jzg 8
.0u wai u: 0laewd g
1
5/100:joo
.
.000000000000000000000000000000000000000
.(10)
pLg j 11111111111111111111111111111
.(C2) 日 日 日 日 日 日 日 日 日 日 日 日 (C1) .(F) :jS
D
J 1
(1)
olwosgjgl
.156 12j y jy jy pLi Li Cw g jg dS oal 59
j 1
.
$$ \left. \right.\left. \right.\left. \right.\left. \right.\left. \right.\left. \right.\left. \right.\left. \right.\left. \right.\left. \right.\left. \right.\left. \right.\left. \right.\left. \right.\left. \right.\left. \right.\left. \right.\left. \right.\left. \right.\left. \right.\left. \right.\left. \right.\left.\left.\left.\left.\left.\left.\left.\left.\left.\left.\left.\left. \text {s i g m a} ^ {\prime} = 0, 1, 2, 3, 4, 5, 6, 7, 8, 9, 1 0, 1 1, 1 2, 1 3, 1 4, 1 5, 1 6, 1 7, 1 8, 1 9, 2 0, 2 1, 2 2, 2 3, 2 4, 2 5, 2 6, 2 7, 2 8, 2 9, 3 0, 3 1, 3 2, 3 3, 3 4, \right| _ {l} - 5. 1 \right|\right|\right|\right|\right|\right|\right|\right|\right|\right|\right| $$
$$ \therefore \mathrm {l} _ {2} \leq \mathrm {l} _ {1} \mathrm {l} _ {0} 1, 5. 6 \mathrm {l} 5. 1 \mathrm {l} _ {0} \mathrm {l} _ {0} $$
(10:0dlaaJnJjS)okssdsyRg
.
.1JlJlJlKjI J0kTsw (JUo qu pr) 5 3" cGg g (A1) Cg Gg
H1 4 4 H2
. 500 j.
.(H4)U(H3)300j
:

1 1 1
.0g,1s glg S 5g gglg jgo:duy
uol oolawl 1 ouw ool o
000000000000000000000000000000000000000000
.1000 4011j 1.5 l6.5 j|Lg
.150 (Jd 1"8 J! 1"Max/6 J! 1"Max/6 J! 1"Max/6 J! 1"Max/6 J! 1"Max/6 J! 1"Max/6 J! 1"Max/6 J! 1"Max/6 J! 1"Max/6 J! 1"Max/6 J! 1"Max/6 J! 1"Max/6 J! 1"Max/6 J! 2
()0o0j0j0o0o0o0o0o0o0o0o0o0o0o0o0o0o0o0o0o0o0o0o0o0o0o0o0o0o0o0o0o0o0o0o0o0o0o0o0o0o0o
.500 0000000000000000000000000000000000000000
J 1000000000000000000000000000000000000000000000000000000
pjlj j0s 0o
1.1 14. g wgSoo jjgo g g
(joo g b) j0j 100/005 bglso-2
1.25 5.1 500 (D) jS bglw jj d
(L.D) _ x
2.1
.15 103.22.1j Lg
(C3) 1 (C2) 5 (C1) jz (B2) (B1)
1.1
1.4 1.1 slg
J - 1.2
.
y 45 sl 42 y j 1 uilgfo jbi oog bgloo 4u j 0b j.05 uolgfo 15 4 y gsw oll
.15 15 15 15 15 (B2) 0
. 0" (A1) dS s
: