DSA220 - Electric mower BESTRON - Free user manual and instructions
Find the device manual for free DSA220 BESTRON in PDF.

| Product Type | Multi-use electric clipper (hair, beard, mustache) |
| Brand | Bestron |
| Model | DSA220 |
| Power Supply | Mains 230-240 V ~ 50 Hz via transformer |
| Transformer Output | 5.3 V ⎓ 140 mA 0.742 VA |
| Charging Time | At least 12 hours |
| Battery Life | Approximately 45 minutes (estimated) |
| Blade Type | Ceramic, requires no sharpening |
| Interchangeable Heads | Clipper head, shaver head, pop-up trimmer |
| Cutting Heights | 2 mm, 4 mm, 6 mm, 8 mm, 10 mm (with removable comb) |
| Usage | Dry or wet |
| Dimensions (approx.) | 18 x 5 x 5 cm |
| Weight (approx.) | 250 g (without accessories) |
| Included Accessories | 5-position removable comb, styling comb, cleaning brush, lubricating oil, charging stand, transformer |
| Housing Material | ABS plastic |
| Warranty | 60 months (5 years) |
| Maintenance | Clean with brush and dry cloth; lubricate monthly |
| Safety | Do not immerse stand/transformer; max charge 3 days; full discharge every 2 months |
| Repairability | Repairs by qualified technician only |
Frequently Asked Questions - DSA220 BESTRON
User questions about DSA220 BESTRON
0 question about this device. Answer the ones you know or ask your own.
Ask a new question about this device
Download the instructions for your Electric mower in PDF format for free! Find your manual DSA220 - BESTRON and take your electronic device back in hand. On this page are published all the documents necessary for the use of your device. DSA220 by BESTRON.
USER MANUAL DSA220 BESTRON
Instruction manual electric trimmer
Italiano
CONDITIONS DE GARANTIE
Congratulations on your new trimmer, which will give you optimum styling ability. The trimmer has a ceramic cutter that is harder than steel. It will therefore never need sharpening. The trimmer has a trimmer head plus attachable comb which can be set for cutting different lengths. There is also an extra shaver head for beards and moustaches. As well as this there is a small trimmer which can be slid out and used to make a better finish. You can use the trimmer both wet and dry.
SAFETY INSTRUCTIONS - General
- Please read these instructions carefully and retain them for reference.
- Use this appliance solely in accordance with these instructions.
This appliance is not intended for use by persons (including children) with reduced physical, sensory or mental capabilities, or lack of experience and knowledge, unless they have been given supervision or instruction concerning use of the appliance by a person responsible for their safety.
Children should be supervised to ensure that they do not play with the appliance - Have any repairs carried out solely by a qualified electrician. Never try to repair the appliance yourself.
SAFETY INSTRUCTIONS - Electricity and heat
- Before plugging in the adapter, make sure the mains voltage matches the voltage specified on the adapter.
- Make sure the socket into which you plug the adapter is earthed.
- Always remove the plug from the socket when you have finished charging the device and when you are no longer using the adapter.
- When you remove the plug from the socket, pull by holding the plug, not the flex.
- Check regularly to make sure the flex is still intact. Do not use the adapter if either the flex or the adapter are damaged. A damaged flex must be replaced by a qualified electrician.
- Never leave the device charging for more than 3 days.
- Do not use the device while it is charging.
- Do not use the device near heat sources such as radiators, or in full sunlight.
- Make sure the re-charging stand and/or the adapter do not come into contact with water.
- Let the battery run down completely every 2 months by using the device until it runs down. Then switch it off and re-charge fully.
SAFETY INSTRUCTIONS - During use
- Place the re-charging stand on a flat, stable surface where it cannot fall into a washbasin.
- Use the device only with the adapter provided. Do not use the trimmer or the recharging stand in combination with other types of adapters.
- Make sure the trimmer or the shaving head is properly attached before switching on the device.
- Take care during use. Always hold the device near the base, never near the head. Do not attempt to remove the trimmer head or the shaver head while the device is switched on. Do not press the trimmer or shaver head too hard against your skin. This could damage both your skin and the shaver head.
After use, remove any hairs from the device and clean it using a clean, dry cloth. - Never immerse the re-charging stand and/or adapter in water or other liquid.
- Never touch the re-charging stand and/or the adapter if they have fallen in water. Remove the plug from the socket. Do not use the re-charging stand and/or the adapter again.
TECHNICAL DETAILS
Type: DSA220
Input: 230-240 V ~50 Hz
Output: 5.3 V 140 mA 0.742 VA
THE ENVIRONMENT

-
Dispos of packaging material, such as plastic and boxes, in the appropriate waste containers. When this product reaches the end of its useful life do not dispose of it by putting it in a dustbin; hand it in at a collection point for the reuse of electrical and electronic equipment. Please refer to the symbols on the product, the user's instructions or the packaging.
-
The materials can be re-used as indicated. Your help in the re-use, recycling or other means of making use of old electrical equipment will make an important contribution to the protection of the environment.
- Contact your municipality for the address of the appropriate collection point in your neighbourhood.
OPERATION - General
Your trimmer is intended only for domestic use. The trimmer head should be used for trimming and styling the hair and facial hair. The small telescopic trimmer is for fine tuning' and for difficult to reach places. The shaving head attachment is for trimming beards and moustaches.
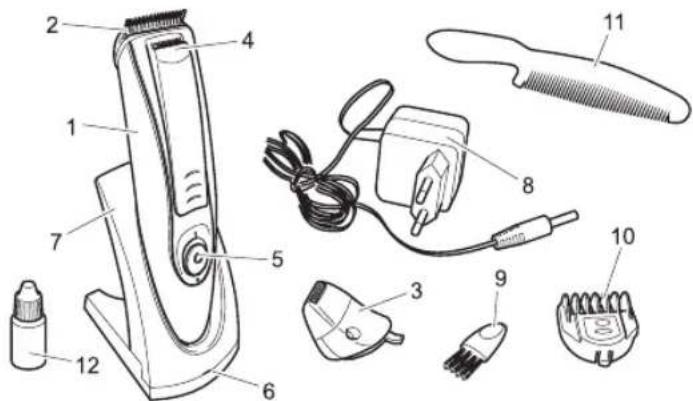
- Casing
- Trimmer head
- Shaver head
- Telescopic trimmer
- On/Off switch
- Re-charging indicator light
- Re-charging stand
- Mains adapter
- Cleaning brush
- Attachable comb
- Comb
- Oil
Figure 1
OPERATION - Before use for the first time
- Make sure the on/off switch (5) is in the 0 (off) position.
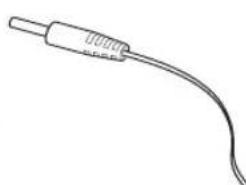
- Insert the adapter plug (8) into the socket on the rear of the re-charging stand (7) (see figure 2).
- Place the casing (1) in the re-charging stand.
- Insert the adapter connector plug into the mains socket.
The re-charging indicator light (6) should come on. (red
light)
- Leave the device to charge for at least 12 hours. The device may become slightly warm during this time. This is normal and does not indicate a fault. (green light)
- Remove the adapter plug from the mains socket.
- Remove the connector plug from the re-charging stand.
- Remove the device from the re-charging stand. It is now ready for use.
Figure 2
OPERATION - Trimmer
- Make sure the on/off switch (5) is in the 0 (off) position.
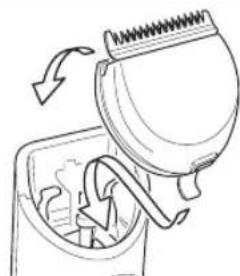
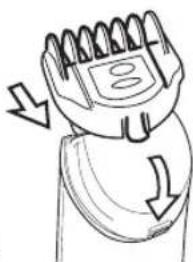
- Place the lip on the bottom of the trimmer head (2) in the oblique opening on the casing (1). See figure 3. Press the top of the head forward to click the head into place.
To remove the head, hold the top of the head and pull it backwards. Do so only when the device is switched off.
Figure 3
- Slide the attachable comb (10) over the trimmer, with the teeth to the front of the trimmer head. See figure 4. Press on the back of the comb to click into place.
To remove the comb, hold by the lip on the bottom and pull it up. Do so only when the device is switched off. - The comb has 5 possible settings allowing cutting depths of 2mm , 4mm , 6mm , 8mm or 10mm . Set the comb by holding in the button on the top and moving the top part of the comb backwards or forwards as required with the other hand.
To familiarise yourself with the different settings, we suggest you start with the 10 mm setting. The trimmer can also be used without the attachable comb; it will then remove more hair. Figure 4
- Switch on the device by moving the on/off switch (5) to position I.
- Move the trimmer head diagonally across your skin to remove the unwanted hairs.
OPERATION - Telescopic trimmer
- Make sure the on/off switch (5) is in the 0 (off) position. Remove the attachable comb by holding by the lip at the rear and clicking upwards.
- Press the telescopic trimmer out with your thumb (4). See figure 5.
- Now switch on the device again.
- Move the trimmer head diagonally across your skin to remove the unwanted hairs.
- After use, switch off the device by moving the on/off switch (5) to the 0 position and slide the trimmer back in.
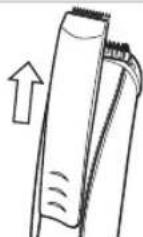
Figure 5 OPERATION - Shaver head
- Make sure the on/off switch (5) is in the 0 (off) position.
- Place the lip on the bottom of the shaver head (3) in the oblique opening on the casing (1). See figure 6. Press the top of the head forward to click the head into place.
To remove the head, hold the top of the head and pull it backwards. Do so only when the device is switched off.
- Switch on the device by moving the on/off switch (5) to position I.
- Move the shaver head diagonally across your skin in circular movements to remove the unwanted hairs. Do not press the shaver head too hard against your skin. This could damage both your skin and the shaver head.
- After use, switch off the device by moving the on/off switch (5) to the 0 position. The extra comb (11) can be used to style your hair after using the device.
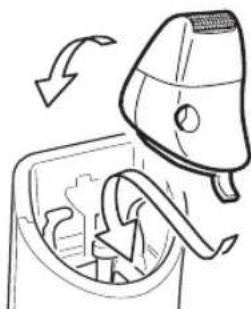
Figure 6
CLEANING AND MAINTENANCE
- After using the trimmer, remove the hairs from the blade using the brush.
- After using the shaver head, remove the head from the device. Empty by tapping gently on a flat surface, with the underside facing down. Remove the hairs from the casing using the brush.
- Wipe over with a clean dry cloth.
- Oil the device once a month with the oil provided.
Make sure the device is not connected to the mains by the adapter when you are cleaning it. Never use harsh or corrosive cleaning agents or sharp objects (such as knives or hard brushes) when cleaning.
GUARANTEE TERMS
The importer guarantees the appliance against defects caused by manufacturing and/or material faults for 60 months from the date of purchase, subject to the following conditions.
- No charges will be made for labour costs or materials during the warranty period. Any repairs carried out during the warranty period do not extend the warranty period.
- The importer automatically becomes the owner of any faulty parts that he replaces or a faulty appliance (in the event of replacement of the appliance).
- All claims submitted under warranty must be accompanied by the original bill of sale.
- Claims under warranty must be submitted to the dealer where the appliance was purchased or to the importer.
- The warranty is issued solely to the first purchaser and cannot be transferred.
- The warranty does not cover damage caused by:
a. Accidents, incorrect use, wear and/or neglect.
b. Faulty installation and/or use in a manner contravening the prevailing legal, technical or safety regulations.
c. Connection to a mains voltage other than the voltage specified on the type plate.
d. Unauthorized modifications.
e. Repairs carried out by third parties.
f. Careless transport, i.e. without suitable packaging materials or protection.
- No claims may be made under this warranty for:
a. Losses incurred during transport.
b. The removal or changing of the appliance's serial number.
8. The guarantee does not cover power cords, lamps or glass parts.
9. No claims can be submitted under this warranty for damage other than the repair or replacement of faulty parts. The importer can never be held responsible for any consequential loss or damage or any other consequences, resulting either directly or indirectly from the appliance supplied by the importer.
10. In case of claims under guarantee you can contact your dealer where the appliance is purchased. Bestron offers you also the possibility to send the appliance directly to our Service Department. Do not send your appliance without consulting us. The package may be refused and any any costs will be for your account. Please contact the Service Department and they will tell you how to pack and send the appliance.
11. This appliance is not suitable for professional use.
SERVICE
If a fault should occur please contact the BESTRON service department:
THE NETHERLANDS:
BESTRON NEDERLAND BV
Bestron Service
Moeskampweg 20
5222 AW's-Hertogenbosch
Tel: +31 (0) 73 - 623 11 21
Fax: +31 (0) 73-621 23 96
Email: info@bestron.com
Internet: www.bestron.com
CE DECLARATION OF CONFORMITY
This product conforms to the essential requirements of the following EU safety directives:
EMC Directive 2004/108/EC
Low Voltage Directive 2006/95/EC