
DLD404 - Electric mower BESTRON - Free user manual and instructions
Find the device manual for free DLD404 BESTRON in PDF.

| Product type | Electric trimmer |
| Brand | Bestron |
| Model | DLD404 |
| Power supply | 230 V ~ 50 Hz adapter, output 3.0 V DC 1000 mA |
| Battery type | Built-in rechargeable |
| Initial charging time | 16 hours recommended, then 12 hours |
| Cutting lengths | 3 mm, 6 mm, 9 mm, 12 mm with combs; close shave without comb |
| Combs included | 2 cutting combs (3-6 mm and 9-12 mm), thinning comb |
| Accessories included | Scissors, cleaning brush, clothes brush, cape, oil |
| Usage | Household only |
| Cleaning | Removable cutting head, brush after use, no harsh detergents |
| Lubrication | Included oil, lubricate blades before and after use |
| Warranty | 60 months (5 years) |
| Certifications | EMC Directive 2004/108/EC, Low Voltage Directive 2006/95/EC |
| Battery maintenance | Full discharge/recharge every 6 months |
| Safety instructions | Do not immerse, use on dry hair, dedicated adapter |
Frequently Asked Questions - DLD404 BESTRON
User questions about DLD404 BESTRON
0 question about this device. Answer the ones you know or ask your own.
Ask a new question about this device
Download the instructions for your Electric mower in PDF format for free! Find your manual DLD404 - BESTRON and take your electronic device back in hand. On this page are published all the documents necessary for the use of your device. DLD404 by BESTRON.
USER MANUAL DLD404 BESTRON
Output: 3,0 Vdc 1000 mA

Milieu
Congratulations with the purchase of your kids trimmer set. Very low noise, so kids friendly. With 2 comb attachments for different hair lengths (3-12mm).

Safety instructions
General
- Please read these instructions carefully and retain them for reference.
- Use this appliance solely in accordance with these instructions.
- Use solely accessories recommended by the supplier. The use of other accessories may result in damage to the appliance, thereby creating hazards for the user.
- This appliance is not intended for use by persons (including children) with reduced physical, sensory or mental capabilities, or lack of experience and knowledge, unless they have been given supervision or instruction concerning use of the appliance by a person responsible for their safety.
Children should be supervised to ensure that they do not play with the appliance. - Have any repairs carried out solely by a qualified electrician. Never try to repair the appliance yourself.
Electricity and heat
- Verify that the mains voltage is the same as that indicated on the type plate on the appliance's adapter before using the adapter.
- Always remove the plug from the wall socket when you have finished charging the appliance and when you are not using the adapter.
- Always remove the plug from the wall socket by pulling on the plug, not the power cord.
- Check the adapter's cord regularly to make sure it is not damaged. Do not use the adapter if the lead or the adapter is damaged. A damaged cord must be replaced by a qualified electrician.
- Do not charge the appliance in the vicinity of heat sources such as radiators, or in the full sun.
- Make sure that the appliance and/or the adapter do not come in contact with water.
During use
- Never use the adapter in humid rooms.
- Make sure that your hands are dry before touching the appliance, power cord or adapter.
- Always use the adapter supplied with the appliance. Do not use the trimmer in combination with other types of adapters.
- Take care during use. Always hold the appliance by the base, not by the head. Do not press the head too hard against your skin. This could injure your skin and damage the head.
After use, remove any hairs from the appliance and clean it using a clean, dry cloth. - Never immerse the adapter in water or other liquids.
- Do not touch the adapter if it falls into water. Remove the plug from the wall socket immediately. Do not use the adapter any more.
- Keep the bottle of oil out of the reach of children, and do not store it in the vicinity of food. Contact a doctor immediately if the oil is accidentally ingested or comes into contact with the eyes.
- This appliance may not be used through an external timer or by means of a remote control.
- Some parts of this appliance may be sharp. Be careful not to cut yourself.
Operation
General
The appliance is intended only for domestic use, not for professional use.
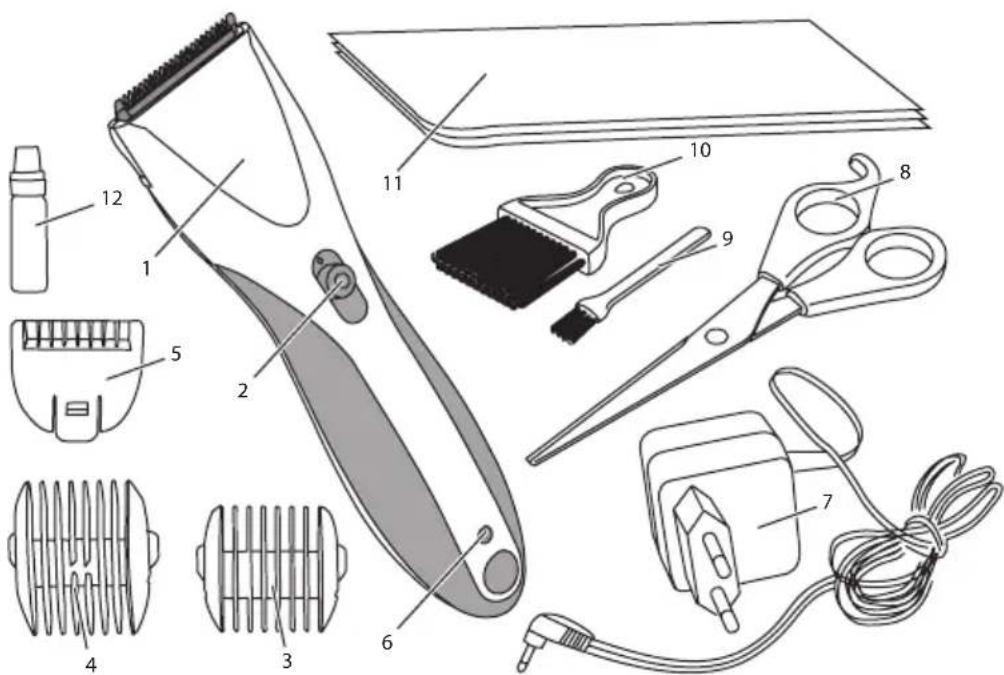
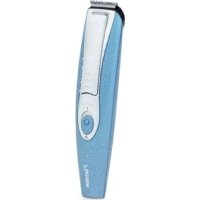
Figure 1 features
- Housing
- On/Off switch
- Comb attachment 1 (3-6mm)
- Comb attachment 2 (9-12mm)
- Thin out attachment
- "Charging" indicator light
- Mains adapter
- Scissors
- Cleaning brush
- Clothes brush
- Cape
- Oil
Using the appliance for the first time/charging the battery
- Make sure the On/Off switch is set to 0 (Off).
- Insert the adapter plug (Figure 2) into the socket at the bottom of the appliance.
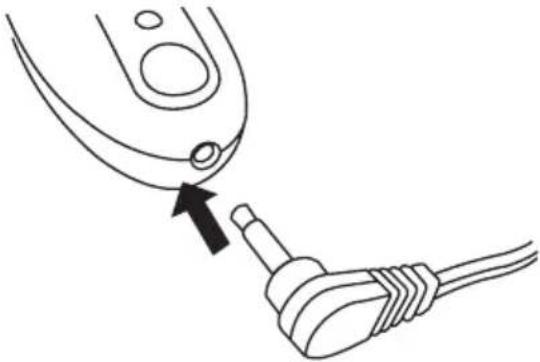
Figure 2 Charging the battery
- Insert the adapter into the wall socket. The "charging" indicator light will now illuminate.
- Allow the appliance to charge for about 12 hours. The appliance may become slightly warm whilst it is charging. This is normal, and does not indicate that the appliance is defective.
Note To maximise the capacity and life of the rechargeable batteries, they should be fully charged for at least 16 hours before first use and then fully discharged by using. Ten charged to full capacity again. This discharging/charging procedure should be done every six months.
- Remove the adapter plug from the mains socket.
- Remove the plug from the appliance.
- Use a little of the oil supplied with the trimmer to lubricate the trimmer head's cutters. It is now ready for use.
PLEASE NOTE
- Discharge the appliance completely once every 6 months and then recharge it fully. This will prolong the useful life of the battery.
- Do not charge the appliance for longer than the specified charging time. This will prevent damage to the batteries.
Use
Fitting a comb attachment
The trimmer is supplied with 2 comb attachments that are used to trim the hair to one of 4 different lengths:
- Comb 1 is used to trim hair to a length of 3mm and 6mm .
- Comb 2 is used to trim hair to a length of 9mm and 12mm .
Using the trimmer without a comb attachment will cut off virtually all the hair.
- Slide one of the comb attachments over the head of the trimmer's fixed cutting comb (see Figure 3). Press the comb attachment into place, and click the base of the attachment over the fixed cutting comb.
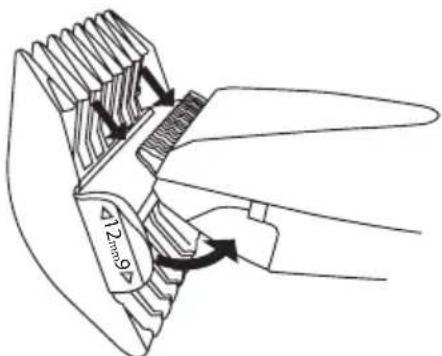
Figure 3 Fitting comb attachments
Note We recommend that you use the largest comb attachment when becoming familiar with the appliance. You can always switch to a smaller comb attachment if you think that your hair is still too long.
Cutting
- Fit the required comb attachment to the trimmer. You can also use the trimmer without a comb attachment; you can then cut your hair to any required length.
- Switch on the trimmer by setting the On/Off switch to 1 (On).
- Start cutting your hair. Move the trimmer at an angle to your skin to remove unwanted hairs.
- After use, switch off the appliance by setting the On/Off switch to 0 (Off).
Neck
- Fit the required comb attachment, for example comb 1 (3 mm or 6 mm).
- Keep the cutting comb face upwards, and trim the hair in your neck from the bottom.
- Trim the hair in successive widths, and from bottom to top.
- Move the trimmer slowly so that the cutting comb trims all the hair. Slow trimming gives the best result.
Back of the head
- Fit the required comb attachment, for example comb 2 (9 mm or 12 mm).
- Trim the hair on the back of the head by slowly moving the trimmer from the bottom to the top, against the direction of growth.
Sides
- Fit the required comb attachment, for example comb 1 (3 mm or 6 mm) and trim the hair on the temples.
- Use a short comb attachment for sideburns. Move the trimmer from top to bottom, with the cutting comb facing downwards.
Top of the head (crown)
- Fit a large comb attachment, for example comb 2 (9 mm or 12 mm). Obviously you can always use a smaller comb attachment if you require shorter hair.
- Trim the top of the head by moving the trimmer from the back to the front, against the direction of growth.
- When the hair on the top of the head is very long you can use the comb to lift the hair whilst you use the trimmer to trim the hair above the comb.
Finishing
- Using the trimmer without a comb attachment will enable you to obtain a clean edge at the base of the neck.
Thin out
- Fit the thin out attachment to the trimmer
- Switch on the trimmer by setting the On/Off switch to 1 (On).
- Start cutting your hair. Move the trimmer at an angle to your skin to remove unwanted hairs.
- After use, switch off the appliance by setting the On/Off switch to 0 (Off).
Tips
- Washing and drying your hair and then combing it thoroughly will make it more supple when you trim it.
- Comb your hair before and regularly during trimming to make sure it remains in the required model.
- Do not move the trimmer too quickly; allow the cutting comb to pass through the hair without using force. Comb your hair regularly during trimming to check that it has been trimmed evenly.
Use the cape to protect your clothing.
Cleaning and maintenance
Clean the trimmer thoroughly after each use.
- Remove the comb attachment, where relevant, from the trimmer so that you can clean the appliance thoroughly.
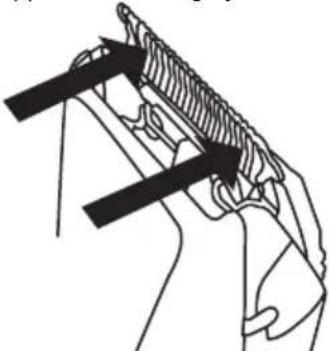
Figure 4 Remove trimming head
- Press the trimming head's cutter downwards firmly with your thumbs (see figure 4). The trimmer head will now be released from the appliance.
- Use the brush to remove hairs from the trimmer head and from the cavity in the appliance.
- Fit the trimmer head back onto the appliance.
- Clean the appliance with a clean damp cloth.
- Lubricate the cutting comb with a few drops of oil supplied with the appliance.
- Fit the plastic protective cap over the cutting comb, and store the trimmer in its case.
PLEASE NOTE
- Make sure the appliance is not connected to the mains via the adapter before you clean it.
- Never use corrosive or scouring cleaning agents or sharp objects (such as knives or hard brushes) to clean the appliance.
Technical details
Type: DLD404
AC/DC mains adapter
Input: 230 Vac 50Hz
Output: 3,0 Vdc 1000 mA

The environment
Dispose of packaging material, such as plastic and boxes, in the appropriate waste containers.
When this product reaches the end of its useful life do not dispose of it by putting it in a dustbin; hand it in at a collection point for the reuse of electrical and electronic equipment. Please refer to the symbols on the product, the user's instructions or the packaging.
The materials can be re-used as indicated. Your help in the re-use, recycling or other means of making use of old electrical equipment will make an important contribution to the protection of the environment.
Contact your municipality for the address of the appropriate collection point in your neighbourhood.
Guarantee terms
The importer guarantees the appliance against defects caused by manufacturing and/or material faults for 60 months from the date of purchase, subject to the following conditions.
- No charges will be made for labour costs or materials during the warranty period. Any repairs carried out during the warranty period do not extend the warranty period.
- The importer automatically becomes the owner of any faulty parts that he replaces or a faulty appliance (in the event of replacement of the appliance).
- All claims submitted under warranty must be accompanied by the original bill of sale.
- Claims under warranty must be submitted to the dealer where the appliance was purchased or to the importer.
- The warranty is issued solely to the first purchaser and cannot be transferred.
- The warranty does not cover damage caused by:
a. Accidents, incorrect use, wear and/or neglect.
b. Faulty installation and/or use in a manner contravening the prevailing legal, technical or safety regulations.
c. Connection to a mains voltage other than the voltage specified on the type plate.
d. Unauthorized modifications.
e. Repairs carried out by third parties.
f. Careless transport, i.e. without suitable packaging materials or protection.
- No claims may be made under this warranty for:
a. Losses incurred during transport.
b. The removal or changing of the appliance's serial number.
-
The guarantee does not cover power cords, lamps or glass parts.
-
No claims can be submitted under this warranty for damage other than the repair or replacement of faulty parts. The importer can never be held responsible for any consequential loss or damage or any other consequences,
resulting either directly or indirectly from the appliance supplied by the importer.
- In case of claims under guarantee you can contact your dealer where the appliance is purchased. Bestron offers you also the possibility to send the appliance directly to our Service Department. Do not send your appliance without consulting us. The package may be refused and any any costs will be for your account. Please contact the Service Department and they will tell you how to pack and send the appliance.
- This appliance is not suitable for professional use.
Service
If a fault should occur please contact the BESTRON service department:
THE NETHERLANDS:
BESTRON NEDERLAND BV
BESTRON SERVICE
Moeskampweg 20
5222 AW's-Hertogenbosch
Tel: +31 (0) 73 - 623 11 21
Fax: +31 (0) 73-621 2396
Email: info@bestron.com
Internet: www.bestron.com
CE Declaration of conformity
This product conforms to the essential requirements of the following EU safety directives:
EMC Directive 2004/108/EC
Low Voltage Directive 2006/95/EC
R. Neyman
Quality control
- Milieu
- Safety instructions
- General
- Electricity and heat
- During use
- Operation
- Using the appliance for the first time/charging the battery
- PLEASE NOTE
- Use
- Fitting a comb attachment
- Cutting
- Neck
- Back of the head
- Sides
- Top of the head (crown)
- Finishing
- Thin out
- Tips
- Cleaning and maintenance
- Technical details
- AC/DC mains adapter
- The environment
- Guarantee terms
- Service
- THE NETHERLANDS:
- CE Declaration of conformity
- Neyman
Brand : BESTRON
Model : DLD404
Category : Electric mower