MHG20002 - Heat gun Meister Craft - Free user manual and instructions
Find the device manual for free MHG20002 Meister Craft in PDF.

| Product Type | Heat gun (stripper) |
| Brand | Meister Craft |
| Model | MHG20002 |
| Power supply | 230 V ~ 50 Hz |
| Max power | 2000 W |
| Temperature - Level I | 350 °C (1000 W, 300 l/min) |
| Temperature - Level II | 550 °C (2000 W, 500 l/min) |
| Air flow | 300 l/min (I) / 500 l/min (II) |
| Power cable | 3 m |
| Weight | 0.65 kg |
| Included accessories | 4 nozzles (surface, deflector, reflector, spot) + scraper |
| Main functions | Stripping varnish, removing labels, loosening rusted screws, thawing pipes, drying paint, shrinking plastics, etc. |
| Intended use | Household (DIY) |
| Safety | Wear gloves and safety goggles; do not direct at people/animals; do not use in explosive atmosphere; integrated stand for upright parking |
| Maintenance and cleaning | Clean with a damp cloth; do not use solvents; unplug before cleaning |
| Spare parts and repairability | Repairs by qualified personnel with original parts; opening voids warranty; contact Meister after-sales service |
| Standards | Directive 2011/65/EU (RoHS) |
Frequently Asked Questions - MHG20002 Meister Craft
User questions about MHG20002 Meister Craft
0 question about this device. Answer the ones you know or ask your own.
Ask a new question about this device
Download the instructions for your Heat gun in PDF format for free! Find your manual MHG20002 - Meister Craft and take your electronic device back in hand. On this page are published all the documents necessary for the use of your device. MHG20002 by Meister Craft.
USER MANUAL MHG20002 Meister Craft
natural_image
Black Meister MWHG2000-2 hair dryer with no visible text or symbols on the device bodyService
natural_image
Black handheld industrial blender with metallic handle and control panel (no visible text or symbols)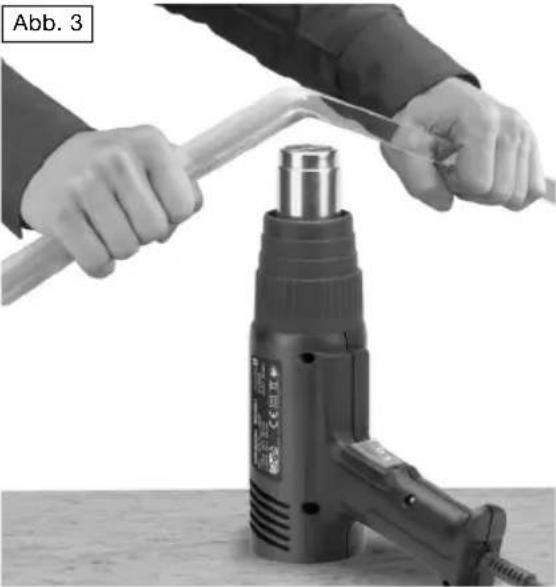
natural_image
Person using a power tool to lift a cylindrical component, no visible text or symbols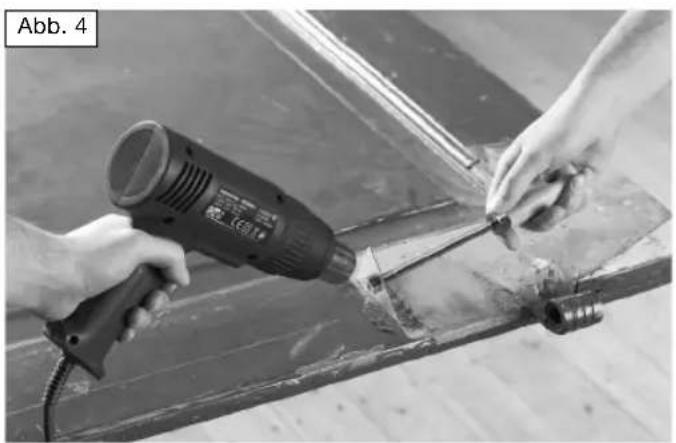
natural_image
Person using a handheld tool to cut or repair a metal component, no visible text or symbols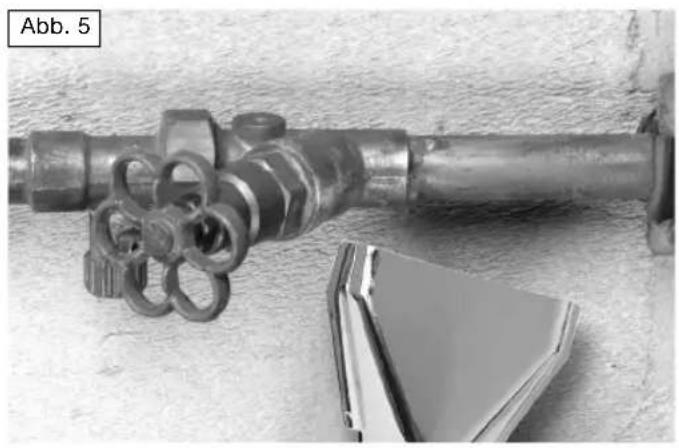
natural_image
Close-up of a metallic pipe fitting with interlocking rings and a folded paper clip, placed on a textured surface (no text or symbols visible)a
natural_image
Metallic 3D-rendered object with smooth curved surfaces (no text or symbols)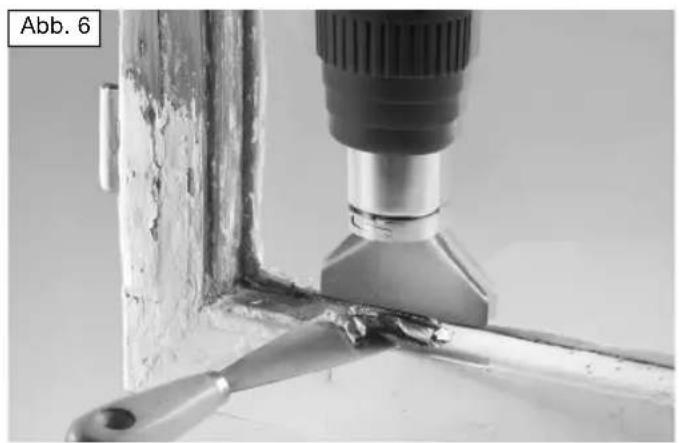
natural_image
Close-up of a mechanical tool with a drill bit and tool, showing no visible text or symbolsb
natural_image
Metallic mechanical component with a conical top and flange (no text or symbols visible)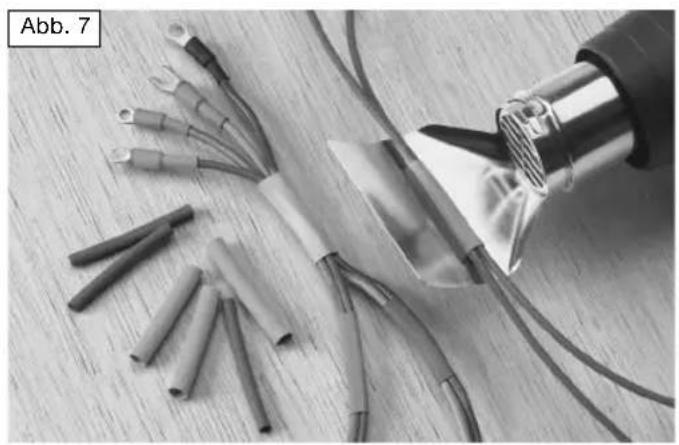
natural_image
Black-and-white photo of soldering tools and a soldering iron on a wooden surface (no text or symbols visible)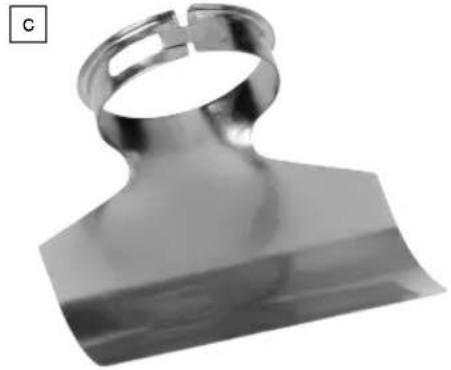
natural_image
Metallic mechanical component with a looped handle and flange (no visible text or symbols)
natural_image
Close-up of metallic pipe fittings and a metal bracket, no visible text or symbols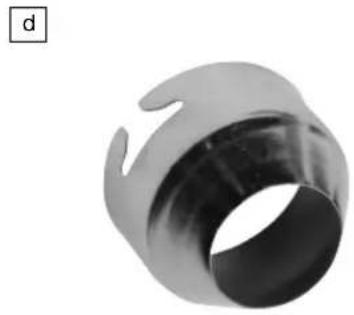
natural_image
Metallic cylindrical object with curved cutouts, no visible text or symbols
Operating instructions & safety hints

WARNING! To reduce the risk of injury, please read the operating instructions through carefully before using the device, and then store with the machine! When passing the device on to another user, these operating instructions must also be included!
Contents
| Page | |
| 1 - Scope of delivery | 29 |
| 2 - Technical information | 29 |
| 3 - Components | 29 |
| 4 - Correct use | 29 |
| 5 - General safety instructions | 30 |
| 6 - Safety instructions relating specifically to the equipment | 32 |
| Page | |
| 7 – Installation and setting | 33 |
| 8 – Operation | 33 |
| 9 – Mode of operation | 33 |
| 10 – Maintenance and environmental protection | 34 |
| 11 – Service instructions | 35 |
1 - Scope of delivery
- Hot air gun
- 4 attachment nozzles and 1 scraper
- Operating instructions
• Guarantee certificate
2 - Technical information
Technical data
| Power supply | 230 V~/50 Hz |
| Power consumption | P_max. = 2000 W |
| Power consumption/ Temperature/ Volume of air | I: P_N 1000 W/ 350 °C/300 l/minII: P_N 2000 W/ 550 °C/500 l/min |
| Cable | 300 cm |
| Weight | 0.65 kg |
Technical changes reserved.
3 - Components
1 Air inlet
2 Unit stand
3 On/Off switch
4 Handle protection
5 Accessory mount
6 Hot air outlet
7 Attachment nozzles and paint scraper
4 - Correct use
- Removing paint and varnish.
- Removing stickers.
- Loosening rusty and too tight nuts and metal screws.
- Thawing frozen pipes, door locks, padlocks etc.
-
Highlighting natural grains in wood surfaces before varnishing or painting. Desacaling wood panelling.
-
Quick drying paint and varnish. This is particularly useful where colour harmonization is required through several coats. Drying test coats. Work carefully and from a greater distance.
- Removing old putty from window panes.
- Drying wet and damp objects and grounds before reworking.
- Shrinking packaging foil.
- Waxing and dewaxing skis.
- Shrinking polyvinyl wire connections.
• Stripping floor coverings. - Shaping plastic.
All other applications are expressly ruled out.
The machine is intended only for use in the household.
5 – General safety instructions for handling power tools

WARNING! Read all safety warnings and all instructions.
Failure to follow the warnings and instructions may result in electric shock, fire and/or serious injury.
Save all warnings and instructions for future reference.
The term “power tool” in the warnings refers to your mains operated (corded) power tool or battery-operated (cordless) power tool.
This device may be used by children aged 8 and above as well as by people
with reduced physical, sensory or mental capacities or a lack of experience and knowledge as long as they are supervised or have been taught to use the device safely and they are aware of the risks involved. Children may not play with the device. Cleaning and user maintenance may not be carried out by children without supervision.
1 Work area
a Keep work area clean and well lit.
Cluttered and dark areas invite accidents.
b Do not operate power tools in explosive atmospheres, such as in the presence of flammable liquids, gases or dust. Power tools create sparks which may ignite the dust or fumes.
c Keep children and bystanders away while operating a power tool.
Distractions can cause you to lose control.
2 Electrical Safety
a Power tool plugs must match the outlet. Never modify the plug in any way. Do not use any adapter plugs with earthed (grounded) power tools. Unmodified plugs and matching outlets will reduce risk of electric shock.
b Avoid body contact with earthed or grounded surfaces, such as pipes, radiators, ranges and refrigerators. There is an increased risk of electric shock if your body is earthed or grounded.
c Do not expose power tools to rain or wet conditions. Water entering a power tool will increase the risk of electric shock.
d Do not abuse the cord. Never use the cord for carrying, pulling or unplugging the power tool. Keep cord away from heat, oil, sharp edges or moving parts. Damaged or entangled cords increase the risk of electric shock.
e When operating a power tool outdoors, use an extension cord suitable for outdoor use. Use of a cord suitable for outdoor use reduces the risk of electric shock.
If it is not possible to avoid using the electrical tool in a damp environment, use a residual current circuit-breaker. The use of a residual current circuit-breaker reduces the risk of an electrical shock.
3 Personal safety
a Stay alert, watch what you are doing and use common sense when operating a power tool. Do not use a power tool while you are tired or under the influence of drugs, alcohol or medication. A moment of inattention while operating power tools may result in serious personal injury.
b Use personal protective equipment. Always wear eye protection.
Protective equipment such as dust masks, non-skid safety shoes, hard hat, or hearing protection used for appropriate conditions will reduce personal injuries.
c Prevent unintentional starting. Ensure the switch is in the off-position before connecting to power source and/or battery pack, picking up or carrying the tool.
Carrying power tools with your finger on the switch or energising power
tools that have the switch on invites accidents.
d Remove any adjusting key or wrench before turning the power tool on. A wrench or a key left attached to a rotating part of the power tool may result in personal injury.
e Do not overreach. Keep proper footing and balance at all times. This enables better control of the power tool in unexpected situations.
f Dress properly. Do not wear loose clothing or jewellery. Keep your hair, clothing and gloves away from moving parts. Loose clothes, jewellery or long hair can be caught in moving parts.
g If devices are provided for the connection of dust extraction and collection facilities, ensure these are connected and properly used. Use of these devices can reduce dust related hazards.
4 Power tool use and care
a Do not force the power tool. Use the correct power tool for your application. The correct power tool will do the job better and safer at the rate for which it was designed.
b Do not use the power tool if the switch does not turn it on and off. Any power tool that cannot be controlled with the switch is dangerous and must be repaired.
c Disconnect the plug from the power source before making any adjustments, changing accessories, or storing power tools. Such preventive safety measures reduce
the risk of starting the power tool accidentally.
d Store idle power tools out of the reach of children and do not allow persons unfamiliar with the power tool or these instructions to operate the power tool. Power tools are dangerous in the hands of untrained users.
e Maintain power tools. Check for misalignment or binding of moving parts, breakage of parts and any other condition that may affect the power tool's operation. If damaged, have the power tool repaired before use. Many accidents are caused by poorly maintained power tools.
f Keep cutting tools sharp and clean. Properly maintained cutting tools with sharp cutting edges are less likely to bind and are easier to control.
g Use the power tool, accessories and tool bits etc. in accordance with these instructions, taking into account the working conditions and the work to be performed. Use of the power tool for operations different from those intended could result in a hazardous situation.
5 Service
a Have your power tool serviced by a qualified repair person using only identical replacement parts. This will ensure that the safety of the power tool is maintained.
b To avoid hazards, damaged power leads must be replaced by the manufacturer or his customer service representative.
6 – Safety instructions relating specifically to the equipment

- When carrying out work in which dust is generated, wear a face mask and safety goggles - do not smoke and avoid naked flames.
- Make sure that the switch is in the 0 position before putting the plug in the socket.


- The nozzle gets very hot. Always wear gloves and safety glasses.
- Never use the hot-air gun as a hair drier.
- Never direct the hot-air flow at people or animals.
- Do not use in an atmosphere prone to explosion.
- After use, set down the device on the stand and allow it to cool before putting it away.
- Do not use the hot-air gun near easily flammable materials or gases.
- Never obstruct the hot-air flow.
- To cool the hot-air gun, always place it in an upright position (fig. 1) or hang it up by the bracket provided.
-
Never use the hot-air gun in a wet environment or in areas with a high degree of humidity (e.g. bathrooms, saunas etc.).
-
When the hot-air gun is being used in a standing position, make sure that it stands on a firm, dustfree surface.
- Vapours can be generated when hot-air is used. Always make sure the working area is well ventilated.
7 - Installation and setting
Mounting the attachment nozzles
A different type of attachment nozzle (7) may be used according to the work you are carrying out. The attachment nozzles are clamped to the accessory mount (5). In order to ensure a firm seat, the rear section of the nozzle may need to be squeezed with a pair of pliers.
CAUTION! Attachment nozzles that are not securely mounted may become loose when working and cause burns!
8 - Operation
Switching on
Set the switch (3) to the I setting. Within a minute the hot air gun will reach an operating temperature of 350 °C .
Set the switch to the II setting. Within a minute the hot air gun will reach an operating temperature of 550 °C.
Switching off
Switch the unit to the 0 setting and leave it on the stand (2) to cool down (Figure 2).
NOTE: If the hot air gun is being operated with an attachment nozzle, switch it off after around 3 minutes and allow it to cool down on
the stand for around 3 minutes to ensure that the unit does not overheat!
The integrated stand (2) means that the unit can be stood up vertically on any smooth surface (Figure 3). This leaves both hands free to work.
9 - Mode of operation
CAUTION! Because of the expected smoke generated when using the unit, you should always wear suitable breathing protection!
CAUTION! Never direct the hot air gun onto the power cable! The cable should not come into contact with the hot nozzle or hot tool as this may melt the insulation of the cable. This may cause electrical shock!
Carefully heat work pieces from a greater distance to start with. If necessary, reduce the gap.
Removing paint and varnish (Figure 4)
NOTE: The hot air gun is suitable for removing both oil and latex based paints! It cannot be used to remove glazes or primers applied to impregnate wood.
CAUTION! Paint vapours are hazardous! You should also ensure sufficient ventilation when working indoors. Remove any paint on the nozzle immediately! Risk of fire, if paint is overheated!
- Always do a test on a small section of paints before you tackle larger surfaces.
-
Do not use any chemical strippers in conjunction with the hot air gun.
-
Switch the hot air gun on. Direct the nozzle onto the paint whilst maintaining a gap of 8-10cm and wait until it starts to blister. Use a scraper or knife to remove the paint from the surface. Work in even sweeps in the direction of the blisters.
- Heat the section in front of the scraper or knife by moving the gun backwards and forwards gently.
- The edge of the scraper or knife must be wiped frequently to ensure that it is clean and sharp.
- On surfaces with contours, the paint must first be softened and then removed with a wire brush.
- All surfaces that are not to be heated should be covered with non-combustible materials. Never direct the water jet onto a window pane or other glass surfaces.
Area of application for attachment nozzles
The attachment nozzles for specialist tasks are fitted to the air outlet of the hot air gun when required.
Flat nozzle (a)
Ideal for removing paint (Figure 4). Also suitable for defrosting frozen water pipes (Figure 5).
CAUTION! Water pipes and gas pipes are very similar to look at! Gas pipes may not be heated!
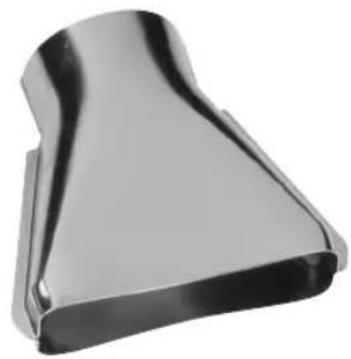
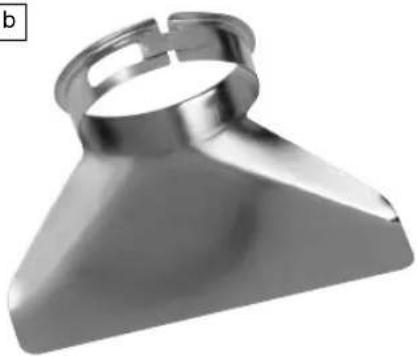
Deflection nozzle (b)
Protects neighbouring surfaces that should not be heated or are sensitive to heat, for example, window panes (Figure 6).
Reflector nozzle (c)
Used to shape plastics, e.g. pipes, and to shrink cables (Figure 7).
Spot nozzle (d)
For accurate work and for soft-soldering (Figure 8).
10 – Maintenance and environmental protection
Ensure that the air inlet and outlet opening are always clean and free from dirt. Clean the gun with a damp cloth. Do not use turpentine, paint stripper, petrol or other similar substances to clean the unit.

CAUTION! Unplug from the power source before cleaning!
CAUTION! Electrical and battery operated units that no longer work should not be disposed of in the household waste! They are to be collected separately, in accordance with the 2012/19/EU directive
for the disposal of electrical and electronic waste, and sent for proper and environ mentally-friendly recycling.
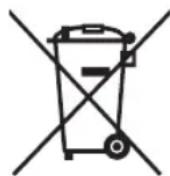
Please discard power tools no longer usable at a local collection point. Collection and disposal of packaging materials separately by types complying with local rules and regulations. For details, please contact your municipal authority concerned.
11 - Service instructions
- Store the machine, operating instructions and where necessary the accessories in the original packaging. In this way you will always have all the information and parts ready to hand.
- Meister devices are to a large extent maintenancefree, a damp cloth being sufficient to clean the casing. Do not drop electrical machines in water. Please note additional hints given in the operating instructions.
- Meister devices are subject to stringent quality control. If however a functional fault should occur, send the device to our servicing address. The repairs will be carried out in a short time.
- A brief description of the defect speeds up the faulttracing and repair time. If within the guarantee period, please enclose the guarantee document and the proof of purchase.
- In so far as a repair under guarantee is not concerned, we will charge the repair costs to your account.
PLEASE NOTE! Opening of the device invalidates the guarantee claim.
IMPORTANT! We point out expressly that in accordance with the Product Liability Act we do not take responsibility for any damage caused by our appliances, in so much that said damage is caused by improper repair, or original parts or parts released by us not being used when parts are changed, or repairs not being conducted by Meister Werk zeuge GmbH, Customer Service or an authorised specialist! The same applies analogously to the accessories used.
- Pack the device well or use the original packaging in order to avoid transit damage.
- Even after the expiry of the guarantee period, we would like to help you and carry out any repairs at a favourable price.

GB - The object of the declaration described above is in conformity with Directive 2011/65/EU of the European Parliament and of the Council of 8 June 2011 on the restriction of the use of certain hazardous substances in electrical and electronic equipment.
GB - Authorized person for storing the technical documentation